The Import export Suite for WooCommerce plugin lets you import and export all your WooCommerce orders from one store to another in an efficient manner.
Mapping of WooCommerce Orders
↑ Back to top| Column Heading | Explanation | Accepted value or format |
|---|---|---|
| order_id | Identification Number of the order | Numerical |
| order_number | The sequential order number | Numerical |
| order_date | Date on which the order was created | MM/DD/YYYY H:i:se.g 9/6/2016 6:29:00 |
| paid_date | completed | MM/DD/YYYY H:i:se.g 9/6/2016 6:29:00 |
| status | Status of the order | Text. Eg:processing, completed, cancelled |
| shipping_total | Total cost of shipping | Numerical |
| shipping_tax_total | Total cost of shipping including tax | Numerical |
| fee_total | Total fees amount | Numerical |
| fee_tax_total | Total cost of order including tax | Numerical |
| tax_total | Total amount of tax | Numerical |
| cart_discount | Discount provided on cart | Numerical |
| order_discount | Discount provided on order | Numerical |
| discount_total | Total discount provided | Numerical |
| order_total | Total cost of order | Numerical |
| order_subtotal | total price of items | Numerical |
| order_currency | Currency used | Text. Eg: USD, EURO, GBP |
| payment_method | ID of payment method | Text. Eg: cheque, COD, Stripe, Paypal |
| payment_method_title | Title of the payment method | Text. Eg: Stripe, PayPal, Check payments, others |
| transaction_id | Transaction id of the order | Alpha-numeric characters |
| customer_ip_address | IP address of the customer | Numerical. Eg: 201.73.89.201 |
| customer_user_agent | Name of the used browser | Alpha-numeric characters |
| shipping_method | Method of shipping the order | Alpha-numeric characters. Eg:Free Shipping (4-8 days via USPS): $30.00, Flat rate |
| customer_id | Identification number of the customer. | Numerical |
| customer_user | Customer id of the order’s customer | Numerical |
| customer_email | Email ID of the customer. | Alpha-numeric characters. E.g. test1@gmail.com |
| billing_first_name | First name of the customer in the billing address. | Text |
| billing_last_name | Last name of the customer in the billing address. | Text |
| billing_company | Company name of the customer in the billing address. | Text |
| billing_email | Email of the customer in the billing address. | Alpha-numeric characters. E.g. test1@gmail.com |
| billing_phone | Phone number of the customer in the billing address. | Numerical |
| billing_address_1 | First billing address of the order | Alpha-numeric characters. |
| billing_address_2 | Second billing address of the order | Alpha-numeric characters. |
| billing_postcode | Billing postcode of the order | Numerical |
| billing_city | Billing city of the order | Text |
| billing_state | Billing state of the order | Text |
| billing_country | Billing country of the order | Text |
| shipping_first_name | First name in the Shipping address | Text |
| shipping_last_name | Last name in the Shipping address | Text |
| shipping_company | Name of the shipping company | Text |
| shipping_phone | Phone number of the shipping company | Numerical |
| shipping_address_1 | First address of the shipping company | Alpha-numeric characters. |
| shipping_address_2 | Second address of the shipping company | Alpha-numeric characters. |
| shipping_postcode | Postcode of the shipping … | Numerical |
| shipping_city | Second address of the shipping company | Text |
| shipping_state | State to which the order is shipped. | Text |
| shipping_country | Country to which the order is shipped. | Text |
| customer_note | Additional note added by the customer at time of placing the order | Text |
| wt_import_key | used to link subscriptions and orders(parent and renewal) even if their id changes while migrating. | Numerical |
| shipping_items | All data for each shipping method, just contain at least method ID, total cost | Alpha-numeric characters. Eg: items:Polo × 1|method_id:flat_rate|taxes:a:1:{s:5:”total”;a:0:{}} |
| fee_items | all fee items for the order | Alpha-numeric characters |
| tax_items | all tax items for the order, must contain tax code and total | Alpha-numeric characters. |
| coupon_items | Coupon details of the product ordered | Alpha-numeric characters. Eg: code:test|amount:10.00 |
| refund_items | Refund details of the product ordered | Alpha-numeric characters. Eg:amount:110.00|reason:|date:2021-06-08 12:33:04 |
| order_notes | updates in an order. Example: status change, payment info etc. | Alpha-numeric characters. |
| download_permissions | data that is used to grant download permission for a downloadable product order. Set this to “1” to grant access to downloadable products in the order | Numerical. Eg: 1 and 0 |
| meta:eh_stripe_intent_id | Payment intent id of stripe | Alpha-numeric characters. |
| meta:is_vat_exempt | Identifies if the tax is paid or not | Text. Eg: Yes, No |
| meta:total_sales | Total sales for the product | Numerical |
| meta:wf_invoice_number | Invoice number by Web Toffee plugin | Numerical |
| meta:wf_proforma_invoice_number | Proforma invoice number by Web Toffee | Alpha-numeric characters. |
| line_item_1 | First line items purchased in the order, such as product, price, quantity, sku, id | Alpha-numeric characters. |
| line_item_2 | Second line items purchased in the order, such as product, price, quantity, sku, id | Alpha-numeric characters. |
Steps to import orders
↑ Back to topIf you are migrating the store as a whole, we recommend you to import the data in the following the sequence : User/Customer > Product > Product reviews > Coupons > Order.
To import WooCommerce orders:
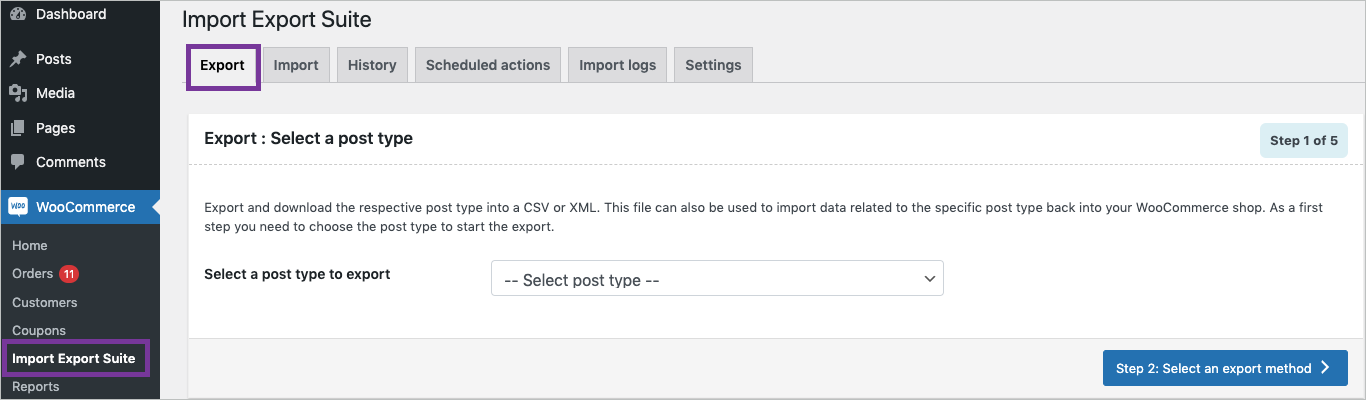
- Navigate through the menu: WooCommerce > Import Export Suite and click on the tab: Import.
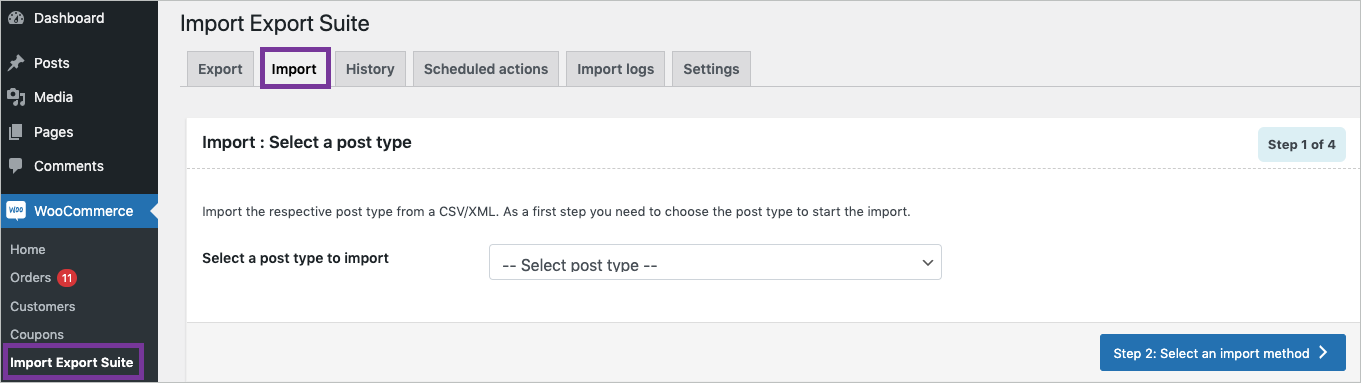
Step 1: Select post type
↑ Back to topAs a first step, you need to choose the post type as Order.

Step 2: Select import method
↑ Back to topChoose from the below options to continue with your import:
- Quick import
- Pre-saved template
- Advanced import
Let us have a look at each of these export methods:
Quick Import
- Imports the basic/standard fields of the respective post type.
- To be used when your input file was exported using the same plugin.
- One can import files from:
- Local
- URL
- FTP
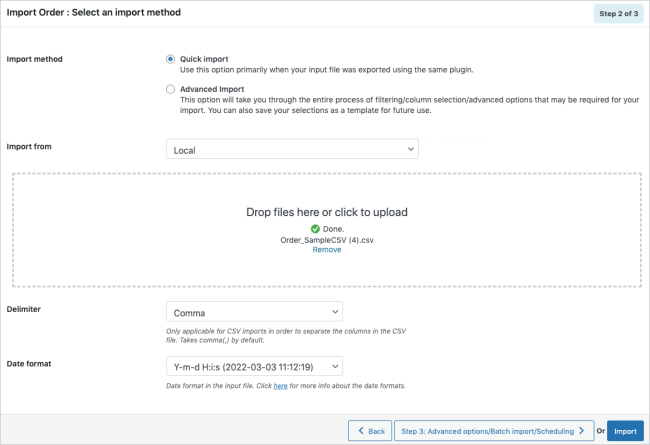
- Click the Import button to complete the action or proceed to Step 3 for advanced options.
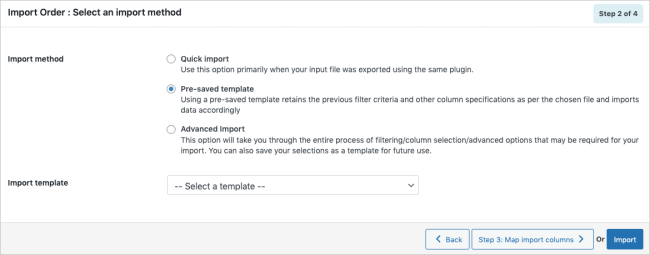
Pre-saved template
- imported data using the Advanced import method in any of your previous imports.
- saved the selections as a template for future use.
This method retains the previous filter criteria and other column specifications as per the chosen file and imports data accordingly. By selecting this option, one can choose a previously saved template from the Import template drop-down.
Note: The template will be listed in the drop down only if you have saved it in previous imports.
If you go through the Advanced import, at Step 4 you will get an option to save the template. Once you save that, next time when you want to import a pre-saved template, it will be populated within the drop down.
- Click the Import button to complete the action or proceed to Step 3 to map the import columns.
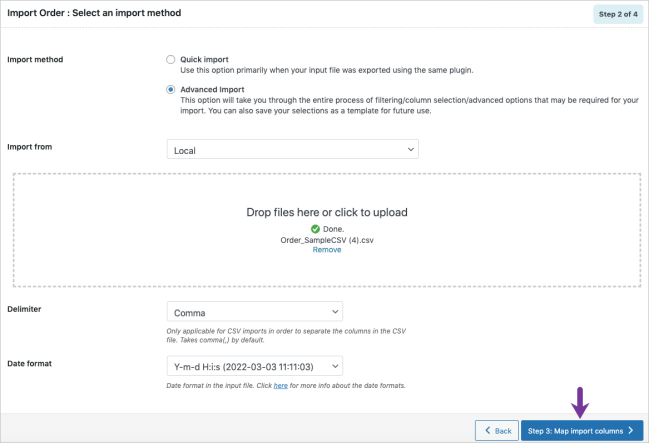
Advanced import
This option will take you through a detailed process of filtering/column selection/advanced options that may be required for your import.
Note: You can also save this file as a template for future use.
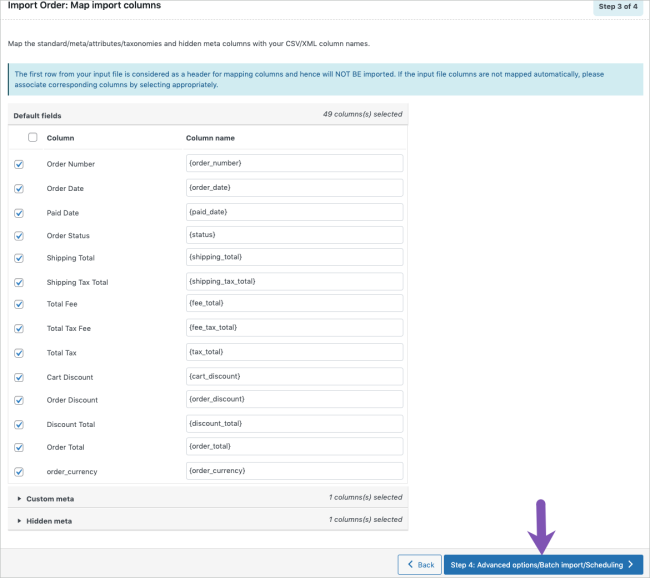
Step 3: Map import columns
↑ Back to topHere, one can map the import columns under the following 3 fields:
- Default fields: The column names appearing in this section can be edited if required. The preferred names and choices that were last saved can be viewed on choosing a pre-saved template.
- Meta(custom fields)
- Hidden meta
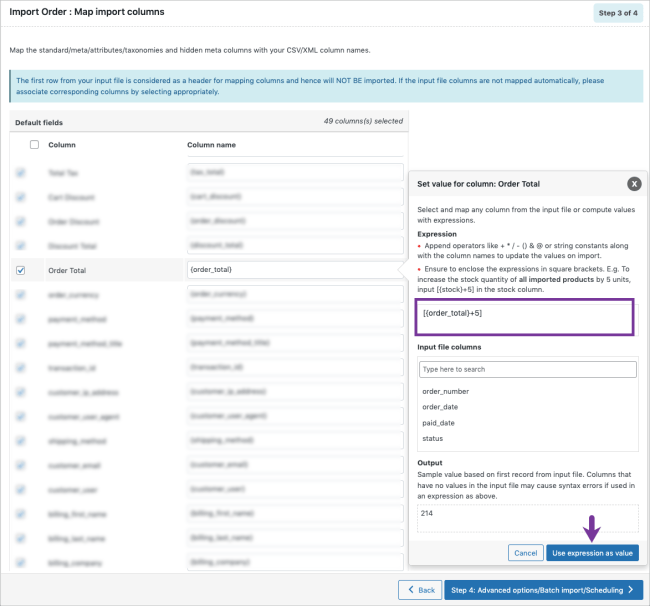
Evaluate field
Evaluate field can be used to append a value/expression to an existing item while importing. It basically selects/maps any column from the input file and compute the values with expressions and creates output.
- Expression: Any of the operators +*/-()&@ or string constants can be used along with the attributes to manipulate the respective value.
- Input: Select the column from the drop down which has to be modified.
- Output: Sample value will be created based on the first record from input file.
Note: Columns that have no values in the input file may cause syntax errors if used in an expression.
- Click on Step 4 to proceed.
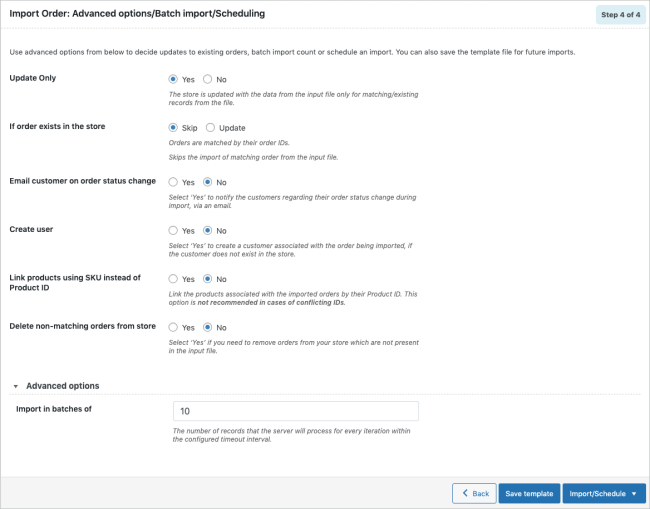
Step 4: Advanced Options/Batch Import/Scheduling
↑ Back to top- On reaching Step 4, the following window will appear, from where one can:
- Update Only: On selecting “Yes”, the store is updated with the data from the input file only for matching/existing records from the file. On selecting “No”, the entire data from the input file is processed for an update or insert as the case maybe.
- If order exists in the store: One can either Skip or Update the entry.
- If conflict with an existing Post ID: One can either Skip item or Import as new item.
- Email customer on order status change: Notify the customers regarding their order status change via an email.
- Create User: One can create a customer and notify them if needed.
- Link products using SKU instead of Product ID: Link the products associated with the imported orders by their Product ID. Not recommended in cases of conflicting IDs.
- Delete non-matching orders from store: Choose ‘Yes’ to remove orders from your store which are not present in the input file.
Note: On expanding Advanced options, one can set the number of records that the server will process for every iteration within the configured timeout interval.
If the import fails due to timeout you can lower this number accordingly and try again.
- Save the template file for future (if needed).
- Click on Import/Schedule to finish.
You can either import the orders directly into your store or schedule the import using FTP.

To schedule the import:
- Hit the Schedule option, and you will be taken to the cron schedule window as shown below:
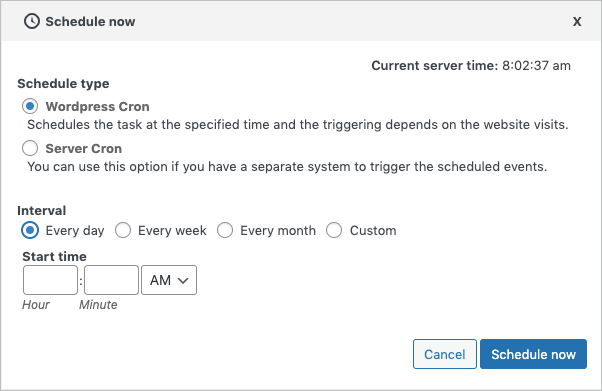
The plugin supports two different schedule types:
- WordPress Cron: Upon a visit, WordPress Cron will check to see if the time/date is later than the scheduled event/s, and if it is– it will fire those events.
- schedules your job at the specified time.
- is dependent on your website visitors.
- Server Cron: You may need to trigger the URL every minute depending on the volume of data to be processed.You can use this option :
- to generate a unique URL that can be added to your system in order to trigger the events.
- if you have a separate system to trigger the scheduled events.
You can also configure the time at which the import is to be scheduled. Click on Schedule now to finish.
To directly import:
- Hit on the Import option
Once the import is completed, a pop-up will be displayed showing import status which contains the number of successful imports and failed imports (if any).
Steps to export orders
To export WooCommerce orders:
- Navigate through the menu: WooCommerce> Import Export Suite and click on the tab: Export.
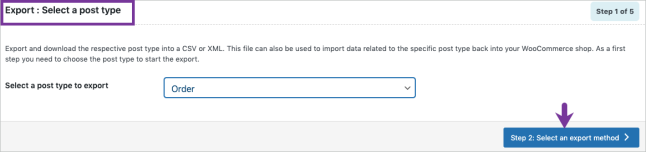
Step 1: Select a post type
↑ Back to topAs a first step, you need to choose the post type as Order.
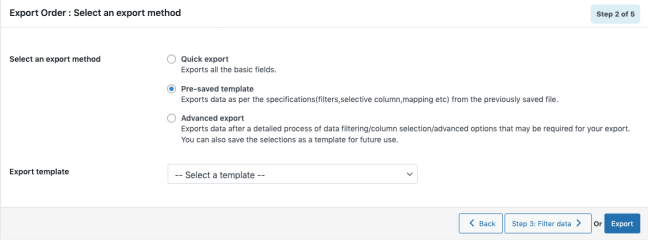
Step 2: Select an export method
↑ Back to topChoose from the below options to continue with your export:
- Quick export
- Pre-saved template
- Advanced export
Let us have a look at each of these export methods:
Quick Export
- Exports the basic/standard fields of the respective post type.
- To include fields from Custom meta and Hidden meta, select the respective group’s checkboxes.

- Click the Export button to complete the action or proceed to Step 3 for advanced options.
Pre-saved template
- exported data using the Advanced export method in any of your previous exports.
- saved the selections as a template for future use.
Exports data as per the specifications(filters, selective column, mapping.. etc) from the previously saved file. By selecting this option, one can choose a previously saved template from the Export template drop-down.
Note: The template will be listed in the drop down only if you have saved it in previous exports.
If you go through the Advanced export, at Step 5 you will get an option to save the template. Once you save that, next time when you want to export a pre-saved template, it will be populated within the drop down.
- Click the Export button to complete the action or proceed to Step 3 to filter data.
Advanced Export
Takes you through a detailed process of filtering/column selection/advanced options that may be required for your export.
Note: You can also save this file as a template for future use.
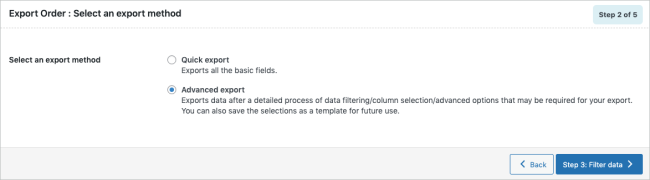
- Click on Step 3 to filter data.
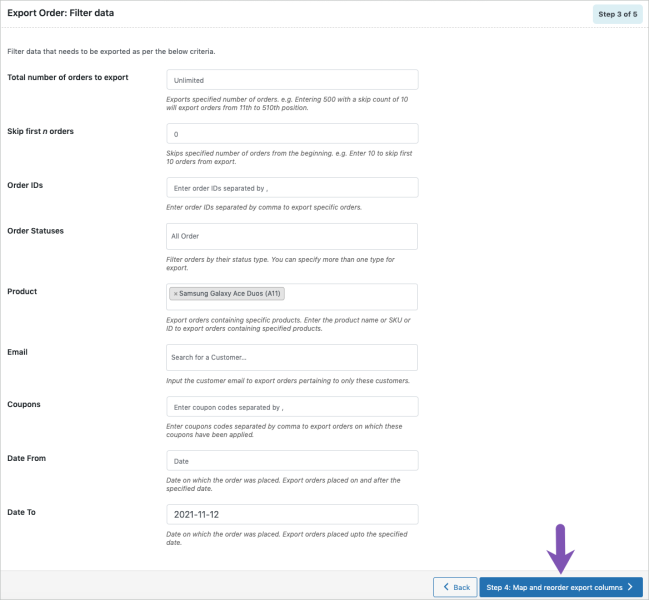
Step 3: Filter data
↑ Back to topFilter data that needs to be exported as per the below criteria.
- Total number of orders to export: The actual number of orders you want to export. e.g. Entering 500 with a skip count of 10 will export orders from 11th to 510th position.
- Skip first n orders: Specify the number of orders to be skipped from the beginning. e.g. Enter 10 to skip the first 10 orders from export.
- Order IDs: Enter order IDs separated by comma to export specific orders.
- Order Statuses: Filter orders by their status type. You can specify more than one type for export.
- Product: Export orders containing specific products. Key-in the specific product names to export orders accordingly.
- Email: Input the customer email to export orders pertaining to only these customers.
- Coupons: Enter coupon codes separated by comma to export orders on which these coupons have been applied.
- Date From: Export orders placed on and after the specified date.
- Date To: Export orders placed upto the specified date.
Step 4: Map and reorder export columns
↑ Back to topThe column names appearing in this section can be edited if required. The preferred names and choices that were last saved can be viewed by choosing a pre-saved template. One can also move the columns to reorder the arrangement.
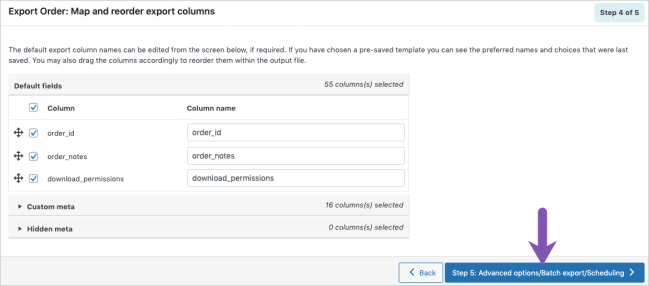
- Here, one can map and reorder the export columns under the following 3 fields:
- Default fields
- Custom meta
- Hidden meta
- Click on Step 5 to proceed.
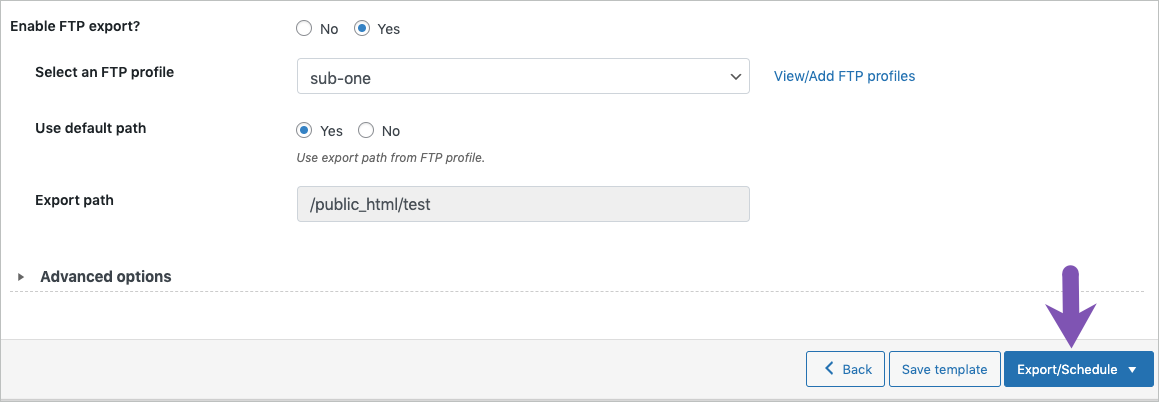
Step 5: Advanced Options/Batch Export/Scheduling
↑ Back to top- On reaching Step 5, the following window will appear, from where one can:
- Exclude Already Exported: Option ‘Yes’ excludes the previously exported orders.
- Export line items into separate columns: Option ‘Yes’ exports the line items within the order into separate columns in the exported file.
- Export file name: To specify a filename for the exported file. If left blank the system generates a default name.
- Export File Format: Both CSV and XML file formats are available.
- Delimiter: Separator for differentiating the columns in the CSV file. Assumes ‘,’ by default.
- Enable FTP export: On opting ‘Yes’, choose an FTP profile and specify the export path.
Note: On expanding Advanced options, one can set the number of records that the server will process for every iteration within the configured timeout interval.
If the export fails due to timeout you can lower this number accordingly and try again.
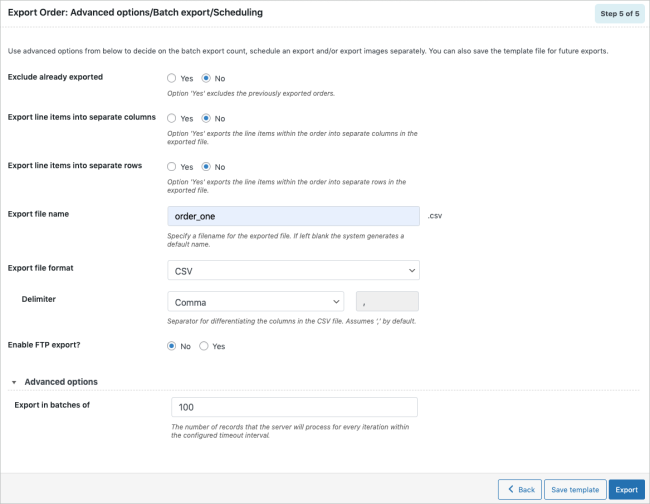
- Save the template file for future export as shown below(if needed).
- Click on Export to export or schedule the export to finish.