About Google Listings & Ads
↑ Back to topGoogle Listings & Ads makes it simple to connect your WooCommerce store to Google Merchant Center so you can showcase your products to shoppers across Google Search, Shopping, Gmail, YouTube, and the Display Network to drive traffic and sales for your store, for free or with ads.
Once your accounts are synced and you meet eligibility requirements, you can list products on the Google Shopping tab for free and create ad campaigns to reach more shoppers and grow your business.
Connect your store with Google Merchant Center
↑ Back to topIntegrate with Google Merchant Center to upload your store and product data to Google. Your products will sync automatically to make relevant information available for free listings, Google Ads, and other Google services. You can create a new Merchant Center account or link an existing account to connect your store and list products across Google.
Reach online shoppers with free listings
↑ Back to topShowcase eligible products to shoppers looking for what you offer and drive traffic to your store with Google’s free listings on the Shopping tab. Your products can also appear on Google Search, Google Images, and Gmail if you’re selling in the United States.
Boost store traffic and sales with Google Ads
↑ Back to topGrow your business with Performance Max campaigns. Create a campaign to promote your products across Google Search, Maps, Shopping, YouTube, Gmail, the Display Network, and Discover feed. You can connect your Google Ads account, choose a budget, and launch your campaign straight from your WooCommerce dashboard.
Get started
↑ Back to topInstallation
↑ Back to topGoogle Listings & Ads requires a 64-bit version of PHP.
To check that:
– Go to WordPress admin page
– Navigate the menu to Tools > Site Health
– Switch to the Info tab and expand the Server section
If the PHP is running in 64-bit mode, it will show “(Supports 64bit values)” on the PHP version field
- Install the extension on your site automatically or manually.
- Once installed and activated, navigate to your site’s WP Admin dashboard.
- Click Plugins in the sidebar menu.
- Scroll to Google Listings & Ads.
- Begin setup by clicking the Get started link.
Setup and configuration
↑ Back to top- Sync your store with Google and configure your free product listings
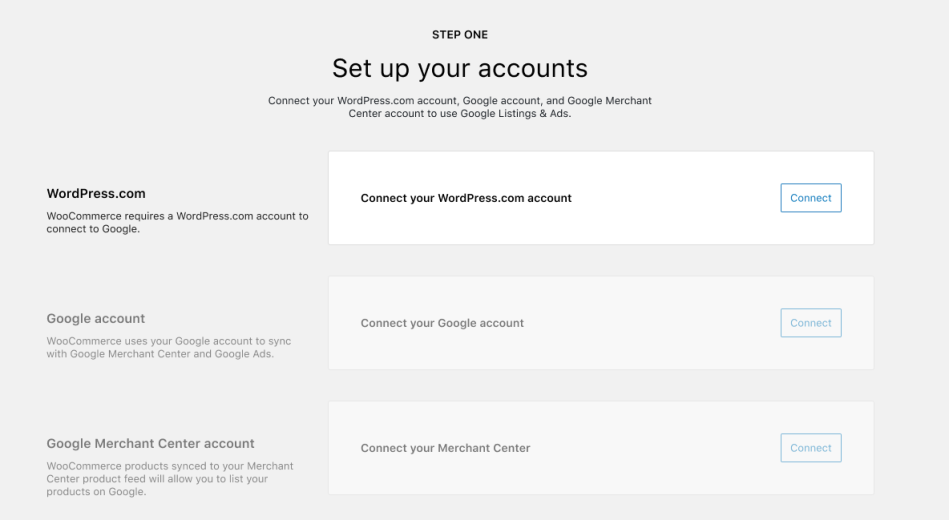
1.1 Set up your accounts. Connect your WordPress.com account, Google account, and Google Merchant Center accounts.
If you don’t see your Google Merchant Center account, please navigate to example.com/wp-admin/admin.php?page=connection-test-admin-page (replacing example.com with your domain) and check if your Google account is connected.
1.1.1 Claim and verify your website. Once you create or link your Google Merchant Center account, you will also need to claim and verify your website. If you are new to Merchant Center, and there are no existing claims to your website, claiming and verification will happen automatically when you create your new Merchant Center account. Learn more about verifying and claiming website URLs on Google Listings & Ads.
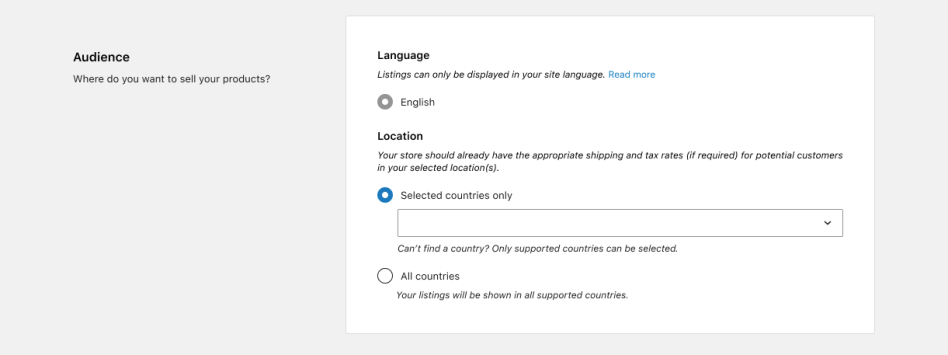
1.2 Choose your audience. Select your site language and determine your target locations.
1.3 Configure your product listings. Provide your shipping and tax rate information and complete your feed setup to list eligible products on the Google Shopping tab for free. If you have any existing settings in Google Merchant Center, they will be overwritten by any new configurations you enter here in WooCommerce.
1.4 Confirm your store requirements. Add your contact phone number and store address, which Google will use to verify your business. This information will not be displayed to customers. Next, review your pre-launch checklist and ensure that your website meets all of the Merchant Center requirements listed.

2. Launch a paid Performance Max campaign
Google Performance Max campaigns
Create Performance Max campaigns to promote your products across Google Search, Maps, Shopping, YouTube, Gmail, the Display Network, and Discover feed and help grow your business.
You can connect your Google Ads account, choose a budget, and launch your campaign straight from your WooCommerce dashboard. You can also track performance, review campaign analytics, and access automated reports so you can track performance all in one place.
Once you launch your Performance Max campaign, Google’s machine learning will optimize your ads so they appear at the right time and place to boost store traffic and sales. You can edit or pause your campaign at any time, but we recommend you allow at least 15 days for your campaign to optimize before making any changes.
Helpful articles:
Getting started with campaign analytics
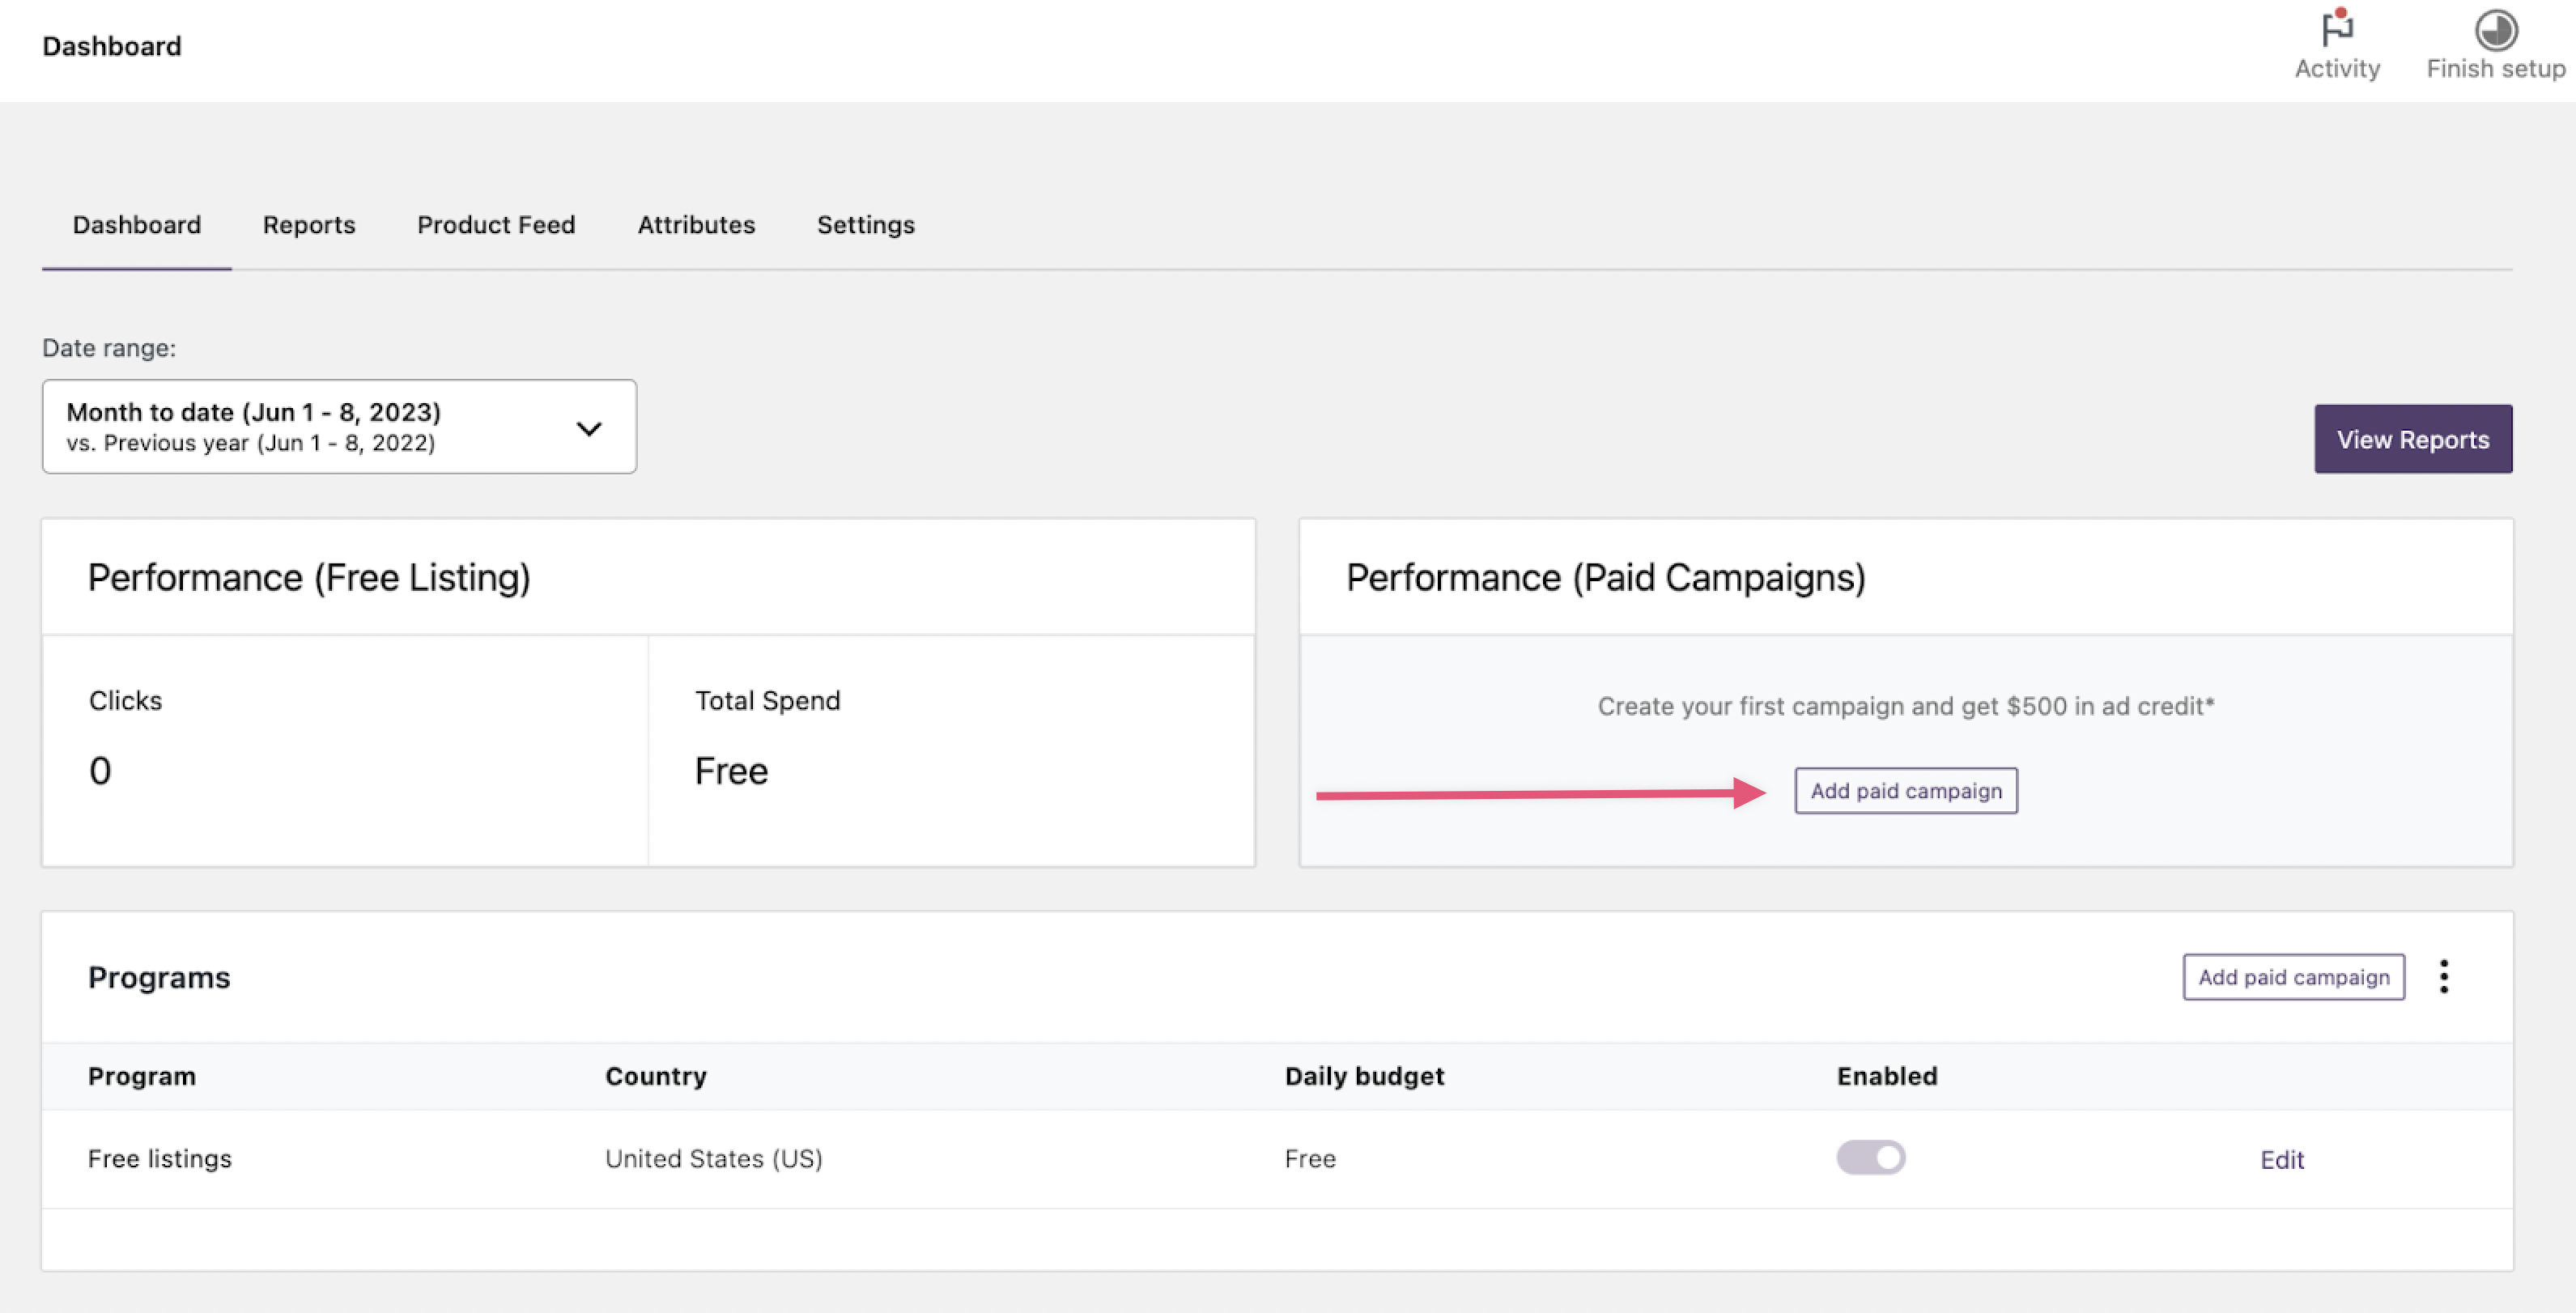
Once your free listings and Performance Max campaigns are set up, you will be able to track your performance directly from your WooCommerce dashboard. You can view yearly, quarterly, monthly, weekly, or daily reports. The following metrics will be visible within these reports:
Similar in Marketing
Get in front of shoppers and drive traffic to your store so you can grow your business with Performance Max campaigns and free listings.
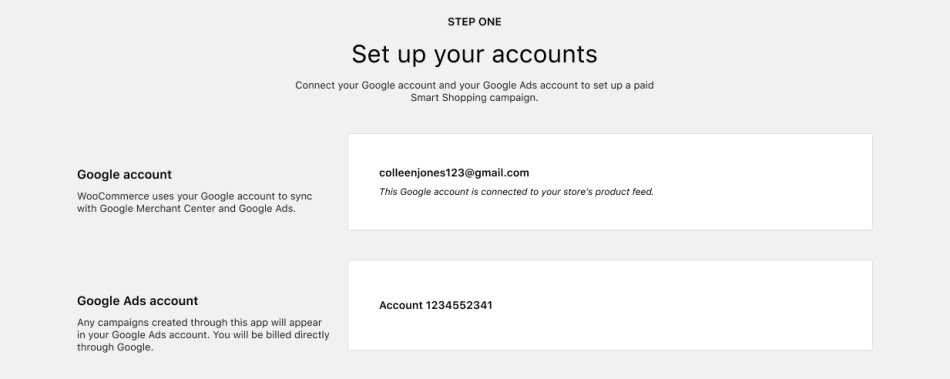
2.1 Set up your accounts. Connect your Google and Google Ads accounts.
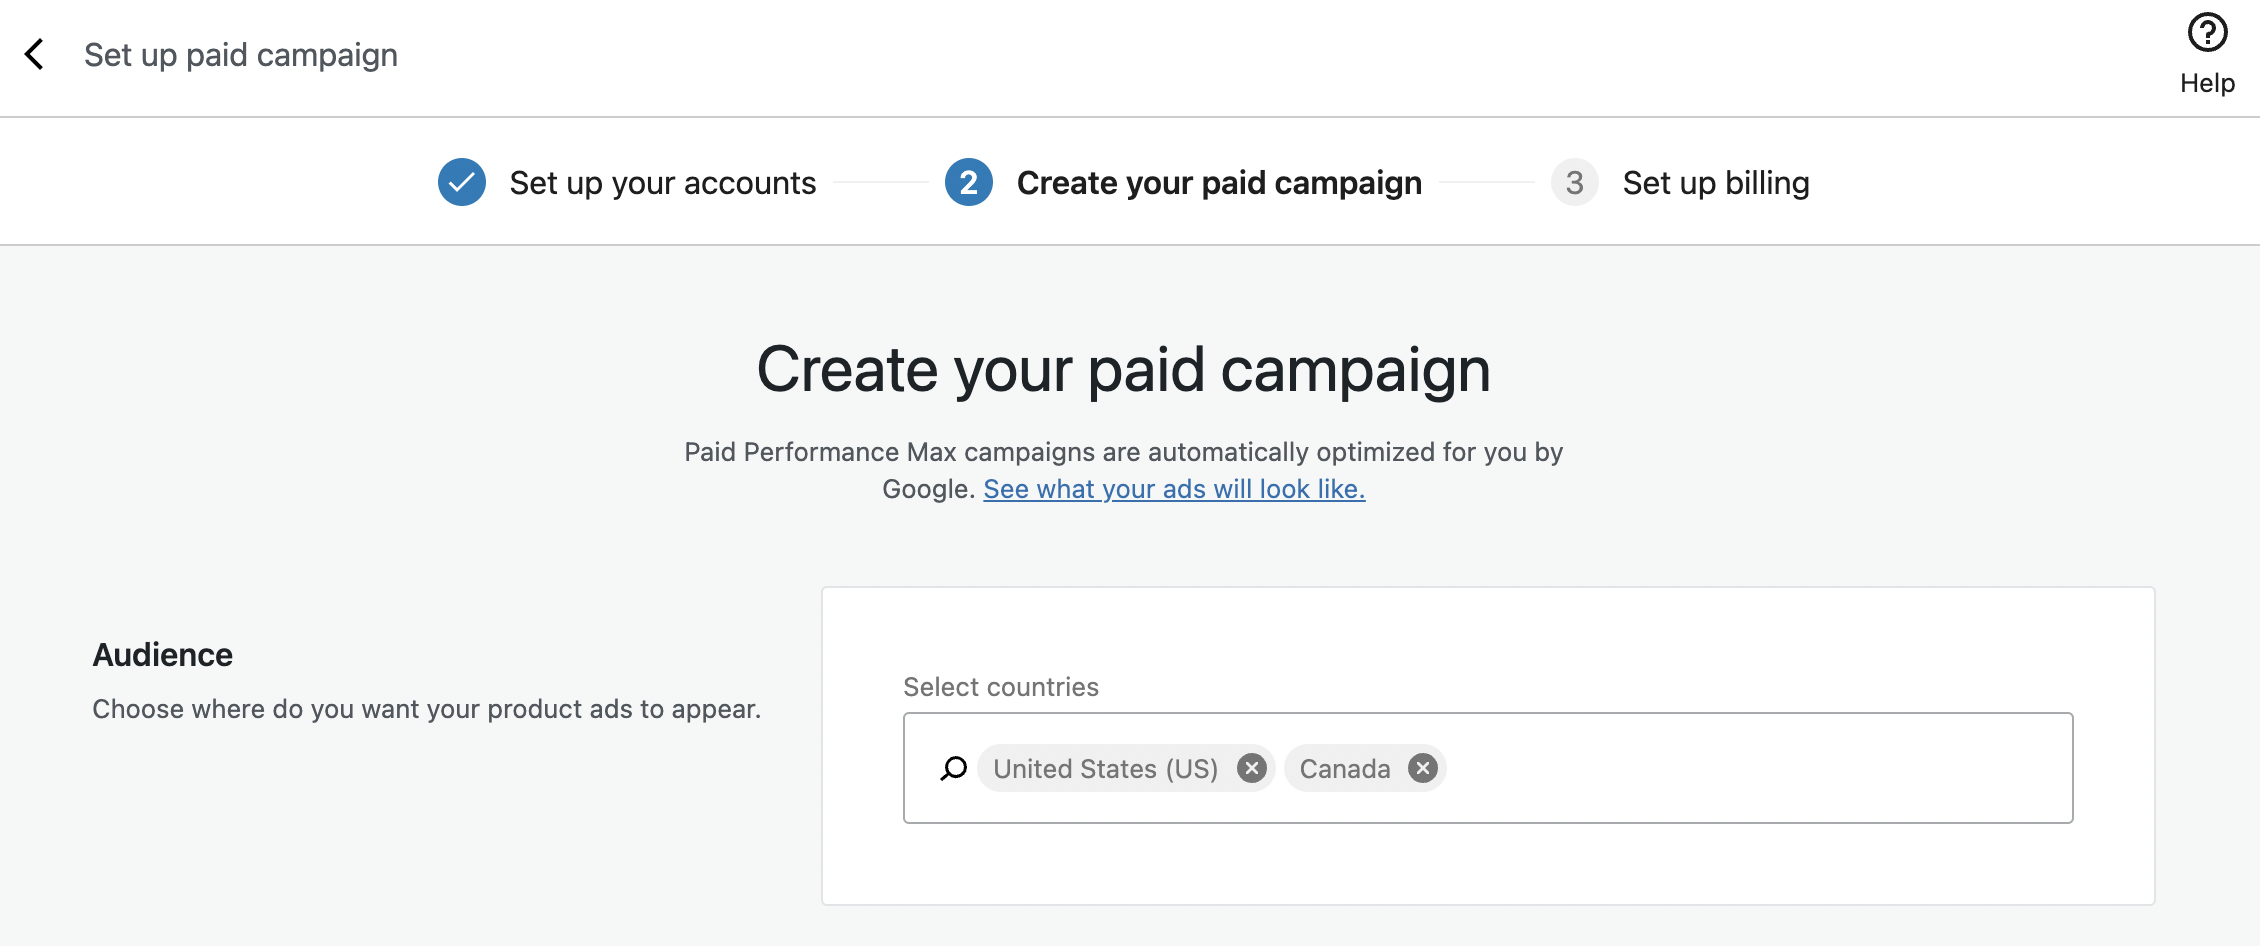
2.2 Configure and launch a paid campaign. Select your target countries, determine your budget, and enter billing details to launch your campaign and promote approved products across Google Search, Shopping, Gmail, YouTube, and the Display Network. Once your billing information is confirmed by Google Ads, click Launch paid campaign to activate your paid campaign.
Pausing or editing your campaign. You can pause or edit a campaign at any time — although we recommend letting your campaign run for at least 15 days without pausing or editing to allow Google’s machine learning to fully optimize your campaign.
General requirements
↑ Back to topTo sync your WooCommerce store with Google and begin showcasing your products online, complete the following steps within the Google Listings & Ads setup:
- Set up your accounts.
- Choose your audience.
- Provide shipping information.
- Provide tax rate information (required for US only).
- Display price including tax (for merchants selling outside the US/Canada).
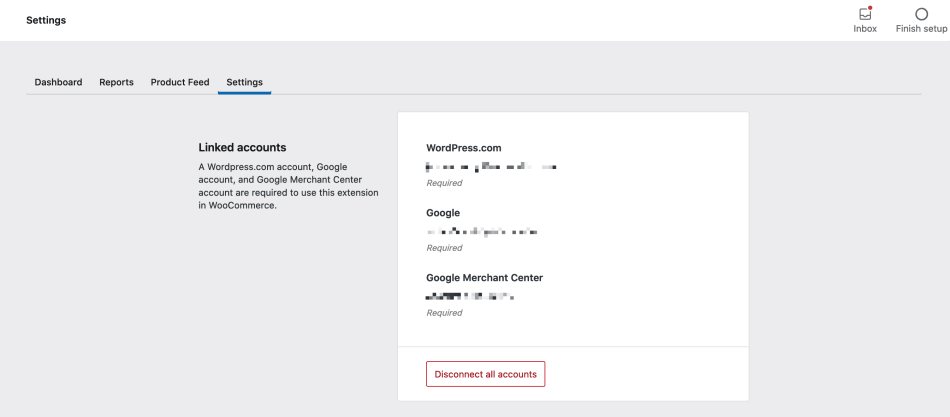
Set up your accounts
Connect the following accounts to use Google Listings & Ads:
- WordPress.com: Connect your WordPress.com account to Google.
- Google account: Connect your Google account with Google Merchant Center and Google Ads.
Required Google account permissions
In order to create and manage your Google Merchant Center and Google Ads accounts through this extension, you will need to grant certain Google account permissions. Failure to grant all requested authentication scopes will prevent you from using the extension.
When connecting your Google Account to Google Listings & Ads, you will be prompted to grant the following authentication scopes:
- Manage your Ads campaigns. This allows the extension to create and manage your Google Ads account on your behalf. If you do not grant this access, you will not be able to create new Google Ads accounts or make changes to existing accounts via the extension.
- Manage your product listings and accounts for Google Shopping. This allows the extension to create a Google Merchant Center account, manage an existing Google Merchant Center Account, and sync your WooCommerce products to Google. This is an essential step for successfully completing onboarding. If you do not grant this access, you will not be able to use Google Listings & Ads.
- Manage your new site verification with Google. This allows the extension to verify and claim your store’s website (or, in other words, prove to Google that you are the owner/admin of this website) in order to set up your Merchant Center account. This is an essential step for setting up your Merchant Center account through the Google Listings & Ads extension. If you do not grant this access, you will not be able to use Google Listings & Ads. Learn more about verifying and claiming your store’s website.
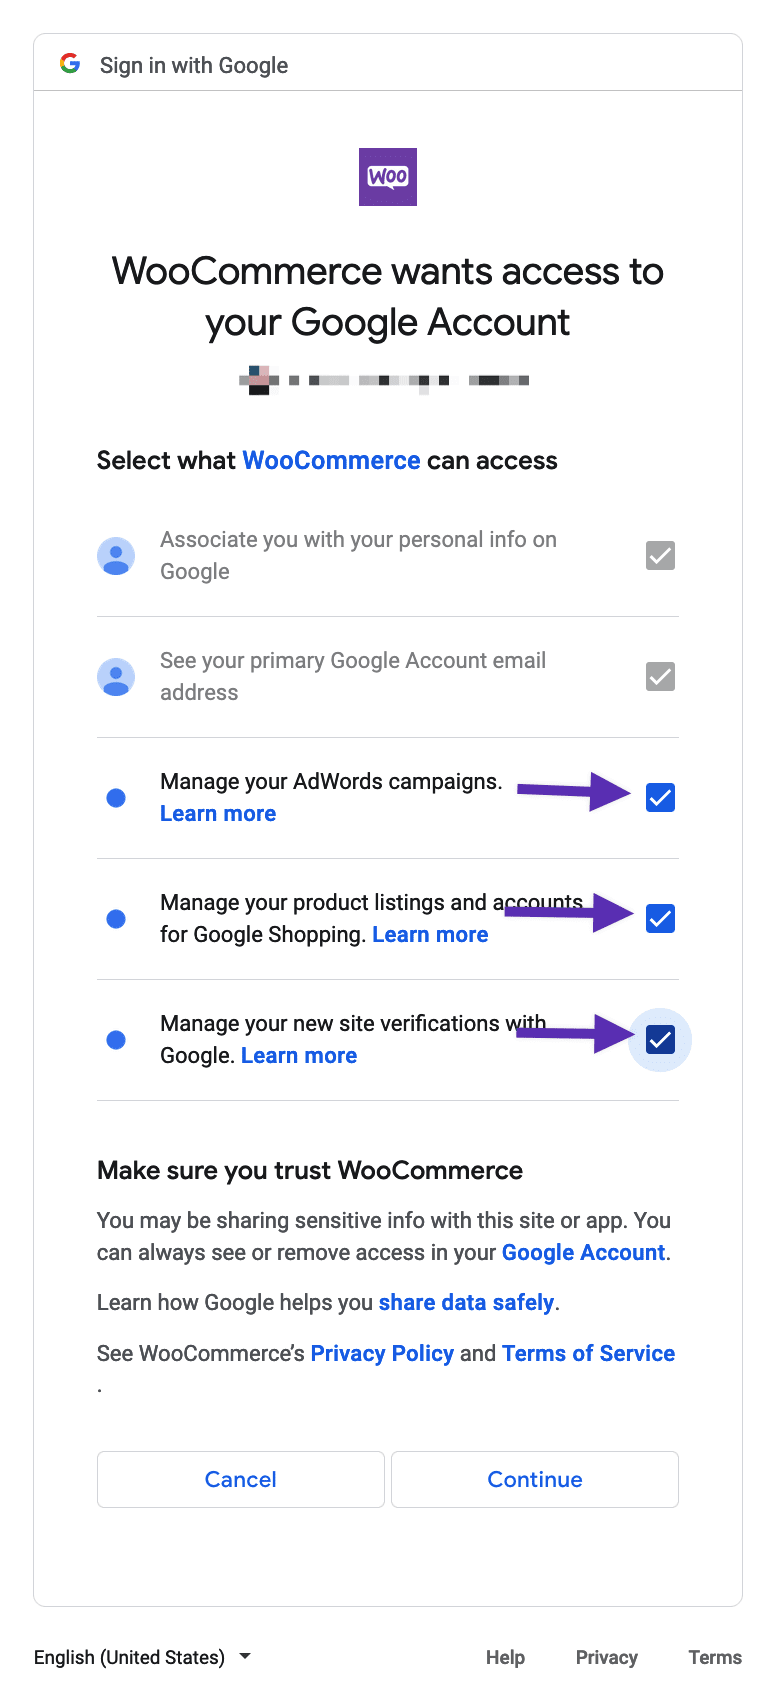
Please note that those permissions are unchecked by default. Clicking Continue without checking these prompts can lead to extension errors. Merchants on versions 1.6 or higher will be required to allow these permissions in order to use the extension and will be continuously prompted to do so in order to complete onboarding.
If you are facing issues and suspect that you may not have granted all necessary permissions, perform the following steps to ensure the correct authentication scopes have been granted.
- Revoke previous access permissions to your Google account in order to reconnect. From your Google Account’s security settings, navigate to Manage third-party access and remove access for WooCommerce.
- Reconnect your Google Account to Google Listings & Ads, ensuring that all necessary authentication scopes are granted. From your site’s WP Admin dashboard, navigate to Marketing > Google Listings & Ads and reconnect your Google account. Ensure that all requested scopes are granted by checking the boxes.
- Reconnect your Google Merchant Center and Ads accounts. Once all the necessary scopes have been granted, reconnect your Merchant Center and Ads accounts and continue setup as prompted.
Learn more about Google’s granular account permission changes for third-party applications.
Claiming and verifying website URLs on Google Listings & Ads
Once you create or link your Google Merchant Center account, you will also need to claim and verify your website. If you are new to Merchant Center, and there are no existing claims to your website, claiming and verification will happen automatically when you create your new Merchant Center account.
- Reclaiming a URL. If your URL is currently claimed by another Merchant Center account, you can attempt to reclaim it. Reclaiming a URL will cause any existing product listings or ads to stop running and the other verified account will be notified that they have lost their claim.
- URLs with existing product feed. If your URL has an existing product feed in Google Merchant Center, your product feed and all existing settings might be overwritten by completing the Google Listings & Ads setup.
- The Merchant Center account must belong to a Google account that has been verified via URL; only one Merchant Center account can claim a URL.
- By default, claiming also claims any sub-URLs. For example, if
https://www.example.comis claimed,https://www.example.com/storeis not claimable by another account. - While it is possible to overwrite a URL claim, this can only be done with a Merchant Center sub-account (an account that was created within the Google Listings & Ads extension). Existing independent accounts do not have permission to overwrite existing URL claims.
Learn more about verifying and claiming website URLs.
Choose your audience
Select your site language and where you will sell your products.
- Language: Your product listings will only be displayed in your site language.
- Location: Select your target country or countries. Your eligible and approved products will be shown in all supported countries. Your store should already have the appropriate shipping and tax rates (if required) for potential customers in your selected location(s). Learn about supported countries and currencies.
Shipping information
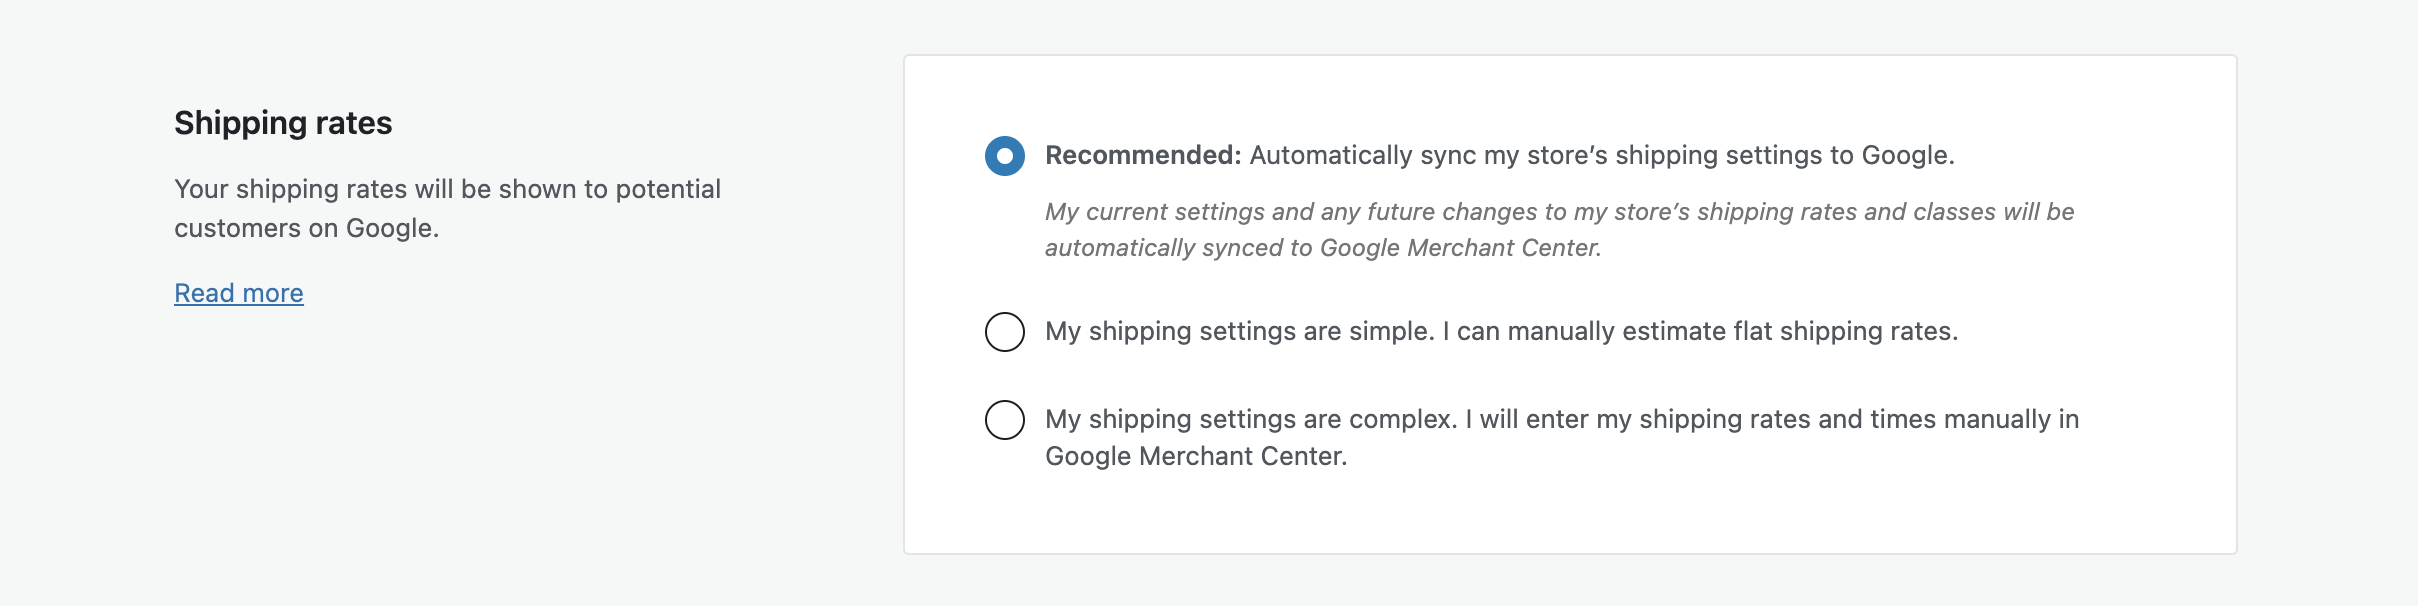
Provide your shipping information. This will be shown to potential customers on Google and may help them with their purchasing decisions.
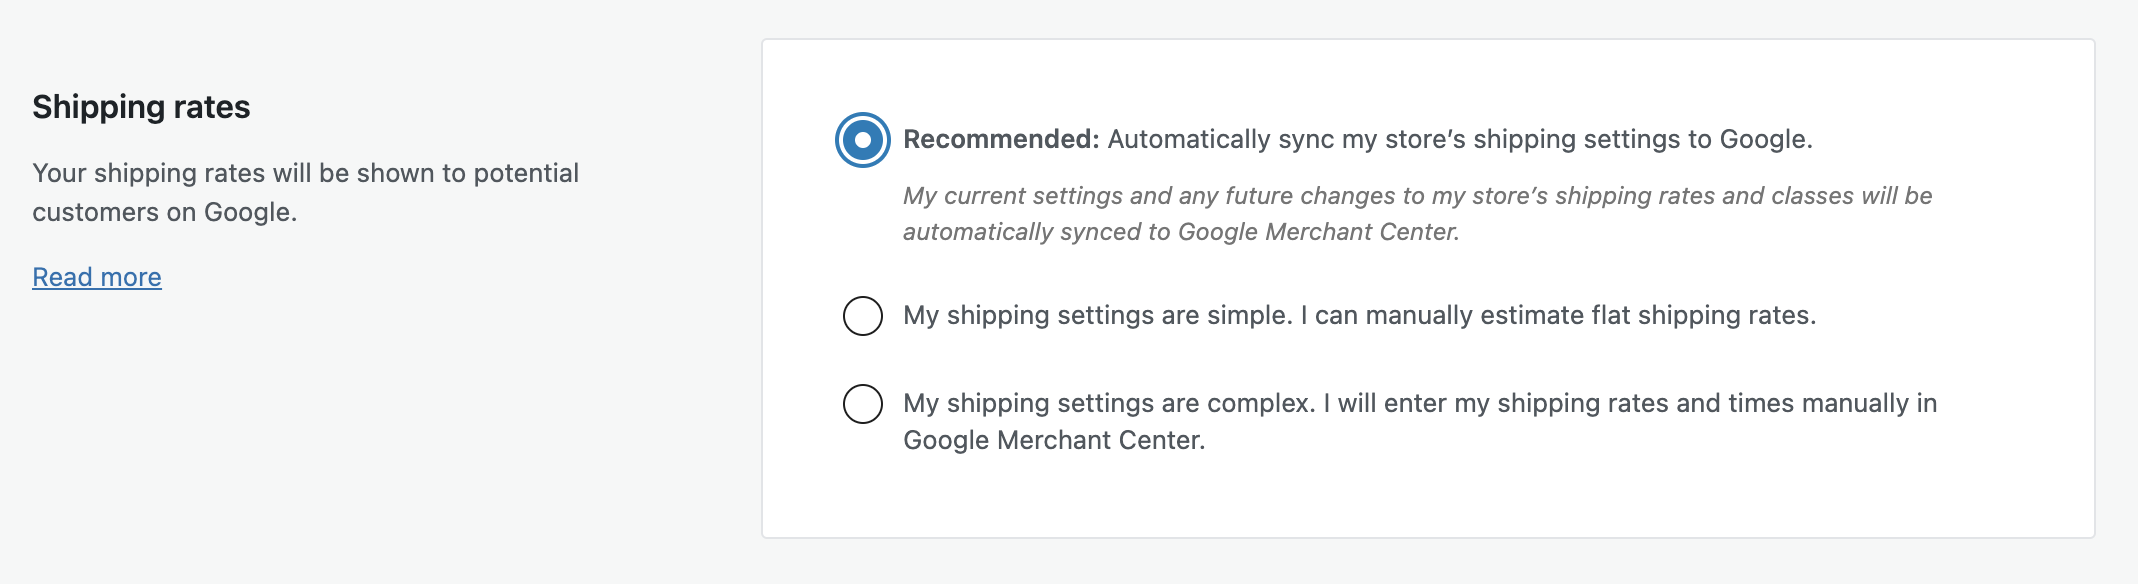
- Shipping rates: choose from the following three options.
- Recommended: Automatically sync my store’s shipping settings to Google.
Choosing this option allows Google Listings & Ads to automatically synchronize the core shipping settings defined in your WooCommerce store with the Merchant Center. This means that any changes you make to your WooCommerce shipping settings will be automatically submitted to the Merchant Center. Flat-rate advanced costs are not supported.
Currently, the extension only supports regional shipping syncing in Australia, Japan, and the United States. If regional shipping rates are defined for states/provinces or zip/postal codes of these countries in your store’s shipping zones settings, Google Listings & Ads will synchronize them with the Merchant Center. The shipping rates for all other countries are submitted at the country-wide level.
The extension also does not currently support dynamically calculated carrier-based shipping.- As this happens asynchronously, it may take a while for changes to appear in your Merchant Center account. Make sure that WordPress CRON and ActionScheduler are set up properly on your store to ensure that the automatic sync works as expected.
If there are duplicate shipping methods for the same region, Google Listings & Ads will choose the most expensive method (or the one with a higher value) for the minimum order amount condition.
As a general rule, always check your shipping settings in Google Merchant Center after you complete the setup to confirm they are as expected.
- My shipping settings are simple. I can manually estimate flat shipping rates.
You will need to enter estimated shipping rates for all countries specified in your target audience to be able to proceed to the next step. - My shipping settings are complex. I will enter my shipping rates and times manually in Google Merchant Center.
- Recommended: Automatically sync my store’s shipping settings to Google.
- Shipping time:
If you have chosen to enter your shipping settings manually in Google Merchant Center, you will also need to set the shipping time information there.
Otherwise, if you choose to automatically sync your shipping rates (or enter an estimated flat shipping rate), you must also enter an estimated shipping time in days. This will apply to all your shipping settings. You can then modify this value manually for each of your shipping rate settings via the Google Merchant Center.
You must enter a shipping time for all of the countries defined in your target audience in the previous step. If you don’t enter an estimated shipping time for all countries, you will not be able to progress to the next step; the Save changes button will remain disabled.
You can edit the estimated shipping time for the chosen countries or add/remove estimated times for other countries by clicking the Edit button next to each input.
Server requirements
If your WordPress site doesn’t meet the minimum recommended server requirements for WooCommerce, the Google Listings & Ads extension won’t function as expected. We highly recommend checking that your site meets these requirements.
Tax rates (required for US only)
Provide your tax rate information. This will be shown to potential customers on Google, together with the cost of your product. Choose between two options:
- My store uses destination-based tax rates.
- My store does not use destination-based tax rates.
Tax rates (stores selling outside the US/Canada)
Ensure that your website displays prices including tax if you’re selling products outside the US/Canada. This is required in order to be approved by Google Merchant Center; Google recommends using the price attribute and advises against using the tax attribute. Get more information on tax settings for target countries.
Google Merchant Center requirements
↑ Back to topYour business must follow Google Merchant Center guidelines. Start by ensuring that your website has:
- Website, domain, and URL basics.
- A secure checkout process and payment information.
- Refund and return policies.
- Billing terms and conditions.
- Contact information.
If you’re located in the European Economic Area (EEA) or Switzerland, review the Comparison Shopping Services guidelines. Learn more below.
Helpful articles:
- Verify that your store follows Google Shopping Ads policies and requirements.
- Common disapproval reasons and how to avoid or fix them.
Website, domain, and URL basics
Your website must:
- Be live on the internet and have a valid domain.
- Contain no broken links.
- Have a verified and claimed URL.
Secure checkout process and payment information
Your website must meet the following payment and transaction requirements:
- Secure checkout process. Payment or transaction processing must be conducted over a secure processing server (SSL-protected, with a valid SSL certificate), usually marked as
https://in the browser address bar. - Valid payment provider. Process all transactions through a valid payment provider (such as WooPayments, Stripe, or PayPal).
- Visible payment methods. Display all of your accepted payment methods on your website.
Helpful tip: If you are using PayPal, you have the option to link your account to Merchant Center. Linking your PayPal account helps provide Google with relevant order and shipping data, which can improve your Google Listings & Ads reporting and performance over time.
Refund and return policies
Your refund and return policies must be accurate and easy to find on your website. If Google’s review team can’t find them, your account may be suspended. Clearly explain the following:
- Policies (mandatory): How you handle returns and refunds, including what the customer is required to do, the timeframe for returns, and when a customer can expect a refund.
- Return addresses (mandatory): Where the return should be mailed to.
- Rules (recommended): Provide any additional rules for refunds and returns.
If you don’t offer returns or refunds, be sure to explicitly state this on your website.
Don’t have a refund and return policy already?
When setting up a new store, WooCommerce automatically generates certain pages for you, including a Refund and Returns Policy page. In order to review and publish your Refund and Returns Policy page in WP Admin, go to WooCommerce > Home and review the prompt to set it up. You can also review and edit existing pages by going to Pages > All Pages.
Learn more about return policy requirements.
Billing terms and conditions
Your site must clearly and conspicuously disclose all related conditions before and after purchase, as well as the payment model and full expense that a user will bear before and after purchase. Learn more about billing terms and conditions.
Contact information
In case any issues arise with your shoppers, you must feature at least one contact method on your website. Contact methods include, but are not limited to, a Contact Us form, a link to your business profile(s) on social media, an email address, or a phone number.
A great way to make it easy for your customers to find you is to add contact details to your website footer.
Separately, you must also provide your phone number and business address to Google Merchant Center for verification. This verification information will not be displayed to customers. You can do this by going to Google Listings & Ads > Settings > Contact information in WP Admin.
Comparison Shopping Services guidelines
If you are in the European Economic Area (EEA) or Switzerland, your Merchant Center account must be associated with a Comparison Shopping Service (CSS). Learn more about Comparison Shopping Services.
If you choose to create a new Merchant Center account through this extension, it will be associated with Google’s CSS (Google Shopping) by default. You can change the CSS associated with your account at any time. Learn more about Comparison Shopping Partners.
Once you have set up your Merchant Center account, you can use our onboarding tool regardless of which CSS you’re working with.
Product feed information
↑ Back to topGoogle Listings & Ads automatically syncs your WooCommerce product data to Google Merchant Center; you can also add or edit products individually or in bulk. To ensure products are approved by Google, ensure that your product feed includes the following information:
- General product information.
- Unique product identifiers.
- Data requirements for specific categories (auto-assigned by Google):
- Apparel & Accessories.
- Media.
- Books.
Learn more about product data specifications.
After setting up Google Listings & Ads, you can review whether missing required product data may be preventing your products from showing on Google. To do so, navigate to Marketing > Google Listings & Ads > Product Feed in WP Admin and review the Account Issues and Product Issues tabs.
Note: Google Listings & Ads syncs general product information to Google upon setup. For unique product identifiers and category-specific data stored as custom attributes, you can use our Attribute Mapping Tool to meet Google Merchant Center requirements. Learn more about attribute mapping.
Did you know? Google will remove a product from a feed if it hasn’t been updated in 30 days. Google Listings & Ads checks for expiring products and resubmits them.
General product information
Ensure your products have the following basic information:
- Product title.
- Product description.
- Product ID.
- Product link.
- Product image.
Since these are required fields for any product to be approved in Google Merchant Center, Google Listings & Ads will not sync WooCommerce products that do not have these fields.
Unique product identifiers
Include unique product identifiers to help define your products in the global marketplace. This data helps Google identify the products you are selling to match them with search queries so your products can show up when shoppers are searching on Google. Learn more about unique product identifiers.
Data requirements for specific categories
Provide any specific requirements for products within these categories:
- Apparel & Accessories: Review the guidelines for age group, gender, color, and size.
- Media: Products like music, movies, or video games require a unique product identifier (UPC, EAN, or JAN).
- Books: Products in this category require a unique ISBN product identifier.
- Electronics: Products in this category require a unique product identifier (UPC, EAN, or JAN). Additional recommended identifiers include color and size
Note: In WooCommerce, this information is typically stored as custom global attributes, which are not synced to Google by default when setting up Google Listings & Ads. In order to sync this information to Google, use our Attribute Mapping tool. Learn more about attribute mapping.
Don’t have this information in WooCommerce already? Learn how to create global attributes for these required fields.
Sync and statuses
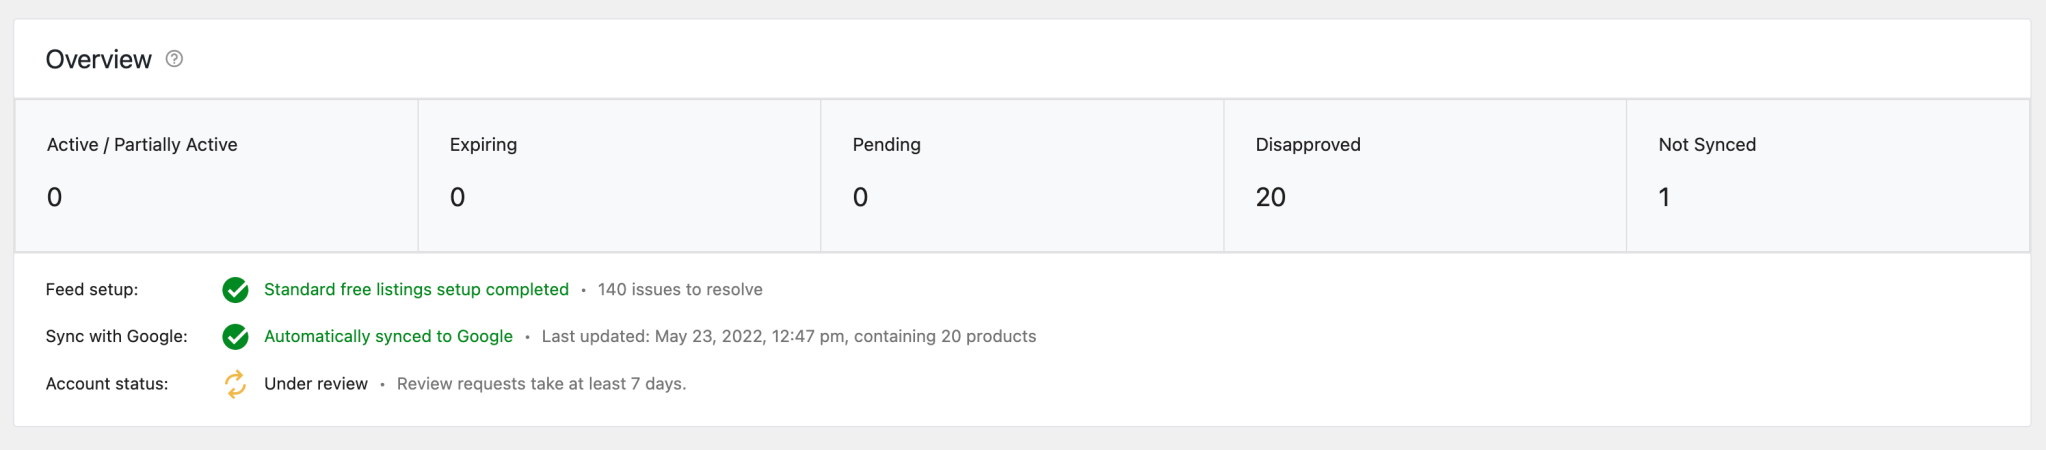
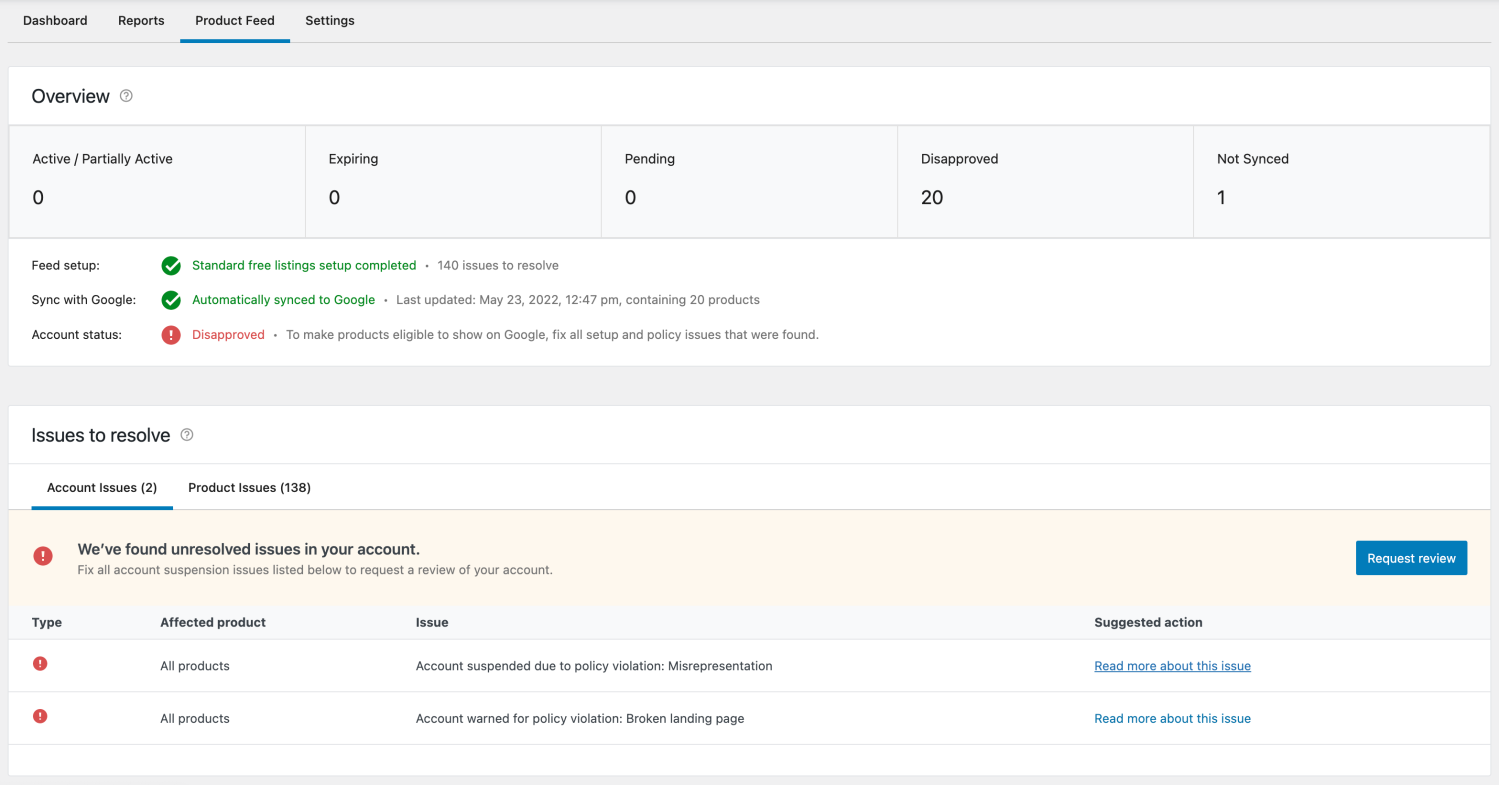
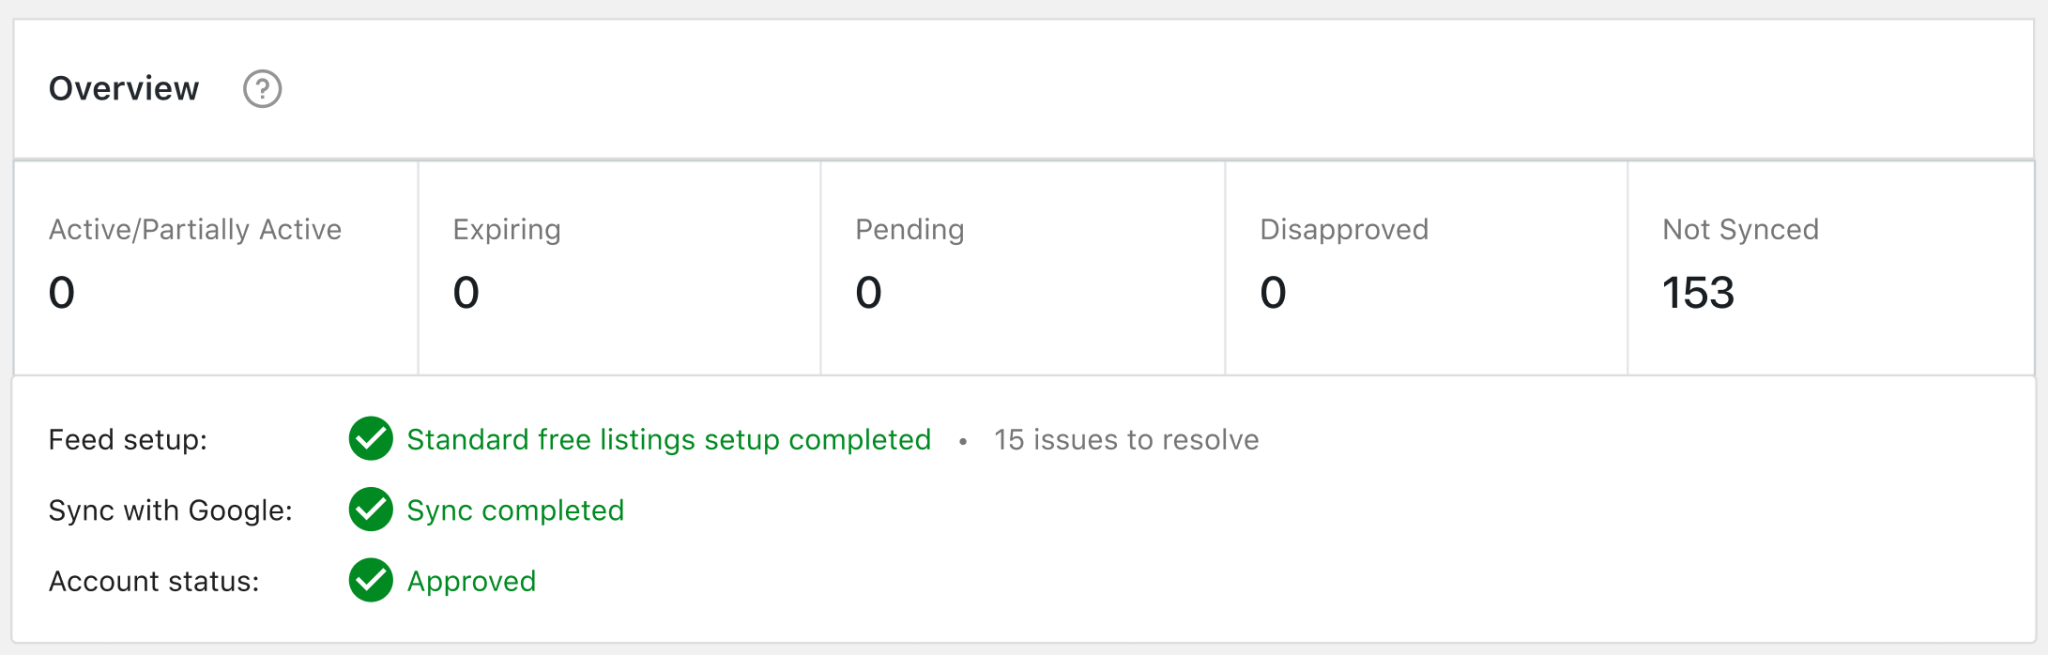
After submitting your product feed, your products will be assigned a status. There are six different product statuses:
- Not synced. These products do not appear across Google or the Google Shopping tab as free listings. They are queued for submission or may be ineligible or excluded from the product feed.
- Active. These products are fully approved and eligible to appear in free listings on the Google Shopping tab within the next 3-5 days. If you’re selling in the United States, your products can also appear on Google Search, Google Images, and Gmail.
- Expiring. These products will become inactive within the next three (3) days, and will no longer appear in Google Listings.
- Pending. These products are still being processed by Google and will not appear in Google Listings until they are approved.
- Disapproved. These products are inactive and do not appear in Google Listings. Check the error status to learn more.
Channel visibility
Choose which products you want to list across Google by toggling the Channel Visibility option in the Google Listings & Ads Product Feed. There are two options:
- Sync and Show: Eligible products will be visible across Google
- Don’t Sync and Show: These products will not be visible across Google (helpful for custom products with varying prices, giveaway products, etc.)
When you set up Google Listings & Ads, all products in your WooCommerce store are automatically added to your Product Feed, and set to Sync and show. You can change the channel visibility of your products at any time, and your product feed will sync automatically within 1-2 days.
All products set to Sync and show in your product feed will appear in both your free listings and paid campaigns.
Displaying deals and promotions on Google
To show your coupons and promotions on Google Shopping listings, make sure you’re using the latest version of Google Listings & Ads (version 1.6+). When you create or update a coupon in WP Admin under Marketing > Coupons, you’ll see a Channel Visibility settings box on the right; select Show coupon on Google to enable it. This is currently available in Australia, Canada, Germany, France, India, the United Kingdom, and the United States.
Free listings on Google
↑ Back to topShowcase eligible products to shoppers looking for what you offer and drive traffic to your store with Google’s free listings on the Shopping tab. If you’re selling in the United States, your products can also appear on Google Search, Google Images, and Gmail.
Free listings
Products that are eligible for free listings will appear in content-rich formats on the Shopping tab, which can boost traffic and drive sales. If you are approved for free listings, your products will be shown as Active in your WooCommerce dashboard.
Opting out of free listings
You can opt out of showing your products on Google’s free listing program from Google Merchant Center. Learn about removing a feed from a destination.
Helpful articles:
- Data and eligibility requirements to show your products for free.
- Best practices for showing up on surfaces across Google.
Google Performance Max campaigns
↑ Back to top
Create Performance Max campaigns to promote your products across Google Search, Maps, Shopping, YouTube, Gmail, the Display Network, and Discover feed and help grow your business.
You can connect your Google Ads account, choose a budget, and launch your campaign right from your WooCommerce dashboard. You can also track performance, review campaign analytics, and access automated reports so you can track performance all in one place.
Once you launch your Performance Max campaign, Google’s machine learning will optimize your ads so they appear at the right time and place to boost store traffic and sales. You can edit or pause your campaign at any time but we recommend you allow at least 15 days for your campaign to optimize before making any changes.
Get $500 in free ad credits
New advertisers can get $500 in ad credit* when they spend their first $500 on Google Ads within 60 days.
How does it work?
After completing the extension setup, create a Performance Max campaign using the following steps:
- From Marketing > Google Listings & Ads in WP Admin, under Performance (Paid Campaigns) click Add paid campaign.
- Create a new Ads account, or choose from a list of existing accounts to create your campaign.
- Define your audience by choosing the countries where you want your product ads to appear.
- Choose your budget; you will be prompted with a recommendation based on the countries you are targeting.
- Add your billing information in the Google Ads pop-up window that appears.
- Once complete, return to Google Listings & Ads to complete ad setup and launch your Performance Max campaign.
Earn promotional ads credit as a new advertiser
When you create a new Google Ads account through Google Listings & Ads, a promotional code will be automatically applied to your account. Get $500 in ad credit* when you spend $500 within your first 60 days. You can edit or cancel your campaign at any time.
* Ad credit value varies by country; see full terms and conditions.
Helpful articles:
Google reviews and approvals
↑ Back to topInitial review
When you upload items to your account for the first time, your products and website will be subject to an initial review to ensure they meet Google’s requirements and Shopping ads policies. This process can take between 3-5 days, during which time your products will show as Pending.
If the review determines that your products or website do not comply with the Shopping ads policies, your account will be suspended immediately and you will receive a notification email with further details. If the review is successful, your products will become eligible to serve in Shopping ads. Learn more about account-level enforcement for policy violations.
Account-level policy violations: warnings and suspension
If your products or website are not compliant with Shopping ads policies, your products may be disapproved. You may also receive:
- A warning email containing details about the issue, how to fix it, and a time frame in which to fix your issues (usually seven (7) days).
- An account suspension. If your issues are not fixed, you’ll receive a series of emails containing all of the relevant information related to Shopping ads policies and account suspension. Once you resolve all issues, your account or website will be reviewed and the warning will be lifted.
Learn more about account-level enforcement for policy violations.
Requesting an account review
Account reviews can be requested through the Google Listings & Ads extension or directly on Google Merchant Center. Requesting a review through the extension is only available to merchants who created their Merchant Center account during the extension setup. Merchants who linked existing standalone accounts must request a review directly from Google Merchant Center.
You can only request a review if there are no other pending requests. If your account has multiple policy issues in the same country of sale, the review will apply to all issues for that country of sale. If your account is suspended, you’ll have two opportunities to request a review. Learn more about account-level enforcement for policy violations.
Requesting a review via the Google Listings & Ads extension
If your account gets a warning for setup/policy issues or is suspended, after resolving the issues, you can request a review via the Product Feed section of the Google Listings & Ads extension (accessible in WP Admin in Marketing > Google Listings & Ads > Product Feed).

To request a review, click the Request review button; this will open a modal with a summary of the issue(s) to resolve and a reminder to resolve the issue(s) before requesting a review.

If you’ve resolved all the issues, tick the checkbox marked I have resolved all the issue(s) listed above, then click Request account review. This will submit a review request to Google Merchant Center and display a notice confirming a review request has been submitted.
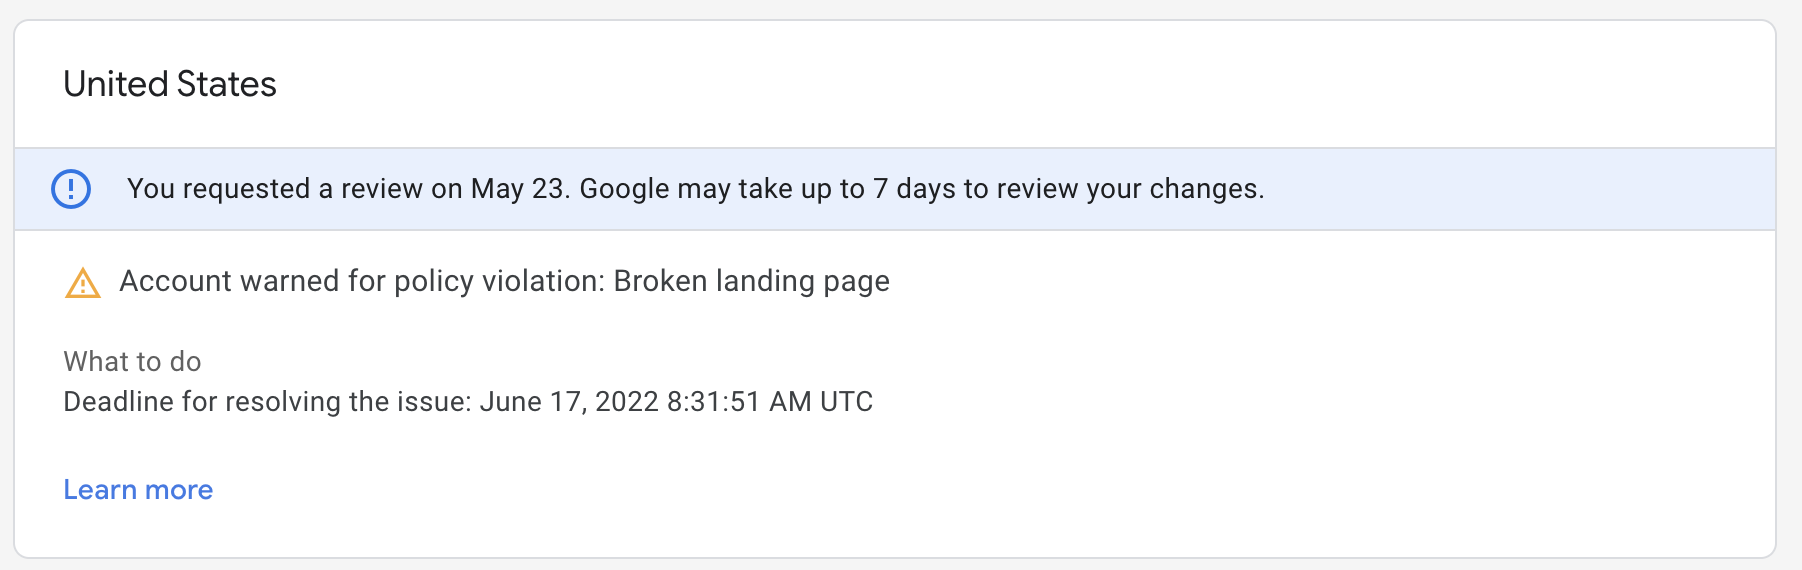
Under review
Once a review request is submitted, the account status is changed to Under review. It takes at least seven (7) days for an account to be reviewed.
Review disapproved
When an account review is disapproved, a notice is shown in the Account Issues tab under Issues to resolve, as well as an indicator in the Product Feed Overview. If the disapproved account is eligible for a review, the Request review button will be available in the notification.
Disapproved – cooldown period
If the account is disapproved after requesting a second review, it enters a probation period referred to as the cooldown period. This means the user needs to wait for approximately seven (7) days before requesting another review. In this case, we show a message with the expected wait time; the Request review button is also disabled.

Approved
Once an account is approved, the account status is changed to Approved.
Requesting a review via Google Merchant Center
If your account has been suspended, you can request a review by completing the following steps:
- Sign in to your Merchant Center account.
- Navigate to Account issues on the Diagnostics page.
- Locate the account-level issue that you’d like to have reviewed.
- Make sure that in-stock products are uploaded and that all issues for the affected country of sale are resolved.
- Click Request review.
- Read the information in the subsequent pop-up window to ensure that you understand the review process’s requirements and limitations.
- Finally, tick the checkbox and click Request review.
Product-level policy violations: disapproved products
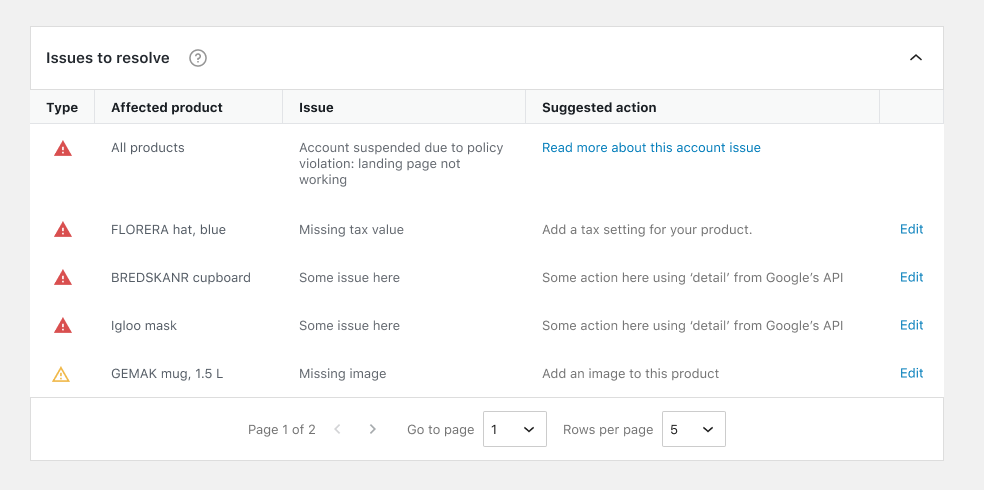
WooCommerce automatically checks your product feed before Google’s review to help you resolve any issues. Any issues requiring your attention will be listed in your Google Listings & Ads Product Feed and will include all the necessary details, including the affected product name, issue, and suggested action. You can edit products individually, or make edits in bulk via Products > Bulk actions > Edit in WP Admin. Your product feed will then be synced automatically within 1-2 days.
Helpful articles:
- Troubleshoot your product feed.
- Disapprovals for product data quality violations.
- Product data specification.
- Item disapprovals for policy violations.
Getting started with campaign analytics
↑ Back to topOnce your free listings and Performance Max campaigns are set up, you will be able to track your performance directly from your WooCommerce dashboard. You can view yearly, quarterly, monthly, weekly, or daily reports. The following metrics will be visible within your reports:
Conversions
A conversion is an action that’s counted when someone interacts with your ad or free product listing (for example, clicking a text ad or viewing a video ad) before taking an action that you’ve defined as valuable to your business — such as an online purchase. Learn about conversions.
Clicks
A click is counted when someone clicks your paid ad or free listing. Learn about clicks.
Impressions
An impression is how often your paid ad or free listing is shown. It’s counted each time your paid ad or free listing is shown on a search result page or other site on the Google Network. Learn about impressions.
Total Sales
The total number of sales your store has received through paid campaigns only.
Total Spend
The total amount you have spent on ads.
You can also review product and account issues that could potentially be affecting your performance by going to Marketing > Google Listings & Ads > Product Feed in WP Admin and reviewing the Account Issues and Product Issues tabs. Read more about the issue if needed in the documentation linked and edit your items to meet the guidance. For best performance, ensure products are approved and that there are no unresolved issues causing limited performance.
Disconnect Google Listings & Ads
↑ Back to topIf you’d like to disconnect the extension and revoke WooCommerce’s access to your Google account, follow the prompts in the Settings tab (see below) to disconnect Google Ads or all linked accounts.
Clicking the Disconnect all accounts button will display a pop-up asking you to confirm the process.
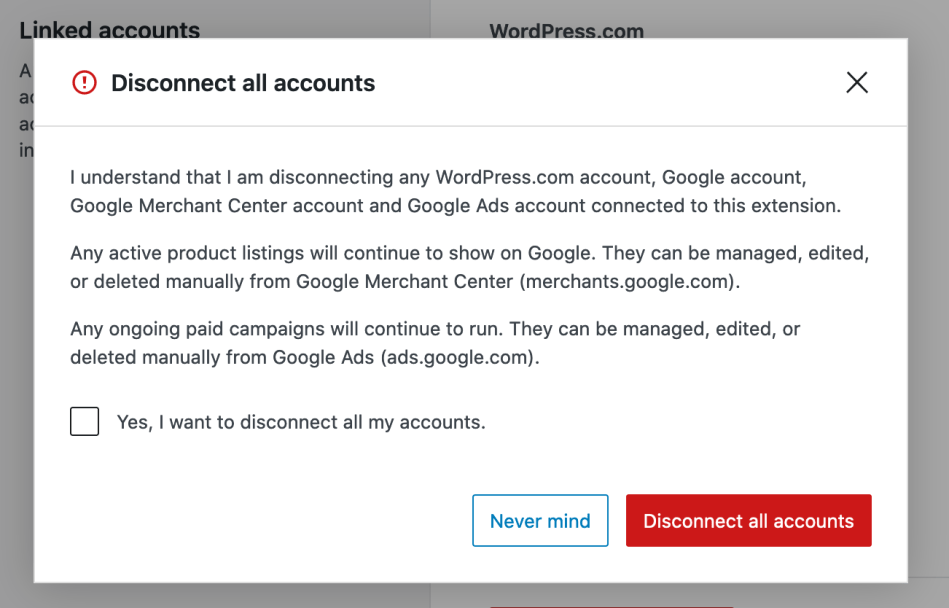
When disconnecting:
- Any active product listings will continue to display on Google. They can be managed, edited, or deleted manually via Google Merchant Center.
- Any ongoing paid campaigns will continue to run. They can be managed, edited, or deleted manually via Google Ads.
- WooCommerce’s access to your Google account will be revoked. This affects all sites connected to your Google account using Google Listings & Ads. If you wish to continue using the extension elsewhere, you may need to reconnect on these other sites.
Note: if Jetpack is being used elsewhere on your site, it will continue to remain connected.
When plugins and extensions are removed in WordPress, data can often be left behind in the site’s database. To fully delete all data related to Google Listings & Ads, you can define a constant in the wp-config.php file. This constant needs to be added before the extension is deleted.
define( 'WC_GLA_REMOVE_ALL_DATA', true );Note that this only works once the extension is deleted from your WordPress site, not when it is simply deactivated.
Attribute mapping
↑ Back to topGoogle Listings & Ads attribute mapping functionality is designed to map existing WooCommerce product attributes to Google Merchant Center feed data. It allows merchants to create attribute rules at the category level and systematically apply them to Google Merchant Center product data that has no attribute values defined — thereby assigning Google product attributes to all products in the specified category.
With attribute mapping, you can:
- Map existing WooCommerce product attributes to Google product attributes.
- Map from available values (Adult, Age Group, Condition, Gender, Is Bundle, Size System, Size Type).
- Map items based on fixed values.
See common attribute mapping use cases.
Please note that individual product attributes assigned on the Google Listings & Ads tab of the product editing screen override global attributes rules. This means that global attribute rules won’t apply to fields with individual attributes assigned.
Available attributes
Attributes currently available in Google Listings & Ads:
- Adult
- Age Group
- Brand
- Color
- Condition
- Gender
- GTIN
- Is Bundle
- Material
- MPN
- Multipack
- Pattern
- Size
- Size System
- Size Type
How to map existing WooCommerce product attributes to Google product attributes
Existing global attributes can be mapped to Google product data attributes. Please note that individual product attributes created on the product page are not supported; these need to be created as global attributes.
To map an existing attribute to Google:

- In WP Admin, navigate to Marketing > Google Listings & Ads and click the Attributes tab.
- Click the Create attribute rule button.
- Select a Google attribute to manage (e.g. Color).
- Click Use value from existing product field and select an existing attribute (e.g. Product Color).
- Next, select the category you want this rule to apply to:
- Apply to All categories: used when the attribute selected above should be populated for all items that have blank attributes.
- Apply to All categories EXCEPT: used to provide your attribute above to every category that is not selected.
- Apply ONLY to this category: used to assign the provided attribute to this specific category.
- To pick a category, select Apply to All categories EXCEPT or Apply ONLY to this category, click the search box, and choose your category.
- Click Save rule.
How to map items based on fixed values (Set a fixed value)
↑ Back to topIf all of your products have the same value for an attribute, you can create a fixed value and assign it to all Google product data. Be mindful of the attribute value requirements and case sensitivity.
To assign a fixed value to an attribute:

- In WP Admin, navigate to Marketing > Google Listings & Ads and click the Attributes tab.
- Click the Create attribute rule button.
- Select the target attribute (e.g. Brand) and input the fixed value.
- Next, select the category you want this rule to apply to:
- Apply to All categories: used when the attribute selected above should be populated for all items that have blank attributes.
- Apply to All categories EXCEPT: used to provide your attribute above to every category that is not selected.
- Apply ONLY to this category: used to assign the provided attribute to this specific category.
- To pick a category, select Apply to All categories EXCEPT or Apply ONLY to this category, click the search box, and choose your category.
- Click Save rule.
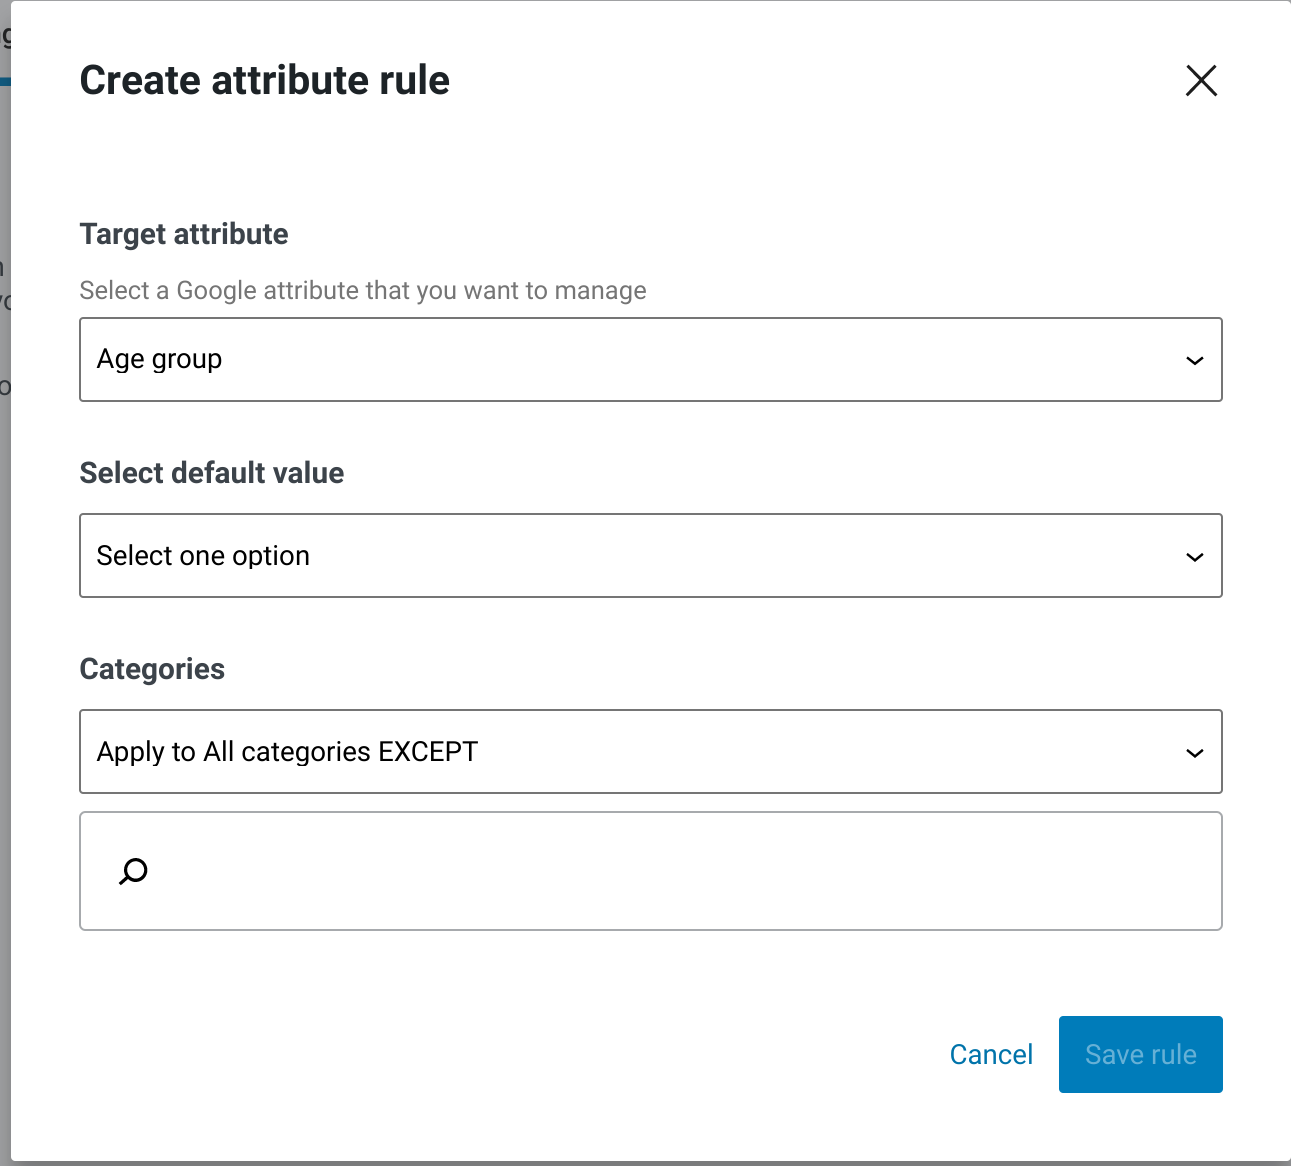
How to map items based on available values (Set default value)
↑ Back to topThis option is given when Google requires specifically listed values (i.e. ENUMs) for a field in Merchant Center.
To set a default value for an attribute:

- In WP Admin, navigate to Marketing > Google Listings & Ads and click the Attributes tab.
- Click the Create attribute rule button.
- Select the target attribute (e.g. Age group).
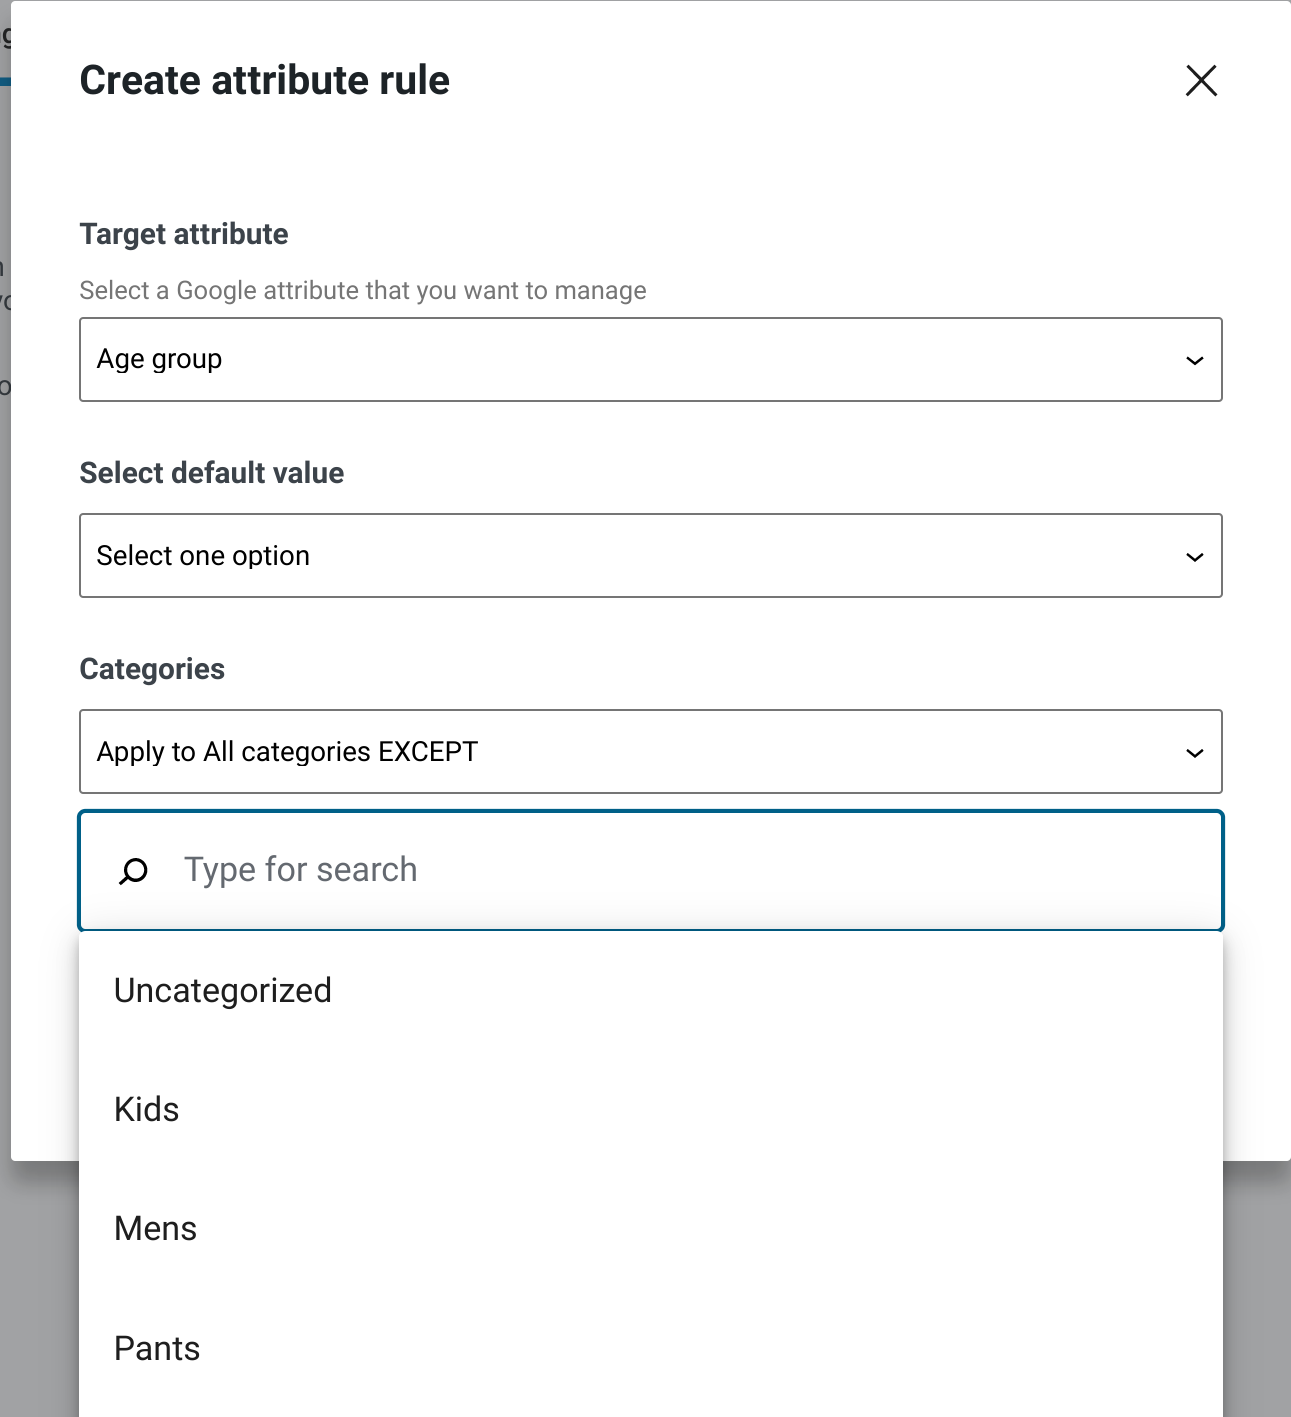
- Select a default value from the dropdown; this value sets the demographic your product is designed for. For example, the Age group attribute’s options are:
- Newborn: 0-3 months old. Sizes are often identified by the age range in months (0-3) or simply newborn.
- Infant: sizes are often identified by the age range in months (3-12).
- Toddler: sizes are often identified by the age range in months (12-24) or years.
- Kids: sizes are often identified by the age range in years (5-13).
- Adult: all sizes within this age group have been manufactured to fit an adult or teen.
- Next, select the category you want this rule to apply to:
- Apply to All categories: used when the attribute selected above should be populated for all items that have blank attributes.
- Apply to All categories EXCEPT: used to provide your attribute above to every category that is not selected.
- Apply ONLY to this category: used to assign the provided attribute to just this specific category.
- To pick a category, select Apply to All categories EXCEPT or Apply ONLY to this category, click the search box, and choose your category.
- Click Save rule.
How to Map Age Group
↑ Back to topSet the demographic that your product is designed for.
- In WP Admin, navigate to Marketing > Google Listings & Ads and click the Attributes tab.
- Click the Create attribute rule button.
- Select Age Group as the target attribute.
3. Select a default value from the dropdown; this value sets the demographic your product is intended for. If your product is designed for all age groups, select Adult.
- Newborn: 0-3 months old. Sizes are often identified by the age range in months (0-3) or simply newborn.
- Infant: sizes are often identified by the age range in months (3-12).
- Toddler: sizes are often identified by the age range in months (12-24) or years.
- Kids: sizes are often identified by the age range in years (5-13).
- Adult: all sizes within this age group have been manufactured to fit an adult or teen.
4. Next, select the category you want the rule to apply to.
- Apply to All categories: used when the attribute selected above should be populated for all items that have blank attributes.
- Apply to All categories EXCEPT: used to provide your attribute above to every category that is not selected.
- Apply ONLY to this category: used to assign the provided attribute to just this specific category.
5. To pick a category, select Apply to All categories EXCEPT or Apply ONLY to this category, click the search box, and choose your category.
7. Click Save rule.
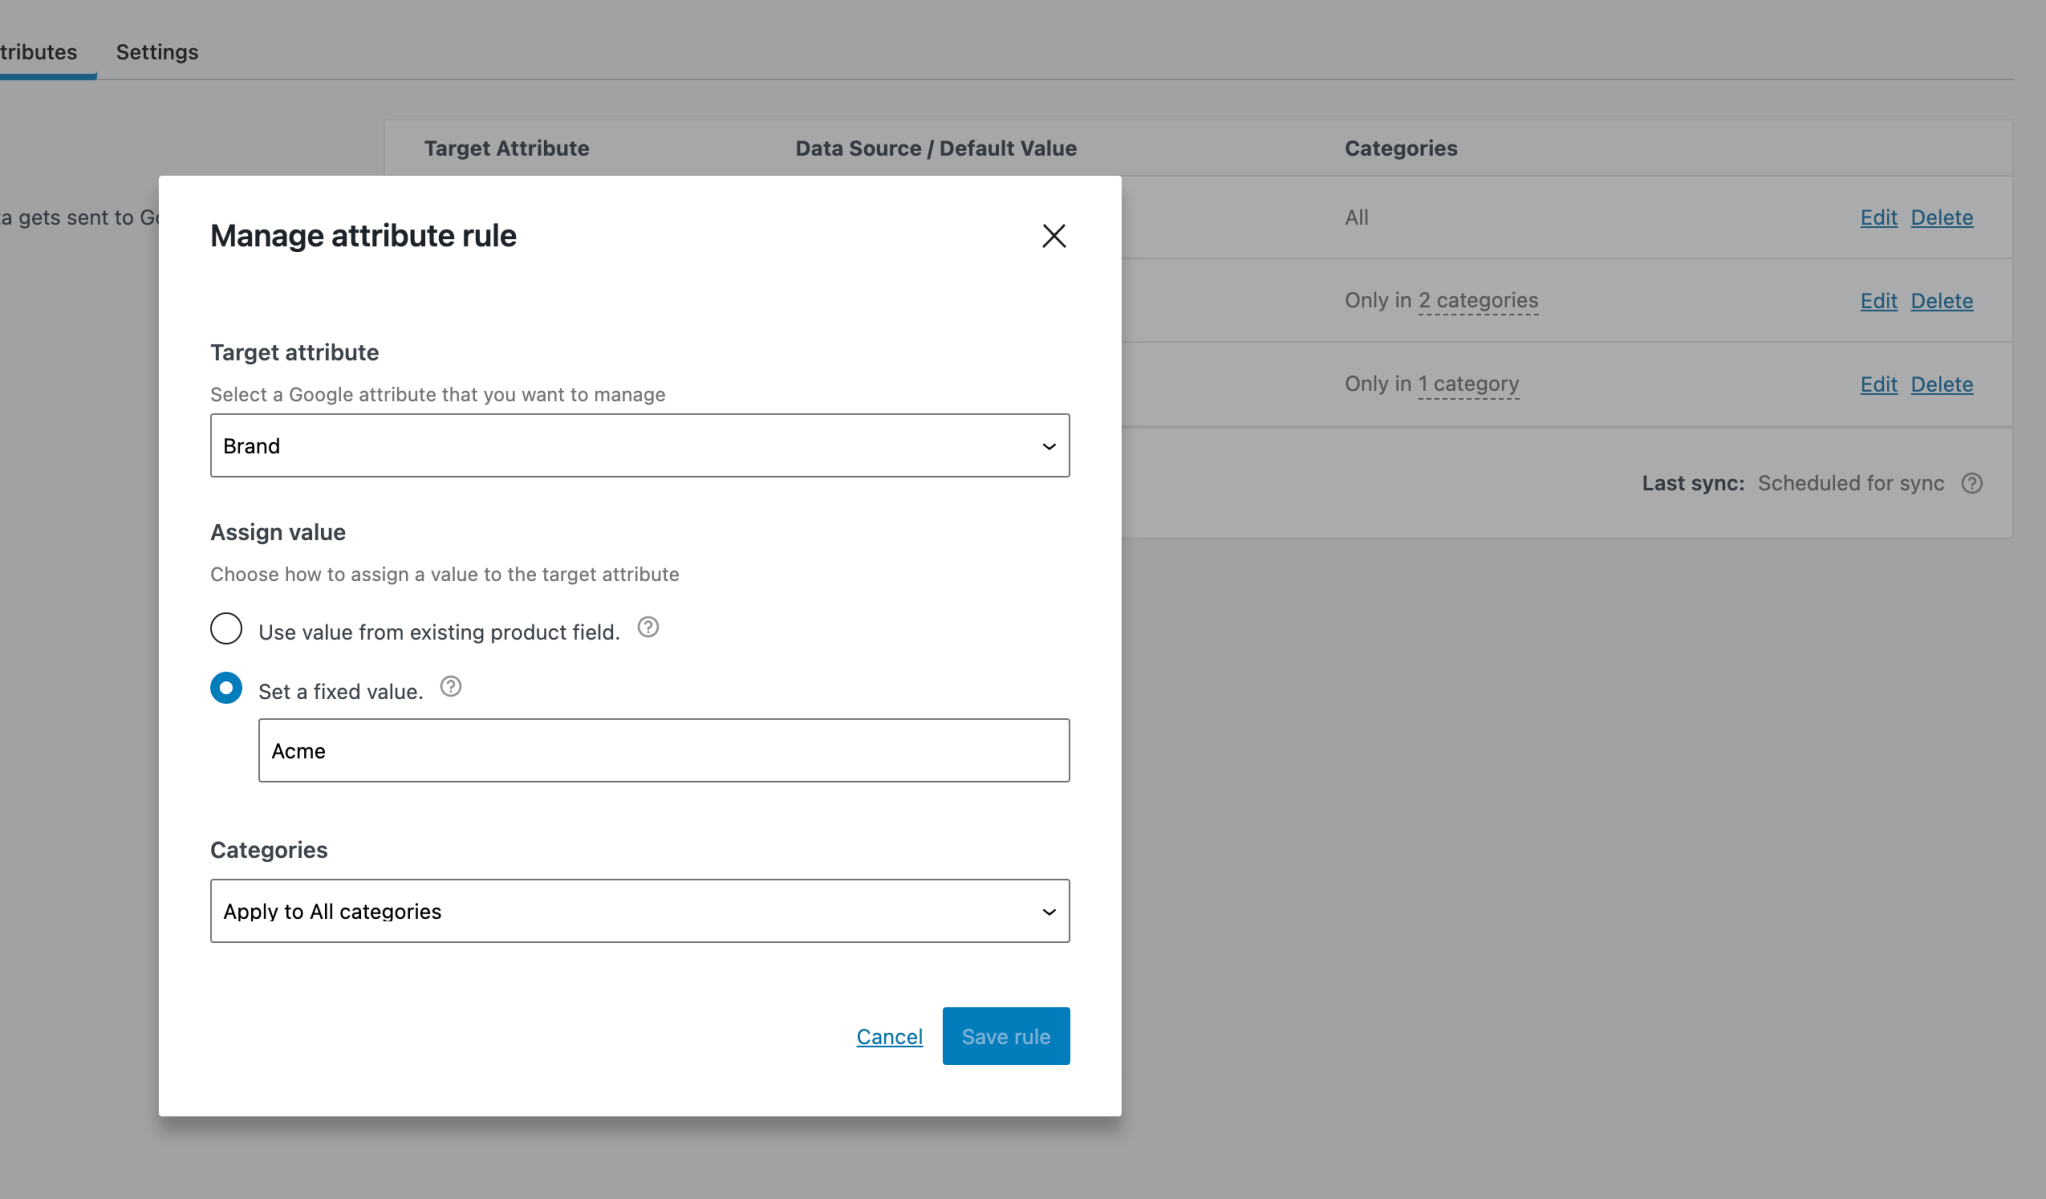
How to Map Brand
↑ Back to topThe Brand attribute is used to identify the brand name of a product to the customer. If you manufacture your own goods or have your own private label, insert your Store Name as the Brand. If you sell products from other manufacturers, enter the appropriate brand name for each item.
- In WP Admin, navigate to Marketing > Google Listings & Ads and click the Attributes tab.
- Click the Create attribute rule button.
- Select Brand as the target attribute.
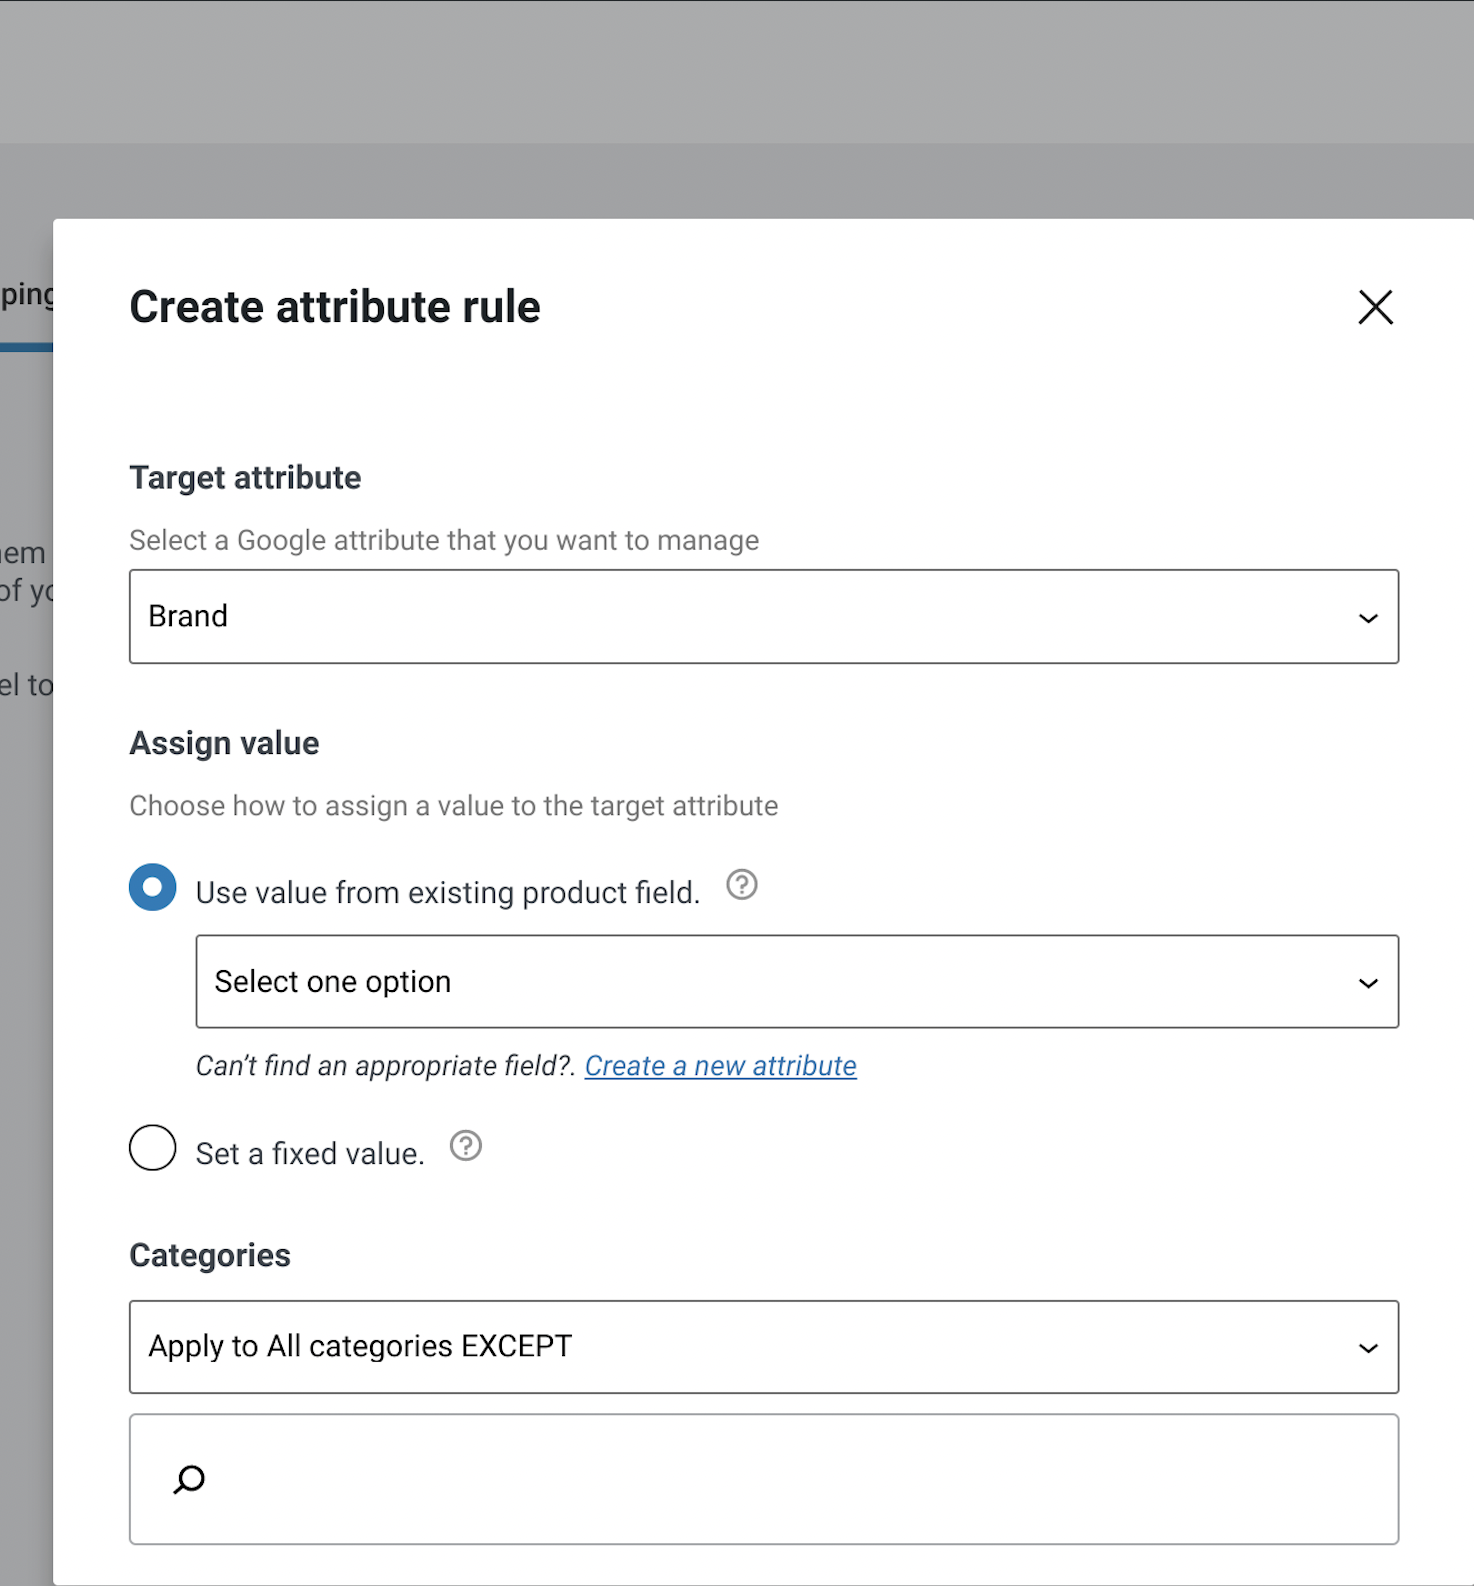
4. Next, choose how you’d like to assign a value to this attribute:
- Use value from existing product field. If you have created product brands using WooCommerce Brand, you can map the brand attribute by selecting Brands under Taxonomies.
- Set a fixed value. This allows you to set a fixed value for products in a specific category or all products.
If you want to use a value from an existing product field, skip ahead to step 6 below. If you’d prefer to set a fixed value, continue to step 5.
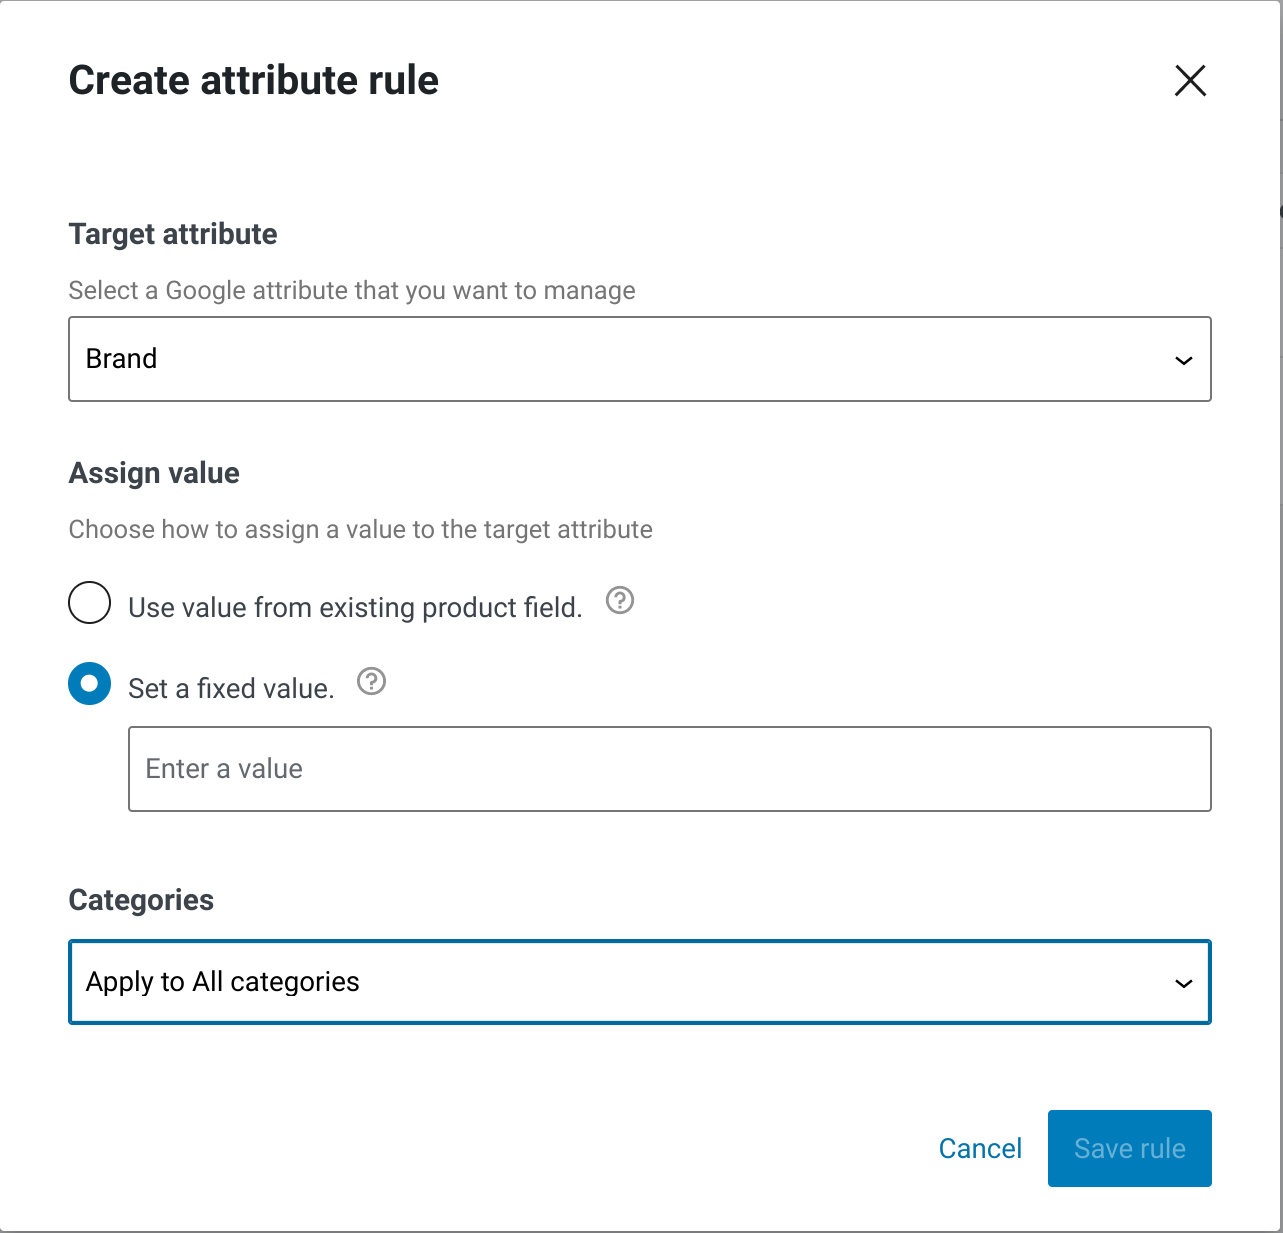
5. Click Set a fixed value and enter the Brand in the field. If you’re selling custom products, enter your store name or domain name without https and www (e.g. example.com).
6. Select the category you want the rule to apply to:
- Apply to All categories: used when the attribute selected above should be populated for all items that have blank attributes.
- Apply to All categories EXCEPT: used to provide your attribute above to every category that is not selected.
- Apply ONLY to this category: used to assign the provided attribute to just this specific category.
7. To pick a category, select Apply to All categories EXCEPT or Apply ONLY to this category, click the search box, and choose your category.
8. Click Save rule.
How to Map Color
↑ Back to topThe color value will be used to help users identify the primary color of an item for filtering purposes. You may enter your proprietary color in this field or use standardized colors for example (Blue, Red, Yellow Green). If your item contains two colors, put the most dominant color first.
1. Click on Create Attribute Rule
2. Select Color
3. Select an option:
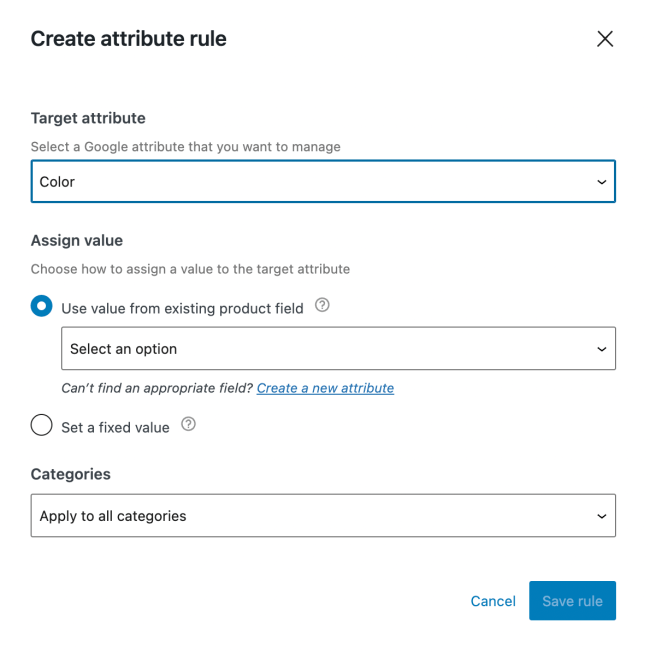
- Use value from existing product field – This option will allow you to map color to WooCommerce global color attributes by selecting “Product Color” under “Global Attributes”.
- Set a fixed value – If all of your items have the same color, you can create your color at a bulk level by selecting “Set a fixed value” and inputting your color.
4. Select the category to apply and save changes:
- Apply to All categories: used when the attribute selected above should be populated for all items that have blank attributes.
- Apply to All categories EXCEPT: used to provide your attribute above to every category that is not selected.
- Apply ONLY to this category: used to assign the provided attribute to just this specific category.
How to Map Gender
↑ Back to topThe following value sets the gender your product is intended for. If your product is designed for all, select Unisex.
1. Click on Create Attribute Rule
2. Select Gender
3. Select an attribute to indicate the gender your product is designed for.
- Male
- Female
- Unisex

4. Next, select the category you want the rule to apply to.
- Apply to All categories: used when the attribute selected above should be populated for all items that have blank attributes.
- Apply to All categories EXCEPT: used to provide your attribute above to every category that is not selected.
- Apply ONLY to this category: used to assign the provided attribute to just this specific category.
5. Click Save Rule.
How to Map MPN
↑ Back to topAn MPN uniquely identifies your product. This specific number helps us make your ad or unpaid listing richer and easier for your customers to find. MPN codes are unique to each variant and SKU and cannot be reused. If you are the manufacturer of your own items you can use whatever unique identifier you use to distinguish your items as the MPN. You can also map your SKUs as MPN.
1. Click on Create Attribute Rule
2. Select MPN
3. Select an option:

Use value from existing product field – Selecting this will allow you to map existing value from product fields such as SKU.
Set a fixed value – This will allow you to input your desired value.
4. In the categories dropdown, select the category in which you want the rule to apply.
- Apply to all categories – Should be used when the attribute selected above should be populated for all items that have blank attributes.
- Apply to All categories Except – This is used to provide your attribute above to every category that is NOT the ones that are selected.
- Apply to Only to this category – This is used to assign the provided attribute to just this specific category.
5. Click Save Rule
How to Map Size
↑ Back to topThe size attribute describes the standardized size of your product. When you use this attribute, your product can appear in results that are filtered by size.
1. Click on Create Attribute Rule
2. Select Size
3. Select an option under Assign value
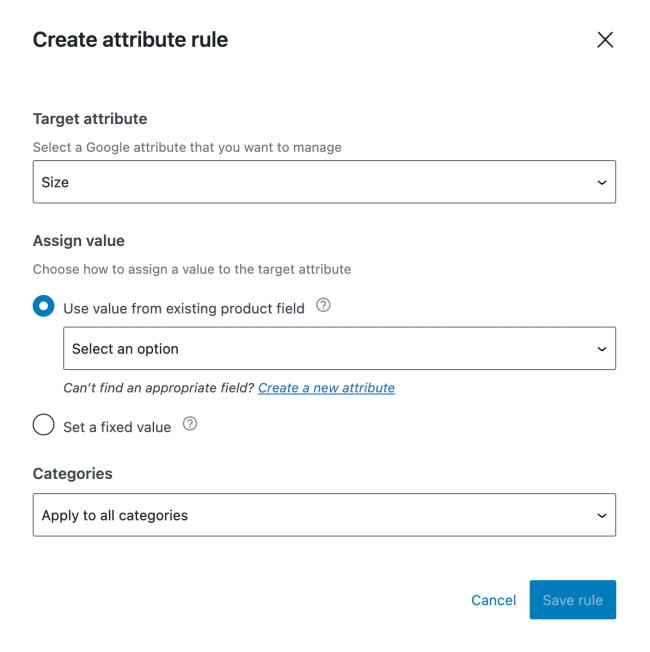
- Use value from existing product field – if you’re using a global size attribute for your products, you can map to it by selecting “Product Size” in the dropdown.
- Set a fixed value – This will allow you to type in your size name in the field (e.g Medium).
4. In the categories dropdown, select the category in which you want the rule to apply.
- Apply to all categories – Should be used when the attribute selected above should be populated for all items that have blank attributes.
- Apply to All categories Except – This is used to provide your attribute above to every category that is NOT the ones that are selected.
- Apply to Only to this category – This is used to assign the provided attribute to just this specific category.
5. Click Save Rule
Editing attribute rules
↑ Back to topTo modify an existing attribute rule:
- Click the Edit link in the rule’s row; this will open the Manage attribute rule modal.
- Make the required changes and click the Save rule button.
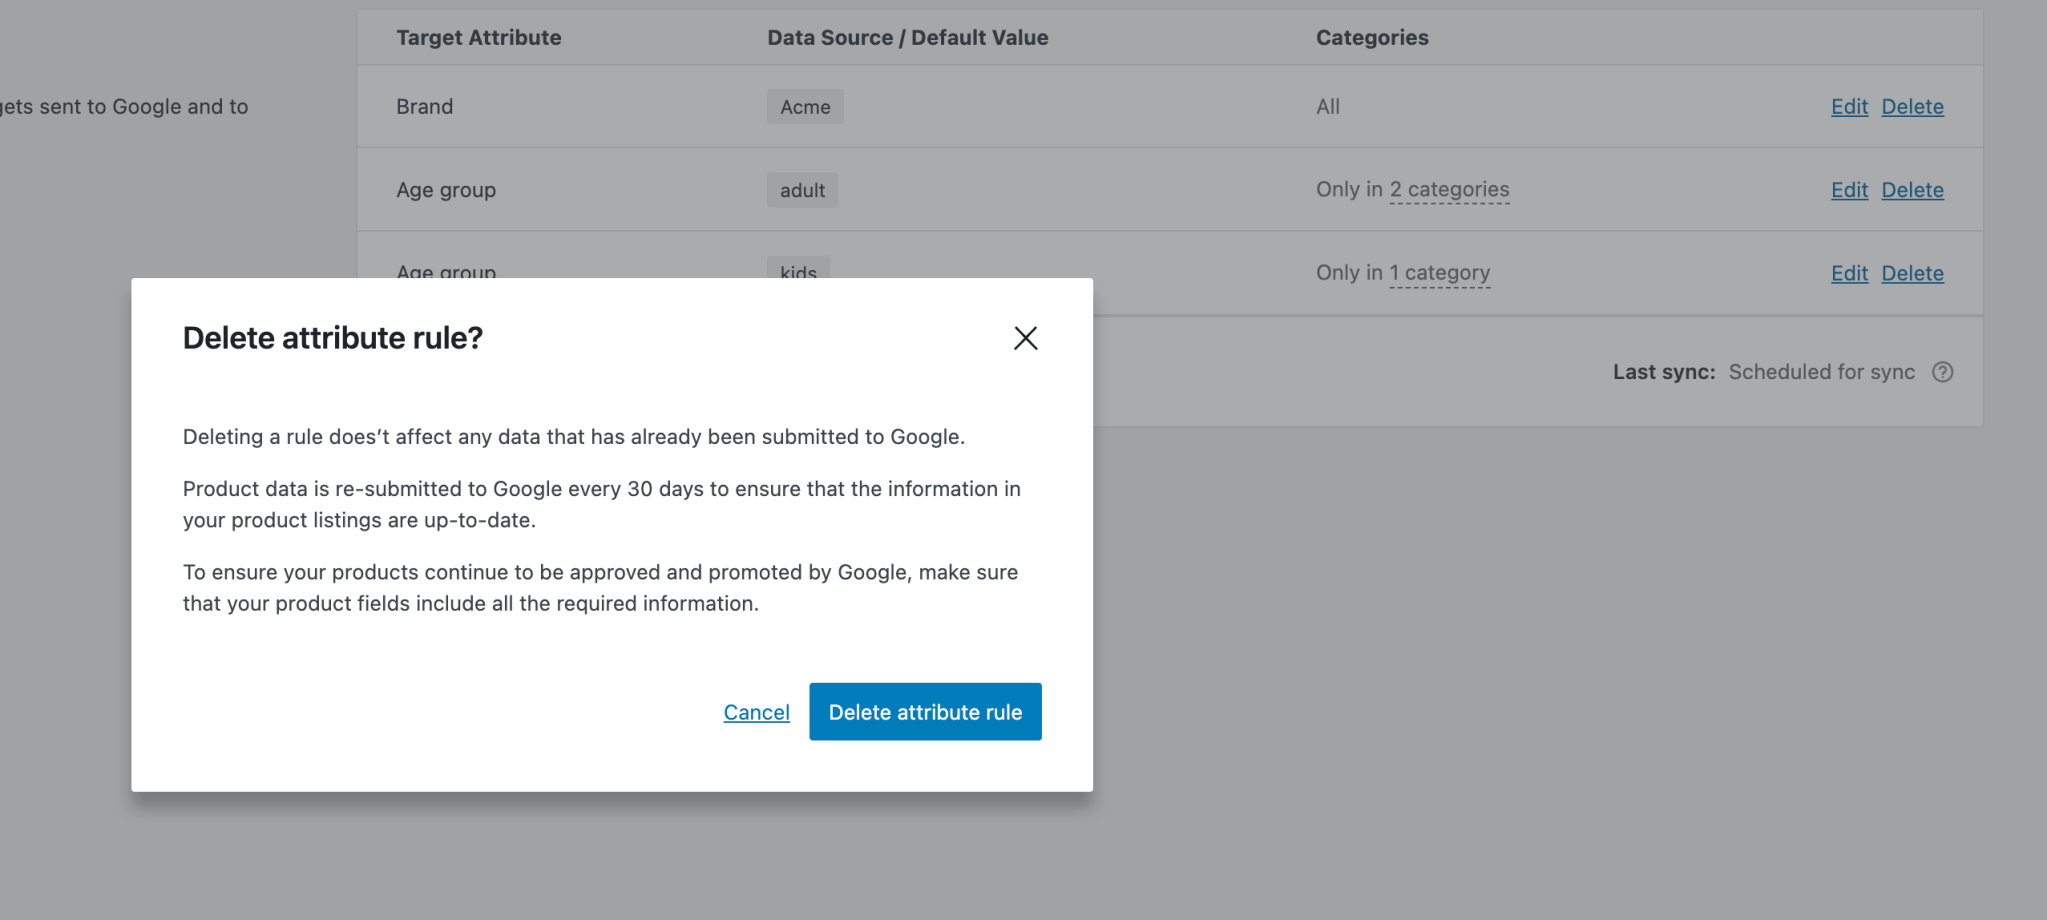
Deleting attribute rules
To delete an existing attribute rule:
- Click the Delete link in the rule’s row; this will open the Delete attribute rule? modal.
- Click the Delete attribute rule button to confirm deletion.
Attribute mapping use cases
New to attribute mapping? We’ve documented some common attribute mapping use cases to help.
Common errors and how to resolve them
↑ Back to topCan’t complete setup; Continue button not working
↑ Back to topThe Continue button on the final step of the onboarding screen is greyed out when one of the pre-launch items has not been completed. The most common cause is an incomplete store address.
You can resolve this by navigating to WooCommerce > Settings in WP Admin and ensuring this information is complete — including address, city, postcode, and country.
Limited performance due to missing identifiers (GTIN, MPN, Brand)
↑ Back to topThis error is caused by products with missing product identifiers, such as Global Trade Item Number (GTIN), Manufacturer Part Number (MPN), and Brand. These identifiers distinguish products and help match them to related search queries.
Although adding these identifiers is not mandatory, not assigning them may result in less visibility for products on Google Shopping channels — while adding them increases performance.
Product identifiers can be assigned individually via the Google Listings & Ads tab in the Product data meta box while editing a product page. They can also be mapped at a store-wide or category level using the attribute mapping functionality. See attribute mapping use cases.
Below, you’ll find how to resolve this error for custom/homemade products, as well as items from other brands.
Custom/homemade products
If you’re selling custom/homemade products, follow these steps to ensure your products are not flagged:
[gtin]— Leave blank.[mpn]— Assign the product SKU used in WooCommerce.[brand]— Assign your domain name (excludinghttps://www.).
Products from known brands
If you’re selling products from known brands, identifiers are usually assigned by the manufacturer.
[gtin]— GTINs are provided by the manufacturer and are usually available on a product’s barcode or packaging. If you can’t find the GTIN, please contact the manufacturer.[mpn]— An MPN is a manufacturer-assigned alphanumeric value used to identify items from the same manufacturer. If your product does not have an MPN, leave this field blank.[brand]— Enter the brand of the product, e.g. Adidas, etc. This is used to match products to searches.
Unable to update your Google Merchant Center contact information; please try again later.
↑ Back to topUnable to update your contact information errors usually occur when Google Listings & Ads cannot communicate with your site’s XML-RPC URL. An XML-RPC connection is used to communicate with WordPress.com; when this connection is blocked, communication is not possible. A common cause is your web hosting provider, firewall, or a security plugin blocking XML-RPC requests to your site.
The first step to troubleshooting this issue is confirming that your site’s XML-RPC URL — example.com/xmlrpc.php — is working properly. It should display the message XML-RPC server accepts POST requests only. If this message is not displayed, your XML-RPC URL is blocked.
Next, you’ll need to contact your web host to unblock the connection or check that a security plugin (or your site’s firewall) isn’t blocking the URL. If your web host confirms that they’re not blocking the URL, perform a conflict test to help you check whether your theme or a plugin is blocking the connection.
Sites intentionally blocking the XML-RPC connection can:
- Add Jetpack’s IPs to the allowlist. This ensures that only Jetpack can use the XML-RPC connection. Learn more about Jetpack and XML-RPC.
- Allow access to the Jetpack endpoint. Jetpack defines a custom XML-RPC endpoint —
https://example.com/xmlrpc.php?for=jetpackorhttps://example.com/?for=jetpack&jetpack=comms— that behaves mostly the same as the canonical WordPress one. This XML-RPC endpoint only works for Jetpack XML-RPC methods.
Note: Google Listings & Ads uses Jetpack services to initiate the connection to WordPress.com; the Jetpack plugin is not required.
A Google ID was not found in Merchant Center
↑ Back to topTypically, this error occurs when the status for a product marked as synced on your site cannot be found in Google Merchant Center. This may be due to the product being deleted directly in Google Merchant Center, resulting in the Google Listings & Ads extension being unable to find a product with a matching ID in Google Merchant Center.
This error is not a cause for concern, as all products are automatically synced to Google Merchant Center when updated. The Sync All Products with Google Merchant Center option on the debug page — accessible at wp-admin/admin.php?page=connection-test-admin-page — can be used to push a sync for all products to Google Merchant Center.
Error submitting products to Google: Google Merchant Center has not been set up correctly. Please review your configuration.
↑ Back to topThis error results from an issue with the Google Merchant Center connection; it can be resolved by disconnecting the extension connections and reconnecting them. To disconnect the connection, navigate to Marketing > Google Listings & Ads > Settings in WP Admin and click Disconnect from all accounts.
Questions
↑ Back to topFrequently Asked Questions
↑ Back to topAnswers to frequently asked questions about Google Listings & Ads can be found below.
Support
↑ Back to topDo you still have questions and need assistance?
- Get in touch with a Happiness Engineer via our Help Desk. We provide expert priority support for WooCommerce.com and Jetpack customers, but not other third-party extensions.
- If you are not a WooCommerce.com customer, we recommend finding help on the Google Listings & Ads support forum or hiring one of our accredited WooExperts.