
When giving people access to your website, it’s important to maintain full control, while still allowing your employees, contractors, and volunteers to do their jobs effectively. There are a few important steps you should take to accomplish this.
We’ll look at the different user types that WordPress and WooCommerce give you access to, what those permissions mean, and other best practices for WooCommerce security.

User Roles and Permissions
↑ Back to topThe user management system is based on two aspects: roles and capabilities.
A role is the classification title assigned to a group of users on your WordPress site. Each role correlates with its own set of capabilities.
A capability is a specific action that a user is permitted to complete. For example, editing a post is one distinct capability, while moderating blog post comments is another.
WordPress has six default user roles, each with its own set of permissions and capabilities:
- Super Admin: A super admin has capabilities that specifically apply to multisite environments. They can manage settings for all websites on the network. In the case of single sites, the Admin is the highest level of user.
- Admin: The most powerful user role because it gives you access to everything. As the website owner, this should be your role
- Editor: This user is typically responsible for managing content. Editors can add, edit, publish, and delete any posts and media, including those written by other users. Editors can also moderate, edit, and delete comments, and add and edit categories and tags
- Author: Typically responsible for tasks related to writing content. They can create, edit, and publish their own posts. They can also delete their own posts (even when they’re already published), but cannot edit or delete posts written by other user
- Contributor: The contributor is a more basic version of the author role. Contributors can perform three tasks on your site: read all posts, create and edit their own posts, and delete their own posts. However, this role stops short of allowing them to directly publish their posts on your site. This gives you a chance to review and have final control over any content they create before it goes live
- Subscriber: Assigned to new users if you enable registrations on your site. This role has the least number of permissions. Users are only able to update their own profile, read the content on your site, and leave comments.
When you install WooCommerce, you’ll gain two user roles:
- Customer: Assigned to new customers when they create an account on your website. This role is basically equivalent to that of a normal blog subscriber, but customers can edit their own account information and view past or current orders.
- Shop Manager: This allows the user to run the operations side of your WooCommerce store without the ability to edit back-end functionality like files and code. A manager has the same permissions as a customer, plus they’re also granted the ability to manage all settings within WooCommerce, create/edit products, and access all WooCommerce reports. Important: They ALSO have access to the WordPress editor capabilities mentioned above.
WooCommerce also offers additional capabilities that allow an Administrator to:
- Manage all WooCommerce settings
- Create and edit products
- View WooCommerce reports
When to Use the Shop Manager Role
↑ Back to topAssign the Shop Manager role when:
- You want to allow a user to manage orders, issue refunds, and produce reports, without being able to edit plugins, themes, or settings on your site.
- You want to allow a user to view and update orders and products, but not access your user settings (they won’t be able to add/edit user roles and permissions).

When to Use the Administrator Role
↑ Back to topThere might be instances when you need to give another user an Administrator role on your site.
Examples of admin users:
- Website Developer
- Website Designer
- Social Media Marketing Agency
- Digital Marketing Agency
Typically, people in these roles need access to more extensive WordPress features and settings in order to carry out projects on your website.
You’ll want to be extremely careful with this since Administrator is the most powerful role on your store.
Best Practices for User Permissions
↑ Back to top- Only provide users with the access they need. This is important for security, to prevent users from making unapproved changes, and prevent content from being accidentally deleted.
- Limit the number of users that have an Administrator role. Many vendors may request this role, but few actually need such an advanced level of access. Before granting the request, carefully reconsider the job functions they’ll be performing and see if a lower level of access would be sufficient.
- If you’d like more control over exactly what your user gets access to, download the free User Role Editor plugin, which allows you to select the individual capabilities you grant each user.
Website Security Best Practices
↑ Back to topAdding users to your website requires additional security measures – the more users you have, the more risk you take on.
Secure Usernames and Passwords
Always make sure that your entire team maintains strong usernames and passwords.
- Enable two-factor authentication, if possible. The free Jetpack plugin makes this easy.
- For usernames, avoid common titles like “Admin” or “Administrator”. This makes your site vulnerable to security breaches. Instead, create a specific username for each person.
- WordPress will automatically create a secure password for you when you create a new user, but you do have the ability to override this and allow your users to set their own password.
- When creating a new password, make sure it has an uppercase letter, lowercase letter, number, symbol, and is at least 12 characters long. This might sound extreme, but the more complicated the password is for each of your users, the better your security will be.
Regularly Review Roles
Periodically review user roles, especially for Administrators. You may need to assign them a new role or remove their account entirely.
For example, if you stop working with an agency or developer, make sure to remove their account from your website so they no longer have access to it. The same thing applies to other user roles.
No user should have access to your site unless they currently need it.
This is also true for your hosting and domain name accounts. If you gave someone access to your login information and you’re no longer working with them, change your password. If, at any point, you provided FTP credentials to a developer so that they could manage your website files, make sure to update or delete those credentials entirely. InMotion Hosting provides an easy-to-follow walkthrough for anyone using cPanel.
Remember: Website professionals can still get access to your website through your hosting account information or FTP credentials.
Regularly Create Backups of Your Website
Creating regular backups of your website and online store is extremely important, not only for security but for peace of mind.
If a user ends up making unapproved changes to your site or if your site becomes compromised, it’s imperative to have a copy on hand so you can restore it to its original state.
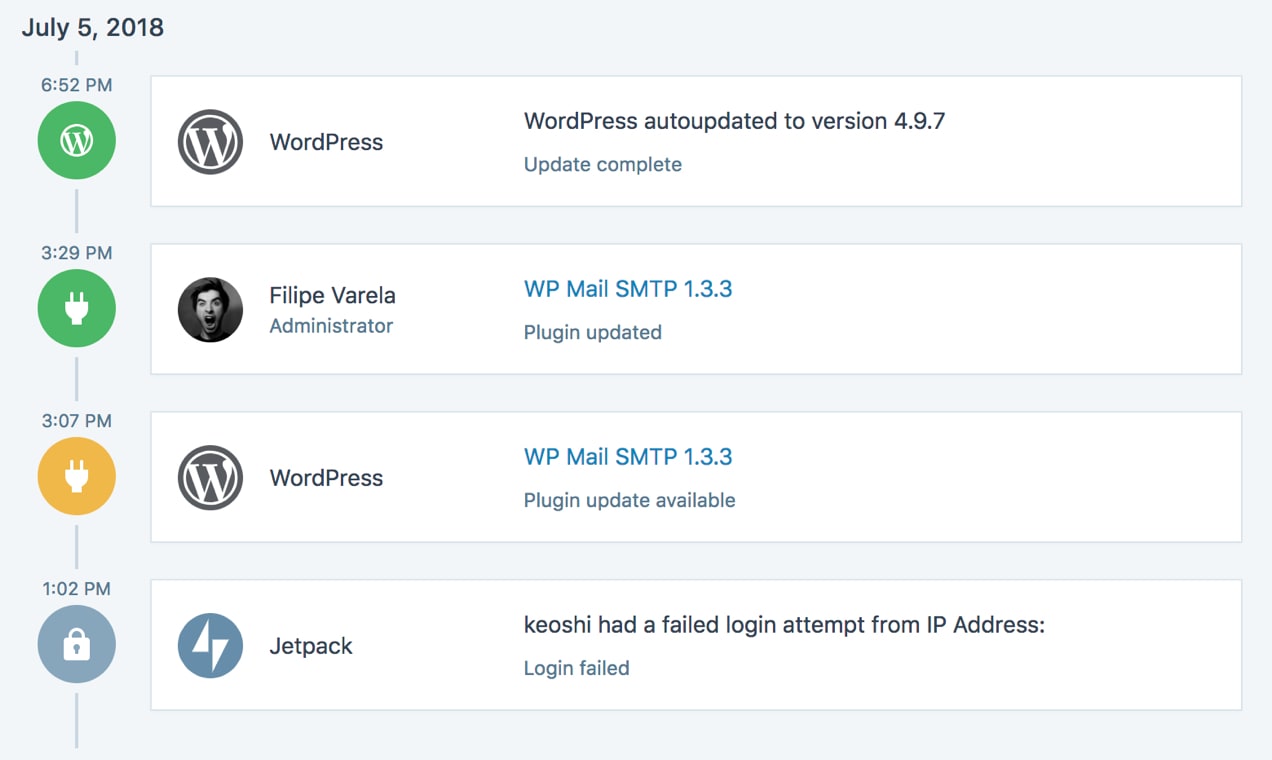
Paid Jetpack plans allow you to quickly restore a site backup with the click of a button. Jetpack also keeps an audit log in your WordPress dashboard, providing detailed information about all changes made to your site. You can see which user made the change, what time it took place, and exactly what the change was.
It’s important not to rely on any free backups that your hosting provider includes. You should have full control over your files and backups, and many hosts only keep backups for 48 hours. You may also want to keep backups independent of any accounts you may have shared access to. One way to do this is by saving a copy on an online cloud provider like Dropbox or Google Drive, or keeping a copy on a physical hard drive.
Sharing Login Credentials
If you need to share login credentials for user roles or for your hosting/domain accounts, don’t send them through email or another unsecure system.
Instead, take advantage of free password sharing tools like LastPass.
LastPass allows you to create an account, store all of your online usernames and passwords in a vault, and share credentials through their encrypted and secure network.
You can also set user permissions in this tool – for example, you can check a box if you want the user to be able to see the password or not.
Be Safe Out There
↑ Back to topOwning an online store comes with a lot of responsibility, especially when it comes to assigning access to the back-end of your site.
Thankfully, WordPress and WooCommerce make it easy to assign specific user roles, lock down permissions, keeping customers’ information and your digital property safe.

About


I already used a woo-commerce plugin on my website. I am a bit confused with some work but with your article I got information. keep sharing more for solving the problems.
Glad you found the information valuable! If you have any more questions, feel free to check out our documentation (https://docs.woocommerce.com) or reach out to our support team (https://woocommerce.com/contact-us). Thanks!
Thanks a lot for this guide. I’ve just begun with woocommerce on my website and your guide for me as a newbie is very helpful!
I’m so happy you found it helpful. Thanks for reading!