I am Francisco Aguilera G., Creative Director of APK Estudio, a small Chilean web design studio, and blogger at FranciscoAMK.com. I have published online tutorials and courses for several years through my own blog, my company website and other platforms such as Udemy and Floqq.

At the beginning of 2014 I had three courses published independently on different platforms:
- Diseño web con HTML y CSS desde cero (Web design with HTML and CSS from scratch) (Published at Udemy)
- Dominando WordPress sin programación (Mastering WordPress without programming) (Published at Floqq, Udemy and a course website, using Campaign Monitor autoresponders to send a daily class to registered users)
- Tu primera tienda online (Your first online store) (Published on its own website, also sending a daily class by email autoresponder)
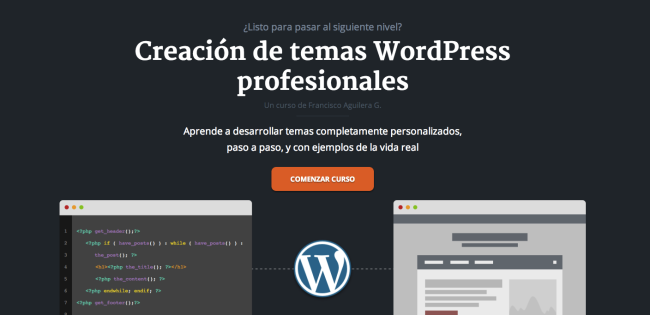
In March 2014 I began to prepare material to publish a new course called Creación de temas WordPress profesionales (Professional WordPress theme creation), but on this occasion I decided to publish it on my own platform – pro.franciscoamk.com.

My requirements for this platform included being able to offer my students a learning experience as nice as Udemy’s, being able to decide how to communicate with my students, to contact them and promote my course, and most importantly, being able to charge a fair and low price, by not having to pay 50% commission per student registered.
Additionally, this platform should allow me to have all my courses in one place, offering a simpler mechanism to manage and sell them as well as being able to sell other kinds of products such as ebooks and themes.
This is how I discovered Sensei and its excellent integration with WooCommerce. Love at first sight!
Getting the platform ready
↑ Revenir en hautIn order to prepare the platform, the first step was to create a new WordPress installation and install the following plugins:
- WooCommerce: to enable the shopping cart system.
- WooCommerce Google Analytics Integration: to keep track of visits and add to cart actions.
- Sensei: to enable the publication of courses and lessons.
- Sensei Modules: to divide each course into modules.
- Sensei Media Attachments: to attach files to my lessons.
Sensei settings are very simple and offer the required options. The most relevant setting adjustments were:
- Users must be registered to see courses and lessons.
- WooCommerce will be used to sell the courses.
I need to collect my students’ personal information in order to keep in touch with them, including those who are taking free courses. This is why I made these restrictions.
Creating a course which can be sold is easy. You just need to create the product on WooCommerce and from the Sensei course editing page to associate the corresponding product with it.
In order to test the platform, I published a course called Dominando WordPress sin Programación (Mastering WordPress without programming) whose videos are originally published on YouTube. They worked well but I needed a way to delete the related videos once they finished. So I used the Hide YouTube Related Videos plugin to solve this problem.
It is very important for me to synchronize my registered students with a subscribers list in Campaign Monitor. Therefore, I installed the Campaign Monitor Synchronization plugin to associate all my students with a new list and used the “_money_spent” data to create a segment with those students who have paid for their courses.
Finally, as the platform and courses should be in Spanish, I used the Codestyling Localization plugin to translate all messages generated by Sensei and the other plugins.
Creating the design
↑ Revenir en hautAs a designer, the visual aesthetics of the website are very important. However, it was not my intention to use a common theme. So I created my own theme based on my blog style to keep the design consistent.
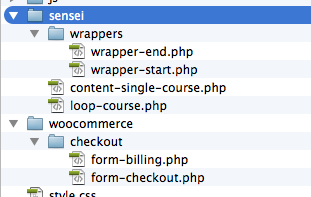
Sensei provides the ability to change its appearance, by making a copy of the template files within the active theme.
The folder looks like this:

Thanks to these files I was able to modify the following:
- Container elements of Sensei pages to match the classes and ids used in the theme.
- The add to cart button not only adding a course to the cart, but also redirecting the user to the checkout page to finish the purchase immediately. Basically the route must be similar to
http://website.com/checkout-page/?add-to-cart=PRODUCT-ID.
Additionally, I modified the WooCommerce behavior, deleting most of checkout fields and preventing the common styles from loading on the front of the site. This was accomplished by adding some code to my theme functions file:
Selling different packs
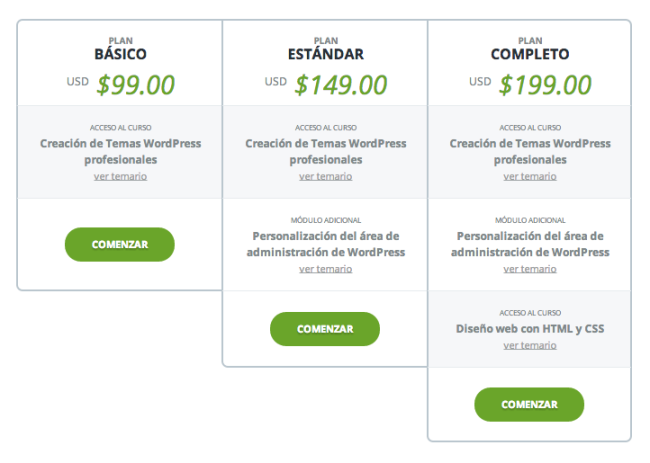
↑ Revenir en hautThis platform would be launched along with my Creación de temas WordPress profesionales course which had a unique characteristic: It had to be sold in different packages at different prices with each package giving access to different contents.
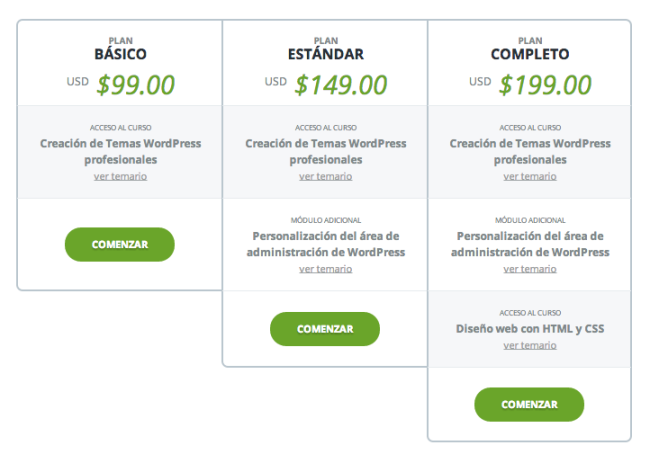
The basic package would have access to the course only, the intermediate package access to the basic course plus an extra module (this is within Sensei as a separate course) and the full package access to the basic course, the additional module plus access to a 100% free coupon for Diseño web con HTML y CSS desde cero currently published at Udemy.
In order to meet the need of granting different accesses, I read the case study of the Vitruvian Fine Art Studio, but honestly speaking, the method used there did not serve my purpose. I decided to use the Product Bundles extension to create these packages. This way, the person buying a pack would have access to one, two or three courses within the platform.
I created a landing page to promote the course which initiated the use of this platform. On this page visitors would be offered the option to choose one of the three available packages in the course.
These landing page purchase links used the same procedure to avoid the add to cart option and redirect to the checkout page, each pointing to the grouped product specific ID – for example http://pro.franciscoamk.com/finalizar-comprar/?add-to-cart=343.

After launching the platform
↑ Revenir en hautWhen the platform was launched and students began to use it, I discovered some limitations which I could solve with some additional plugins:
- Limit login attempts: to avoid reiterative invalid entry attempts.
- Crayon Syntax Highlighter: to allow students to share code fragments with the instructor within comments in each lesson.
- User Switching: to allow me to visit the platform as is seen by the users. This way I can help them with any kind of problems in the lessons, access their accounts, etc.
- WP Mandrill: to send mails generated by the platform through Mandrill servers. Some users had reported not having received mails such as purchase confirmation. Nevertheless, since Mandrill has been installed and set up, all mails are effectively delivered.
Conclusion
↑ Revenir en hautWordPress + WooCommerce + Sensei = one of the best combinations ever. This is a great tool which allows me to publish my material and have full control of important functionality, such as communication with my students, promotion strategies, limited offers or discount coupons.
As a designer, this combination has also given me freedom to design the platform according to my needs and style, without any restrictions.
It is up to us how creative we can be to meet our students’ needs using these three tools. In addition, I have received very positive comments from my students.
I hope this post will be helpful and has given you some ideas for your own online learning platform.
About


Thanks for sharing Francisco. This is a great case study. Did you use a plugin to create the pricing table? If so, which one?
Thanks Brent.
The pricing table was hand coded in HTML/CSS
A very informative case study! Thanks for sharing, Francisco!
🙂
Hello Woo, thanks for sharing my Case Study 🙂
No problem, Francisco. It’s great to see different uses of Sensei like this 🙂
Thanks for sharing! Great case study!
Francisco this was awesome, but although you say it’s easy, I’m intimidated because you have a great deal of technical knowledge. How can I get someone to build this for me? Could I find someone on O Desk?
Thank you!
Helen Adeosun
Or you can simply contact me in franciscoamk.com/contacto 😉
Angesagt
How buy now, pay later options can help your business grow
By Vanessa Petersen •
HomeWizard overcomes the complexities of international growth with Mollie and Woo
By Vanessa Petersen •
How to move your custom site to WooCommerce (and why you should)
By Mahrie Boyle •
Never miss a beat — join our mailing list
Please enter a valid email.
View our privacy policy. You can unsubscribe anytime.
There was an error subscribing; please try again later.
Thanks for subscribing!
Emails will be sent to
You're already subscribed!
Emails are sent to