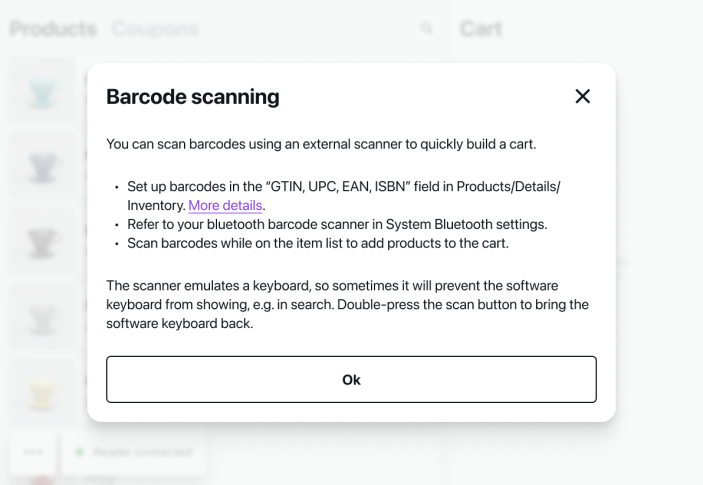
The WooCommerce Mobile app supports barcode scanning when using the Point of Sale (POS) mode. Barcode scanning allows you to connect a supported external barcode scanner to scan products supported barcodes and automatically add the product to the Cart when in POS mode.
Setting Up Barcode Scanning
↑ Back to topTo start scanning barcodes, we will need to ensure that the products and barcode scanner are properly configured.
Please Note: Barcode scanning requires Point of Sale (POS) mode, meaning you must be using a device compatible with the Woo Mobile POS mode as outlined here.
Configuring Products
↑ Back to topPlease Note: Unlike in the Orders and Products tab, POS does not support the SKU for barcodes, as the SKU is intended for inventory management.
To configure a product for scanning, we will need to add the barcode value to each product that we wish to scan. To add a barcode value:
- On your WordPress website, navigate to Products > All Products.
- Under the product you wish to configure select Edit to open the Product Details.
- On the Products Details page under Product Data, select Inventory.
- Enter the corresponding barcode value in the GTIN, UPC, EAN, and ISBN field.
- Update the product to save changes.
You can also add a barcode value to a product directly from the Woo Mobile app:
- In the Woo Mobile app select the Products tab in the bottom menu bar.
- Select the product you wish to add the barcode value to by tapping it.
- Select Inventory in the list of Product Details buttons.
- Enter the corresponding barcode value in the GTIN, UPC, EAN, and ISBN field.
- Update the product to save changes.
Please Note: The Woo Mobile app with look up exactly what is provided by the scanner. This means that every character will need to be in the product’s GTIN, UPC, EAN, and ISBN field. Including check digits and country codes. The minimum code length is 6 digits, but the standard length for UPC-A is 12 digits, and for GTIN/EAN/ISBN, it is 13 digits.
Configuring a Barcode Scanner
↑ Back to topThe Woo Mobile app supports most barcode scanners that connect using Bluetooth HID (Human Interface Device). HID is a mode in which the scanner emulates a keyboard typing very quickly, which allows apps to support a wide range of scanners.
We recommend the following scanners as they have been integrated directly tested to ensure compatibility:
For recommended scanners, you can follow the streamlined setup process below to connect and verify your scanners configuration.
- While in POS Mode select the Menu (three dots) button in the the bottom left-hand corner. Then choose Set up a barcode Scanner.
- You will see a menu to select the scanner you are trying to set up. Please refer to the corresponding section below.
Note: For scanners not listed, select Other and follow the steps outlined below to connect a compatible scanner.
- After selecting the scanner from the list presented, turn on your scanner and scan the code presented. Once your scanner indicates that you have successfully scanned the configuration code, select Next.
- Next, you will see a screen prompting you to pair your scanner. Select Go to your device settings to be automatically redirected in order to connect the scanner with Bluetooth.
Support guides for connecting Bluetooth are available for each operating system here: - Once your device is paired successfully via Bluetooth, return to the WooCommerce app and select Next.
- Test the barcode scanning functionality by scanning the example barcode provided.
Note: If the app does not detect the barcode is scanned within 10 seconds it will notify you that no data has been detected. If the screen does not change after scanning, please go back to complete the setup process or refer to the troubleshooting section of this guide.
- If successful, you will see Scanner set up!, and can then dismiss the setup modal and begin scanning your products barcodes using the external scanner.
Connecting other scanners
Many scanners will be configured in a compatible mode by default. You can ensure that your scanner is configured correctly by referring to the scanner’s manual. The scanner should be set up to use Bluetooth HID, and to send carriage return and line feed characters (/r or /r/n) at the end of each code.
Once your scanner is configured, connect it to your device using Bluetooth. You can find help guides for connecting aBluetooth devices based on your operating system below:
Once it’s configured, connect it to your tablet in iOS or Android’s Bluetooth settings.
Other than in the apps, you can test your scanner by scanning while in a notes app or other text field – since it behaves as a keyboard, the barcode numbers will be entered into the note.
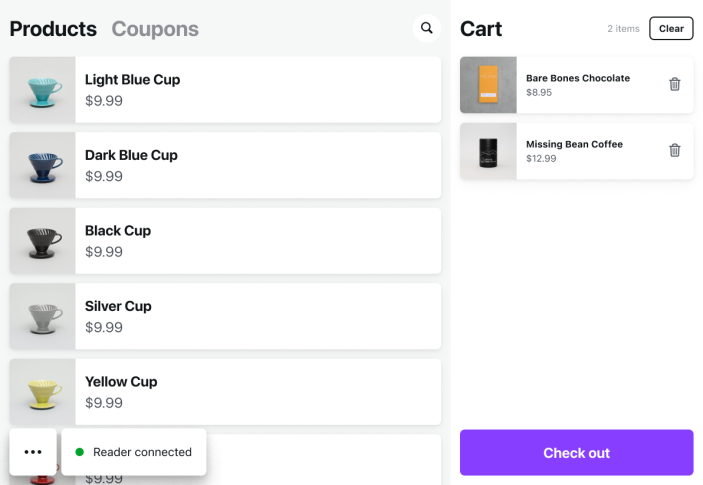
Scanning Barcodes
↑ Back to topTo start scanning your products after successful configuration, you will first need to enter POS mode. Once in POS mode, you can scan products using your barcode scanner.
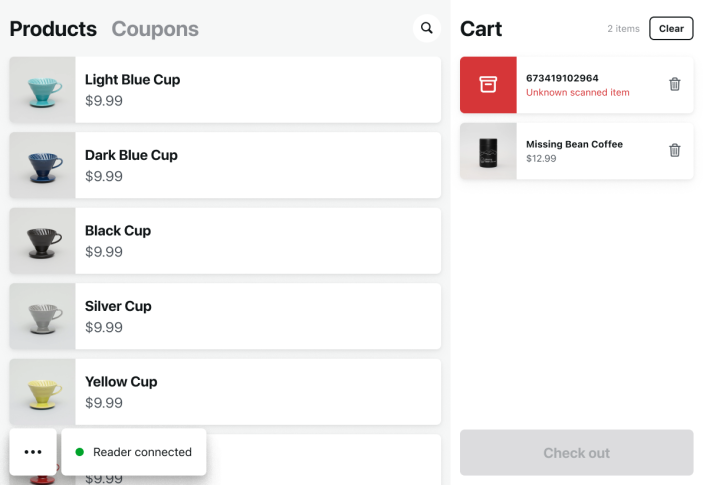
If a scan is successful, the corresponding product will be added to the Cart.
If the scan is unsuccessful, the barcode number will be added to the cart with the error Unknown scanned item. This item can be removed from the Cart by selecting the Trash icon next to it.
Keyboard Visibility with Barcode Scanners (Android)
↑ Back to topAndroid recognizes barcode scanners as external keyboards, which may cause some software keyboards to hide automatically. If your on-screen keyboard doesn’t appear, please try the following troubleshooting steps:
- When a scanner is connected, find in Android’s settings Show on-screen keyboard setting and enable it
- Your keyboard app may also have its own settings – find your keyboard app settings (Gboard, Samsung Keyboard, etc.)
- Enable the option to “Show on-screen keyboard when physical keyboard is connected”
This setting varies between keyboard apps and devices.
FAQ
↑ Back to topHow Can I Test if My Scanner Is Working?
↑ Back to topTo test if your scanner is working correctly, we recommend opening a notes or documents app and scanning a barcode. You should see the products barcode value followed by carriage return and line feed characters (/r or /r/n).
Can I Scan With My Devices Camera?
↑ Back to topNo, it is not possible to scan a barcode using your device’s camera, we only support hardware scanners.
What Happened to My Keyboard?
↑ Back to topWhen you scan with a HID-scanner, it is emulating an external keyboard. When you use the scanner iOS or Android may determine that you’re using an external keyboard and hide the software keyboard. You can bring the keyboard back by using the keyboard button that the iOS or Android put on screen to re-enable the keyboard.
With some scanners, quickly double-pulling the trigger will also restore the software keyboard.
Android Troubleshooting
Android recognizes barcode scanners as external keyboards, which may cause some software keyboards to hide automatically. If your on-screen keyboard doesn’t appear, please try the following troubleshooting steps:
- When a scanner is connected, locate the Show on-screen keyboard option in your device settings and enable it. A common location for this in the Settings app is Hub Mode > At a glance > Search your tablet.
- If you are using a third-party such as Gboard or Samsung keyboard it may have its own settings. We recommend reviewing the keyboard settings or reaching out to the keyboard developer directly for support.
- In your device setting, locate the option for Show on-screen keyboard when physical keyboard is connected and enable it. Location of this setting will depend on your individual device, refer to your device manufacturer for specific information.
This setting varies between keyboard apps and devices.
My Scanner Is Not Working?
↑ Back to topSince the scanner behaves as a keyboard, it can help to set the hardware keyboard layout to US English. This isn’t usually required for numeric-only barcodes, which are recommended, but it may help resolve some issues.