If you don’t already have a PayPal account, you’ll need to set one up to start using PayPal Payments on your WooCommerce store. Setting up a PayPal Sandbox account is also recommended if you are testing your integration.
Setting Up a PayPal Account
↑ Back to topYou can create a PayPal account in advance, or skip these steps and proceed to the PayPal Payments account setup.
- Create a PayPal Business Account:
- Visit PayPal’s Sign-Up Page and select Sign Up.
- Choose Business Account (required for WooCommerce transactions).
- Fill out the required details including business information, email, and financial data.
- Complete the sign-up process and verify your email address.
- Link Your Bank Account or Credit Card:
- To enable payment processing, you will need to link your PayPal account to a bank account or credit card. Follow PayPal’s instructions for verification.
- Verify Your PayPal Account:
- Once you’ve linked your financial information, PayPal will require you to verify your account. This includes confirming your email and possibly submitting documentation to confirm your identity and business details.
PayPal Payments account setup
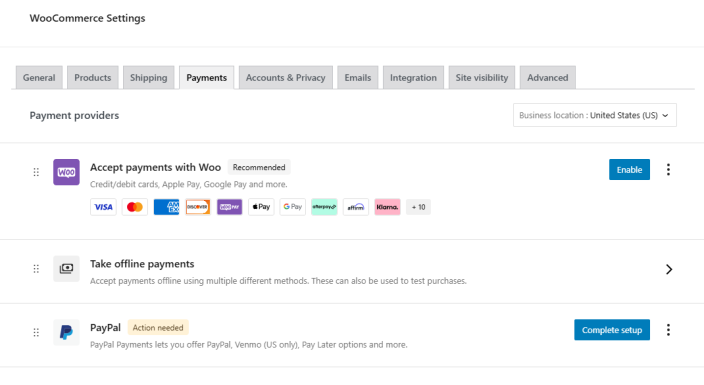
↑ Back to topTo start the account setup, navigate to the WooCommerce Settings > Payments section and click Enable or Complete setup next to PayPal.
You can start the onboarding process once you navigate to the PayPal Welcome page.
Onboarding
↑ Back to topOnboarding is the process of connecting your PayPal account to WooCommerce. You can either do this automatically or manually. Here’s a breakdown of the onboarding steps:
Automatic Onboarding
↑ Back to top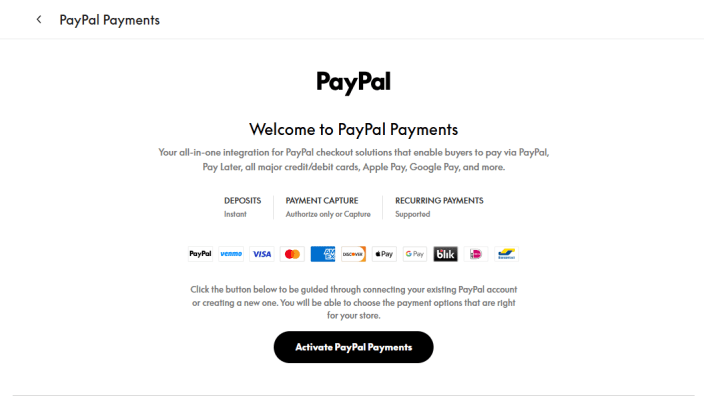
- On the Welcome page, click the “Activate PayPal Payments” button to begin the setup process.
- Clicking the button will take you through a brief setup wizard to automatically configure PayPal for your needs.
Choose Your Account Type

- Set up your account type: You will be prompted to choose between Business and Personal, depending on your PayPal account type.
- Note: PayPal supports personal seller accounts (listed as “Casual” here) only in some regions
Recommendation: If you’re running a WooCommerce store, we recommend selecting the Business Account option to unlock features like advanced payment processing, invoicing, and other business-specific tools.
- Continue to the Next Step: After selecting the appropriate account type, click Continue to proceed.
Select product types

- Tell PayPal About the Products You Sell: Choose the types of products you sell to help tailor the setup. You can select from:
- Virtual Products: Services, downloadable items, bookings, or deposits.
- Physical Goods: Items that require shipping.
- Subscriptions: If you sell subscription-based products, enable the Subscriptions option (note that this requires WooCommerce Subscriptions to be enabled).
- Continue to the Next Step: Once you’ve selected your product types, click Continue.
Choose checkout options

Depending on the previous selections and your WooCommerce store configuration, PayPal may prompt you to add Expanded Checkout for more ways to pay
- Expanded Checkout Features require additional application to unlock
- Continue to the Next Step: After selecting your desired options, click Continue to proceed to the final step.
Connect Your PayPal Account

- Log in to PayPal: You will now be prompted to log in to your existing PayPal account or create a new one if you don’t have an account yet. PayPal will guide you through the process of creating a new account if necessary.
- Complete the Setup: Once you’ve logged into your PayPal account, click Connect to PayPal to finalize the setup and connect your PayPal account to WooCommerce.
- Return to the Store: After the PayPal window closed, the PayPal Payments settings will reload and display the Overview with Things to do next.
That’s it! You have successfully connected your PayPal account to PayPal Payments!
Testing with PayPal sandbox
↑ Back to topSet up Sandbox Option
This allows you to test PayPal payments in a safe environment before going live with your store. You can either enable Sandbox Mode and use the connection wizard, or manually connect using a the Client ID, and Secret Key of your manually created PayPal Sandbox REST application.
Creating A PayPal Sandbox account:
- Visit https://developer.paypal.com
- Log in using your PayPal account credentials
- Navigate to Dashboard -> Developer Dashboard -> Sandbox Account -> Create Account
- Either use the existing pre-generated business account or create a new business or personal account
- For the Sandbox account you would like to use, click the email address or … and select View/Edit Account
- Note the email address and password for the account to use with the onboarding process
- While here, create a second business or personal account and note down these login details as well to use as the buyer when testing the PayPal payment process
Instructions:
- Optional step: Go through the onboarding wizard if you want the plugin’s default configuration after connecting to reflect your choices for e.g. Credit Card for subscription features:
- Choose your PayPal account type (Business or Personal).
- Select product types (e.g., Physical, Virtual, Subscriptions).
- Review checkout options.
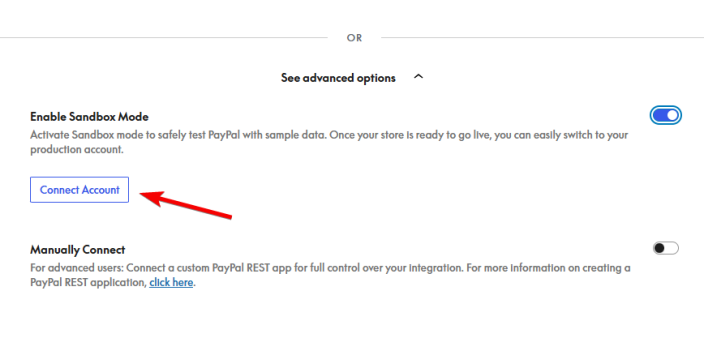
- Navigate back to the Welcome screen and scroll down to “See advanced options“.
- Enable Sandbox Mode:
- To test PayPal transactions using sample data, turn on Sandbox Mode in the “Advanced Options” dropdown. This allows you to test payments without real transactions. You can safely try out the entire payment process and switch back to live mode once you’re ready.
- After enabling, click Connect Account to link your PayPal sandbox account.
Manual Onboarding with Client ID and Secret Key
↑ Back to topIf connecting with the onboarding process is not possible (e.g., due to a lack of login credentials), the PayPal account can also be connected with manually created API credentials. On the Welcome page, click on See advanced options to access the Manually Connect option.
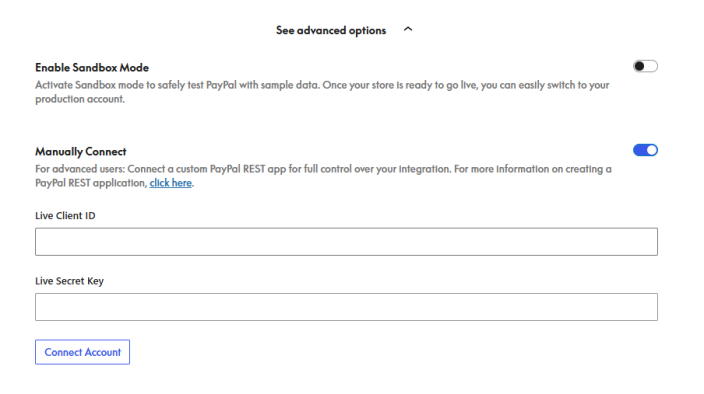
- Provide your Client ID and Secret Key in the respective fields.
- Once entered, click Connect Account to establish the connection.
Note: The “See advanced options” section is only available on the Welcome page (the first step, where the “Activate PayPal Payments” button appears). If you have already proceeded through the onboarding wizard and are now on the “Complete Your Payment Setup” screen (showing only the “Connect to PayPal” button), you will not see the advanced options from there.
To access the manual connection option from that screen, use the Back button in the navigation panel to return to the Welcome page, then scroll down past the “Activate PayPal Payments” button and the documentation section until you see the “See advanced options” link.
Obtaining the Client ID and Secret Key
↑ Back to topThe Client ID and Secret Key can only be obtained from the PayPal Developer website.
- Visit the PayPal developer dashboard: https://developer.paypal.com/
- Log in with your PayPal account. Every PayPal account is automatically a PayPal developer account with access to this site.
- In the top left corner, click Apps & Credentials. Choose between creating a Sandbox or a Live app from this page before clicking Create App.
- Fill in your desired name for the new app (e.g. ppcp-manual-app) and click Create App. Sandbox apps may need to be assigned to a specific Sandbox account on this page.
- On the next page, PayPal displays the account email address, Client ID, and Secret Key.
Disconnecting or Starting Over
↑ Back to topIf you need to restart the connection process, you can disconnect your PayPal account from the WooCommerce PayPal Payments plugin.
To disconnect:
- Navigate to WooCommerce > Settings > Payments > PayPal.
- Navigate to the Settings tab.
- Click Disconnect next to your connection status.
- A confirmation window will appear with two options:
- Disconnect only (default): Removes the PayPal connection credentials but preserves all plugin settings (payment methods, checkout options, etc.). Use this if you want to reconnect a different account without losing your configuration.
- Start over: Toggle this option on to also reset the plugin to its initial state and restart the connection wizard. This is destructive and cannot be undone — all plugin settings will be cleared.
Warning: Disconnecting with “Start over” enabled will erase your current connection and reset plugin settings to the factory default, requiring a full reconfiguration.
