The thank you page, also referred to as the purchase confirmation page, is an often-neglected part of many ecommerce websites. Since its primary function is to let customers know that their purchase was successful, store owners sometimes pay little attention as long as it displays a success message of some sort.
But the thank you page can provide much more value for you and your customers if you spend some time optimizing it.

Why customize your WooCommerce thank you page?
↑ Back to topEven though your thank you page may seem like a small part of your site, every point in the customer journey is a chance to provide the shopper with more value and increase revenue for your store. Studies have shown that it’s much less expensive to retain existing customers than it is to find new ones. If someone arrives at your thank you page, it means they’ve already made a purchase. And since they’re already more likely to make another one, this is a great opportunity to guide them in that direction. All it costs is a little effort up front and this new improvement to your store will go to work for you each and every day.
Also, the thank you page is a safe place for you to display offers to your customers instead of sending them in transactional emails, where you may want to limit the amount of promotional content.
Here are some ways to use custom thank you pages to improve your store:
- Include important information related to the order. Add a delivery time estimate so customers have an idea of when they will receive their order. Or include links to product guides, onboarding videos, FAQs, or other support documents. This will help manage expectations, provide needed information, and reduce support tickets.
- Share special offers. Include coupons that customers can use on their next order and suggest related products or affiliate products.
- Remind customers of loyalty points, rewards, or subscription status. With WooCommerce Points and Rewards, customers can earn points for purchases, account signups, and reviews. The thank you page is a great place to remind them of the points they’ve earned, how close they are to redemption, and ways to earn more. If you sell subscriptions or memberships, the thank you page presents a great opportunity to suggest plan upgrades or remind customers if their recurring payment method is about to expire.
There are a few different ways you can customize your thank you page. Manual methods include coding a custom page template, using WooCommerce hooks via your theme’s functions.php file, and adding custom styles to your child theme’s stylesheet. If you’re not comfortable with coding, you can use a plugin that lets you customize your thank you page.
The default WooCommerce thank you page
↑ Back to topThe style of your thank you page may differ based on the theme you have installed. It may even use custom thank you pages already. However, what you see below is the default content included with styles applied from the Sinatra theme:
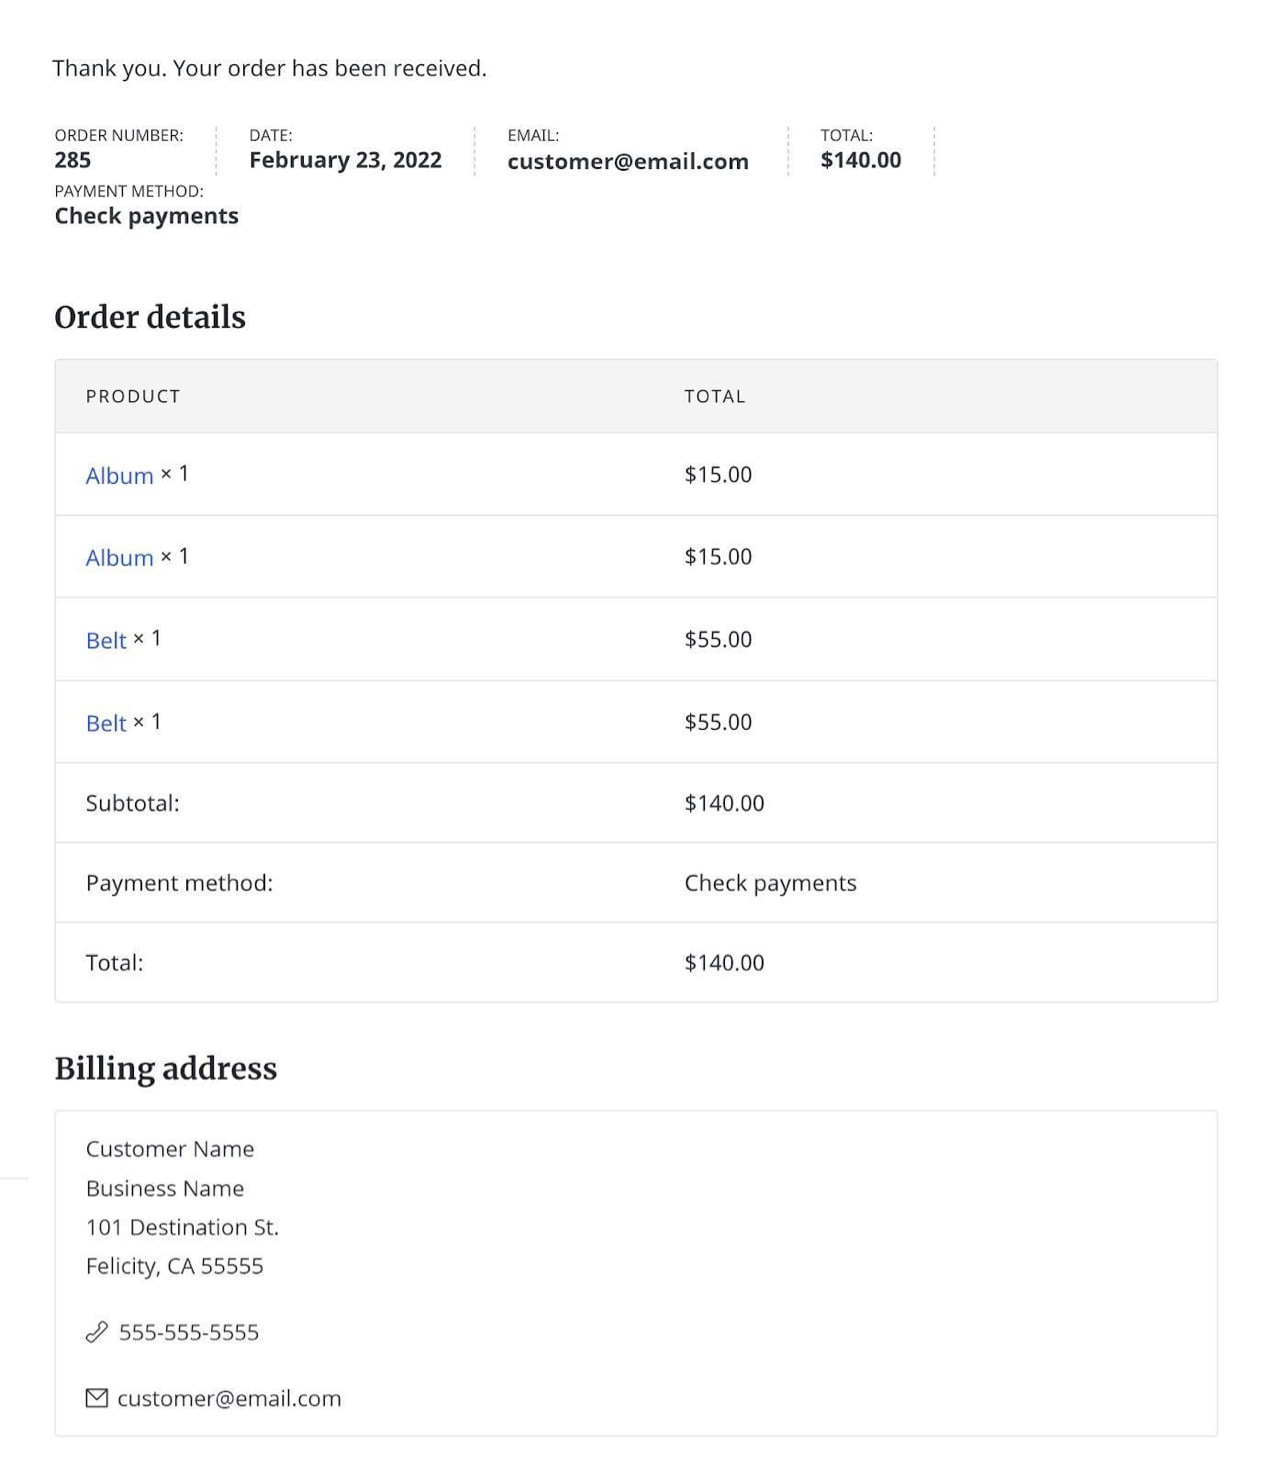
As you can see, the content is relatively basic. The order number, date, customer email, total, payment method, products purchased, and billing information are included by default. Let’s explore some ways we can add some basic customizations to improve the thank you page.
Using an extension to customize your WooCommerce thank you page
↑ Back to topIf the process of manually customizing your thank you page seems tedious, or you’re simply not comfortable digging into code, there are extensions that can do the heavy lifting of creating custom thank you pages for you.
The Custom Thank You Pages extension lets you create multiple thank you pages that display conditionally based on the products that were purchased. These custom thank you pages can display unique titles and descriptions, billing and shipping information, cross-sells, up-sells, and anything else that you might want to add. Since these are actual pages and not dynamically generated, you can add any WooCommerce or theme shortcodes, embed video, and add custom text.
Just create and format your thank you pages and choose which one you want to display in the Product data section for each product.
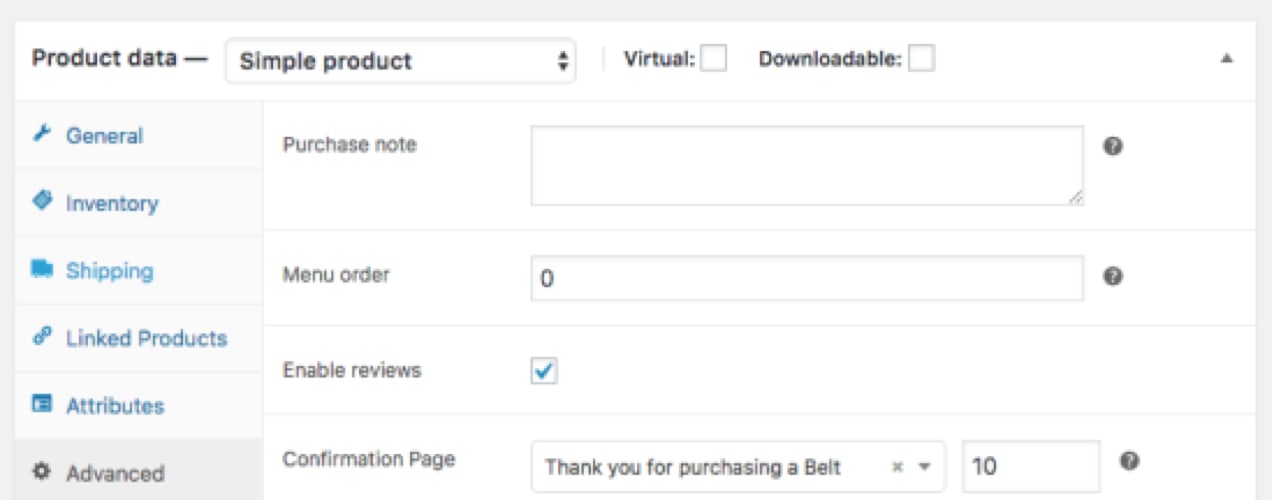
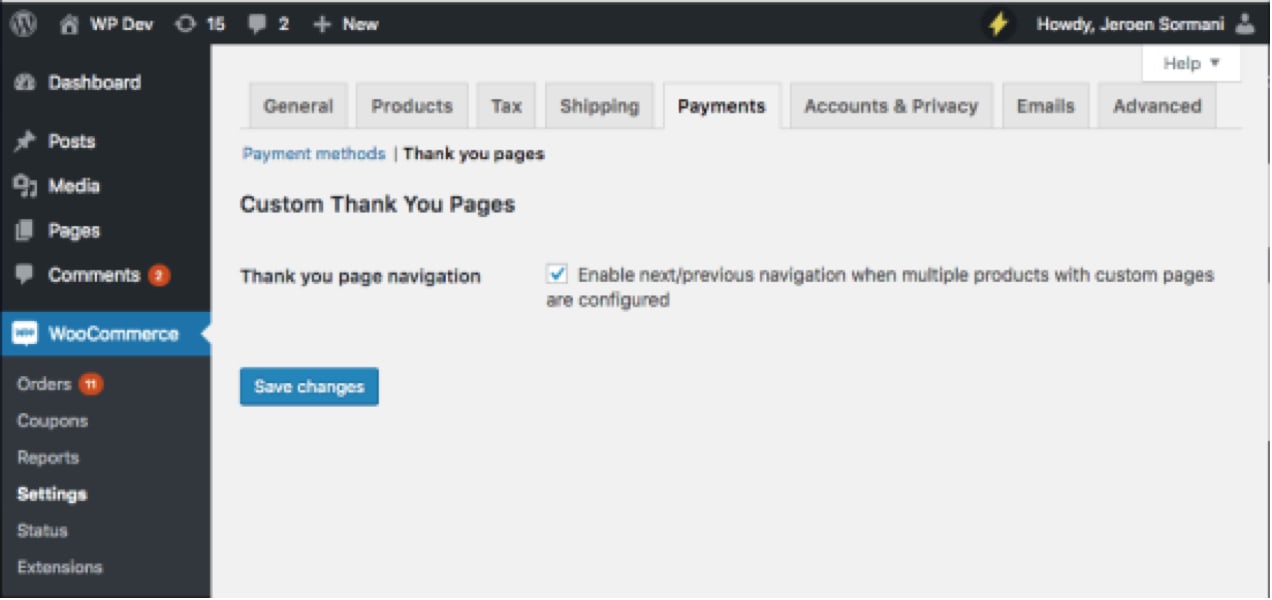
You can even show multiple thank you pages for a single product or opt for a single thank you page that displays based on priority. If a customer buys multiple products in an order that each have their own thank you page assigned to them, the page with the lowest priority number will be the one that displays.
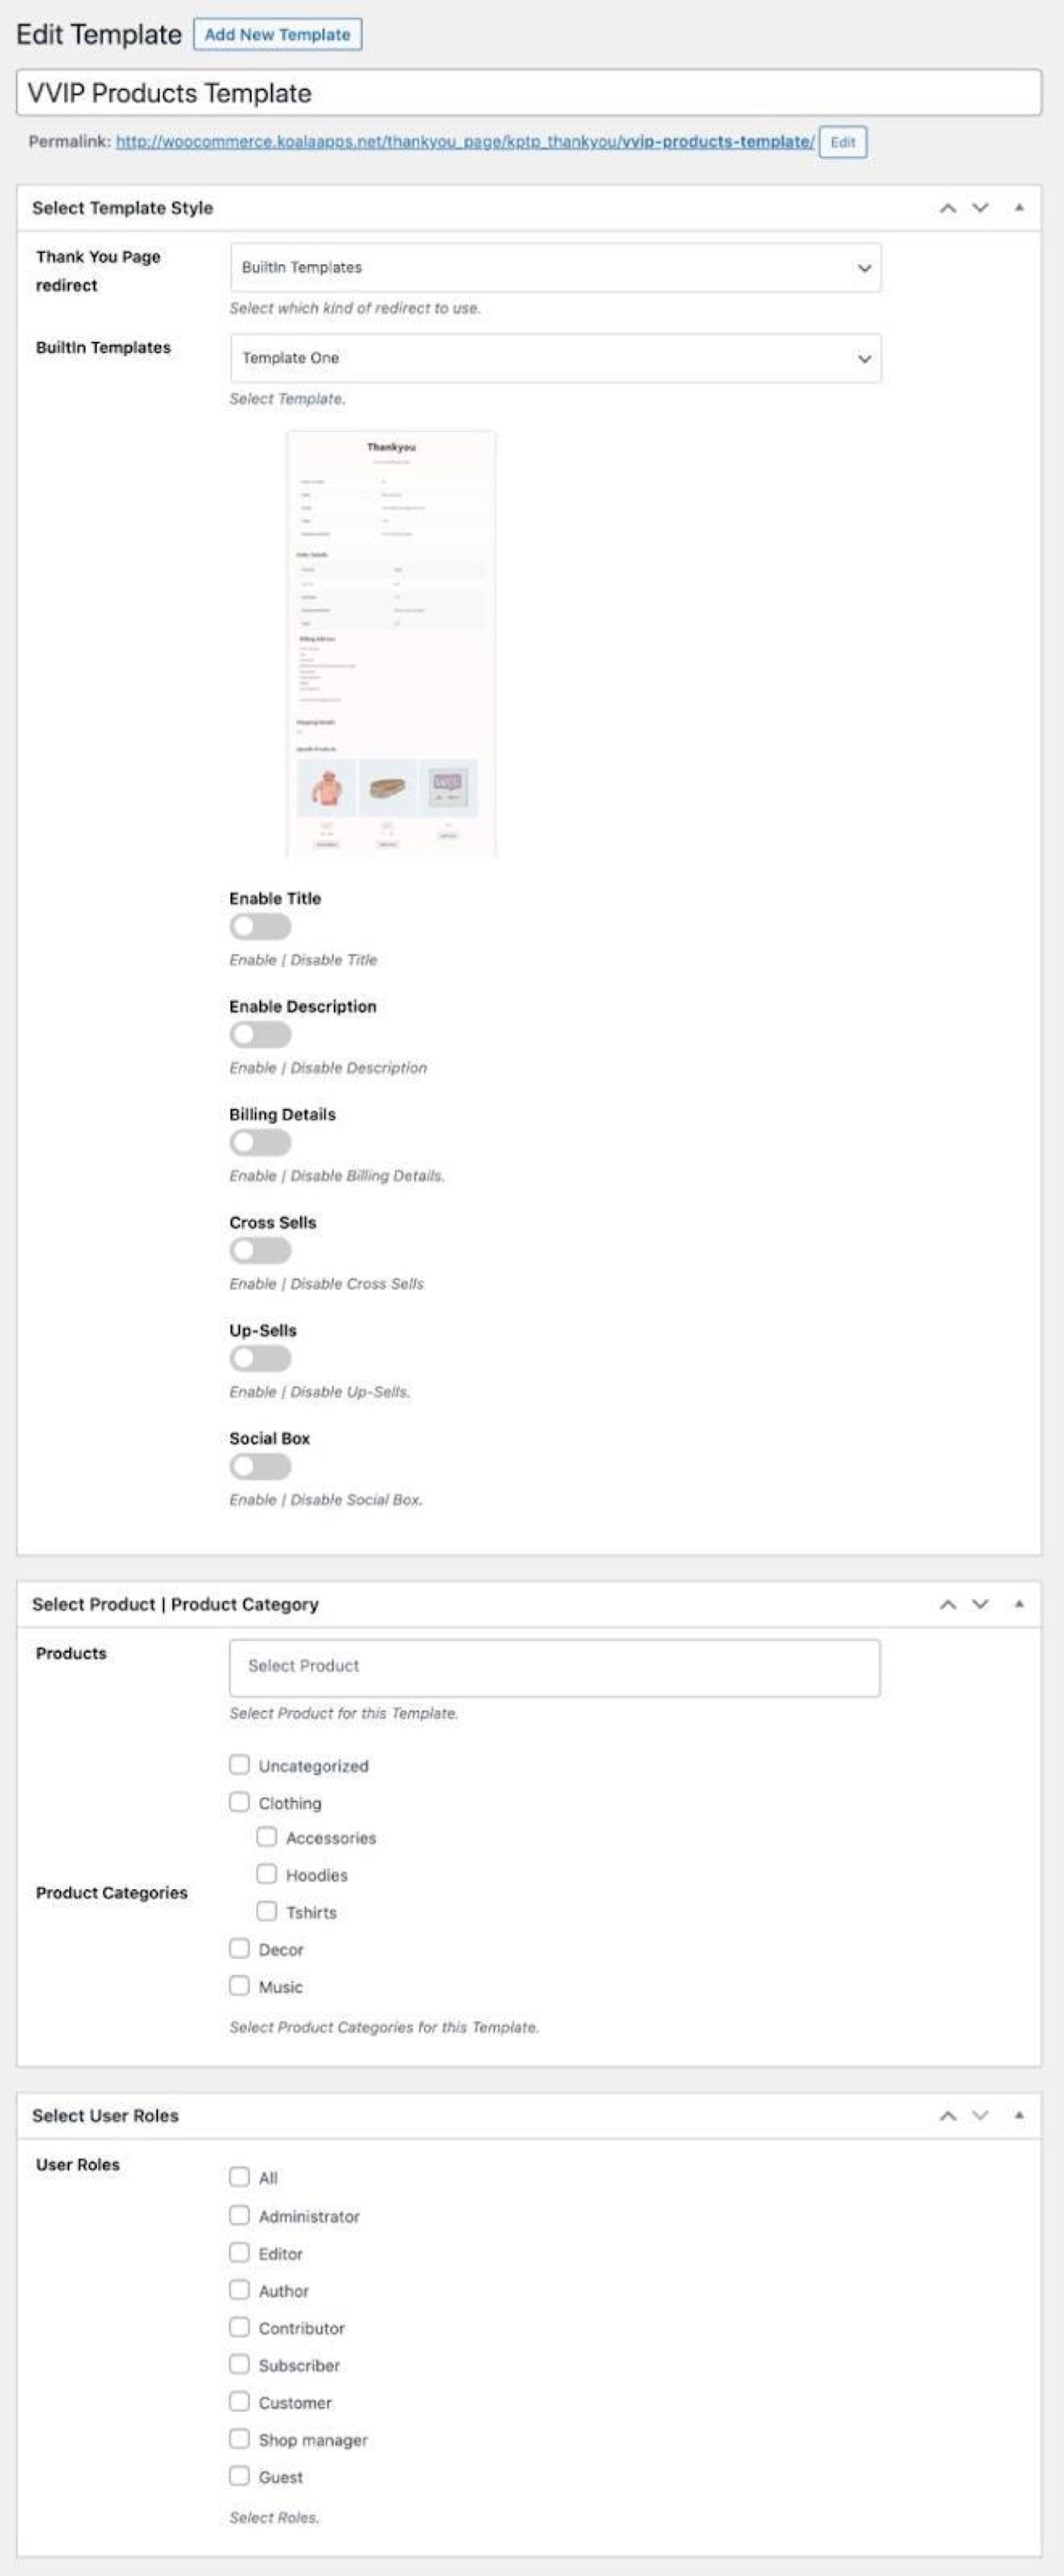
Another option for creating custom thank you pages is the Custom Thank You and Success Pages extension. It has similar features to the Custom Thank You Pages extension but also has the capability of displaying thank you pages based on user role or categories and showing built-in social sharing buttons.
Create a custom WooCommerce thank you page manually
↑ Back to topIn this section, we’ll discuss three different ways to manually customize your WooCommerce thank you page.
Before you get started, make sure you’re using a child theme instead of a parent theme. Do not directly overwrite files in WooCommerce or your parent theme as these files will be overwritten in future updates.
Note: If you’re unfamiliar with code and resolving potential conflicts, select a Woo Partner or Developer for assistance. We’re unable to provide support for customizations under our Support Policy.
How to code a WooCommerce thank you page template
Step 1: Download the thankyou.php page template file
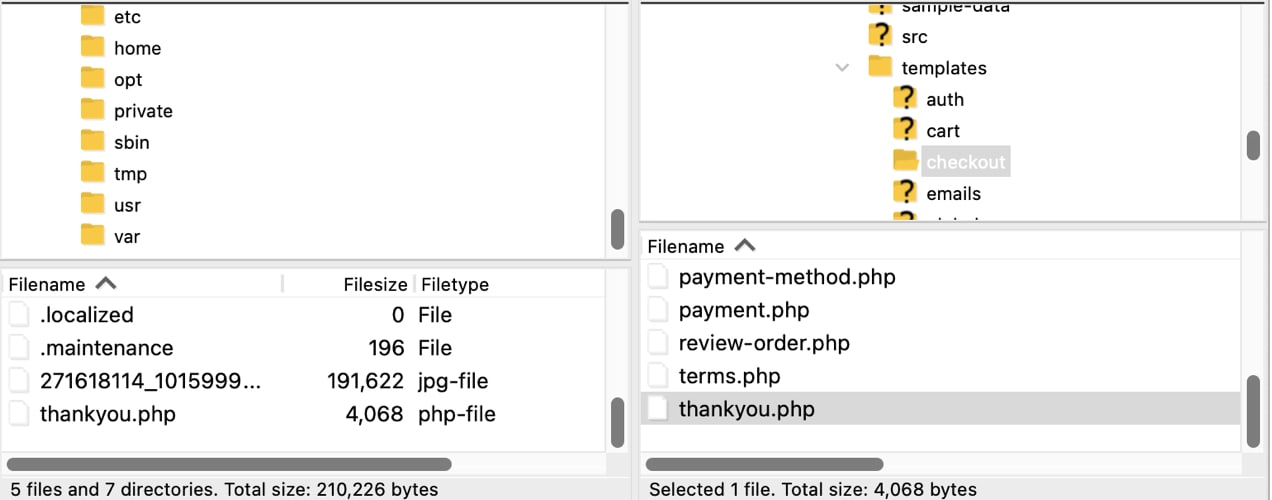
Use an SFTP client or your host’s cPanel to access your site’s files and navigate to wp-content/plugins/woocommerce/templates/checkout. Download the file thankyou.php to your local machine.
Step 2: Edit the thankyou.php file with your custom code
Open thankyou.php in your text editing software of choice. You can use Notepad (Windows) or TextEdit (Mac), but make sure you’re editing in plain text mode. Better still, use a free text editing software designed specifically for coding like Visual Studio Code. Visual Studio Code is a cross-platform text editor available for Windows, Mac OS, and Linux operating systems.
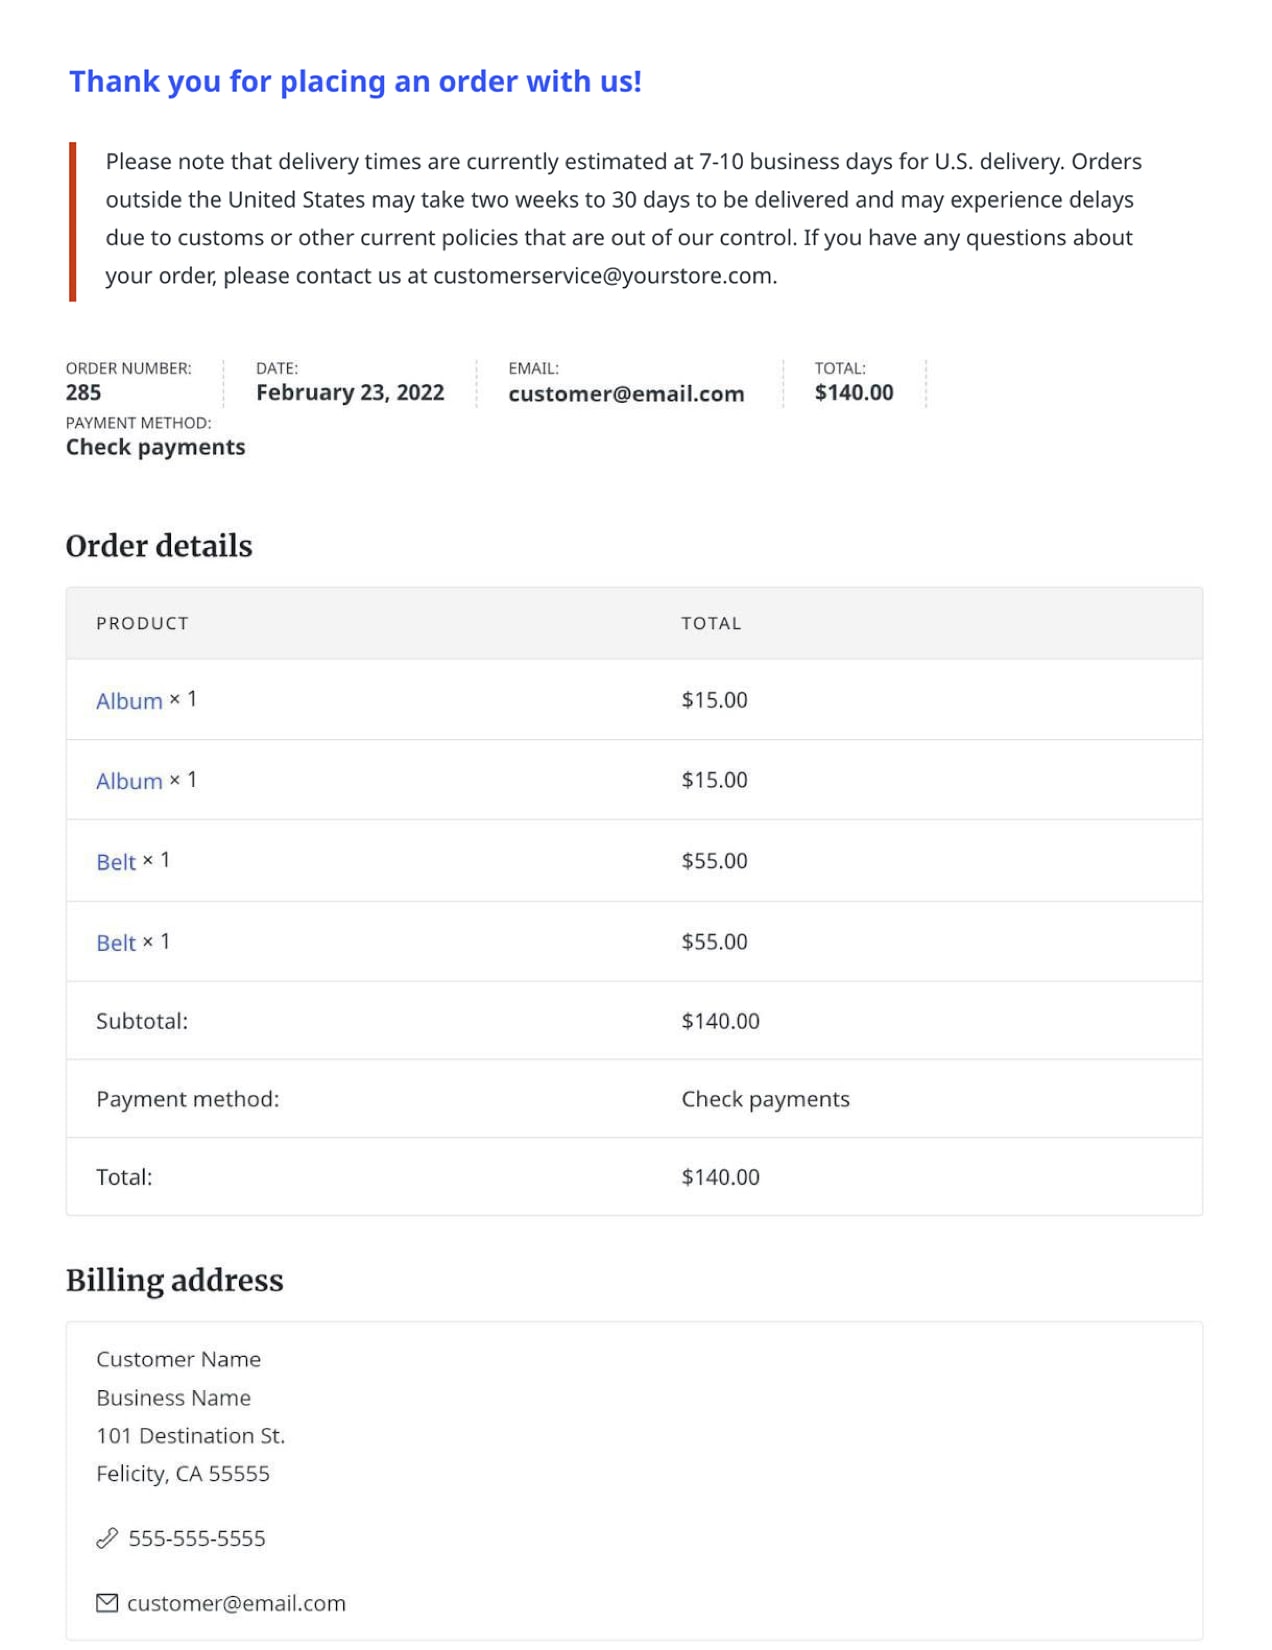
For this example, we’ll change the text “Thank you. Your order has been received.” to “Thank you for placing an order with us!” We’ll also add some information about shipping and make some style changes to visually call attention to this important information.
Original code:
This is the default code that we’ll be editing in the child theme template.
<p class="woocommerce-notice woocommerce-notice–success woocommerce-thankyou-order-received"><?php echo apply_filters( 'woocommerce_thankyou_order_received_text', esc_html__( 'Thank you. Your order has been received.', 'woocommerce' ), $order ); // phpcs:ignore WordPress.Security.EscapeOutput.OutputNotEscaped ?></p>Replacement code:
This is the code we’ll be using in our new custom thank you page.
<p class="woocommerce-notice woocommerce-notice–success woocommerce-thankyou-order-received"><?php echo apply_filters( 'woocommerce_thankyou_order_received_text', esc_html__( 'Thank you for placing an order with us!', 'woocommerce' ), $order ); // phpcs:ignore WordPress.Security.EscapeOutput.OutputNotEscaped ?></p>

<p class="thankyou-note”> Please note that delivery times are currently estimated at 7-10 business days for U.S. delivery. Orders outside the United States may take two weeks to 30 days to be delivered and may experience delays due to customs or other current policies that are out of our control. If you have any questions about your order, please contact us at customerservice@yourstore.com.</p>
After making these changes, save your file with the same name, thankyou.php. In your SFTP application or cPanel, navigate to wp-content/themes/your-child-theme. In your child theme folder, you’ll create two new folders. First, create a folder named woocommerce. In the woocommerce folder create a folder called checkout.
Now upload your modified thankyou.php file to the child theme’s woocommerce/checkout folder.
CSS customizations
Note that we’ve added a new p class called .thankyou-note. In our child theme’s style.css file, we’re going to add some customizations to the already existing p.woocommerce-notice class and add styles to the new p.thankyou-note class as follows:
.woocommerce-checkout p.woocommerce-notice {

    font-size: 20px;

    font-weight: 800;

    color: #3857F1;

}

.woocommerce-checkout p.thankyou-note {

    margin-bottom: 40px;

    padding: 0 0 5px 20px;

    border-left: solid 5px #c4401c;

}
Save your style sheet and re-upload it with these customizations to your child theme folder.
You should now have a thank you page that looks like this:
Customizing the WooCommerce thank you page template with hooks
You can also use WooCommerce hooks in your child theme’s functions.php file to add or remove content from your thank you page. If you’re unfamiliar with WooCommerce hooks, review the WooCommerce documentation. For a complete list, check out the WooCommerce Action and Filter Hook Reference page.
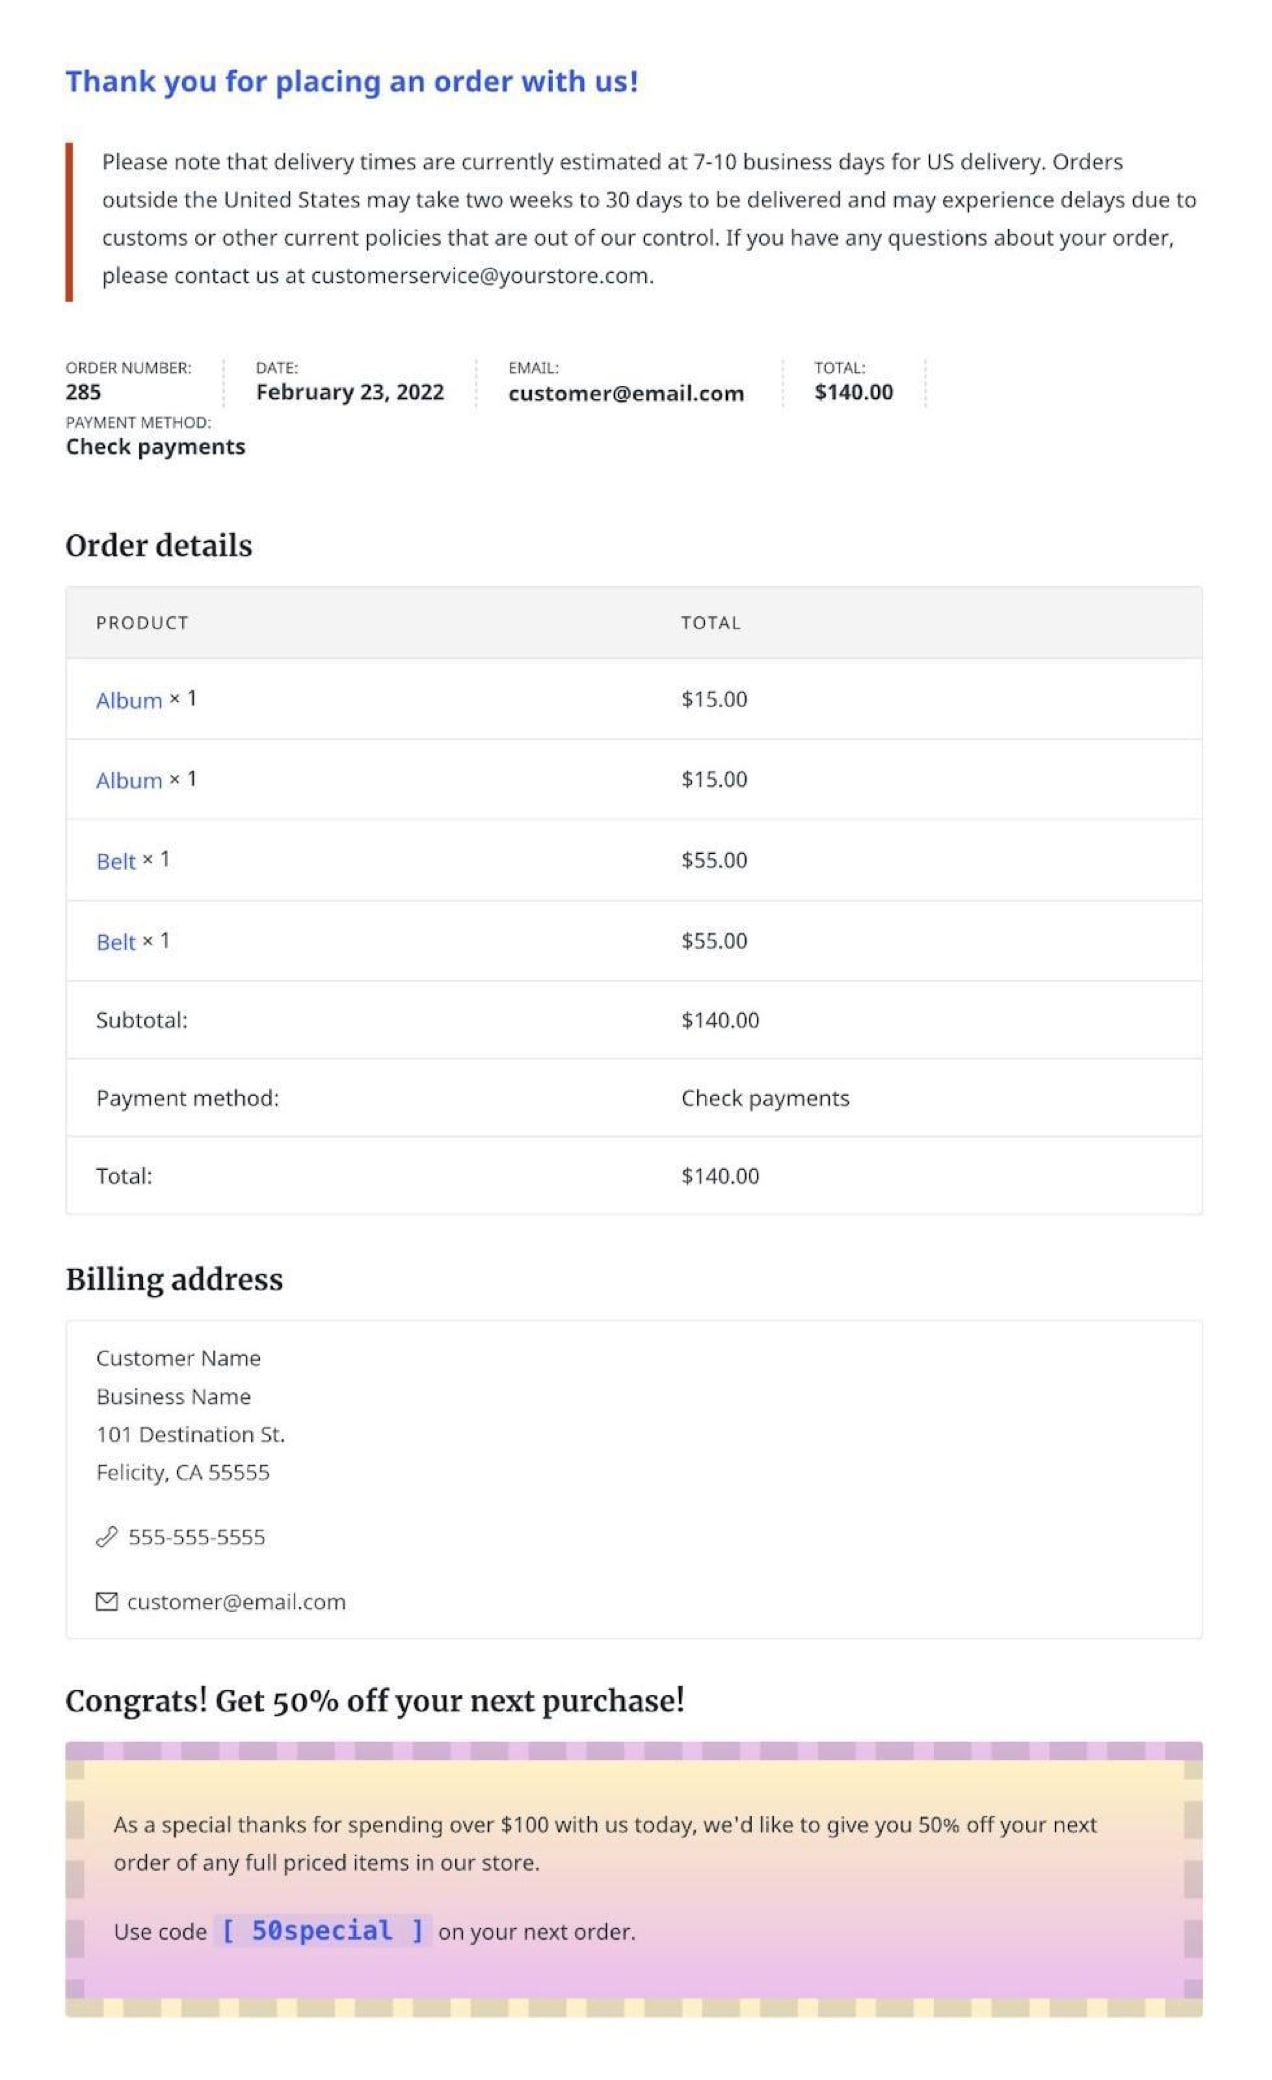
For this example, we’ll use a hook to add a special coupon for orders over $100 that will appear below the billing address section.
In our child theme’s functions.php file, we’ll add the following code:
add_action( 'woocommerce_thankyou', 'coupon_thankyou', 10, 2 );
function coupon_thankyou( $order_id ) {
$order = wc_get_order( $order_id );
$total=0;
foreach ( $order->get_items() as $item_key => $item ) {
$item_data = $item->get_data();
$item_total = intval( $item_data[‘total’] );
$total += $item_total;
}
if ( $total>100 ) {
echo "<section class='woocommerce-thankyou-coupon'><h2 class='woocommerce-column__title'>Congrats! Get 50% off your next purchase!</h2><div class='tybox'><p>As a special thanks for spending over $100 with us today, we’d like to give you 50% off your next order of any full priced items in our store.</p><p>Use code <code class='tycoupon'>[ 50special ]</code> on your next order.</p></div></section>";
}
}Save your changes and upload the revised file to your child theme folder.
CSS customizations
Note that we’ve added some new CSS classes in the above action — section class .woocommerce-thankyou-coupon, a div class called .tybox, and a code class called .tycoupon. Since this is a special coupon, we want to call attention to it and add unique styles that help it stand out from the rest of the thank you page. We’ll add these styles to the new custom classes in the child theme style.css file as follows:
.woocommerce .woocommerce-thankyou-coupon div.tybox {

    border: dashed 13px;

    border-radius: 3px;

    border-color: rgba(110,110,110,.2);

    padding: 12px 20px;

    background: rgb(176,34,195);

    background: linear-gradient(0deg, rgba(176,34,195,0.30) 0%, rgba(253,214,45,0.30) 100%);

}

.woocommerce .woocommerce-thankyou-coupon {

margin-bottom: 2em;

}

code.tycoupon {

    font-size: 18px;

    font-weight: 800;

}
Re-upload the child theme style sheet with these customizations to your child theme folder. The result should now look like this:
In need of some help customizing your WooCommerce store? Get in touch with a Woo Partner! Fully vetted by our team, Woo Partners are trusted specialists in all things Woo. Find a Woo Partner.
No matter which method you decide to use to customize your WooCommerce thank you page, you should take the time to develop a strategy that provides the best return on your efforts. Depending on the type of business you’re running, you may focus on rewards or loyalty points, coupons, or detailed onboarding information.
While custom thank you pages are just one part of the bigger puzzle that is growing your business, they’re a unique opportunity to provide helpful information and targeted marketing messages that both save and make you money.
Discover more ways to customize your WooCommerce store.
About


