Amazon for WooCommerce is a powerful tool that allows you to effortlessly connect your WooCommerce store with the largest e-commerce platform i.e. Amazon. Using the tool, you can streamline your entire selling process across platforms and maximize your reach to millions of potential customers.
This comprehensive solution offers seamless inventory syncing, centralized order management, bulk product uploads/ updates, and much more. You can effectively track, fulfill, and ship your Amazon orders directly from your WooCommerce dashboard, saving you valuable time and resources.
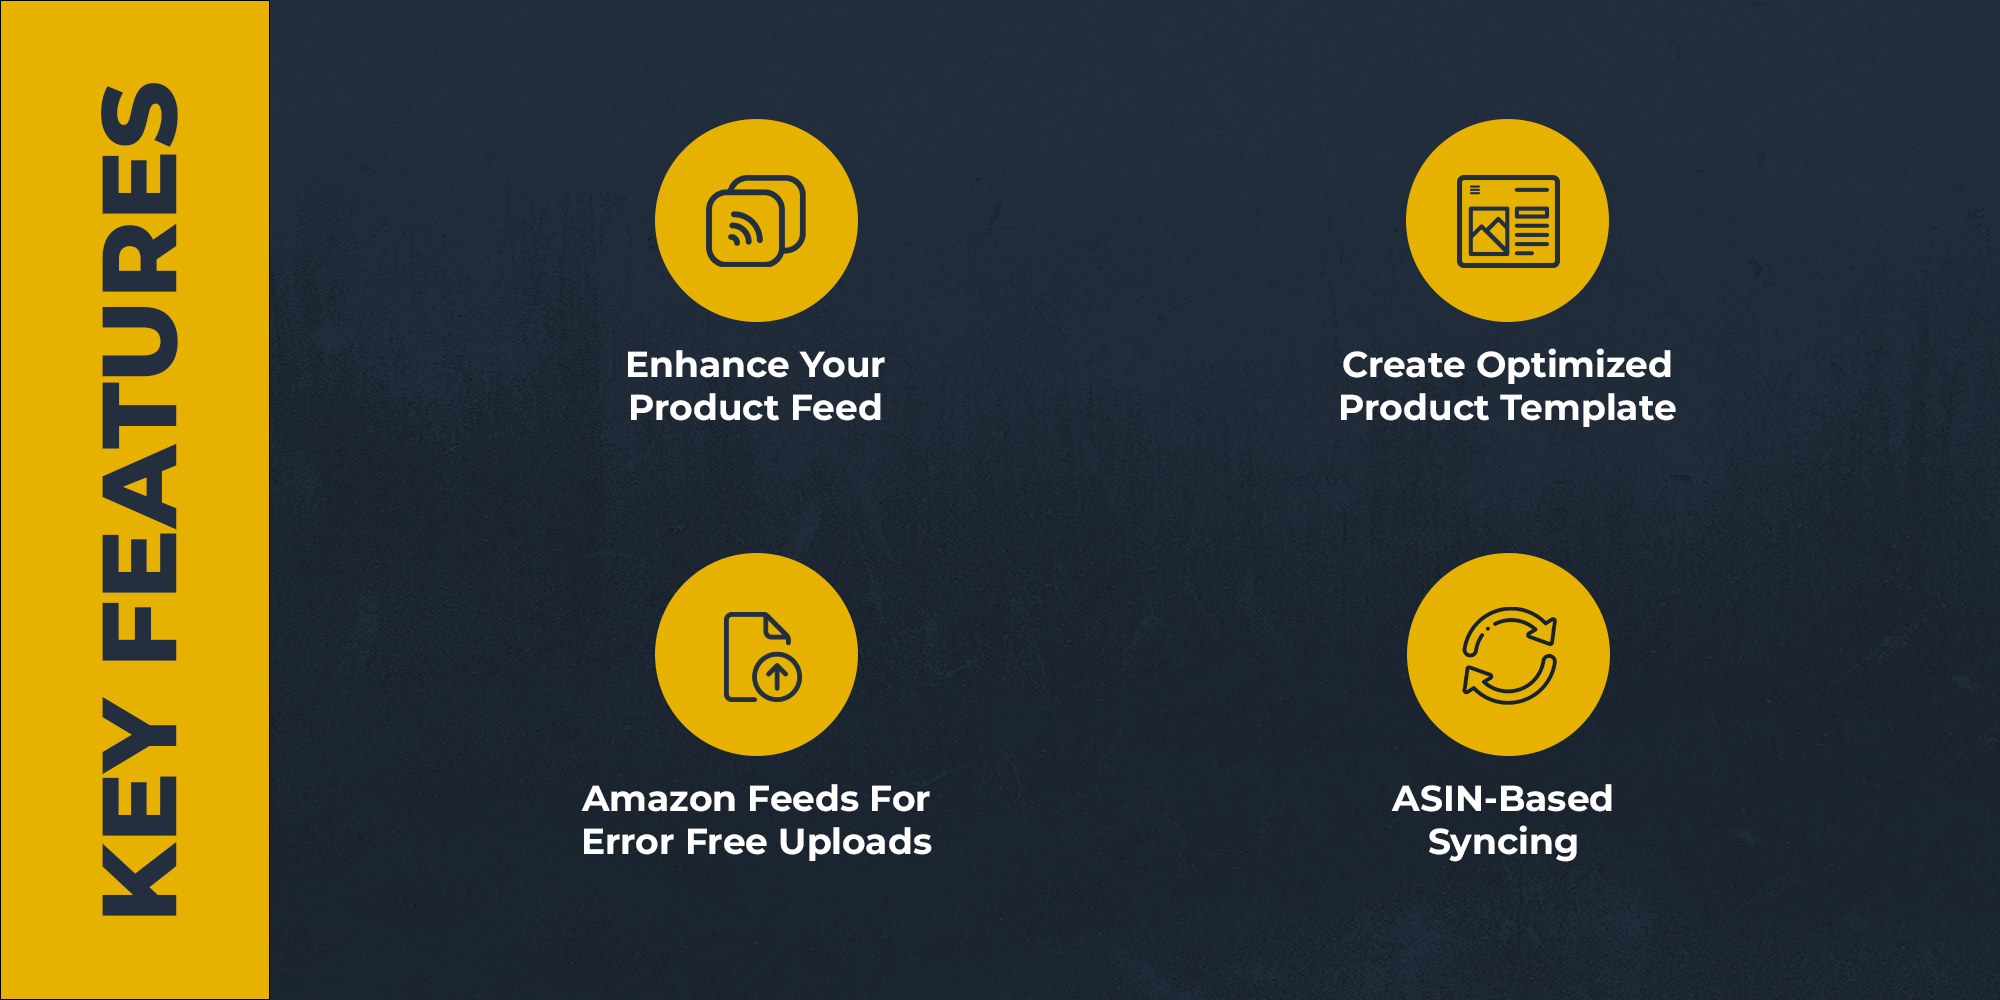
Key features of the Plugin
↑ Back to top- Enhanced product feed: Craft an optimized product data feed for your Amazon store, increase visibility, and rank high in search results.
- Create an optimized product template: Easily incorporate new Amazon-required attributes into your template, ensuring seamless product uploads without delays.
- Use Amazon feeds: Amazon feeds allow you to track the inventory status and identify the cause of product upload failures, ensuring error-free listing.
- ASIN-based syncing: The ASIN-based syncing allows a cohesive and accurate representation of your products. ASIN-based syncing also helps when you place offers on the Amazon listings of other sellers.
- Order management: Amazon for WooCommerce simplifies your order management across Amazon and WooCommerce. It automatically fetches your Amazon orders with WooCommerce using the order-sync feature.
- Flexible subscriptions: Start with a free trial. Then, after the trial, choose between monthly and annual payment options.
Getting Started with the Plugin
↑ Back to topPlugin Installation
↑ Back to top- Get your Amazon for WooCommerce plugin from the official WooCommerce store by clicking on the Free Download button.
- Next, you will be prompted to fill out the basic details for the confirmation.
- Once the details are submitted, click Pay $0.00 and you will get the option to download the plugin for free. Click Download and the plugin will be downloaded on your computer in the form of a zip file.
- Now, on your WordPress admin panel go to Plugins ➡️ Click on Add New ➡️ Click Upload ➡️ Select and upload the zip file from your computer.
- Next, Click on Install and then Activate the plugin.
Onboarding Requirements
↑ Back to topThe onboarding process for Amazon for WooCommerce guides you through connecting and configuring options and settings and ensures successful online selling. Before proceeding, please ensure the following:
- You have primary access to the Amazon Seller Central account.
- Your seller account is active and not suspended.
- An Amazon Professional account with a valid Payment Method is in use.
- You are connecting a Professional Seller Account, not Amazon Pay or any other account.
- For New Amazon Sellers-:
- For new Amazon Sellers who want to list products not already present in the Amazon catalog.
- Ensure products have Amazon-approved Brands.
- Products should have valid GTIN Exemption.
The Onboarding Process
↑ Back to topOnce the plugin installation is done, you can find the Amazon for WooCommerce plugin on your WordPress admin panel as CedCommerce under the WooCommerce tab.
Simply click on CedCommerce and you will be redirected to begin the onboarding process.

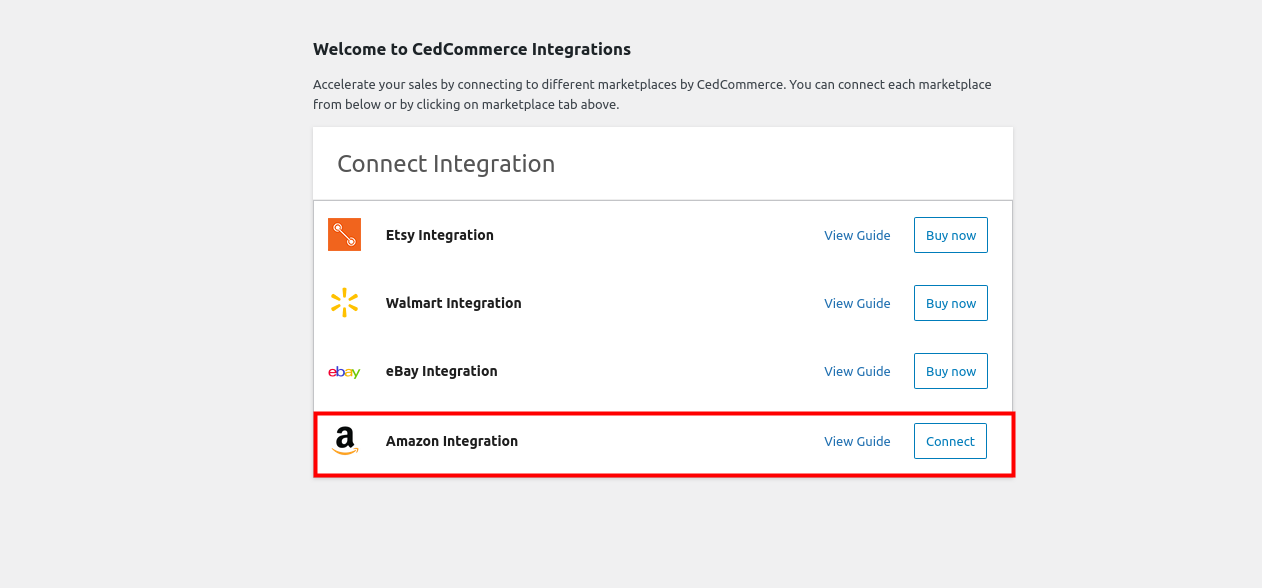
Here you have the Amazon integration option along with the Connect option.
Now you need to click on connect as highlighted in the image below and this will take you to the next page.
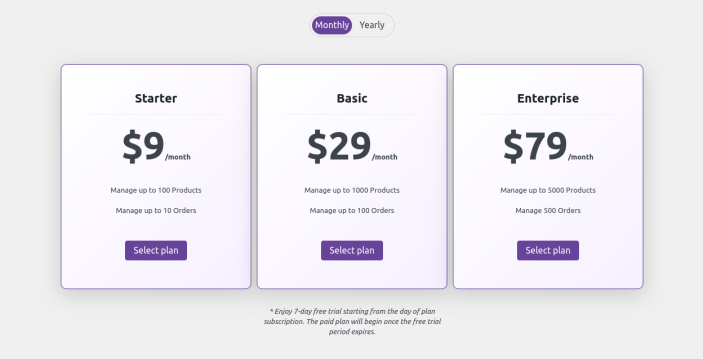
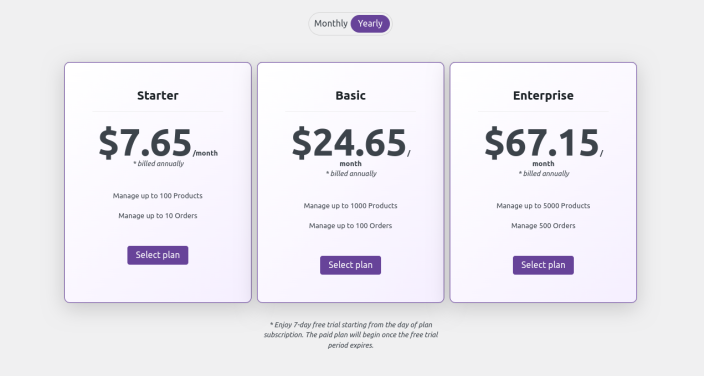
In case you haven’t selected any pricing plans yet, you’ll be redirected to the pricing page where you can select the best plan as per your business needs.
On the pricing page, you can have a look at the different plans along with their offerings. Once you have evaluated the best plan click Select plan and proceed to checkout in the next step.
Note- You will be charged only after your free trial of 7 days ends.
Monthly Pricing
Yearly Pricing
Fill up all the required details to complete the checkout process. Once the checkout is done, you will be redirected to the home page of the plugin where you can see the notification as- Plan purchased successfully.
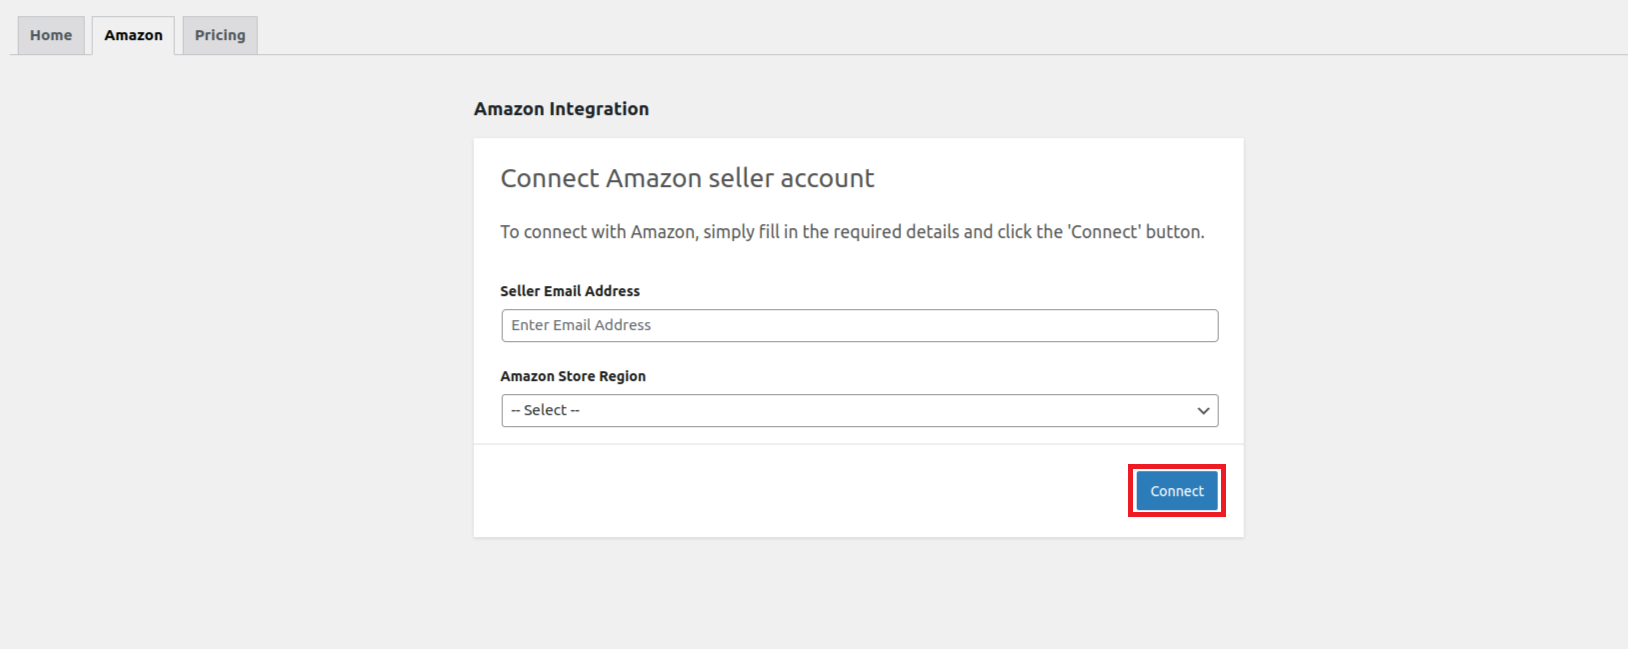
Now, again click on the Connect option as highlighted in the image below and proceed to configure your Amazon seller account with the plugin. After purchasing the plugin successfully start connecting your Amazon account.
On the next page, you need to enter the Seller Email Address and Amazon Store Region.
Simply fill in the details and click Connect.
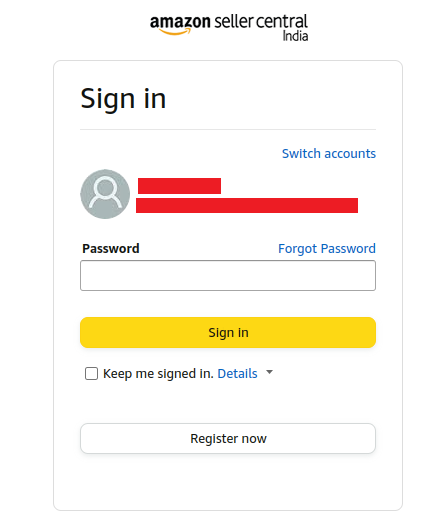
In the next step, you will have to enter the Amazon Seller Central email address and password and click Sign In to proceed.
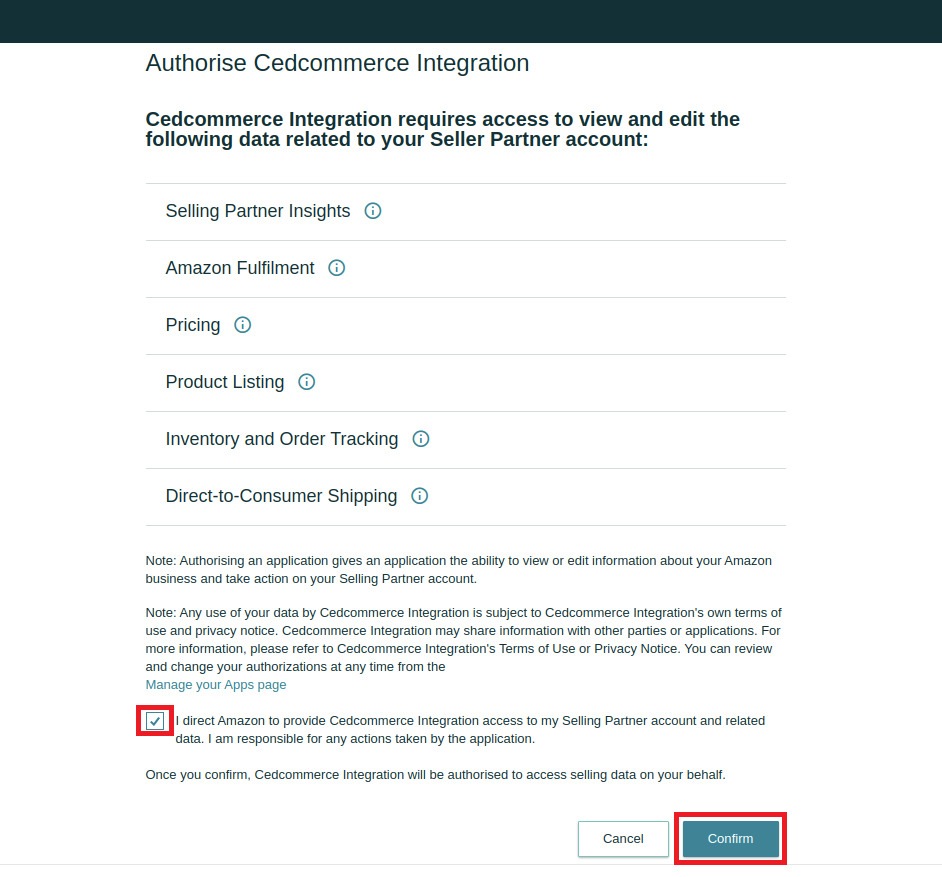
Moving ahead, you need to authorize the CedCommerce integration to view and edit data related to your Seller Partner Account.
Tick the box and click Confirm as highlighted in the image below.
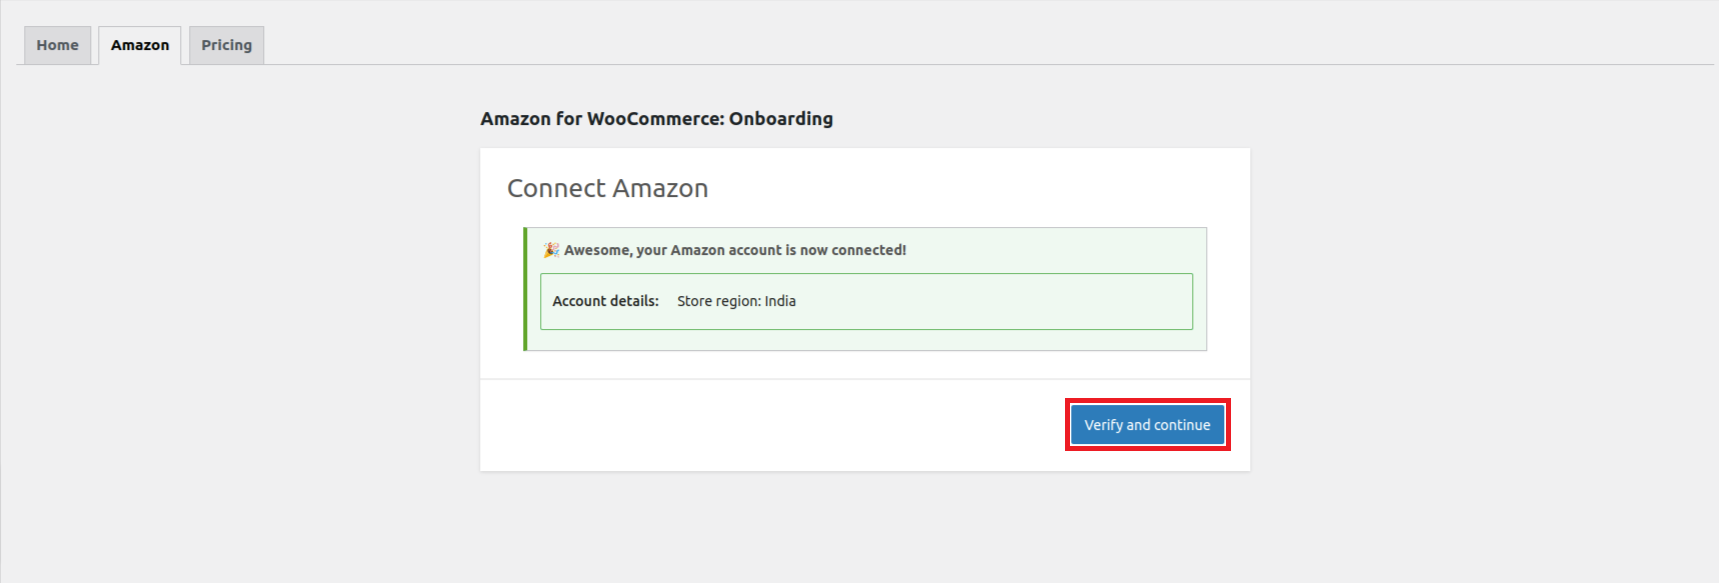
After the confirmation, you will be redirected to the page that clearly displays that your Amazon account is now connected. All you need to do is click on Verify and continue.
Click on Verify and Continue to start the validation of your Amazon account details. In case, if the onboarding fails a message will be displayed as Unable to verify you. Please try again. There might be a few reasons for this failure which can be –
- We can’t confirm the seller’s permission to operate in the selected region.
- The seller’s account is suspended.
- A valid credit card is not attached to the account.
- The seller is not the account owner and has insufficient permission to add the account.
- If none of the above, it might be possible that there is an issue with authentication on our end or an issue with Amazon APIs.
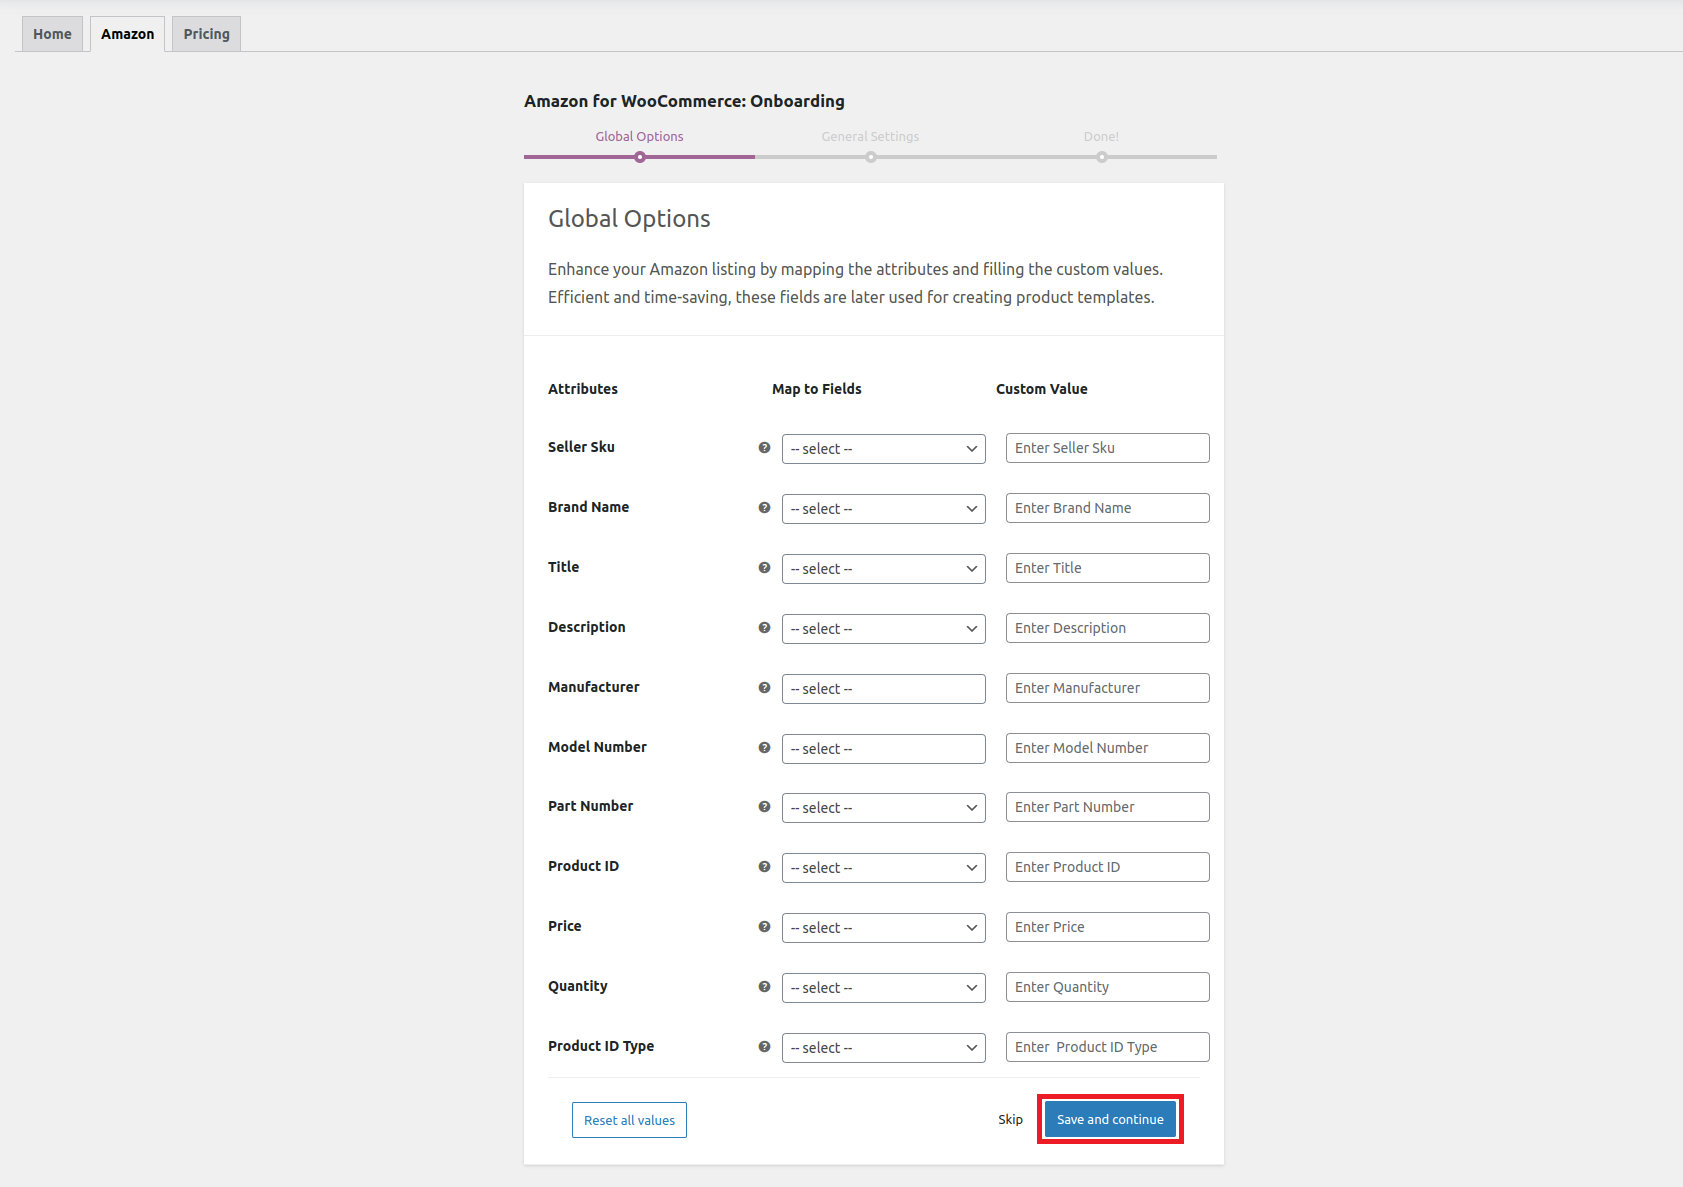
But if the onboarding is successful it will take you to the Global Options to set up Attributes, Field Mapping, and Custom values if required. The Global Options will help you save loads of time and effort while creating product templates at any later point of time.
Assign fields and enter custom values wherever required to complete the attribute mapping and proceed to click on Save and continue to finish the Global Options Settings.
Also, you can skip the section or reset all the entered values as per your preference.
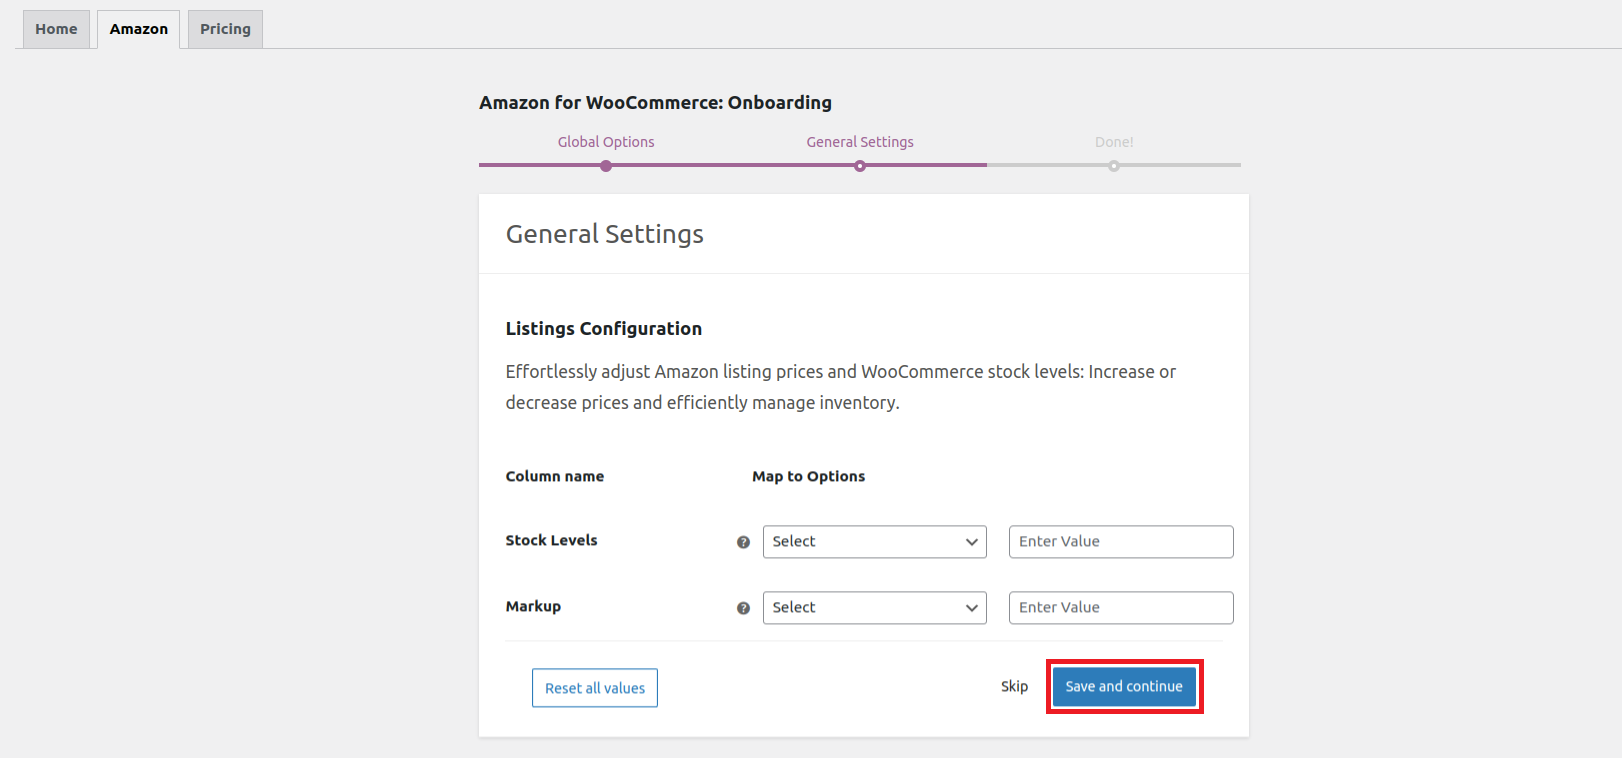
Once done with the Global Options, the next step is to complete the General Settings for Listing Configuration.
Here you need to adjust inventory stock levels and the markup prices of your listings before they get displayed on the Amazon marketplace.
Under the stock levels, you can assign the maximum stock quantity while under the markup section, you get to choose from 4 different variations of price markups which include-
- Fixed increment
- Fixed decrement
- Percentage Increment
- Percentage decrement
Once done with the selection click Save and continue to complete the onboarding process. Also, you can skip the section or reset all the entered values as per your preference.
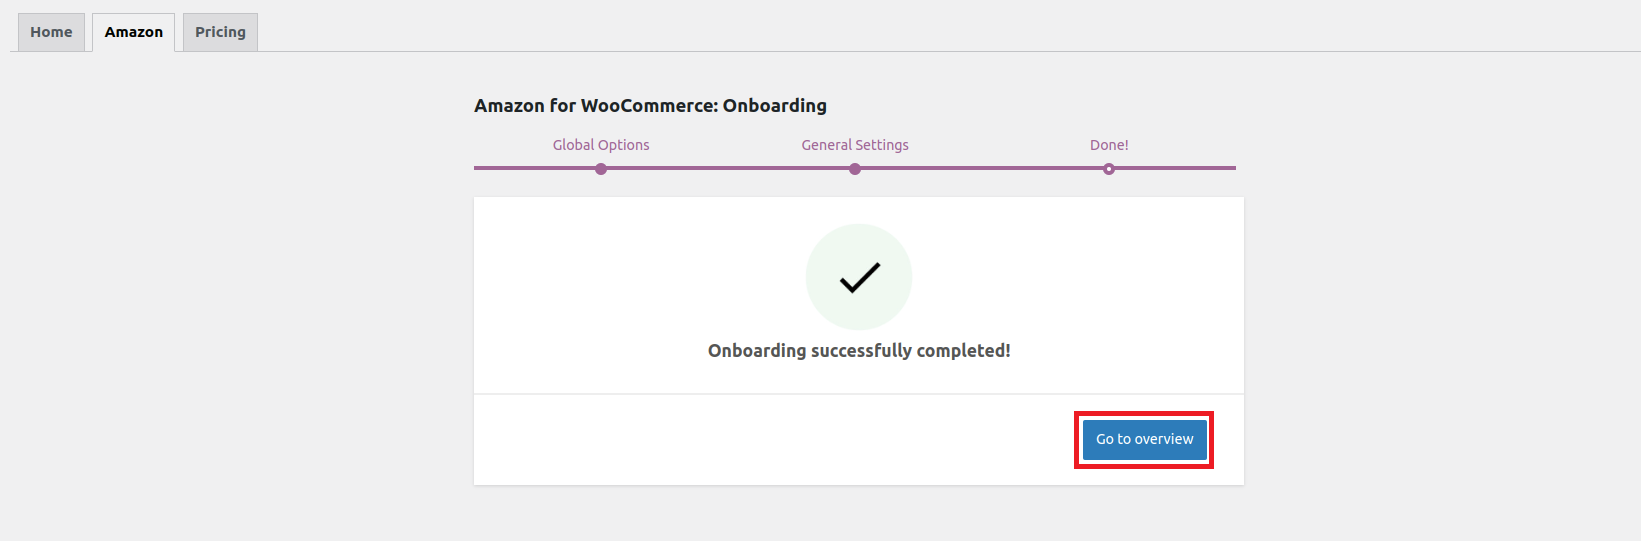
The successful completion of the onboarding process will be displayed as highlighted in the image below. You can now proceed to other settings of the plugin by clicking on the Go to overview button.
But in case if the onboarding fails, there might be a few reasons for it which can be –
Plugin Settings
↑ Back to topOnce the onboarding is done, you now get access to all settings of the plugin. Amazon for WooCommerce has 6 subsections namely –
1)- Overview
2)- Settings
3)- Templates
4)- Products
5)- Orders
6)- Feeds
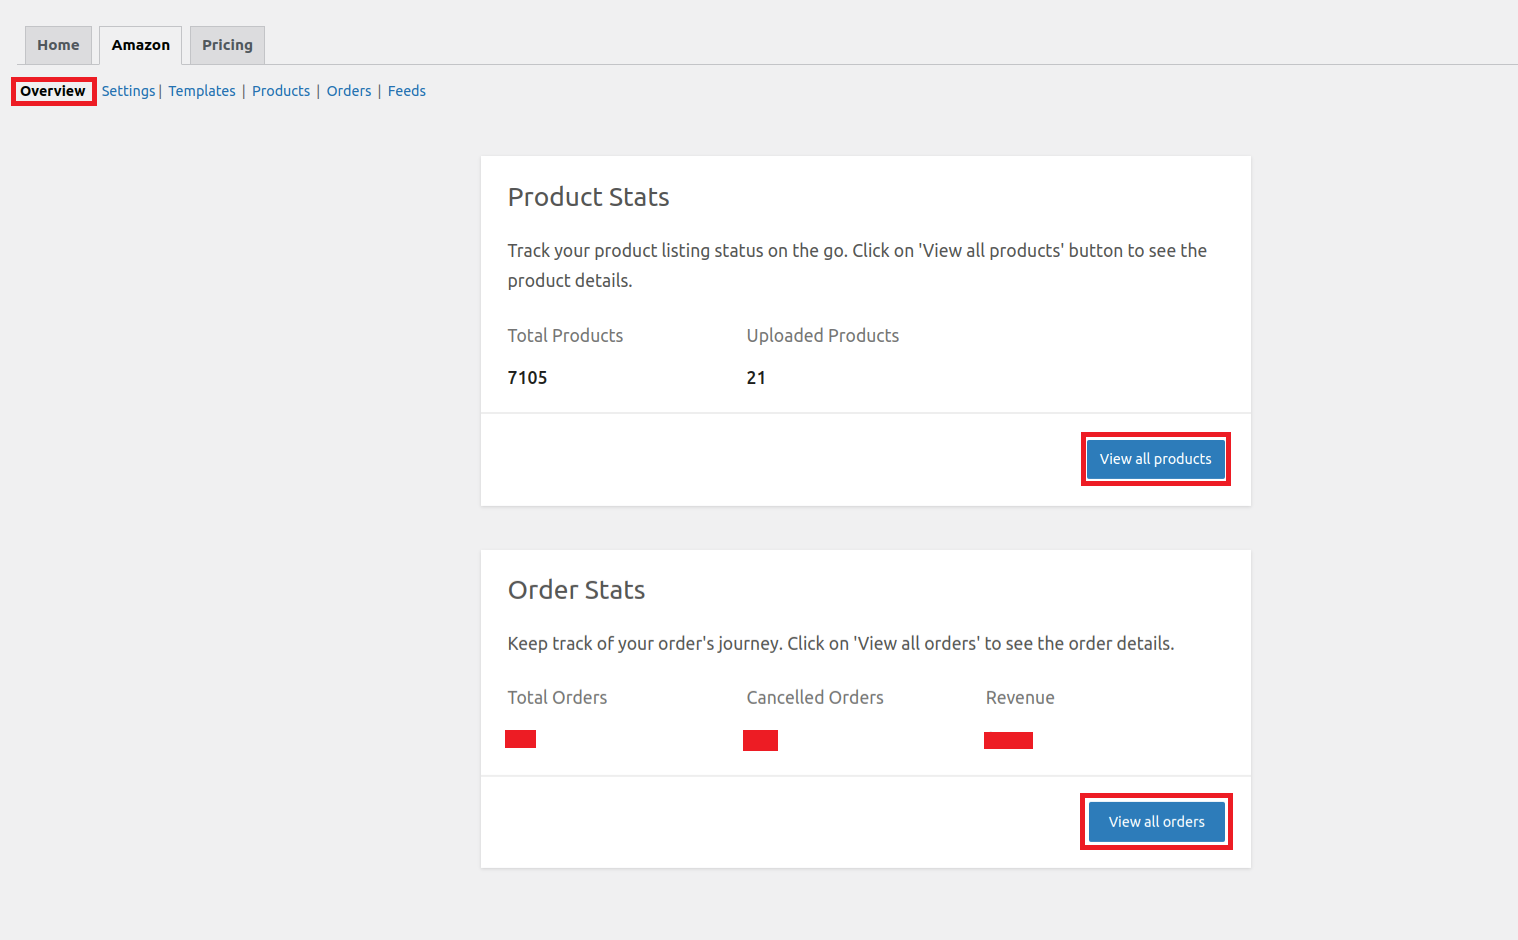
1)- Overview
↑ Back to topThe overview section provides you with accurate data on Products and Orders.
- Product Stats
This will assist you in tracking your product listings on the go. Under the product stats, you can see the total number of products along with the uploaded products. You can also view all your products in detail by clicking on the View all products button.
- Order Stats
Under the order section, you can have an overview of total orders placed, canceled orders, and the revenue generated. For more crisp information related to orders, you can click View all orders.
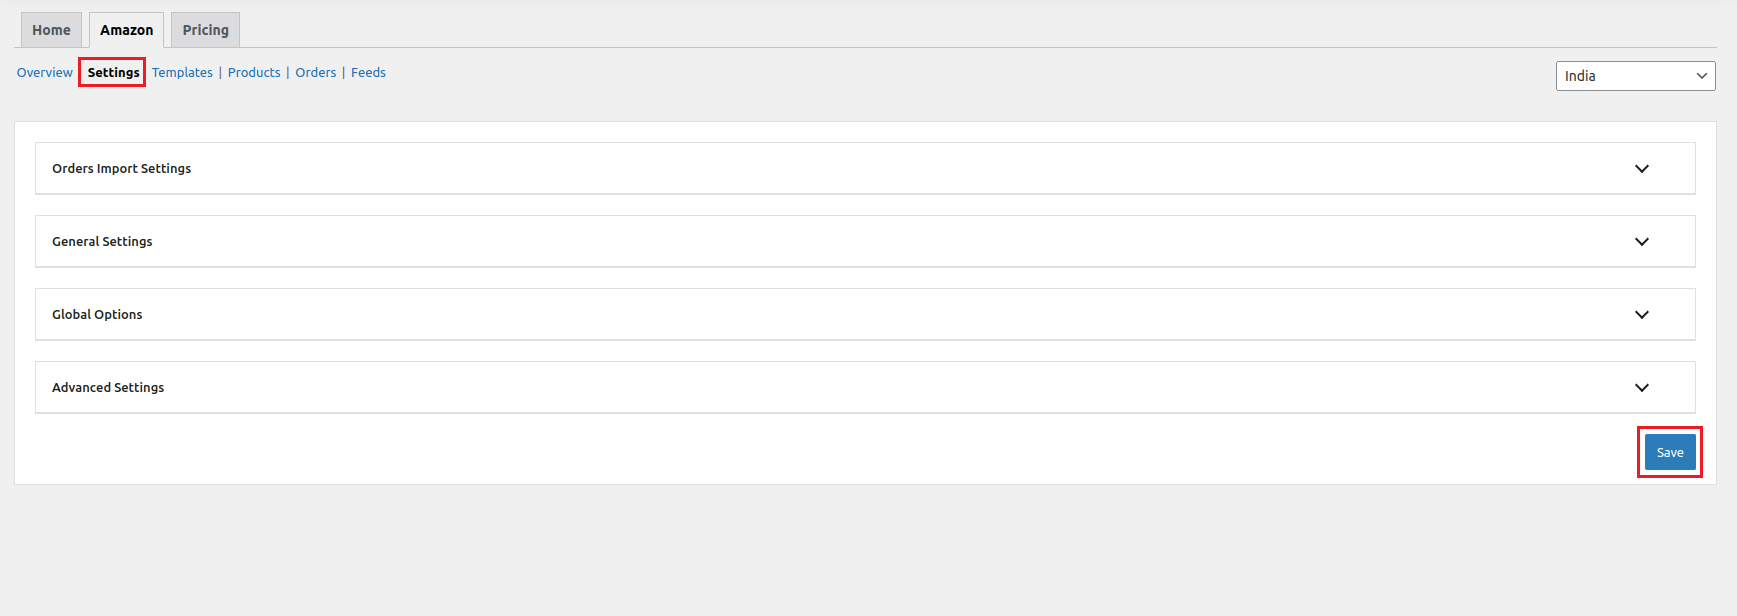
2) Settings
↑ Back to topThe settings section is divided into 4 subsections namely-
- Orders Import Settings
- General Settings
- Global Options
- Advanced Settings
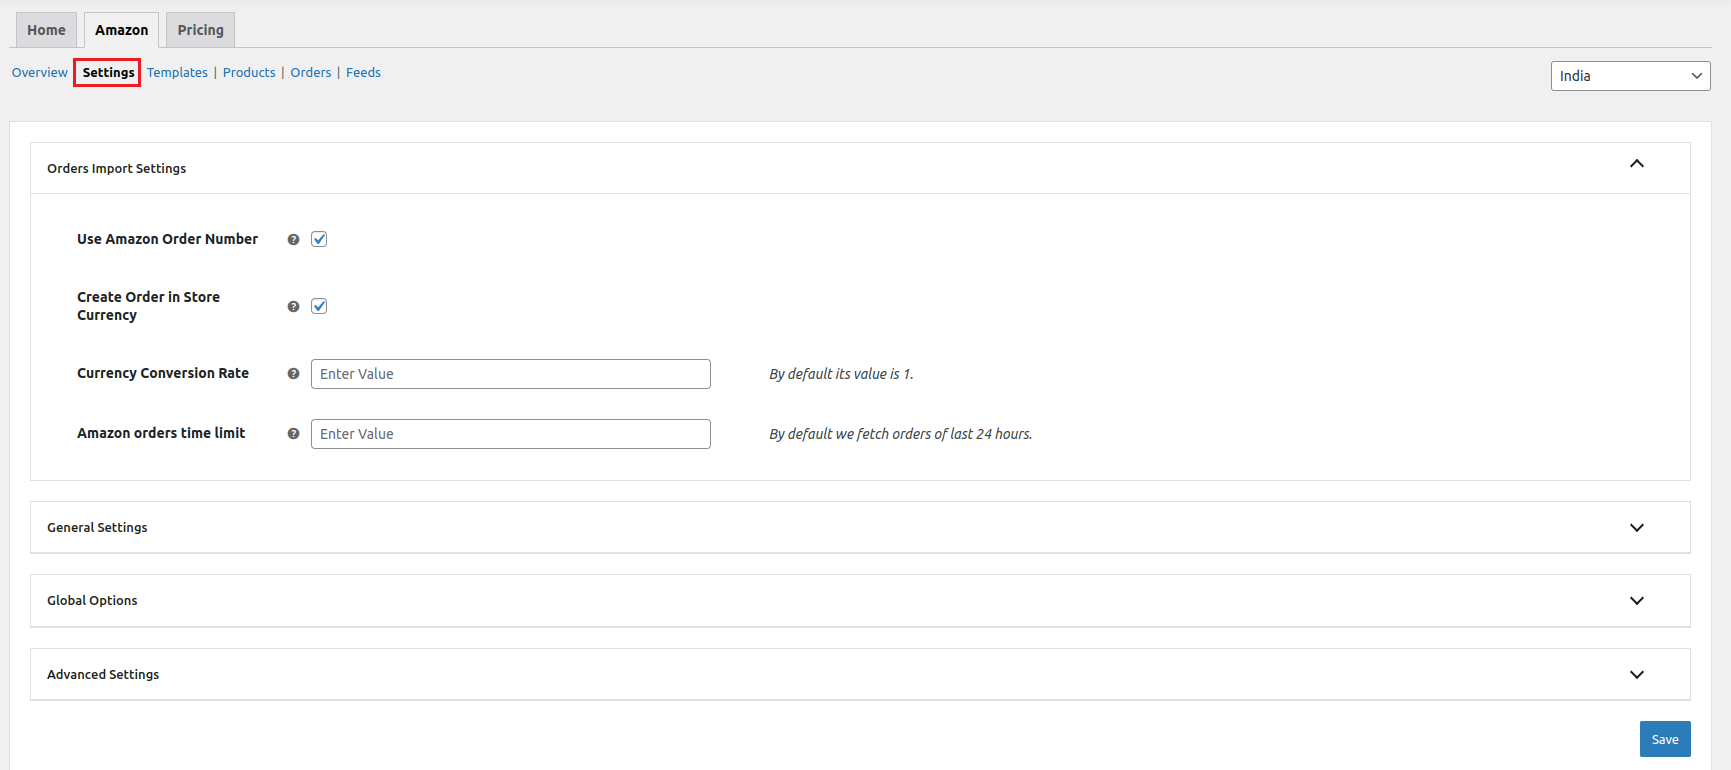
Orders Import Settings
This subsection has-
- Use Amazon Order Number: Enabling this option will display Amazon order numbers inside your WooCommerce orders section once you fetch all the orders generated on Amazon to WooCommerce.
- Create Order in Store Currency: Enable this feature if you wish to create orders on your WooCommerce dashboard in a currency based on your store’s region. Clicking on this will open up the currency conversion rate option. You need to enter a conversion value here to effectively convert order values into your regional currency.
- Amazon Orders Time Limit: Fetch Amazon orders to your WooCommerce dashboard of a certain time period as entered by you.
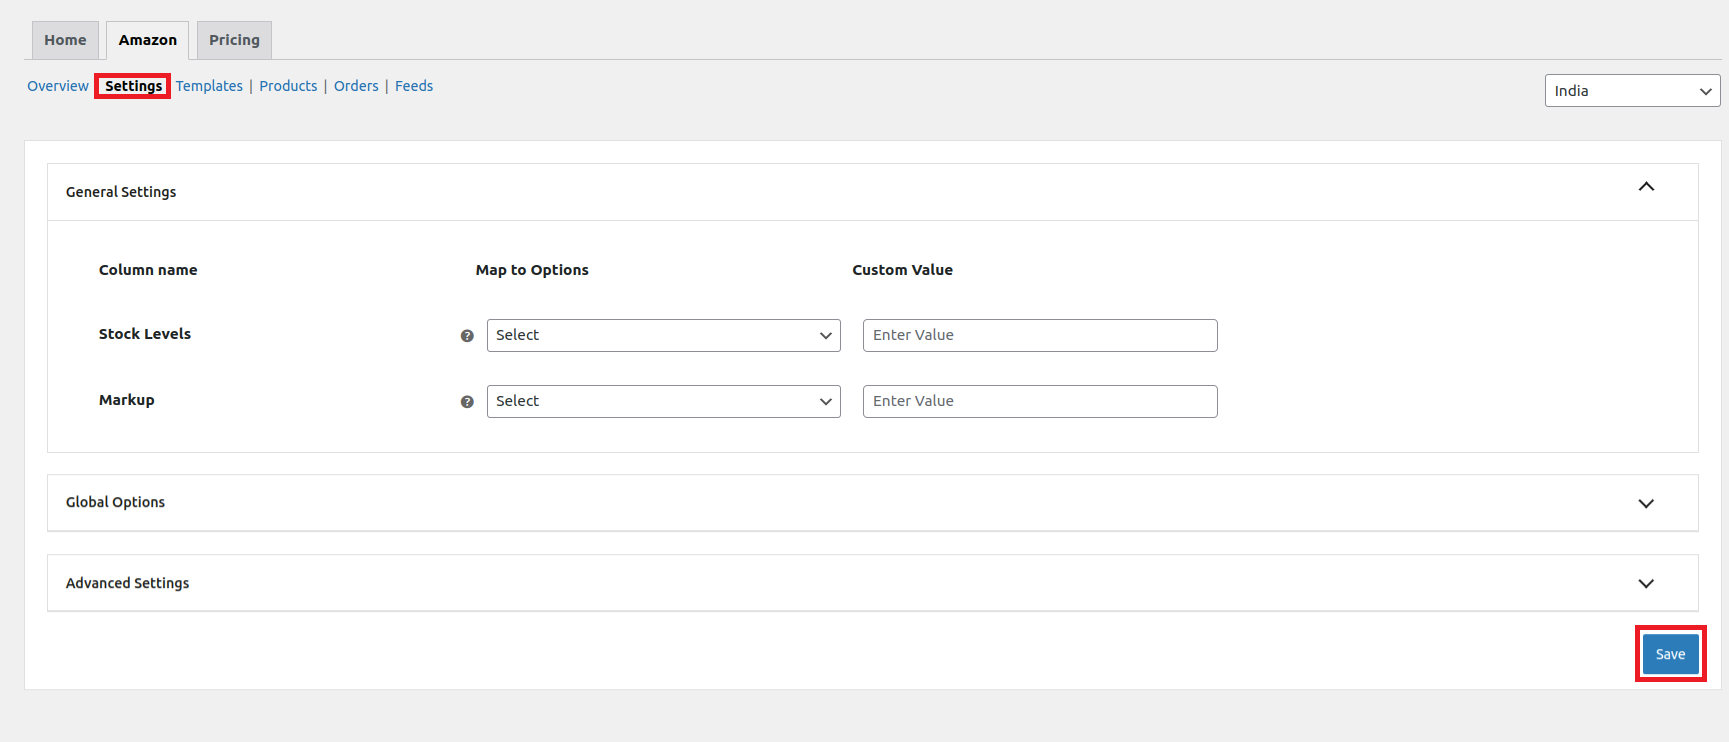
General settings
The general settings cover all the essential options you need to make your product listings shine when uploading products from WooCommerce to Amazon.
- Stock Levels: For sellers with a large inventory in WooCommerce, you can now choose to list only a portion of your products on Amazon. Set a cap on the quantity to ensure that you maintain control over your stock levels.
- Markup: Price adjustments are made easily with our price markup tool. You can assign fixed values or percentage markups to increase or decrease the prices of your Amazon listings without altering the WooCommerce product prices.
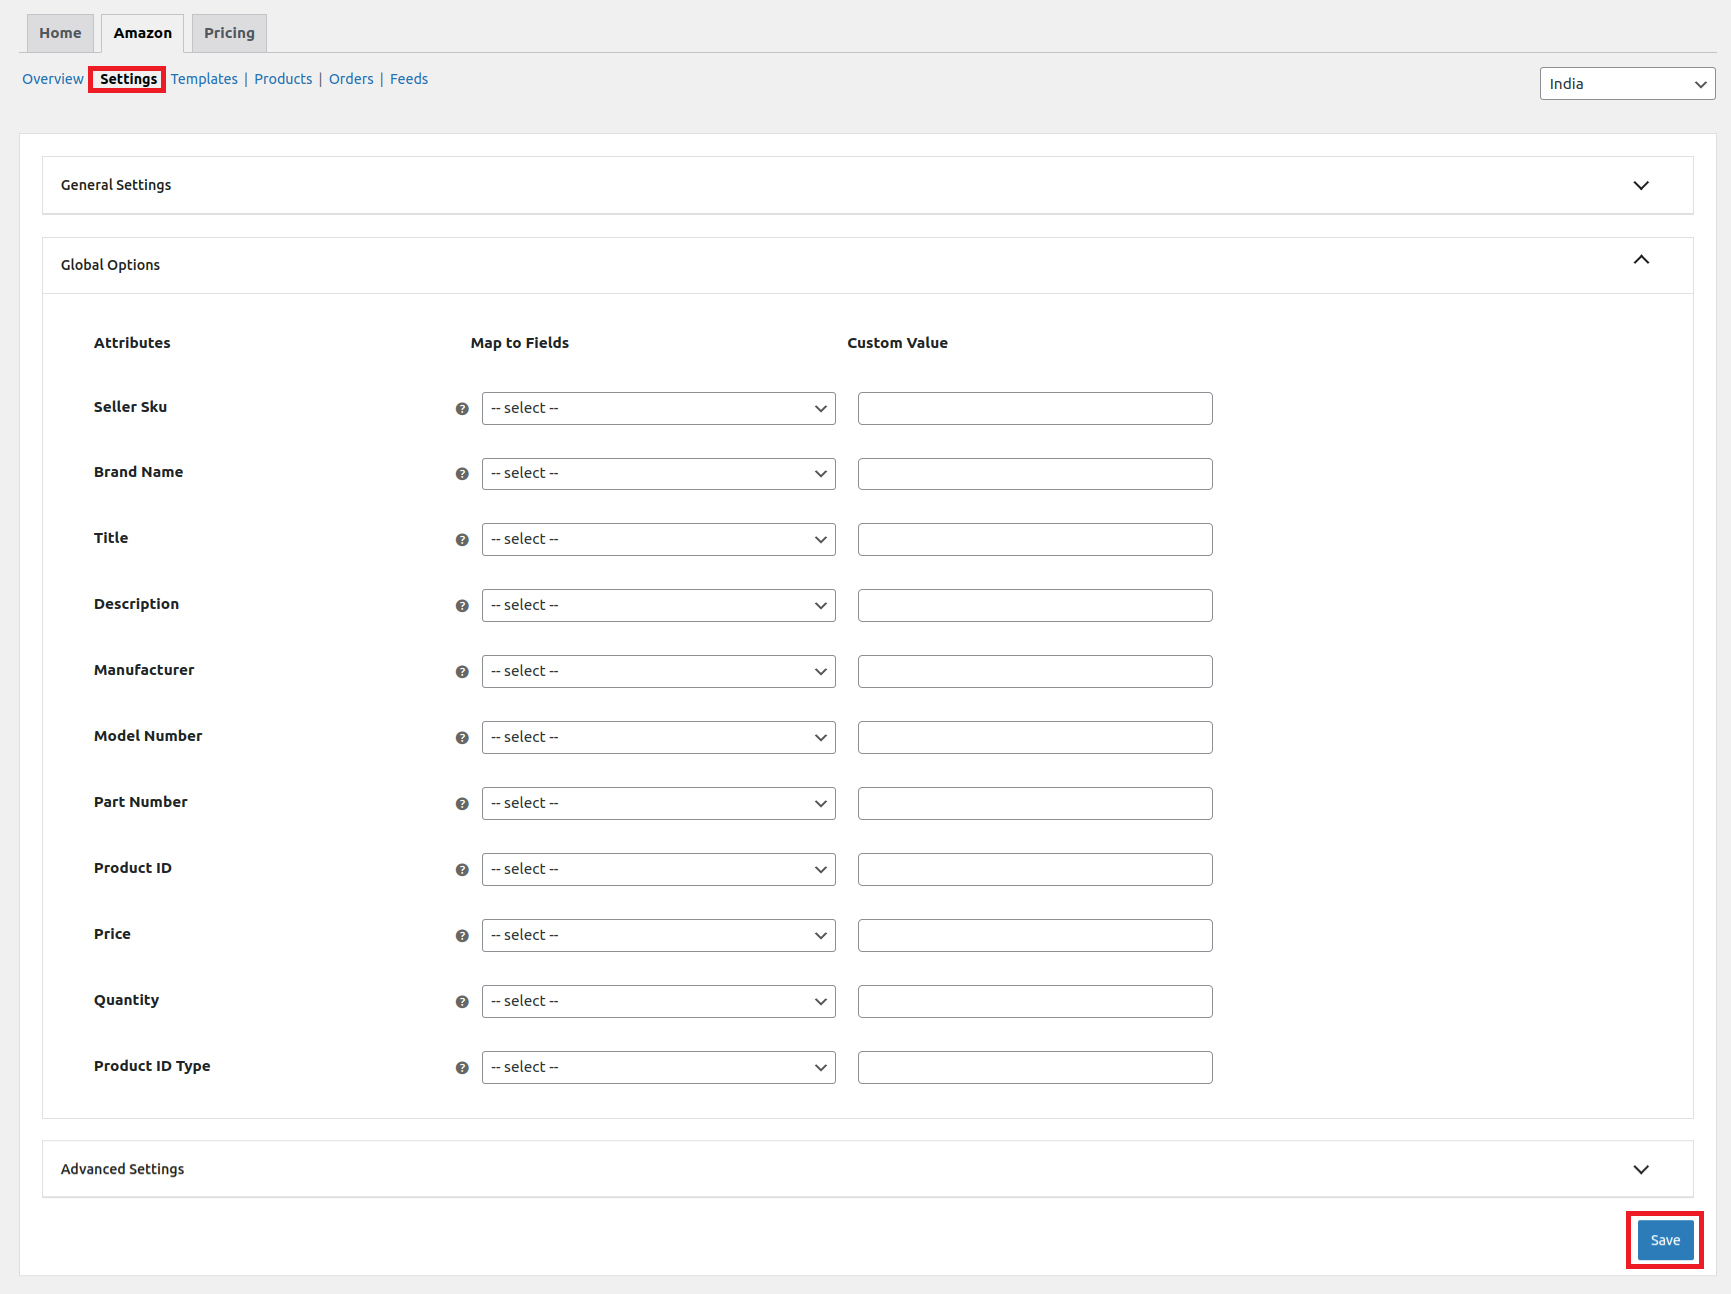
Global Options
Fields under the Global Options are not mandatory yet we encourage you to fill this voluntarily.
There are attributes like- Seller SKU, Brand Name, Title, Description, Manufacturer, Price, Quantity, etc. These attributes function as template fields, effectively eliminating the need for repetitive input. The fields within the global options are automatically populated in all the product templates created by a seller, thereby eliminating the requirement for repetitive administration or data entry across multiple templates.
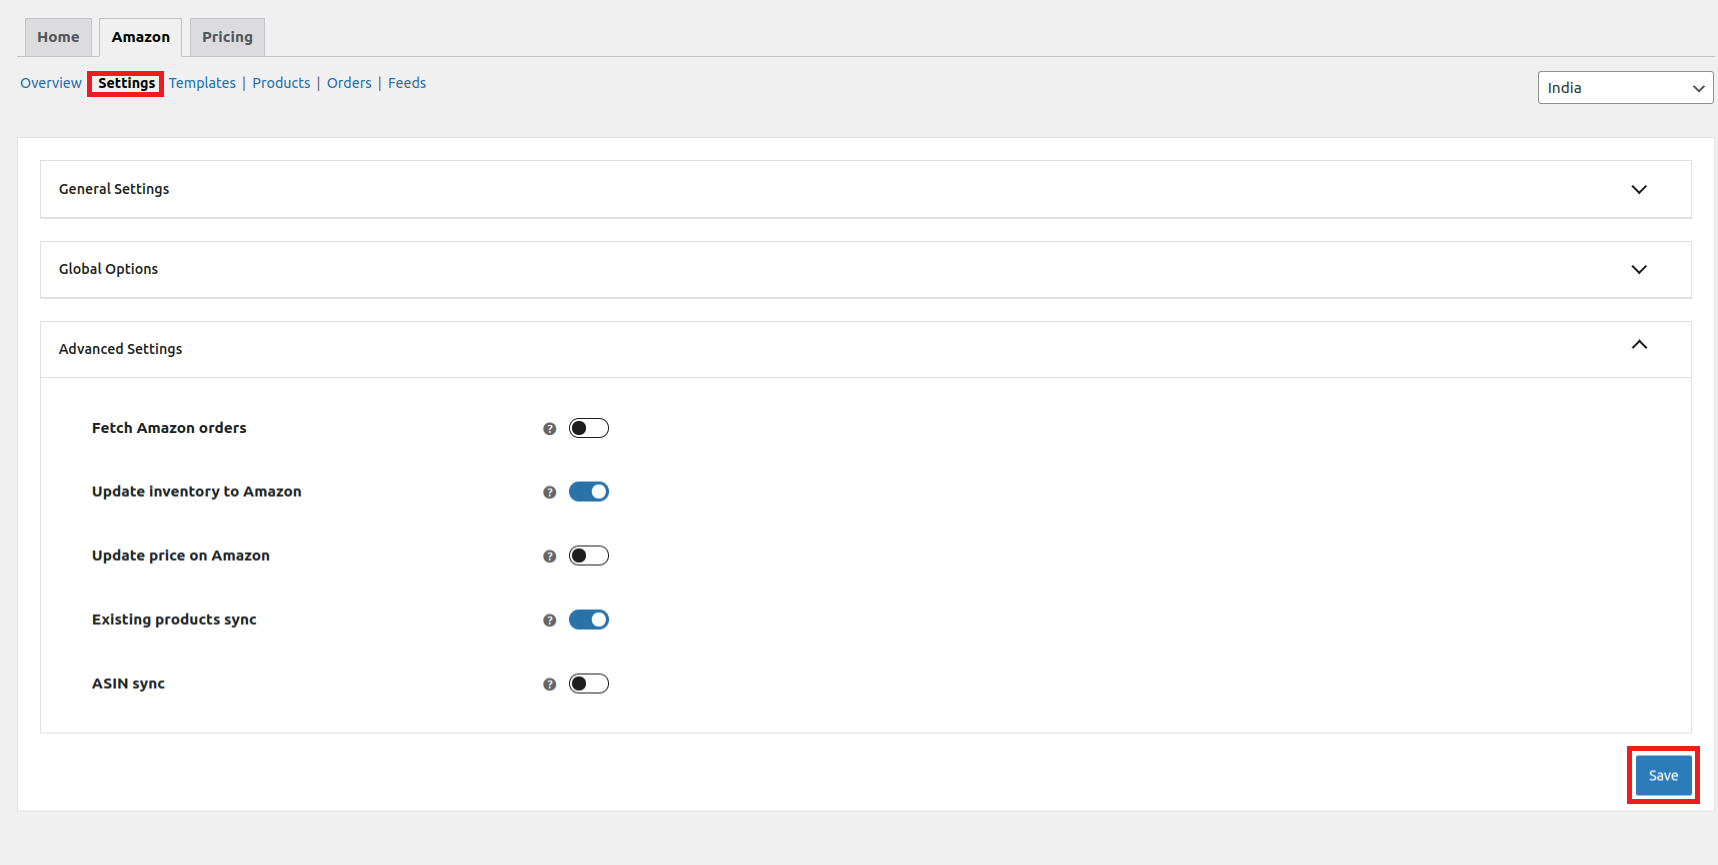
Advanced Settings
With the Advance Settings feature, you can make sure that your WooCommerce and Amazon store are perfectly in sync, without any errors getting in the way. These settings help you to-
- Fetch Amazon Orders
To make sure your WooCommerce store and Amazon are perfectly synced, it’s super important for the products in your store and the ones ordered on Amazon to have the same SKUs. When these SKUs match up, everything will flow smoothly between both platforms.
- Update inventory on Amazon
With matching SKUs, the stock in WooCommerce seamlessly syncs with the corresponding Amazon listing. You can easily track the status of these stock updates in the feeds section, ensuring your inventory remains up-to-date and in sync across both platforms.
- Update Price on Amazon
It is of utmost importance to regularly update the pricing of your products on Amazon in order to maintain accuracy and ensure that they are up-to-date. By doing so, you can effectively reflect any alterations in cost, promotions, or market conditions. This practice not only helps to keep your product listings competitive but also enhances the overall shopping experience for potential customers.
- Existing Product Sync
The Existing Product Sync feature is designed to seamlessly sync the ASIN of your Amazon listings to the corresponding WooCommerce listings by relying on the SKUs (Stock Keeping Units). This synchronization process functions smoothly when the SKUs of your WooCommerce listings match up with those on Amazon.
- ASIN sync
With the ASIN sync, you can sync the ASIN of Amazon catalog products to the corresponding WooCommerce products on the basis of UPC/ EAN or other product identifiers to connect your WooCommerce items with your Amazon listings. Just enable the scheduler and choose the right identifier from the dropdown menu to start the synchronization process.
Once done with all the subsections of the Settings tab click the Save given at the bottom right corner. This will complete and save all the changes that you have made under the Settings section.
3)- Templates
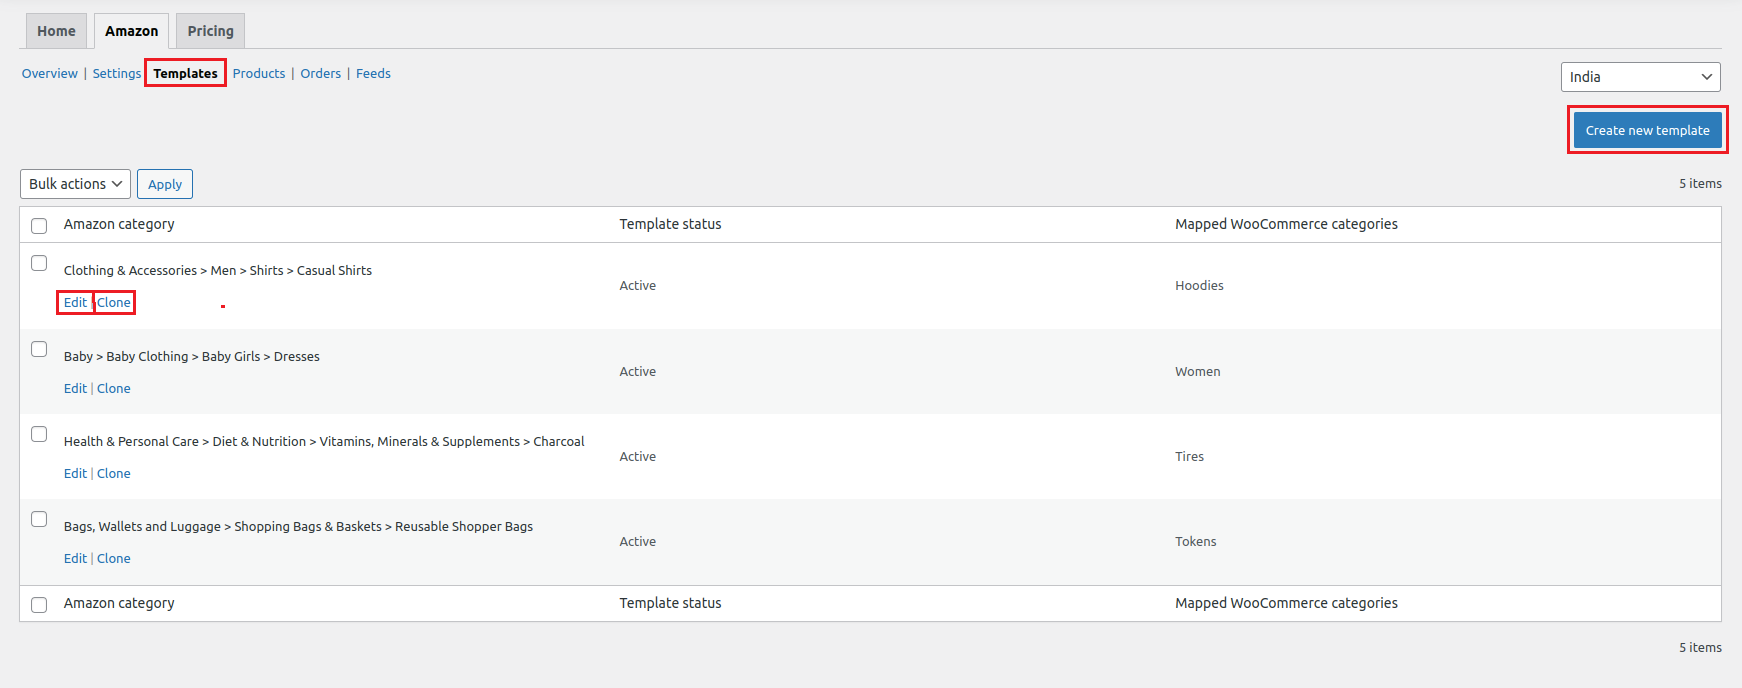
↑ Back to topUnder this section, you can create templates by mapping your WooCommerce product categories with the Amazon categories. Multiple templates can be created for your several WooCommerce categories or you can even clone any existing template.
To create a product template, start by clicking on the Create new template.
You will be redirected to a new page wherein you can map your WooCommerce category with the respective Amazon category.
Once done with filling all the details, hit Save Template. The created template will now reflect under the Templates section. Moreover, the Refresh template button is used to fetch the latest or updated Amazon template attributes or fields.

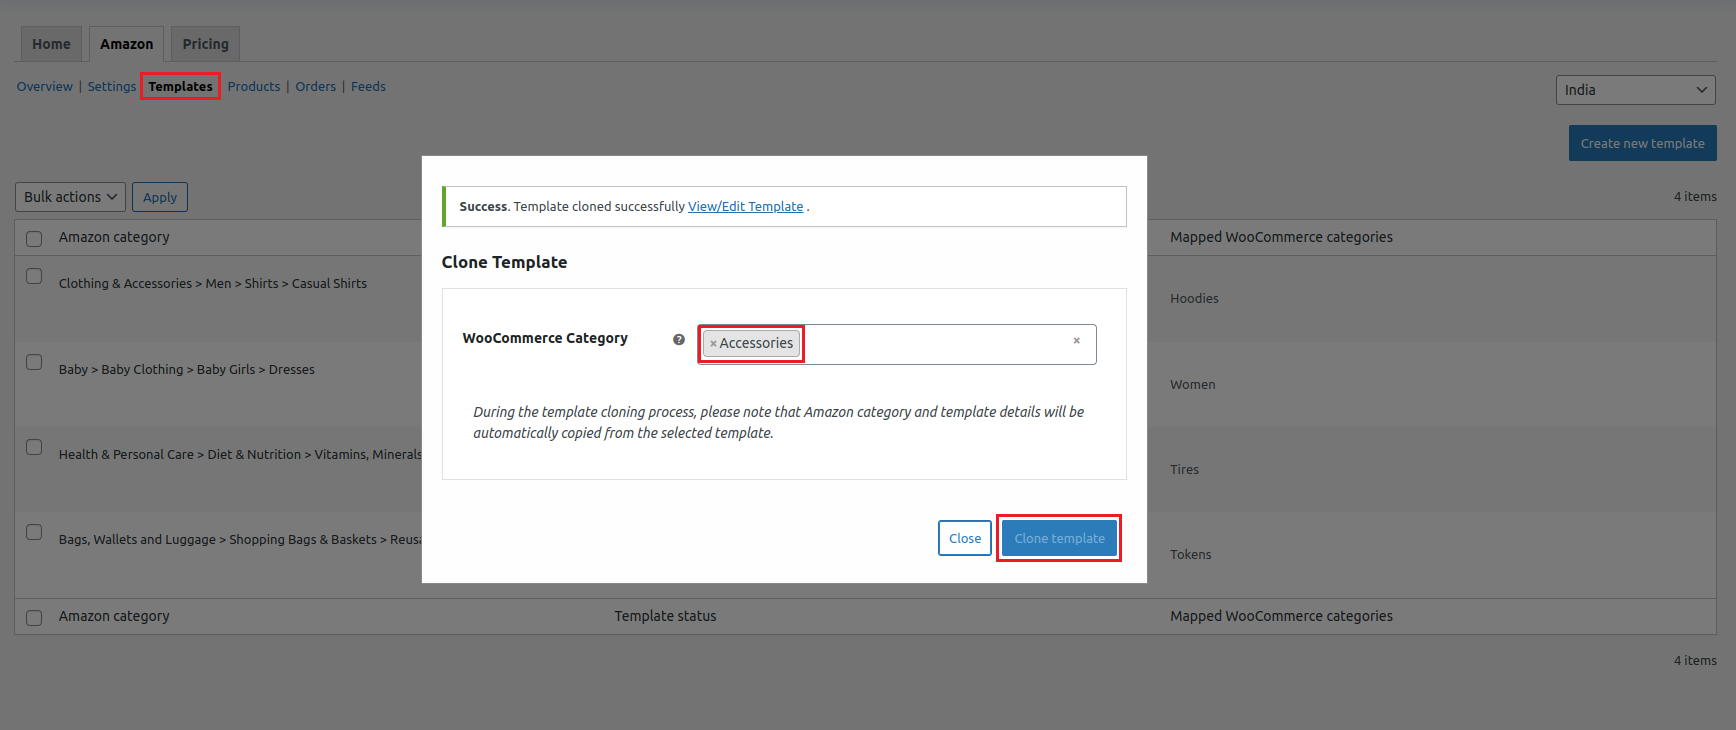
To clone an existing template click on Clone which is next to the Edit button. A popup page will open up wherein you have to select a WooCommerce category while the rest will remain the same.
Here we are trying to clone the first template for your reference which is-
Clothing & Accessories > Men > Shirts > Casual Shirts – Hoodies (WooCommerce category)
Into
Clothing & Accessories > Men > Shirts > Casual Shirts- Accessories (New WooCommerce category)
Once the WooCommerce category is done (eg- Accessories) click Clone template and a success message is displayed. Click Close and it will automatically refresh the page.
Now, you can clearly see that your template has been cloned with a new WooCommerce category in the templates section as shown in the image below.

4)- Products
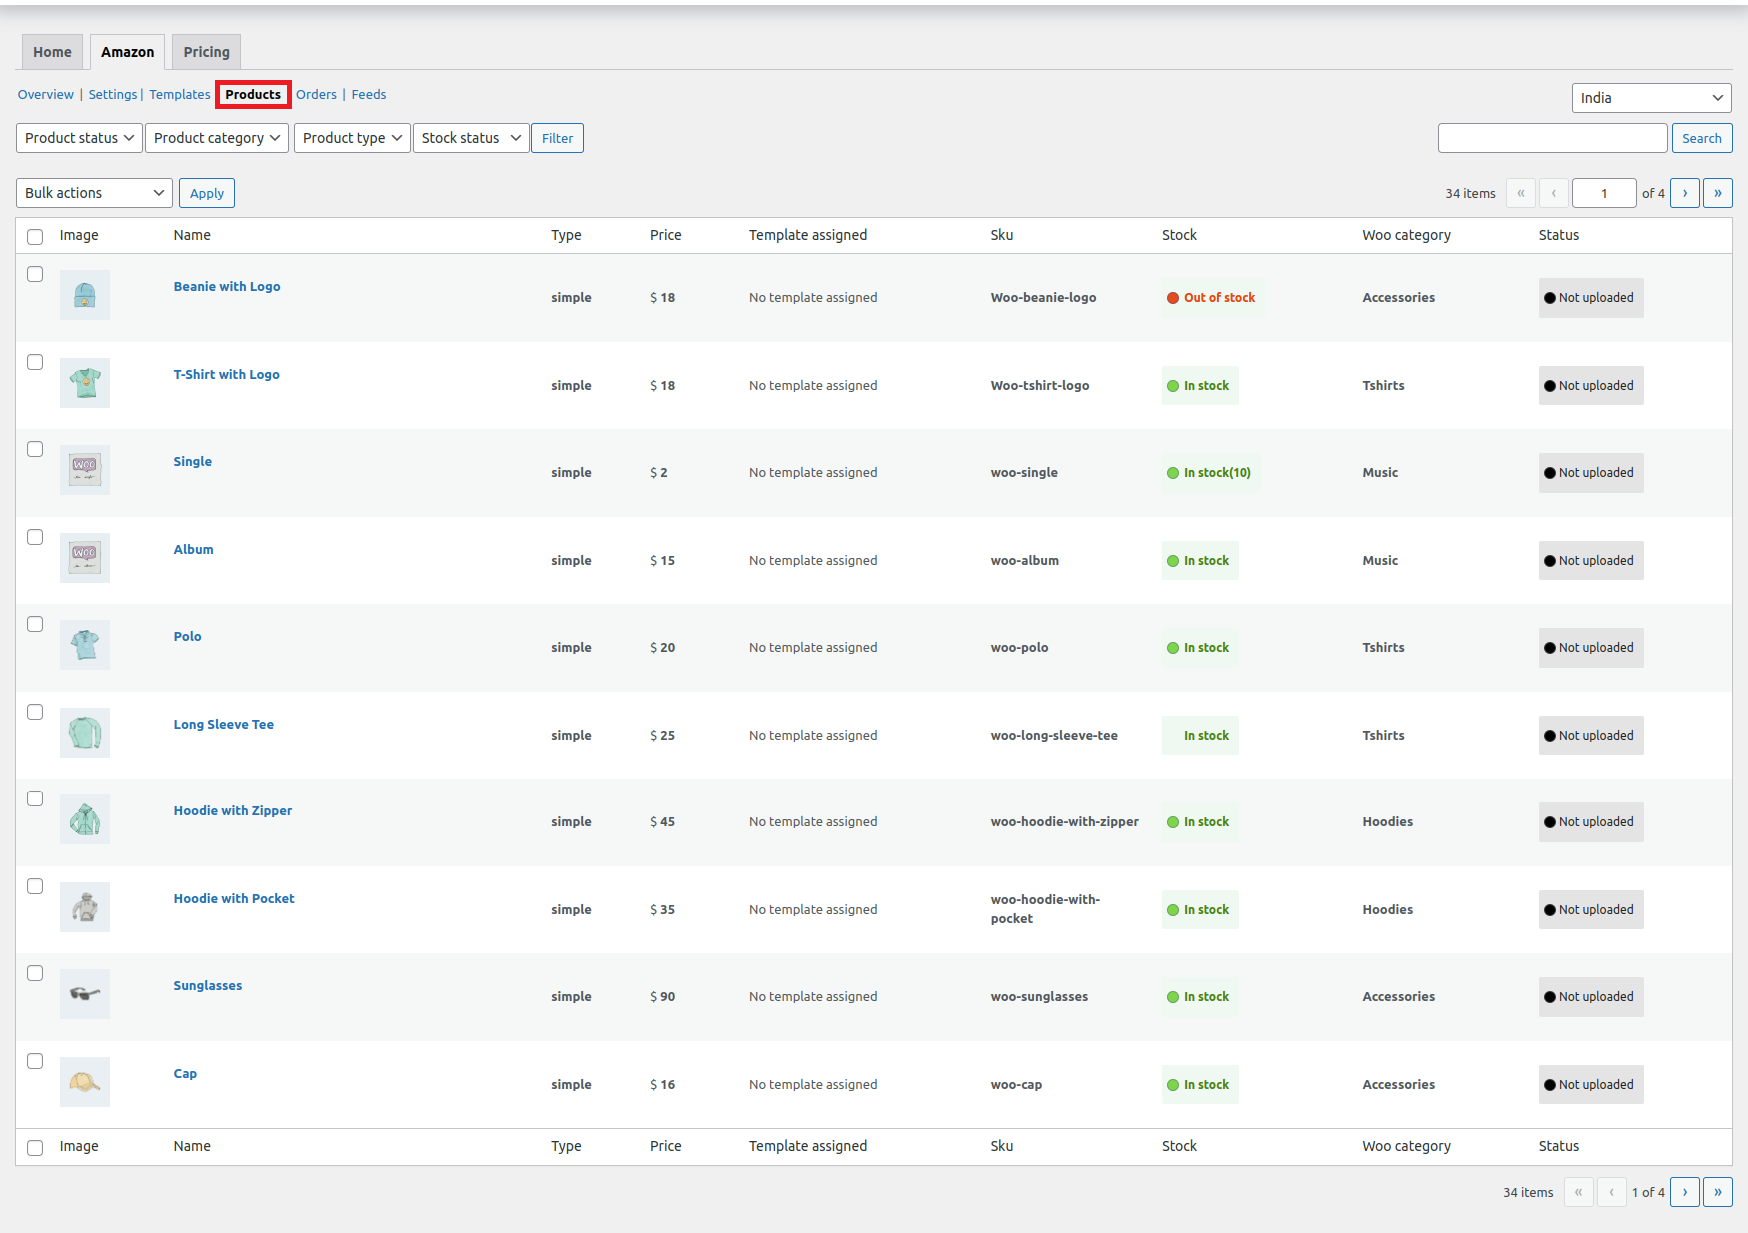
↑ Back to topThe product management section helps you centrally manage all your products. It has all the granular information regarding your products.
It allows you to filter out products based on-
- Product Status
- Product Type
- Product Category
- Stock Status
- Product name
Also, you get to view the product image, name, type, price, template assigned, SKU, stock, Woo category, and status.
Apart from these, you can perform several bulk actions which are listed below-
- Upload: Save time by uploading WooCommerce products in bulk to Amazon. Our robust system eliminates the need for manual input, allowing you to effortlessly transfer multiple product listings from your WooCommerce store to Amazon’s marketplace.
- Relist Product: Choose and relist products on Amazon from WooCommerce. The integration streamlines the process by relisting products by automatically transferring all product details, including images, descriptions, pricing, and inventory levels.
- Update Inventory: Effortlessly update your inventory in bulk by selecting and updating across platforms with the help of a super straightforward interface and easy-to-follow steps.
- Update Price: Simplify the process of updating the price of selected products with bulk updates. This feature not only saves valuable time, but also ensures greater accuracy and consistency
- Update Images: Easily update images in bulk for the selected products using this feature. Users can select the desired products to modify, and then upload new images to replace the existing ones in one swift action.
- Delete Listing: Select and remove listings from Amazon with ease using Amazon for WooCommerce integration.
- Look up on Amazon: Synchronize your ASIN with your WooCommerce products using SKUs by selecting the products and clicking look up on Amazon.
Every action performed under the products section will generate a feed. Feeds help you know the progress of the task being performed. You can view the generated feeds under the Feeds section.
5)- Orders
↑ Back to topOrders generated on Amazon can be fetched to your WooCommerce dashboard with the help of Fetch orders button. Also, you can schedule the syncing of orders using CRON schedulers.
The best part is that the plugin supports HPOS (High-Performance Order Storage). For more detailed information on HPOS, kindly refer to this article- https://developer.woocommerce.com/2022/09/14/high-performance-order-storage-progress-report/
The fetched orders will have all the data, that includes-
- WooCommerce order ID
- WooCommerce status
- Amazon Order ID
- Amazon status
- Ordered Items
- Total
- Fulfillment channel
- Created on
This is how your orders dashboard will look like, once the orders from Amazon are fetched to your WooCommerce dashboard.

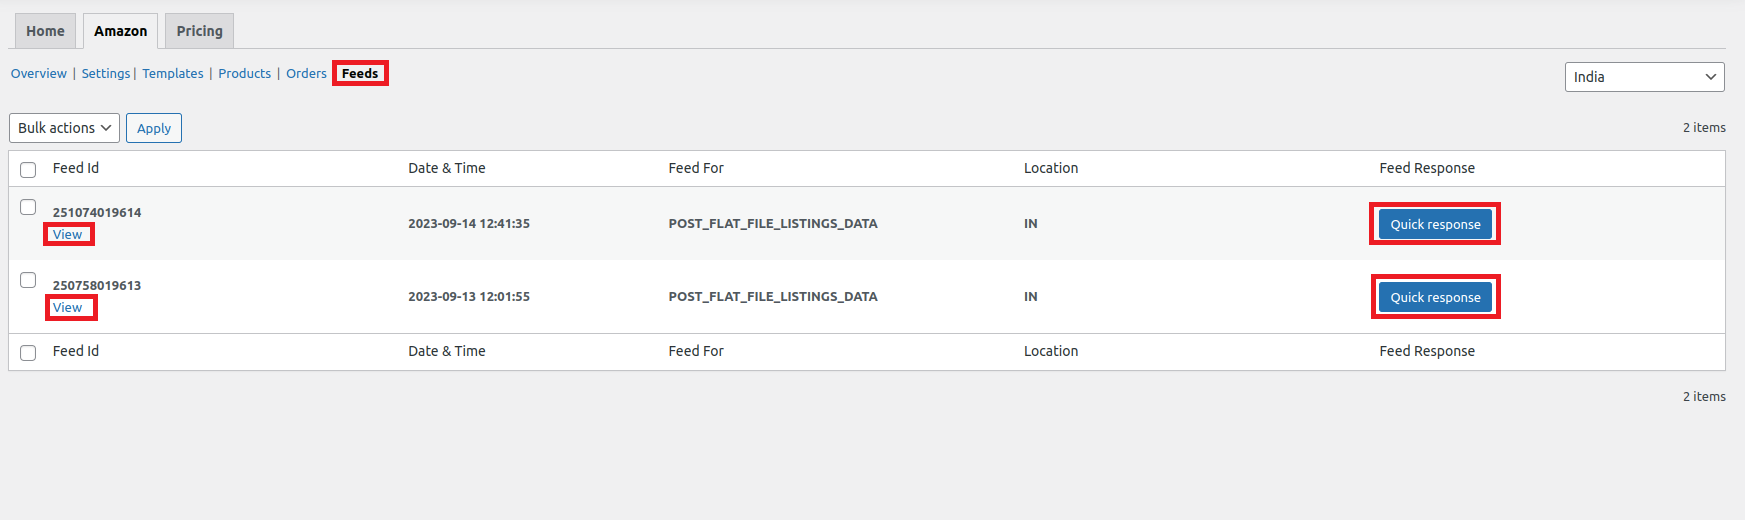
6)- Feeds
↑ Back to topThe Amazon for WooCommerce feeds feature is super helpful for sellers who want to stay on top of their store’s activities like product upload, pricing update, and inventory sync.
You can have a quick look at the feed details either by clicking on the Quick response button or the View option under the feed ID as highlighted in the image below-
We hope that this documentation helps you in the best possible way. For any further assistance feel free to connect with our support team.
FAQ
↑ Back to topInstallation error
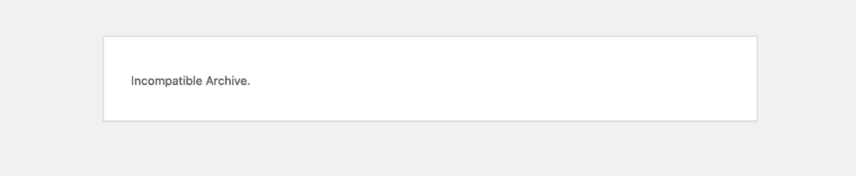
Q- I am unable to install the plugin due to an Incompatible Archive error. How to solve this issue?
Ans. This is a temporary error where you might not be able to install the plugin on your WordPress dashboard.
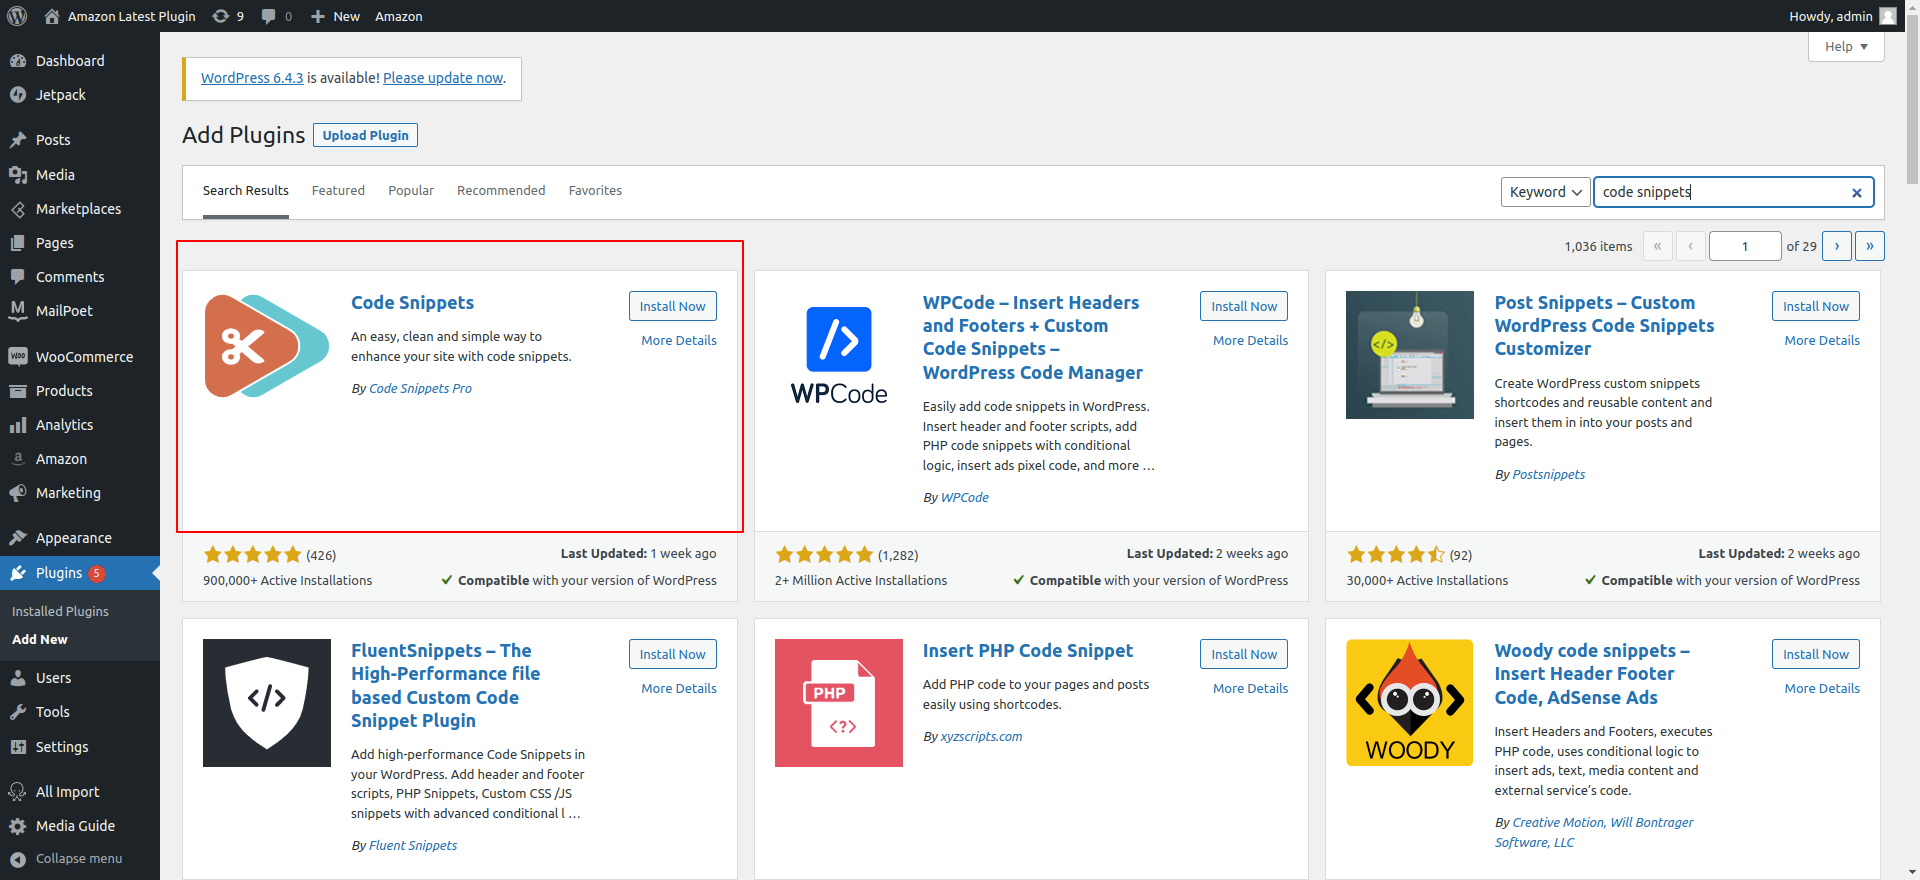
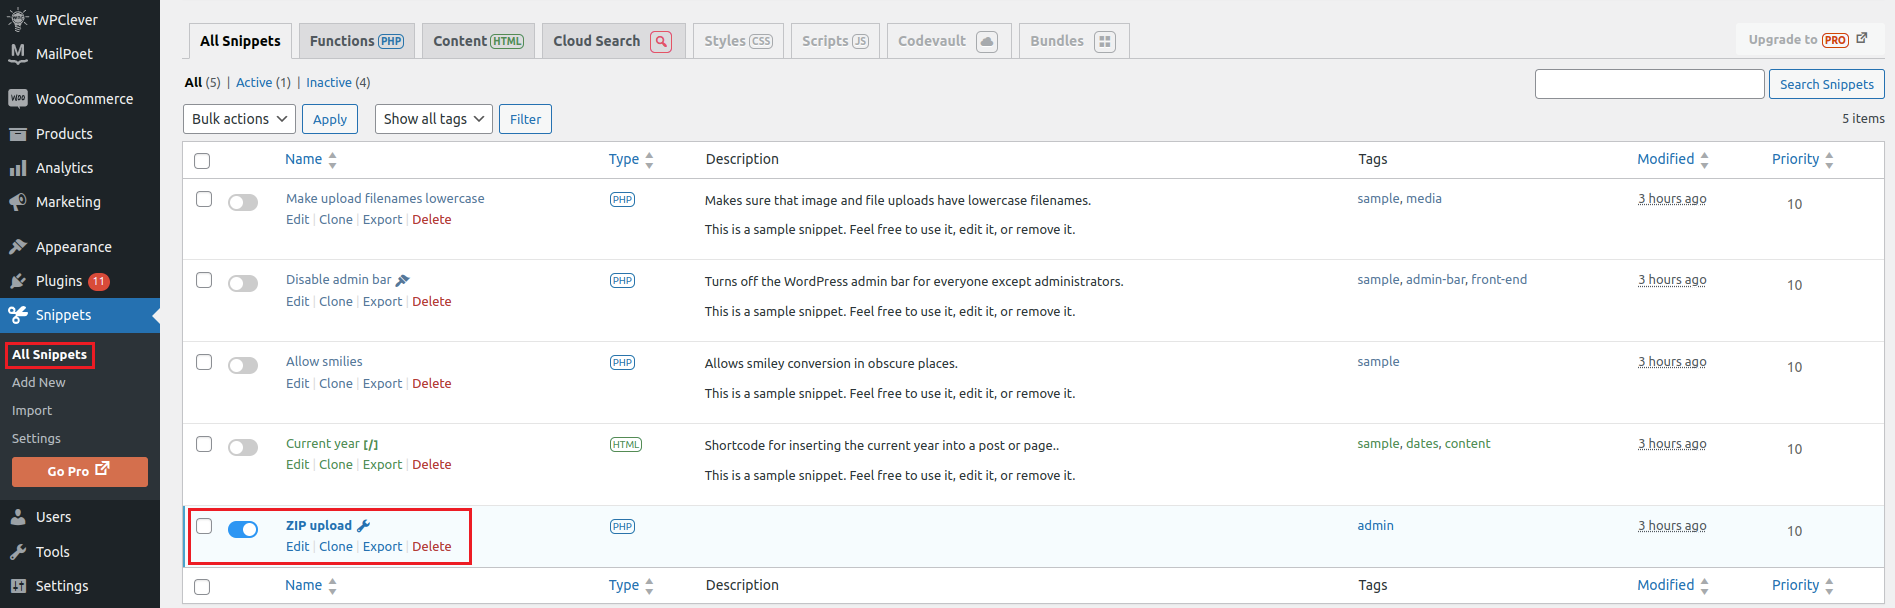
To solve the issue you need to Install and Activate a plugin named Code Snippets as shown in the image below-
Once activated click on Add New under the Snippets section and create a new snippet.

In the next step enter a name for your snippet with the following code in the code section- add_filter(‘unzip_file_use_ziparchive’, ‘__return_false’);
Choose an option “only run in administration area” in the next field.
Once done click Save Changes and Activate.
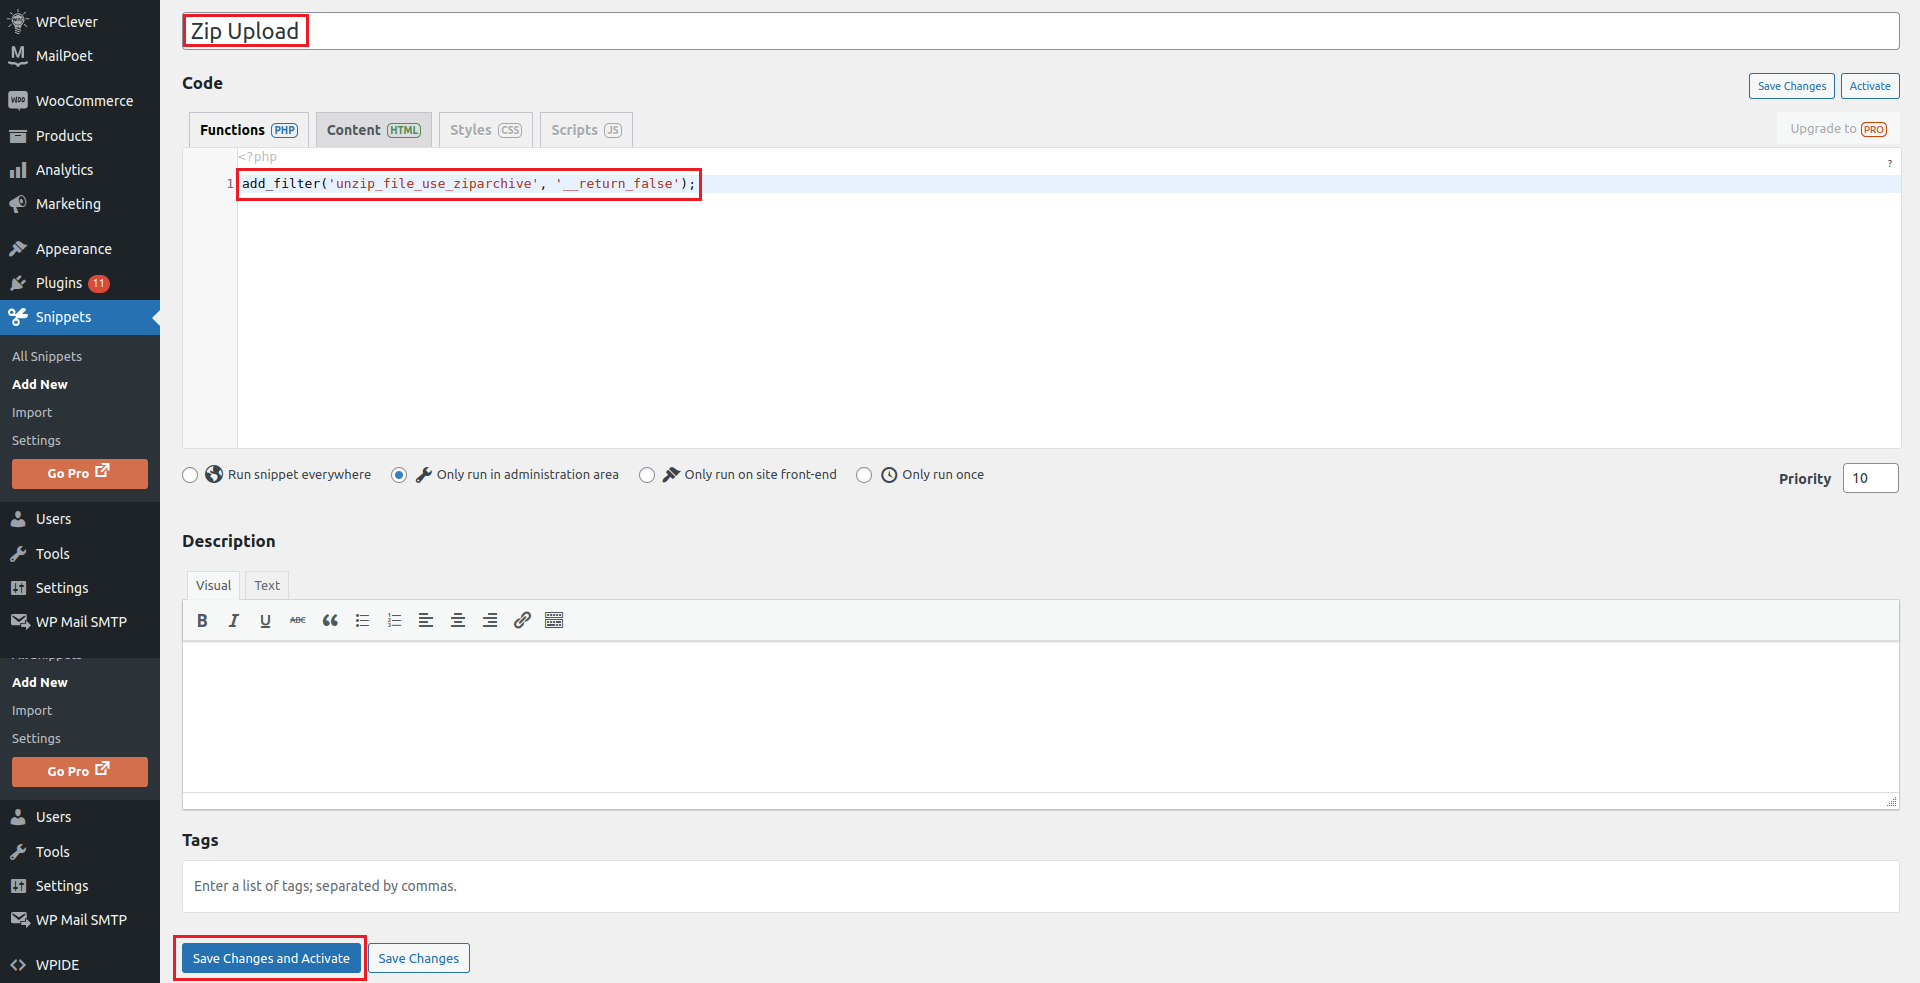
Your new snippet is activated and will hopefully resolve the Incompatible Archive error issue.
Now you can move ahead and retry to install the plugin on your WordPress dashboard.
If not yet resolved contact the support team by raising a ticket and our support team will be in touch shortly.