
Purple uses the WordPress Site Editor to control your store’s layout, styles, and shared WooCommerce templates. Before you begin, install and activate Purple using the getting-started guide. This guide explains how to make design changes safely and keep the shopping experience consistent across your store.
Before you customize
↑ Back to top- Work on a staging site and make a backup before changing shared templates.
- Remember that a template change can affect every page that uses that template.
- Replace sample text, images, products, and links before publishing your store.
Open the Site Editor
↑ Back to topTo customize Purple, go to Appearance > Editor. The Site Editor gives you access to your site’s navigation, styles, pages, templates, and template parts.
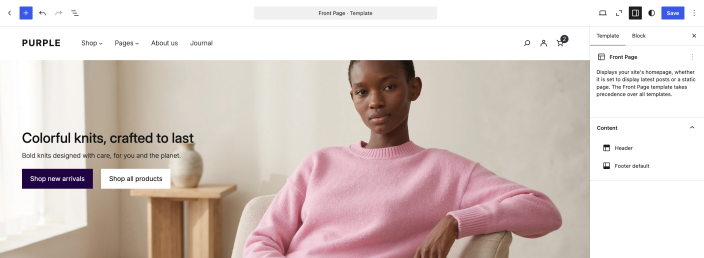
Purple’s default Front Page template supplies its own storefront layout. If changing your assigned homepage’s page content has no visible effect, open Templates > Front Page in the Site Editor and review that layout.
A template controls the layout of a type of page. A template part is a shared section, such as a header or footer. A pattern is a ready-made group of blocks you can insert and edit. Choose the smallest area that needs changing, because shared layouts can affect several pages.
For an overview of the Site Editor and block-based store editing, see Using the WordPress Site Editor in WooCommerce.
Choose your colors and typography
↑ Back to top- In the Site Editor, open Styles.
- Browse the available style variations and preview one that fits your store.
- Open the individual color, typography, or layout controls when you need to make a smaller adjustment.
- Select Save and review the changes before confirming.
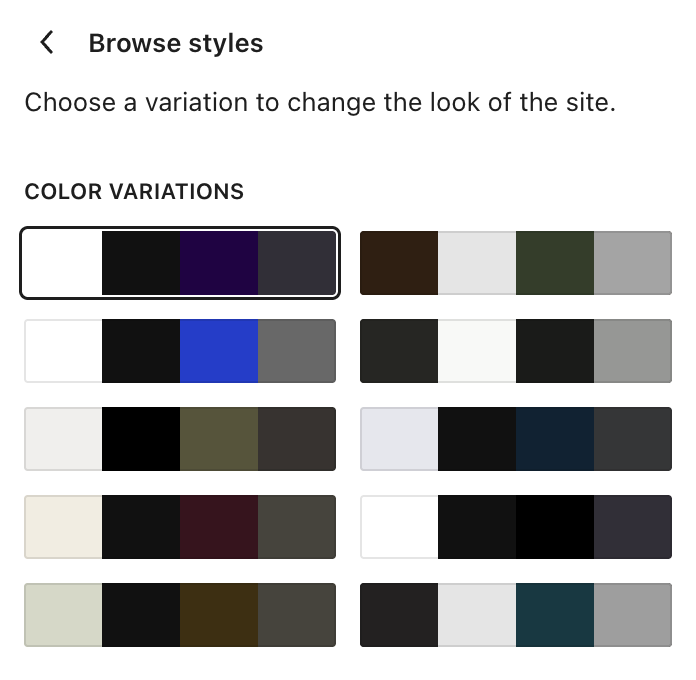
Choose colors and type styles that keep buttons, prices, links, and notices easy to read. Review your choices on both light and dark sections of the design.
Use wider content layouts
↑ Back to topPurple uses a relatively narrow default width for regular content. If a group of columns or another section feels cramped, select its outer block and choose Wide width or Full width when the block offers those options. Preview the result on smaller screens before saving.
Edit the header, footer, and navigation
↑ Back to topOpen the site view in the Site Editor, then select the header or footer to edit it. These are template parts, so a change can appear across many pages.
- If the header starts with a text site title, select the header, replace the Site Title block with a Site Logo block, and upload or select your store logo.
- Check that the navigation includes the pages customers need, such as Shop, Cart, and My Account.
- Replace sample contact details, policy links, social links, and copyright text in the footer.
- Preview the header and footer on a product page and the cart after saving.
Purple’s default checkout layout uses a separate checkout header and does not include a footer. To review that header, open Templates > Page: Checkout in the Site Editor and select its header template part.
Customize the homepage
↑ Back to top- Open Templates > Front Page.
- Replace example headings, images, buttons, and links with your store’s content.
- Keep the first view focused on what your store sells and what customers should do next.
- Preview the page at desktop, tablet, and mobile widths before saving.
Use Purple patterns
↑ Back to topPatterns are ready-made groups of blocks that you can insert and edit. Purple patterns can help you build storefront sections, product collections, service sections, about and contact layouts, testimonials, and newsletter sections. Some are starter designs rather than live store data, so review every heading, image, link, category, product selection, and shipping or promotional statement after inserting one.
- Open the page or template you want to edit.
- Select the block inserter, then open Patterns.
- Browse the available Purple and WooCommerce patterns. Available patterns depend on your WooCommerce version.
- Select a pattern to insert it, then replace its example content and configure any product or category blocks for your store.
Remove sample sections that your store does not need. Do not leave placeholder text, images, products, or links in a customer-facing page.
Customize store templates
↑ Back to topIn the Site Editor, open Templates and choose the layout you want to review. WooCommerce selects store templates for the relevant customer journey; do not assign a Cart, Checkout, or Single Product template to an ordinary page.
For instructions on accessing, creating, and managing WooCommerce templates, see Customizing your store with templates in WooCommerce.
For cart and checkout, review both the surrounding template and the content of the assigned page. Use the page editor to change its Cart or Checkout block. Review My Account separately, including its page content and any account sections added by extensions.
| Template | Review these areas |
|---|---|
| Product Catalog | Product grid, sorting, filters, pagination, category images, and empty results. |
| Single Product | Images, price, variations, add-to-cart controls, product details, reviews, related products, and upsells. |
| Page: Cart | Filled and empty cart states, coupons, shipping, totals, express payment options, and the checkout link. |
| Page: Checkout | Contact, billing, shipping, payment, order summary, validation messages, and mobile layout. |
| Order Confirmation | Order status, customer details, totals, downloads, and next steps. |
Use the Purple demo shop page as a reference while reviewing your product catalog template. Your filters, products, pricing, and available options depend on your store configuration.

Review a single product template as well. Confirm that product media, prices, reviews, options, quantity controls, and purchase actions remain clear in your design.
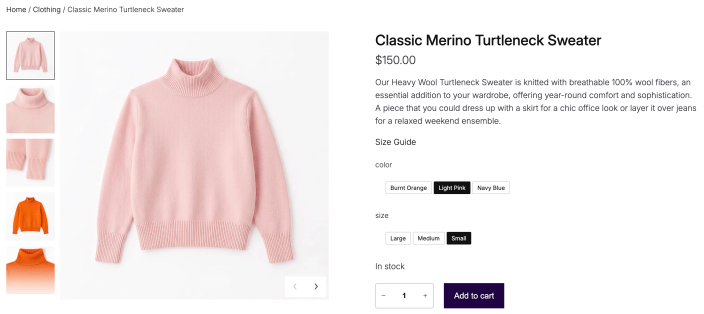
After editing a shared template, review more than one page of that type. Include an empty, no-results, or logged-out state where available.
Decide whether to edit a page or a template
↑ Back to top- Edit an individual page when the content should appear only on that page; for example, your About page or Stockist page would be editable as individual pages, as they only appear in a single instance.
- Edit a template when the layout should be shared by a group of pages; for example, all of your single product pages use the same underlying single product template.
- Edit a template part when the change belongs in a shared header, footer, or other reusable area.
Review and save your changes
↑ Back to top- Select Save and inspect the list of changed templates and parts before confirming.
- Check the homepage, catalog, product, cart, checkout, order confirmation, and My Account pages.
- Test navigation, product search, filters, add to cart, coupons, payment, and account actions.
- Review the store on a phone and a desktop-sized screen.
For detailed guidance on WooCommerce templates and blocks, see WooCommerce store editing.
If a change affects unexpected pages or breaks a layout, check which shared template or template part you changed. Use its revision history where available to restore a previous version, or restore the affected design from your backup. Repeat the affected customer journey on staging before transferring the change to your live store. Reactivating a previous theme does not undo changes to individual page content.

