The Variation Gallery is a powerful feature in Variation Monster for WooCommerce that enhances how product variations are displayed.
By default, WooCommerce allows only one image per variation, which limits how much visual information can be shown. However, with the Variation Gallery feature, admins can assign multiple images to each variation.
This means:
- Each variation (e.g., color or style) can have its own image gallery
- Customers can view multiple images for a selected variation
- Product presentation becomes more detailed and visually appealing
This feature helps customers better understand the product by viewing it from different angles or in different contexts, ultimately improving user experience and increasing conversion rates.
Why Use Variation Gallery?
- Displays multiple images for each variation
- Improves product clarity and visual presentation
- Helps customers make better purchasing decisions
- Ideal for products with different colors, styles, or designs
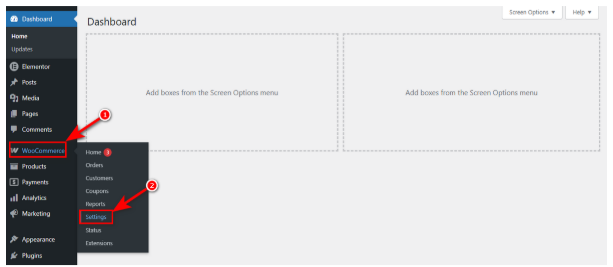
How to Access the Settings
- Go to WordPress Admin Panel → WooCommerce → Settings
- Click the Variation Monster tab
- Select the Variation Gallery tab
From here, you can configure all settings related to the Variation Gallery and manage how variation images are displayed on your store.
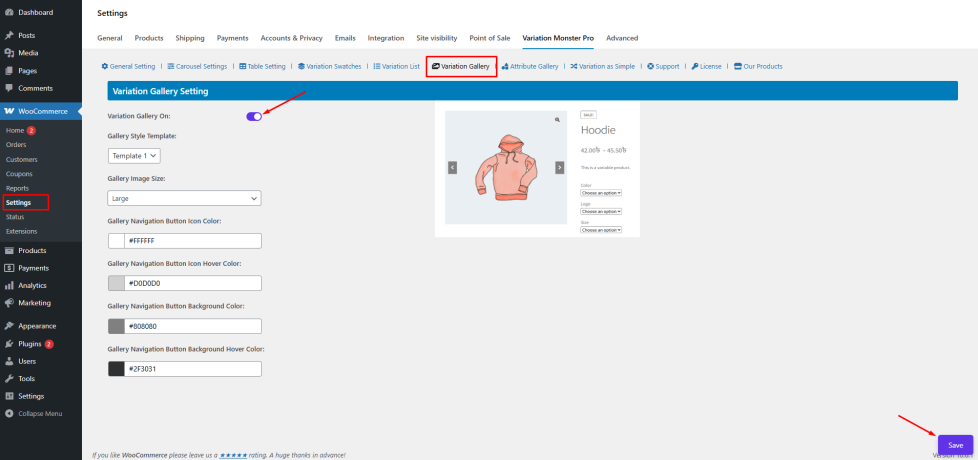
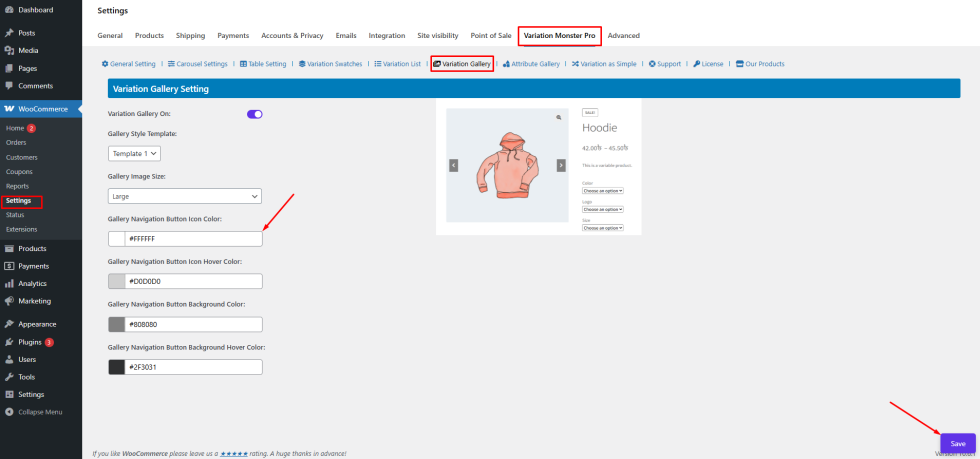
Variation Gallery On
↑ Back to topThe Variation Gallery Enable option allows you to activate the Variation Gallery feature for your WooCommerce products.
Once enabled, you can assign multiple images to each variation, instead of being limited to a single image as in the default WooCommerce system.
How to Configure
Step 1: Enable Variation Gallery
- Go to WordPress Admin Panel → WooCommerce → Settings
- Click the Variation Monster tab
- Navigate to the Variation Gallery section
- Enable the Variation Gallery option
- Click the Save button
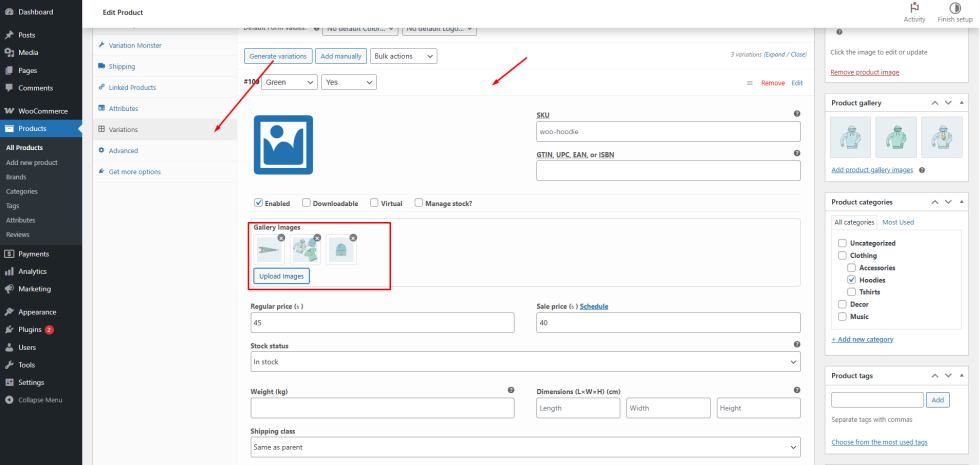
Step 2: Add Gallery Images to Variations
- Go to Products → Edit Product
- Scroll to the Product Data → Variations section
- Open any variation
- You will see a Variation Gallery Image Upload field (usually near the variation image/price section)
- Upload or select multiple images for that variation
- Repeat for other variations if needed
Click Update to save the product
Frontend Output
After configuration:
- When a customer selects a variation (e.g., color or size),
- The product gallery will update dynamically
- It will display all the images assigned to that specific variation
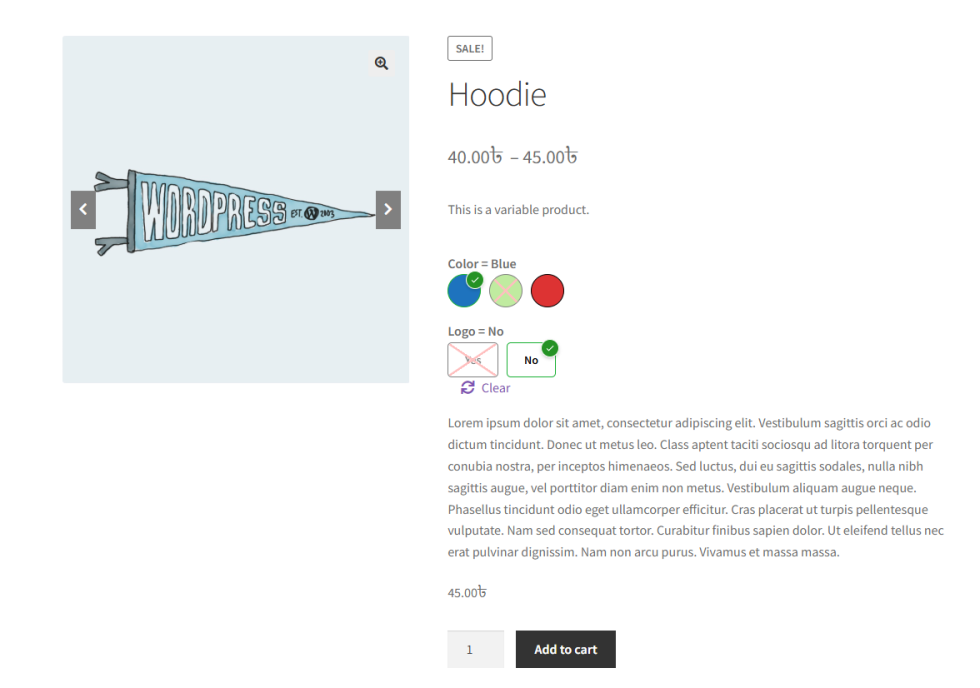
This allows customers to view multiple images for each variation, improving product clarity and enhancing the overall shopping experience.
How Gallery Style Template Works
↑ Back to topThe Gallery Style Template setting allows the admin to choose how the variation gallery images are displayed on the single product page.
Variation Monster provides five different gallery templates, giving flexibility to match your store’s design and layout preferences.
Each template offers a unique style for displaying images, such as different layouts, thumbnail positions, or gallery structures.
Why Use This Feature?
- Choose from multiple gallery layouts
- Match the gallery design with your website theme
- Improve visual presentation of variation images
- Enhance customer browsing experience
How to Configure
- Go to WordPress Admin Panel → WooCommerce → Settings
- Click the Variation Monster tab
- Navigate to the Variation Gallery section
- Locate the Gallery Style Template option
- Select your preferred template from the available five options
Click the Save button
Frontend Output
After saving the settings:
- The selected gallery template will be applied to the single product page
- When a customer selects a variation, the gallery will update using the chosen layout
- All assigned variation images will be displayed according to the selected template style
This ensures a more attractive and user-friendly product gallery experience.
Gallery Image Size
↑ Back to topThe Gallery Image Size setting allows the admin to control the size of images displayed in the Variation Gallery.
Choosing the correct image size is important for maintaining both visual clarity and performance. If images are too small, customers may not clearly see product details. If they are too large, it can affect page loading speed and layout.
With this setting, the admin can select from available image sizes such as:
- Thumbnail
- Medium
- Large
- WooCommerce Thumbnail
- WooCommerce Single
- WooCommerce Gallery Thumbnail
This ensures that gallery images are displayed in the most suitable size for your store.
How to Configure
- Go to WordPress Admin Panel → WooCommerce → Settings
- Click the Variation Monster tab
- Navigate to the Variation Gallery section
- Locate the Gallery Image Size option
- Select your preferred image size from the dropdown
- Click the Save button
Frontend Output
After saving the settings:
- All variation gallery images will be displayed using the selected image size
- When a customer selects a variation, the gallery updates with properly sized images
- This ensures a clear, consistent, and optimized viewing experience on the single product page