
This guide connects Anti-Fraud Shield for WooCommerce to Claude or Codex through the WordPress MCP Adapter. It covers read-only access first, then optional write access with administrator approval.
Before you start
↑ Back to topYou need:
- Anti-Fraud Shield for WooCommerce with its MCP feature available.
- A WordPress user allowed to access the Anti-Fraud Shield features you plan to use. A separate user for MCP is recommended.
- A WordPress Application Password for that user. Do not use the user’s normal WordPress password.
- Node.js and npx on the computer running Claude or Codex. The local MCP bridge uses them to connect the client to WordPress.
- HTTPS enabled on your WordPress site.
The bridge used below is Automattic’s `@automattic/mcp-wordpress-remote` package. It runs locally and forwards MCP requests to the WordPress endpoint. This is useful when the client cannot authenticate directly to the site’s MCP endpoint with a WordPress Application Password.
1. Prepare WordPress
↑ Back to top1. Sign in to WordPress Admin.
2. Open Settings → Permalinks. The REST API works best with a non-Plain permalink setting. If the REST API returns a 404, select a non-Plain option, save, and try again.
3. Confirm the WordPress REST API is available by opening https://your-site.example/wp-json in a browser. It should return JSON. Replace this example address with your site’s address.
4. Confirm the shared WordPress MCP Adapter is installed and active, or that your WooCommerce installation provides the adapter. Anti-Fraud Shield uses this shared adapter; it does not install a second adapter.
2. Enable Anti-Fraud Shield MCP
↑ Back to top1. In WordPress Admin, open WooCommerce → Anti-Fraud Shield → AI Assistant.
2. Under Model Context Protocol (MCP), turn on Enable MCP tools.
3. For the first connection test, leave Allow MCP write requests off.
4. Under Allowed Anti-Fraud Shield Features, allow only the features this MCP user needs.
5. Click Save AI Assistant Settings, then reload the page.
6. Confirm the MCP status says the server is enabled.
7. Copy the complete MCP endpoint shown on this page. Use that exact URL in the client setup below. Do not construct the URL from this guide: the path can differ between installations. For example, an installation may show a URL containing index.php?rest_route=… instead of a /wp-json/… path. The server ID shown on the settings page is useful when checking the connection, but the client configuration needs the full endpoint URL.
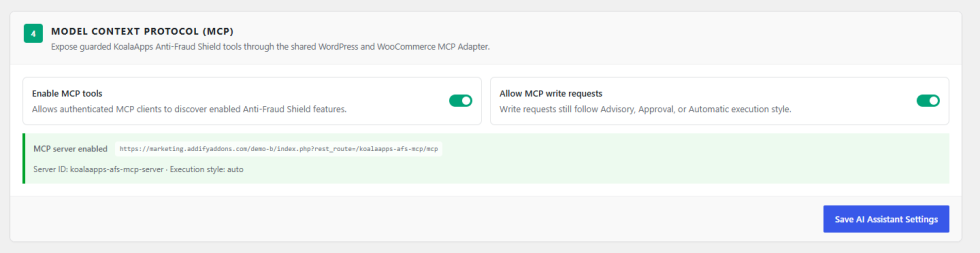
Illustration of the settings area. Copy the endpoint displayed in your own WordPress Admin.
The built-in Anti-Fraud Shield assistant’s AI provider is separate from MCP. Claude or Codex uses its own model and connects to the store’s MCP tools.
3. Create a WordPress Application Password
↑ Back to top1. Open Users → Profile for the WordPress user that MCP will use. You can create a separate user first if needed.
2. Find Application Passwords.
3. Enter a name such as Claude Anti-Fraud MCP or Codex Anti-Fraud MCP, then click Add New Application Password.
4. Copy the password when WordPress displays it. It is shown only once.
Keep this password private. WordPress Application Passwords are individual credentials for integrations and can be revoked from the same profile without changing the user’s normal password. Store owners should give the MCP user only the permissions it needs.
The client stores its MCP configuration on your computer, including the Application Password. Do not share that configuration file or paste its contents into support chats. Revoke the Application Password if it is exposed.
4. Connect Codex
↑ Back to topRun this in a terminal on the computer where Codex is installed. Replace the example endpoint, username, and password with your own values. Keep the single quotes around values, especially the Application Password, which may contain spaces. See the Codex MCP command reference for CLI details.
codex mcp add koalaapps-anti-fraud-shield \
–env ‘WP_API_URL=https://your-site.example/PASTE-THE-EXACT-ENDPOINT-HERE’ \
–env ‘WP_API_USERNAME=mcp_store_user’ \
–env ‘WP_API_PASSWORD=xxxx xxxx xxxx xxxx xxxx xxxx’ \
–env ‘OAUTH_ENABLED=false’ \
— npx -y @automattic/mcp-wordpress-remote@latest
Check that Codex has the server:
codex mcp list
If Codex was already open, restart it. In Codex, use /mcp or Settings → MCP Servers to confirm the server is enabled and its tools are listed.
5. Connect Claude Code
↑ Back to topRun this in a terminal on the computer where Claude Code is installed. Replace the example endpoint, username, and password with your own values. See Anthropic’s Claude Code MCP guide for other setup options and command details.
claude mcp add –scope user –transport stdio \
–env ‘WP_API_URL=https://your-site.example/PASTE-THE-EXACT-ENDPOINT-HERE’ \
–env ‘WP_API_USERNAME=mcp_store_user’ \
–env ‘WP_API_PASSWORD=xxxx xxxx xxxx xxxx xxxx xxxx’ \
–env ‘OAUTH_ENABLED=false’ \
koalaapps-anti-fraud-shield — npx -y @automattic/mcp-wordpress-remote@latest
Check the connection:
claude mcp list
In Claude Code, run /mcp to view the server and its tools. If it was already open when you added the server, restart Claude Code.
6. Connect Claude Desktop
↑ Back to topIn Claude Desktop, open Settings → Developer → Edit Config if your version provides that option. Add this entry under the existing mcpServers object. Do not replace other server entries. Replace the example endpoint, username, and password with your own values. Claude Desktop’s setup menus vary by version; check Anthropic’s current Claude Desktop MCP help if you do not see Edit Config.
{
“mcpServers”: {
“koalaapps-anti-fraud-shield”: {
“command”: “npx”,
“args”: [“-y”, “@automattic/mcp-wordpress-remote@latest”],
“env”: {
“WP_API_URL”: “https://your-site.example/PASTE-THE-EXACT-ENDPOINT-HERE”,
“WP_API_USERNAME”: “mcp_store_user”,
“WP_API_PASSWORD”: “xxxx xxxx xxxx xxxx xxxx xxxx”,
“OAUTH_ENABLED”: “false”
}
}
}
}
Save the file and fully quit and reopen Claude Desktop. Open Settings → Developer and confirm the server is running and its tools are available.
7. Test read-only access first
↑ Back to topIn Claude or Codex, ask:
“Use the Anti-Fraud Shield MCP tools to show me the current protection settings. This is a read-only request. Do not change anything.”
Allow the client to use the requested read-only tool if it asks. Confirm that the response contains Anti-Fraud Shield data from your store.
8. Optional: allow changes with approval
↑ Back to topOnly continue after the read-only test works.
1. Return to WooCommerce → Anti-Fraud Shield → AI Assistant in WordPress Admin.
2. Keep Execution Style set to Approval Mode.
3. Turn on Allow MCP write requests and save the settings.
4. Ask Claude or Codex for a small test change and explicitly ask it to submit the change for approval, without applying it automatically.
5. Review the proposed values in Activity & Audit Log. Approve only if the target and values are correct; otherwise deny it.
6. Check the relevant Anti-Fraud Shield setting to confirm the final result.
Important: A response saying a request is pending does not mean the setting has changed. Confirm the request appears in the Activity & Audit Log and verify the setting after approval. If the log is blank or does not load, do not repeatedly submit the same request. The site’s audit-history route or plugin may need attention from the plugin maintainer. Keep the store in Approval Mode while resolving that issue.
Execution modes
↑ Back to top| Mode | What happens |
|---|---|
| Suggestion Mode | The assistant gives instructions but does not change store data. |
| Approval Mode | The assistant queues a proposed change for administrator review. |
| Auto-Apply Mode | Allowed changes are applied immediately. Use only if you intentionally want to bypass the approval step. |
Allow MCP write requests is a separate control. It must be on for MCP changes to be accepted, whatever execution mode is selected.
Troubleshooting
↑ Back to topThe MCP endpoint returns 404
↑ Back to top- Confirm the REST API root at https://your-site.example/wp-json returns JSON.
- Try a non-Plain permalink setting and save it.
- Copy the full endpoint shown in the Anti-Fraud Shield MCP settings. Some WordPress sites use an index.php?rest_route=… endpoint; do not substitute the example route in this guide.
- If the endpoint still returns the site’s 404 page, ask the host to check WordPress rewrite rules and REST API access.
The MCP Adapter is not detected
↑ Back to top- Confirm the WordPress MCP Adapter is installed and active, or that your WooCommerce version provides it.
- Reload the Anti-Fraud Shield AI Assistant settings page and check the connection status.
Authentication fails or the client says authentication is unsupported
↑ Back to top- For this setup, connect through the local @automattic/mcp-wordpress-remote bridge shown above. Do not add the store endpoint as a direct HTTP server when using a WordPress Application Password.
- Confirm WP_API_URL is the exact full endpoint shown by Anti-Fraud Shield.
- Confirm WP_API_USERNAME is the WordPress login name, not an email address unless the email is also the login name.
- Confirm WP_API_PASSWORD is an Application Password, not the normal WordPress password.
- Keep OAUTH_ENABLED=false when using an Application Password with the bridge.
- Make sure HTTPS is working and that a security plugin, proxy, firewall, or host is not blocking authenticated REST requests.
- If you replace the Application Password, update the MCP configuration and restart the client.
The server connects but Anti-Fraud Shield tools are missing
↑ Back to top- Turn on Enable MCP tools.
- Allow at least one feature under Allowed Anti-Fraud Shield Features.
- Save the settings, reload WordPress Admin, and restart the client so it refreshes the tool list.
- Check the server status in Codex Settings → MCP Servers or by running /mcp in Claude Code.
A write request is rejected or does not apply
↑ Back to top- Confirm Allow MCP write requests is on.
- Confirm the MCP user has the required WordPress permissions and the requested feature is allowed.
- In Suggestion Mode, no change is made. In Approval Mode, approve the queued request before expecting a change. In Auto-Apply Mode, the change may apply immediately.
- If Approval Mode reports a queued request but no entry appears in Activity & Audit Log, do not submit it again until the log is working. Contact the plugin maintainer with the error and Anti-Fraud Shield version.
- Read the setting back after approval or automatic application to verify it changed.
Remove the connection
↑ Back to top1. In WordPress, turn off Enable MCP tools and save the settings.
2. In Users → Profile → Application Passwords, revoke the password created for MCP.
3. Remove the connection from the client:
codex mcp remove koalaapps-anti-fraud-shield
claude mcp remove koalaapps-anti-fraud-shield
For Claude Desktop, remove the koalaapps-anti-fraud-shield entry from the mcpServers configuration, save, and restart Claude Desktop.