
Product brands give you a dedicated way to organize products by manufacturer, label, or maker. Each brand can have its own name, description, image, and archive page.
Create a brand
↑ Back to top- Go to Products > Brands.
- Enter the brand details:
- Name: The name shown to customers.
- Slug: The URL-friendly version of the name. Leave this blank to generate it automatically.
- Parent brand: An optional parent for a brand hierarchy.
- Description: Text that your theme can display on the brand archive.
- Thumbnail: An image or logo for the brand.
- Select Add new brand.
The brand appears in the list on the right. Select a brand name to edit it. Deleting a brand removes the term and its product assignments, but does not delete the products.
Assign brands to products
↑ Back to top- Go to Products > All Products and edit a product.
- Find the Brands panel in the product editor.
- Select one or more existing brands, or add a new brand.
- Select Publish or Update.
WooCommerce uses these assignments for brand archives, shortcodes, product imports and exports, and other integrations.
Brand archive pages and permalinks
↑ Back to topWooCommerce creates an archive page for each brand. The archive lists products assigned to that brand. Its layout is controlled by your theme or site templates.
To change the URL base used by brand archives, go to Settings > Permalinks and edit Product brand base in the optional permalink settings.
You can also use %product_brand% as part of a custom product permalink structure. It cannot be the entire product base on its own. Include another segment, such as /product/%product_brand%/.
After changing permalink settings, select Save Changes and test a product URL and a brand archive URL.
Display brands with shortcodes
↑ Back to topAdd a Shortcode block to a page or post, then enter one of the following shortcodes.
product_brand
↑ Back to topBrand image links for the current product, or for the product selected with post_id.
[product_brand post_id="123"]brand_products
↑ Back to topProducts assigned to one or more brand slugs. It also accepts the standard WooCommerce products shortcode attributes.
[brand_products brand="alpine-outfitters" per_page="12" columns="4"]product_brand_list
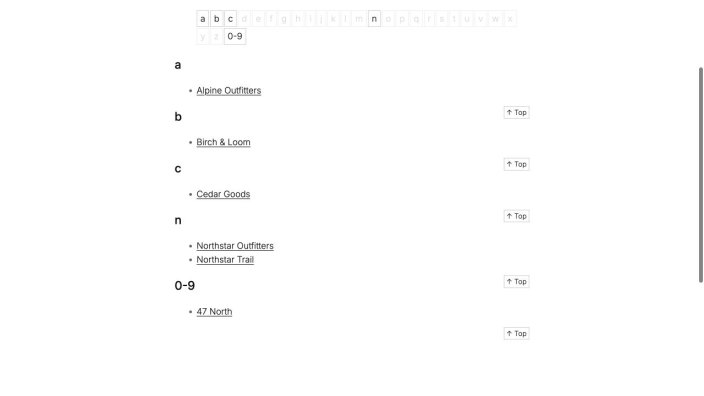
↑ Back to topAn A-Z list of brands.
[product_brand_list show_empty_brands="true"]product_brand_thumbnails
↑ Back to topA grid of brand thumbnail links.
[product_brand_thumbnails number="12" show_empty="false" columns="4"]product_brand_thumbnails_description
↑ Back to topBrand thumbnails with descriptions.
[product_brand_thumbnails_description number="12" show_empty="false"]The available attributes depend on the shortcode. Copy an example first, then change values such as the brand slug, product ID, number of results, or number of columns.
The A-Z list groups names under their first letter and groups names beginning with a number under 0-9.
Import and export product brands
↑ Back to topThe built-in Product CSV Importer and Exporter supports product brands.
- The CSV column heading is
Brands. - Separate multiple brands with commas.
- Use
Parent > Childfor a hierarchy. - Escape a comma that is part of a brand name as
\,.
When importing, map the CSV column to Brands if WooCommerce does not map it automatically. Export a small sample first if you need a template for your catalog.
Use brands with Google for WooCommerce
↑ Back to topGoogle for WooCommerce can map WooCommerce product data to Google’s required attributes. To send a product’s assigned brand, create an attribute mapping rule for Google’s Brand attribute and use the existing product field Taxonomies – Brands.
See Attribute mapping in Google for WooCommerce for the current setup steps and supported rule options.
Brand widgets for classic themes
↑ Back to topStores using classic widget areas can add these widgets under Appearance > Widgets:
- WooCommerce Brand Description: Displays the current brand description on a brand archive.
- WooCommerce Brand Layered Nav: Lets customers filter products by brand.
- WooCommerce Brand Thumbnails: Displays a grid of brand thumbnail links.
Widget availability and placement depend on your active theme. Block themes may use template blocks or shortcodes instead.
Developer resources
↑ Back to topFor custom integrations, use the current WooCommerce API references:
Questions and support
↑ Back to topDo you still have questions and need assistance?
This documentation is about the free, core WooCommerce plugin, for which support is provided in our community forums on WordPress.org. By searching this forum, you’ll often find that your question has been asked and answered before.
If you haven’t created a WordPress.org account to use the forums, here’s how.
- If you’re looking to extend the core functionality shown here, we recommend reviewing available extensions in the WooCommerce Marketplace.
- Need ongoing advanced support or a customization built for WooCommerce? Hire a Woo Agency Partner.
- Are you a developer building your own WooCommerce integration or extension? Check our Developer Resources.
If you weren’t able to find the information you need, please use the feedback thumbs below to let us know.