This bookings use case will walk through how to use WooCommerce and WooCommerce Bookings to set up a bookable room, and collect a deposit for the room in advance.
The optional deposit taking feature is powered by the WooCommerce Deposits plugin.
Scenario
↑ Torna in cimaYou have a room you would like make available for booking and you would like to collect a 25% deposit during checkout to hold the room.
Requirements include:
- the room can only be booked for an entire day at a time, not for specific time slots
- the room is available 7 days a week, 365 days a year
- the cost of the room varies by the type and number of people who will be using it – each adult is $85, each young adult is $25, and children are free
- the room can hold 5 people maximum but can be booked for any number of people between 1 and 5
- a 25% deposit on the cost of the room booking is required on checkout, with the remainder due when the room is actually used

Products Used
↑ Torna in cimaSetup and Configuration
↑ Torna in cimaCreating a Bookable Product
↑ Torna in cima- In the sidebar of your WordPress Admin, click on Products.
- Click on the Add New button on the top.
- Add a title to your new product, such as “Room Booking.”
- Under Product data select Bookable Product.
General Settings
↑ Torna in cima- On your newly created Bookable Product, or on an existing Bookable Product you are editing, scroll down to the Product Data > General tab.
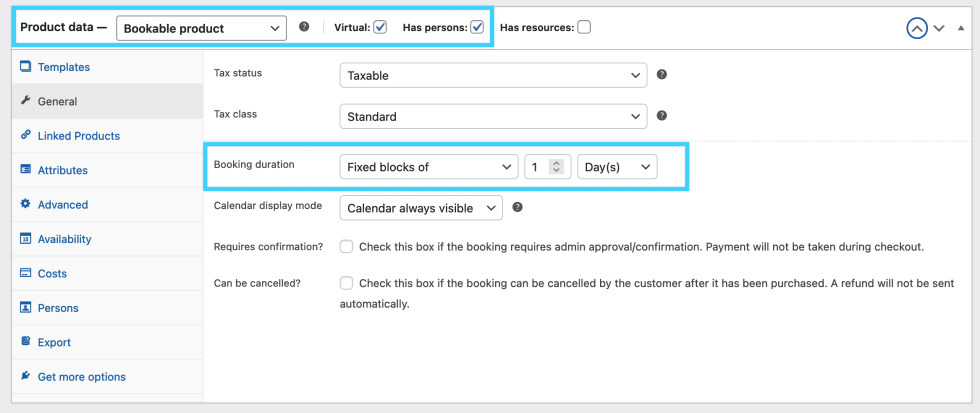
- Check the Virtual box to indicate that this product is virtual, as there is no physical item to be delivered. This will cause a booking for this room to be automatically marked as Complete once they are paid.
- Check the Has Persons box to allow the customer booking the room to indicate the number of persons that will be using the room. This allows you to alter the price of the room based on number of people, if required.
- Set the Booking Duration to be Fixed Blocks of 1 Day, as the room booking is for a specific date and books the room for the entire day.
Setting the Availability
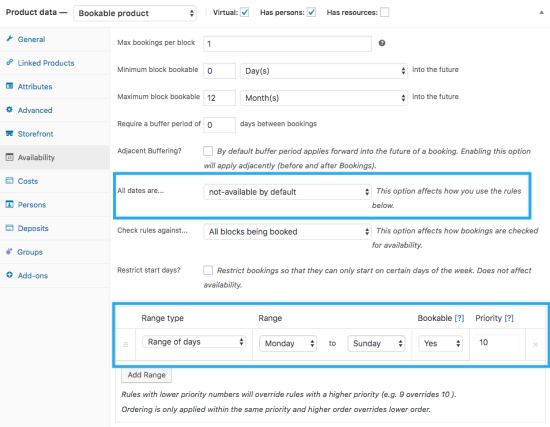
↑ Torna in cimaIn the Product Data box, click on the Availability tab. Here, we will set the days and dates that the room is available.
- Set Max Bookings per Block to 1, as we only have 1 room to offer; once it is booked, no other bookings are possible.
- Set Minimum block bookable and Maximum Block Bookable for allowed days in advance the room can be booked. In our example here, we are using a 0 day minimum, meaning same-day bookings are allowed, and a 12 month maximum, meaning tickets can be purchased for dates up to a year in advance.
- Setting the All dates are… to “not-available by default” is often the best approach when creating complex availability rules. It’s easier to then add days and dates when the booking is available in the Range Box. In this case, we will take that approach and set this setting to not-available by default.
- Use the Range Type and Days/Dates to set a range of Monday through Sunday and mark these days as available for booking by setting the “Bookable” column to “Yes.”
Setting up Persons
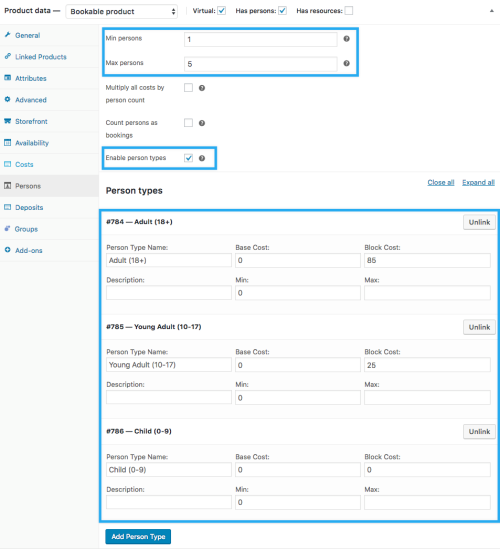
↑ Torna in cimaIn the Product Data box, click on the Persons tab. Here, we will set up the types of people who might use the room (Adult, Young Adult, and Child) and set prices for each.
- Set the Min Persons and Max Persons to the total number of persons allowed in the room for a single booking. In this case, we have set the minimum number of persons to 1 as at least 1 person must be using the room. The room can hold 5 people, so the maximum number of persons is 5.
- Do NOT check Count persons as bookings – this ensures that we enforce a maximum number of people at 5, but it’s all part of one total booking for the one room.
- Check Enable person types – this option will allow the creation of different types of people, i.e. Adult, Young Adult, and Child.
- Click the Add Person Type button to add a new person type. Give the new person type the name “Adult” with a base cost of $85. As an option, you can set the Minimum to 1, which would mean that each room booking must include at least one Adult.
- Click the Add Person Type button again to add a second person type. Give the new person type the name “Young Adult” with a base cost of $25 and set the minimum in this case to 0, as adding Young Adults to the room is optional.
- Click the Add Person Type button again to add a third person type. Give the new person type the name “Child” with a base cost of $0 and set the minimum in this case to 0, as adding Children to the room is optional.
Setting up Deposits
↑ Torna in cimaTaking a deposit is an optional feature and requires the use of WooCommerce Deposits.
If you have purchased and installed the WooCommerce Order Barcodes plugin, be sure to activate it and configure its basic settings. You can learn more about setting up the Deposits on the WooCommerce Deposits Setup and Configuration Page.
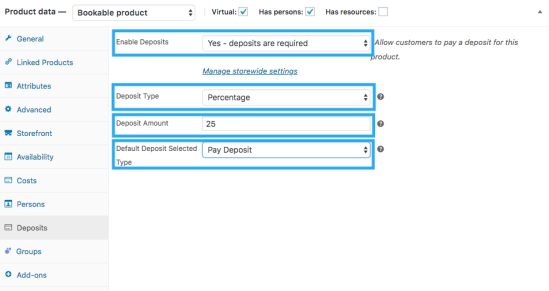
To set up deposits for your room booking product, in the Product Data box on the product’s editing page, click on the Deposits tab. Here, we will set up the required deposit amount and type.
- Under Enable Deposits, select “Yes – deposits are required.”
- WooCommerce Deposits allows you to take a deposit as a percentage, a fixed amount or a payment plan. For our example, we do not need a payment plan since we will collect the balance when our customer checks in to the room. We are going to choose percentage, but we could easily chose a fixed amount, it just depends on preference. So for this case, set Deposit Type to “Percentage.”
- Set Deposit Amount to “25” for a 25% deposit amount.
- Set Default Deposit Selected Type to “Pay Deposit” to indicate that only the deposit amount is due at checkout for the booking.
Publishing the Product
↑ Torna in cimaAs with all WooCommerce Products, you can optionally add a Product Image, Product Categories, and Product Tags for the Museum Tickets product.
Then, publish the product using the blue Publish button in the top right corner.
Questions and Support
↑ Torna in cimaSomething missing from this documentation? Do you still have questions and need assistance?
- Have a question before you buy this extension? Please fill out this pre-sales form – please include the name of this extension in your query.
- Already purchased and need some assistance? Get in touch with a Happiness Engineer via the WooCommerce.com Support page and choose this extension name from the “I need help with” dropdown