
SMTP & Email Logs for WooCommerce connects your store to authenticated email providers so WooCommerce transactional emails are sent through a trusted mailer instead of the default WordPress mail function.
The extension also keeps a centralized record of every outgoing email, making it easier to confirm delivery, troubleshoot failures, and resend messages when needed. For additional reliability, you can create multiple named connections and set one as the primary connection with optional fallbacks.
Features
↑ Back to top- Support for Brevo, Gmail / Google Workspace, Microsoft 365 / Outlook, Mailgun, SendGrid, Postmark, Maileroo, and Other SMTP providers
- Multiple named SMTP connections with independent credentials and sender settings
- Support for configuring the same mailer provider more than once
- One Primary connection and up to multiple active fallback connections
- Unlimited saved connections, with additional connections kept Inactive
- Automatic fallback delivery in priority order
- Drag-and-drop connection reordering
- Turn individual connections on or off without deleting their settings
- Per-connection test emails and connection health visibility
- Detailed email logs with connection names, roles, attempts, timestamps, and errors
- Resend, search, filter, export, and delete actions for email logs
Getting started
↑ Back to topWhat is SMTP?
↑ Back to topSimple Mail Transfer Protocol (SMTP) is the standard protocol used to send email. Using an authenticated mailer instead of the default PHP mail function generally improves delivery reliability and reduces the risk of messages being rejected or marked as spam.
What is fallback delivery?
↑ Back to topFallback delivery adds another layer of reliability. The plugin first sends through the Primary connection. If that attempt fails under one of the configured failure conditions, it automatically tries each enabled fallback connection in order until the message is delivered or every active connection has failed.
Connection roles
↑ Back to topEach enabled connection has one role in the delivery chain:
- Primary — the first connection used for every outgoing email.
- Fallback #1 — used when the Primary connection cannot deliver the email.
- Fallback #2 — used when the Primary and Fallback #1 attempts fail.
- Fallback #3 — used when the Primary, Fallback #1, and Fallback #2 attempts fail.
- Inactive — a saved connection that is not currently used for delivery.
Note: You can save any number of connections, but only enabled connections can participate in the delivery chain at the same time.
Installation
↑ Back to topTo install SMTP & Email Logs for WooCommerce from your WooCommerce.com account:
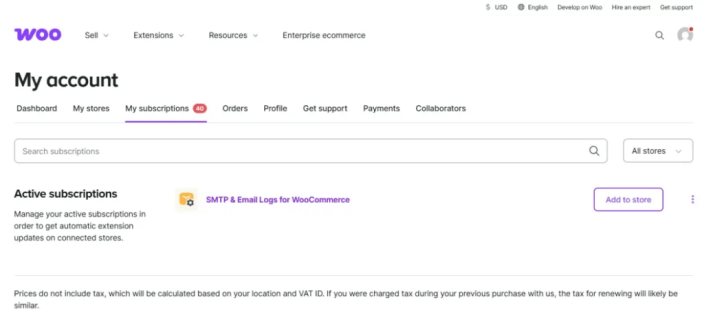
- Go to My subscriptions.
- Find SMTP & Email Logs for WooCommerce and select Add to store.
- Follow the on-screen instructions to connect your store and complete the installation.
For alternative installation methods, see Managing WooCommerce.com subscriptions and Adding a WooCommerce.com subscription to your store.
Manage SMTP connections
↑ Back to topOpen the Connections screen.
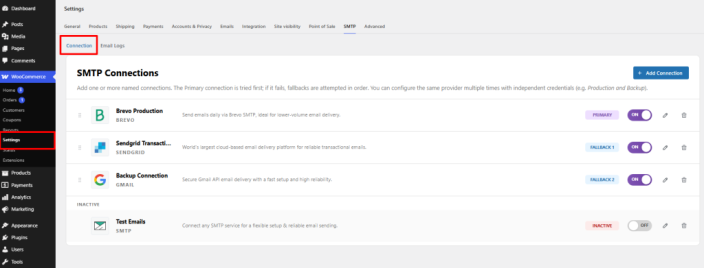
↑ Back to topFrom your store’s WP Admin dashboard, go to WooCommerce > Settings > SMTP > Connections.
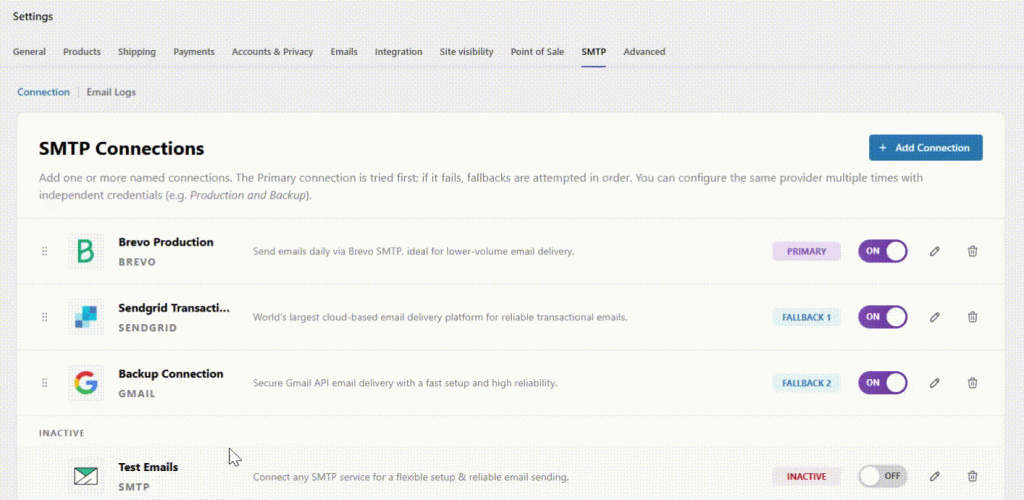
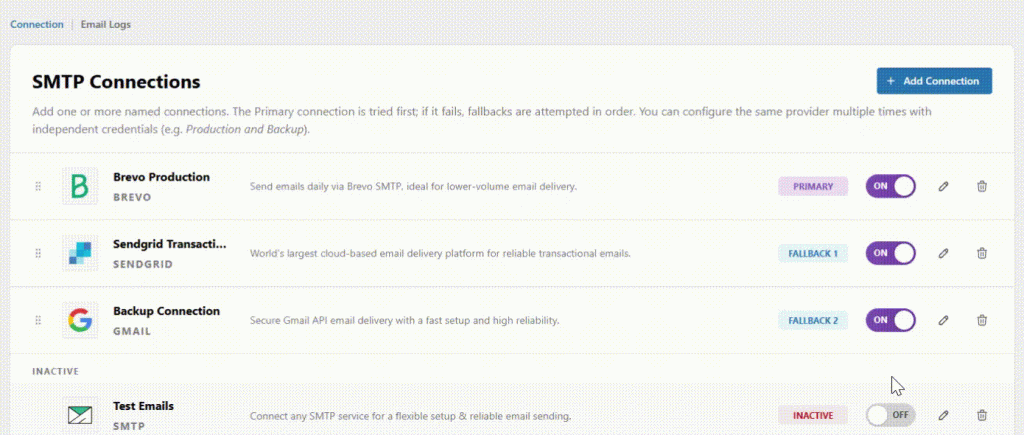
The SMTP Connections screen shows all saved connections in delivery order. Enabled connections appear first as Primary, Fallback #1, Fallback #2, and Fallback #3. Disabled connections remain saved as Inactive.
Connection card information
↑ Back to topEach connection card displays:
- Connection Name
- Mailer provider
- Current role
- Connection health and recent sending activity
- Turn toggle on or off
- Edit action
- Delete action
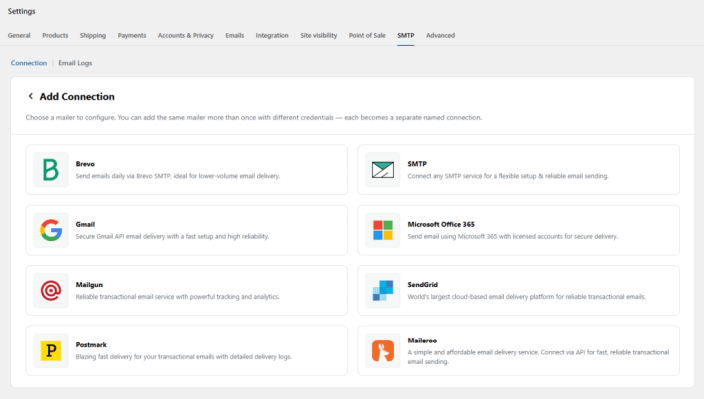
Add a New or Existing connection
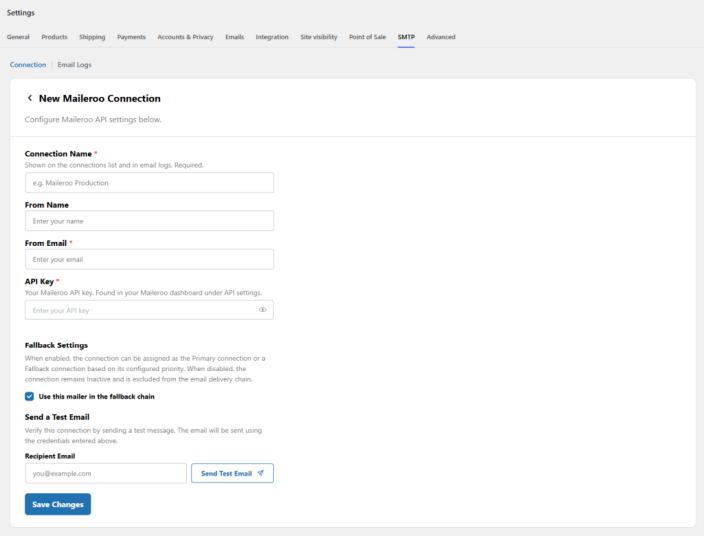
↑ Back to topTo create a new mailer connection:
- Select Add Connection.
- Choose a mailer provider from the available options. Providers that are already configured remain available so that you can create another connection using separate credentials.
- Enter a unique Connection Name, such as “Brevo Production” or “Other SMTP Backup.”
- Complete the provider credentials and sender settings.
- Enable the connection and assign its role, or leave it Inactive for later use.
- Send a test email, then click Save Changes.
You have selected the same mailer provider for fallback delivery. A separate connection will be created using the same provider type with independent credentials and settings.
Connection settings
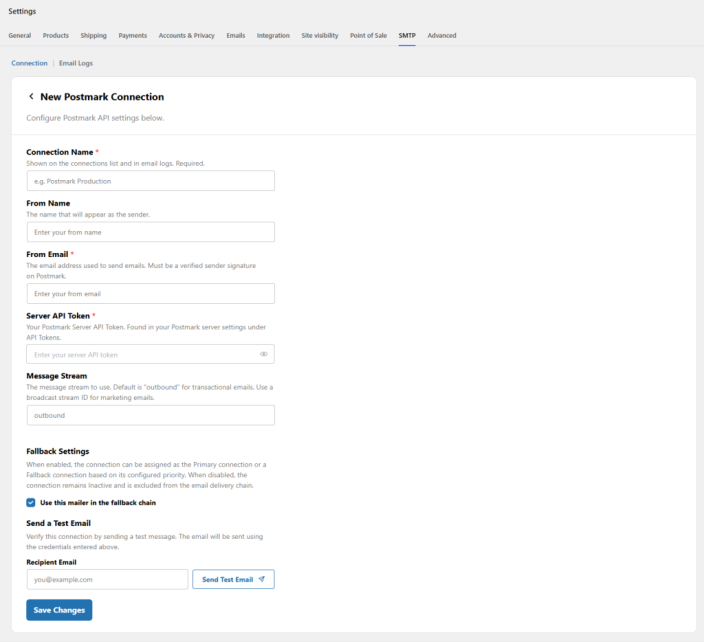
↑ Back to topThe fields shown depend on the selected mailer provider. A connection can include:
- Connection Name — required, 1–60 characters, and unique for that mailer provider
- Enable Connection
- Assigned Role
- From Email
- From Name
- Provider-specific credentials, such as SMTP host, port, username, password, API key, OAuth client ID, or OAuth client secret
A connection with this name already exists for this mailer provider. Enter a different Connection Name before saving.
Select & Configure each mailer provider.
↑ Back to topThe steps below explain how to obtain credentials for each supported provider and add them to a named connection. Start from WooCommerce > Settings > SMTP > Connections, select Add Connection, choose the provider, and enter a unique Connection Name. After completing the provider settings, send a test email and save the connection. You can then enable it and place it in the Primary or fallback chain.
Other SMTP providers
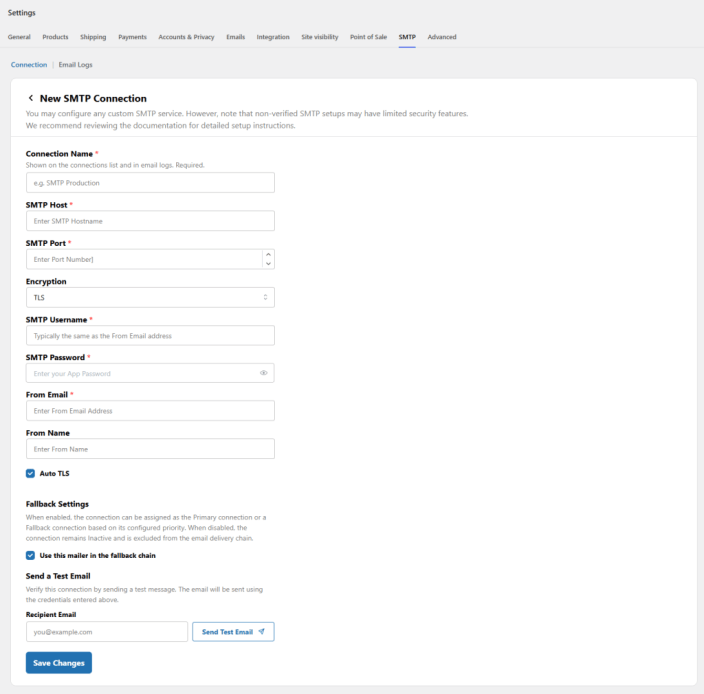
↑ Back to topUse Other SMTP when your email service is not listed or when your provider gives you standard SMTP credentials.
Get the SMTP details from your email provider:
- SMTP Host
- SMTP Port
- Encryption type, such as TLS or SSL
- SMTP Username
- SMTP Password
- Sender email address
In the plugin:
- Select Add Connection, then choose Other SMTP.
- Enter a unique Connection Name.
- Enter the From Name and From Email.
- Enter the SMTP Host, Port, Encryption, Username, and Password supplied by your provider.
- Enable SMTP authentication when your provider requires it.
- Send a test email. When the test succeeds, select Save Connection.
Brevo (formerly Sendinblue)
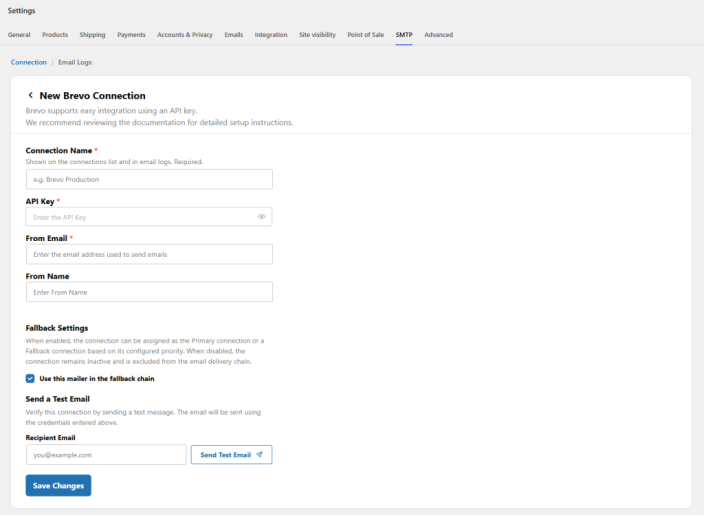
↑ Back to topBrevo uses an API key to authenticate the connection.
Create a Brevo API key:
- Sign in to your Brevo account.
- Open Settings > SMTP & API > API Keys & MCP.
- Select Generate a new API key.
- Name the key, generate it, and copy it immediately. Brevo displays the full key only when it is created.
Add Brevo to the plugin:
- Select Add Connection, then choose Brevo.
- Enter a unique Connection Name.
- Enter the API Key and From Email.
- Send a test email, then select Save Connection.
Make sure the sender address is authorized in Brevo before using the connection for live emails.
Gmail / Google Workspace
↑ Back to topGmail and Google Workspace use OAuth credentials instead of a normal mailbox password.
Create Google OAuth credentials:
- Open Google Cloud Console and create a project or select an existing project.
- Go to APIs & Services > Library, find Gmail API, and enable it.
- Configure the OAuth consent screen when prompted.
- Go to APIs & Services > Credentials and create an OAuth Client ID.
- Choose Web application as the application type.
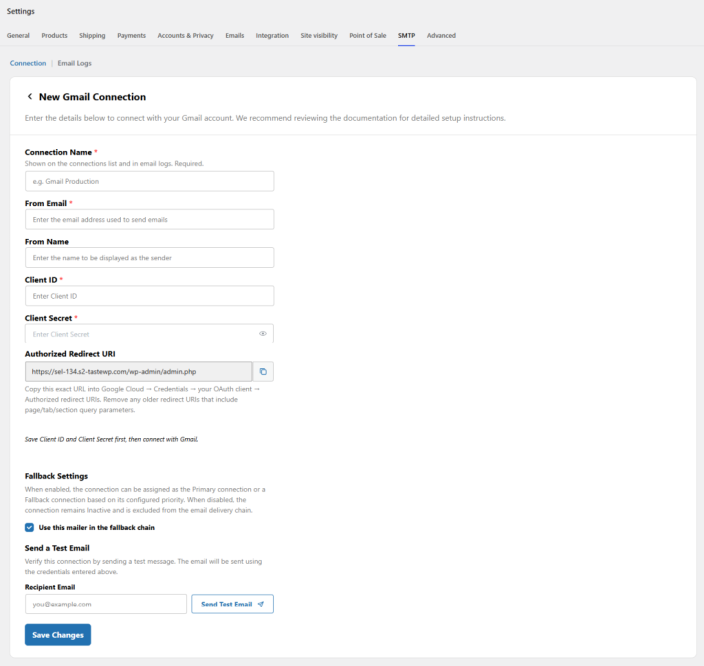
- Copy the Redirect URL displayed by the plugin and add it under Authorized redirect URIs.
- Create the credentials and copy the Client ID and Client Secret.
Add Gmail to the plugin:
- Select Add Connection, then choose Gmail / Google Workspace.
- Enter a unique Connection Name.
- Enter the From Name, From Email, Client ID, and Client Secret.
- Complete the Google authorization step shown by the plugin and grant the requested permission.
- Send a test email, then select Save Connection.
Use the authorized Google account address or an allowed sending alias as the From Email.
Microsoft 365 / Outlook
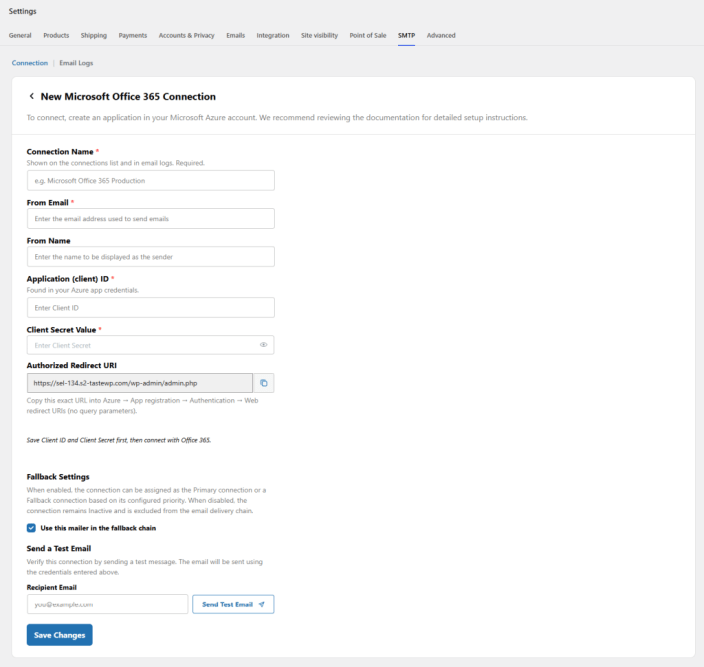
↑ Back to topMicrosoft 365 and Outlook connections use OAuth credentials created in Microsoft Entra ID.
Create Microsoft OAuth credentials:
- Open the Microsoft Azure portal and go to Microsoft Entra ID.
- Select App registrations, then select New registration.
- Enter an application name and complete the registration.
- Add a Web redirect URI using the Redirect URL displayed by the plugin.
- Copy the Application (client) ID.
- Open Certificates & secrets and create a new client secret.
- Copy the client secret Value when it is displayed.
Add Microsoft 365 / Outlook to the plugin:
- Select Add Connection, then choose Microsoft 365 / Outlook.
- Enter a unique Connection Name.
- Enter the From Name, From Email, Client ID, and Client Secret Value.
- Complete the Microsoft authorization step shown by the plugin.
- Send a test email, then select Save Connection.
Copy the client secret Value, not its Secret ID.
Mailgun
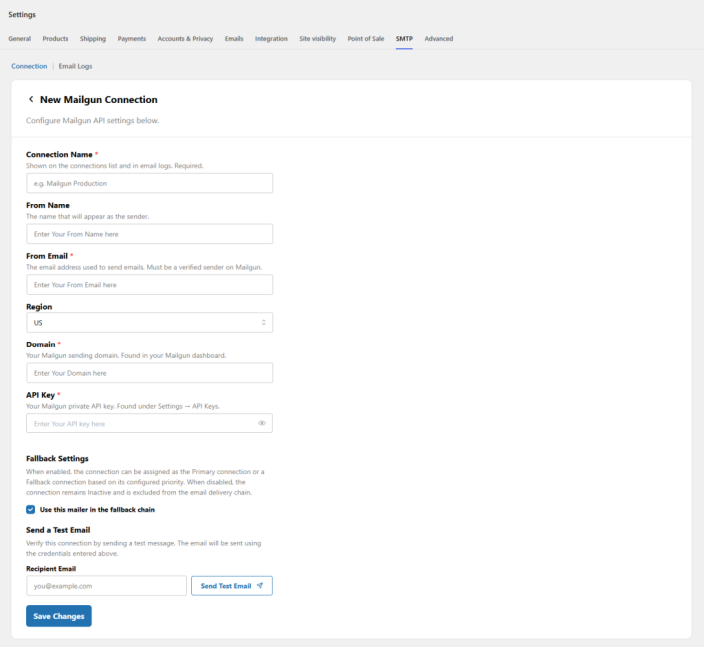
↑ Back to topMailgun requires a private API key and a verified sending domain.
Prepare the Mailgun account:
- Sign in to Mailgun and open Settings > API Keys.
- Copy the Private API Key.
- Go to Sending > Domains and select the domain you will use.
- Complete Mailgun’s DNS verification for the domain before sending live emails.
Add Mailgun to the plugin:
- Select Add Connection, then choose Mailgun.
- Enter a unique Connection Name.
- Enter the From Name, From Email, Domain, Region, and API Key.
- Choose the region that matches the Mailgun account and sending domain.
- Send a test email, then select Save Connection.
Postmark
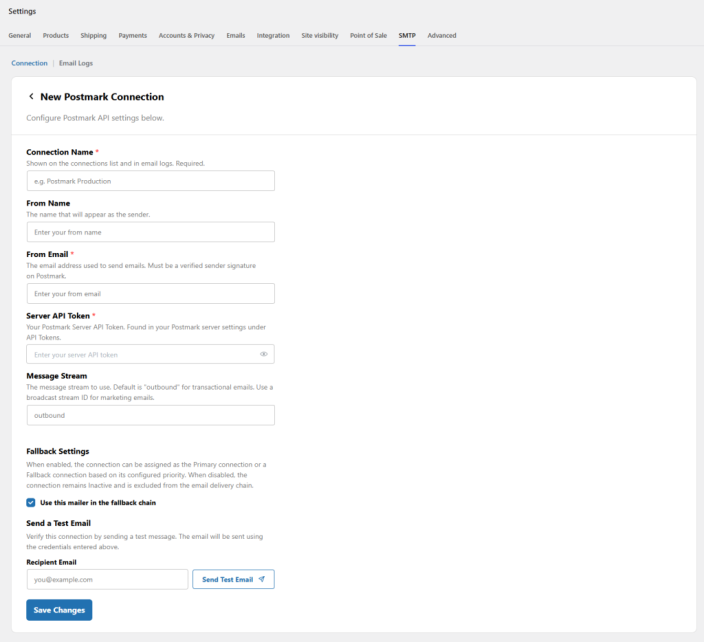
↑ Back to topPostmark authenticates the connection with a Server API Token and can route mail through a selected Message Stream.
Get the Postmark credentials:
- Sign in to Postmark and open Servers.
- Select the server used for WooCommerce emails.
- Open API Tokens and copy the Server API Token.
- Open Message Streams and identify the transactional stream you want to use.
Add Postmark to the plugin:
- Select Add Connection, then choose Postmark.
- Enter a unique Connection Name.
- Enter the From Name, From Email, Server API Token, and Message Stream.
- Send a test email, then select Save Connection.
The From Email must use a sender signature or domain verified in Postmark.
SendGrid
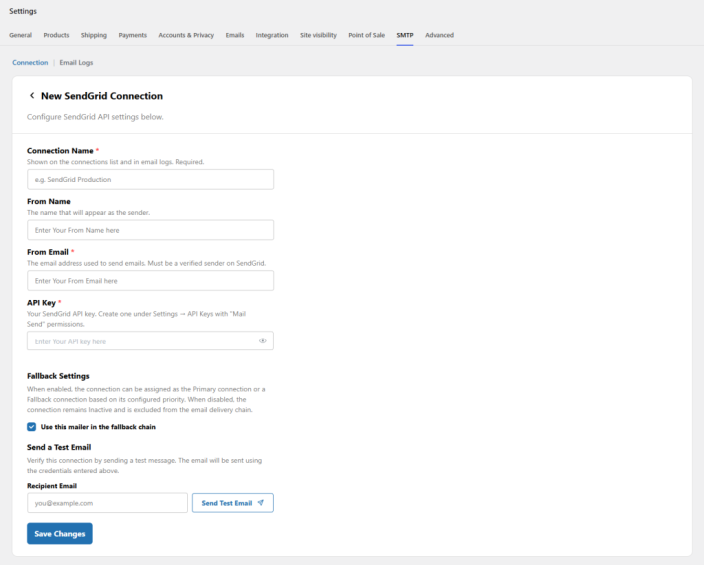
↑ Back to topSendGrid uses an API key with permission to send email.
Create a SendGrid API key:
- Sign in to SendGrid and go to Settings > API Keys.
- Select Create API Key.
- Give the key permission to send email, then create and copy it.
Add SendGrid to the plugin:
- Select Add Connection, then choose SendGrid.
- Enter a unique Connection Name.
- Enter the From Name, From Email, and API Key.
- Send a test email, then select Save Connection.
The From Email must belong to a verified Sender Identity or authenticated domain in SendGrid.
Maileroo
↑ Back to topMaileroo provides API-based email delivery.
Create a Maileroo API key:
- Sign in to Maileroo.
- Open Settings > API Keys.
- Generate a new API key and copy it.
Add Maileroo to the plugin:
- Select Add Connection, then choose Maileroo.
- Enter a unique Connection Name.
- Enter the From Name, From Email, and API Key.
- Send a test email, then select Save Connection.
Confirm that the sender or sending domain is verified in Maileroo.
Test an individual connection.
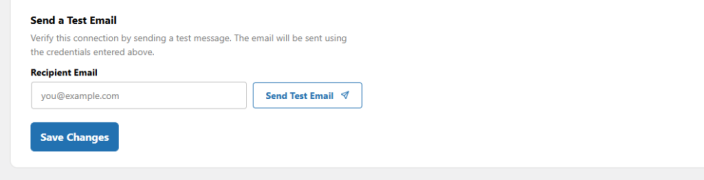
↑ Back to topUse Send a Test Email on a connection’s settings screen to verify that connection before relying on it for live store emails. The test uses the credentials currently entered in that form, including unsaved changes, and does not switch to another connection.
- Enter the recipient email address.
- Select Send Test Email.
- Review the success or failure message displayed below the test form.
Test email sent successfully.
Failed to send. Check the connection credentials and try again.
Assign connection roles
↑ Back to topOnly one enabled connection can occupy each active role. Assign roles to connections rather than to provider types, so two connections using the same provider can be placed in different positions in the chain.
When you assign an occupied role to another connection, the remaining enabled connections are reordered to keep a continuous Primary-to-Fallback sequence. The updated order applies to subsequent email deliveries.

Note: Enable the checkbox for Email delivery always starts with the connection currently assigned as Primary.
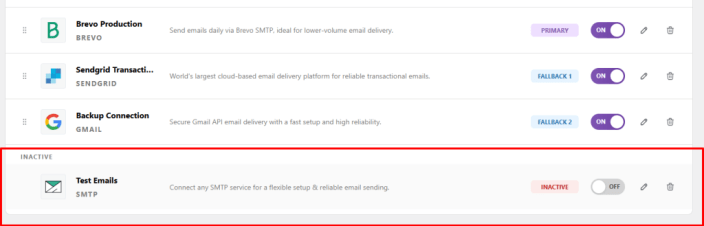
Turn a connection on or off.
↑ Back to topTurn a connection ON to make it available for email delivery. When a role is available, the connection is placed in the next open fallback position. When all four active roles are occupied, additional saved connections remain Inactive until a role becomes available or you manually reorganize the chain. The turn OFF connection would be displayed as the INACTIVE in the connection table.
Reorder connections
↑ Back to topDrag and drop enabled connections on the Connections screen to change delivery priority. After reordering:
- The first enabled connection becomes Primary.
- The second becomes Fallback #1.
- The third becomes Fallback #2.
- The fourth becomes Fallback #3.
The updated priority takes effect immediately for new outgoing emails. A delivery already in progress continues with the order that was active when it started.
Delete a connection
↑ Back to topSelect the delete action on a connection card, then confirm the deletion. The remaining enabled connections are reordered automatically.
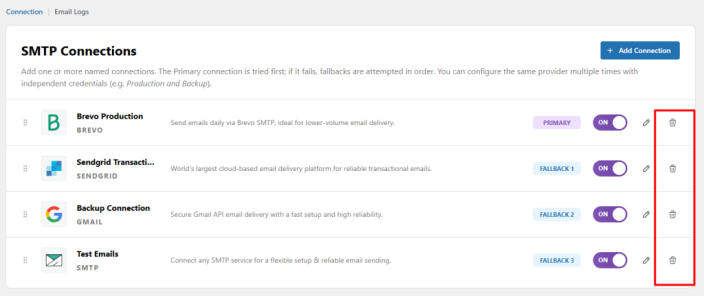
Note: Deleting or renaming a connection does not change historical email logs. Existing logs keep the Connection Name and role recorded at the time of delivery.
Configure fallback settings
↑ Back to topFallback Settings are available in the Primary connection settings. These options control how the plugin responds when delivery through the Primary connection fails.
You can configure:
- Fallback Delivery — turn on or off automatic use of fallback connections
- Retry Count — the number of retries allowed before moving to the next connection
- Retry Delay — the waiting period between retry attempts
- Failure Conditions — the errors that trigger fallback delivery, such as connection timeouts, authentication errors, or provider rejection responses
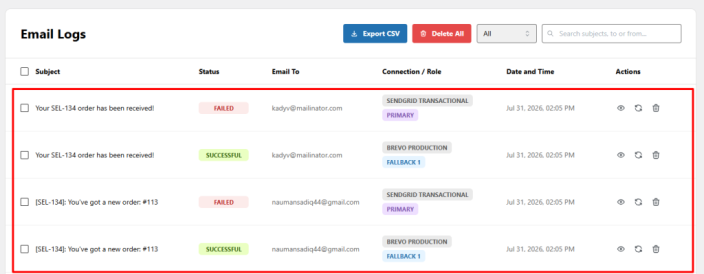
Note: Fallback Settings are configured on the Primary connection and apply globally to the delivery process. All configured fallback connections inherit this behavior.
How fallback delivery works
↑ Back to topFor every outgoing email, the plugin follows this sequence:
- Attempt 1: Send through the Primary connection.
- If the Primary succeeds, mark the email Successful, record one attempt, and stop.
- If the Primary fails and the failure matches the configured fallback conditions, try Fallback #1.
- If Fallback #1 fails, try Fallback #2.
- If Fallback #2 fails, try Fallback #3.
- If any fallback succeeds, mark the email Successful and record the connection that delivered it.
- If every enabled connection fails, mark the email Failed, stop delivery, and keep the message available for resend.
Disabled and Inactive connections are skipped. Every attempted connection is recorded, whether the attempt succeeds or fails.
Email logs
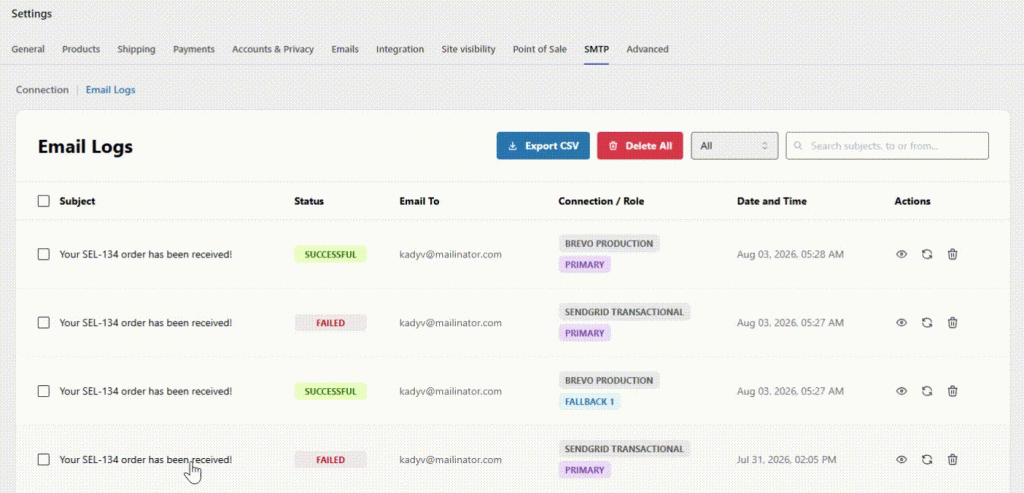
↑ Back to topThe plugin automatically logs WooCommerce emails and their delivery attempts. Logs provide a clear record of which named connection was used, whether fallback delivery was needed, and where a failure occurred.
View email logs
↑ Back to topFrom your store’s WP Admin dashboard, go to WooCommerce > Settings > SMTP > Email Logs.
Use the status filter and search field to find messages by subject, recipient, or Connection Name. You can also export logs to CSV or delete logs you no longer need.
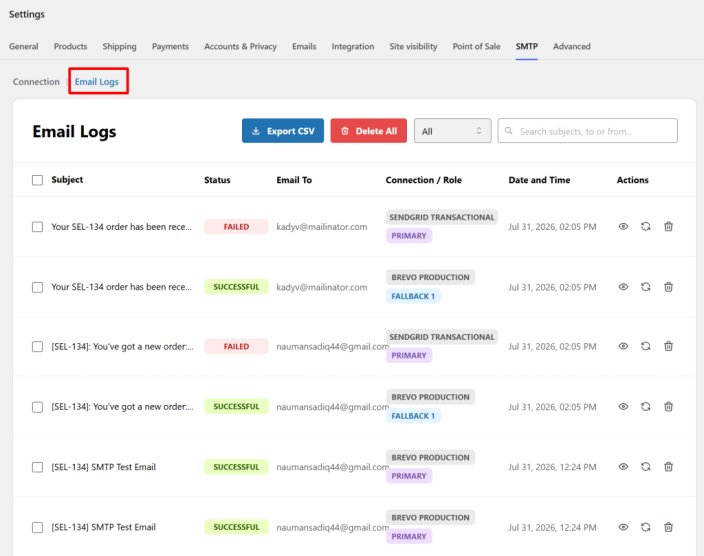
Information recorded in each log
↑ Back to top- Email subject
- Recipient email address
- Final delivery status
- Connection Name used for successful delivery
- Mailer provider
- Role at the time of the attempt
- Total number of attempts
- Timestamp
- Error message for failed attempts
- Actions to view, resend, export, or delete the email
View fallback history
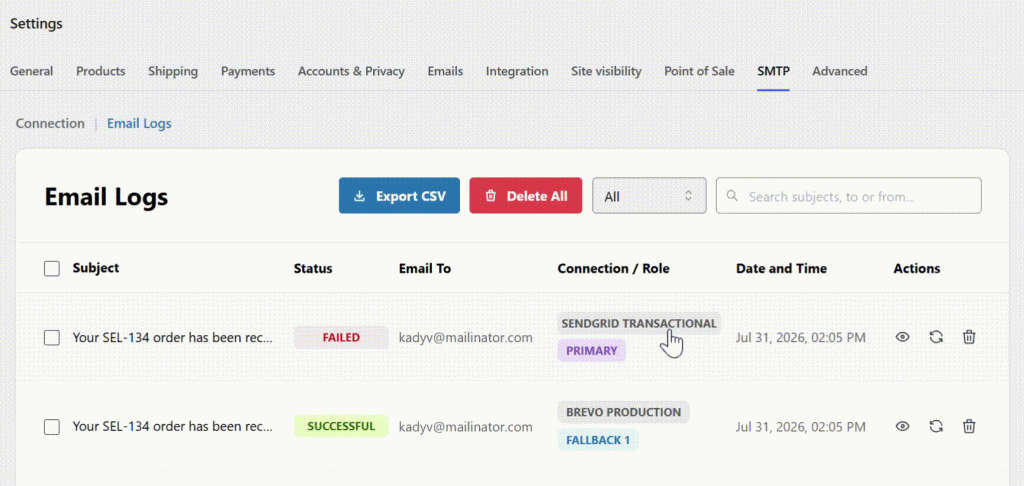
↑ Back to topOpen an email log to view the complete delivery history. When more than one connection was attempted, the Fallback History section lists each attempt in order, including:
- Attempt number
- Connection Name
- Mailer provider
- Role
- Successful or Failed result
- Error message, when applicable
- Timestamp
Note: Fallback History is hidden when the Primary connection delivers the email on the first attempt.
View logs on an order
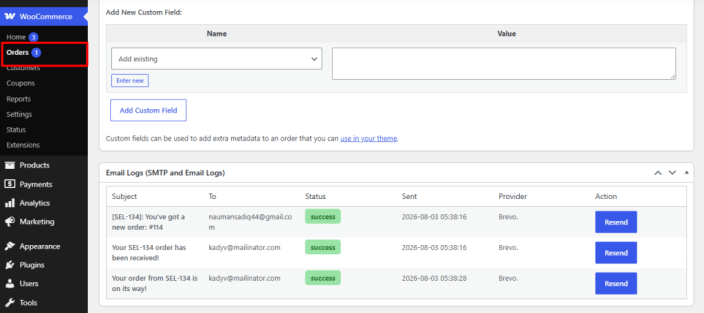
↑ Back to topYou can also review the emails associated with an individual order. Go to WooCommerce > Orders, open the order, and view the SMTP & Logs section to see the related delivery records.
Resend emails
↑ Back to topIf an email remains Failed after all enabled connections have been attempted, you can resend it from the Email Logs screen.
How to resend an email
↑ Back to top- Go to WooCommerce > Settings > SMTP > Email Logs.
- Find the email marked Failed.
- Select Resend in the Actions column or from the Email Log detail panel.
- The plugin starts a new delivery attempt using the currently active Primary and fallback order.
- Open the updated log to review the new result and attempt history.
Note: If an email repeatedly fails, test the active connections and review the error shown for each attempt before resending again.
Was this guide helpful for you?

