BL Bulk Product Image Uploader helps you upload multiple product images and assign them to the correct products in a single workflow.
Instead of opening and editing each product individually, simply prepare your image filenames, upload your images, review the matches, and start the upload.
The extension supports matching products by:
- SKU
- Product ID
- Product Slug
It also supports:
- Simple products
- Variable products
- Individual product variations
Whether you’re launching a new store, importing supplier images, migrating from another ecommerce platform, or updating an existing catalog, the extension helps simplify product image management while giving you full control over the upload process.
Before You Begin
↑ Back to topBefore uploading images, make sure that:
- WordPress and WooCommerce are installed and activated.
- You have permission to manage WooCommerce products.
- Your products already exist in your store.
- Your image filenames use the correct product identifiers.
Installation
↑ Back to top- Install BL Bulk Product Image Uploader.
- Activate the extension.
- In your WordPress dashboard, open:
WooCommerce → Bulk Image Uploader
The uploader is now ready to use.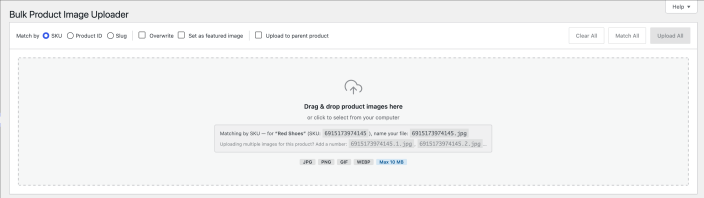
Understanding How Images Are Assigned
↑ Back to topThe extension uses your image filenames to determine which product each image belongs to.
Before uploading, choose one matching method:
Match by SKU
↑ Back to topThe extension searches for products whose SKU matches the filename.
Example:
TSHIRT-001.jpg
matches the product whose SKU is:
TSHIRT-001
Match by Product ID
↑ Back to topThe extension searches using the product’s WordPress Product ID.
Example:
125.jpg
matches Product ID:
125
Match by Product Slug
↑ Back to topThe extension searches using the product slug.
Example:
blue-tshirt.jpg
matches the product whose slug is:
blue-tshirt
Choose the matching method that best fits how your product catalog is organized.
Preparing Image Filenames
↑ Back to topThe recommended filename format is:
IDENTIFIER.SORT_POSITION.extension
Example:
TSHIRT-001.0.jpg
Where:
| Part | Description |
|---|---|
| TSHIRT-001 | SKU, Product ID, or Product Slug |
| 0 | Gallery position |
| jpg | Image format |
The gallery position determines where the image is inserted into the product gallery.
If no gallery position is included, the image is added using the default position.
Supported Image Formats
↑ Back to topBy default, the extension accepts the image formats supported by WordPress, including:
- JPG
- PNG
- GIF
- WEBP
Additional image formats may be available if they have been enabled on your website.
Understanding Products and Variations
↑ Back to topWooCommerce stores images differently depending on the product type.
Simple Products
↑ Back to topSimple products contain:
- A product gallery
- A featured image
Images uploaded to a simple product can be added to the gallery, set as the featured image, or both.
Variable Products
↑ Back to topVariable products contain:
- A parent product
- One or more product variations
Each variation can have its own image, while the parent product has its own gallery and featured image.
This allows you to upload images either to the parent product or directly to individual variations, depending on the upload options you choose.
Before Your First Upload
↑ Back to topBefore uploading a large batch of images, we recommend importing a small number of images first.
A small test upload allows you to:
- Confirm that filenames match the correct products.
- Verify gallery positions.
- Check featured image behavior.
- Confirm that upload options produce the expected results.
Once you’re happy with the results, you can confidently upload the rest of your image library.
Uploading Images
↑ Back to topUploading images is completed in five simple steps:
- Choose how products will be matched.
- Add your images.
- Review the matches.
- Configure the upload options.
- Upload your images.
Taking a few moments to review your matches before uploading can help avoid assigning images to the wrong products.
Step 1 – Choose a Matching Method
↑ Back to topBefore adding images, select how the extension should identify your products.
You can match images using:
- SKU
- Product ID
- Product Slug
The selected method should match the identifiers used in your image filenames.
For example, if your filenames contain product SKUs, choose Match by SKU.
Step 2 – Add Your Images
↑ Back to topAdd images by dragging and dropping them into the upload area or by selecting them from your computer.
As each image is added, the extension reads its filename and extracts:
- The product identifier
- The gallery position (if provided)
The upload list is then prepared for matching.
Step 3 – Review the Matches
↑ Back to topThe extension attempts to match every image to the correct product automatically.
Each uploaded image displays its current matching status so you can quickly identify images that need attention.
Before uploading, you can:
- Review the matched product.
- Edit the product identifier.
- Change the gallery position.
- Search for another product manually.
- Retry matching for an individual image.
Reviewing matches before uploading helps ensure images are assigned to the correct products.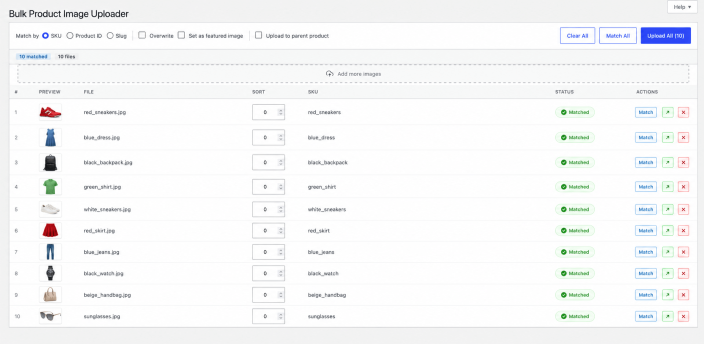
Searching for Products
↑ Back to topIf an image cannot be matched automatically, or if you want to choose a different product, you can search for products directly from the upload list.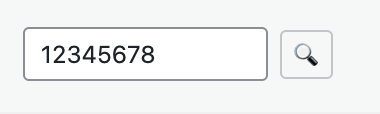
The product search supports:
- Product name
- SKU
- Product ID
- Product Slug
Matching search results display product information to help you select the correct product.
After selecting a product, the image is ready for upload.
Gallery Position
↑ Back to topEach image can include a gallery position.
Gallery positions determine where images appear within the product gallery.
For example:
TSHIRT-001.0.jpg
TSHIRT-001.1.jpg
TSHIRT-001.2.jpg
These images are added to the gallery in the same order.
If no gallery position is provided, the extension uses the default position.
Gallery position only affects the product gallery.
It does not determine which image becomes the featured image.
Upload Progress
↑ Back to topOnce the upload starts, the extension displays progress information throughout the process.
During the upload you can monitor:
- Current image being processed
- Overall progress
- Successfully uploaded images
- Failed uploads
- Images that could not be matched
When the upload finishes, a summary is displayed.
Upload Results
↑ Back to topAfter the upload completes, review the summary before leaving the page.
The summary helps identify:
- Images uploaded successfully
- Images that could not be matched
- Upload failures
If any images fail to upload, you can correct the issue and upload those images again.
Automatic Retry
↑ Back to topTemporary upload failures can occasionally occur because of server limits or temporary interruptions.
When this happens, the extension automatically retries failed uploads before reporting them as failed.
In many cases, no action is required.
Working with Simple Products
↑ Back to topSimple products contain:
- A product gallery
- A featured image
Depending on the upload options you choose, imported images can:
- Be added to the gallery.
- Replace the existing gallery.
- Become the featured image.
Working with Variable Products
↑ Back to topVariable products are made up of a parent product and one or more product variations.
The extension supports uploading images to both.
Understanding where an image is uploaded is important before starting a large import.
Uploading to the Parent Product
↑ Back to topUploading to the parent product adds images to the main product gallery.
These images are shared by the product and are typically displayed on the main product page.
Choose this approach when the images represent the product as a whole rather than a specific variation.
Uploading to Product Variations
↑ Back to topEach product variation can have its own image.
When an image is matched directly to a variation, it is assigned only to that variation.
This allows different sizes, colors, or other variations to display different images.
Uploading Variation Images to the Parent Product
↑ Back to topWhen Upload to Parent Product is enabled, images matched to variations are added to the parent product instead of the variation itself.
This option is useful when variation images should also appear in the main product gallery.
Before Uploading a Large Batch
↑ Back to topBefore uploading hundreds of images, it is recommended to perform a small test upload.
A test upload helps verify that:
- Filenames match the expected products.
- Gallery positions are correct.
- Variation images are assigned as expected.
- Upload options produce the desired results.
Testing with a small number of images can help avoid making large changes that need to be corrected later.
Upload Options Overview
↑ Back to topThe extension provides several upload options that control how images are assigned to products.
Each option affects a different part of the product image structure:
- Product gallery
- Featured image
- Product variations
- Parent product gallery
Understanding how these options work together helps ensure images are assigned correctly.
Overwrite Existing Gallery
↑ Back to topWhen enabled, the extension removes the current product gallery before adding new images.
This option is useful when you want to fully replace existing product images.
What it affects
- Product gallery only
- Does not remove product variations
- Does not automatically change the featured image unless also selected
Important behavior
If multiple images are uploaded for the same product with Overwrite enabled:
- The gallery is cleared each time new images are processed for that product
- Only the last processed image remains in the final gallery state
This is expected behavior when replacing a full gallery.
Set as Featured Image
↑ Back to topWhen enabled, the uploaded image is set as the product’s featured image.
The featured image is the main image shown for a product in WooCommerce.
Key points
- Featured image is updated independently of the gallery
- Gallery position does not affect featured image selection
- The last processed image becomes the final featured image when multiple images are uploaded
Upload to Parent Product
↑ Back to topThis option applies only to product variations.
When enabled, images matched to variations are added to the parent product instead of the variation itself.
When to use it
Use this option when:
- Variation images should also appear in the main product gallery
- You want to keep a unified product image gallery
When it does not apply
- Simple products
- Parent products directly
How Options Work Together
↑ Back to topSome options can be enabled at the same time. The final result depends on how they interact during the upload process.
Overwrite + Set as Featured Image
When both options are enabled:
- The existing product gallery is replaced
- The featured image is updated
If multiple images are uploaded:
- The last processed image becomes the featured image
- The last processed image remains in the gallery
Set as Featured Image + Product Variations
When uploading images directly to variations:
- Each variation receives its own featured image
- Parent product featured image is not affected
Each variation stores its image independently.
Upload to Parent Product + Product Variations
When enabled:
- Images matched to variations are added to the parent product
- Variation images are not updated directly
This is useful when variation images should also be visible in the main product gallery.
Overwrite + Upload to Parent Product
When both options are enabled:
- The parent product gallery is replaced
- Images from variations are added to the parent gallery instead of the variation
Variation images remain unchanged.
Using All Options Together
When all options are enabled:
- Variation images are redirected to the parent product gallery
- The parent product gallery is replaced
- The parent featured image is updated
This results in a unified product gallery that reflects all imported images.
Gallery Position vs Featured Image
↑ Back to topGallery position and featured image are independent.
Gallery position
↑ Back to top- Controls image order inside the product gallery
- Has no effect on featured image selection
Featured image
↑ Back to top- Always determined by the featured image option
- When multiple images are set as featured, the last processed image becomes the final featured image
Recommended Workflows
↑ Back to topThese workflows help you choose the correct settings based on your goal.
Replace all product images
↑ Back to topUse when you want to fully refresh a product’s images.
Enable:
- Overwrite Existing Gallery
Optional:
- Set as Featured Image
Add new images without removing existing ones
↑ Back to topUse when updating or extending product images.
Disable:
- Overwrite Existing Gallery
Update only the featured image
↑ Back to topUse when you want to change the main product image only.
Enable:
- Set as Featured Image
Disable:
- Overwrite Existing Gallery
Upload variation images only
↑ Back to topUse when each variation should have its own image.
Enable:
- Match by variation
- Set as Featured Image (optional)
Disable:
- Upload to Parent Product
Share variation images with parent product
↑ Back to topUse when variation images should also appear in the main gallery.
Enable:
- Upload to Parent Product
Best Practices
↑ Back to top- Use Upload to Parent Product only when variation images should appear in the main gallery.
- Start with a small test upload before processing large catalogs.
- Always review matches before uploading.
- Use consistent filenames to avoid incorrect matches.
- Use Overwrite only when replacing an entire product gallery.
Troubleshooting
↑ Back to topThis section helps you solve common issues that may occur during image uploads.
Images are not matching to products
↑ Back to topIf images are not being matched correctly:
- Check that you selected the correct matching method (SKU, Product ID, or Product Slug).
- Verify that filenames exactly match product identifiers.
- Ensure there are no extra spaces or typos in filenames.
- Confirm that the products exist in your store.
Tip: Try uploading a single image first to verify matching behavior.
Images appear as unmatched
↑ Back to topIf an image is shown as unmatched:
- The product identifier in the filename may not exist in your store.
- The matching method may not match your filename format.
- The product may be a variation while you are matching by parent product (or vice versa).
You can fix unmatched images by:
- Editing the identifier in the uploader.
- Using the built-in product search to manually assign the image.
Images uploaded but not visible in product gallery
↑ Back to topIf images upload successfully but do not appear in the product gallery:
- Check if the Overwrite option was enabled.
- Verify gallery position settings.
- Refresh the product page in the WooCommerce admin.
- Clear any caching plugins if installed.
Featured image is not what I expected
↑ Back to topIf the featured image is incorrect:
- Check if multiple images were uploaded with “Set as Featured Image” enabled.
- The last processed image becomes the final featured image.
- Ensure you are not uploading multiple images for the same product unintentionally.
Variation images are not applied
↑ Back to topIf variation images are not showing:
- Ensure you are matching the correct variation (not the parent product).
- Check that the variation exists and is published.
- Verify whether “Upload to Parent Product” is enabled (this will redirect images to the parent gallery instead).
Upload failed or incomplete
↑ Back to topIf uploads fail:
- Check your server upload limits (file size or timeout limits).
- Ensure WordPress media uploads are working correctly.
- Retry the upload (the extension automatically retries temporary failures).
- Try uploading fewer images in a batch.
Understanding Upload Results
↑ Back to topAfter each upload, the extension shows a summary of results.
Successful uploads
↑ Back to topImages that were correctly matched and uploaded to products.
Unmatched images
↑ Back to topImages that could not be linked to any product.
These images remain available for review and can be reassigned manually.
Failed uploads
↑ Back to topImages that could not be uploaded due to server or network issues.
These can usually be retried after fixing the underlying issue.
Frequently Asked Questions
↑ Back to topCan I use this with variable products?
↑ Back to topYes. The extension supports both parent variable products and individual product variations.
Can I upload multiple images to one product?
↑ Back to topYes. You can upload multiple images and assign them to the same product using filenames and gallery positions.
What happens if I upload images with the same identifier?
↑ Back to topAll images with the same identifier are assigned to the same product. Their order is determined by the gallery position.
Can I replace existing product images?
↑ Back to topYes. Enable the Overwrite option to replace the current product gallery.
Can I set a featured image?
↑ Back to topYes. Enable “Set as Featured Image” during upload.
What happens if I make a mistake?
↑ Back to topYou can:
- Re-upload corrected images
- Manually edit product galleries in WooCommerce
- Use Overwrite to replace incorrect uploads
Does the extension modify product data?
↑ Back to topThe extension only modifies:
- Product image galleries
- Featured images
- Variation images (if selected)
It does not change product names, prices, or descriptions.
Best Practices Summary
↑ Back to top- Always test with a small batch before large uploads.
- Use consistent naming conventions for image files.
- Review matches before uploading.
- Use Overwrite only when replacing full galleries.
- Be careful when combining multiple upload options.