
Use AutomateWoo with WooCommerce Bookings to remind customers about an upcoming booking. This example starts when a booking changes to Paid, then schedules an email for one day before the booking begins.
Prerequisites
↑ Back to top- WooCommerce Bookings
- AutomateWoo
Create the workflow
↑ Back to top- Go to AutomateWoo > Workflows, then select Add New Workflow.
- Enter a title that describes the reminder.
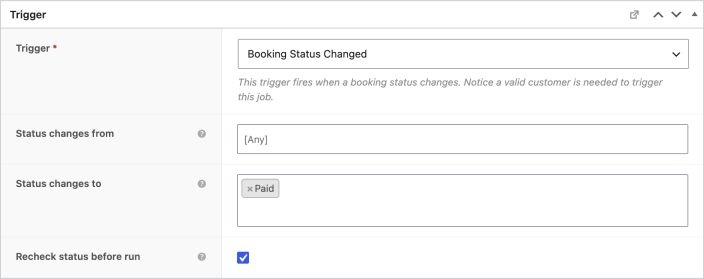
- Set Trigger to Booking Status Changed.
- Leave Status changes from set to Any.
- Set Status changes to to Paid.
- Select Recheck status before run. AutomateWoo will confirm that the booking is still paid before it sends the scheduled reminder.
Limit the workflow to specific products
↑ Back to topThis step is optional. Add a rule when the reminder should only apply to specific bookable products. For example, assign those products to a category, then configure Product – Categories to matches any and select that category.
Schedule the reminder
↑ Back to top- In the Timing panel, select Schedule with a variable.
- Enter
{{ booking.start_date | modify: '-1 day' }}in the Variable field. Change the modifier if you want to send the reminder earlier or later. - Keep Revalidate rules before run selected so AutomateWoo checks the rule again when the scheduled time arrives.
- In the Options panel, select Is transactional? Booking reminders contain service information and should not depend on marketing opt-in status.
Configure the email
↑ Back to top- In the Actions panel, select Add Action, then choose Send Email.
- Set To to
{{ customer.email }}. - Add the email subject, heading, and preheader. You can use workflow variables in these fields.
- Keep Template set to WooCommerce Default to use the store’s transactional email template.
- Write the reminder in Email content. Insert customer, product, booking, and order variables where needed.
Example email content
↑ Back to topHi {{ customer.first_name }},
Your booking for {{ product.title }} is coming up.
Booking ID: {{ booking.id }}
Status: {{ booking.status | format: 'label' }}
Starts: {{ booking.start_date | format: 'custom', custom-format: 'l, F j, Y' }} at {{ booking.start_time }}
Ends: {{ booking.end_date | format: 'custom', custom-format: 'l, F j, Y' }} at {{ booking.end_time }}
We look forward to seeing you!
To include the related order number, use {{ order.number }}. Do not use the product ID as an order number.
Preview and activate the workflow
↑ Back to top- Set the workflow status to Disabled, then select Save.
- Select Preview in the email action.
- Check that the preview resolves the customer, product, booking date, and time as expected.
- When you’re ready to use the workflow, change its status to Active and select Save.
If you use a different booking status, timing rule, or product category, test that path before activating the workflow. A booking that no longer matches the trigger or rules should not receive the reminder.