Use WooCommerce Bookings with Product Vendors (purchased separately) to let approved vendors offer classes, appointments, rentals or other bookable services in your marketplace. This guide explains how to enable bookings for a vendor, assign a bookable product, and optionally override its vendor settings.
Marketplace owner and vendor access
↑ Back to topThe marketplace owner approves vendors, assigns the users who manage them, and controls commission settings. Vendors with the bookings feature enabled can create and manage their own bookable products and bookings, including product prices, durations and availability. Access is limited to the vendor they manage; vendors cannot access or manage booking resources.
For vendor roles, approval, commissions and payout setup, see the Product Vendors settings guide. For the vendor’s dashboard, see the Vendor’s Guide.
Enable bookings and assign a product
↑ Back to topBefore you start, activate both extensions, create the vendor, and assign a vendor admin or manager to it. The example below uses Chef Lucia Ortiz and a Family Cooking Class bookable product.
- Go to Products > Vendors and edit the vendor.
- Under Bookable Products, select Enable bookings feature, then select Update.
- Edit an existing bookable product, or create a bookable product with its price, duration and availability.
- In the product editor’s Vendors panel, select the vendor. This is a separate panel, not a tab inside Product data.
- Select Update or Publish to save the product. Reopen it and confirm that the intended vendor remains selected.
Ask the vendor to check that the product appears in their dashboard and that they can access its booking settings. If the bookable product option is missing, confirm that WooCommerce Bookings is active and that Enable bookings feature is selected on the vendor. If a product is missing, check its vendor assignment and that the user is assigned to that vendor.
Override shipping and tax settings for one product
↑ Back to topThe product normally uses its vendor’s shipping and tax settings. The marketplace owner can override these for one product:
- Assign the vendor first, then open Product data > General.
- Under Product Vendors, select Override product vendor settings.
- Choose whether to Pass shipping charges to the vendor. For a service with no shipping charge, leave this unchecked.
- Choose a Tax Handling option: Keep Taxes calculates commission on the product price only; Pass Taxes includes all tax charges in the vendor’s commission; Split Taxes calculates commission using the full price including tax.
- Select Update and review the saved settings. Leave the override unchecked when you want the vendor’s settings to apply.
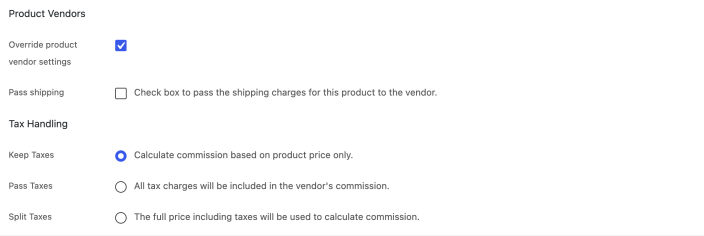
These controls determine how shipping and tax affect the vendor’s commission. Set commission rates separately using the marketplace, vendor or product commission settings described in the Product Vendors settings guide.
For a worked marketplace example, see the Multi-Vendor Shop use case. If each vendor needs a separate Google Calendar, see the multiple-calendar integration guide for the additional integration setup.
Questions and support
↑ Back to topSomething missing from this documentation? Still have questions and need assistance?
- If you have a question about a specific extension or theme you’d like to purchase, contact us to get answers.
- If you already purchased this product and need some assistance, get in touch with a Happiness Engineer via our support page and select this product’s name from the Product dropdown.