Restaurant Menu for WooCommerce enables you to automatically add linked products to the cart, synchronize stock and quantities, manage pricing, and control flexible display positions within your store.
Installation
↑ Back to topTo start using a product from WooCommerce.com, you can use the “Add to store” functionality on the order confirmation page or the My subscriptions section in your account.
- Navigate to My subscriptions.
- Find the Add to store button next to the product you’re planning to install.
- Follow the instructions on the screen, and the product will be automatically added to your store.
Alternative options and more information at:
Managing WooCommerce.com subscriptions.

Setup and Configuration
↑ Back to topSettings are located at: WooCommerce > Settings > Restaurant Menu
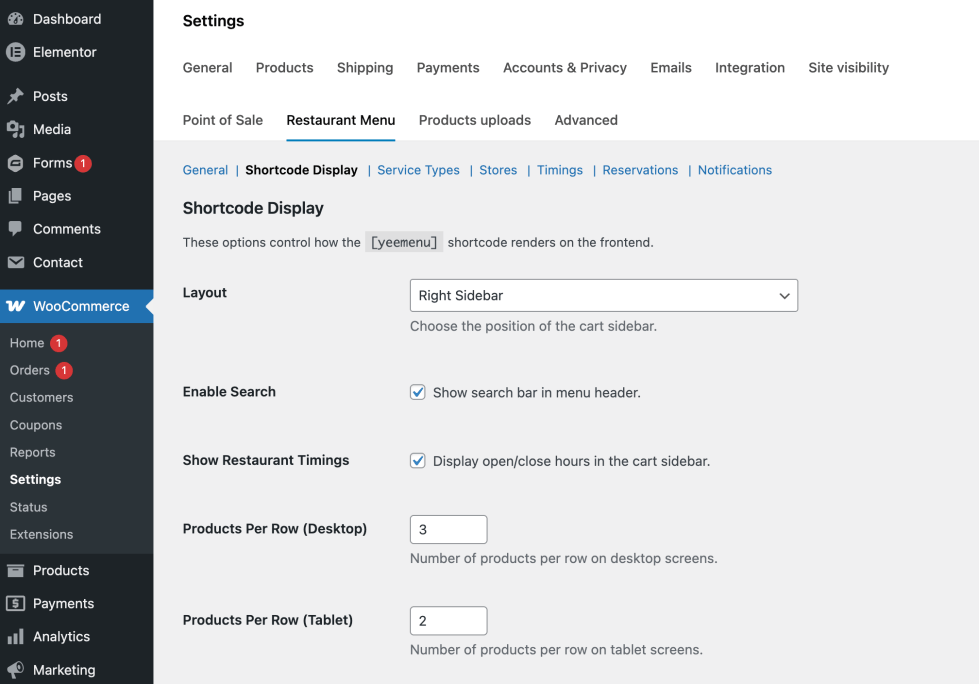
The interface has four main sections:
- General: Settings for search, top-selling, and layout defaults.
- Display: Manage the main brand color and global category/product visibility.
- Stores & Service Types: Configure delivery, takeaway, dine-in, and branch locations.
- Restaurant Timings: Set up daily opening hours and pre-order slots.
- Table Reservations: Manage table booking schedules, guest capacity limits, and real-time availability for dine-in customers.
- Admin Notifications: Configure automated alerts via Email or Push for new orders, system status updates, and daily sales reports.
Menu Layouts
↑ Back to topThe restaurant offers three distinct structures to match your theme. Go to WooCommerce > Settings > Restaurant Menu > General to change the Layout:
- Sidebar Right (Default): The classic POS/App look. Products on the left, sticky cart on the right.
- Sidebar Left: Flipped orientation. Category navigation moves above the cart on the left.
- Full Width (Top): Disables the sticky sidebar cart entirely. Ideal if your theme already features a prominent sticky cart widget.
Service Types & Locations
↑ Back to topEnable different ways for customers to receive their orders.
- Delivery: Standard WooCommerce shipping functionality applies.
- Takeaway & Dine-In: If enabled, you can add multiple Store Branches. The user will be required to select their preferred branch before adding items to the cart.
- Guest Count: Included automatically when Dine-In is selected.
Timings & Pre-order
↑ Back to topControl exactly when your kitchen accepts orders.
- Multiple Daily Slots: Set intervals like 09:00-14:00 and 17:00-22:00 for the same day.
- Mark as Closed: Instantly shut down accepting orders for a specific day of the week.
- Pre-Ordering: Allow customers to schedule orders up to 7 days in advance if you are currently closed.
Shortcodes – Display
↑ Back to topThe primary way to display the menu is via the [yeemenu] shortcode.
| Attribute | Example | Description |
|---|---|---|
category | [yeemenu category="id"] | Overrides global settings to only display the specified category slug. |
limit | [yeemenu limit="20"] | Loads 20 products per category before requiring pagination. Default is 10. |
layout | [yeemenu layout="full"] | Overrides the global layout for a specific page (left, right, full). |
columns | [yeemenu columns="3"] | Sets the number of product columns to display per row (e.g., 2, 3, 4). |
enable_search | [yeemenu enable_search="yes"] | Toggles the live search bar visibility at the top of the menu (yes/no). |
show_timings | [yeemenu show_timings="no"] | Shows or hides the restaurant’s daily opening hours on the menu page. |
Product Add-ons Pro
↑ Back to topThe Add-ons Pro feature in YeeMenu allows you to add custom product options such as extra toppings, variety, or special requests. This enhances the customer experience and boosts revenue through upselling.
Note: This feature currently performs best with Simple Product type in WooCommerce.
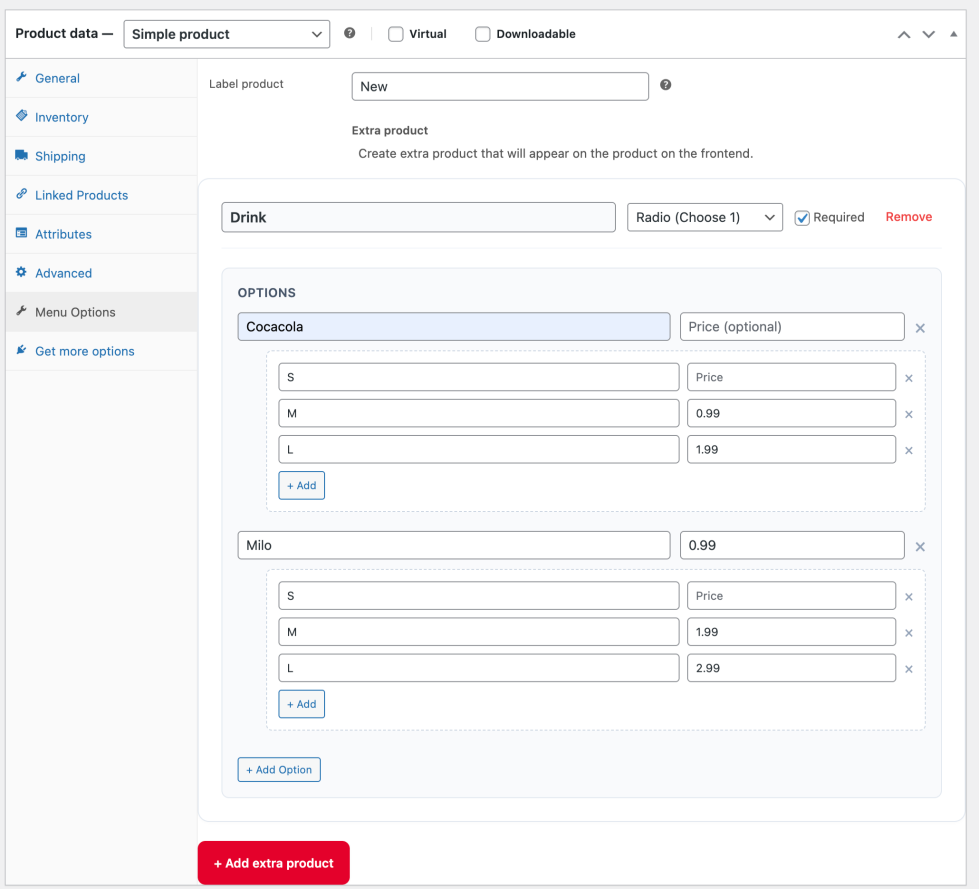
How to Configure
↑ Back to topTo add options to a product, follow these steps in your WooCommerce admin panel:
- Edit any WooCommerce product.
- Go to the Product Data panel.
- Click on the Menu Options tab.
- Add a group, choose title, and selection type (Radio/Checkbox).
- Add options with their respective extra prices.
Here you can create “Option Groups”. Each product can support multiple groups based on your menu needs.
Selection Types
↑ Back to topYeeMenu supports two common customer selection patterns:
- Radio (Single Choice): Customers can only pick one item from the group (e.g., Choosing a size: S, M, or L).
- Checkbox (Multiple Choice): Customers can pick several items at once (e.g., Adding multiple toppings like Pearl, Jelly, and Pudding).
You can also check the Required box to force a selection before the item can be added to the cart.
“Sizes” (Nested Options)
↑ Back to topThis unique feature allows you to define different price points for the same topping or add-on.
Example: A "Beef" topping with different portions:

Beef (Large Portion): +$2.00

Beef (Small Portion): +$1.00
When a customer selects an option that contains “Sizes”, a sub-list appears for them to specify their choice further.
Frontend Experience
↑ Back to top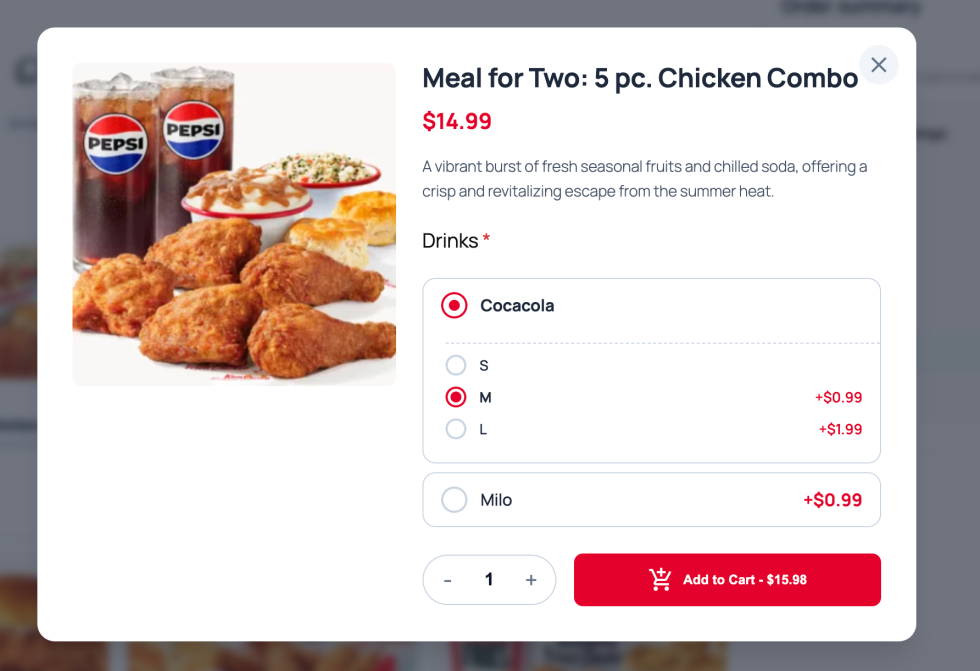
On the single product page or Quickview modal, add-ons appear directly above the “Add to Cart” button.
- Real-time Price Engine: As customers toggle options, the product total price (including extra charges) recalculates instantly.
- Validation: If a group is marked as “Required”, the system will gently remind the customer if they forget to make a choice.
Table Reservations
↑ Back to topThe Restaurant Menu Table Reservation system allows customers to book a table directly from your website. It integrates seamlessly with WooCommerce orders, providing a familiar interface for both store owners and customers.
Setup & Shortcode
↑ Back to topTo display the reservation form on any page or post, use the following shortcode:
[yeemenu_reservation]
How to implement:
- Create a new page (e.g., “Book a Table”).
- Paste the [yeemenu_reservation] shortcode into the content editor.
- Publish the page.
Reservation Statuses
↑ Back to topIntroduces two specific order statuses to distinguish table bookings from regular product orders:
- Reservation (Pending): The initial state when a customer submits a booking request. Admin approval is required.
- Confirmed Booking: The state after an administrator approves the reservation.
Administrators can manually change these statuses within the standard WooCommerce > Orders screen.
Email Notifications
↑ Back to topKeep everyone informed with automated emails. Configuration for these emails is located in WooCommerce > Settings > Emails.
1. New Table Reservation (Admin)
Sent to the restaurant manager when a new request is received. You can configure multiple recipients using comma-separated email addresses.
2. Reservation Confirmed (Customer)
Sent to the customer the moment their reservation status is changed to “Confirmed Booking” by the admin.
Auto-Confirmation
↑ Back to top
If you prefer to accept all bookings automatically without manual approval, you can enable this in the settings:
- Go to WooCommerce > Settings > Table Reservations.
- Check the option “Automatically confirm reservations”.
- Save changes.
When enabled, all new reservations will jump directly to the Confirmed Booking status and trigger the customer notification immediately.
Admin Notifications
↑ Back to topStay alerted even when you’re away from the dashboard.
- New Order Pulse: A visual notification in the admin panel header.
- Sound Alerts: Play a sound (default or custom URL) when a new order arrives.
- Email Integration: Detailed emails for both Orders and Reservations. Configure these in
WooCommerce > Settings > Emails.
Order Management for Chefs & Owners
↑ Back to topEfficiently manage Delivery, Takeaway, and Dine-In orders with a streamlined interface.
eeMenu enhances the default WooCommerce Order list by adding critical restaurant-specific metadata, advanced filtering options, and quick-action buttons designed for busy kitchen operations.
All enhancements are visible directly under WooCommerce > Orders
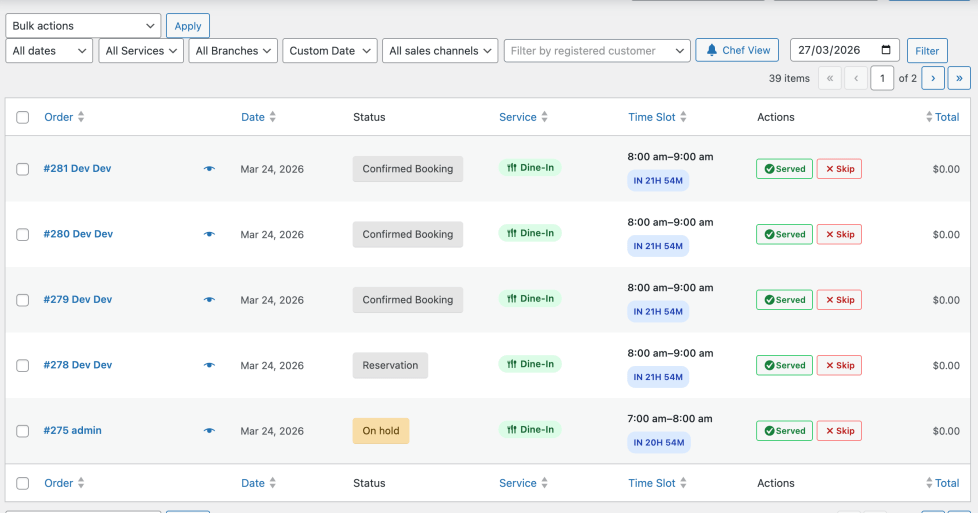
Chef View
↑ Back to topThe Chef View is a one-click quick filter designed to help the kitchen focus on what needs to be prepared now.
When activated, the Chef View performs the following actions:
- Filters by Date: Only shows orders for Today.
- Filters by Status: Only shows active orders (Pending, Processing, On-hold, Reservation Confirmed).
- Sorts by Time: Automatically sorts orders chronologically by their Time Slot.
Custom Data Columns
↑ Back to topNew columns have been added to the orders table to provide instant information at a glance:
| Column | Description |
|---|---|
| Service | Displays the service type: Delivery, Takeaway, or Dine-In. |
| Time Slot | Shows the appointment time and a real-time countdown (e.g., “In 15 mins”, “Now”, “10 mins ago”). |
| Branch | Identifies which restaurant location the order belongs to (Hidden by default). |
| Guests | Shows the number of people (for Dine-In/Reservations) (Hidden by default). |
Quick Actions
Managers and Chefs can update order statuses with a single click in the Actions column:
- Served: Instantly marks the order as Completed and removes it from the active prep list.
- Skip: Marks the order as Cancelled (useful for “No-show” reservations) and removes it from the list.
Advanced Filtering
↑ Back to topFilter your orders by multiple criteria to find exactly what you need:
- By Time: Filter for Today, Tomorrow, or pick a Custom Date.
- By Service: View only Delivery, Takeaway, or Dine-In orders.
- By Branch: Focus on orders for a specific restaurant location.
FAQs
↑ Back to top
How do I change the restaurant's opening hours?
Go to WooCommerce > Settings > Restaurant Menu > Timings. You can set multiple time slots for each day of the week. Ensure you click “Save Changes” at the bottom of the page.
How do I customize the notification sound?
In WooCommerce > Settings > Restaurant Menu > Notifications, you can provide a custom MP3 URL for the new order alert sound. You can also test the sound directly from that settings page.
Can customers edit their choices after adding to cart?
Yes, customers will see an Edit Choice link in the checkout sidebar to modify their service type, branch, or time slot