- Download the .zip file from your WooCommerce account.
- In your WordPress Admin, go to Plugins > Add New and upload the plugin by choosing the downloaded file.
- Click Install Now, then Activate the extension.
Setup and Configuration
↑ Back to topSetting Up WhatsApp order & Live chat For WooCommerce
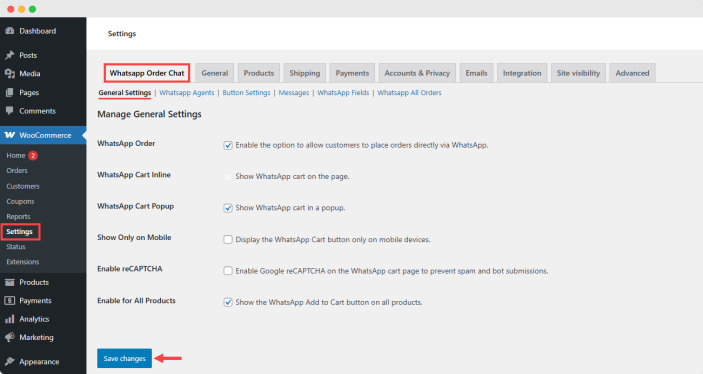
↑ Back to topConfigure WhatsApp Order – General Settings
↑ Back to top- WhatsApp Order: Enable this option to allow customers to place their orders directly via WhatsApp.
- WhatsApp Cart Inline: Turn this on to display the WhatsApp cart inline on the page. This allows users to see the WhatsApp cart directly without any popups.
- WhatsApp Cart Popup: Enable this option to show the WhatsApp cart as a pop-up window instead of inline.
- Show Only on Mobile: When enabled, the WhatsApp Cart button will only be visible on mobile devices for a cleaner desktop experience.
- Enable reCAPTCHA: Turn on Google reCAPTCHA to protect the WhatsApp cart page from spam and bot activity.
- reCAPTCHA Site Key: Enter your Google reCAPTCHA Site Key here. This key is required for reCAPTCHA to work properly. You can get it from the Google reCAPTCHA website.
- reCAPTCHA Secret Key: Add your Google reCAPTCHA Secret Key. This is used in the backend to verify submissions and prevent spam.
- Open in New Tab: Enable this option to open the WhatsApp chat window in a new browser tab when a customer submits an order via WhatsApp.
- Enable for All Products: Turn on this setting to automatically show the WhatsApp “Add to Cart” button on all products in your store.
- You can also fine-tune visibility by choosing specific products and product categories to include or exclude.
Manage Agent Settings
↑ Back to top-
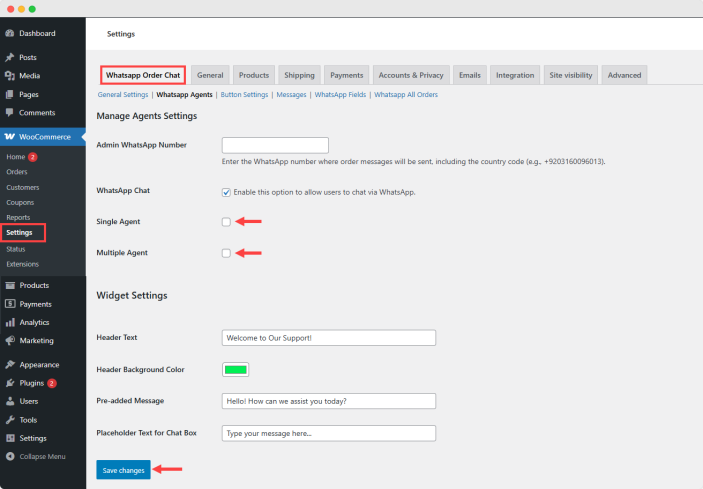
- Admin WhatsApp Number: Enter the WhatsApp number where all customer order messages will be sent. Make sure to include the country code.
- WhatsApp Chat: Enable this option to allow users to initiate live chats directly through WhatsApp from your store.
- Single Agent Settings: Use this if you want one agent to handle all customer WhatsApp communications.
- Multiple Agent Settings: Use this option to assign multiple support agents for WhatsApp chats, based on time slots and availability.
-
- Enable Multiple Agents: Tick this checkbox to activate multiple agent support for WhatsApp communication.
- WhatsApp Number: Enter the WhatsApp number for each support agent, including the country code
- Time Range: Set specific time slots for when each agent will be available to respond to messages.
- Select a Day: Choose the days each agent is active (e.g., Monday to Friday).
- Add New: Click the “Add New” button to add more agents with their respective availability schedules.
- Remove: Use the “Remove” button to delete an agent entry if needed.
- WhatsApp Number: Enter the single agent’s WhatsApp number, including the country code
Widget Settings
If you have multiple support agents, you can customize the appearance and default messages of the WhatsApp chat widget.- Header Text: Enter a welcome message that appears at the top of the chat widget
- Header Background Color: Choose a background color for the widget header that matches your brand or store theme.
- Pre-added Message: Set a default message that auto-fills the chat input when users open the widget
- Placeholder Text for Chat Box: Customize the placeholder text shown inside the message input field
Manage Button Settings
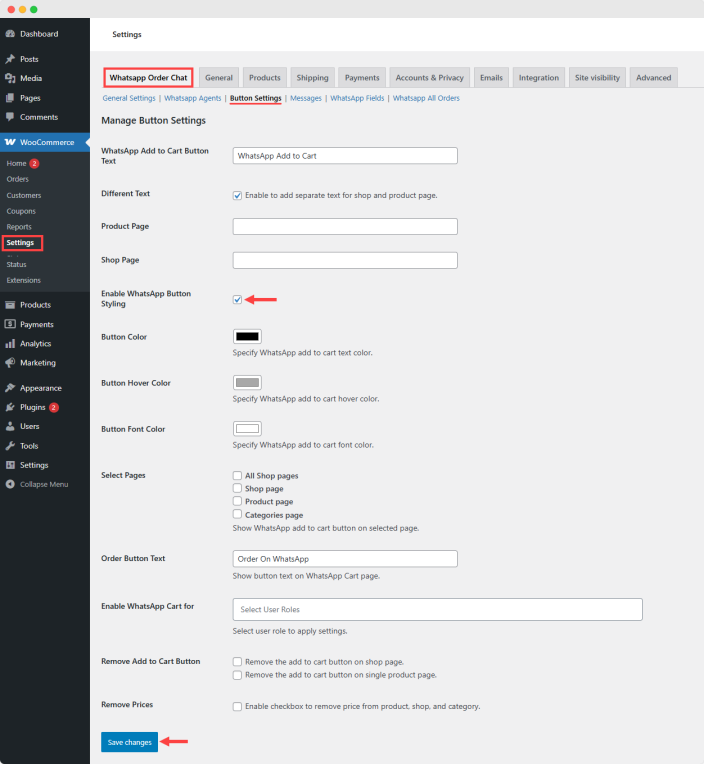
↑ Back to top- WhatsApp Add to Cart Button Text: The default text is displayed on the WhatsApp Add to Cart button.
- Different Text: Enable this option if you want to use separate button texts for the shop page and the product page.
- Product Page Text: Enter the custom WhatsApp Add to Cart button text specifically for product pages.
- Shop Page Text: Enter the custom WhatsApp Add to Cart button text specifically for shop pages.
- Enable WhatsApp Button Styling: Turn this on to customize the appearance of the WhatsApp Add to Cart button.
- Button Color: Choose the background color of the WhatsApp Add to Cart button.
- Button Hover Color: Set the background color when the mouse hovers over the button.
- Button Font Color: Select the color of the text on the button.
- Select Pages: Choose on which pages the WhatsApp Add to Cart button should be displayed.
- All Shop Pages: Show the button on every page related to your shop.
- Shop Page: Show the button only on the main shop page.
- Product Page: Show the button only on individual product detail pages.
- Categories Page: Show the button on product category listing pages.
- Order Button Text: The text displayed on the button on the WhatsApp Cart page.
- Enable WhatsApp Cart: Select the WordPress user roles for which these WhatsApp cart settings will be applied.
- Remove Add to Cart Button: Options to hide the default WooCommerce Add to Cart buttons.
- Remove on Shop Page: Remove the Add to Cart button on your shop listing page.
- Remove on Single Product Page: Remove the Add to Cart button on individual product pages.
- Remove Prices: Enable this checkbox to hide product prices on the product, shop, and category pages.
Order Message for Admin
↑ Back to top- Custom Order Message: Add any custom text you want to appear in the WhatsApp order message sent to the admin.
- Dynamic Cart Information Tags: Include these placeholders in your message to automatically show key details about each product in the order:
- Product_id: Displays the unique ID of the product.
- Product_name: Shows the name of the product.
- Product_price: Shows the price of the product.
- Product_quantity: Indicates how many units of the product were ordered.
- Product_link: Provides a direct link to the product page on your store.

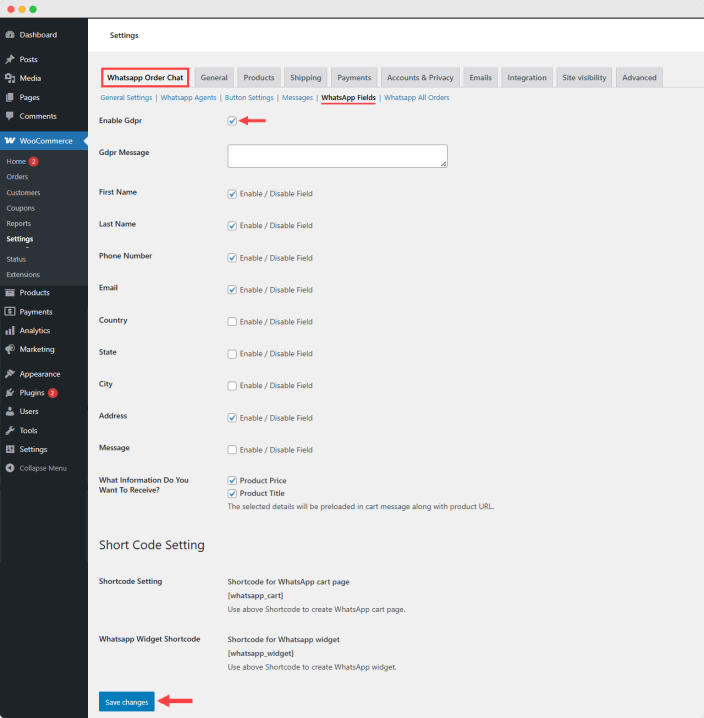
WhatsApp Fields Settings
↑ Back to top- Enable GDPR: Toggle this option to enable or disable GDPR compliance. When enabled, you can add a GDPR consent message for customers.
- GDPR Message: Enter the text for the GDPR consent message that customers will see before submitting their information.
- Customer Information Fields: Enable or disable the following fields on the WhatsApp order form to collect customer details as needed:
- First Name: Enable or disable the first name field.
- Last Name: Enable or disable the last name field.
- Phone Number: Enable or disable the phone number field.
- Email: Enable or disable the email address field.
- Country: Enable or disable the country field.
- State: Enable or disable the state field.
- City: Enable or disable the city field.
- Address: Enable or disable the address field.
- Message: Enable or disable a message/note field for customers to add additional comments.
- What Information Do You Want To Receive? Select which product details will be automatically included in the WhatsApp cart message along with the product URL:
- Product Price: Include the price of the product.
- Product Title: Include the title/name of the product.
Shortcode Settings
Use these shortcodes to add WhatsApp functionalities to your site pages:- WhatsApp Cart Page Shortcode – [whatsapp_cart]: Use this shortcode to create a dedicated WhatsApp cart page on your site.
- WhatsApp Widget Shortcode – [whatsapp_widget]: Use this shortcode to add a WhatsApp widget anywhere on your site.
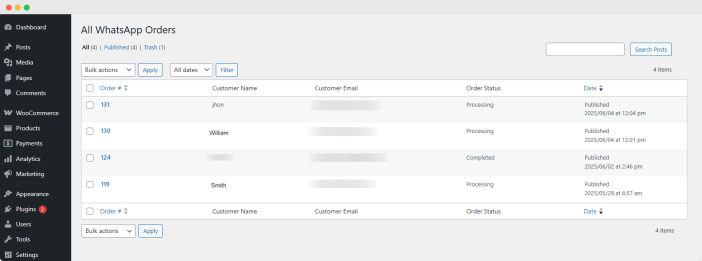
All WhatsApp Orders
↑ Back to top