This document explains how to create a custom integration between Google Calendar and WooCommerce Bookings. The WooCommerce Bookings extension allows you to synchronize your Bookings with a Google Calendar and supports two-way syncing.
You can connect your Google Calendar, using your own app credentials, by following these steps:
- Create a project in Google Cloud Console
- Enable the Calendar API and create credentials
- Set up OAuth Consent screen, Scopes, and OAuth Client ID
- Add Credentials to your website and authorize with Google
- Set up calendar and Sync Preference
If you’re unfamiliar with Google Cloud Console and configuring this type of integration, the rest of this document provides more detail about each step.
Note: If you have a working connection but would like to switch to this method, please disconnect the other connection first.
Create a project in Google Cloud Console
↑ Back to topTo use this integration, go to the Google Developers Console and follow these instructions:
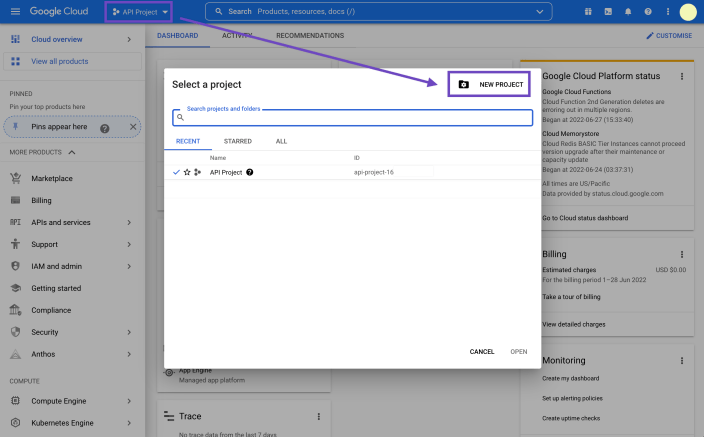
- Go to Projects > Create Project button. A popup should appear and ask for a Project Name and Project ID. Enter your preferences.
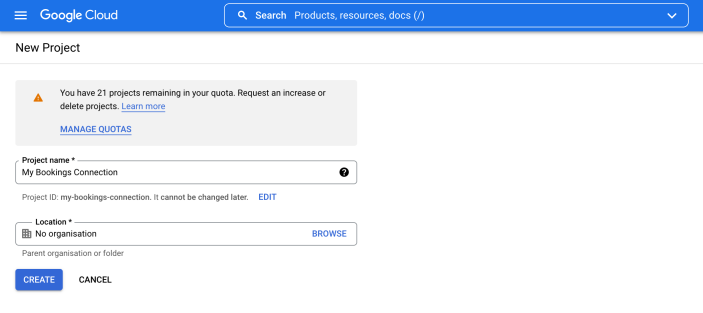
2. Name your new project. For example, “My Bookings Connection”.
Enable the Calendar API and Create Credentials
↑ Back to topNow that you’ve created the project, you can enable the calendar API by following these steps:
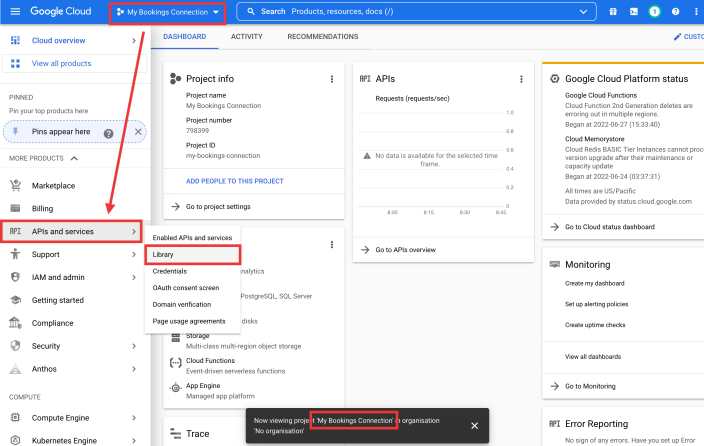
- Select the project from the drop-down menu in the top-left of the screen.
- Then, from the menu on the right, select APIs and Services > Library.
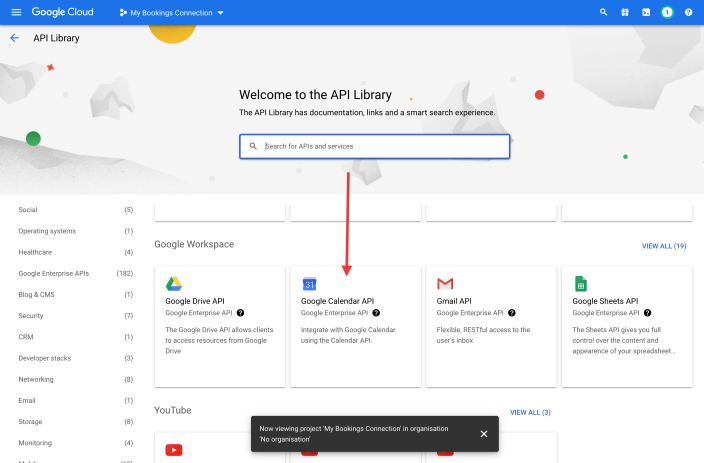
3. Choose the Google Calendar API.
4. Then click on Enable.
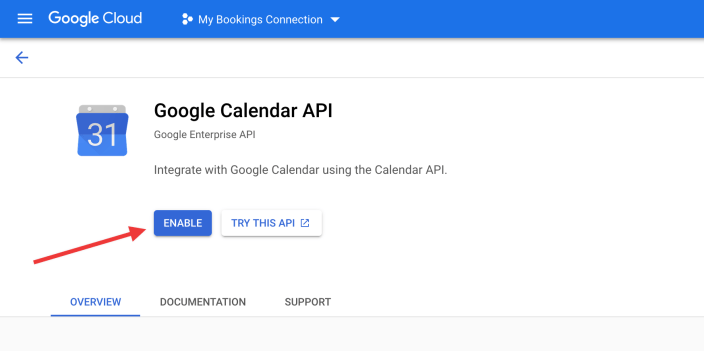
Creating Credentials:
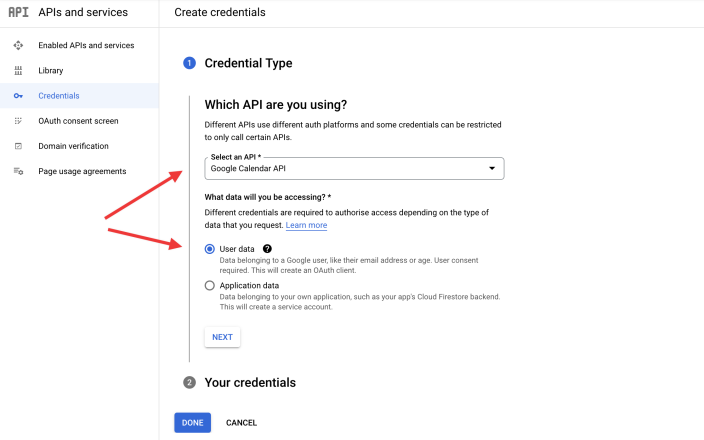
After creating the Calendar API and clicking “enable” it will take you to the screen where you can create the credentials that you’ll use to link the calendar to your site. Follow these instructions to create the credentials:
- Select Go to Credentials from the top-right of the screen.

- Under Select an API select Google Calendar API
- Under What data will you be accessing? select User data
- Then click on the Next button, which takes you to the configuration for the OAuth consent screen.
Set up OAuth Consent screen, Scopes, and OAuth Client ID
↑ Back to topAfter configuring credentials, you’ll move. onto configuring the OAuth Consent screen, Scopes, and the OAuth Client ID. We’ll go through the set-up for each of these step-by-step in this section.
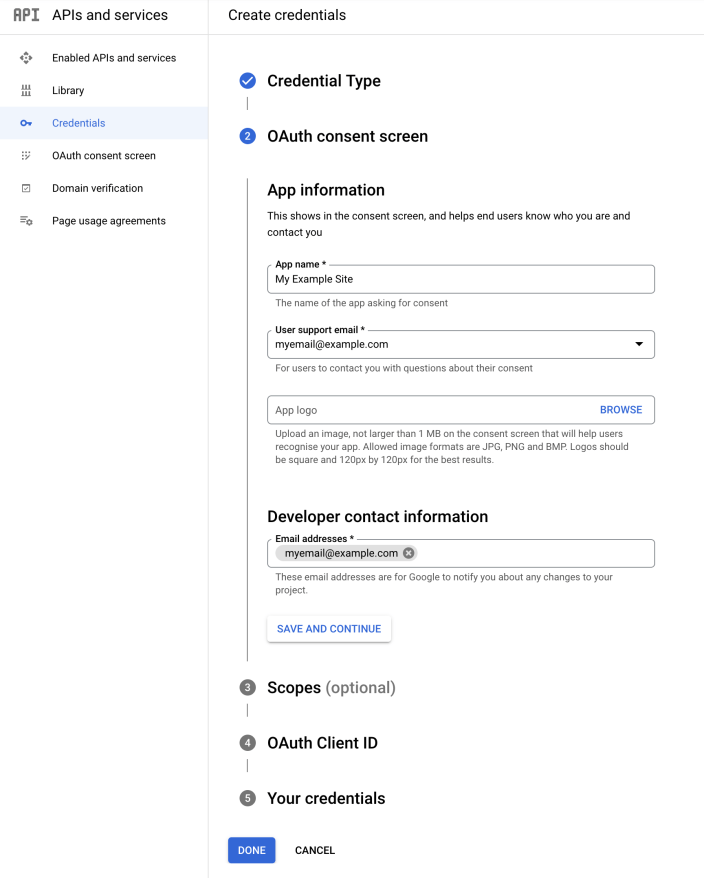
- Set up OAuth Consent screen:
The consent screen appears when you click on Connect in the Bookings Settings in your store under WP-Admin > Bookings > Settings > Calendar Integration. The following explains the information you need to enter to configure the OAuth Consent screen:
- App Name is for reference and will appear on the popup.
- User support email: This is set to the logged-in account by default (there may be other options in the dropdown menu).
- App logo: We suggest not to add an App logo. It may trigger your app needing a review by Google and can take up to 4-6 weeks (during which you will not be able to use it). We don’t recommend adding one since this app is only for internally connecting the site to the calendar.
- Developer Contact Info: A required field, you can add the same information as the user support email.
- Click Save and Continue.
- Scopes
There is no required information in the Scopes section, so feel free to leave it blank.
Scroll to the bottom of the section and click Save and Continue to move on to the next step.
- Create the OAuth Client ID:
Follow these steps to create an OAuth Client ID:
- Set Application Type to Web Application.
- Set Name to a reference for yourself (it’s not publicly visible anywhere).
- Leave Authorized JavaScript origins blank.
- Set Authorized redirect URIs to
https://example.com/wc-api/wc_bookings_google_calendar/(replace example.com with the URL of your website). - Click Create.
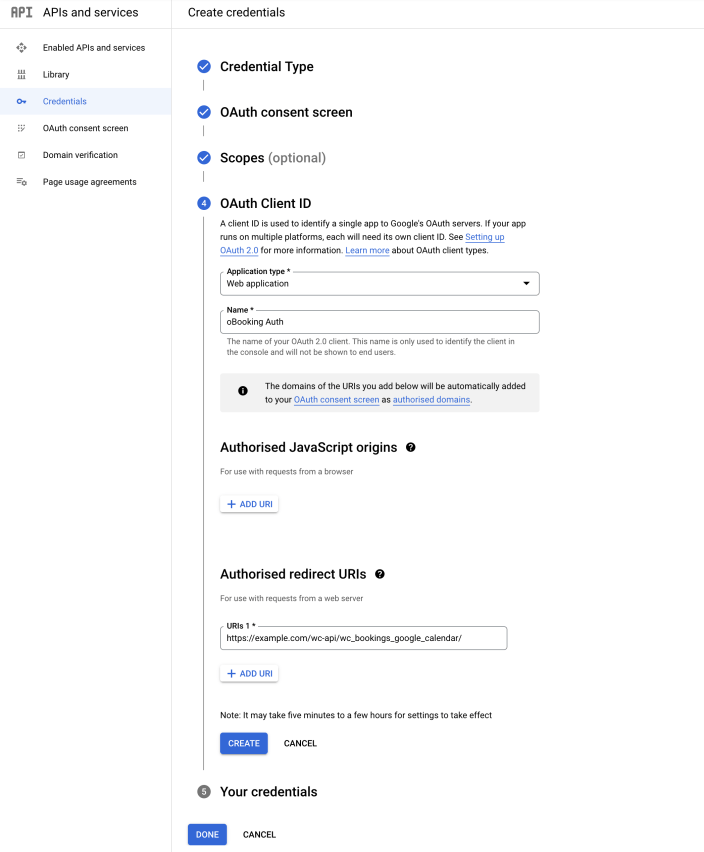
Once you’ve filled in the above information and clicked “Create” you move to the “Your credentials” section. Here you have the opportunity to copy your client ID to the clipboard or download your credentials as a JSON file. The JSON file contains a Client ID and Client Secret, which you will need to complete setup, in addition to other information that you will not need.
Click Done after you’ve copied or you’ve downloaded the information.
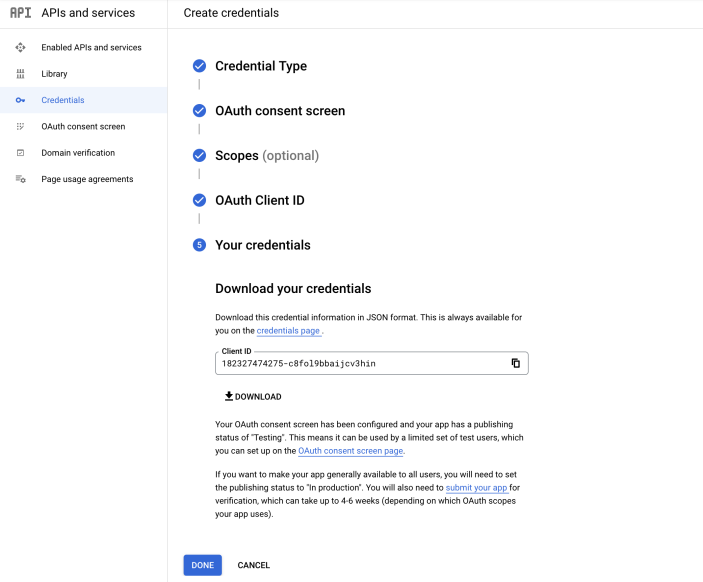
Additional Information about Credentials:
If you need to access your credentials again later, you can do so by going to APIs and Services > Credentials, and clicking on the relevant OAuth 2.0 Client ID, from where you can copy the credentials (Client ID and Client secret) from the top-right of the screen.

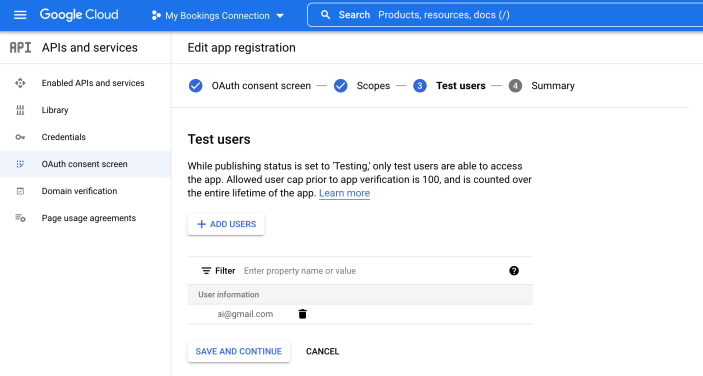
If the publishing status of your app is set to Testing then you need to add Test Users.
- Add at minimum your own email address. You can do so from under OAuth Consent Screen > Test Users.
- Click the Add Users button and type the email address of the account that’s allowed to use this application.
Add Credentials to your website
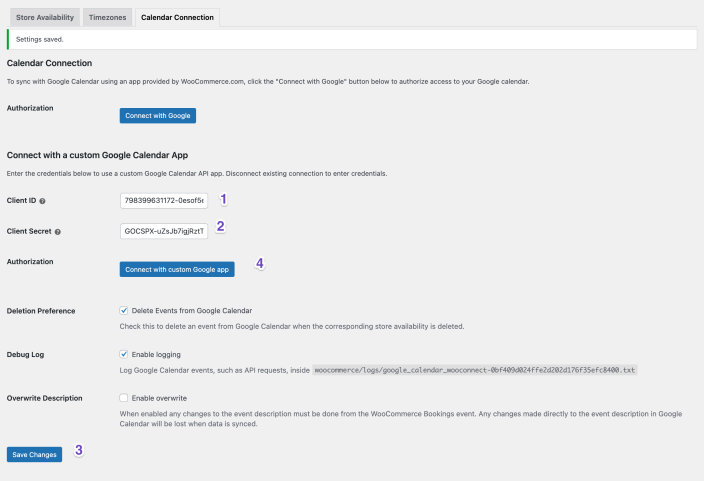
↑ Back to topWith your credentials copied or downloaded, head to your store’s admin dashboard and navigate to Bookings > Settings > Calendar Connection and follow these steps to add them to your website:
- In the Connect with a custom Google Calendar App section, paste the Client ID and the Client Secret in their respective fields.
- Next, at the bottom of the page, click the Save Changes button.
- Click on the Connect with Custom Google App button that appears after you save changes.
4. Once you are on the Choose an account screen, select the account that you want to connect:
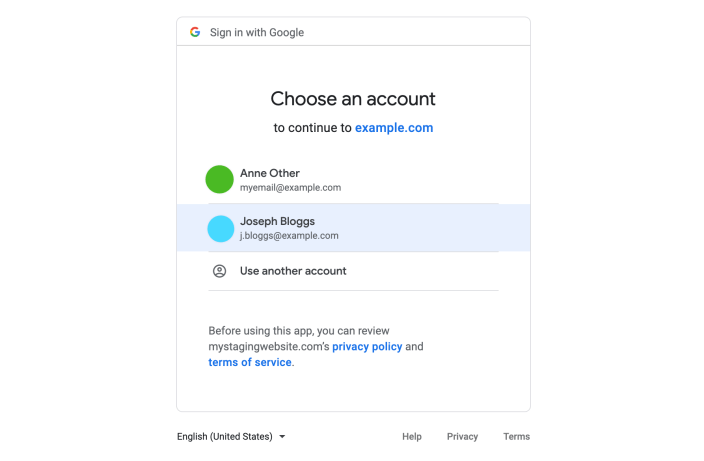
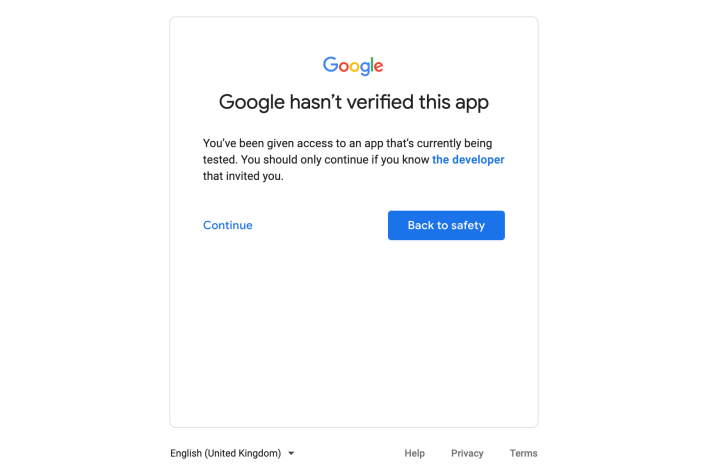
- Once you select an account, a warning appears about the app not being verified (you can read more about it here). Click Continue.
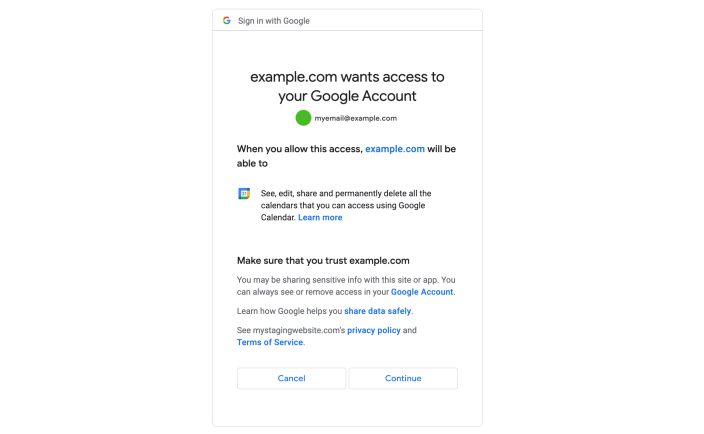
- Next, you will see a popup that reflects the information you entered in the Setup OAuth Consent Screen section to grant access to your calendar. Review the information and Click Continue:
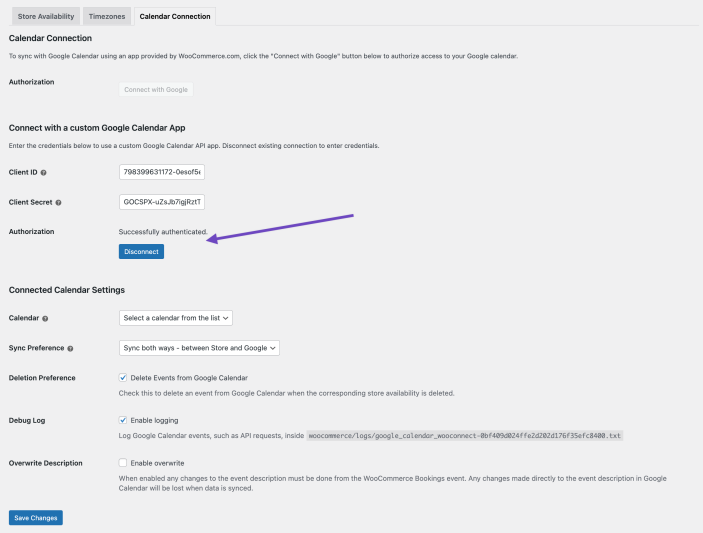
- Google will then redirect you back to your site and a Successfully authenticated message should be visible above the button that has now changed to read Disconnect:
Set Calendar and Sync Preferences
↑ Back to topNow that the calendar is configured and connected to your site, follow the steps here to finish the setup and learn more about the integration with your Google Calendar.
