Note:
If you want to save time in configuring the plugin on your website, our trusted partner, Codeable, can help. See their offer to configure one or more plugins on your site.
This document outlines the menu items added by, as well as the settings available in, the WooCommerce Bookings extension.
Bookings Menu Items
↑ Back to topOnce the WooCommerce Bookings extension is installed and activated on your site, you will see a Bookings menu item in the sidebar with the following sub-menu options. Use the links below to learn more about each admin page added by WooCommerce Bookings:
- All Bookings – Here is where you can review, manage, and edit bookings made on your store
- Resources – Manage the resources associated with your bookable products here.
- Add Product – Access templates to create a bookable product, or start with a blank bookable product.
- Add Booking – Here you can manually add a booking for a customer or guest from the backend.
- Calendar – The calendar view allows you to view booked time slots, and manage bookings arranged by the date of each booking.
- Send Notification – Here you can customize and send an email notification to all customers who have a future booking for a particular booking product.
- Settings – Configure bookings specific settings for your shop.

Settings
↑ Back to topClick the Bookings >Settings link in your site’s admin area to configure additional options for:
- Store Availability
- Timezones
- Calendar Connection
- Accommodation (If the free Accommodation Bookings extension is enabled)

Store Availability
↑ Back to topThe Store Availability settings govern the general availability of all your bookable products or services within your store. They provide you with the capability to establish the times when customers can make bookings for your products or services. Visit our Store Availability guide to configure these settings.
Timezones
↑ Back to topThe Timezones settings control how Bookings showcases the timezone to customers. Visit our Timezones guide for help with configuring these settings.
Calendar Connection (Google Calendar Integration)
↑ Back to topWooCommerce Bookings enables one-way or two-way sync with Google Calendar. You need a Google account to use this functionality.
To set up your site’s sync with Google Calendar, read the following documentation: Google Calendar Integration.
To set up your site’s sync with a custom Google Calendar, read the following documentation: Custom Google Calendar Integration.
Accommodation (Overnight Bookings)
↑ Back to topBy default, Bookings only supports bookings by days. The free WooCommerce Accommodation Bookings add-on allows the booking duration to be specified as “number of nights”.
Once you have activated the free WooCommerce Accommodation Bookings extension, an additional setting is provided to set site-wide check-in and check-out times.
Site-wide check-in and check-out times are displayed to the user when making new bookings, or reviewing past bookings.
To set sitewide checkout times:
- Navigate to WordPress Admin > Bookings > Settings > Accommodation
- Enter your store’s global Check-in and Check-out times.
- Click on the Save changes button.

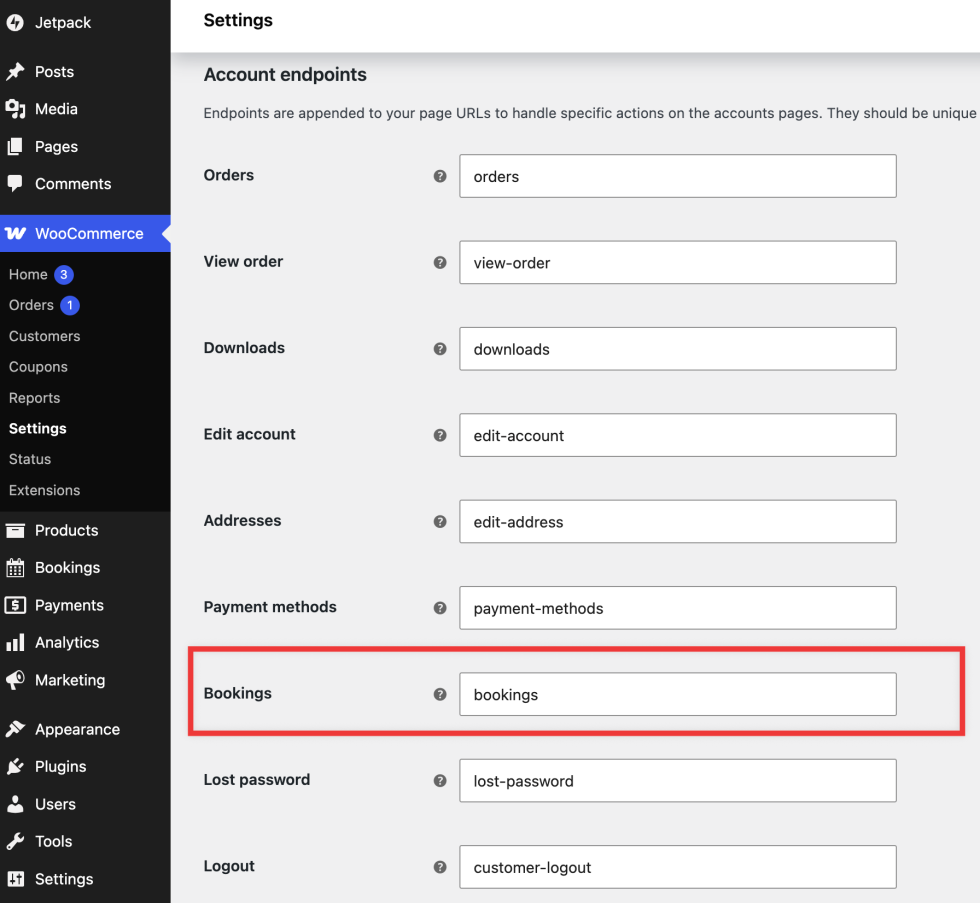
Bookings Endpoint
↑ Back to topYou can customize the bookings endpoint for the My Account > Bookings page. To do this:
- Go to WooCommerce > Settings > Advanced > Page Setup
- Scroll down to the Account endpoints section
- Find the Bookings endpoint setting; this controls the URL slug used for the Bookings section within the My Account page. The default value is
bookings, which produces a URL such asyoursite.com/my-account/bookings/ - Change this value if you need the endpoint to use a different slug
Questions and support
↑ Back to topSomething missing from this documentation? Still have questions and need assistance?
- If you have a question about a specific extension or theme you’d like to purchase, contact us to get answers.
- If you already purchased this product and need some assistance, get in touch with a Happiness Engineer via our support page and select this product’s name from the Product dropdown.