Resources represent the staff, rooms, equipment, or other assets needed for a booking. Use this guide to create a resource, link it to a bookable product, and choose how its availability and costs apply.
Before you begin, make sure WooCommerce Bookings is active and your account can edit the product and resources. You need a bookable product to link the resource to.
How resources work
↑ Back to topA resource has its own availability rules and available quantity. You can link the same resource to several products so bookings for those products draw from the same resource capacity. Set resource costs separately on each product.
Each booking uses one selected or assigned resource. If Count persons as bookings is enabled in the product’s Persons tab, each person consumes one unit of that resource’s available quantity. This uses more units of the same resource; it does not assign a different resource to each person.
Resource examples
↑ Back to top- Staff: A therapist shared by several appointment types, with one available unit so they can serve one booking at a time.
- Rooms: A meeting room available for either a workshop or a private appointment.
- Equipment: A pool of identical chairs, bikes, or tools. Set Available Quantity to the number you can supply at once.
- Customer choices: Room types or service options that have different availability or costs. Use separate bookable products when the services need different durations or other product settings.
Add a resource
↑ Back to top- Go to Bookings > Resources and select Add New Resource.
- Enter a unique, recognizable Bookable resource name. Customers can see this name, so avoid internal-only references.
- Set Available Quantity to the number of units that can be booked at the same time. For one staff member or one specific room, use 1.
- If the resource has availability restrictions, select Add Range and enter the range, whether it is bookable, and its priority.
- Select Publish. Reopen the resource to check its saved quantity and rules.
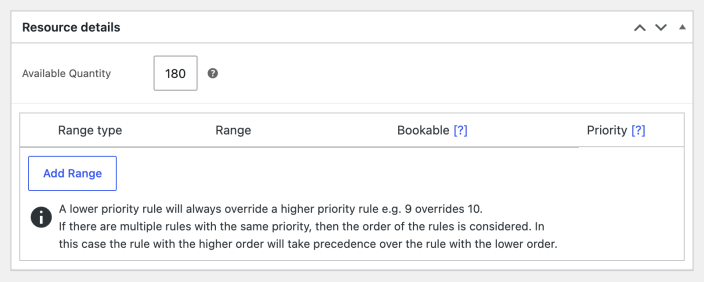
Resource rules work alongside product and store rules. Use custom availability ranges for the rule options and availability rule priorities when rules overlap. A lower priority number takes precedence; for example, 9 overrides 10.
Link resources to a product
↑ Back to top- Go to Products > All Products and open the bookable product.
- In Product data, select Has resources, then open the Resources tab.
- Enter a Label for the customer-facing selector, such as Instructor or Room type.
- Under Resources are…, choose Customer selected or Automatically assigned. Compare the assignment options below.
- Choose an existing resource from the dropdown next to Add/link Resource, then select that button. To create one here instead, choose New resource, select the button, and enter its name. Use Edit resource to check the new resource’s quantity and availability.
- Expand the linked resource row and enter any additional Base Cost and Block Cost. Base Cost is added once per booking; Block Cost is added for each booked block. Product pricing rules and person cost multipliers can also affect the final total.
- Select Update to save the product. Reopen it and confirm that the linked resources, costs, and assignment option remain as intended.
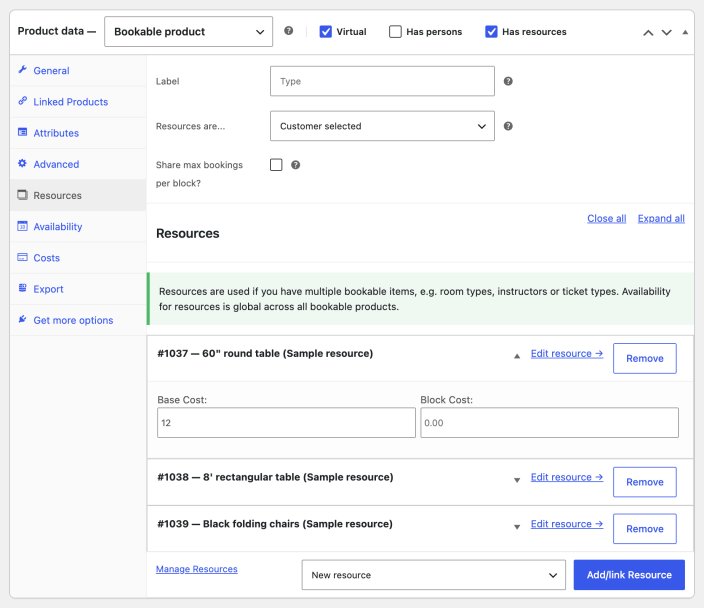
If an existing resource is missing from the dropdown, check whether it is already linked and whether your account can edit it. Resources already linked to the product are not offered again. Creating a resource from this tab creates a global resource record, so check Bookings > Resources before trying again after an uncertain result.
Choose how resources are assigned
↑ Back to topBoth options assign one resource per booking and respect its remaining quantity and applicable availability rules.
Customer selected
↑ Back to topChoose Customer selected when the choice matters to the customer, such as a preferred instructor or room type. The booking form shows the linked resources under your Label. Its calendar and available times depend on the selected resource.
Automatically assigned
↑ Back to topChoose Automatically assigned when any available resource can fulfill the booking, such as similar boats in a rental fleet. The customer does not choose a resource. A slot can remain available while at least one linked resource can accommodate the requested booking.
Bookings checks resources in their saved order and assigns the first one with enough availability. Drag the resource rows into the desired order in the Resources tab, then select Update. This is a preference order, not an equal rotation between resources.
Share max bookings per block
↑ Back to topBy default, a resource with an Available Quantity uses that quantity as its capacity. The product’s Max bookings per block is not a single shared limit across those resources. Enable Share max bookings per block? in the Resources tab when the product also needs one combined allowance.
With this setting enabled, Max bookings per block on the Availability tab limits bookings across all resources linked to that product. Each resource’s own quantity and availability still apply. The shared limit does not create extra resource capacity.
For example, a Portrait Sessions product has two photographers, each with Available Quantity set to 1. There is only one lighting setup, so set the product’s Max bookings per block to 1:
- Shared limit off: Each photographer can accept one booking in the same time slot, allowing two simultaneous sessions.
- Shared limit on: One session uses the product’s shared allowance, so the other photographer cannot accept another session for that product in the same slot.
This combined allowance belongs to the product. If another product uses the same photographers, it has its own product limit, but still shares each photographer’s actual resource capacity.
Share a resource across products
↑ Back to topLink the same resource record to every product that needs to share its availability. Creating separate resources with similar names does not connect their capacity.
For example, link one therapist with Available Quantity set to 1 to both a consultation product and a treatment product. An overlapping reservation for that therapist prevents another booking from using that same unit. Set a higher quantity only when the resource represents several interchangeable units.
Start times when products share resources
↑ Back to topEach product keeps its own start-time schedule, based on its first available time, booking duration, and buffer. Sharing a resource does not make another product’s start times become available.
For example, Product A has fixed 60-minute bookings and a 30-minute buffer, starting at 2:00 PM. Its next start is 3:30 PM. Product B shares the resource but has fixed 30-minute bookings with a 30-minute buffer. Booking Product B at 2:00 PM does not add a 3:00 PM start to Product A’s schedule; Product A’s next scheduled start remains 3:30 PM, provided the resource is available then.
Check the setup
↑ Back to top- Open the product’s booking form and check the expected resource choices, available dates, and calculated total. For automatic assignment, a customer-facing selector should not appear.
- On a test site, create a fictional booking and open it in Bookings > All Bookings to confirm the assigned resource. Check another overlapping booking against the same resource’s quantity.
- If products share a resource, also test the overlap on the other product. If a shared product limit is enabled, test a different resource on the same product too.
If the result differs, check the linked resource record, its Available Quantity, existing reservations, product and store availability rules, duration and buffers, person settings, and the shared-limit setting. Correct one constraint at a time and retest before accepting customer bookings.
More examples
↑ Back to topSee the Bookings resource use cases for worked examples.
Questions and support
↑ Back to topSomething missing from this documentation? Still have questions and need assistance?
- If you have a question about a specific extension or theme you’d like to purchase, contact us to get answers.
- If you already purchased this product and need some assistance, get in touch with a Happiness Engineer via our support page and select this product’s name from the Product dropdown.