Choose whether customers see booking times in your store’s timezone or their own local timezone. Store time can be useful for visits to a physical location; visitor time can make remote appointments easier to compare with a customer’s own calendar.
Before configuring Bookings, check Settings > General > Timezone in WordPress. Choose a city in the timezone you use rather than a fixed UTC offset, so seasonal daylight-saving changes can be handled correctly. Booking events use the site’s timezone automatically; there is no separate Enable Bookings Timezone Calculation setting to turn on.
Configure Bookings timezone settings
↑ Back to top- Go to Bookings > Settings and select Timezones.
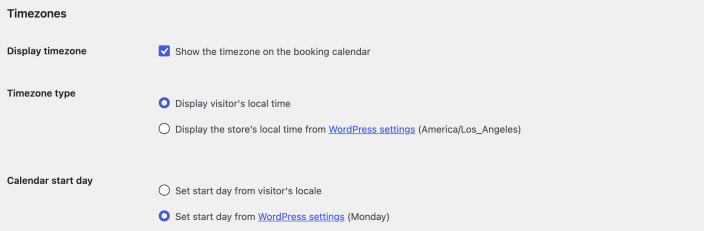
- Under Display timezone, select Show the timezone on the booking calendar if you want customers to see the timezone label alongside the calendar.
- Under Timezone type, choose Display visitor’s local time to use the visitor’s browser timezone, or Display the store’s local time from WordPress settings to keep times in the store’s timezone.
- Under Calendar start day, choose the visitor’s locale or the day configured in WordPress. This controls which weekday appears first in the calendar.
- Select Save Changes and reload the page to confirm your choices were saved.
Visitor-time conversion applies to bookable products with durations in minutes or hours. Products booked in days or months keep their dates in the site’s timezone. The Display timezone checkbox controls the calendar’s label; use Timezone type to choose how times are displayed.
Check the customer-facing time
↑ Back to topOpen an hourly or minute-based bookable product on your store, choose an available date, and check the timezone label and time slots. When visitor-local time is selected, compare the page from a browser or device using a different timezone. The same appointment should appear at the corresponding local time, rather than becoming a different booking slot.
If the time is unexpected, check the WordPress timezone, the selected Timezone type, the product’s duration unit and the visitor’s device timezone. Refresh the product page after saving changes. Booking forms in the store’s admin area stay in store time.
Set the time format and first weekday
↑ Back to topBookings uses your site’s time format. To switch between 12-hour times with am/pm and 24-hour times, go to Settings > General > Time Format, choose the format you want, and select Save Changes. Check the time slots on a bookable product afterward.
To choose a fixed first weekday, change Settings > General > Week Starts On. Bookings uses that value when Calendar start day is set to WordPress settings. Choose the visitor’s locale instead if you want the first weekday to vary with the visitor.
Questions and support
↑ Back to topSomething missing from this documentation? Still have questions and need assistance?
- If you have a question about a specific extension or theme you’d like to purchase, contact us to get answers.
- If you already purchased this product and need some assistance, get in touch with a Happiness Engineer via our support page and select this product’s name from the Product dropdown.