
Sell a chef’s cooking class through your store with WooCommerce Bookings and Product Vendors. Give the chef access to their bookable product, charge different prices for adults and children, and calculate the chef’s commission.
Scenario
↑ Back to topA restaurant hosts Chef Lucia Ortiz’s family cooking class every Saturday from 11 am to 1 pm. The class has 18 seats, shared by adults and children. Adults pay $10 and children pay $5, with at least one adult in each reservation. The chef earns 75% of the product sale amount; the restaurant retains 25% before its fees and expenses. These example prices are in US dollars before tax or discounts.
Before you begin
↑ Back to topInstall and activate WooCommerce, WooCommerce Bookings, and Product Vendors. Work as a store administrator and use a test store to check access, prices, availability, and commissions before taking customer bookings. Confirm your store currency, tax settings, and time zone.
A vendor profile represents the business selling a product. A WordPress user with the Vendor Admin role manages that profile. You need both the user role and the profile assignment; one alone isn’t enough.
Set up the vendor
↑ Back to topCreate the vendor’s user account
↑ Back to top- Go to Users > Add User. Enter the chef’s username, email address, and name.
- Select Vendor Admin under Role. For an existing user, edit their account and change its role instead.
- For a real vendor, leave Send User Notification selected so they receive account access instructions. Select Add User to save.
Create and configure the vendor profile
↑ Back to top- Go to Products > Vendors. Under Add New Vendor, enter the chef’s name and Vendor Email, then select Add New Vendor.
- Open the vendor’s name in the list. Under Vendor Administrators, search for and select the chef’s user account.
- Set Commission Type to Percentage and Commission Amount to 75. This is the vendor’s share, not the restaurant’s share.
- Under Tax Handling, select Keep Taxes for this example. Commission is calculated on the product price without tax. Pass Taxes adds the full tax amount to the vendor’s commission; Split Taxes calculates commission on the product price including tax. Choose the option that fits your arrangement.
- Under Additional Settings > Bookable Products, select Enable bookings feature.
- Select Update.
For the initial test, leave Enable instant PayPal payouts clear and use a manual payout schedule. Automatic commission payments require an approved PayPal Payouts setup and the vendor’s PayPal Email; entering an email alone doesn’t enable them. See Product Vendors setup and payout settings before enabling automatic payments.
Set up the cooking class
↑ Back to topThe following steps are for the store administrator. The chef can manage the assigned class once their vendor access and bookings feature are enabled.
Create and assign the product
↑ Back to top- Go to Products > Add new product and name it Family Cooking Class.
- In Product data, select Bookable product, then select Virtual and Has persons. Virtual prevents shipping charges for the class.
- In the product editor’s Vendors panel, select Chef Lucia Ortiz. Keep this assignment when saving the product.
Set the duration and base costs
↑ Back to top- Under Product data > General, set Booking duration to Fixed blocks of, 2, Hour(s). Select Calendar always visible for Calendar display mode.
- Leave the product’s Commission (%) field blank to inherit the chef’s 75% rate. Leave Override product vendor settings clear to use the vendor’s tax settings.
- Under Costs, set Base cost and Block cost to 0 and leave cost rules empty. Set the adult and child charges on the person types below.
Open the Saturday class
↑ Back to top- Under Availability, set Max bookings per block to 18.
- Set All dates are… to not-available by default and keep Check rules against… set to All blocks being booked.
- Set First block starts at… to 11:00 AM. Leave the buffer at 0 for this example.
- Select Add Range. Set Range type to Every Saturday (Set time), the time range to 11:00 AM–1:00 PM, Bookable to Yes, and Priority to 10.
- Set a booking window that includes your test Saturday. This example uses a minimum of 1 Day(s) and a maximum of 6 Month(s) into the future.
The two-hour duration fits one class into the 11 am–1 pm range. Store or vendor availability rules can still close that time; check those rules if the expected Saturday is unavailable.
Set adult and child prices
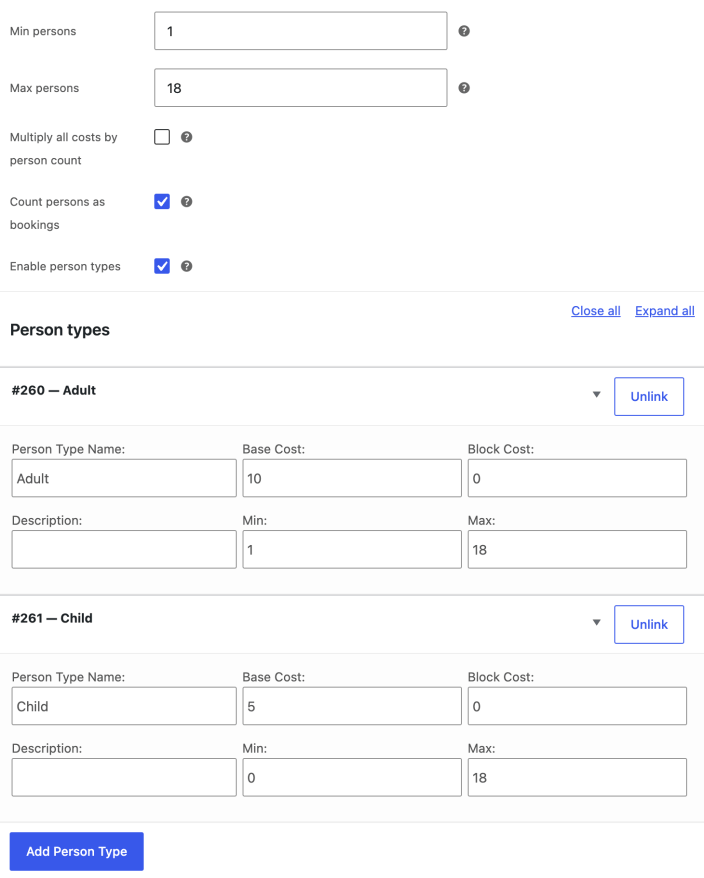
↑ Back to top- Under Persons, set Min persons to 1 and Max persons to 18.
- Select Count persons as bookings so each adult or child uses one of the 18 seats. Select Enable person types.
- Leave Multiply all costs by person count clear. Person-type prices are already charged for each person; this example has no additional product-level charge to multiply.
- Select Add Person Type. Name it Adult, set Base Cost to 10, Block Cost to 0, Min to 1, and Max to 18.
- Add a second type named Child, with Base Cost 5, Block Cost 0, Min 0, and Max 18.
- Select Publish or Update to save the product.
The overall maximum of 18 applies to adults and children combined. The Adult minimum requires one adult per reservation, including reservations with children.
Check the customer view
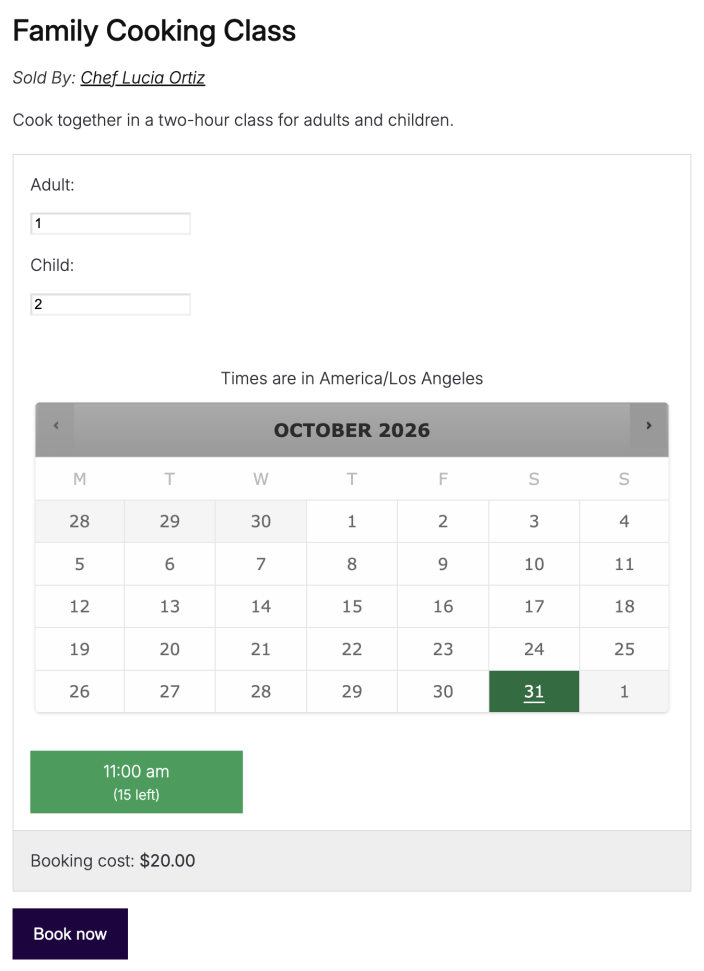
↑ Back to topOpen the published product, enter one adult and two children, choose an available Saturday, and select the 11 am time. The booking cost should be $20 before tax: $10 + (2 × $5).
Verify seats, access, and commission
↑ Back to top- Create an active test reservation for one adult and two children on that Saturday. You can use Bookings > Add Booking with Don’t create an order for this booking to check capacity without taking payment.
- Refresh the product and select the same session. There should be 15 seats left. A group of 15 should fit; a group of 16 should not. A child-only group should also be rejected.
- Cancel the test reservation and refresh the product. Its three seats should become available again.
- Have the chef sign in to their own account and confirm they can find and edit their assigned class.
- Use your test checkout to check the resulting order and commission. On a $20 product sale with no discounts, tax, shipping, or product-level override, the chef’s commission should be $15. A booking created without an order checks seats only; it doesn’t create an order commission.
If the result differs
↑ Back to top- The chef can’t see the class or Bookable product: check their Vendor Admin role, the vendor’s Vendor Administrators assignment, Enable bookings feature, and the product’s selected vendor.
- No Saturday time appears: check the two-hour duration, the 11 am start, the Saturday time range, booking window, remaining seats, and store or vendor availability rules.
- Several people use only one seat: select Count persons as bookings and check that the test reservation is active.
- The price is wrong: check both person-type prices, product base and block costs, cost rules, and any add-on charges. Keep the all-cost multiplier clear for this setup.
- The commission is wrong or unpaid: check the product’s vendor assignment and commission override, the vendor’s percentage and tax handling, discounts, order status, and payout configuration. An unpaid commission is not proof that the booking failed.
Questions and support
↑ Back to topSomething missing from this documentation? Still have questions and need assistance?
- If you have a question about a specific extension or theme you’d like to purchase, contact us to get answers.
- If you already purchased this product and need some assistance, get in touch with a Happiness Engineer via our support page and select this product’s name from the Product dropdown.

