WooCommerce Bookings is compatible with the Product Add-Ons extension (purchased separately). Integrating the Product Add-Ons extension with WooCommerce Bookings allows you to offer additional free or paid booking options for customers, such as gear, accessories, food, etc. This guide explains how to create a bookable product with product add-ons and how to manually create a booking that includes add-ons.
How to Create a Bookable Product with Product Add-Ons
↑ Back to topMaking product add-ons available for bookable products works the same as with other product types when Product Add-Ons is active. Here is how to add them:
- Create a Bookable Product.
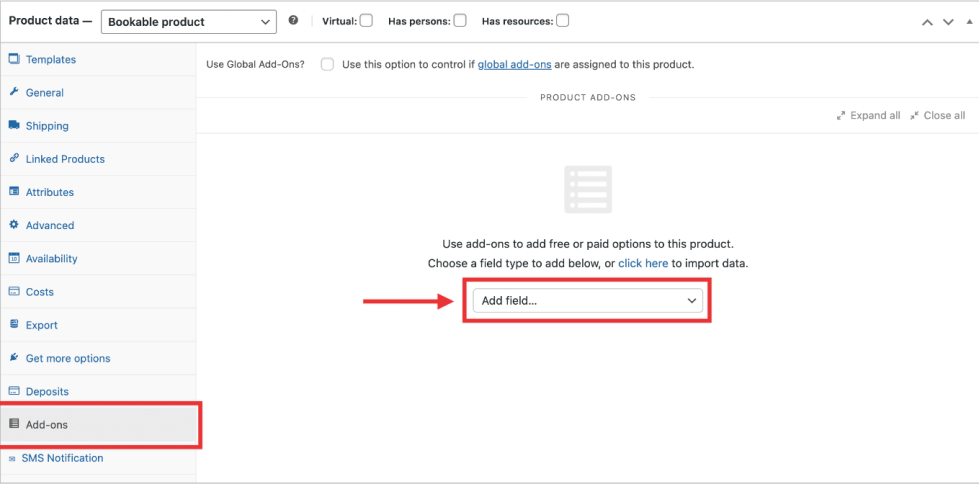
- Click on the Add-ons tab in the product data section.
- A window will pop up with the Product Add-ons options.
- Click the Add Field dropdown list:

- Select the Product Add-on type from the dropdown options.
- Select whether to multiply the add-on cost by the number of persons on the booking or the number of blocks booked.
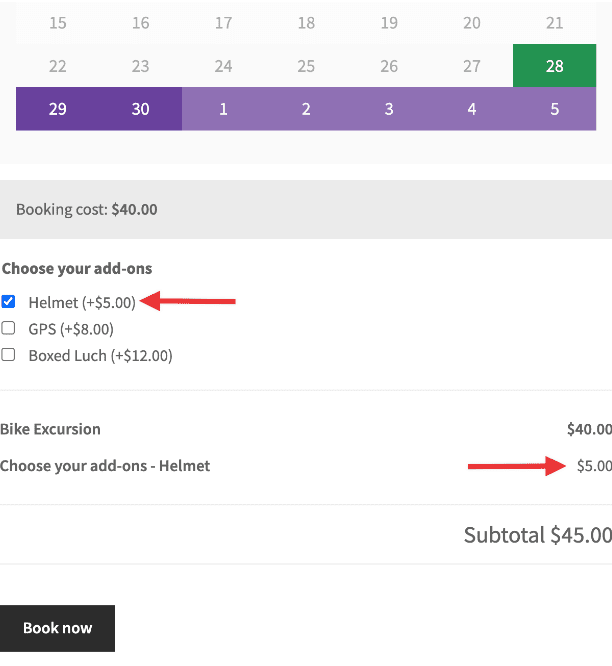
- At this point, you can either publish the product or select Add Option to add additional Product Add-ons to your bookable product. After publishing, customers will see add-ons below the primary booking form. Here is what it looks like:

Note: The Google Calendar integration will include Bookings Product Add-On information. Read more about that here.
How to Create a Manual Booking with Product Add-Ons
↑ Back to topIf you need to add a manual booking for a customer which includes add-ons, you can follow the steps below:
- Create a Booking via Bookings > Add Booking in the sidebar of your WP-Admin dashboard.
- Next, you’ll move to another screen where you assign the new booking to a customer and a product using the two drop-down menus presented. We recommend selecting “create a new corresponding order for this new booking” in the create order section of this step (as shown below):

- Click Next to select the date, time, and duration of the new booking.
- Click Add Booking and the Edit Order screen opens for the new booking.
- Click the pencil icon next to the item total on the edit order screen to access the edit order options.
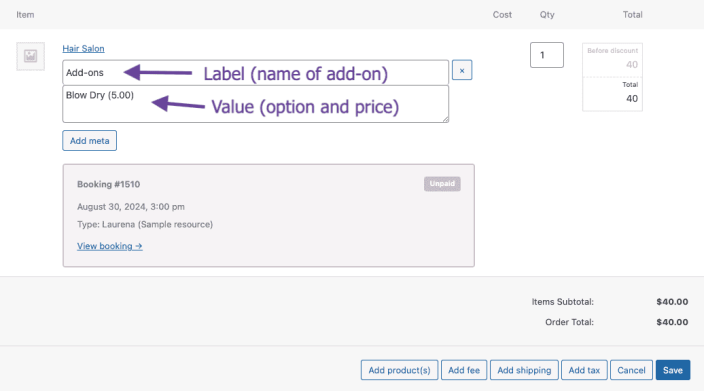
- Click the Add meta button under the name of the bookable product.
- Enter the product add-on label (name) and the value (the option you are adding and its price) as shown here:

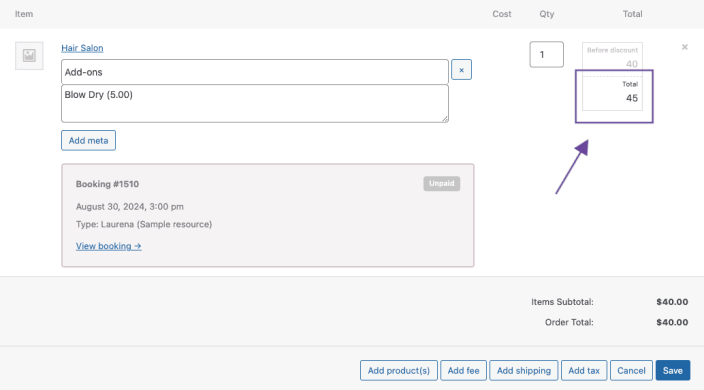
- Enter the new price for the booking if the add-on(s) have an extra fee (this is not update automatically) by editing the number in the “total” box next to the booking name, as shown here:

- Click Save when you finish editing.
- Click Recalculate under the total if the price was changed in step 8 (this ensures the total is accurately calculated).
Now that the booking has been created and the product add-ons added, use the order actions at the top of the screen to send the order details to your customer. Select “Send order details to customer” and click “update” to trigger the email.
Note: While this process does create a booking for the customer, the booking will be set to “unconfirmed” and “unpaid” until the customer pays for it.
Questions and support
↑ Back to topSomething missing from this documentation? Still have questions and need assistance?
- If you have a question about a specific extension or theme you’d like to purchase, contact us to get answers.
- If you already purchased this product and need some assistance, get in touch with a Happiness Engineer via our support page and select this product’s name from the Product dropdown.
