With WooCommerce Bookings, only one Google Calendar can be connected to the site and only from one account (i.e. the admin account). So all bookings made on the site are synced to this one Google Calendar.
With the help of WooCommerce Zapier, you can now synchronize multiple booking calendars. You can also sync Individual Booking Products with individual Google Calendars using WooCommerce Zapier integration. This is useful for cases like:
- If you’d like to sync your booking details across multiple Google Calendars for your staff members
- If you’d like to sync bookings of individual booking products to individual Google Calendars
This integration ensures that appointments or reservations made for specific products are automatically reflected in the corresponding Google Calendar, providing a comprehensive overview of your schedule.
Note: This sync is one way i.e. from the WooCommerce site to the Google Calendar. Events Added to the Google Calendar are not synched back to the WooCommerce site. Only the events that are added to the calendar connected within Bookings > Settings > Calendar Connection are synced to Bookings Store Availability rules.
Also, please note that you will need to have a separate Zapier account for this to work.
Multiple Calendar Integration
↑ Back to topLet’s start with how you can sync the bookings made on your site to multiple Google calendars.
By default, the calendar connected within Bookings > Settings > Calendar Connection will receive the booking details. Now, to sync the booking details to multiple calendars, use WooCommerce Zapier integration.
Please follow the below instructions:
- Install and Activate the WooCommerce Zapier extension
- Authenticate your site with WooCommerce Zapier by following the steps mentioned in this document
- Create a Zap within your Zapier account
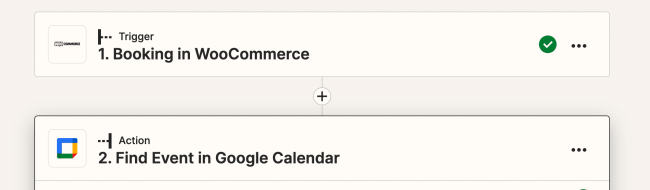
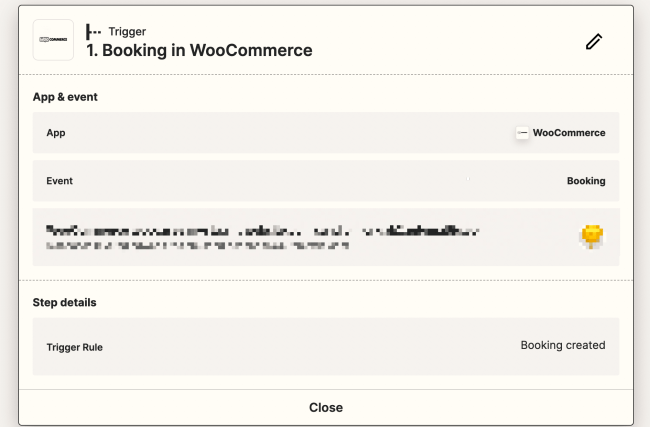
- Set the Trigger to “Booking Created” in WooCommerce (Make sure to authenticate your site with WooCommerce Zapier)
- Set the Action to “Find Event in Google Calendar (optionally create the event if not found)”
- Authenticate the required Google account.
- Select the desired Google calendar
- Fill in the additional required details for the event (i.e. Search Term, End time, and Start time)
Now, whenever a booking is created, it will be synced to the connected Google Calendar via the Zapier Integration along with the calendar connected at Bookings > Settings > Calendar Connection.
You can add additional “Actions” to this Zap and connect other Google Calendars to it and they all will receive the booking details whenever a booking is created.

You can find more booking triggers for Zapier here.
Sync Individual Booking Products to Individual Google Calendars
↑ Back to topSyncing Individual Booking Products to Individual Google Calendars is useful for the below use cases:
- If you are using Product Vendors, then synching the Vendor Booking Products to their respective Google Accounts
- If you have set up resources and would like to send the booking details for the resources booking product to the resources Google calendar
To explain this, we will conder the first example of synching the Vendor Booking Products to their respective Google Accounts.
To send vendor-related bookings to their respective calendars using WooCommerce Zapier, you need to create a similar zap as above, the only additional step that is required is – we need to add a filter such as the “Zap” check for the booking product ID and send the details to a specific calendar.
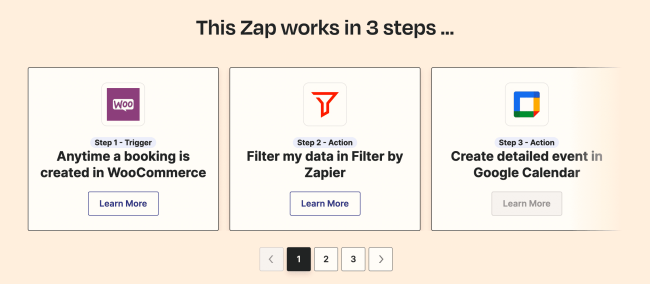
The Zap will work in 3 steps:
- Anytime Booking created in WooCommerce
- Filter the data (check for the booking product ID)
- Send the details to the respective Google Calendar
Here are the steps in detail:
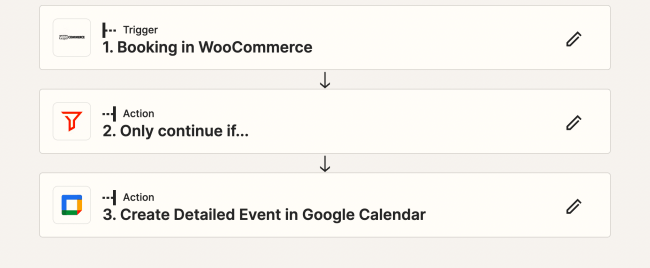
- Whenever a booking is created on the site, the trigger will run:
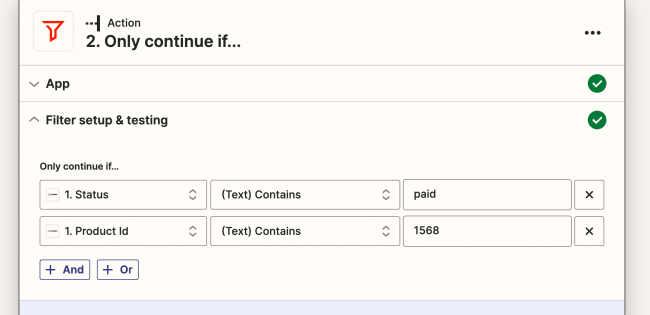
- The filter Action then ensures that the Booking is only for ‘X’ product. In my example, my Booking product ID is 1568, which is my vendor Booking product. I have also added another option to check if the booking is paid. So if the booking product ID is 1568 and the booking status is paid, it will send the booking details to the Google Calendar
- Finally create an action by connecting the required Google Calendar (Vendor’s Google Calendar), populating with the details that the ‘zap’ pulls:
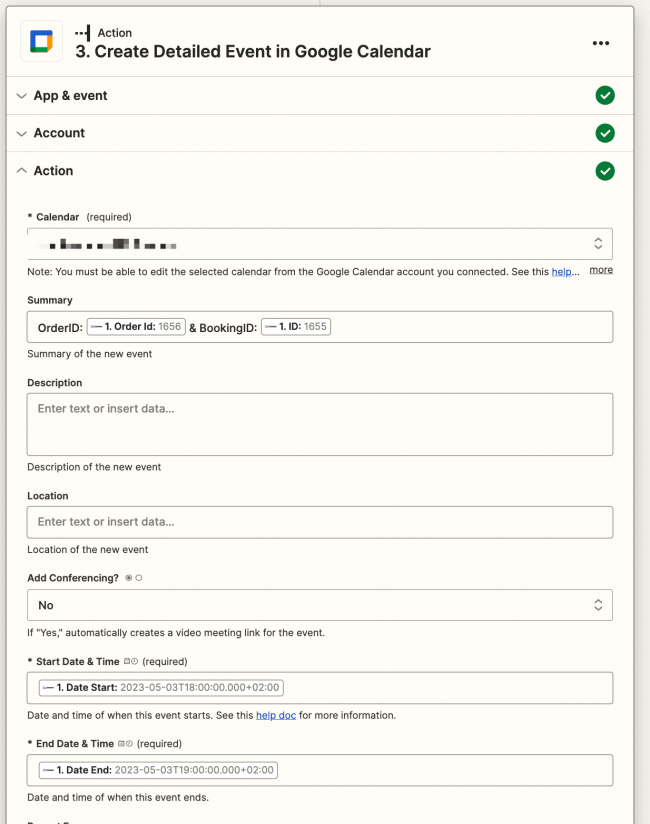
Now, the bookings made on the site for my vendor product with the ID 1568, will be synced to the Vendor’s Google Account, along with the calendar connected at Bookings > Settings > Calendar Connection.
Do note that this isn’t a one-click option, and you’d need to set this up for each of your vendor-booking products for each vendor. The good news is that ‘zaps` can be duplicated, so once you have the first set-up, adding others should be a quicker process. One can set up a similar Zap for their resources.
Questions and Feedback
↑ Back to topHave a question before you buy? Please fill out this pre-sales form.
Already purchased and need some assistance? Get in touch with a Happiness Engineer via the Help Desk.