


✨ Welcome to the Mizu Theme for Luxury Fashion Documentation ✨
Mizu Theme for Luxury Fashion is a minimal, multi-purpose, intuitive and easy-to-
use premium WooCommerce theme. It encompasses a simple yet sophisticated
design that offers customers a smooth and seamless shopping experience.
Expertly optimized for fashion and beauty websites, Mizu Theme’s flexible and
versatile design allows it to be adapted for many different types of ecommerce
websites and stores.
Mizu Theme incorporates many professional modern web design features and
standards to optimize and enhance your customers shopping experience,
resulting in increased customer engagement, retention, and satisfaction
1. Getting Started
↑ Back to topThe Mizu Theme Documentation will guide you through how to install and
customize Mizu Theme.
It is written in a tutorial style so you can follow it from beginning to end. If you are
already familiar with WordPress and WooCommerce, then you can skip to the
relevant sections.
You can download the Mizu Theme Documentation PDF here:
Mizu Theme for Luxury Fashion Documentation (PDF)
1.1. Requirements
↑ Back to topMizu Theme for Luxury Fashion requires a working WordPress installation with
the WooCommerce plugin installed. Mizu Theme is currently compatible with
WooCommerce versions 9.4 and above.
If your current store uses an older unsupported version of WooCommerce, but
you would still like to use Mizu Theme for Luxury Fashion, please contact our
support team and we’ll see what we can do for you.
If you haven’t already installed WordPress, you can find instructions on how to
install the latest version here: How to install WordPress.
1.2. Installation
↑ Back to topTo install Mizu Theme for Luxury Fashion, do the following:
- Go to the Downloads page on your WooCommerce.com account.
- Click the
DOWNLOADlink next to Mizu Theme for Luxury Fashion to save themizu.zipfile to your preferred folder. - Visit your site’s Dashboard.
- Navigate to
Appearance > Themes. - Click on the
Add Themebutton at the top of the page. - Click on the
Upload Themebutton at the top of the page. - Click on the
Browsebutton and select themizu.zipfile you downloaded in step 2. - Click on the
Install Nowbutton. You should be redirected to a screen that says ‘Theme installed successfully’. - Click on the
Activatebutton.
Now when you visit your site, it should be using Mizu Theme.
2. Customizing Your Shop
↑ Back to topIn this section, you will learn how to configure each part of Mizu Theme for
Luxury Fashion. Everything will be customized through your site’s Dashboard.
2.1. The Header
↑ Back to top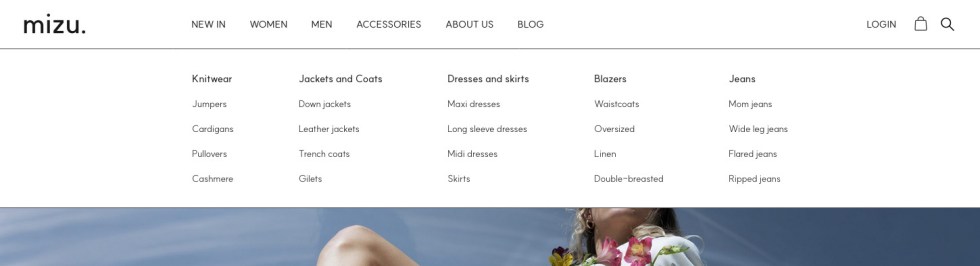
2.1.1. Editing the Logo
To edit the Logo of your site, do the following:
- Navigate to
Appearance > Customizefrom the Dashboard. - Click on the
Site Identitysection. - Locate the
Site logosetting. - Click on the
Select imagebutton and choose yourLogo image. - Enter a height in pixels in the
Desktop logo height (px)field. - Enter a height in pixels in the
Mobile logo height (px)field. - Click on the
Publishbutton at the top of the Customizer.
NOTE:
If you don’t see your changes, you may need to refresh the page.
2.1.2. Adding Menu Items to the Navigation Bar
To add menu items to the Navigation Bar (Navbar), do the following:
- Navigate to
Appearance > Customizefrom the Dashboard. - Click on the
Menussection. - Click on the
Create New Menubutton. - Type a menu name in the
Menu Namefield. - Under
Menu Locations, select the locations where you want your menu to display. For example, if you want your menu to display in the Navbar and Mobile Side Menu, select theMain Menulocation. - Click on the
Nextbutton. - Click on the
Add itemsbutton. - Select all the
Menu itemsyou want to add to your menu. - Reorder the menu items by dragging them up or down. If you want to create a submenu item, drag the menu item over the desired parent menu item.
- Click the
Publishbutton at the top of the Customizer when you are finished.
If you added your menu to the Main Menu location, you should see the menu items
in the Navbar on desktop computers and in the Mobile Side Menu on mobile
devices.
NOTE:
Mizu Theme will display menu items up to three levels deep.
2.1.3. Adding a Product Search Field
To add a Product Search field to the header of your store, you will need to use theLegacy Product Search widget. To use WordPress/WooCommerce Legacy Widgets,
you will need to install the Classic Widgets plugin from the WordPress Plugin
Directory.
To install the Classic Widgets plugin, do the following:
- Navigate to
Plugins > Add Pluginfrom the Dashboard. - Search for
"classic widgets"in the search bar. - Locate the
Classic Widgetsplugin.
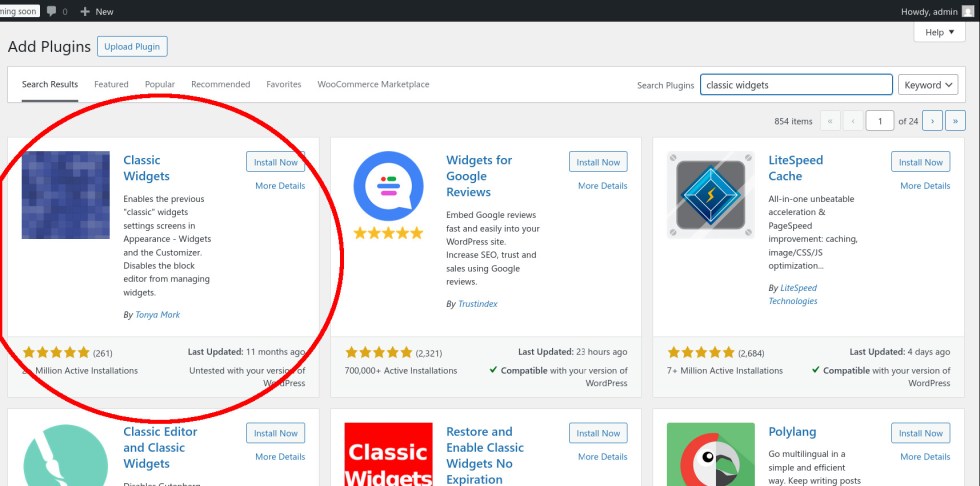
- Click on the
Install Nowbutton. - Click on the
Activatebutton once it is installed.
To add the Legacy Product Search to the desktop Navbar, do the following:
- Navigate to
Appearance > Widgetsfrom the Dashboard. - Locate the
Product Searchwidget and click on it. - Select
Top Nav Searchfrom the dropdown. - Click on the
Add Widgetbutton.
The desktop Navbar should now display a Search icon. When you click on the
Search icon a Search box should appear below.
IMPORTANT
When you activate the Classic Widgets plugin, the Gutenberg
Blocks options will no longer be available in the Customizer.
Therefore, we recommend that you Deactivate the Classic plugin after you have completed the above steps.
Widgets
2.2. The Mobile Side Menu
↑ Back to top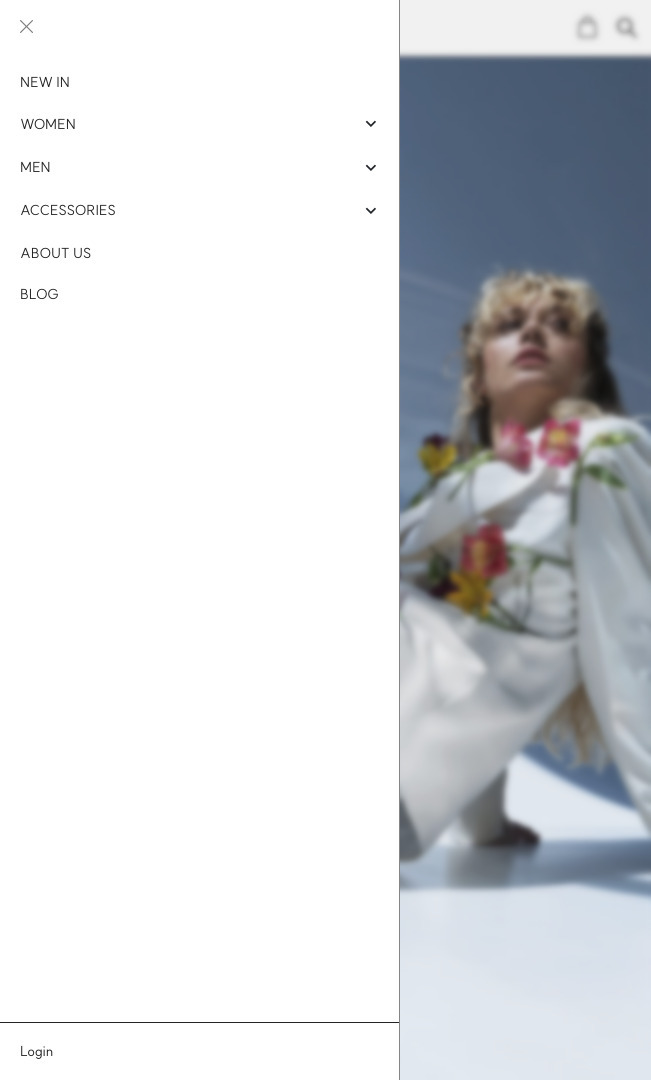
2.2.1. Adding Menu Items to the Mobile Side Menu
To add menu items to the Mobile Side Menu, refer to Adding Menu Items to the Navbar.
2.2.2. Adding WordPress Blocks and Widgets to
the Mobile Side Menu
In Mizu Theme the Mobile Side Menu has three widget areas:
Mobile Side Menu (Top)Mobile Side Menu (Middle)Mobile Side Menu (Bottom)
To add WordPress Blocks and Widgets to these widget areas, do the following:
- Navigate to
Appearance > Customizefrom the Dashboard. - Click on the
Widgetssection. - Select the
Widget areathat you want to customize. - Click on the
+ iconand clickBrowse all. You should now see a selection of blocks to choose from.
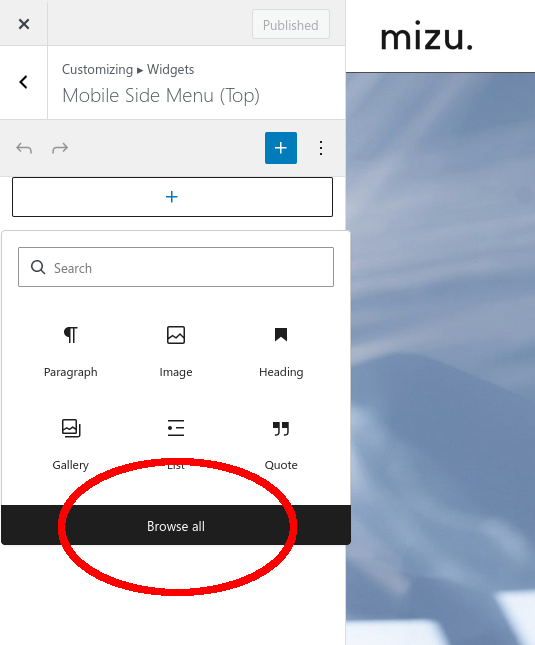
- Select the
Blocksyou want to add to theWidget area. - Click on the
Publishbutton at the top of the Customizer once you’re finished.
NOTE:
If you can’t see a selection of Blocks and can only see a list of Legacy, you will need to deactivate the
WidgetsClassic Widgets plugin.
2.3. The Footer
↑ Back to top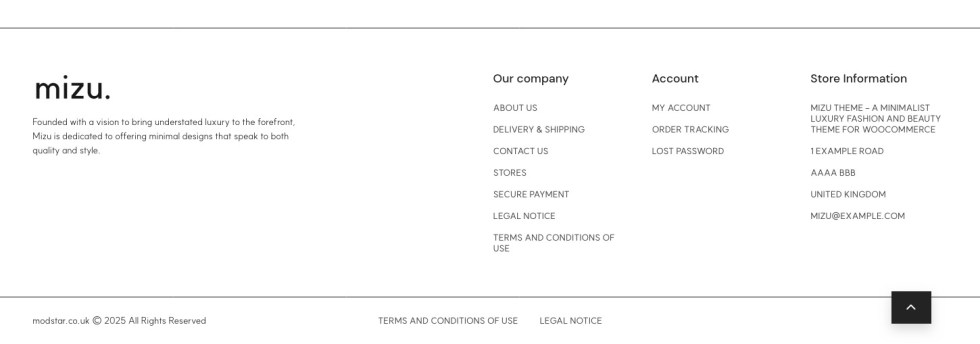
2.3.1. Customizing the Block Footer
By default, Mizu Theme uses a Block Footer, which you can completely customize using the WordPress Block Editor.
To customize the Block Footer, you will need to edit the Footer Template Part by
doing the following:
- Navigate to
Appearance > Designfrom the Dashboard. - Click on the
Patternssection. - Click on the
All template partssection. - Find the
Footertemplate part and click on it. - Customize the template part to your liking using the WordPress Block Editor.
- Click on the
Savebutton in the top right corner once you’re finished.
You can find more information about how to use the WordPress Block Editor
here: WordPress Editor Tutorial.
2.3.2. Switching to the Classic Footer
Mizu Theme offers the option to use the Classic Footer if you prefer the simplicity
of the WordPress Customizer.
To use the Classic Footer, do the following:
- Navigate to
Appearance > Customizefrom the Dashboard. - Click on the
Block Settingssection. - Tick the
Enable block footercheckbox. - Click on the
Publishbutton at the top of the Customizer.
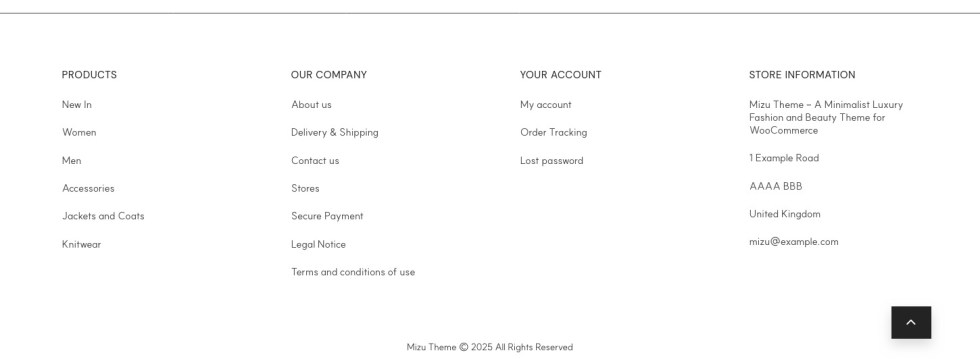
2.3.3. Adding Menus to the Classic Footer
In Mizu Theme, the Classic Footer can display four different menus by utilizing
the four available menu locations:
Footer menu 1Footer menu 2Footer menu 3Footer menu 4
To learn how to add menu items to these menu locations, refer to Adding Menu Items to the Navbar.
2.3.4. Adding WordPress Blocks and Widgets to
the Classic Footer
Mizu Theme provides two widget areas in the Classic Footer:
Footer TopFooter Info
To learn how to add WordPress Blocks and Widgets to these widget areas, refer to Adding WordPress Block Editor Widgets to the Mobile Side Menu.
2.3.5. Changing the Copyright Text in the Classic Footer
If you want to change the Classic Footer Copyright Text, do the following:
- Navigate to
Appearance > Customizefrom the Dashboard. - Click on the
Site Identitysection. - Enter your copyright text in the text field under the
Copyright Textlabel. - Click on the
Publishbutton at the top of the Customizer.
2.4. The Home Page
↑ Back to top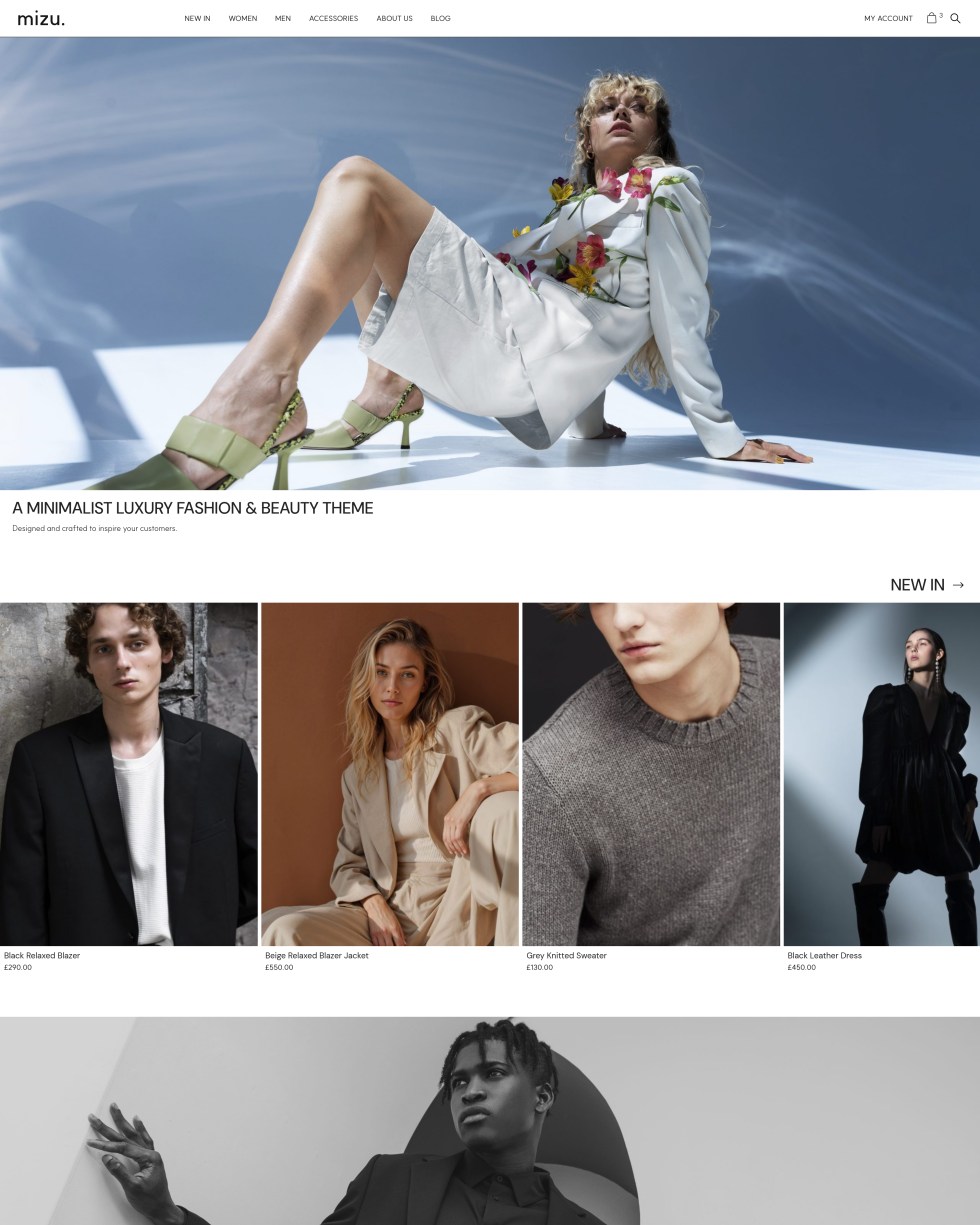
2.4.1. Configuring the Homepage
To display the Homepage, you will need to configure it by doing the following:
- Navigate to
Pages > Add PageFrom the Dashboard. - Type
"Homepage"in theAdd titletext box. - Click on the
Publishbutton in the top right corner of the screen. - Return to the Dashboard by clicking on the
WordPress logoin the top left corner of the screen. - Navigate to
Appearance > Customizefrom the Dashboard. - Click on the
Homepage Settingssection. - Select the
A static pageradio button under theYour homepage displayslabel. - Click on the dropdown under the
Homepagelabel and selectHomepage. - Click on the
Publishbutton at the top of the Customizer.
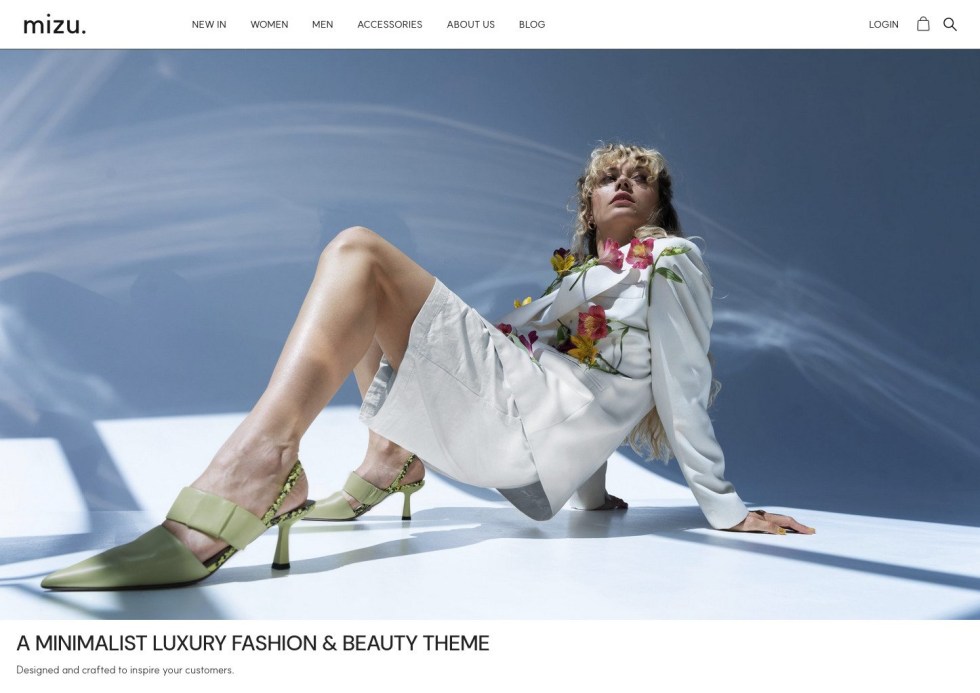
Now when you first visit your website, it should look like the screenshot below:
NOTE:
If the Homepage displays an empty page, do the following:
1. Navigate to Pages from the Dashboard.
2. Hover over the Homepage page you created.
3. Click on the Quick edit button.
4. Change the Slug field to "homepage".
5. Click Update.
2.4.2. Customizing the Homepage Design
To customize the Homepage, you will need to edit the Home template part by doing
the following:
- Navigate to
Appearance > Designfrom the Dashboard. - Click on the
Patternssection. - Click on the
All template partssection. - Find the
Hometemplate part and click on it. - Customize the page to your liking using the WordPress Block Editor.
- Click on the
Savebutton in the top right corner once you’re finished.
You can find more information about how to use the WordPress Block Editor
here: WordPress Editor Tutorial.
2.4.3. Adding Slides to the Main Banner
The Main Banner will turn into a slideshow if you add more than one slide. To add
a new slide, do the following:
- Navigate to
Appearance > Designfrom the Dashboard. - Click on the
Patternssection. - Click on the
All template partssection. - Find the
Hometemplate part and click on it. - Open the
Document Overviewside menu by clicking on the button with three horizontal lines in the top left corner of the page. - On the
List Viewtab, unfold theGroup blocksat the top of the list of blocks
until you locate theCover block. - Once you locate this
Cover block, hover over theGroup blockdirectly above
it and click the button with three dots. - Click
Duplicateto create your second slide. Repeat this step to create as
many slides as you need.
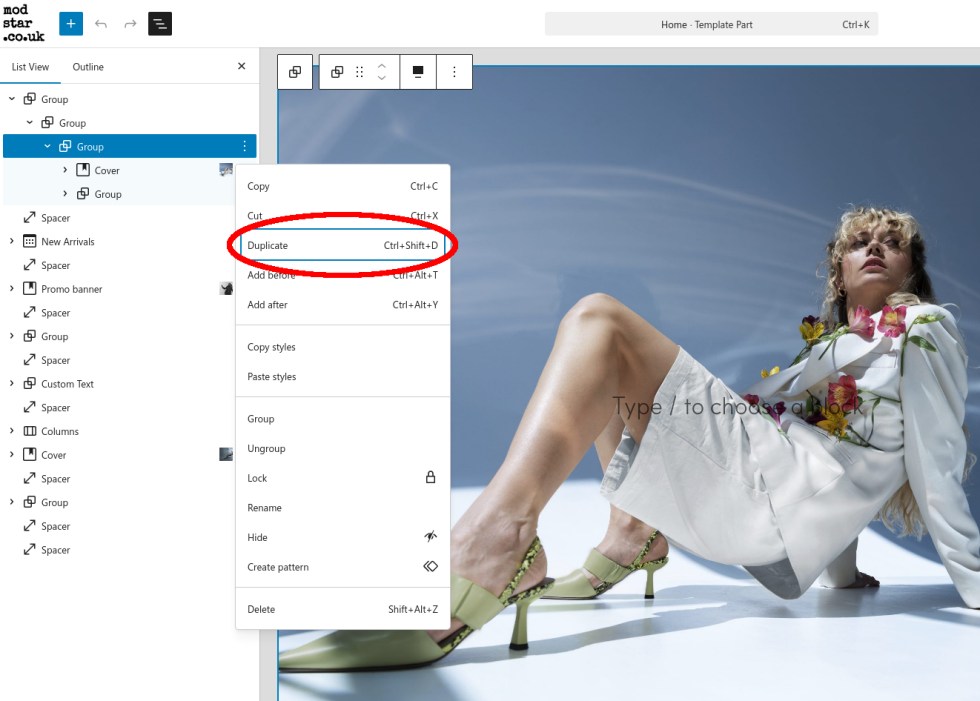
- Unfold the newly created
Group blockand edit the content to your liking.
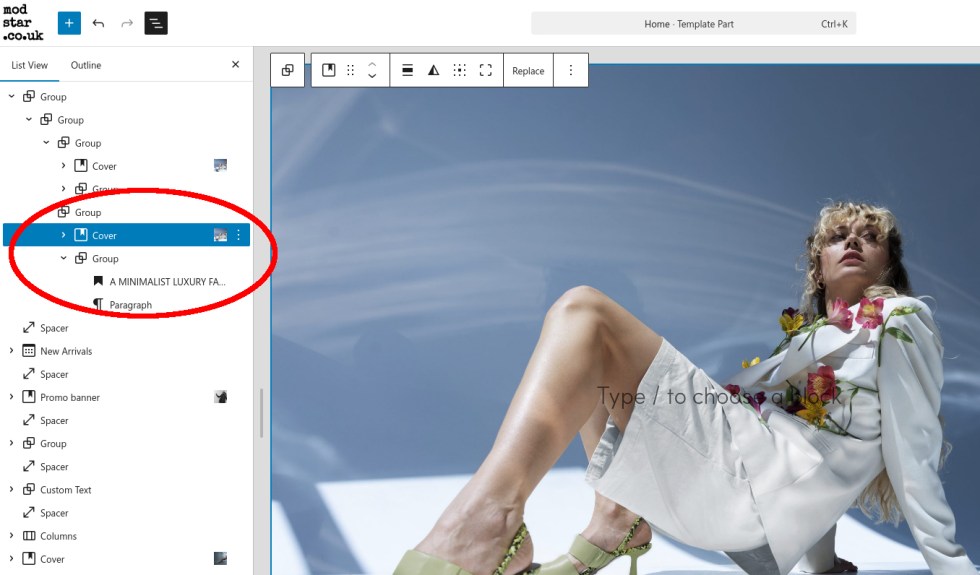
- Click on the
Savebutton in the top right corner once you’re finished. You should now be able to swipe through the slides you added to your Main Banner when you visit your Homepage.
2.5. The Category Page
↑ Back to top
2.5.1. Changing the Product Image Sizes
To change the Product Image Sizes, do the following:
- Navigate to
Appearance > Customizefrom the Dashboard. - Click on the
WooCommercesection. - Click on the
Product Imagessection. - Change the
Main image width,Thumbnail widthandThumbnail croppingsettings. - Click on the
Publishbutton at the top of the Customizer once you’re finished.
2.5.2. Changing the Product Catalog Pagination
Settings
To change the Product Catalog Pagination Settings, do the following:
- Navigate to
Appearance > Customizefrom the Dashboard. - Click on the
WooCommercesection. - Click on the
Product Catalogsection. - Change the
Products per rowand theRows per pagesettings. - Click on the
Publishbutton at the top of the Customizer once you’re finished.
NOTE:
If you don’t see your changes, you may need to refresh the page.
2.5.3. Customizing the Filter Menu

To add, remove, or style the Product Filters, do the following:
- Navigate to
Appearance > Designfrom the Dashboard. - Click on the
Patternssection. - Click on the
All template partssection. - Find the
Product Filterstemplate part and click on it. - Click on the
+icon in the top left corner of the editor to add more filters. - Select one of the filters that are already displayed e.g. the
Price filter. - Type
"filter"into the search box. You should now see a selection of differentFilter blocks. If you can’t see a list of different filter blocks, check the NOTE at the end of this section.

- Select the
Filter blocksyou want to add. - Style the blocks using the Settings Side Menu on the right-hand side.
- Click on the
Savebutton in the top right corner once you’re finished.
NOTE
In step 7, if you don’t see a selection of different Filter blocks after typing "filter", you may need to upgrade all the filter blocks to the latest version.
To upgrade the filter blocks, do the following:
1. Click on one of the Product filter blocks
2. Click on the Upgrade all Filter blocks link in the Settings on the right-hand side.
Side Menu

2.6. The Cart and Checkout Pages
↑ Back to top
2.6.1. Switching to the Classic Cart and
Checkout
By default, WooCommerce uses the Block Cart and Checkout, but for Mizu
Theme, we recommend using the Classic Cart and Checkout, as it is designed to
fit with the rest of the theme.
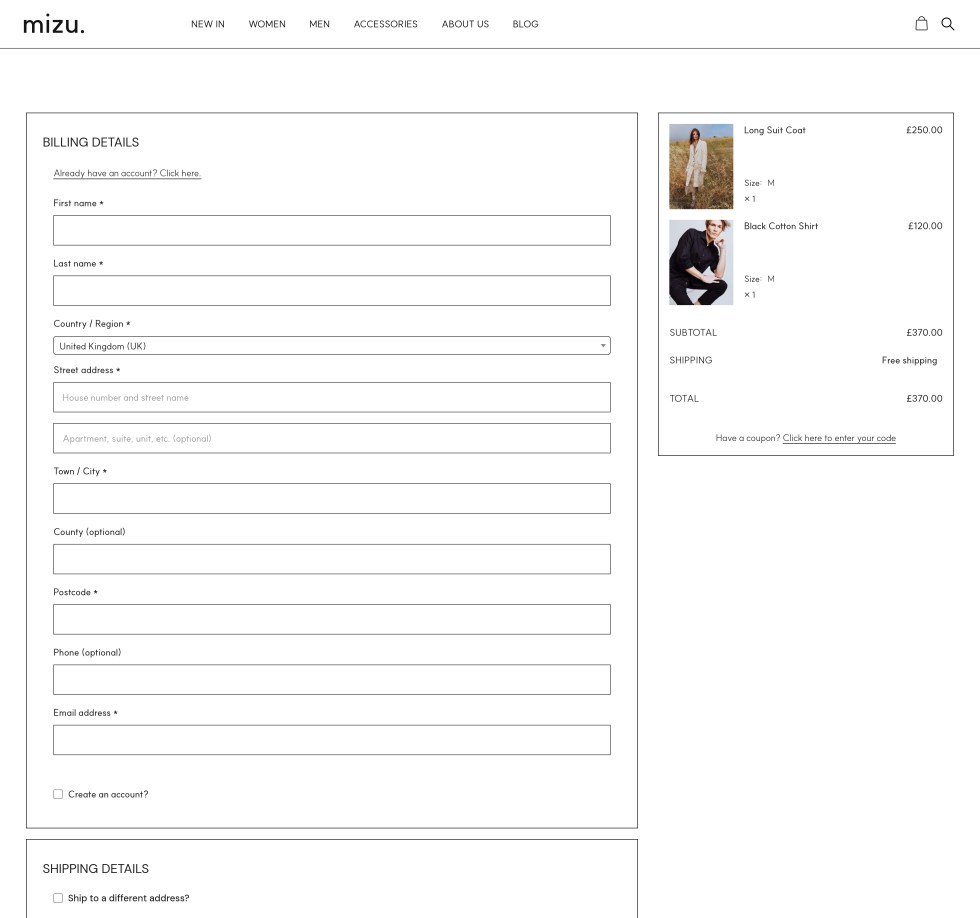
To use the Classic Cart and Checkout, do the following:
- Navigate to
Pagesfrom the Dashboard. - Hover over the
Cartpage and click on theEditbutton. - Open the
Document Overviewside menu by clicking on the button with three horizontal lines in the top left corner of the page. - Click on the
Cartblock in theDocument Overviewside menu. TheCartblock should now have a border around it with theBlock toolbaron top. - Click on the
Cart iconin theBlock toolbar.
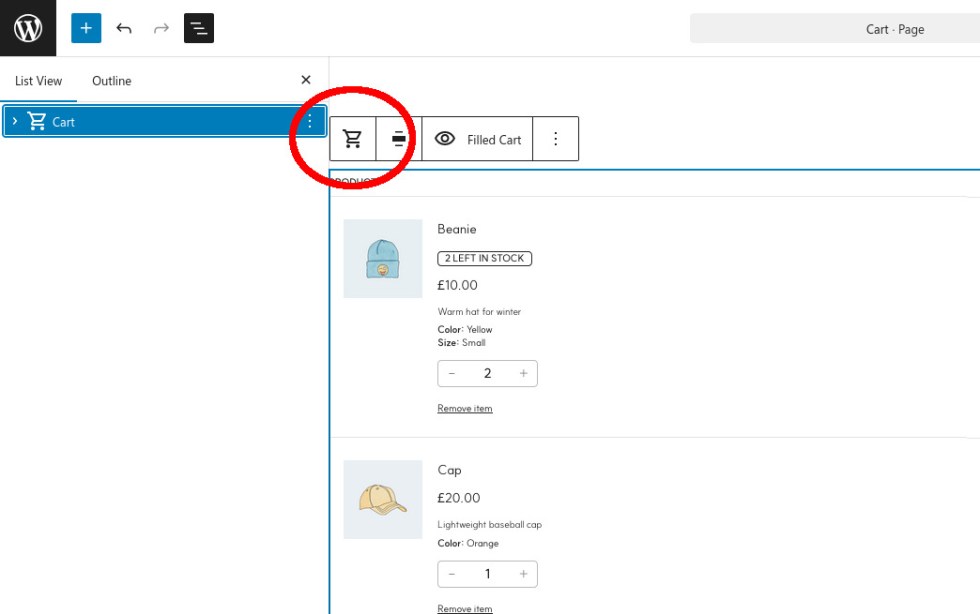
- Select
Classic Shortcodefrom the dropdown. In theDocument Overviewmenu, it should now sayClassic Cart. - Click on the
Savebutton in the top right corner of the page. - Repeat steps 1-7 for the
Checkoutpage.
NOTE:
The Classic Cart and Checkout design is not customizable from the
WordPress Block Editor. If you prefer to have a customizable
alternative, you can use the Block Cart and Checkout.
2.7. The Blog Page
↑ Back to top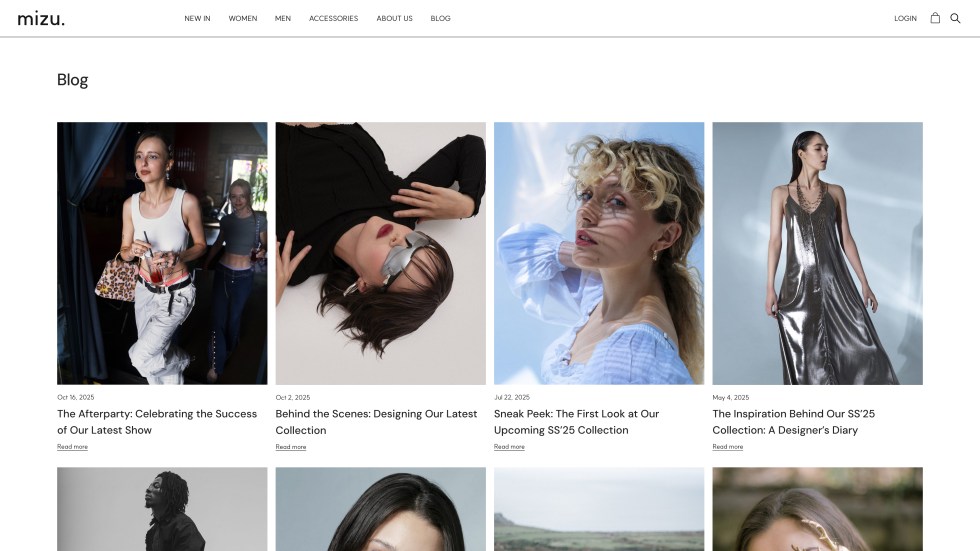
2.7.1. Configuring the Blog Page
To configure the Blog Page, do the following:
- Navigate to
Pages > Add Pagefrom the Dashboard. - Type in a name for your Blog Page in the
Add titletext box, such as"Blog"or"Journal". - Click on the
Publishbutton in the top right corner of the screen. - Return to the Dashboard by clicking on the
WordPress logoin the top left corner of the screen. - Navigate to
Appearance > Customizefrom the Dashboard. - Click on the
Homepage Settingssection. - Ensure that the
A static pageradio button under theYour homepage displayslabel is selected. - Click on the dropdown under the
Posts pagelabel and select the page that you created in step 3. - Click on the
Publishbutton at the top of the Customizer.
To add the blog page to one of your menus, refer to Adding Menu Items to the Navbar.
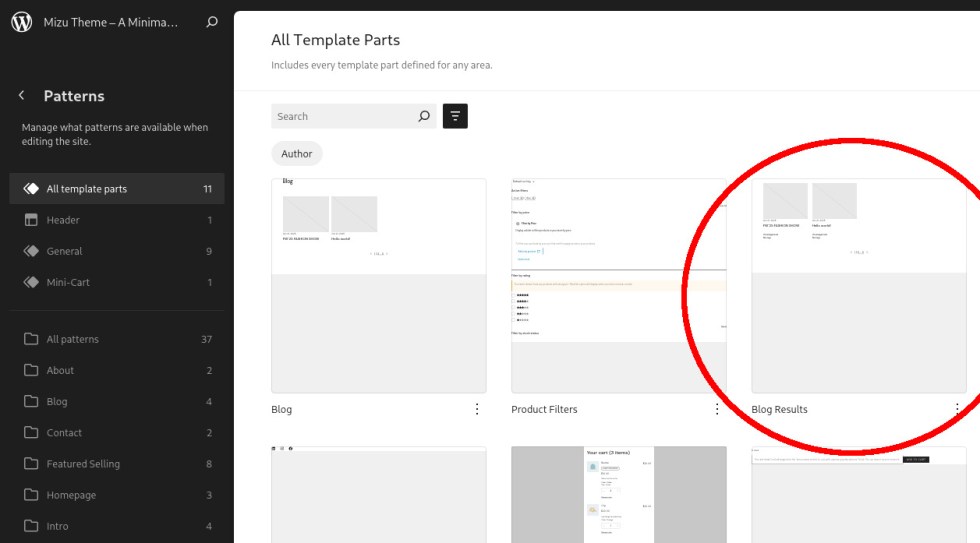
2.7.2. Customizing the Blog Page Design
To customize the design of the Blog Page, do the following:
- Navigate to
Appearance > Designfrom the Dashboard. - Click on the
Patternssection. - Click on the
All template partssection. - Find the
Blogtemplate part and click on it.
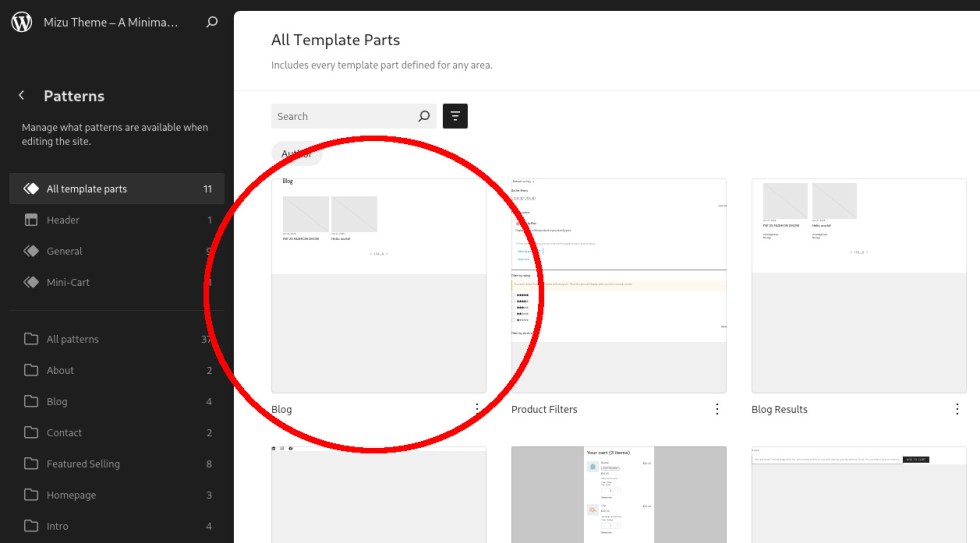
- Customize the page to your liking using the WordPress Block Editor.
- Click on the
Savebutton in the top right corner once you’re finished.
If you are using a search bar for blog posts on your site, make sure to copy your
changes to the Blog Results template part as well.
2.8. The Blog Posts
↑ Back to top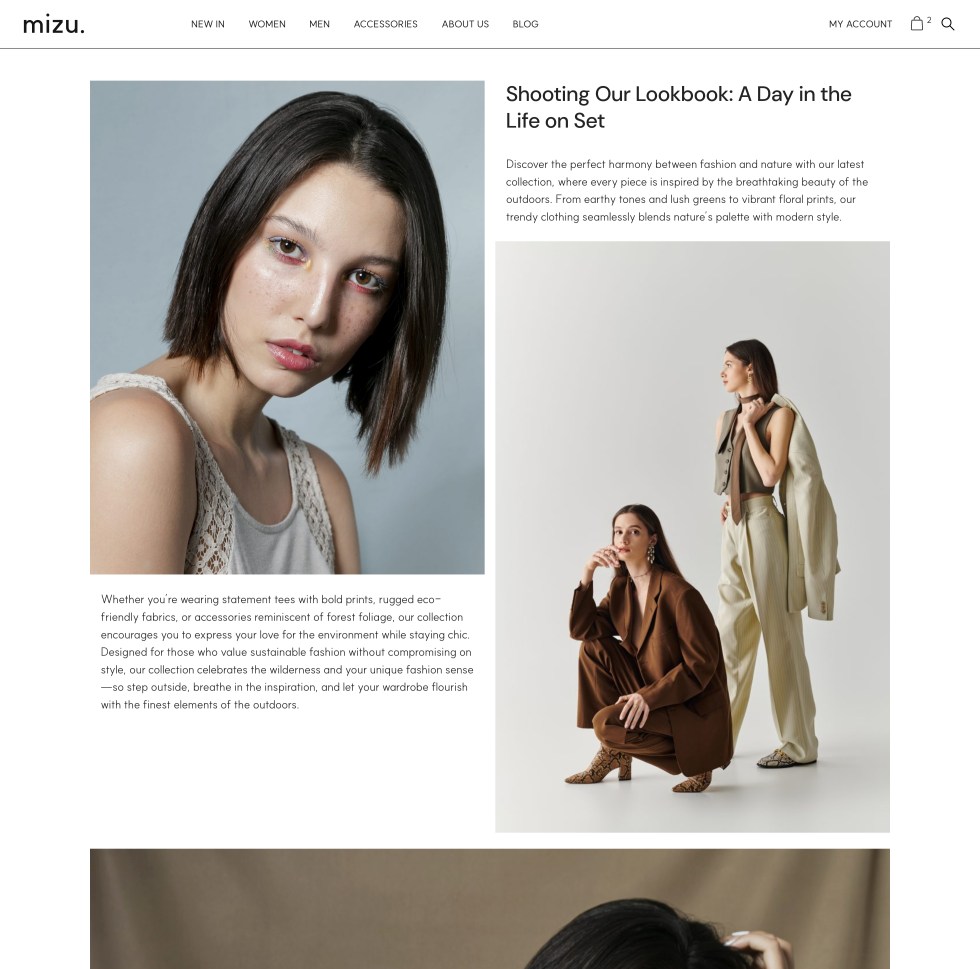
2.8.1. Creating a Blog Post
Mizu Theme currently offers two Blog Post Patterns:
Blog Post 1– A full width layout.Blog Post 2– A partial width layout.
To use one of the available patterns, do the following:
- Navigate to
Posts > Add Postfrom the Dashboard. - Type in a title for your new post in the
Add titletext box. - Click on the
+ iconin the top left corner. - Navigate to the
Patternstab. - Type in
"blog post"in theSearch field. - Select either
Blog Post 1orBlog Post 2. The blog post pattern you select will be inserted into your new post.
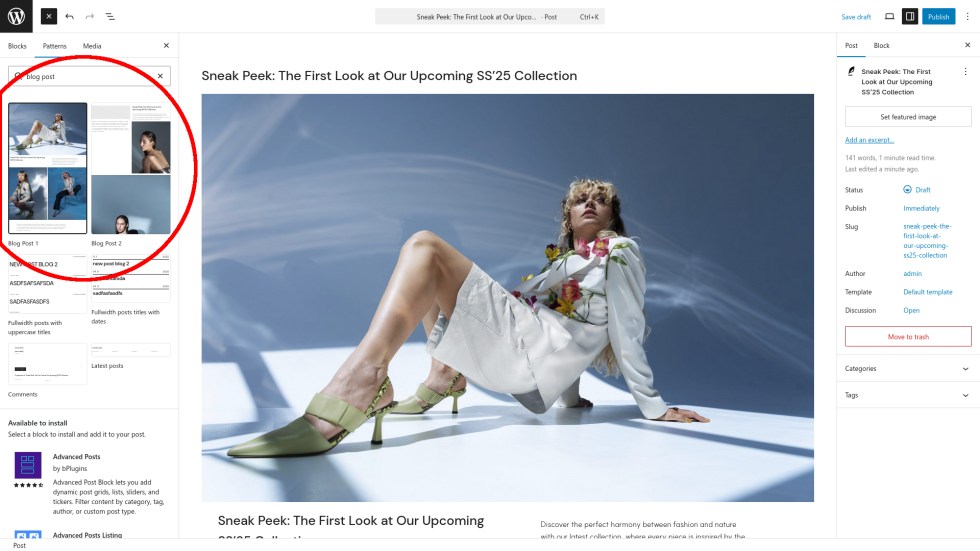
- Customize the page to your liking using the WordPress Block Editor.
- Click on the
Publishbutton in the top right corner once you’re finished.
You can find more information about how to use the WordPress Block Editor
here: WordPress Editor Tutorial.
2.9. The 404 Page
↑ Back to top
2.9.1. Adding WordPress Blocks and Widgets to
the 404 Page
To add WordPress Blocks and Widgets to the 404 page, do the following:
- Navigate to
Appearance > Widgetsfrom the Dashboard. - Locate the
404 Pagesection and click on it. - Click on the
+button. - Select the block you want to add.
- Click on the
Updatebutton in the top right corner once you’re finished.
NOTE:
To use Gutenberg Blocks instead of Legacy Widgets, make sure that
the Classic Widgets plugin is Deactivated.
2.10. Fonts
↑ Back to topMizu Theme gives you the option to apply two fonts to your site, one font for
headings and one font for content.
For these next steps, you will need to have your font files ready so that you can
upload them to your site. Mizu Theme works with both static and variable fonts
2.10.1. Changing the Font on Your Site
By default, WordPress does not allow users to upload font files, so you will need
to install a font uploader plugin. We recommend installing the Custom Fonts plugin.
Once you have installed and activated the Custom Fonts plugin, you can change
the fonts on your site by doing the following:
- Navigate to
Appearance > Customizefrom the Dashboard. - Click on the
Fontssection. - To upload a heading font, click on the
Select filebutton below theHeading Fontlabel and upload your desired font. You can upload either a static or variable font. - To upload a content font, either upload a single variable font using the
Content Variable Fontfield, or upload a static font for each font weight using theContent Static Fontfields. - To add a
Fallback Font, type in the name of a web-safe font underHeading Fallback Font. Then do the same for theContent Fallback Font. - Click on the
Publishbutton at the top of the Customizer once you’re finished.
NOTE:
If you don’t see your changes, you may need to refresh the page.
2.11. Page Templates
↑ Back to top2.11.1. Changing the Layout of Your Pages
Mizu Theme provides six page layouts:
Full width (with title)Full width (no title)Medium container (with title)Medium container (no title)Small container (with title)Small container (no title)
To change the layout of one of your pages, do the following:
- Navigate to
Pagesfrom the Dashboard. - Hover over the
Pageyou want to edit and click on theEditbutton. - Navigate to the
Pagetab in theSettings menuon the right. - Locate the
Templatefield and click on the blue text next to it.
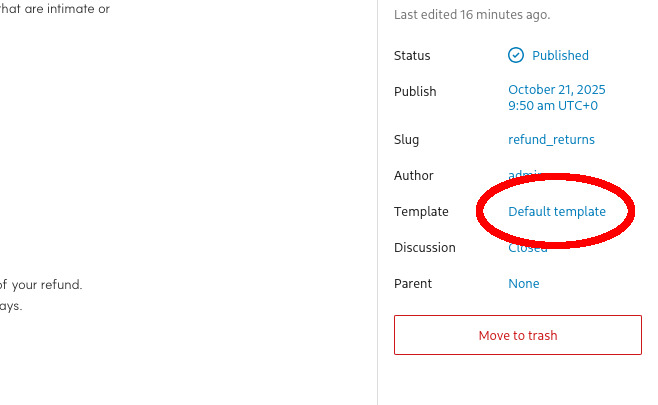
- Select the
Templateyou want to use from the dropdown menu. - Click on the
Savebutton in the top right corner of the page. - Click on the
View pagebutton in the top right corner of the page to view the changes.
2.12. Translations
↑ Back to top2.12.1. Adding Translations for Your Language
Mizu Theme comes with translation files for the following languages:
- Catalan
- Chinese (Taiwan)
- Czech
- Dutch
- Dutch (Formal)
- French (France)
- German
- German (Formal)
- Greek
- Hebrew
- Hungarian
- Indonesian
- Italian
- Polish
- Portuguese (Brazil)
- Portuguese (Portugal)
- Russian
- Spanish (Colombia)
- Spanish (Spain)
- Spanish (Venezuela)
- Swedish
- Turkish
Each of these files are only partially translated, so you will need to install a translation plugin (such as Loco Translate) to add any missing translations.
If your language is not listed above, you can also use the Loco Translate plugin to create a translation file for your language.
2.12.2. Adding a Language Switcher to Your Store
By default, WordPress does not support multiple languages in a single store, so if you want to add a language switcher to your store, you will need to install a plugin.
There are many multi-language plugins to choose from in the WordPress Plugin Directory, but we highly recommend TranslatePress.
3. Support
↑ Back to topWe hope that this documentation has been useful in helping you to set up your
store. If you have any questions, we are always happy to help! 🙂
3.1. Feature Requests
↑ Back to topIf you have any ideas about useful features that you want us to add to Mizu Theme for Luxury Fashion, please feel free to submit a feature request.
Submit a Mizu Theme for Luxury Fashion Feature Request
3.2. Bugs and Fixes
↑ Back to topIf you discover any bugs or possible fixes in Mizu Theme for Luxury Fashion, please contact our support team.
Contact the Mizu Theme for Luxury Fashion Support Team
3.3. Other Requests or Feedback
↑ Back to topIf you have any other requests or would simply like to give us (hopefully positive) feedback, please feel free to contact our support team, as they are always happy to hear from you and are eager to help!
Contact the Mizu Theme for Luxury Fashion Support Team
3.4. Positive Reviews
↑ Back to topIf Mizu Theme for Luxury Fashion brightens your day (and your online business),
then please leave a positive review on the WooCommerce Marketplace, as every
bit of positive feedback is greatly appreciated by us!