With WooCommerce Shipping, you can create ready-to-print labels for UPS®, USPS, DHL Express, and FedEx directly in WooCommerce and use discounted commercial rates.
WooCommerce Shipping is currently available to stores based in the United States, including U.S. territories, that use U.S. dollars.
WooCommerce Shipping provides label purchasing and fulfillment tools in the order admin. It does not provide live shipping rates at checkout. To offer live rates, use the WooCommerce UPS® Shipping Method, USPS Shipping Method, or FedEx Shipping Method extension alongside WooCommerce Shipping.
You do not need your own UPS, USPS, DHL Express, or FedEx account. WooCommerce Shipping uses Woo’s carrier accounts to provide discounted label rates. To get started, connect your WordPress.com account, add and validate an origin address, and accept each carrier’s Terms of Service when prompted.
Get shipping rates from the UPS API which handles both domestic and international parcels.
Get shipping rates from the USPS API which handles both domestic and international parcels.
🎁 2026 Holiday Shipping Deadlines and Peak Surcharges 🎁
See the last day to ship for holiday delivery this year for USPS, UPS, FedEx and DHL Express, plus the peak surcharges each carrier is adding this season. View deadlines and surcharges.
Installation
↑ Back to topTo start using a product from WooCommerce.com, you can use the “Add to store” functionality on the order confirmation page or the My subscriptions section in your account.
- Navigate to My subscriptions.
- Find the Add to store button next to the product you’re planning to install.
- Follow the instructions on the screen, and the product will be automatically added to your store.
Alternative options and more information at:
Managing WooCommerce.com subscriptions.

Moving from WooCommerce Shipping & Tax
↑ Back to topThe legacy plugin is now named WooCommerce Tax. Keep WooCommerce Tax active if you use Automated Taxes; WooCommerce Shipping can run alongside it for label purchases. If you do not use Automated Taxes, WooCommerce Tax is not required for WooCommerce Shipping labels.
Set Up Shipping Labels & Origin Address
↑ Back to topLet’s set your preferences under WooCommerce > Settings > Shipping > WooCommerce Shipping.
First, choose the paper size for your shipping labels: Label (4″ x 6″) or Letter (8.5″ x 11″). If you’re not sure which size to use or have a new printer to test, see the Test Label Printing section below.
Shipping labels are charged to the payment method saved on the WordPress.com account that connected your site. Only that account can add or select a payment method for label purchases. If no payment method is available, ask the site administrator who connected the site to add a card from their WordPress.com payment methods or select a default payment method. If that account has one saved payment method, WooCommerce Shipping selects it automatically. If it has more than one, that administrator can choose the default payment method to use for label purchases.
Note: Currently, 3DS cards aren’t supported in WooCommerce Shipping & Taxes for purchasing labels. Please ensure you select a card that does not have the 3DS security feature.
To finish the Shipping Labels section, you have a few preferences around label receipt emails and previous service & package selection.
- Email label purchase receipts
- Email the label purchase receipts to your WordPress.com email address
- Remember service selection
- Save the service selection (USPS Ground, Priority, etc.) from the previous transaction.
- Remember package selection
- Save the package selection (Custom package or Carrier package) from previous transaction.
- Enable address validation at checkout
- Give your customers the chance to validate their shipping address before they complete their purchase.
- Remember last shipping date
- Remember the last shipping date used to purchase a label.
- Enable automatic returns of undeliverable international shipments
- Select Return package to sender if undeliverable by default when you create a label for a cross-border shipment. You can change the selection for each shipment.

In the next section, you’re able to set your Origin addresses. That does mean you can save more than one to be used when creating shipping labels. These can be saved to help speed up label creation, so be sure to set a default address or two for where you ship from.
Once you’ve made your choices, be sure to select Save changes. Let’s now move on to creating a shipping label.

Creating Shipping Labels
↑ Back to topTo create UPS®, USPS, DHL Express, or FedEx shipping labels using WooCommerce Shipping, we need to head into an order that is ready to ship. On the Edit order page, you’ll see a prompt at the top in the Shipping Label section that notifies you how many items in the order are ready to be fulfilled. Click the Create shipping labels button to get started.
You’ll see a new interface appear to help you progress through each step of creating a label for your shipment.
You can also purchase and print shipping labels from the Woo mobile apps for iOS and Android. See Creating Shipping Labels in the Mobile Apps for the current workflow and requirements.

UPS Ground Saver®, a cost-effective service for your lower-priority shipments, is now available through WooCommerce Shipping versions 1.7.0 and higher. Learn more.
Items
↑ Back to topIn the Items section, you’ll see the products ordered, the quantity ordered, dimensions, weight, and product price. You’ll have the option here to split the shipment if, for example, one product is ready to ship immediately while another needs to be custom-made.
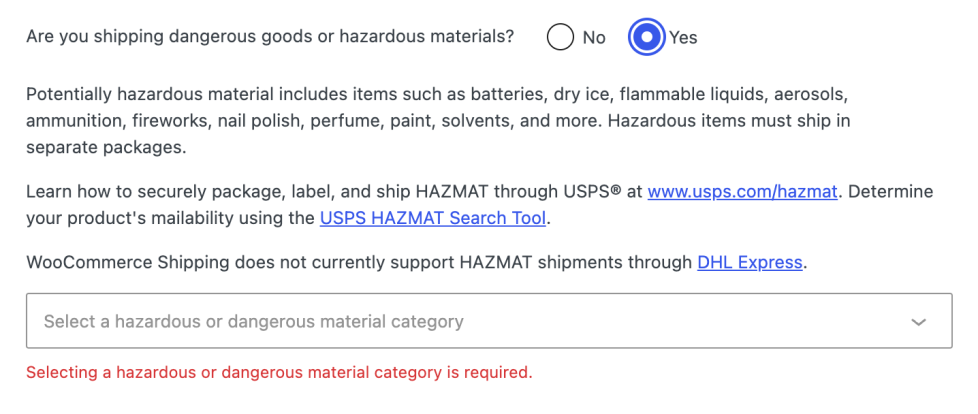
Shipping hazardous materials (HAZMAT)
↑ Back to topSome everyday products may be classified as hazardous materials (HAZMAT), including lithium batteries and devices containing them, aerosols, alcohol-based fragrances, nail polish, paint, and dry ice. Before shipping one of these products, confirm that USPS accepts it and follow the material-specific packaging, marking, and labeling requirements.
Warning:
Starting July 12, 2026, USPS is introducing a HAZMAT Handling Fee and a HAZMAT Noncompliance Fee for applicable services. Existing HAZMAT mailing requirements still apply.
What WooCommerce Shipping handles for you
When creating a label, answer “Are you shipping dangerous goods or hazardous materials?” accurately and select the correct material type. WooCommerce Shipping sends this information to its label provider, which uses the HAZMAT-specific USPS Service Type Code (STC) required for the label data you provide.
What you’re responsible for
- Confirm that the material is mailable. Use the USPS HAZMAT Search Tool to find restrictions and the applicable packaging instructions. If you’re unsure how the product is classified, check its Safety Data Sheet (SDS) or contact the manufacturer.
- Package, mark, and label it correctly. Follow the USPS instructions for the specific material, including quantity limits and any required exterior markings or labels.
- Remove old markings from reused packaging. Fully remove or cover any labels and markings that don’t match the package’s contents.
- Place required HAZMAT labels and markings correctly. Put them on the address side of the package, keep them visible and unobscured, and never place them on the bottom.
For a step-by-step overview, see the USPS HAZMAT Shipping Safety Guide. This guide covers domestic USPS shipments; international dangerous goods requirements are different.
Split shipments
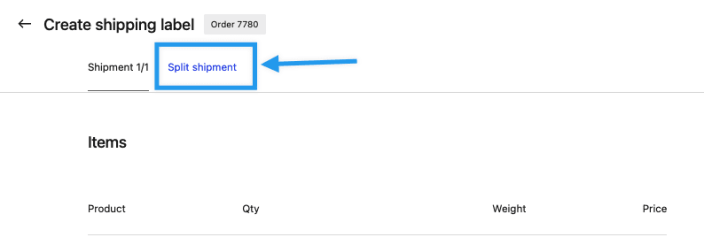
↑ Back to topIf you need to use more than one package or shipment to fulfill an order, click the “Split shipment” link at the top of the shipping label UI.
Next, choose the products to include in the shipment by checking the box next to the appropriate products and then click the “Create new shipment” button.
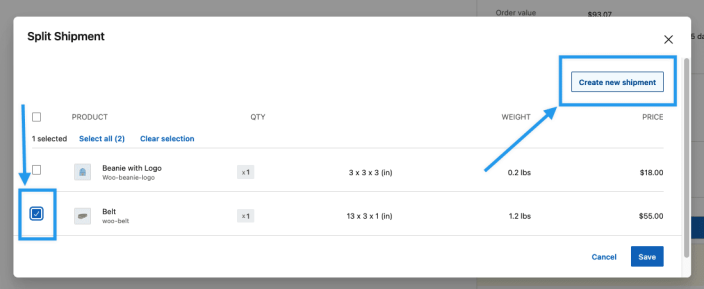
Repeat this process until all products have been added to the correct shipment. If you add a product to the wrong shipment, check the box next to that product, then click the “Move To” dropdown and choose the correct package in the list.
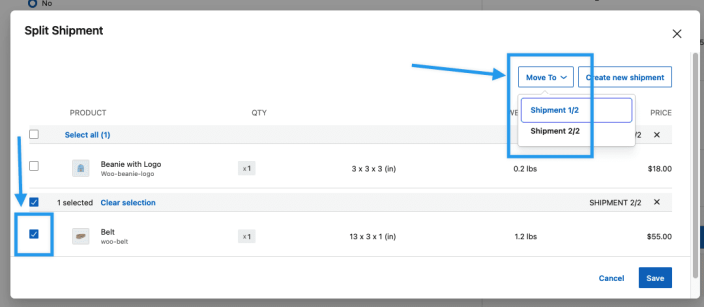
When you’re done setting up the shipments, click the “Save” button in the bottom-right corner.
Each shipment will only show the product(s) that have been added to it and you can navigate between shipments by clicking the links at the top of the label UI (next to the “Split shipment” link).
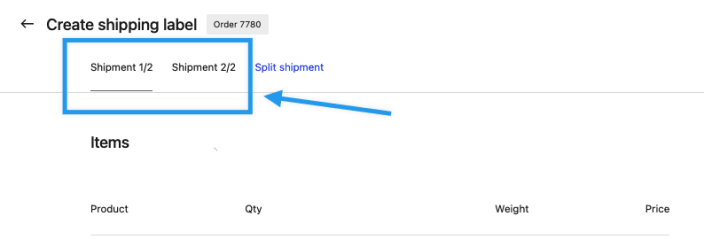
Continue with the label purchase process for each shipment that you are ready to send, as they will each need their own individual shipping labels. If some items are being fulfilled later, wait to purchase those shipping labels until you are ready to send the shipment (to ensure the label is valid when you use it).
Because each split shipment is separate, you can use different packages and services on each of them. This is useful for orders that require multiple packages, situations where you need to ship one product now and others later, or orders that contain a mix of some items that need specific services/options (such as hazardous materials or perishable goods) and other items that don’t.
Customs
If you sell internationally and are shipping an order out of your country, you will see a Customs section next. In that section, the following fields need to be filled in.
- Content Type
- Choose from default options, or if choosing Other, describe the goods in your package.
- Restriction Type
- Choose from the default options, or if choosing Other… describe the restriction your package must have.
- Internal Transaction Number (ITN)
- Use the provided link to read more about obtaining an ITN
- Return package to sender if undeliverable
- Choose whether an undeliverable international package should be sent back to you. If selected, you are responsible for all return shipping costs and any applicable customs duties, taxes, broker fees, or handling fees.
- Product details
- Description
- This is required for countries following EU customs rules
- HS Tariff Number
- Read more below about HS Tariff Numbers
- Value Per Unit
- Weight Per Unit
- Origin Country
- Description
Note:
If you are registered for VOEC (Norway) or IOSS (EU), enter your tax identification numbers in Settings > Shipping > WooCommerce Shipping. These IDs will automatically populate in customs documentation when required. It is your responsibility to provide valid tax IDs and ensure they are entered correctly. Empty or invalid IDs may result in delayed shipments or additional fees charged to your customer.
Package
↑ Back to topMoving into the Package section of creating a shipment is where you’ll choose what your product(s) ship in. You can add and save your own custom packages, use carrier-provided packages from UPS®, USPS, DHL, and FedEx, or choose a previously saved package template.
Custom packaging
When creating your custom package, you can first choose the package type: is it either a Box or Envelope? Next, enter the package’s length, width, and height.
There is a checkbox beneath those dimension fields where you can save this custom package as a template to reuse. Provide a name for this package and select Save so you can use this on future orders.
The package you just created can be reused via the Saved templates section.
If there are no remaining errors or fields needing to be filled out, you can select Get shipping rates to receive your rates.
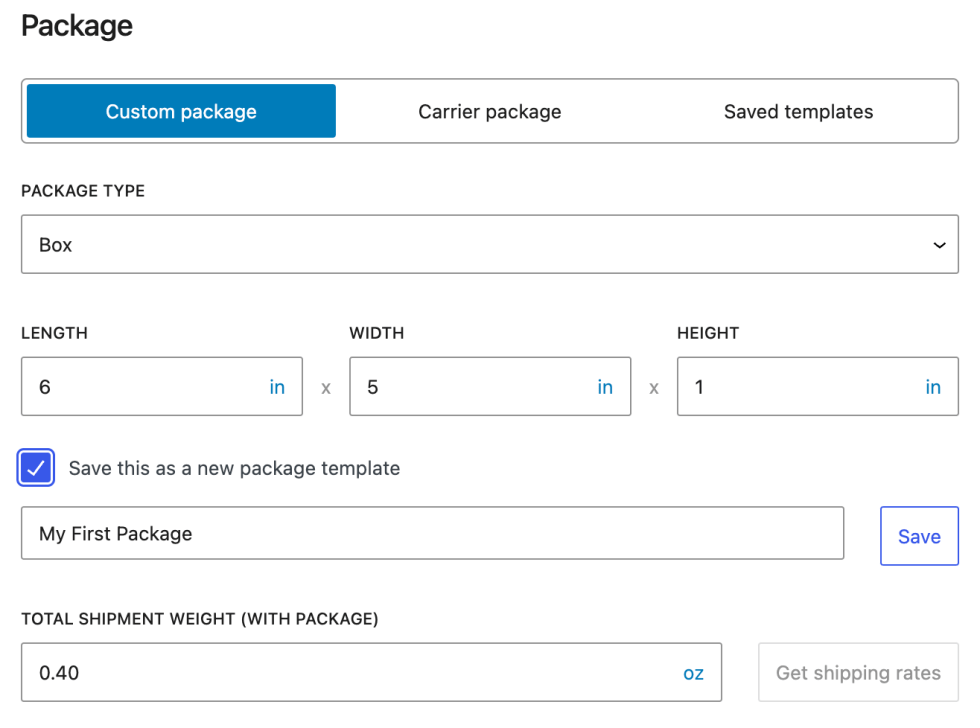
Note: Carriers typically recommend rounding up fractional measurements. For example, if a box length is 10.5″, round that up to 11″.
Carrier package
This lets you use existing packages from UPS®, USPS, DHL Express, or FedEx. You can also star a carrier package, which will show up in your Saved templates.
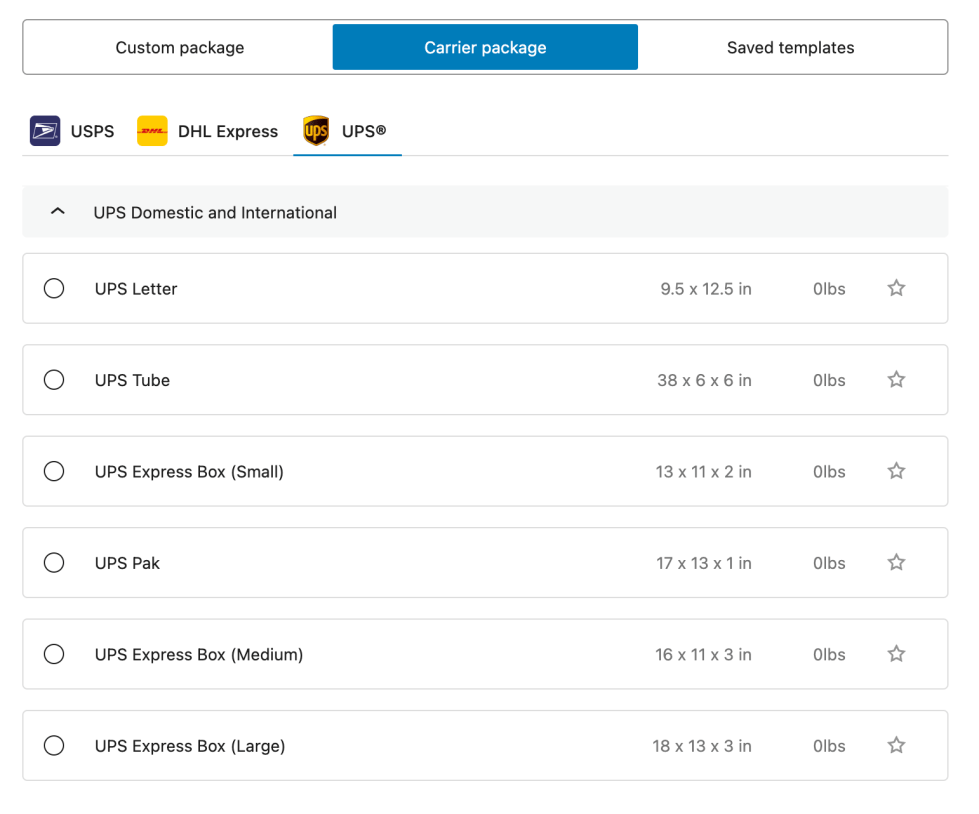
Once you’ve set up shipments, selected a package, and verified the total shipment weight is correct, select the Get shipping rates button to see rates you’ll pay for your shipping label.
If this button isn’t selectable, it may just be that the customer’s address needs to be verified , or another essential is missing from the Essential details to provide section.
Order details
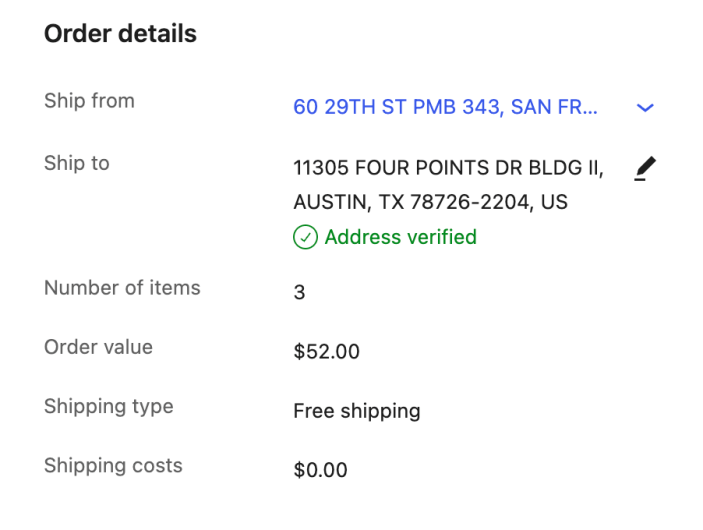
The final steps take place under the Order details section in the sidebar. You’ll see here your store base address, or default Origin address you’d set earlier in the Ship from setting. If you have multiple Origin addresses saved, use the dropdown to easily switch between those.
Following that, in the Ship to setting will be your customer’s address they’d entered at checkout. This will likely show an Unverified address warning; select that text to help verify this address. You can also change the shipping address in cases where a customer may request this, etc.
Following this, you’ll see the Number of items count, the total Order value, the Shipping type, and the Shipping costs the customer paid during checkout.
Shipment details
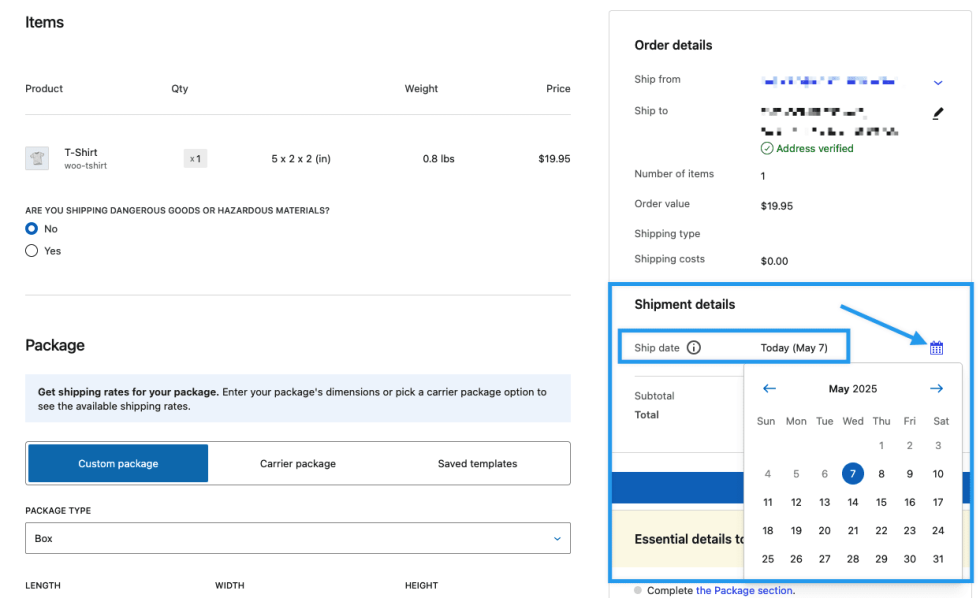
The Shipment details section is below the Order details in the sidebar and includes the Ship date information. This date represents when the package will be given to the carrier. By default, the Ship date will use today’s date, but you can change the date by clicking on the calendar icon on the right. Some carriers charge different amounts for their services on specific days, so using this feature will help ensure label costs are accurate.
Shipment costs
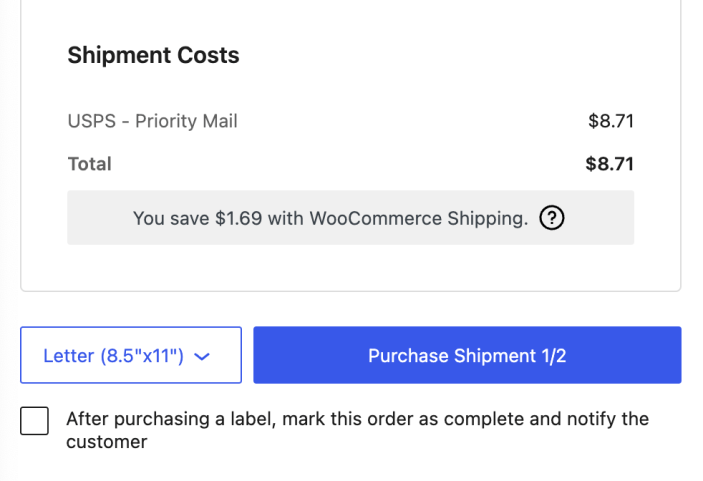
This shows the service you’ve chosen (e.g., “USPS — Priority Mail”), the cost of that service, and the total you’ll pay for your shipping label. You’re able to then choose the paper size to print said label on, select if you want the order marked as completed after purchasing the label, and then you can select the Purchase label or Purchase shipment button to buy your label.
Printing your shipping label
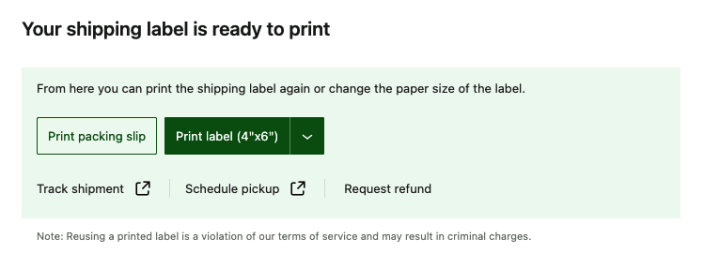
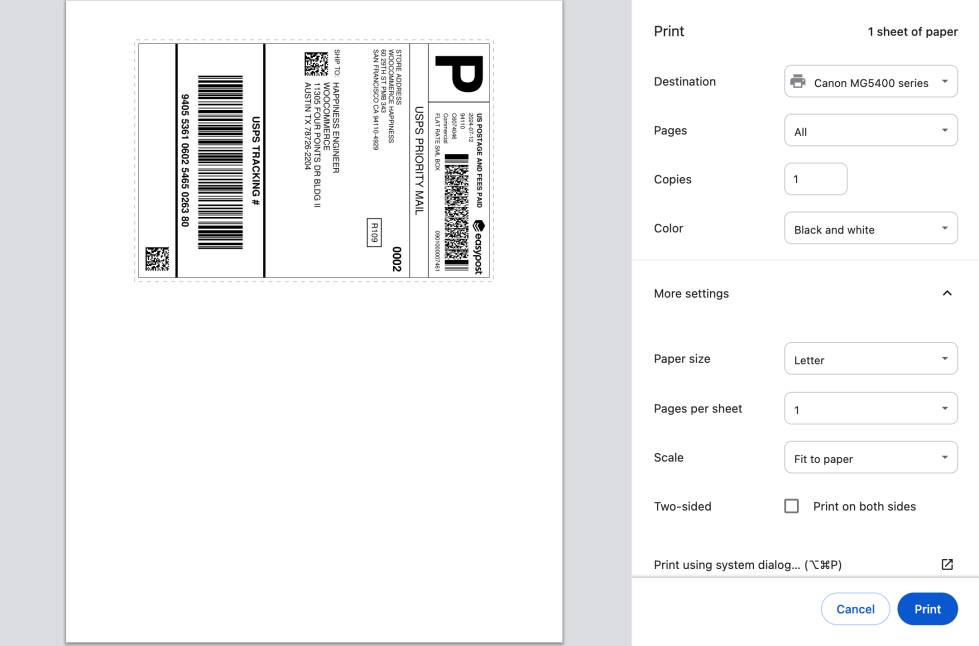
↑ Back to topAfter purchasing a shipping label, you’ll see a green notice in the label UI that includes several buttons and links. In this green box, you will see the “Print label” button, which has a dropdown to select the size of the label you want to print (either 4″ x 6″ or 8.5″ x 11″). After selecting the paper size you want to use in the button dropdown, you can print the shipping label by clicking the “Print label” button, which will open a preview of your label in your browser print dialog. Once the shipping label has been printed, attach the label to your package, and it’s ready to ship.
Warning:
Some international FedEx shipments to commercial addresses require a printed commercial invoice. If WooCommerce Shipping provides a commercial invoice with your label, print and sign it, then attach it securely to the parcel before handing it to FedEx. Missing or unsigned forms may delay the shipment at customs. Requirements vary by destination; see FedEx’s Commercial Invoice country list for general guidance.
You can print shipping labels via WooCommerce Shipping on any 8.5″ x 11″ paper and then attach it directly to your package. Or if you have a thermal printer setup, you can use the 4″ x 6″ labels. The size you select should be related to your current printing setup, as both options are acceptable to the carriers.
Return labels
↑ Back to topReturn label functionality was added in version 2.0.0, so you need to be using that version or higher to have access to this feature.
How to create a Return label
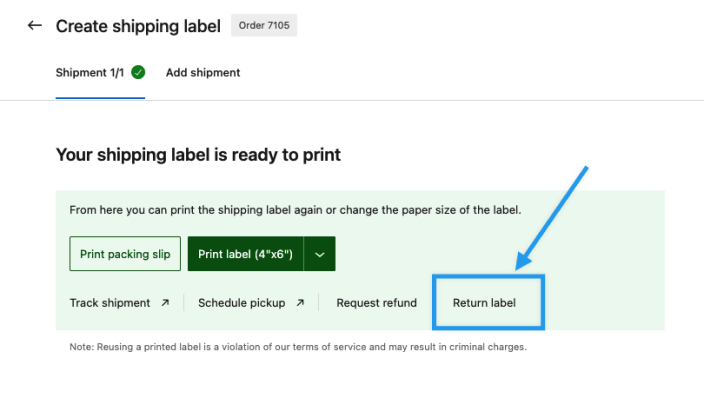
Once you have purchased the regular label you will be using to ship the package to your customer, you will see the “Return label” link in the print box label UI, next to the “Request refund” link:
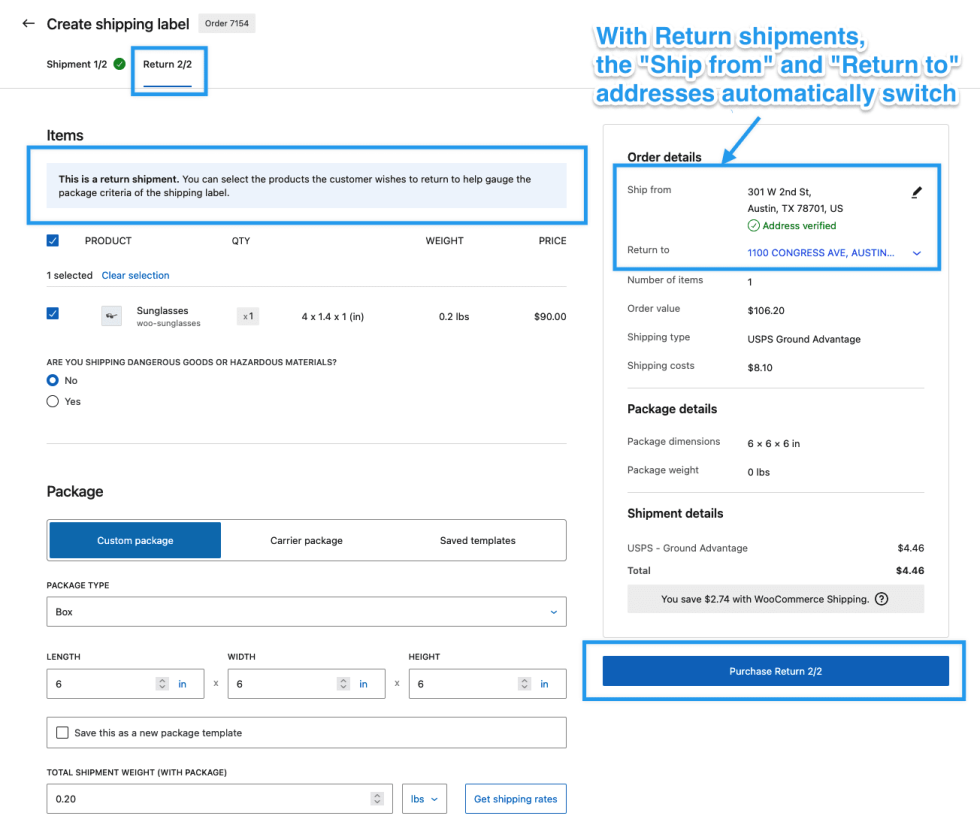
Selecting the “Return label” link will automatically create a new Return shipment that is pre-populated with the same items as the regular shipment. The “Ship from” and “Return to” addresses will also be updated automatically with the recipient’s address now set as the “Ship from” address and your return address set as the “Return to” location.
Below is an example of what a Return label looks like in the label UI:
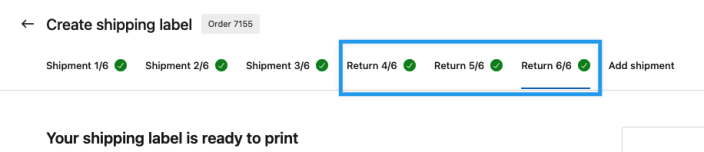
If you have multiple Shipments on an order, you can create multiple Return labels (one for each shipment):
How to set your default return address
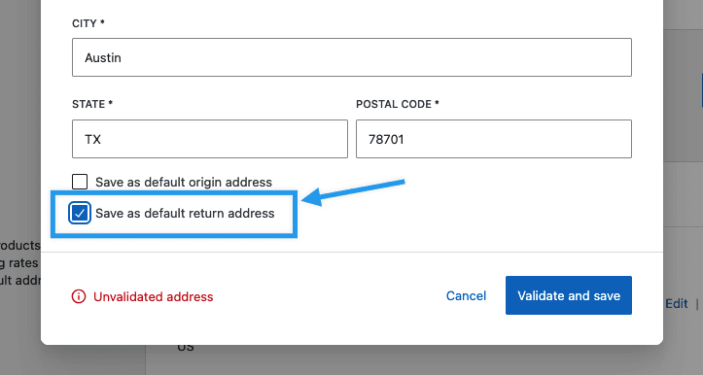
At the bottom of the Origin address fields (which you can access by clicking the edit icon in the label UI or editing the Origin address on the WooCommerce > Settings > Shipping > WooCommerce Shipping page), there is a “Save as default return address” checkbox that allows you to specify which address should be used as the default for Return labels:
How to use a different address for returns
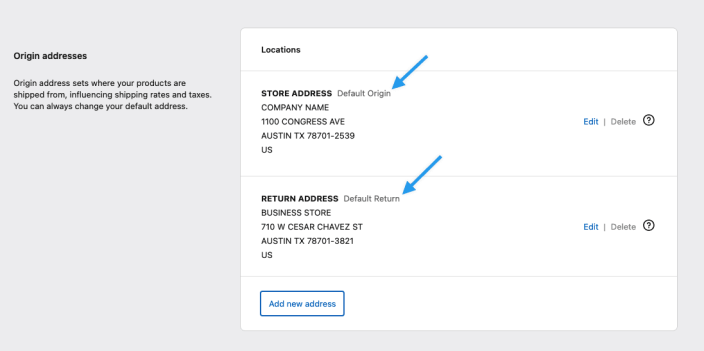
If you would like to have returns sent to an address that is different from your Origin address, you can add a new address on the WooCommerce > Settings > Shipping > WooCommerce Shipping page and solely check the “Save as default return address” box at the bottom and leave the “Save as default origin address” box unchecked.
You can confirm which address is currently set as the Default Origin and Default Return by looking at what is shown next to the Name for each address:
Print packing slip
↑ Back to topTo make the fulfillment process easier for whoever is packing the order, WooCommerce Shipping includes the option to print a packing slip for any order you have purchased a shipping label for.
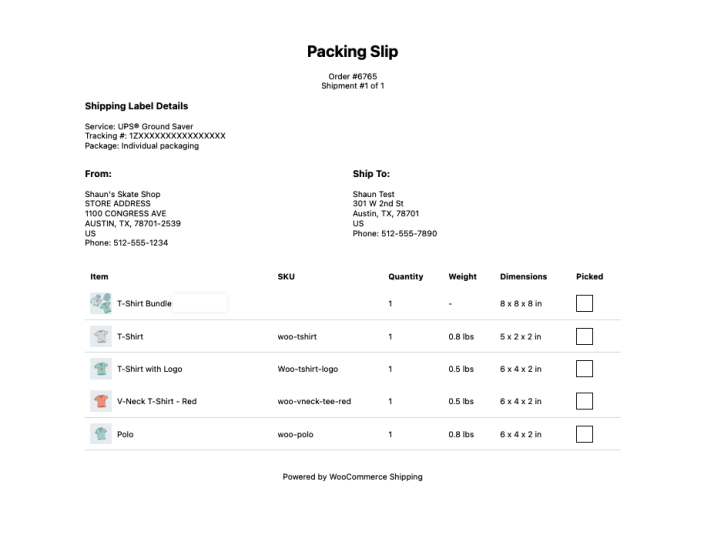
The Print packing slip button can be found in the green notification box in the label UI immediately after purchasing the shipping label or by viewing a label that was previously purchased, to the left of the Print label button.
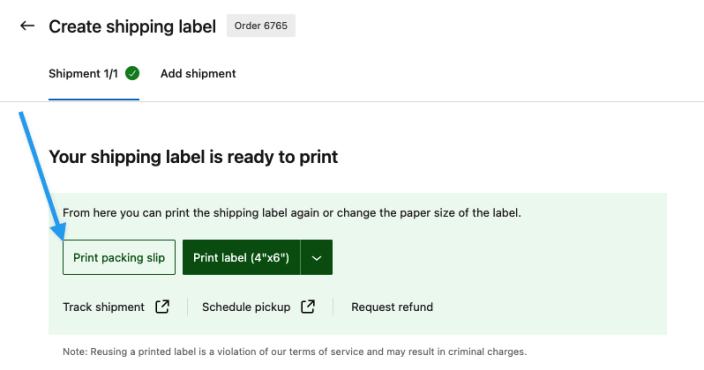
Selecting the “Print packing slip” button will open a separate print dialogue box and show a preview of the packing slip, which includes the order number, the shipment number (ex: shipment 1/1, 1/2, etc.), the shipping label details, the “from” and “to” addresses, and a list of items that should be included in the shipment. On the right side of each line item, in the “Picked” column, is an empty box that can be checked off once that item has been added to the shipment package.
After packing and checking off all the items on the packing slip, you can choose to include the packing slip in the shipment to show your customers that everything in that list was confirmed during the packing process, or you can choose to leave it out. It is entirely up to you, based on your personal preference.
Tracking numbers
↑ Back to topAfter you purchase a label, WooCommerce Shipping automatically generates the tracking number and saves it to the order. You can find the tracking number and link in the Shipment Tracking sidebar widget or by selecting View purchased shipping label.
Note: If shipping labels are not visible on the order immediately after purchasing it, refresh the order, and they should show in the Shipment Tracking sidebar widget.
When the order status changes to “Completed,” the “Completed Order” email sent to the customer includes the purchased tracking numbers. To have WooCommerce Shipping complete the order after a successful label purchase, select After purchasing a label, mark this order as complete and notify the customer in the label creation interface. Otherwise, update the order status to “Completed” manually when the shipment is ready.
Schedule pickup
↑ Back to topWith this feature, you can use the appropriate form from UPS®, USPS, DHL, or FedEx to check availability and costs to have your packages picked up. This can help save you time and money, especially if the pickup is free. See details below for how the pickup feature can work between each provider.
- UPS® – Request an on-demand pickup for your UPS ground, air, and international shipments.
- USPS – Free for packages when scheduled at the same time your mail is delivered by your letter carrier. For scheduling a pickup at a select time and day, you can opt for USPS’s Pickup on Demand® for a fee.
- DHL Express – Free
- FedEx – Schedule an on-call pickup for your FedEx Express and FedEx Ground shipments. You can also drop off packages at any FedEx location for free.
Creating additional shipping labels
↑ Back to topAs of version 1.4.0+, there are no longer any limitations on the number of shipping labels you can create on a single order. If you need additional shipping labels after already purchasing one on an order, start by clicking the View or add shipment button:

Next, click the Add shipment link at the top of the order:

Once the new shipment has been created, you will see all the items on the order. Check the boxes for any items you want to include in the new shipment, and then go through the rest of the label creation process like normal:

USPS® SCAN Forms
↑ Back to topA SCAN Form (Shipment Confirmation Acceptance Notice) is a document with a single master barcode that represents a group of USPS shipping labels. Instead of having every package scanned individually, you hand USPS one form, they scan the single barcode, and all linked packages are checked in at once.
SCAN Forms are optional. Packages without one still ship normally, but they do not receive the initial batch “Accepted” event. USPS adds tracking events as it scans the packages individually.
If you’re dropping off multiple packages at the post office or handing them to your mail carrier, a SCAN Form turns what could be a lengthy scanning process into a single scan, making the whole handoff smoother.
SCAN Forms are free to create and are especially useful if you ship multiple USPS packages per day.
You can enable the USPS ScanForm feature in WooCommerce Shipping by heading to WooCommerce > Settings > Shipping > WooCommerce Shipping. There you’ll see the “Enable USPS ScanForm feature” checkbox.
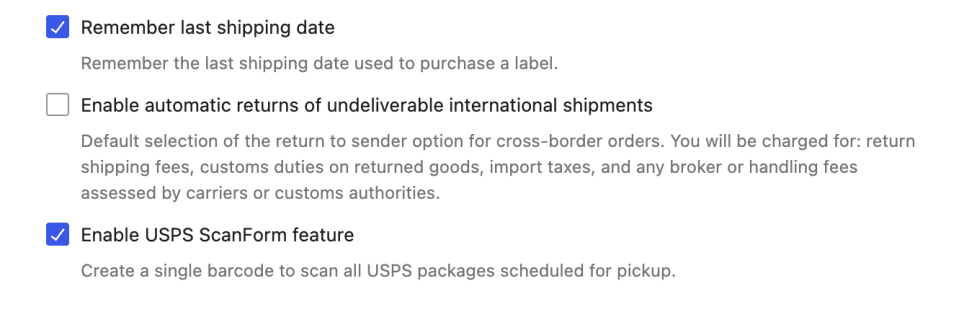
This feature is enabled by default to all users using WooCommerce Shipping.
Requirements and Limitations
Before creating an SCAN Form, keep the following in mind:
A SCAN Form can include both domestic and international USPS labels as long as every label uses the same Ship From address and meets the other requirements below.
- USPS only. SCAN Forms are available for USPS shipments only. Other carrier labels cannot be included.
- Create your SCAN Form the same day you ship. A label is only eligible for a SCAN Form on the shipping date you selected when purchasing it. For example, if you bought a label yesterday with yesterday’s date, it can’t be added to a SCAN Form created the next day. Thus, the simplest approach is as follows: purchase your labels, then create your SCAN Form, and hand off your packages all on the same day.
- No refunded labels. Labels that have been refunded are not eligible for a SCAN Form.
- SCAN Forms cannot be edited. After a SCAN Form is created, you cannot add, remove, or reassign labels. If you need to make changes, you’ll need to create a new SCAN Form with the remaining eligible labels.
- Up to ~1,000 labels per form. For best results, keep each SCAN Form under approximately 1,000 labels.
You can create more than one SCAN Form per day, including separate forms for different origin addresses or for labels purchased after an earlier form was created. Each shipping label can belong to only one SCAN Form.
Creating a SCAN Form
- Go to WooCommerce > Orders.
- Click the Create SCAN Form button.
- You’ll see a list of eligible USPS shipping labels, grouped by Ship From address. Only labels that meet the requirements above will appear.
- Select the labels you want to include. You can select all labels within a Ship From group or choose individual labels.
- Click Create SCAN Form.
- A confirmation will display the carrier, origin address, number of labels, and a reminder that SCAN Forms cannot be edited after creation. Confirm to proceed.
- Once created, you can download and print the SCAN Form.
Tip: Present the printed SCAN Form to your USPS carrier at pickup or when dropping off packages at a USPS location. The carrier scans the single barcode, and all included packages are marked as “Accepted.”
If you create a SCAN Form but do not print or present it, your packages can still be shipped. They will not receive the batch “Accepted” event; USPS adds tracking events as it scans the packages individually.
Viewing Existing SCAN Forms
After creating a SCAN Form, it will appear in your SCAN Form history via WooCommerce > Settings > Shipping > WooCommerce Shipping. From there you can:
- View the details of each form, including the labels it covers and the date it was created.
- Download and reprint a SCAN Form if needed.
- See which labels are already associated with an existing SCAN Form (these labels will not appear as eligible when creating a new form).
Refund a shipping label
↑ Back to topIf you’ve purchased a label you end up not needing or using, you can request a refund for the unused shipping label. To do so, click the View or add shipment button on the order and then click the Request refund link. Doing this will submit a refund request to the specific carrier, who must approve the refund before it is processed.
You can only request a refund for labels that haven’t been shipped and are still in the pre-transit (the carrier hasn’t received the package). Carriers won’t refund labels that have been inducted into their network. Refunds can only be processed within 30 days of the labels being created.
Refunds will take at least 14 days and up to 45 days to process. Carriers will monitor their network for a period of time to ensure that the label didn’t end up in the mail stream.
You can find more information on USPS’s refund policy on the USPS site.
First Class Mail letters are not eligible for refund by USPS.


Test label printing
↑ Back to topIf you’d like to print a test shipping label, you can do so under WooCommerce > Status > WooCommerce Shipping. To get started, first select your label size and then the Print button. You should then see a popover from your browser print dialog to finalize that test label.

Review shipping label purchases
↑ Back to topTo review labels purchased through WooCommerce Shipping, go to WooCommerce > Analytics > Shipping Labels. This report is available to users who have permission to manage WooCommerce.
Use the date filter to choose the reporting period. The report includes:
- A summary of the number of labels purchased, the total label cost, and the number of completed refunds in the selected period.
- A list of each label’s purchase date, order, price, shipping service, tracking number, and refund status.
- Links to open the related order and, when available, track the shipment on the carrier’s website.
- A Download option to export the report for the selected period as a CSV file.
Note:
To improve performance, the report data may be up to 30 minutes old.
Troubleshooting
↑ Back to top- If you’re having an issue with WooCommerce Shipping, such as the “Create shipping labels” button not showing on orders, the troubleshooting tools and information on the WooCommerce > Status > WooCommerce Shipping page are a good place to start, as you can check the Health of the connection/service data and enable Debug logging for more detailed information.
- On Safari’s latest versions, for the labels to open as separate windows, please enable pop-up windows by going to Safari > Settings > Websites > Pop-up window and set it to Allow.
- If Print label spins in Chrome and nothing opens, while Print packing slip works, check your Downloads folder for the label PDF. If it’s there, go to
chrome://settings/content/pdfDocumentsand select Open PDFs in Chrome. Then try again in an Incognito window to rule out extensions. If it still doesn’t open, try another browser.
Health
↑ Back to topUnder WooCommerce > Status > WooCommerce Shipping, you’ll first see a Health section. Here you can get a quick glance at the connection status for WooCommerce, the site’s connection to WordPress.com, and the freshness of the WooCommerce Shipping service data. This is a good place to first check if you are experiencing any issues with your label purchasing or address validation.
If any issues are shown here, your site may be having connection issues to the WooCommerce Shipping server. This could be caused by any sort of security plugin in use on the site, server setup, etc.

Debug
↑ Back to topIf you need to further debug any issues you’re having with labels or address validation, you can use either the Debug or Logging toggles. This can show helpful information directly on the Cart & Checkout pages or save diagnostic messages to log files. Log files are very helpful in troubleshooting.

RBLKLU and HYMNCA errors
↑ Back to topIf you receive the RBLKLU or HYMNCA errors while attempting to purchase a shipping label or update the payment method, please open a ticket with our support team so we can investigate further, as these errors cannot be resolved on your own.
UPS Terms and Conditions errors
↑ Back to topSome carriers, including UPS, tie acceptance of their Terms and Conditions to each origin address. You may need to accept them again after adding or editing an origin address, or when a carrier or the label software updates its agreement.
Most UPS label errors are related to address validation. UPS has strict requirements for addresses, especially for the Origin Address. Please ensure:
- The “Name” field has been entered and has fewer than 30 characters.
- The “Company” name has been entered and has fewer than 30 characters.
- The “Email Address” has been entered and is in a valid email format.
- The “Phone” number has been added, is from the U.S., and in a valid format.
- The “Address” has been entered and fewer than 30 characters. This can be challenging if the address has a Suite or Unit number, as there is not currently an ‘Address Line 2’ field. If this is causing an error, a temporary workaround would be to move Suite/Unit info to the “Company” field. Additionally, the address cannot be a PO Box.
- The “City” has been entered but not abbreviated. Example: use “Saint Charles” instead of “St.Charles”.
- The “State” field uses the 2-letter abbreviation. Example: use “CA” for California.
- The “Postal Code” has been entered and is correct.
Questions and support
↑ Back to topDo you still have questions and need assistance?
- Get in touch with a Happiness Engineer via our Help Desk. We provide support for extensions developed by and/or sold on WooCommerce.com, and Jetpack/WordPress.com customers.
- If you are not a customer, we recommend finding help in the WooCommerce support forum or hiring a Woo Agency Partner. These are trusted agencies with a proven track record of building highly customized, scalable online stores. Learn more about Woo Agency Partners.