Introduction
↑ Back to topWelcome to the official documentation for Shopzy – Multi-Category WooCommerce Theme.
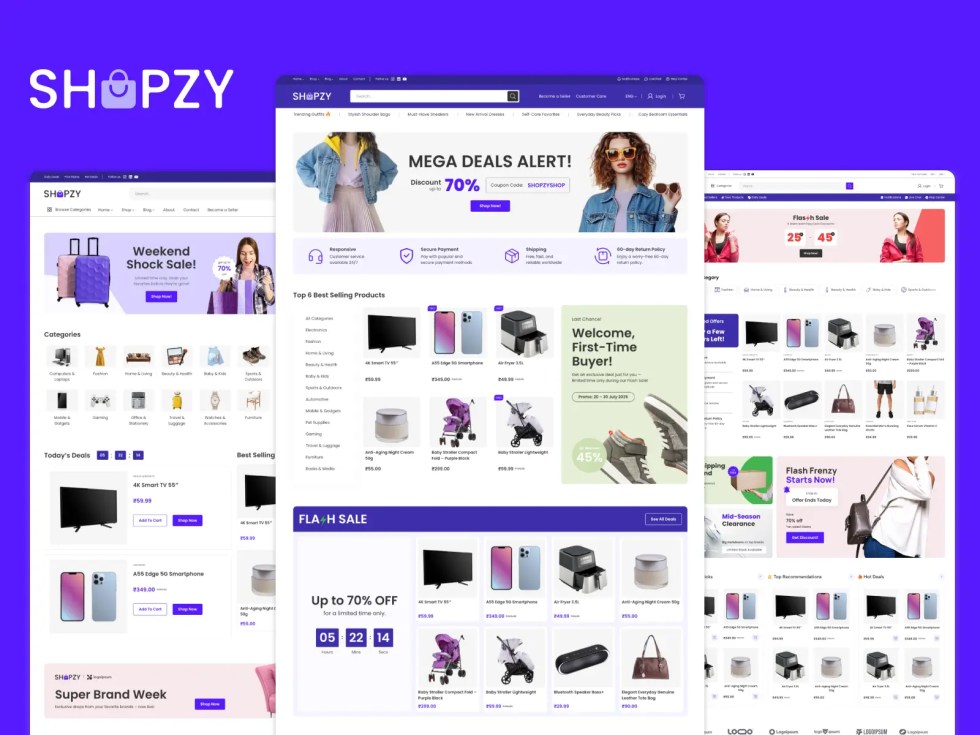
Thank you for choosing Shopzy! We’ve crafted this theme with care to help you build a fast, modern, and flexible online store. This guide will walk you through the main features of Shopzy, along with instructions on setup and customization.
About the Theme
↑ Back to topShopzy is a versatile WooCommerce theme designed for multi-category eCommerce stores. It’s perfect for selling:
- Electronics and gadgets
- Beauty and personal care products
- Fashion and accessories
- Baby and kids items
- Sports and outdoor gear
- Home and living essentials
- Health and wellness products
Built as a block theme with Full Site Editing (FSE) support, Shopzy uses theme.json and custom block styles for smooth, intuitive customization. Styles are loaded on demand for faster performance, while a minified global CSS ensures consistency across your site.
All bundled assets are optimized to ensure fast loading and a great user experience.
Theme Philosophy
↑ Back to topWordPress theme development continues to evolve, but one principle remains the same:
A theme should control how your site looks — not how it works.
Functionality should always come from plugins, while the theme handles design and presentation. This keeps your website flexible, portable, and easy to maintain.
For example, Shopzy does not create or manage contact forms or product features — it simply styles them. You can use any plugin like WPForms, Contact Form 7, or Jetpack Forms, and you may need to adjust settings or add custom CSS to match your store’s design, as styling is not always applied automatically.
Shopzy strictly follows this philosophy, focusing purely on styling WooCommerce and WordPress blocks without adding unnecessary built-in features that limit customization.
System Requirements
↑ Back to topSince Shopzy is built for WooCommerce, we recommend meeting the official WooCommerce system requirements. As a guideline:
- WordPress 6.3 or later
- PHP 7.4 or later
- MySQL 5.6+ or MariaDB 10.4+
- At least 256 MB memory limit
- HTTPS enabled
You may also refer to the official
WordPress Server Requirements for full compatibility.
Required Plugins
↑ Back to top- WooCommerce – Essential for product, shop, and checkout functionalities, as Shopzy’s layouts are built using WooCommerce blocks.
Recommended Plugins
↑ Back to topWe support several third-party plugins to help enhance your store:
- WPForms – For contact and newsletter forms
- MAS Static Content – For building stylish megamenus
- Stackable – For countdown timers and advanced block features
Need Help?
To understand what is covered under theme support, please review our
Support Policy on the Madrasthemes website.
Installation
↑ Back to topIn this chapter, we’ll guide you through installing the Shopzy theme on your WordPress website. If you face any issues during installation, feel free to contact our support team for help.
While theme installation is not generally included in standard support, we offer a one-time free installation servicefor all customers. To use this service, simply reach out via our contact page and provide your WordPress admin details. We will install and configure Shopzy to match the demo setup, usually within 3 business days.
Installation Video
↑ Back to topInstalling the Theme
↑ Back to topOnce you have downloaded the shopzy.zip file, you can install the theme on your WordPress site.
Using WordPress (recommended)
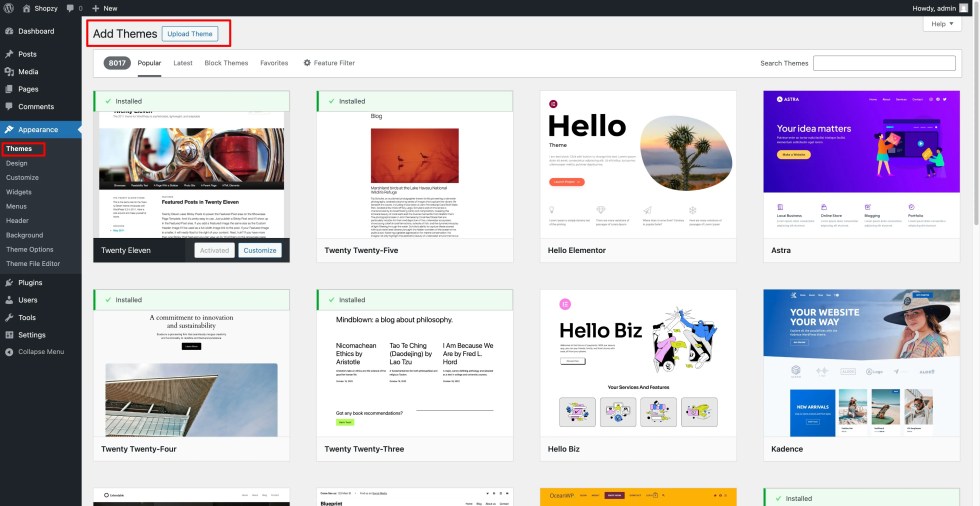
- Go to Appearance → Themes in your WordPress dashboard.
- Click Add Theme at the top.
- Click Upload Theme.
- Click Select File, then choose the
shopzy.zipfile. - Click Install Now.
- After installation, a success message will appear.
Installing the Theme via FTP
- Unzip the
shopzy.zipfile. - Connect to your host with an FTP client (e.g., FileZilla).
- Open the
wp-content/themesdirectory. - Upload the extracted
shopzyfolder. - Go to Appearance → Themes and check that Shopzy appears.
Installing Plugins
↑ Back to topWhile Shopzy works without WooCommerce, we strongly recommend installing WooCommerce to access all eCommerce features.
Steps to Install WooCommerce
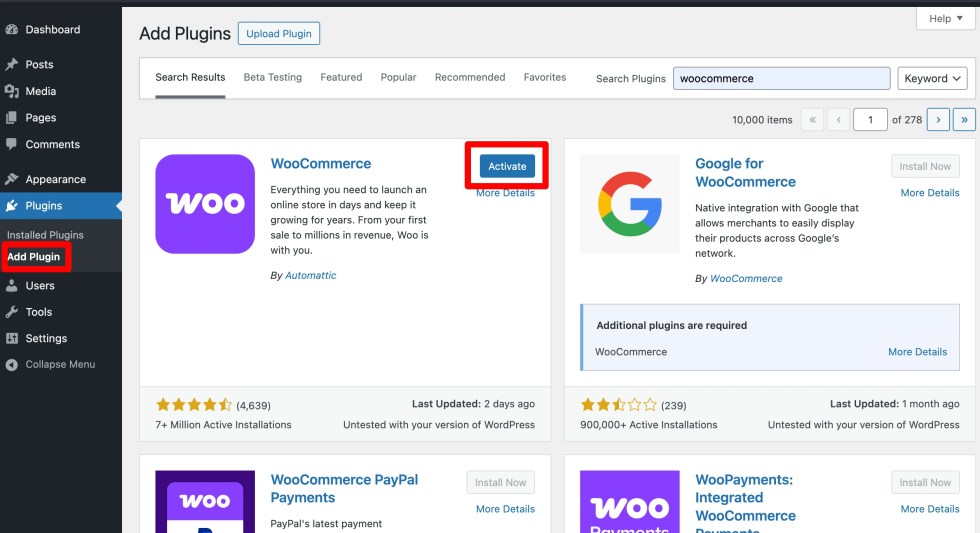
- Go to Plugins → Add New.
- Search for WooCommerce.
- Click Install Now.
- Click Activate after installation.
Activating the Theme
↑ Back to topTo ensure full compatibility, activate WooCommerce before activating Shopzy.
Steps to Activate Shopzy
- Verify that WooCommerce is activated.
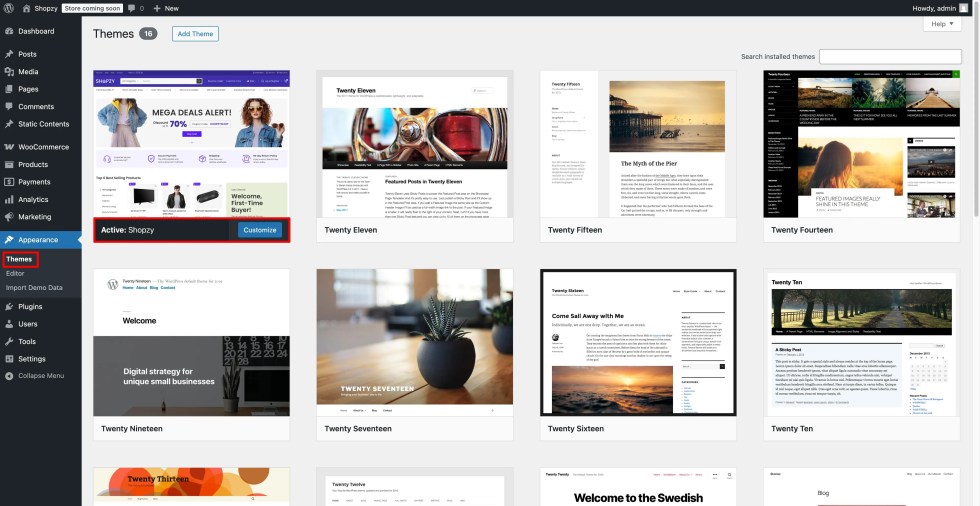
- Go to Appearance → Themes and locate Shopzy.
- Hover over the theme and click Activate.
- You’ll see a confirmation message after activation.
Using Demo Content
↑ Back to topA theme’s demo content is a great way to get started quickly. Shopzy’s homepages and internal pages are built using Patterns, so you don’t need to import every page or add demo products all at once. You can simply insert the Starter patterns you need and build pages easily.
Starter Patterns
We recommend importing demo products and blog posts only if your website is empty.
If you already have products or posts, you can skip the demo import and use the available page patterns to create only the pages you want.
Demo Shop Products
Shopzy includes demo shop products to help you quickly visualize how your store will look. These products are fully WooCommerce-compatible and showcase product grids, categories, and single product layouts.
Key Points:
- Demo products are optional – use them only if your store has no real products yet.
- Importing demo products helps you understand the full design and layout potential of Shopzy.
- You can replace demo products anytime without affecting the theme styling.
Demo Blog Posts
Shopzy also includes demo blog posts to help you preview the blog layout and article styling. They make it easier to see how your blog pages will look before adding real content.
Key Points:
- Demo blog posts are optional – import them only on a new/empty site.
- They help you visualize the blog page structure and styling used in Shopzy.
- You can replace demo posts with your own content whenever you’re ready, without affecting
One Click Demo Import
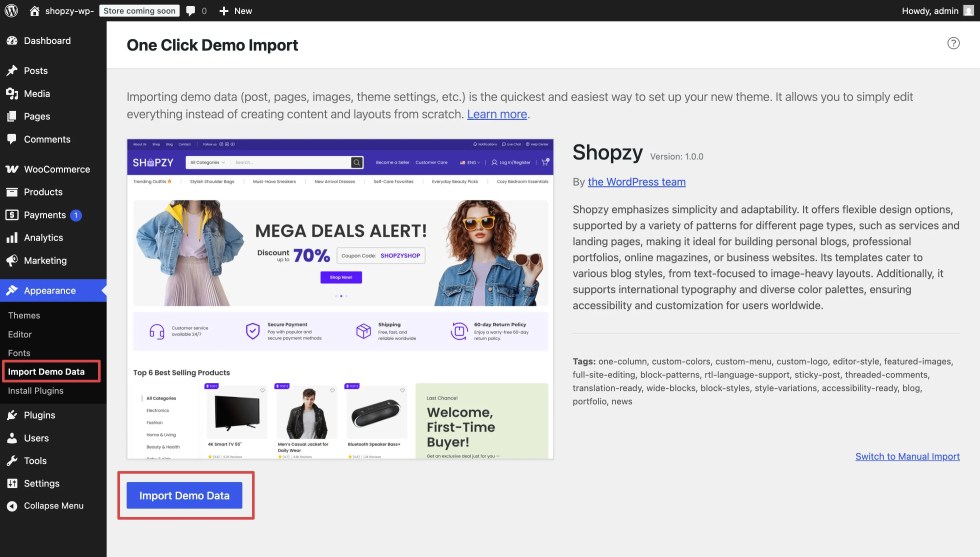
↑ Back to topYou can use a one-click import plugin to import all demo content for Shopzy, including Home pages, Static pages, and Menus, so your site looks exactly like the Shopzy demo (placeholder link).
How to Import Demo Content
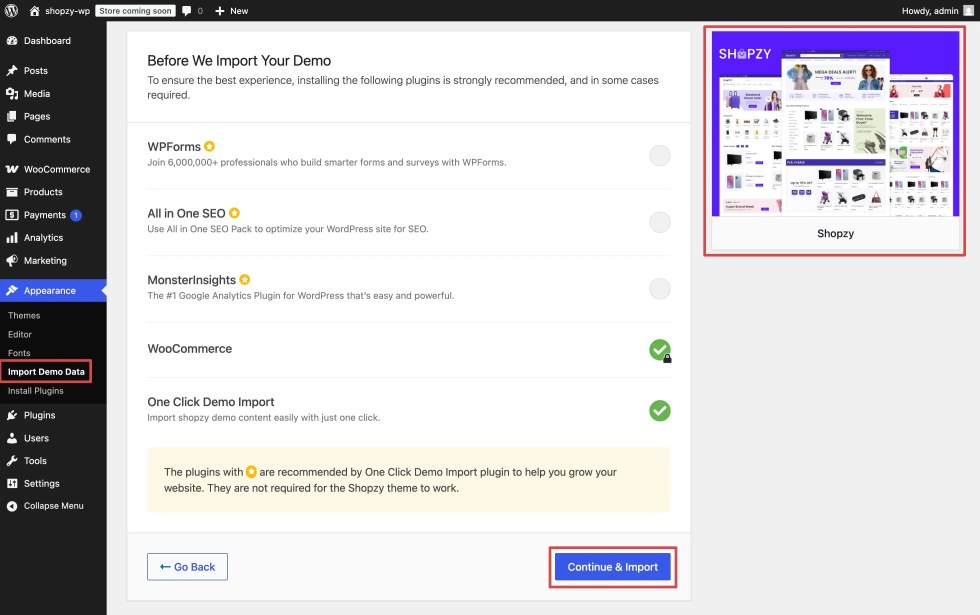
- Ensure that you have installed Shopzy and all recommended plugins from Appearance → Install Plugins.
- Go to Appearance → Import Demo Data.
- Click Import Demo Data to begin the process.
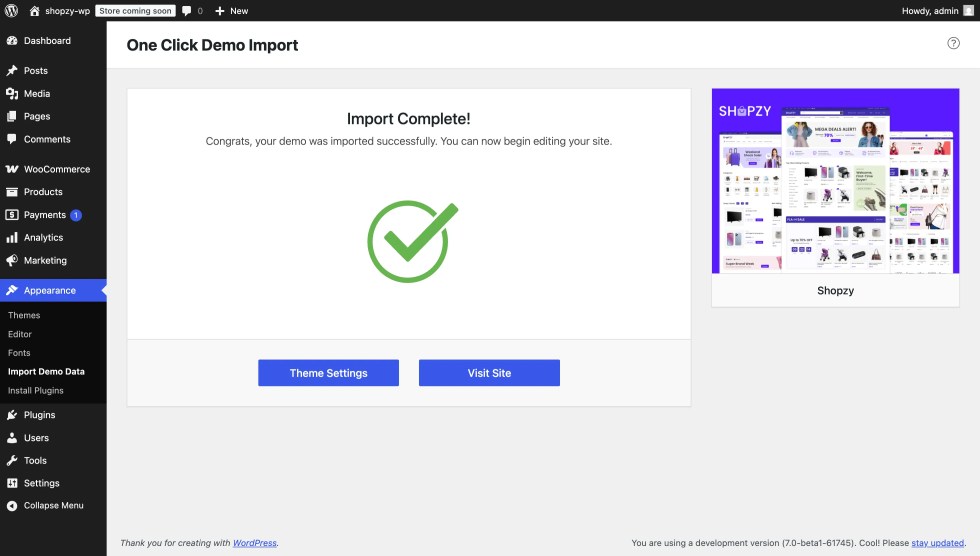
- The importer will automatically load all demo pages, menus, and settings—just click once and wait for the process to finish.
Updating the Theme
↑ Back to topKeeping your Shopzy theme up to date ensures you always have the latest features, improvements, performance enhancements, and security fixes. Depending on how you installed the theme, there are a few different methods you can use to update it.
Recommended Update Methods
- Via FTP:
- Unzip the latest
shopzy.zipfile on your computer. - Connect to your server using an FTP client (such as FileZilla).
- Navigate to
wp-content/themes. - Upload the updated
shopzyfolder and overwrite the existing one. - Check your WordPress dashboard to confirm the theme version has been updated.
- Unzip the latest
Important Notes
- Backup first: Always back up your entire website (files + database) before updating the theme.
- Child theme users: If you’re using a child theme, your customizations remain safe and unaffected.
- Clear cache: After updating, clear your website cache, server cache (if any), and browser cache to ensure the changes are visible.
Setup Pages
↑ Back to topHome Pages
↑ Back to topHomepage Setup
Shopzy includes multiple modern homepage layouts, each created as a block pattern.
This gives you the flexibility to set up your homepage quickly without manually building section-by-section.
Simply choose the homepage pattern you prefer and apply it — each layout is designed to suit online stores selling:
- Electronics
- Beauty & Health
- Fashion
- Baby & Kids
- Sports & Outdoor
- Home & Living
Because all Shopzy homepages are registered as patterns, you can assign them to a page in just a few clicks.
Creating and Assigning Your Homepage
Follow these steps to set up your homepage:
Step 1: Create a Homepage
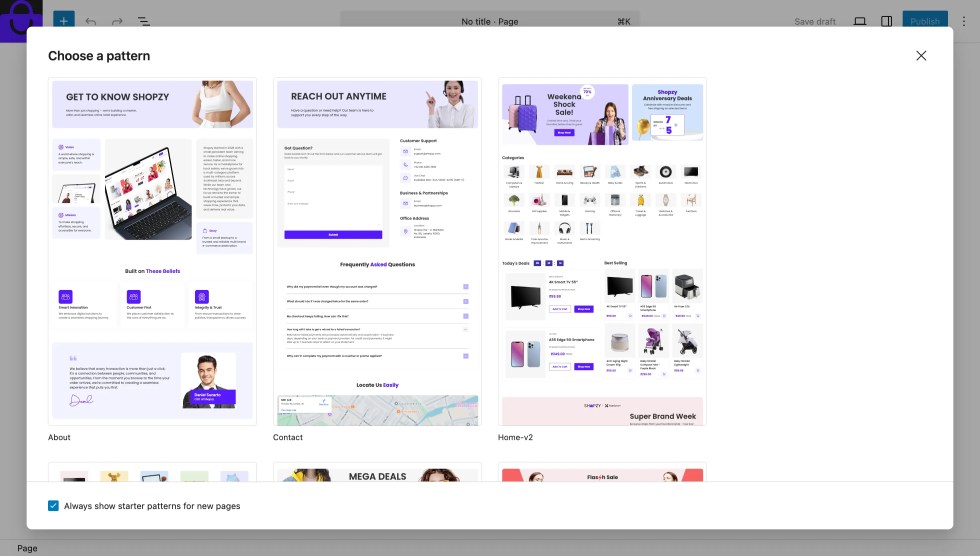
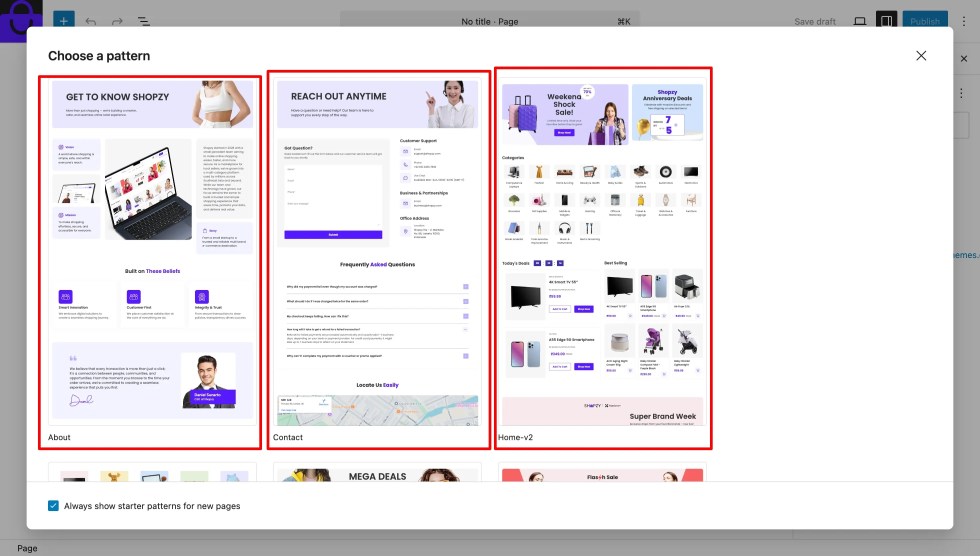
- Go to Pages → Add New.
- When the “Choose a Pattern” pop-up appears, select one of the ready-made Shopzy Homepage Patterns.
This instantly loads a full homepage layout. - Or close the pop-up to start from a blank page.
- Enter a page title (for example: Home).
- In the right sidebar under Template, select:
- Canvas Template – if you want to manually add header & footer as patterns
- Page No Title Template – if you want to use the global header & footer across the site
- Click Publish.
💡 Tip: Selecting a full homepage pattern automatically loads all sections — banners, product grids, categories, deals, and more.
Step 2: Assign a Template to the Homepage
- Open the page you created.
- In the Page settings panel, find the Template section.
- Click Change Template and select the layout you prefer:
- Canvas Template – manually insert separate header and footer
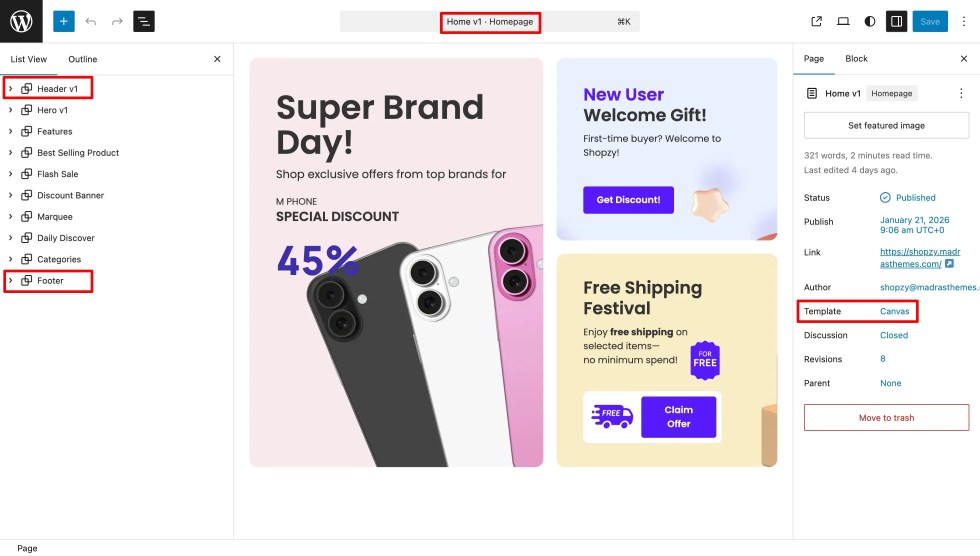
- Page No Title Template – automatically loads the site-wide global header and footer
- Click Preview to see how it looks.
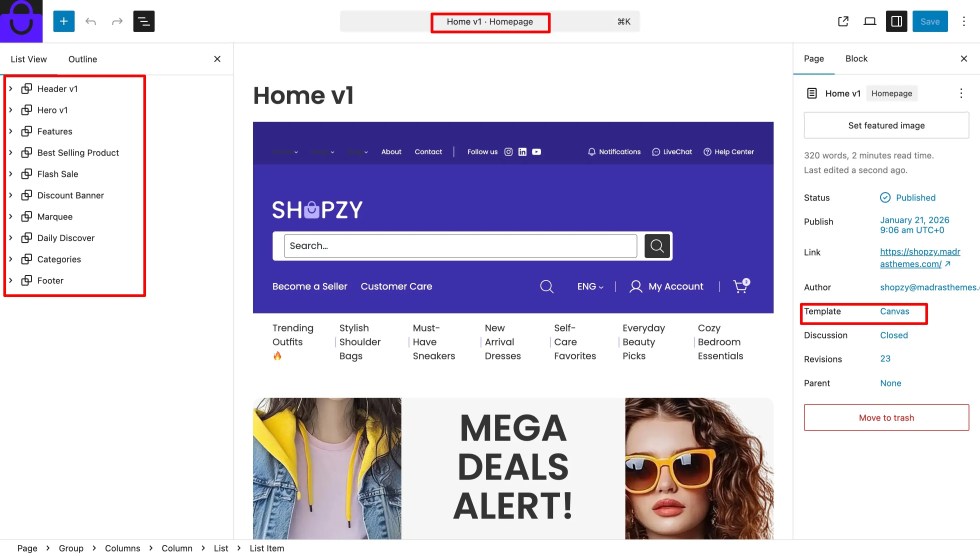
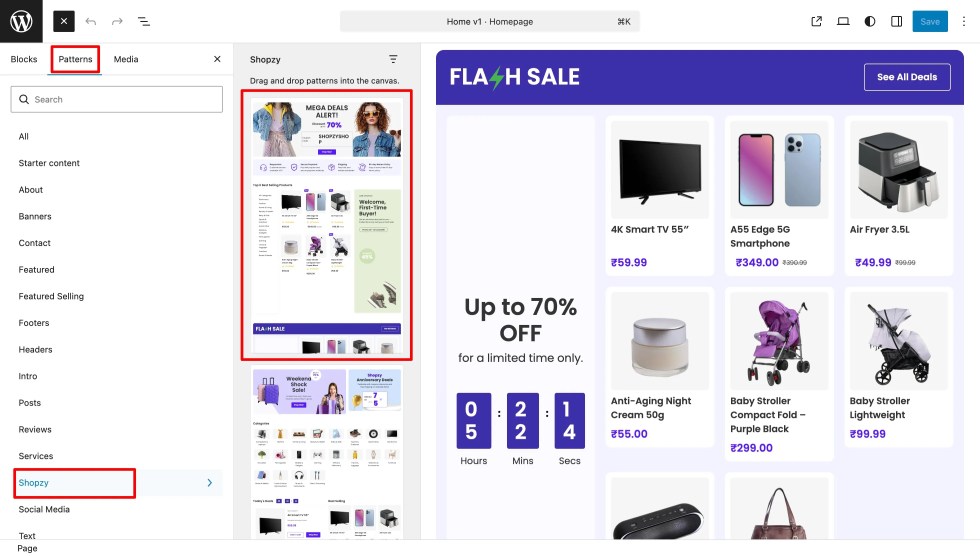
Add Patterns to Your Page
Shopzy provides complete homepage patterns so you can instantly load a ready-made layout.
To insert a homepage or add sections:
- Open the Block Inserter (+).
- Go to Patterns → Shopzy.
- Choose your desired Home pattern (e.g., Home v1, Home v2, etc.).
You may also add smaller section patterns — like featured categories, trending products, banners, or offer blocks — to build a custom homepage.
About the Header
Shopzy’s header is built entirely with WordPress blocks and is fully customizable in the Site Editor.
- Go to Appearance → Editor → Templates → Header.
- Choose from available Header patterns or customize the existing one.
- You can edit elements like:
- Logo
- Navigation menu
- Search bar
- Mini cart
- Account icon
This makes it easy to adapt the header style to match your chosen homepage layout.
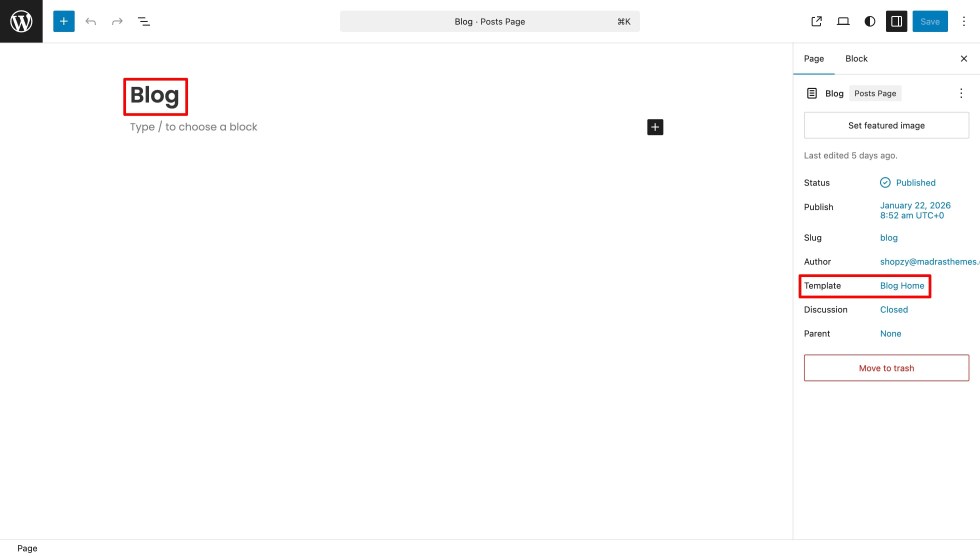
Creating a Blog Page
To create a dedicated blog page:
- Go to Pages → Add New.
- Title it Blog.
- Keep the Template as Default.
- Publish the page.
💡 Tip: This keeps your blog posts separate from the homepage and organizes content cleanly.
Static Pages
↑ Back to topSet Static Pages for Homepage and Blog
Finally, tell WordPress which pages to use for your homepage and blog:
- Go to Settings → Reading in your WordPress dashboard.
- Under Your homepage displays, select A static page.
- For Homepage, choose the Home page you created.
- For Posts page, select the Blog page.
- Click Save Changes.
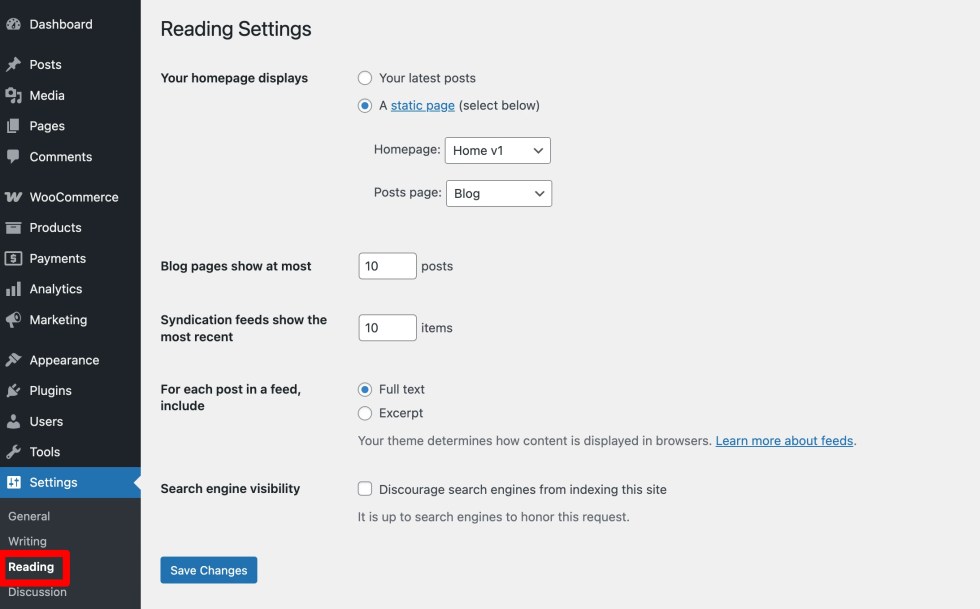
Your site is now ready with:
- A fully designed homepage using your preferred Shopzy layout.
- A customizable header tailored to your store’s style.
- A separate blog page for your posts.
You’re ready to start adding products, customizing your content, and showcasing your brand with Shopzy.
Inner Pages
Shopzy includes several pre-designed inner page templates to give your website a cohesive and professional look. These templates are fully built with blocks, so you can easily customize them using the WordPress Site Editor or add patterns to enhance the page design.
About Page
The About Page is designed to showcase your brand story, mission, and team.
- Includes sections for your company overview, mission statement, team members, testimonials, and call-to-action banners.
- Fully customizable via the Block Editor — you can add images, videos, or patterns as needed.
- Pre-styled headings, paragraphs, and buttons ensure a clean and modern look.
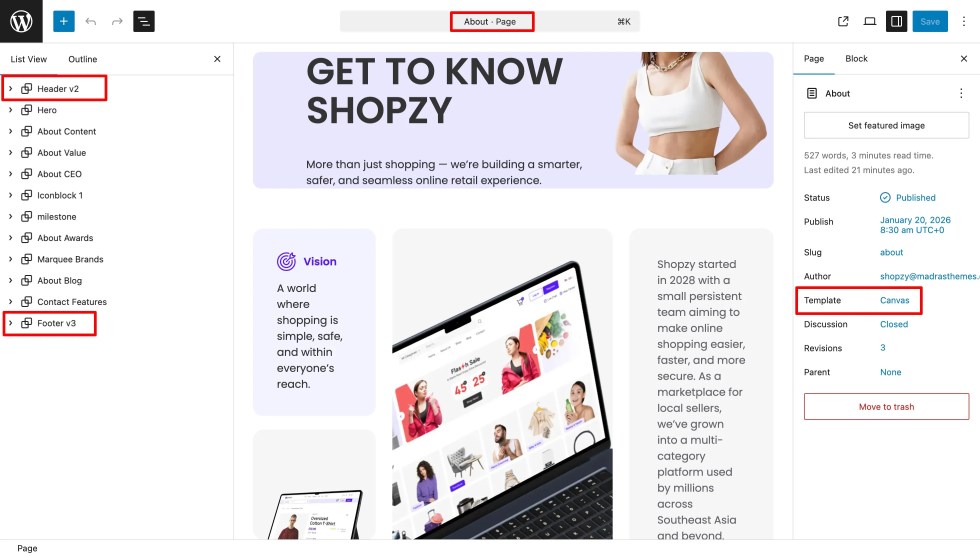
💡 Tip: Use this page to build trust with your customers by clearly explaining your values and what sets your store apart.
Contact Page
The Contact Page helps your customers reach you easily.
- Includes pre-designed sections for contact forms, store address, Google Maps, and social media links.
- Works seamlessly with popular form plugins like WPForms, Contact Form 7, or Jetpack forms.
- Each section is built with blocks, allowing you to move, hide, or customize elements effortlessly.
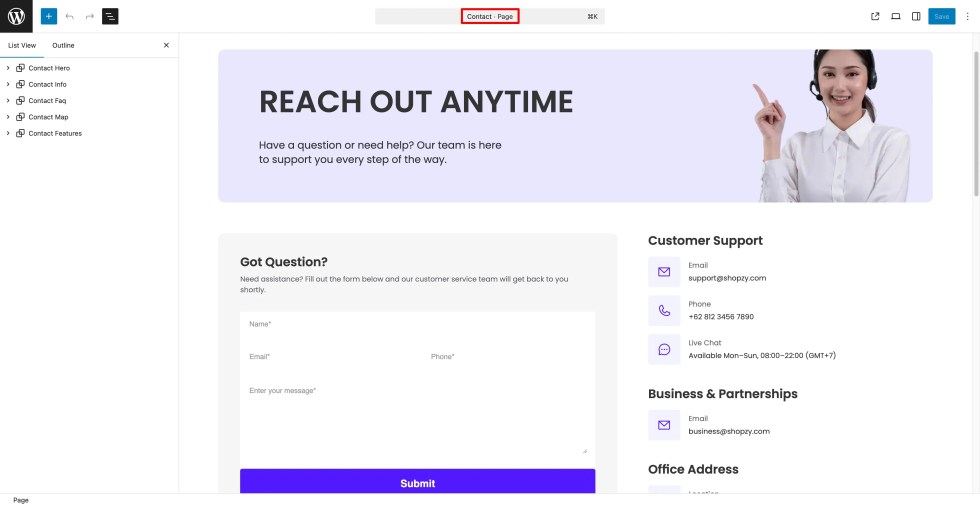
💡 Tip: Ensure your store’s address, email, and phone number are always up to date for better customer support.
Blog
The Blog Page is your hub for sharing news, promotions, or updates.
- Displays all your posts in a clean, easy-to-read layout.
- Supports categories, tags, and featured images to make posts visually appealing.
- Pre-designed single post layouts maintain consistency with your homepage and overall theme.
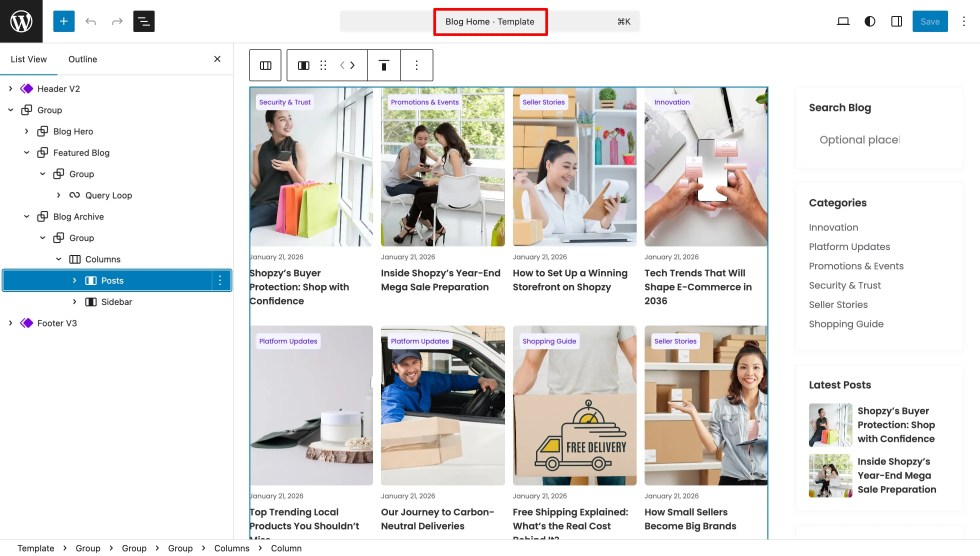
💡 Tip: Use the blog to engage your audience and improve your site’s SEO.
404 Page
The 404 Page appears when a visitor lands on a non-existent page.
- Designed to be informative and friendly, helping users navigate back to your main pages.
- Includes space for search bar, navigation links, and call-to-action buttons.
- Fully customizable — you can add images, text, or patterns to make it match your brand style.
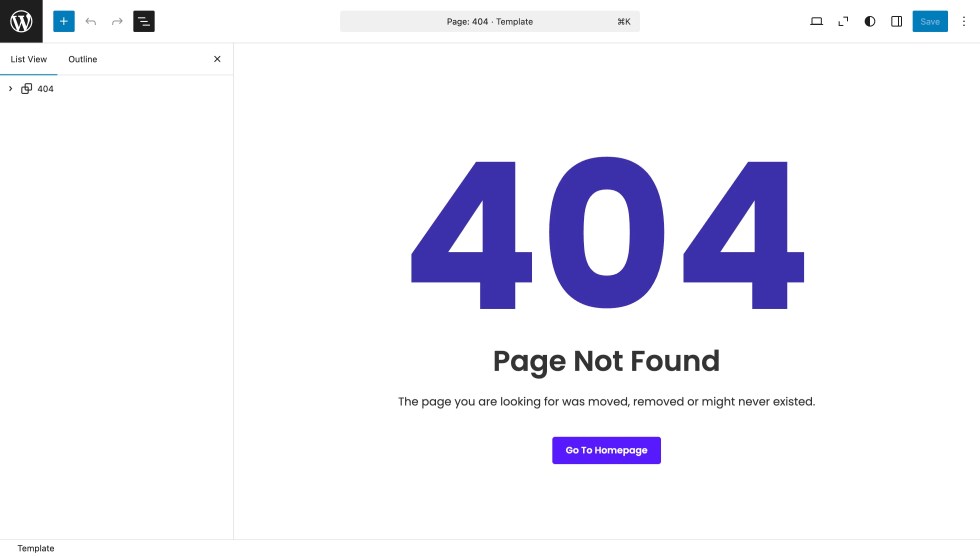
💡 Tip: A well-designed 404 page can reduce bounce rates and guide visitors back to important content.
Header & Footer
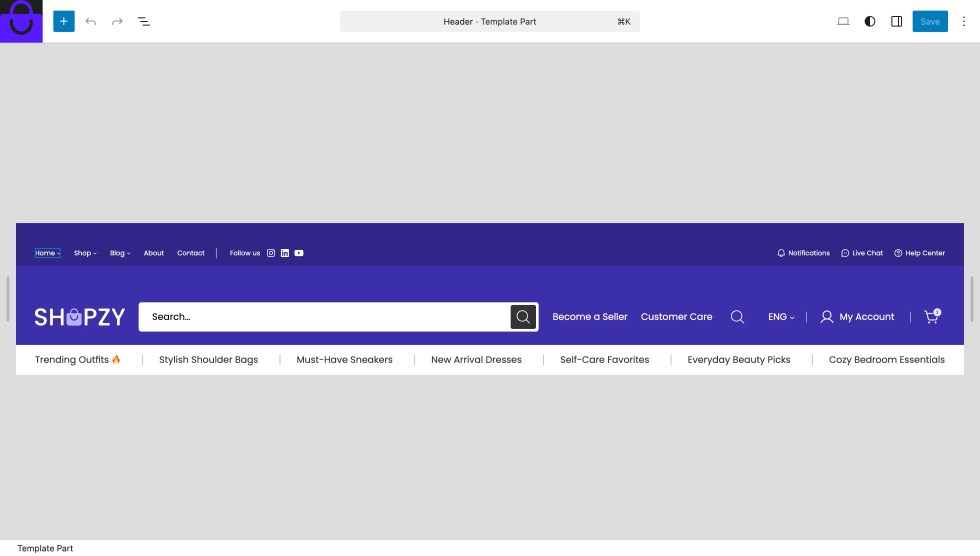
↑ Back to topHeader
↑ Back to topThe header is a key part of your website, appearing on every page and helping visitors navigate your store.
In Shopzy, the header is fully block-based and can be customized using the WordPress Site Editor.
Accessing and Editing the Header
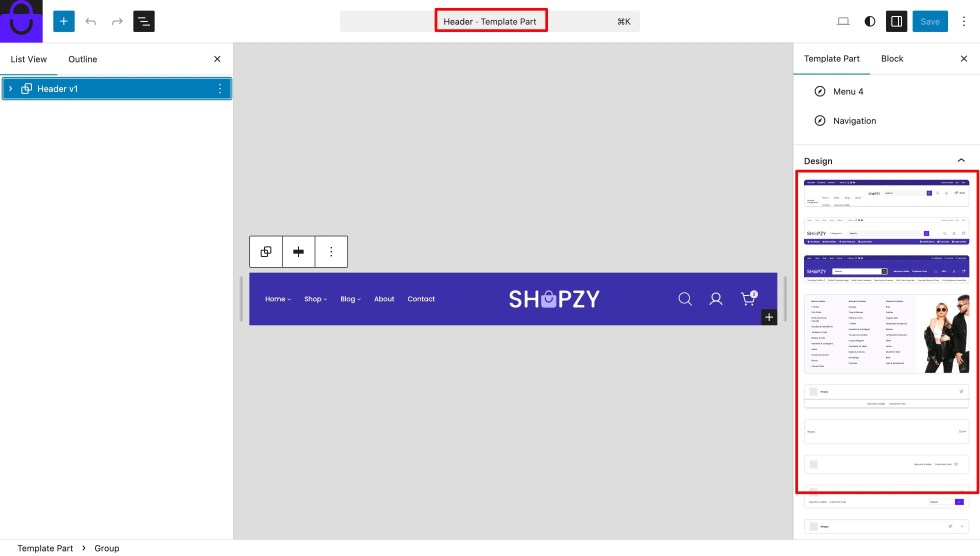
- Go to Appearance → Editor → Patterns → All Template Parts.
- Under All Template Parts, you will see Header listed.
- Click on Header to edit it directly or replace it with a pre-designed Header pattern.
Key Features
- Logo: Add your store logo and link it to the homepage.
- Navigation Menu: Fully customizable menus for pages, categories, and links.
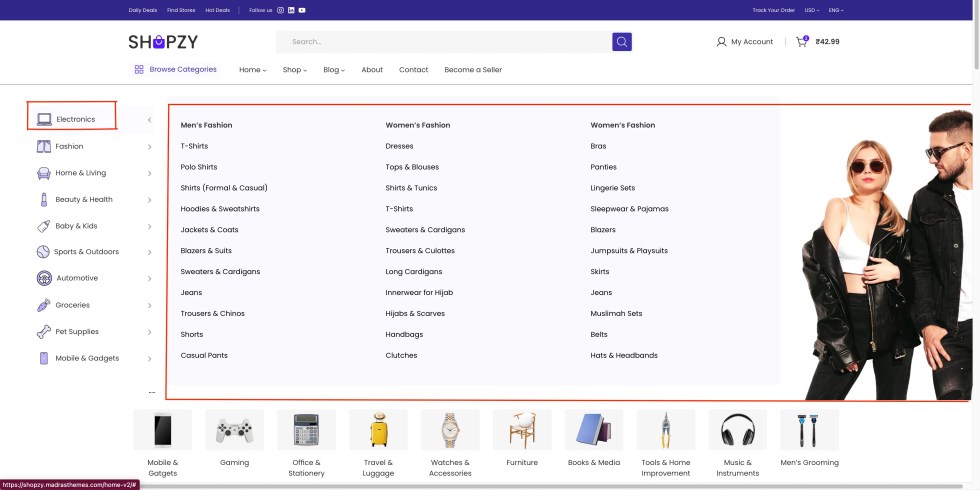
- Search Bar: Helps users quickly find products across categories like electronics, beauty, fashion, home & living, and more.
- Mini Cart: Displays selected products for easy checkout.
- Account Icon / Login: Provides quick access to customer accounts.
Customizing the Header
- Use the block editor to add, remove, or rearrange elements like menus, buttons, or icons.
- Choose a Header pattern to quickly apply a ready-made design.
- Save and preview your changes to ensure consistency across all pages.

💡 Tip: Each Shopzy homepage pattern comes with a matching header style. You can keep the default style or switch to another header to best suit your store’s look and feel.
Navigation
↑ Back to topThe navigation menu is an essential part of your store, allowing visitors to browse products, pages, and categories with ease. In Shopzy, the navigation is fully block-based and can be customized directly from the Site Editor.
Accessing the Navigation
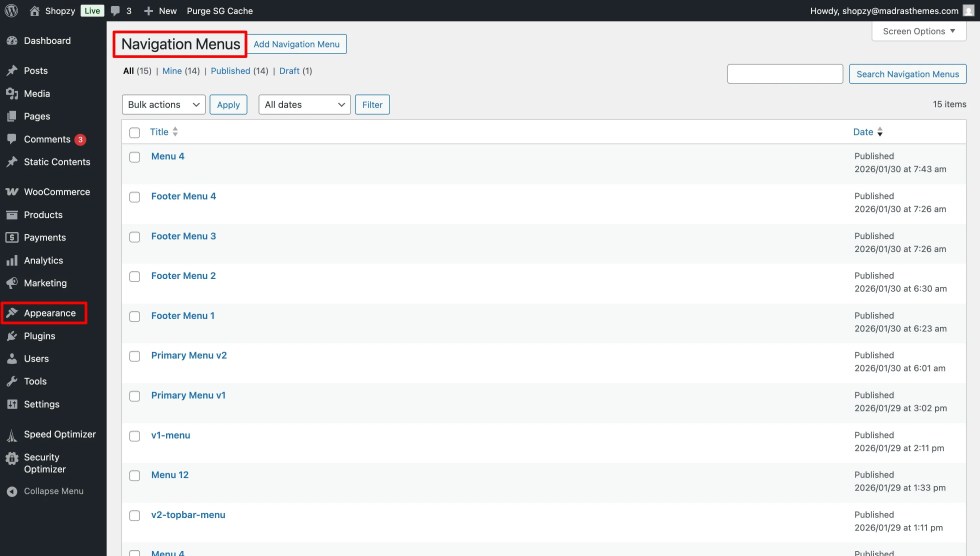
- Go to Appearance → Editor → Navigation.
- Here, you’ll find a list of all existing navigation menus used across your site.
- Select the menu you want to edit or click Add New to create a new one.
Editing the Menu
- Click on any menu item to rename or link it to a page, category, or custom URL.
- Use the + (Add Block) button to add new links or submenus.
- Drag and drop items to reorder them easily.
- To create dropdowns, nest menu items under a parent item.
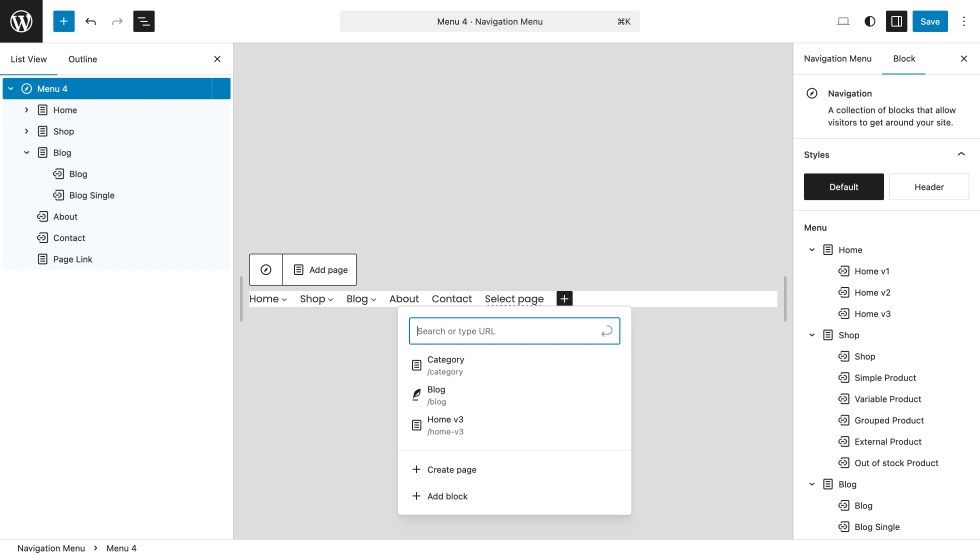
Assigning the Menu
- Once your navigation is ready, go to Appearance → Editor → Patterns → All Template Parts.
- Open the Header and replace or assign the navigation block with the one you created.
💡 Tip: You can design multiple navigation menus — for example, one for the main header and another for the footer — and switch between them anytime from the Navigation screen.
Adding Megamenu
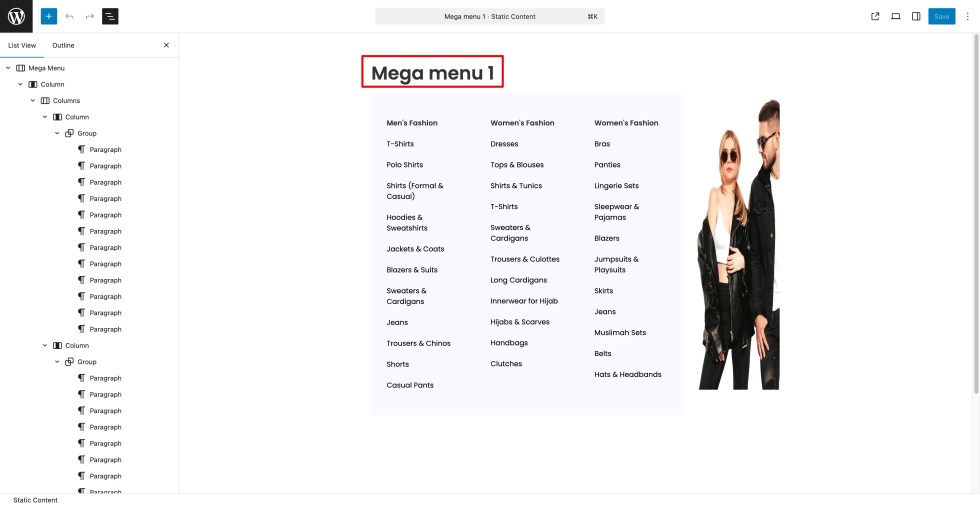
↑ Back to topShopzy supports Megamenu Dropdown using the MAS Static Content plugin.
Install the MAS Static Content Plugin
- Navigate to Plugins → Add Plugin.
- Search for MAS Static Content (the plugin that enables Megamenu support).
- Click Install Now.
- After installation, click Activate to enable it.
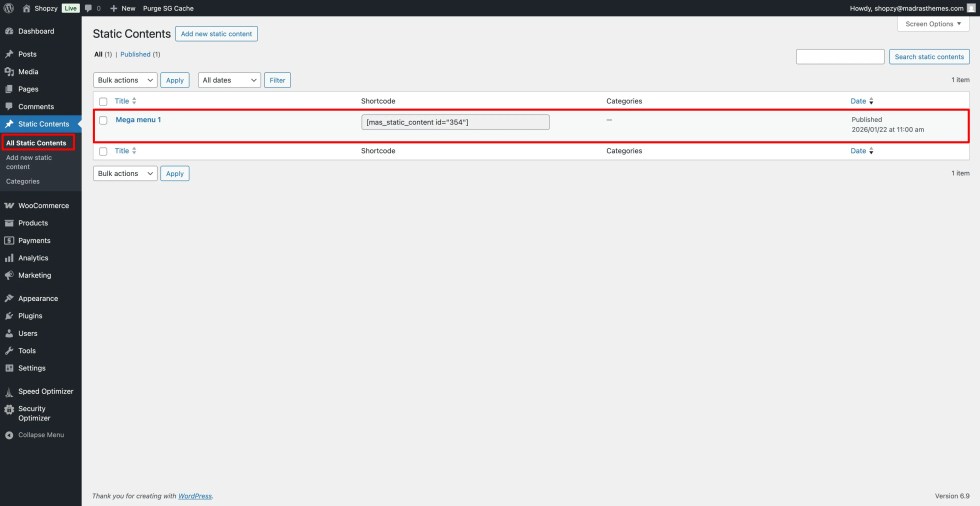
Create the Static Content Block
- Go to Static Contents in your WordPress dashboard.
- Click Add New at the top.
- Enter a name for your static content, such as “Pages Megamenu”.
- Use the Gutenberg block editor to design your mega menu layout.
- Click Publish to save the content.
Editor Settings:
Frontend Output:
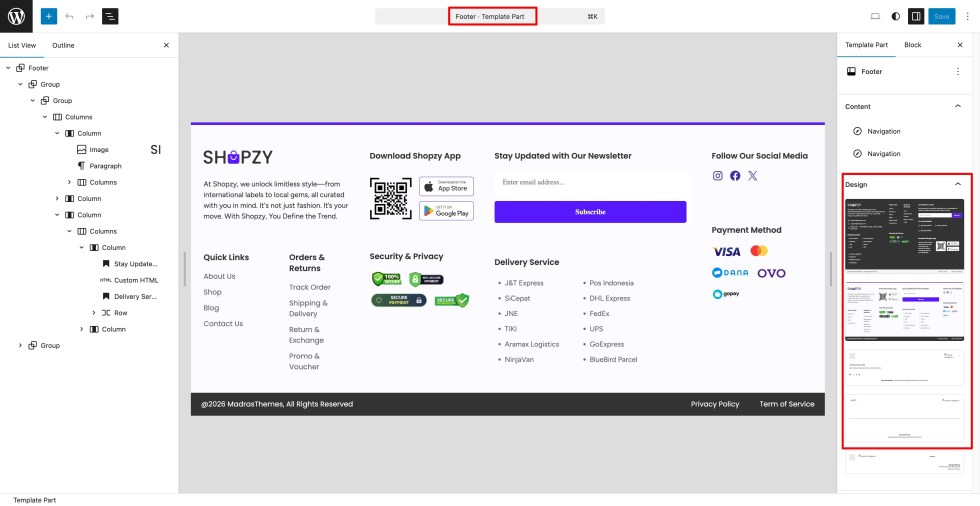
Footer
↑ Back to topThe footer is an essential part of your website that appears at the bottom of every page. It’s the perfect place to include important links, contact information, social media icons, and other helpful details about your store.
In Shopzy, the footer is block-based and can be fully customized using the WordPress Site Editor.
Accessing and Editing the Footer
- Go to Appearance → Editor → Patterns → All Template Parts.
- Under All Template Parts, locate the Footer.
- Click on Footer to open and edit it using the block editor.
Customizing the Footer
- Use the block editor to add, remove, or rearrange elements like menus, text, or widgets.
- You can include key elements such as:
- Quick Links: About, Contact, Privacy Policy, Terms & Conditions, etc.
- Social Icons: Link to your social media profiles.
- Newsletter Signup: Collect customer emails for updates.
- Copyright Notice: Add your store name, current year, and legal details.
- You can also apply a Footer pattern to instantly load a pre-designed layout.
Multiple Footer Designs
- Shopzy includes multiple footer variations designed to match different homepage layouts.
- You can easily switch between them by selecting another Footer pattern from the Template Parts section.
💡 Tip: Keep your footer consistent across all pages to create a professional design and improve site navigation.
WooCommerce Setup
↑ Back to topShop Page
↑ Back to topThe Shop page is the heart of your online store, showcasing all your products in an organized and visually appealing layout. In Shopzy, the Shop page is built using WooCommerce blocks and styled to perfectly match the theme’s design.
Setting Up the Shop Page
- Go to Pages → Add New.
- Enter a title — for example, Shop.
- Leave the template as Default (no need to assign a custom template).
- Click Publish to save the page.
Assigning the Shop Page in WooCommerce
- Go to WooCommerce → Settings → Products.
- Under the General tab, locate the Shop page setting.
- From the dropdown, select the Shop page you just created.
- Click Save Changes.
Customizing the Shop Layout
- Go to Appearance → Editor → Templates.
- Open the Shop or Archive Product template.
- Use the block editor to modify the layout — for example:
- Adjust the number of products per row.
- Change sorting and filter options.
- Add banners, headings, or featured collections above the product grid.
- Save your changes when done.
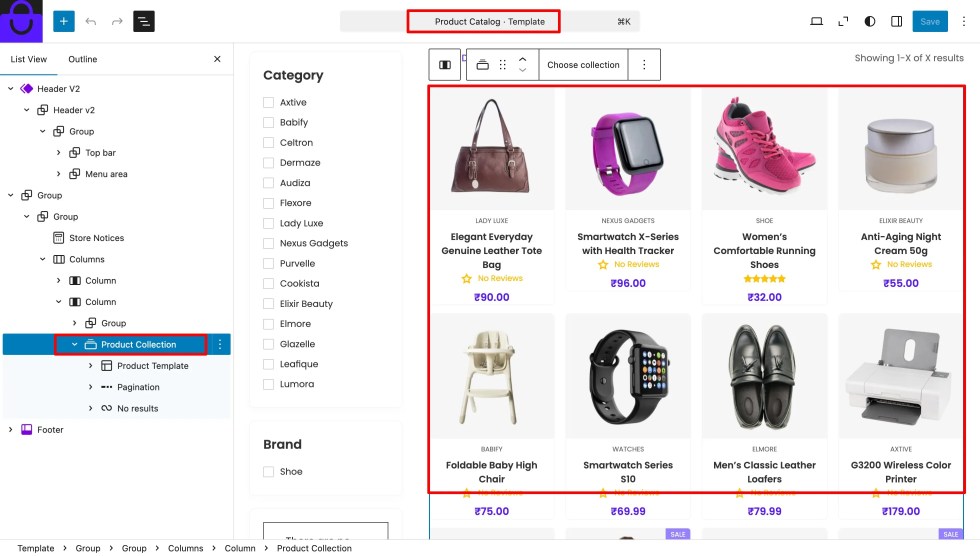
Features of the Shop Page
- Responsive Product Grid – Adapts automatically to different screen sizes.
- Product Filters & Sorting – Allows customers to refine their search.
- Add to Cart – Makes shopping faster and easier.
- Category & Tag Display – Helps users navigate products efficiently.
💡 Tip: You can also include a Product Filter Sidebar with widgets such as filters, price range, or product categories to enhance navigation and improve user experience.
Products
↑ Back to topThe Products section showcases the items you sell in your online store. In Shopzy, products are managed through WooCommerce and displayed beautifully using block-based layouts optimized for speed and design consistency.
Adding a New Product
- Go to Products → Add New in your WordPress dashboard.
- Enter the Product Name and Description.
- Set the Product Data:
- Regular Price and Sale Price.
- Inventory details like SKU and stock status.
- Shipping details (weight, dimensions, etc.).
- Linked Products for upsells or cross-sells.
- Add a Product Image and Product Gallery.
- Assign relevant Categories and Tags to help organize products.
- Click Publish to make the product live on your store.

Customizing the Product Page
- Go to Appearance → Editor → Templates → Single Product.
- Here you can edit the layout of individual product pages using blocks such as:
- Product Title
- Product Price
- Product Image Gallery
- Add to Cart Button
- Product Description
- Related Products or Upsells
- You can rearrange, remove, or add new sections to create a layout that suits your store’s style.
Product Display Features
- Clean Grid Layouts: Products are displayed in an organized and mobile-friendly grid.
- Hover Effects: Smooth image transitions and quick view options.
- Add to Cart & Wishlist: Encourage easy shopping interactions.
- Sale Badges & Labels: Highlight discounts and special offers.
- Optimized Loading: Images and styles load efficiently for faster performance.
💡 Tip: Use high-quality product images and consistent dimensions to maintain a professional look. You can also use plugins like WooCommerce Wishlist or Variation Swatches to enhance functionality.
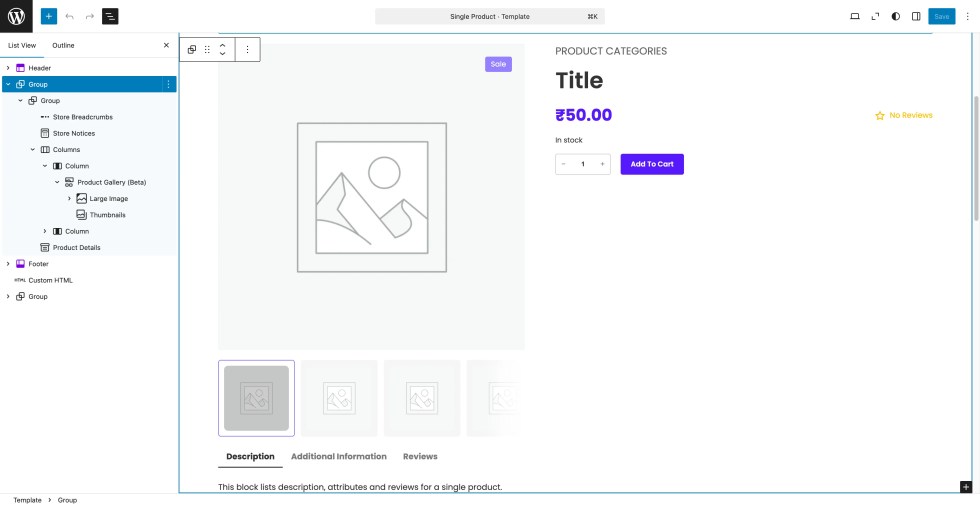
Single Product Page
↑ Back to topThe Single Product Page displays all the details of an individual product, allowing customers to make informed purchasing decisions. In Shopzy, the Single Product Page is fully block-based and customizable using the WordPress Site Editor.
Accessing and Editing the Single Product Page
- Go to Appearance → Editor → Templates → Single Product.
- Open the template to customize the layout of individual product pages.
- Use the block editor to add, remove, or rearrange sections as needed.

Key Sections of the Single Product Page
- Product Title: Displays the name of the product.
- Product Image Gallery: Showcase multiple images with zoom and gallery options.
- Price & Sale Price: Highlight discounts or regular pricing.
- Add to Cart Button: Encourages quick purchases.
- Product Description & Short Description: Detailed info about the product features.
- Product Meta: SKU, categories, and tags.
- Upsells & Related Products: Suggest similar or complementary items.
- Reviews Section: Displays customer feedback and ratings.
Customization Tips
- Rearrange blocks to emphasize important information like images, prices, or promotions.
- Add custom blocks such as call-to-action banners, video demonstrations, or trust badges.
- Ensure your product images are high-resolution for a professional appearance.
Features
- Responsive Design: Looks great on all devices.
- Quick Add to Cart & Wishlist: Improves the shopping experience.
- Optimized Layout: Clean, modern, and fast-loading.
- Pattern Support: You can insert additional patterns such as testimonials, banners, or product highlights to enhance the page.
💡 Tip: Keep the layout consistent across all products for a cohesive user experience. You can also create multiple Single Product templates for different product types if needed.
Cart Page
↑ Back to topThe Cart Page is where customers review the products they have added, adjust quantities, apply coupons, and proceed to checkout. In Shopzy, the Cart Page is fully integrated with WooCommerce and styled to match the theme’s clean and modern look.
Accessing and Editing the Cart Page
- Go to Pages → All Pages and select the Cart page (created automatically by WooCommerce).
- You can edit it using the block editor to add custom content or patterns above or below the cart table.
- To customize the cart layout globally, go to Appearance → Editor → Templates → Cart.
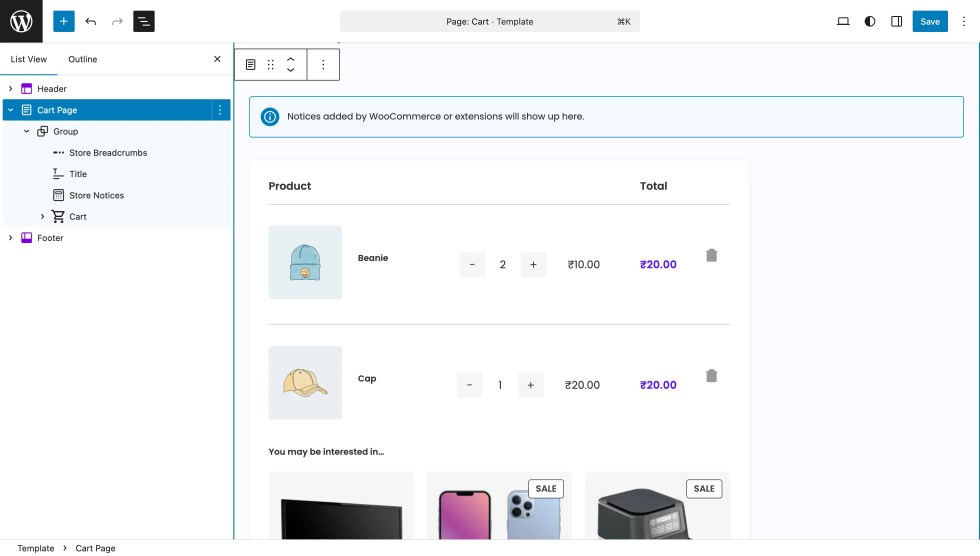
Key Features of the Cart Page
- Product List: Shows all products added to the cart with thumbnail images, titles, prices, and quantity selectors.
- Remove / Update Items: Customers can remove products or adjust quantities directly.
- Coupon Field: Apply discount codes easily.
- Cart Totals: Displays subtotal, taxes, shipping, and total amount.
- Proceed to Checkout Button: Directs customers to the checkout page for payment.
Customization Tips
- Use patterns to add banners, trust badges, or promotional messages above the cart table.
- Rearrange or style cart elements using block settings to match your store’s branding.
- Add optional content like shipping calculators or recommended products to enhance the shopping experience.
💡 Tip: Keep the Cart Page simple and clear — the main goal is to guide customers smoothly to the checkout page.
Checkout Page
↑ Back to topThe Checkout Page is where customers finalize their purchase by providing billing details, selecting a payment method, and placing their order. In Shopzy, the Checkout Page is fully WooCommerce compatible and styled to match the clean, modern look of your store.
Accessing and Editing the Checkout Page
- Go to Pages → All Pages and select the Checkout page (created automatically by WooCommerce).
- You can use the block editor to add custom content or patterns above or below the checkout form.
- To customize the layout globally, go to Appearance → Editor → Templates → Checkout.
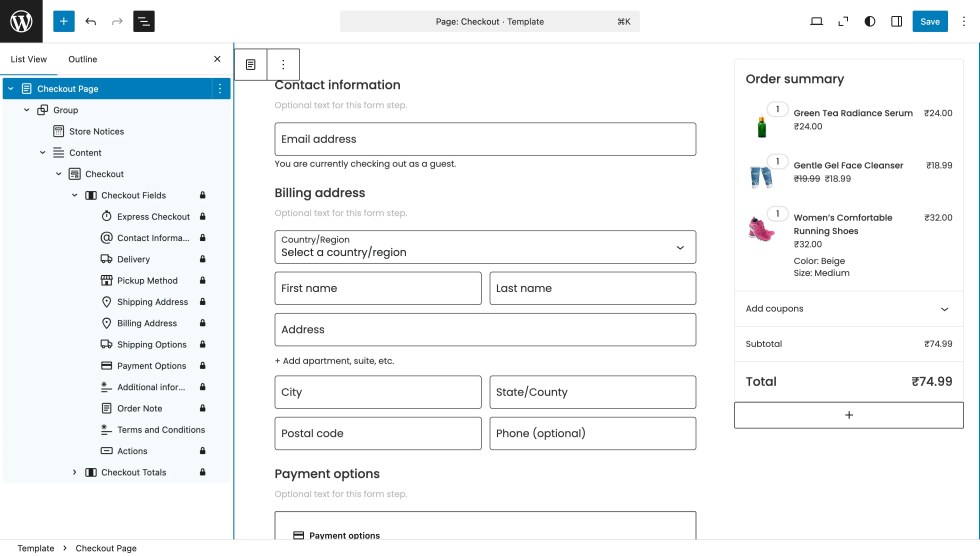
Key Features of the Checkout Page
- Billing & Shipping Details: Customers fill in their contact and delivery information.
- Order Summary: Displays products in the cart, quantities, prices, and totals.
- Payment Methods: Includes all payment gateways enabled in WooCommerce.
- Place Order Button: Completes the purchase and confirms the order.
- Optional Fields / Notes: Customers can leave instructions for the order.
Customization Tips
- Use patterns to add trust badges, promotional messages, or call-to-action banners above or below the checkout form.
- Rearrange or style blocks to make the checkout process intuitive and user-friendly.
- Keep the design clean to reduce friction and cart abandonment.
💡 Tip: Test the checkout page thoroughly with different payment methods to ensure a smooth customer experience.
Customisations
↑ Back to topSite-level Customizations
↑ Back to topShopzy provides several site-level customization options that let you control the overall look and feel of your store. These settings affect all pages, ensuring a consistent and professional design.
Site Logo
To display Logo, standard Site Logo block or an Image block is used.
General steps to change the logo image:
- Navigate to Appearance → Editor
- In the Site Editor, click on the area of your site that contains the header template part.
- Inside the Header, click on the existing logo image.
- The block toolbar will appear, and the Settings Sidebar will open on the right.
- In the block toolbar or the Settings Sidebar, look for a button like “Replace” or “Upload”.
- Click on it, and choose to either:
- Upload: Select a new logo file from your computer.
- Media Library: Select a logo that has already been uploaded to your site.
- In the Settings Sidebar on the right, you can adjust the size of the logo using the Image Width slider or input field.
- Click the Save button in the top right corner of the screen.
- Confirm that you want to save the changes to the Header template part.
- Your new logo will now be displayed across all pages that use this Header template.
💡 Tip: Use a high-resolution logo with transparent background for a clean and professional look.
Header
- Go to Appearance → Editor → Patterns → All Template Parts → Header.
- Edit the header using the block editor:
- Logo
- Navigation Menu
- Search Bar
- Mini Cart
- Account Icon / Login
- You can choose a Header pattern to quickly apply a ready-made design or customize blocks to match your brand.
💡 Tip: Each homepage pattern comes with a matching header style, but you can mix and match headers with different pages.
Primary Color
- Navigate to Appearance → Editor.
- In the left sidebar of the Editor, click on Styles.
- In the Styles panel, click on Color.
- You will see the Theme color palette which are added in theme.json.
- To edit one of the existing theme colors, click on any of the color circles in the Theme palette.
- A color picker tool will open.
- Use the color picker to select a new color, or enter a specific hex code.
- To add a brand new color to your palette, click the + (plus) sign next to the CUSTOM label.
- Use the color picker to define your new custom color.
- Once you have set all the desired colors in the palette, click the Save button.
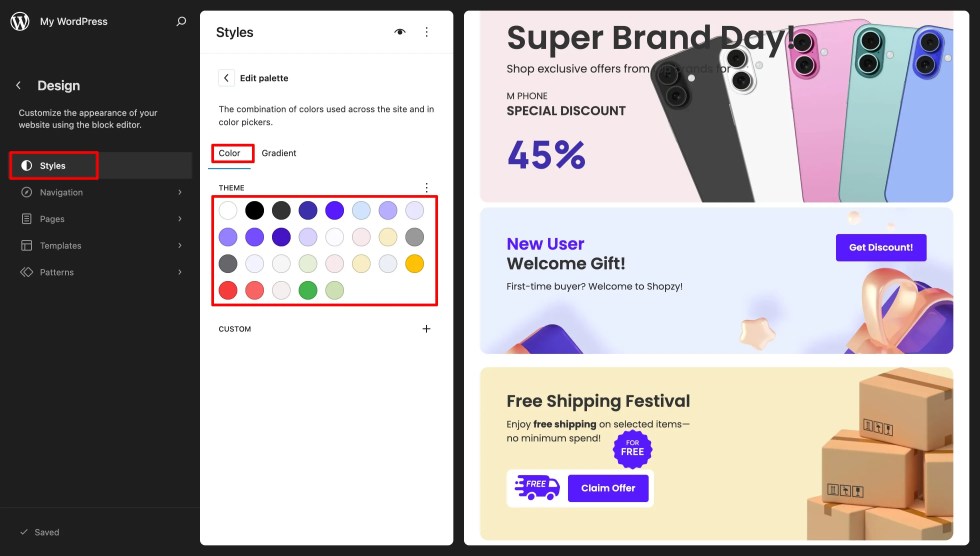
💡 Tip: Choose a color that represents your brand and ensures readability across all text and backgrounds.
Font
- Navigate to Appearance → Editor.
- In the left sidebar of the Editor, click on Styles
- In the Styles panel, click on Typography.
- Customize General or Element-Specific Typography to improve readability and visual hierarchy:
- To Customize Text/Body Typography (General):
- Click on Aa Text under ELEMENTS.
- Adjust settings like Font family (if multiple fonts are available), Appearance (weight and style), Line-height, Letter spacing, and Case.
- To Customize Headings:
- Click on Aa Headings under ELEMENTS.
- The settings you apply here will affect all headings (H1, H2, H3, etc.) unless overridden individually.
- To Customize Other Elements:
- Select other elements like Aa Links, Aa Captions, or Aa Buttons under ELEMENTS to apply specific font, size, and styling to those components.
- Customize Font Sizes (Presets)
- Click on Font size presets under FONT SIZES.
- You may be able to view or edit the predefined size steps (e.g., Small, Medium, Large) that are used throughout the editor.
- Once you have made all your desired changes to the typography settings, click the Save button.
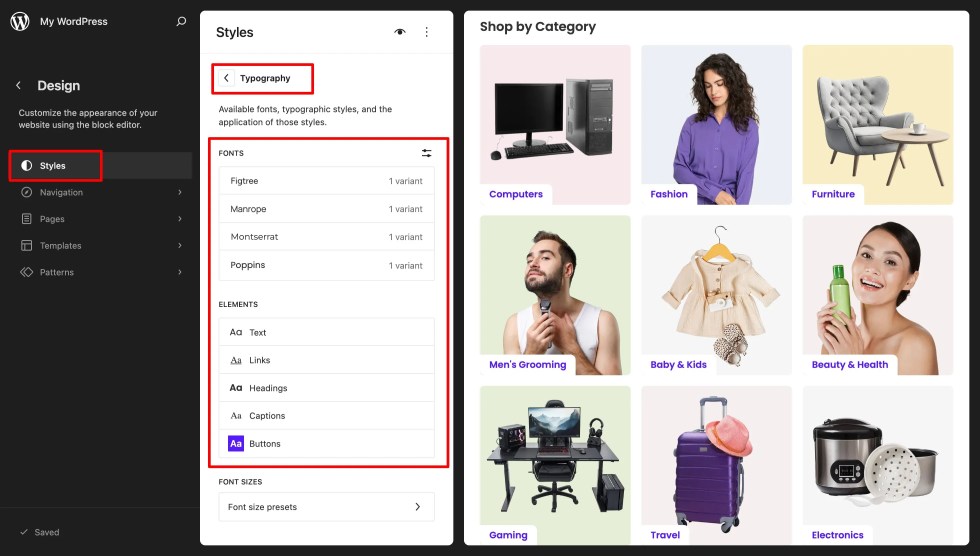
💡 Tip: Stick to 2–3 fonts maximum for a clean and professional look.
Footer
- Go to Appearance → Editor → Patterns → All Template Parts → Footer.
- Customize the footer using blocks:
- Quick Links / Menus
- Social Media Icons
- Newsletter Signup
- Copyright & Branding
- You can also select a Footer pattern to quickly apply a pre-designed layout.

💡 Tip: Keep the footer consistent across all pages to maintain a polished appearance and make navigation easy for users.
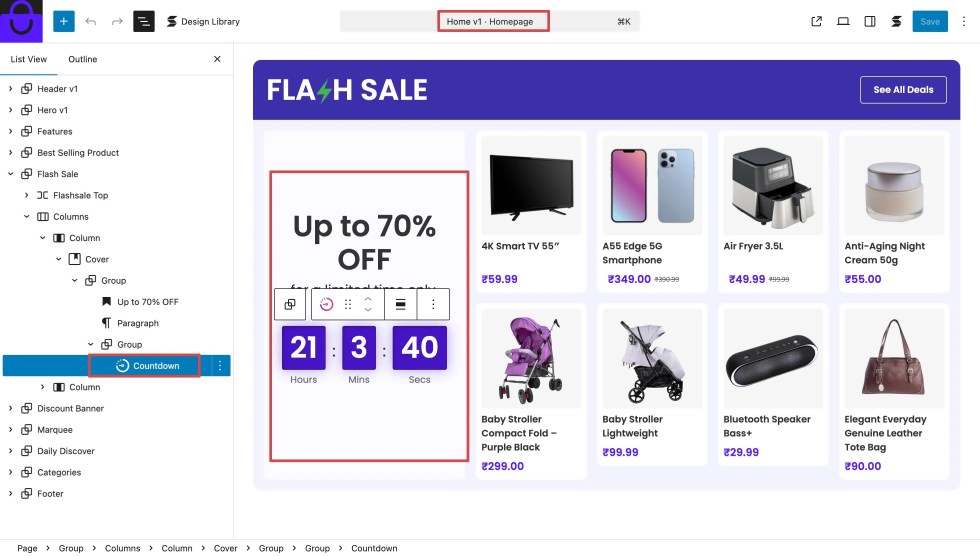
Adding Countdown Timer
↑ Back to topThe Countdown Blocks section allows you to display attractive timers that create urgency for sales, promotions, or upcoming launches. In Shopzy, countdowns are added using the Stackable plugin and seamlessly integrate with your page or product designs.
Installing the Stackable Plugin
- Before using the Countdown Block, make sure the Stackable – Page Builder Gutenberg Blocks is installed and activated.
- Go to Plugins → Add New in your WordPress dashboard.
- Search for “Stackable – Gutenberg Blocks”.
- Click Install Now, then Activate.
- Once activated, you’ll have access to the Countdown Block.
Adding a Countdown Block
- Go to Pages → Edit with Block Editor (or edit any post or product page).
- Click the “+” (Add Block) button and search for Countdown.
- Select the Stackable Countdown Block from the list.
- Configure the Countdown Settings in the right sidebar:
- End Date & Time – set the exact time the countdown should stop.
- Labels – toggle day/hour/minute/second labels on or off.
- Expiry Action – choose what happens when the timer ends (e.g., show a message or hide the block).
Customize the appearance:
- Choose from Stackable’s design presets for quick styling.
- Adjust colors, spacing, and typography.
- Click Update or Publish to save your changes.
WPForms Integration
↑ Back to topShopzy supports WPForms — a powerful drag-and-drop form builder plugin for WordPress — allowing you to easily create and manage contact forms, inquiry forms, and other custom forms throughout your site.
Creating Forms
To create a new form, please make sure the WPForms plugin is installed and activated. You can then create a new form by navigating to WPForms → Add New Form.
After clicking Add New Form, a new page will open where you can create your form using one of the available templates. You can choose from options such as a Simple Contact Form, Signup Form, Suggestion Form, or start with a Blank Form template.

Once you’ve created the form, use the WPForms drag-and-drop builder to add and customize your form fields.
FAQs
↑ Back to topGeneral
Where is my license key?
The theme does not require a license key to work.
Where is the header configuration?
The header and menus are configured in Appearance > Editor > Patterns > Headers.
How can I configure the footer on my website?
To configure the footer, go to Appearance > Editor, then select Patterns and choose Footer. This will allow you to configure the footer widgets and layout to fit your needs.
How can I add page patterns to my website?
To add page patterns, go to Appearance > Editor, then select Pages. Choose Edit page and click on Add patternsto insert the desired patterns into your page layout.
Does Shopzy support multi-vendors?
No. Shopzy is a WooCommerce theme and supports all features of WooCommerce. Multi-vendor management is not a default feature of WooCommerce. You can use third-party plugins like Dokan to add multi-vendor support. However, we cannot guarantee compatibility with any third-party multi-vendor plugins at the moment.
Where can I ask for help about the theme?
Please reach out to theme support from our support page.