Overview
↑ Back to top- Supported currencies:
- BGN (Bulgarian lev)
- CZK (Czech koruna)
- DKK (Danish krone)
- EUR (Euro)
- GBP (Pound sterling)
- HUF (Hungarian forint)
- PLN (Polish złoty)
- RON (Romanian leu)
- SEK (Swedish krona)
- Supported languages:
- Bulgarian
- Croatian
- Czech
- Danish
- Dutch
- English
- Finnish
- French
- German
- Greek
- Hungarian
- Italian
- Polish
- Portuguese
- Romanian
- Spanish
- Version of WooCommerce required: 6.5 or later.
- Pricing: A surcharge of 0.35% is applied on top of the acquiring fee — please refer to Viva’s pricing page.
This extension uses our Smart Checkout solution. Watch our video overview of Smart Checkout’s main features and benefits:
Features
↑ Back to top- Increased conversions: dynamically shows payment methods most likely to convert
- Customer preferences: remembers past payment behavior and preferences of the customer across merchants and countries
- Saved cards (customer-side): customers can pay using cards they have saved during past purchases, even from other merchants; thus, saved cards are available even to first-time customers. The customer does not need to create an account to save a card or re-use saved cards. New merchants take advantage of the pool of already saved cards across the Viva ecosystem
- Card tokenization (merchant-side): the merchant can save the card tokens of their customers in the merchant backend, and then use the saved card tokens when the merchant will redirect their customers to Smart Checkout again in the future. The saved card tokens provided by the merchant will then be presented to the customer on Smart Checkout to use and pay with
- Decline recovery: based on the customer’s past payment behavior, we prompt the customer to re-try a declined payment
- Installments1: the customer can pay via installments, where applicable (available in Greece only)
- Recurring payments: not supported yet
- Pre-authorizations: Merchants can obtain preauthorized payments and capture them either through the WordPress order details page or directly via Viva Self-Care
- Refund and Capture from WordPress: The Refund, Partial Refund, Void, and Capture functions can all be managed directly from the order details page within your WordPress account.
- Compatible with HPOS: The Smart Checkout extension is fully compatible with High-Performance Order Storage (HPOS).
- Mobile optimized: offer an optimized browsing experience on any device (mobile, tablet, laptop, or desktop)
- Local languages and currencies: support for 17 languages (English, German, French, Italian, Spanish, Polish, Romanian, Dutch, Greek, Czech, Portuguese, Swedish, Hungarian, Bulgarian, Danish, Finnish, and Croatian), and 9 currencies
- Cross-border payments: Supported for all payment methods except for local payment methods and Pay By Bank; you can accept payments from international customers for all payment methods except for local payment methods and Pay By Bank
- Cross-currency payments: The customers can pay in the following currencies: BGN (Bulgarian lev), CZK (Czech koruna), DKK (Danish krone), EUR (Euro), GBP (Pound sterling), HUF (Hungarian forint), PLN (Polish złoty), RON (Romanian leu), and SEK (Swedish krona). Merchants will receive payouts in their business account’s currency.
- Compliance and security: full PCI & SCA/3DS support utilizing SCA exemptions, along with advanced fraud protection using Machine Learning algorithms
- Constantly self-updated: regular self-updates with no coding required from you, to a) offer new payment methods, b) offer new conversion-improving features, and c) comply with all the latest regulatory and security requirements
- Single account: No need to have a separate account for settlement
- Instant settlement: The funds from customer payments will be available in your Viva account within the next hour
- 0% acceptance fee: Use your Viva Debit Mastercard to pay for your business expenses and lower your payment acceptance fees up to 0%
- Scalability: Through our reliable and state-of-the-art cloud-based infrastructure, you won’t miss a payment
1 Please note: If offering installments, the value provided by the merchant is not the number of installments the customer will select, and it is not mandatory for the customer to select installments at all. The process is as follows:
- The merchant indicates the maximum number of installments they wish to offer to the customer
- It is then up to the customer whether they pay with or without installments
- If the customer decides to pay in installments, they can select the number of installments (up to the maximum specified by the merchant)
User experience
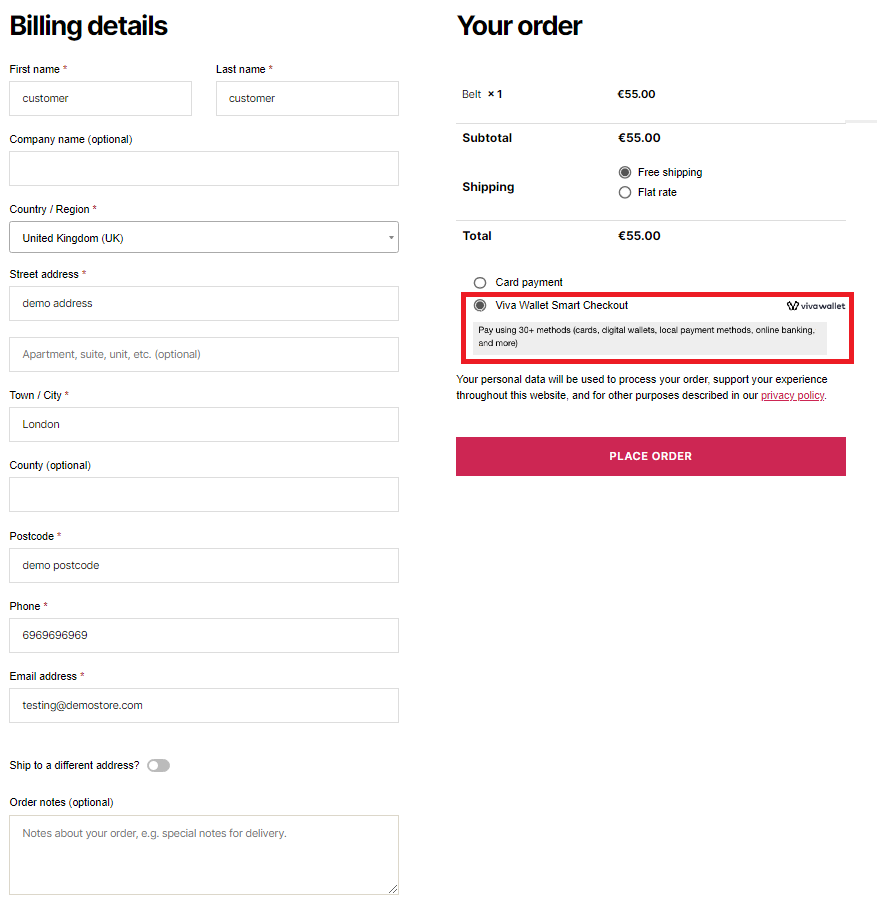
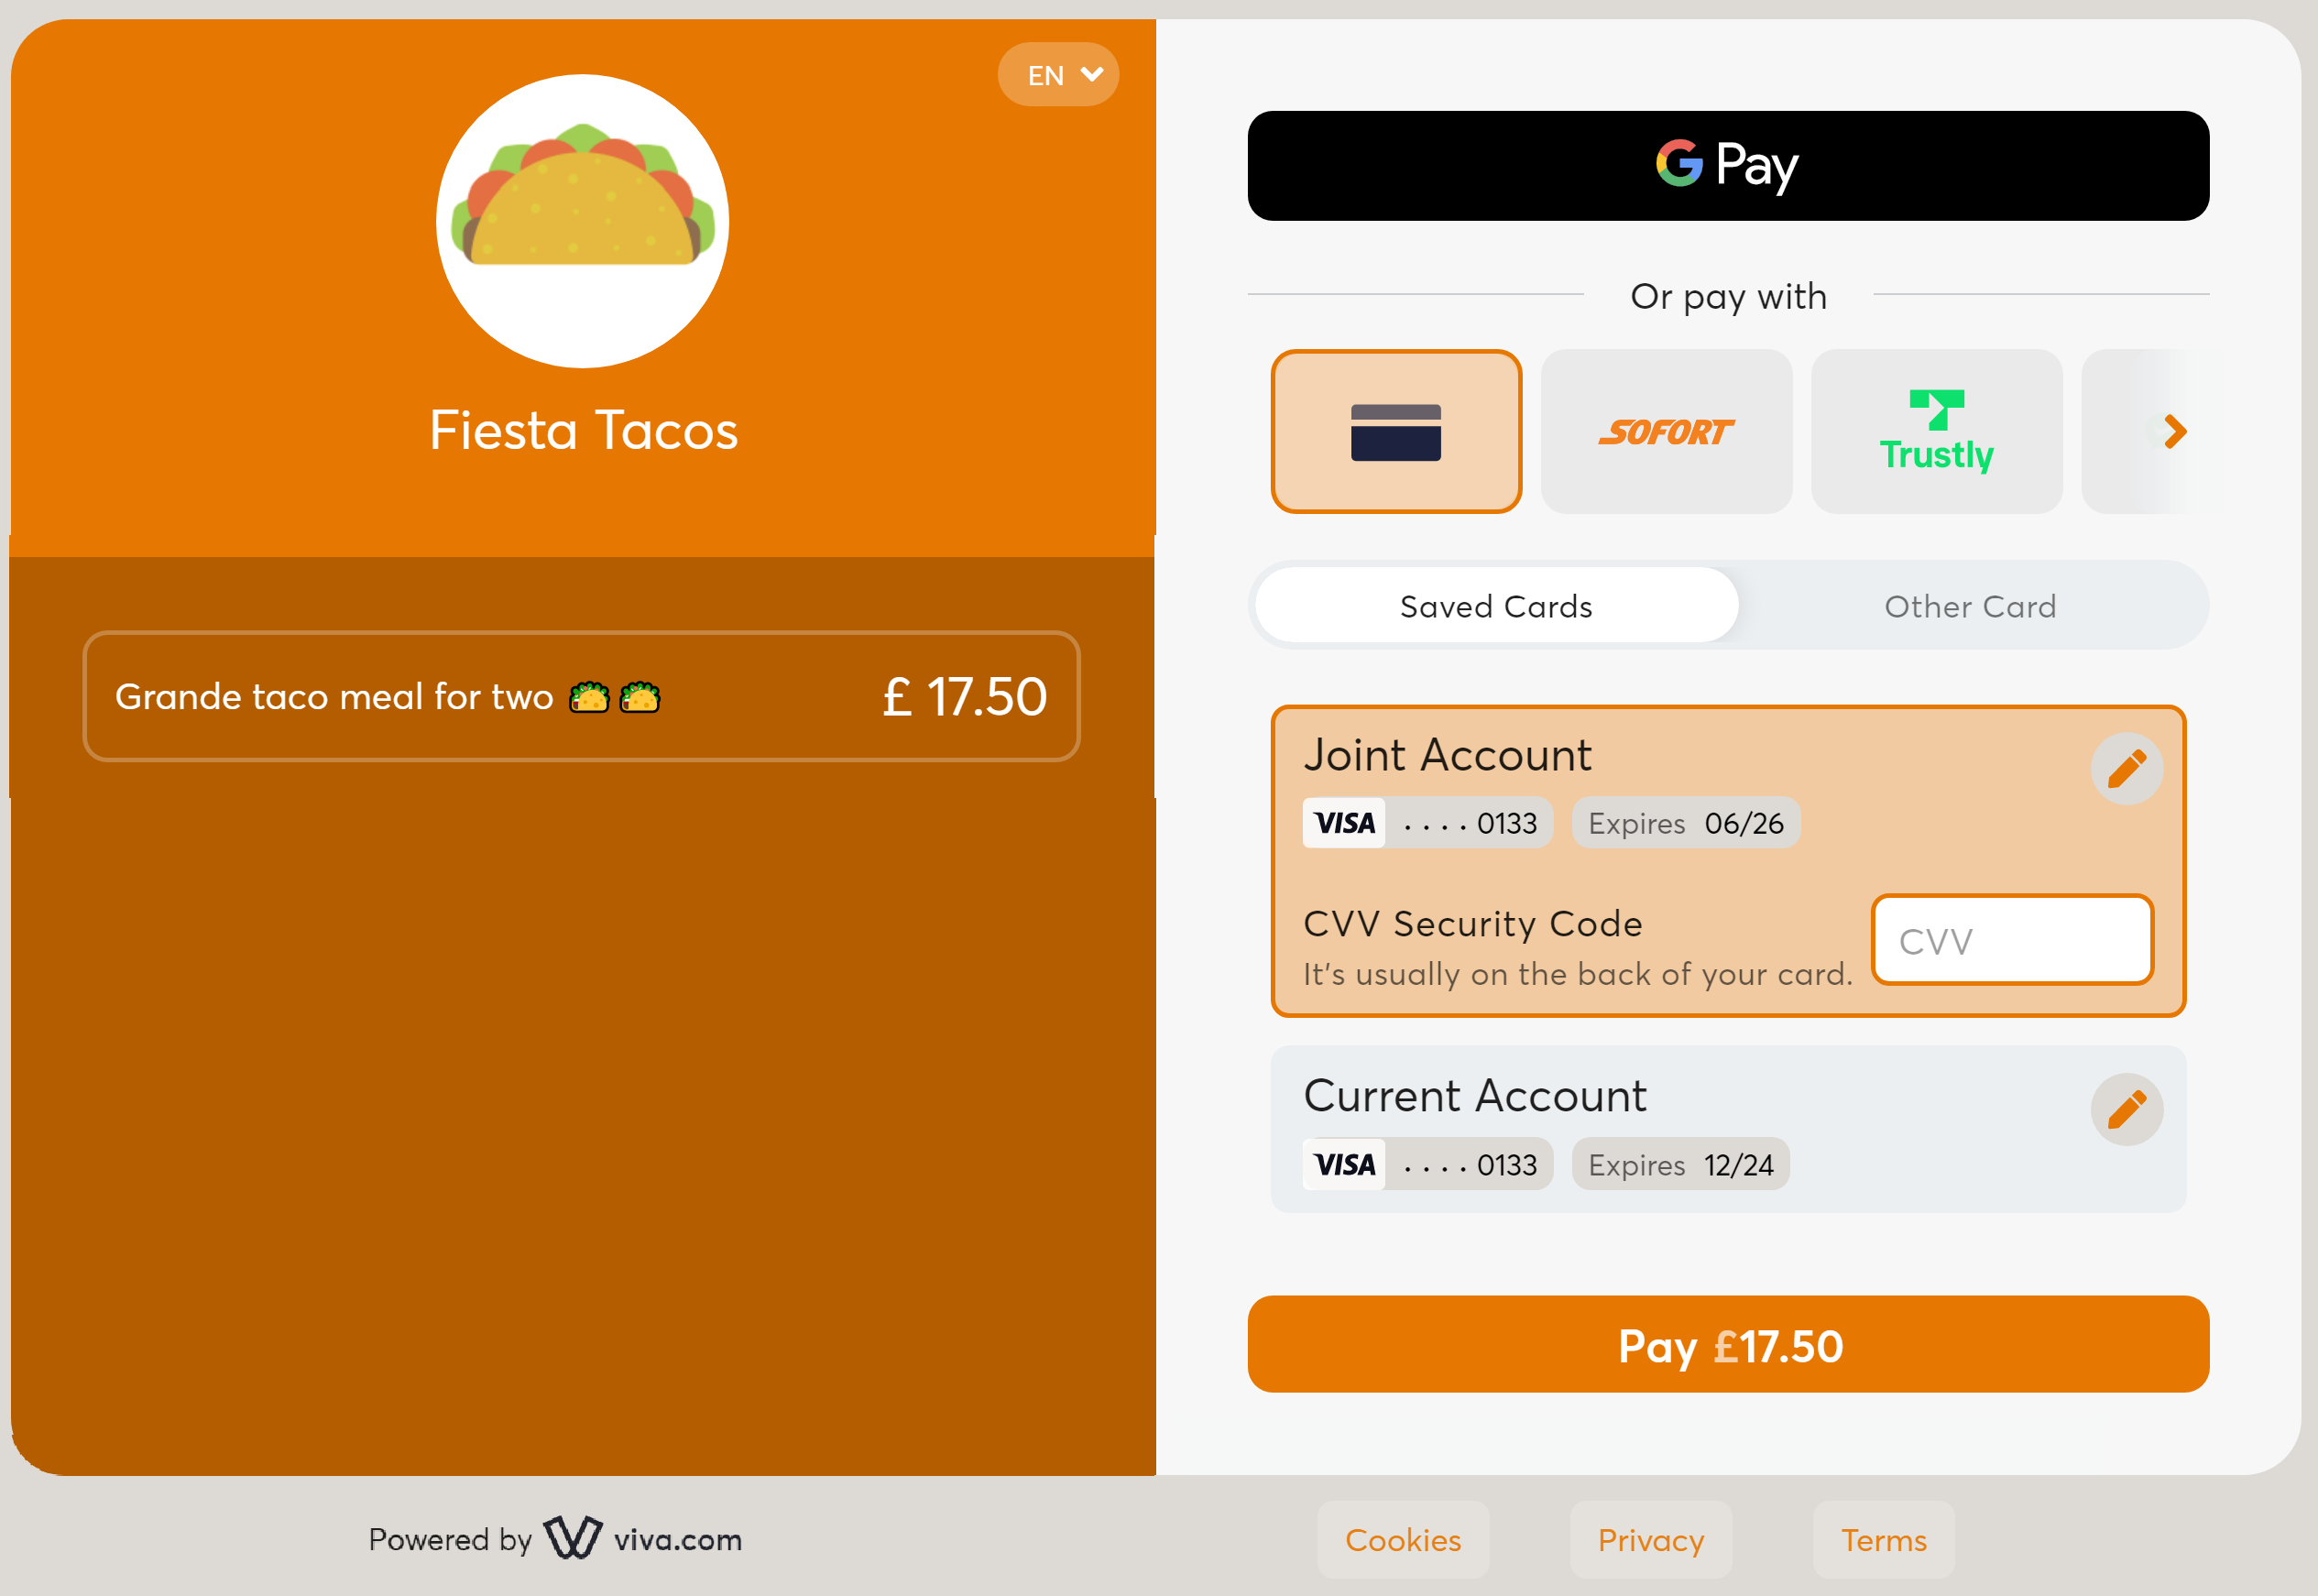
↑ Back to topScreenshots
↑ Back to topThis extension uses our Smart Checkout solution. Customers are redirected from your checkout page on your WooCommerce store to Viva Smart Checkout to pay, and after the customer pays, they are redirected automatically back to your WooCommerce store.
The images below show:
- a demo checkout page on WooCommerce, and
- a Viva Smart Checkout demo:
Video
↑ Back to topThe video below shows the user experience from your checkout page to Viva Smart Checkout.
Supported payment methods
↑ Back to topSmart Checkout supports a wide variety of payment methods, including:
- Cards (Visa, Mastercard, American Express, Maestro, Bancontact, JCB, Discover, Diners Club)
- Digital wallets (Apple Pay, Google Pay, Samsung Pay, PayPal, PayPal Pay Later, Viva Wallet, MobilePay Online)
- Local payment methods (BANCOMAT Pay, Bancontact QR, BitPay, BLIK, EPS, iDEAL, IRIS, Klarna, MULTIBANCO, MB WAY, P24, Payconiq, PayU, Swish, tbi bank, Trustly, WeChat Pay & BlueCode)
- Direct debit and other payment methods (SEPA Direct Debit, Pay By Bank, Cash (Viva Spot), e-banking (ΔΙΑΣ/DIAS))
Please see Viva’s Payment Methods page for further information on all of our payment methods
Cross-border payments: You can accept payments from international customers for all payment methods except for local payment methods and Pay By Bank
Before you begin
Step 1: Create a Viva account
↑ Back to topIf you do not already have an account with Viva please create an account.
- Sandbox/demo account for testing purposes.
- Production/live account for payments in the real world.
Step 2: Find account credentials
↑ Back to top- Log in to Viva (demo or live) and select the required account.
- Go to Settings > API Access and find your WooCommerce Credentials (ClientId and Secret); note these values for future use.
Step 3: Determine your payment methods
↑ Back to topDetermine which payment methods you want to offer to your customers.
Some of these payment methods are automatically activated for you by us (e.g. Apple Pay), other payment methods can only be activated by yourself (e.g. PayPal), for others you need to get in touch with us to activate them for you after a further review of your business.
Setup instructions
↑ Back to topIf you have any other Viva WooCommerce extensions installed on your system, please deactivate them before activating Viva Smart Checkout to ensure smooth functionality.
Installation
↑ Back to topTo start using a product from WooCommerce.com, you can use the “Add to store” functionality on the order confirmation page or the My subscriptions section in your account.
- Navigate to My subscriptions.
- Find the Add to store button next to the product you’re planning to install.
- Follow the instructions on the screen, and the product will be automatically added to your store.
Alternative options and more information at:
Managing WooCommerce.com subscriptions.

Configuring Viva Smart Checkout
↑ Back to top- In your site’s WP Admin dashboard, navigate to WooCommerce > Settings.
- Click on the Payments tab at the top of the page to display the list of available payment methods.
- Find the Viva.com Smart Checkout extension and click on it.
- Ensure that the Viva.com Smart Checkout extension toggle is enabled; click the Finish setup button to configure the Smart Checkout extension’s settings.
- A Viva-specific settings page will be displayed. Please fill out the fields as follows:
- Enable Viva.com Smart Checkout: Check this box to enable the extension.
- Demo mode: When checked, the plugin will connect to the Viva demo environment. In that case, use the credentials from your demo account. When unchecked, use the credentials from your live account.
- Live Client ID: Enter the ClientId within from WooCommerce credentials section. See how to locate your WooCommerce credentials.
- Live Client Secret: Enter the Secret within from the WooCommerce credentials section.
- Preauthorized Payments: Select this option to enable preauthorized payments. When selected, all transactions will initially be created with a preauthorize status. You must capture the payments manually. Please note that you can capture them directly from the order details page within WooCommerce.
- Advance settings: Check the box to access the advanced configuration settings.
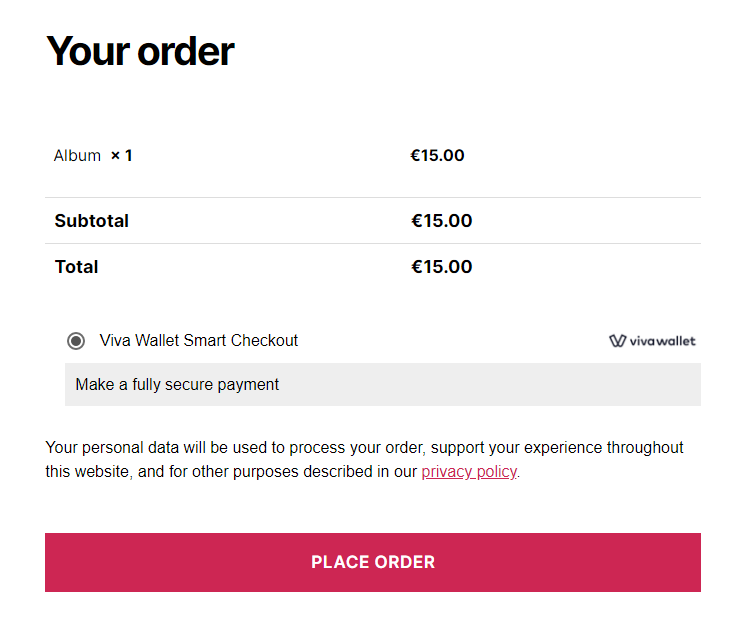
- Title: Enter the title to display to customers on the Checkout screen. For example “Viva Smart Checkout.”
- Description: Enter the description to display to customers on the Checkout screen. For example “Make a fully secure payment.”
- Installments: This is an optional field, only applicable to Greek merchants – you can set the maximum allowed payment card installments and their corresponding order values.
- Live Source Code List: The source code for your plugin will appear here. The plugin will automatically generate the source code.
- Show logo on checkout page: Enable this option to display the Viva.com logo in the Smart Checkout payment methods section.
- Order status: Select the order status in WooCommerce for successful payments. You can choose either “Processing” or “Completed.” Please note that preauthorized payments will remain in “On hold” status until captured. Ensure that preauthorized payments are captured within five (5) days.
- When complete, click on the Save changes button at the bottom of the screen, and the Viva payment option will be available in your checkout
See an example below of how the title and the description are displayed on the checkout page:
Add your brand logo
↑ Back to topOnce you have configured your VIva Smart Checkout extension, it will automatically generate source code for you. You can then locate the source code in your self-care portal and upload your preferred logo.
We would highly recommend you show your company logo on your payment pages to increase customer recognition and trust, thus improving conversion. You can insert your company logo while creating the payment source as outlined above.
You can also change or update this logo at any time. To do this,
- Locate the source code used by your Viva Smart Checkout extension by navigating to its settings page via the Payments tab under WooCommerce settings.
- Log in to Viva Self Care and go to Sales > Online Payments > Website/Apps to locate the source code used by your extension.
- Click on the source code and upload your logo (please do not make any other changes). Once uploaded, accept the terms and save the source code.
For more details about source code configurations, review our tutorial for adding your brand logo.
Updating the extension
↑ Back to topKeeping the extension up to date helps improve user experience with the addition of new features as well as the improvement of existing features.
Update automatically
↑ Back to topThe auto-update feature is one way to update the plugin with no effort required from you. To be able to activate auto-updates,
- Log in to your WP Admin dashboard, navigate to Plugins, and search for Viva Smart Checkout.
- Click Enable auto-updates link to automatically upgrade the plugin in the future.
Update manually
↑ Back to top- To update Viva Smart Checkout, navigate to the Plugins page in WP Admin and search for Viva Smart Checkout.
- If an Update Now link is visible, click it to update your extension.
For developer-level documentation and resources, visit the Viva.com Developer Portal.
