The WooCommerce mobile app is proud to support an early version of our new feature: Point of Sale (POS) mode. POS mode allows you to use a supported tablet like a digital cash register. When using this mode, merchants can add products to the cart with a single tap, and then take in-person payment from customers using a card reader using their existing WooCommerce site.
Requirements
↑ Back to topIn order to use POS mode, the following requirements must be met:
- Your store address must be in the United States or the UK.
- You must be using USD or GBP as the store currency based on a store location in either the United States or the UK.
- You must be using the Woo mobile app version 21.8 or later.
- Tablet device* running iOS 17 or later, or Android 9 or later.
- WooCommerce version 9.6 or later.
- The Point of Sale feature must be enabled. While enabled by default, it can be toggled by visiting Settings > Advanced > Features > Experimental features.
To accept card payments, you can use WooPayments in the UK, and WooPayments or Stripe in United States. You must have a connected Stripe M2 reader (US) or a WisePad 3 reader (UK) to accept card payments.
*Note that for Android devices, “tablet” is determined by the device’s screen being equal to or larger than the minimum supportable size of 674 dp on the short side and 800 dp on the long side.
Feature Overview
↑ Back to topThe WooCommerce Mobile app currently supports an early version of POS mode. While more features and improvements are on the way, we currently support the following:
- Simple physical, Variable and Virtual products.
- Selecting products from a list.
- Collecting payments using cash or a card reader.
- Sending email receipts for successful payments.
Entering POS mode
↑ Back to topAssuming your store, device, and business meet the requirements shown above, you can enter POS using the tab in the app.
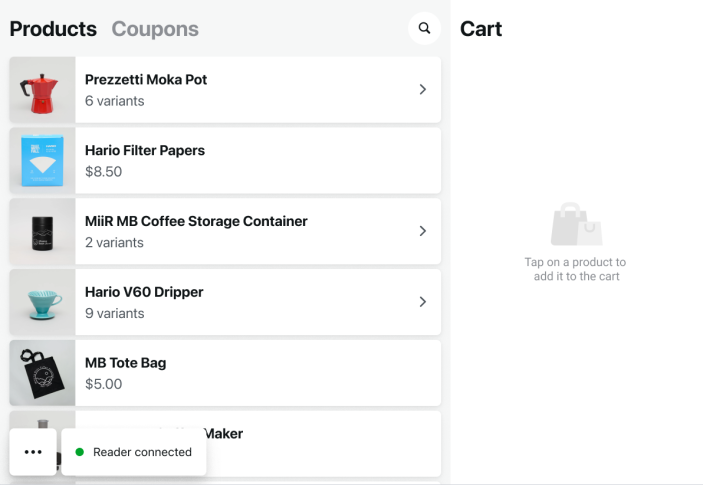
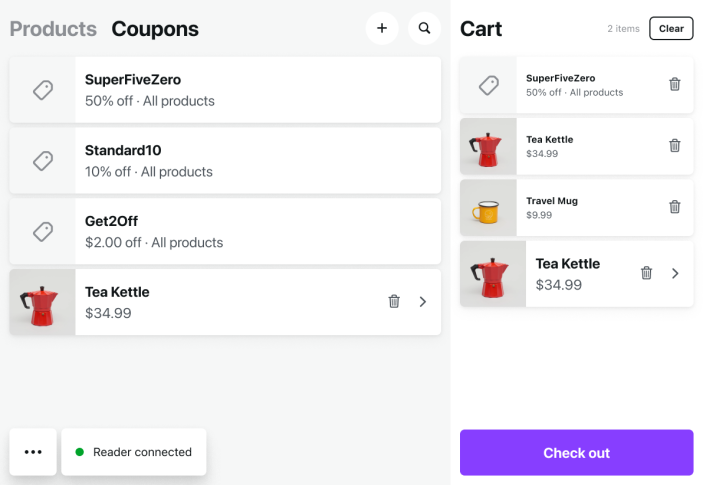
Your products and their prices will be shown on the left, and the cart on the right. The three dots button in the bottom-left allows you to get support or exit POS mode.
The card reader status is also shown. If need be, you can tap the Reader connected button to disconnect it, though of course POS mode will not function if you do.
Working with products
↑ Back to topAs noted above, only simple and variable physical products are available in POS mode at the moment. Other product types will become available in future updates.
To add one of the available products to the current order, simply tap it in the Products column. To add the same product multiple times, tap it multiple times.
To remove a product from the cart, tap the ⓧ icon in the Cart column. To remove all products from the cart, tap the Clear button in the upper right.
Control which products appear in POS
↑ Back to topStarting with WooCommerce 10.5 and Woo Mobile 24.0, you can control which products appear in Point of Sale (POS) mode directly from the wp‑admin.
When editing a product in WooCommerce, go to the Advanced tab and look for the Show in Point of Sale option.
- If this is enabled, the product will appear in POS mode in the mobile app.
- If it’s disabled, the product will be hidden from POS mode but will still be available in your online store.
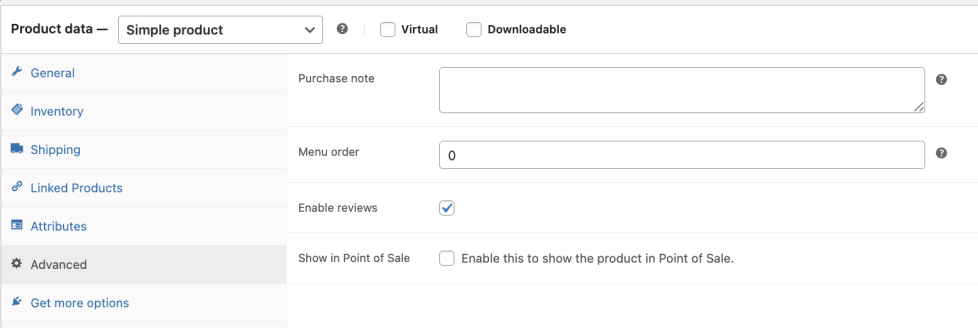
This setting is turned on by default for all eligible products, so you won’t notice any changes unless you manually turn it off.
Any changes to this setting will take effect after the next catalog sync.
See the product editor settings guide for more details: https://woocommerce.com/document/managing-products/product-editor-settings
Search Products
↑ Back to topTo search for a specific product, select the magnifying glass icon in the upper-right corner of the Products view.
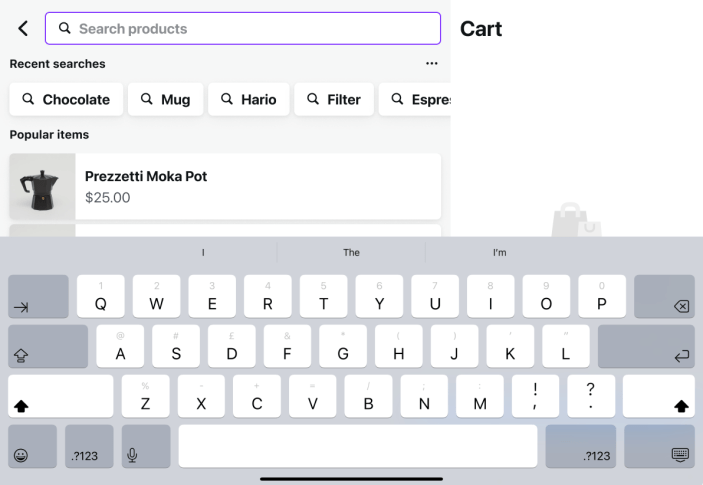
This will open a search box and present your recent searches. Enter your search query to display products that match your search.
To add an item from the search results to the cart, select it from the list. If there are no products matching your search, you will see the error message “No products found.”
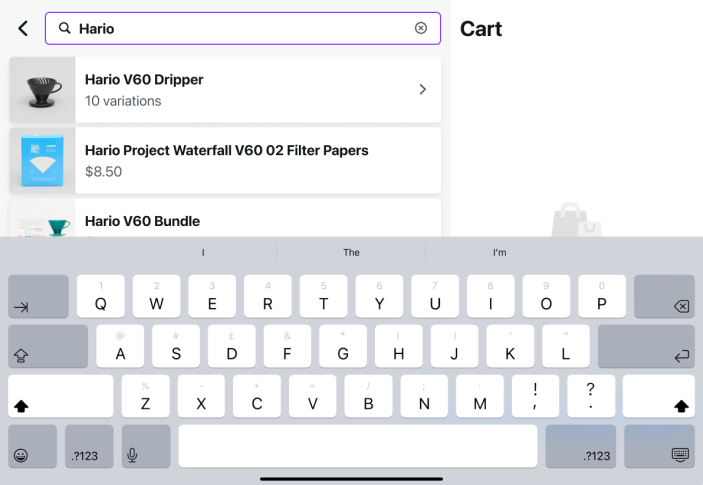
POS search supports flexible matching to help you find products quickly:
- Prefix matching: Type the beginning of a word to find matches. For example,
HoomatchesHoodieandRed hoodie. - Multiple word search: Search for multiple words or prefixes at once. For example,
Bl hoomatchesBlue hoodie. - Order-independent matching: Words can be entered in any order. For example,
Blue hoodmatchesHoodie - blue. - Variation search: Individual product variations now appear directly in search results, in addition to parent products.
If you see the error message “Unable to load products,” please check your device’s connection and try again. If you continue to see this error, you can reach out to support by visiting Settings > Help & Support > Contact us directly from the app.
Working with Coupons
↑ Back to topTo create, manage, or add a coupon, select the Coupon button in the top left of your screen.

To add one of the available coupons to the current cart, tap it in the Coupon column. You can add multiple coupons.
Create a Coupon
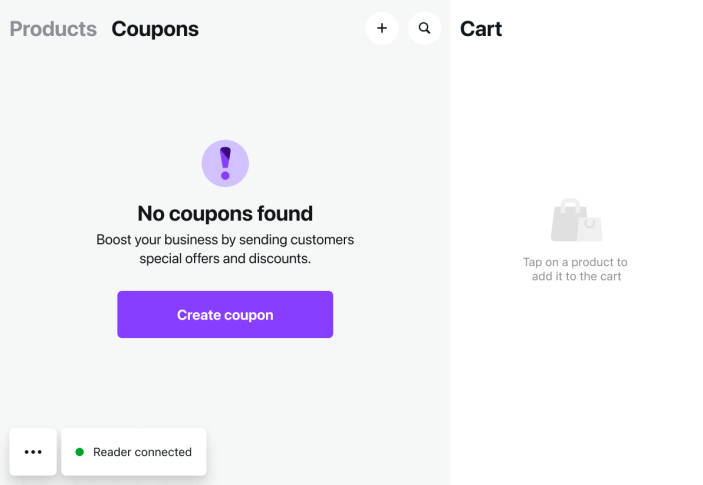
↑ Back to topIf there are no coupons available, you will see the “No coupons found” error message. To create a new Coupon, select “Create Coupon” or select the “Plus” button in the upper-right corner of the Coupon view.
Follow the on-screen prompts to create a new coupon. To learn more about coupons in WooCommerce, please see our help guide here.
Validating your Coupons
↑ Back to topAfter coupons are added to the cart, they will need to be validated before you can check out. Select “Check Out” to begin the checkout process and validate your coupons. This process checks if the coupons can be used with the current products in the cart, and what the discount and transaction total are.
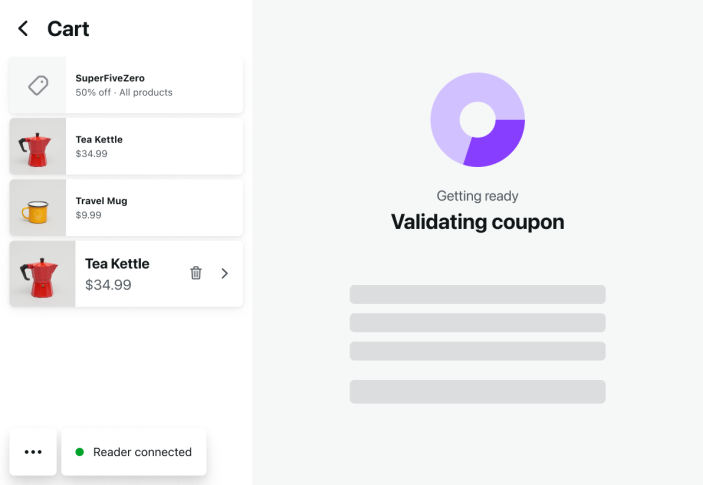
Once your added Coupons have been validated, you will be able to proceed with the checkout, or presented with an error message indicating why the Coupon could not be applied to the cart.
Checking out
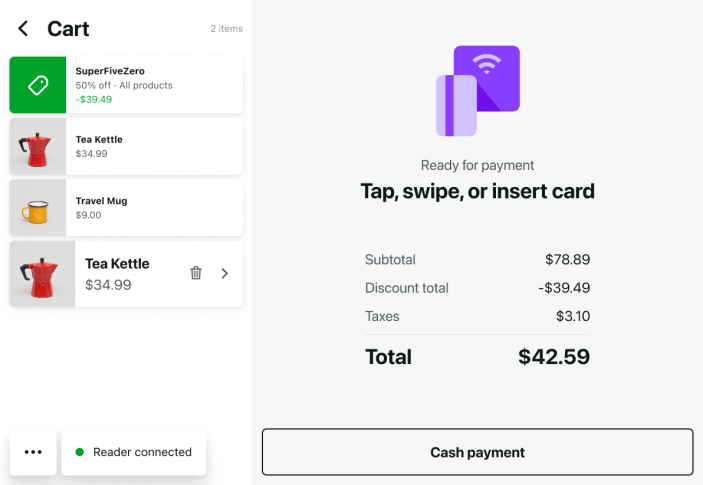
↑ Back to topWhen the order is ready to be paid for, tap the Check out button to proceed. POS mode will calculate the subtotal, taxes, and total price for the order. You can check out using a card reader which will begin connecting, or select Cash payment.

Check out with Card Reader
↑ Back to topTo check out with a compatible Card reader, connect the card reader to your device.

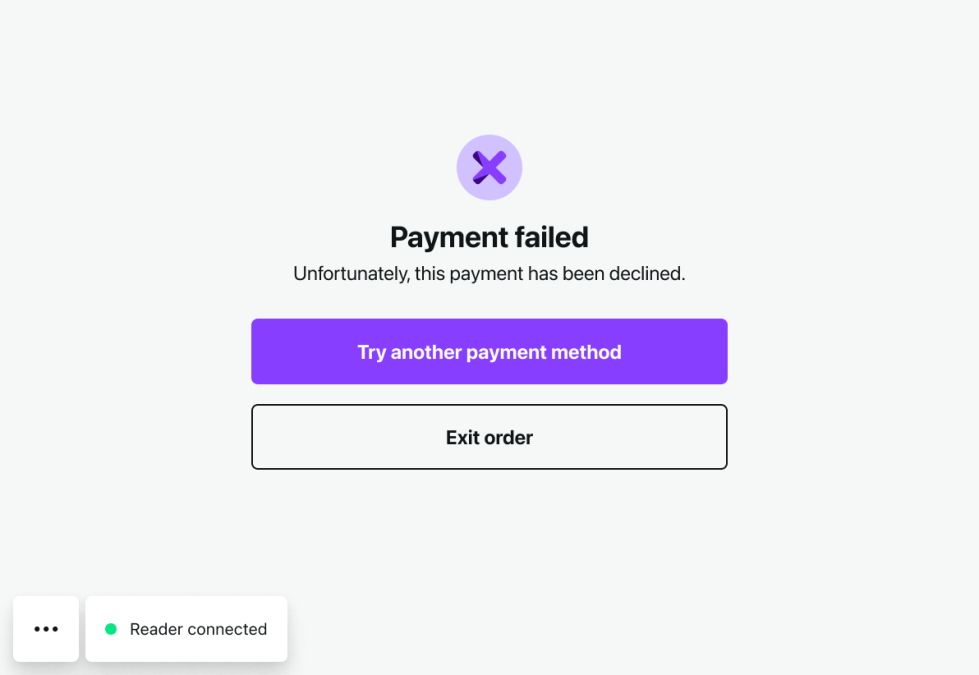
Once the reader is ready, the customer can tap, swipe, or insert their card to pay for their order. If successful, the following screen will be shown:

If payment fails for some reason, POS mode will show a button you can tap to have the customer try a different payment method.
Check out with Cash payment
↑ Back to topAfter selecting Cash Payment, you will be prompted to input the amount of cash received. If the cash amount is larger than the amount owed, Woo Mobile will show you the change due for the transaction.

Once your cash transaction has completed, select Mark payment as complete. The following screen will then be shown:
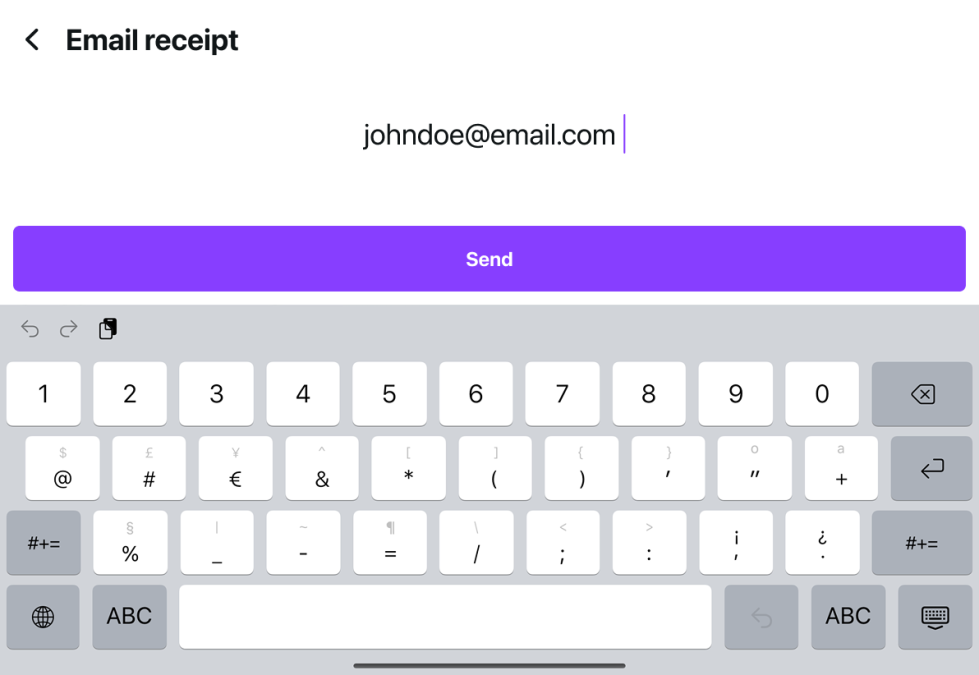
Email Receipt
↑ Back to topAfter a successful transaction you can email a receipt to your customer by selecting Email receipt. The app will prompt you for your customers email address, and will send the receipt when you select Send.
Barcode Scanning
↑ Back to topThe WooCommerce Mobile app supports barcode scanning when using the Point of Sale (POS) mode. Barcode scanning allows you to connect a supported external barcode scanner to scan products supported barcodes and automatically add the product to the Cart when in POS mode.
For more information on barcode scanning please see our dedicated help guide here.
POS Order History
↑ Back to topThe Point of Sale Order screen allows you to access your historical POS orders directly, and provides helpful order details and management functionality.

To open POS Orders:
- When in Point Of Sale mode, select the Menu (three dots) in the lower left-hand corner of the screen.
- Select Orders.

From the orders screen, you will see your history of orders made in POS mode on the left-hand side. You can also search for orders using any of the order details by selecting the Search icon to the right of the Orders heading.
Select an order to open it and view that order’s details. For completed orders, you can select Send Email Receipt to send a receipt for the selected order to an email address.
To issue a refund for a purchase directly from the Orders screen, you can select the Issue refund button in the upper right-hand corner. This option is only available for eligible orders with supported orders and payment gateways.
POS Settings
↑ Back to topThe Settings menu in POS mode provides store information, hardware connection management, and support in one location.

To open POS Settings:
- When in Point Of Sale mode, select the Menu (three dots) in the lower left-hand corner of the screen.
- Select Settings.
The Settings menu consists of multiple sections as outlined below.
Store
↑ Back to topThe Store section provides important store information such as your stores name, and receipt information.
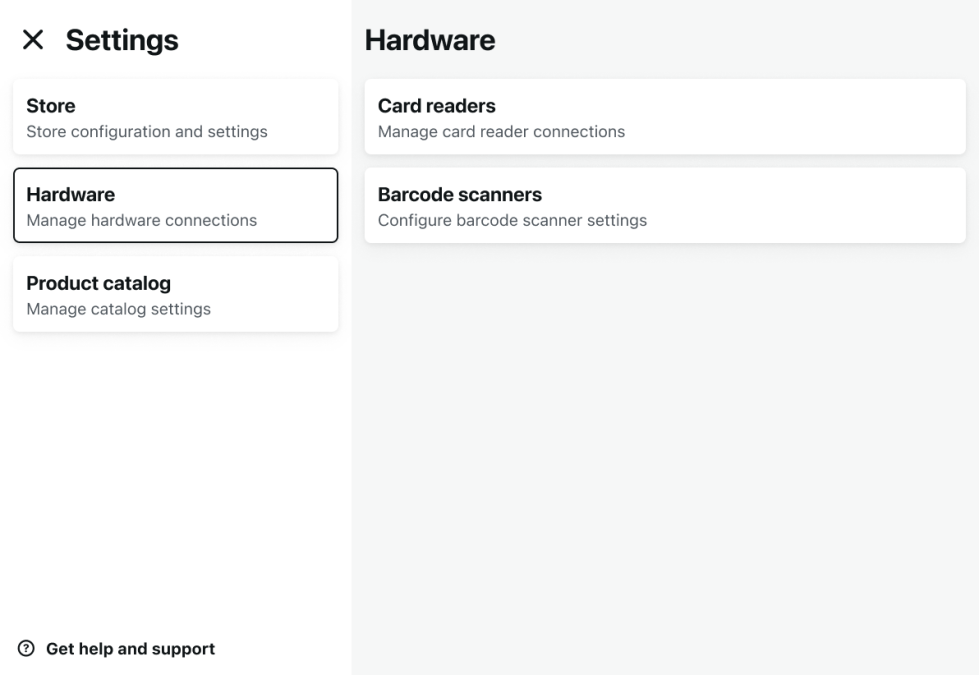
Hardware
↑ Back to topThe Hardware section provides the setup and management settings for external hardware. You can find additional information for setting up and managing hardware on these dedicated support pages:
Product Catalog
↑ Back to topNote: Local product catalog support is currently limited to WooCommerce stores with fewer than 1,000 products. If your store has more products than this, you can still use POS mode, but it will not use the local product catalog.
In order to support blazing fast speeds in POS Mode, the Woo Mobile app will download your site’s entire catalog. This helps power basic catalog browsing and cart creation so you don’t need to wait for loading spinners. POS Mode will always fetch current data from your site during checkout.
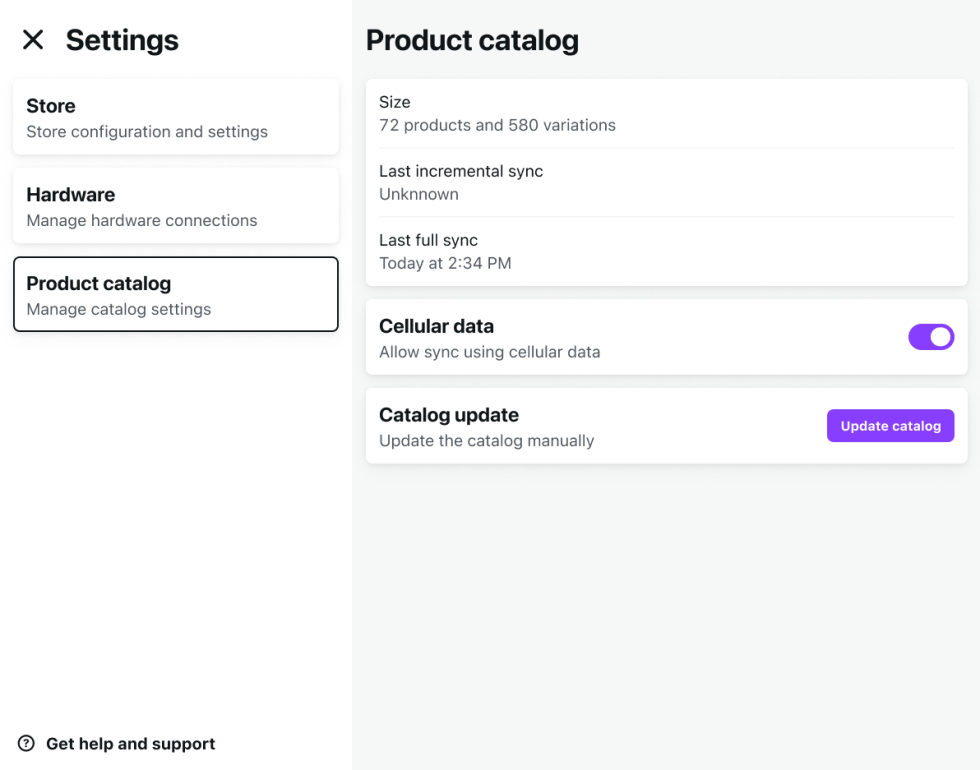
The product catalog settings menu provides information on the current database download stored on your device. Size refers to the number of products and variations currently in the local catalog. Last incremental sync refers to the last partial catalog update to download changes and new products. Last sync refers to the last time the catalog was fully synced with your WooCommerce site. You can force a full sync with a catalog update.
To manually update your catalog through a full sync with your website, select Update catalog while connected to wifi or over cellular on compatible devices with cellular data enabled.
Enable catalog updates using cellular data on supported devices by toggling Cellular data on. Please note that carrier data rates may apply.
Get Help and Support
↑ Back to topThe Help section offers a quick resource for support with POS mode including documentation and a contact form to reach out to our support team.
Where are my products?
Outlines current product limitations for POS Mode, and offers work-arounds and checkout options.
Documentation
Quickly access product documentation for POS mode.
Get Support
Quickly access product support for the Woo Mobile app, and POS mode specifically.
Exiting POS mode
↑ Back to topYou can exit POS mode from main POS screen by following:

- When in Point Of Sale mode, select the Menu (three dots) in the lower left-hand corner of the screen.
- Select Exit POS.
Testing POS mode
↑ Back to topDue to the Stripe integration method that WooPayments uses, the POS mode cannot be tested while WooPayments is in test mode. This is similar to in-person payments using mobile phones.
To test POS mode, we suggest temporarily creating a $1 product and using POS mode to purchase it with a real card. It’s best to use a card that’s not connected to anyone whose information is on file for the WooPayments account used on the store, as such transactions may be flagged by Stripe as potentially fraudulent.
POS Survey
↑ Back to topYou may see a notification requesting your input regarding POS mode in the Woo Mobile app. We are always working to improve your experience using Woo Mobile and POS mode specifically. To better understand how to support you and your business, we may send a notification with a survey request. If you don’t see the survey notification but still wish to provide feedback, you can do so at any time by contacting support throught the following steps:
- While in POS mode, select the menu (three dots) in the bottom left-hand corner.
- Select Settings > Get help and support
- Select Get Support and follow the on-screen prompts to provide your feedback directly.