Requirements
↑ Back to top- PHP 7.1.8
- WordPress’s minimum version must be 5.3.
Configuration
↑ Back to topTo configure WSDesk – WordPress Helpdesk plugin settings, navigate to WSDesk > Settings in the WordPress admin panel. The following settings are available: The plugin requires you to create three pages by placing the appropriate shortcodes. These pages are essential for end customers to submit, reply, and check their ticket status. Details of these shortcodes/pages are given in the Support Forms section below.
General Settings contains Basic and Advanced Settings.
General Settings
↑ Back to topBasic Settings
The plugin’s Basic Settings section includes the following options:
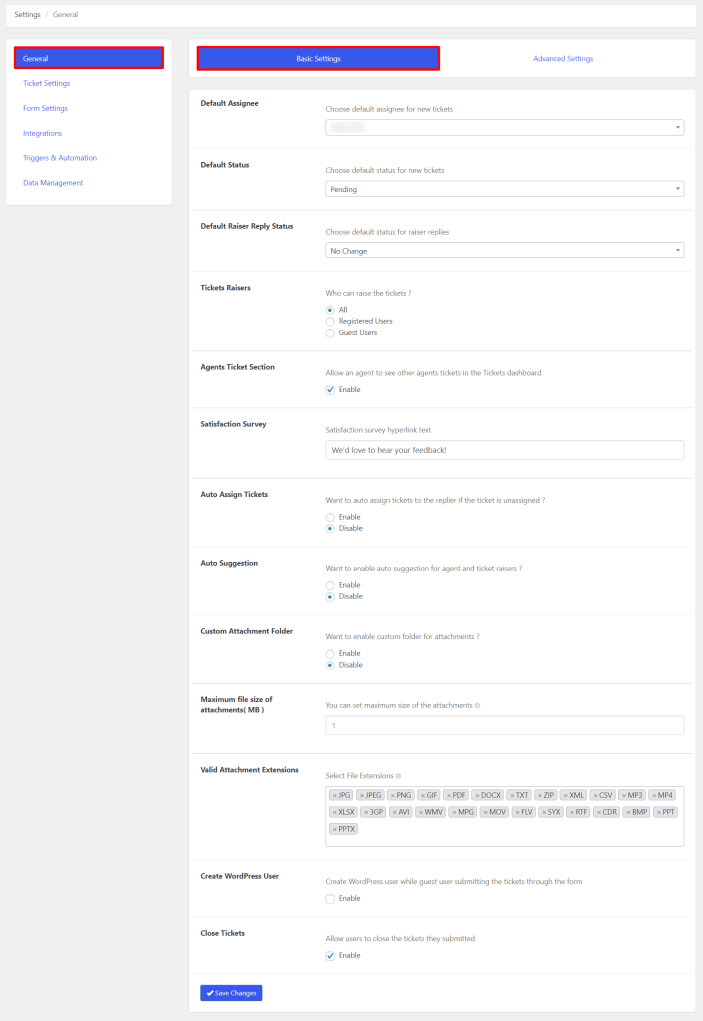
Default Assignee: This option allows you to designate a default assignee for the tickets. Ticket tags can be used to assign the tickets to agents, or you can use the No Assignee option to avoid designating a default assignee. All of the agent profiles created in WSDesk are included in the list of available options.
Default Status: When a new ticket is raised, you can choose a default status to be applied. Both user-created statuses and all default statuses are available in the selection list. In the Ticket Status section, you can add custom statuses.
Default Raiser Reply Status: Choose the default status that will be applied to responses from the person who raised the ticket. There are several statuses to choose from, including “Pending,” “Unsolved,” “Solved,” and “No Change.” Unless the status is manually changed, the default setting will be applied to any new replies that are sent.
Ticket Raisers: This allows you to choose which users are permitted to raise tickets. Options include:
- All – Enables the raising of tickets by both registered users and unregistered users.
- Registered Users – Only WSDesk registered users are permitted to raise tickets.
- Guest Users – Only Guest users are permitted to raise tickets.
Agents Ticket Section: Enable this feature to allow an agent to view other agents’ tickets in the Ticket dashboard.
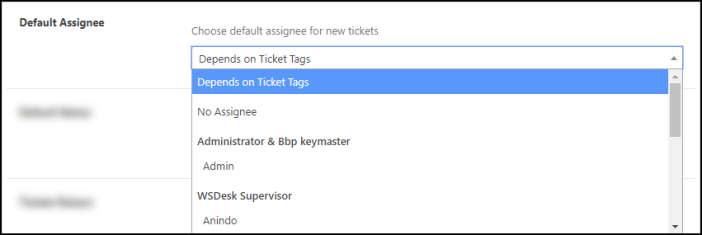
Satisfaction Survey: Include customized hypertext that will appear on emails sent to customers and direct them to your website so they can leave feedback.

In the email sent to the consumers, this hypertext will appear as follows:
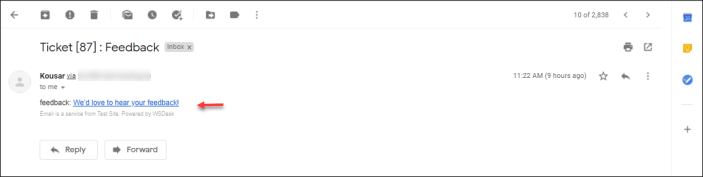
When they click the link, they will be routed to a page where they can leave feedback.
Auto Assign Tickets: If the ticket is unassigned, enabling this setting will automatically assign it to the agent.
Auto Suggestion: You can enable the automatic suggestion option for ticket raisers and agents. Based on the article’s title, content, and tags, the auto-suggestion feature suggests articles to both customers and support agents.
For Customers – Customers can read recommended articles in the support form’s subject field when the auto-suggestion option is turned on and they begin typing. Instead of raising a ticket, customers can choose to read articles about their concerns. This will greatly lower the number of tickets and make your job much simpler.
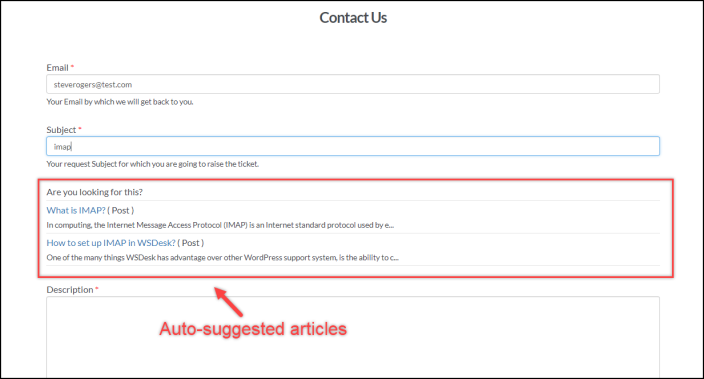
For Agents – Agents need to provide a consistent answer if a problem is raised frequently by several customers. As a result, in such a scenario, a blog post with the right tags can be published, and agents can see the auto-suggested article(s) when responding to tickets. Support agents can send links to articles that address customer concerns quickly and efficiently. You can also suggest products from your WooCommerce store.

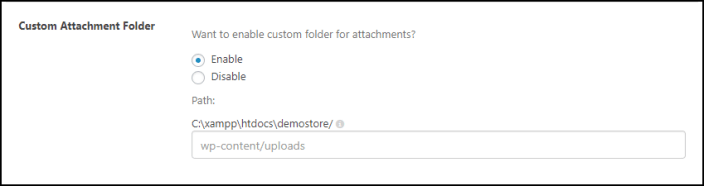
Custom Attachment Folder: Enabling this feature allows you to specify a custom destination folder for all received attachments. The wp-content/uploads folder on your server is the default location for the attachments.
Maximum file size of attachments (MB): The maximum file uploading size should be specified in megabytes. Decimal values should be avoided. 1MB is the default setting.
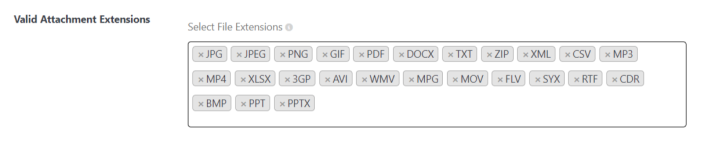
Valid Attachment Extensions: Choose the necessary attachment extensions that you want to enable from the drop-down list. JPG, JPEG, PNG, GIF, PDF, DOCX, TXT, ZIP, XML, CSV, MP3, MP4, XLSX, 3GP, AVI, WMV, MPG, MOV, FLV, SYX, RTF, CDR, BMP, PPT, and PPTX are among the supported file types. In the absence of any selection, all file extensions will be supported.
Create WordPress User: Activate this setting to direct your non-logged-in users to register for a WordPress account when they raise a ticket. This is an effective method of getting your website’s visitor users to register for an account.
Close Tickets: This option enables customers to close open support tickets directly from the front end of your store. By selecting the tickets they want to close and clicking the Close Ticket(s) button, users can close tickets when this option is enabled.

Once you’ve made your selections, select Save Changes and move on to the Advanced Settings tab.
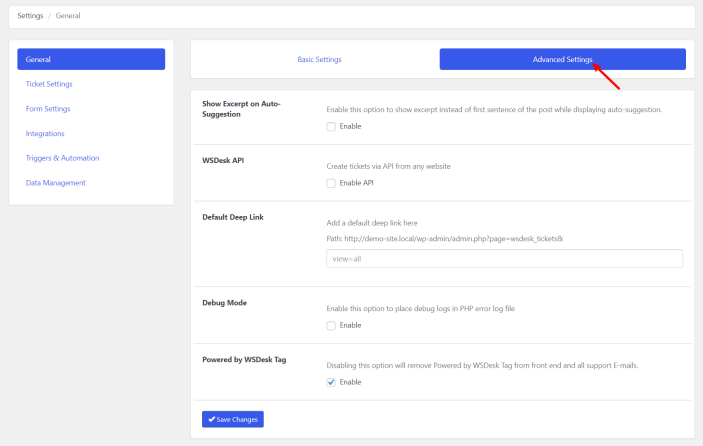
Advanced Settings
The plugin’s Advanced Settings are as follows:
Show Excerpt on Auto-Suggestion: Enable this setting to display customized text in the auto-suggestion results rather than the first sentence of the article.
WSDesk API: You can create WSDesk tickets using any website using the WSDesk API option. A custom API key will be displayed after this option is enabled, and you will need to add it to your website’s API integration section.
Default Deep Link: You can use this function to choose a default view for your primary ticket dashboard. You may display all of the tickets created by your users on the main tickets dashboard, as you are aware, and you can modify it based on the various attributes you want. By including their corresponding deep links, WSDesk makes it easy for you to set any of these attribute values as the default display on your main tickets dashboard.
You can just enter the deep link of the ticket view labeled “Unsolved” in the field to make it the default view, for instance, “https://yoursiteurl.com/wp-admin/admin.php?page=wsdesk tickets&view=label LL01”. Now, the unsolved tickets will always be displayed by default when you or one of your support agents log in to the main tickets dashboard. This enables you to set any view as the default by using its deep link.
Additionally, you can make a ticket view by ordering the tickets according to the dates of their updates (ascending or descending). To accomplish this, you can add the two endpoints (&order=DESC; &order=ASC) to the URL of your main ticket page.
For instance, you can include the deep link https://yoursiteurl.com/wp-admin/admin.php?page=wsdesk tickets&order=DESC if you want to show your most recently updated tickets at the top. The order can also be reversed by adding &order=ASC.
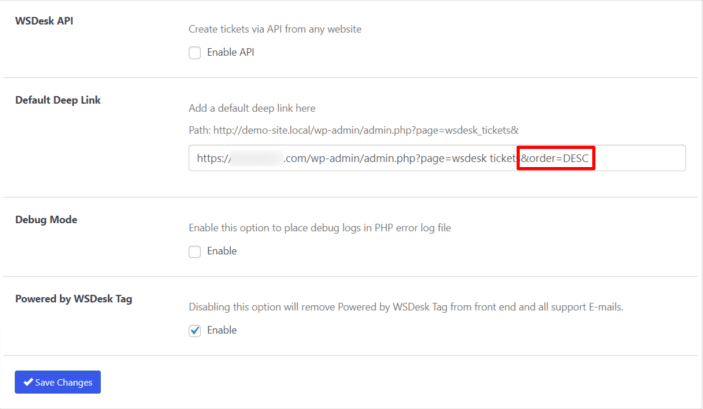
Include the deep link for the view you want to use as the default.
Debug mode: When enabled, the PHP error log file will contain emails and database collation logs.
Powered by WSDesk Tag: If this option is disabled, all support emails and the front end will no longer display the “Powered by WSDesk” tag.
Click Save Changes after making your selections.
Ticket Settings
↑ Back to topAll configuration-related settings for tickets are found in the ticket settings.The five tabs are as follows:
- Ticket Fields
- Ticket Status
- Ticket Tags
- Ticket Views
- Ticket Page
Let’s take a closer look at each tab.
Ticket Fields
On the support form that is visible on the front end of your website, your customer will have the option to submit a ticket. You can add or modify input fields on a support form by using the ticket fields section’s instructions. Textbox, password, selection list, radio button, checkbox, number, email, date, text area, multiple attachments, IP address, and Google reCAPTCHA are examples of input fields. We advise using version 2, even though the plugin is compatible with both versions 2 and 3 of Google reCAPTCHA.
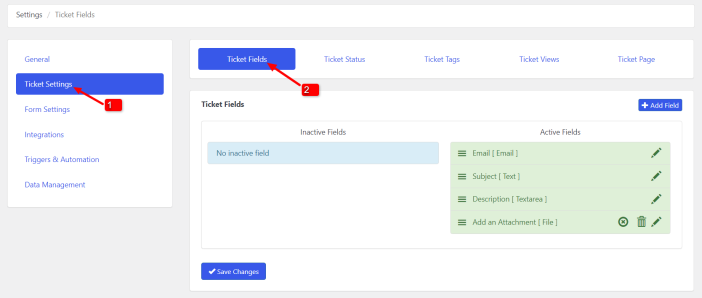
The Ticket Fields can be added, changed, removed, and configured.
Adding a Ticket Field: The Add Field button is located in the dashboard’s upper right corner. Click it to add a ticket field.
Selecting the desired input field will then provide further settings for that particular field.
The options for the Selection input field are shown in the screenshot below.
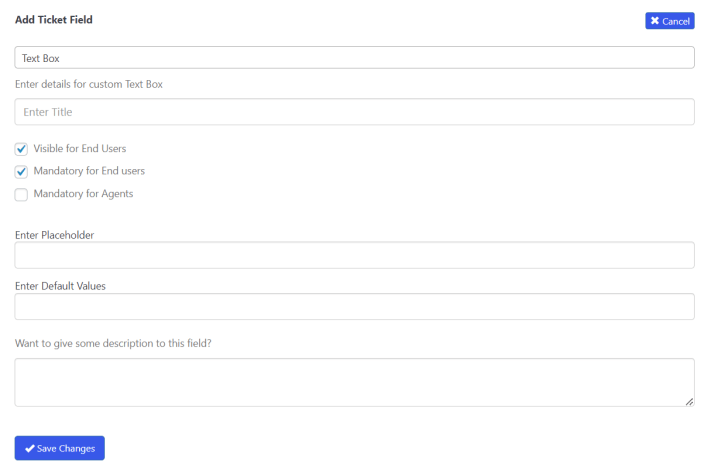
In the text box displayed, enter a custom field title. You can choose the desired limitations for users and agents, as well as the visibility level. Additional information should be entered, such as field values, placeholder text, and field descriptions.
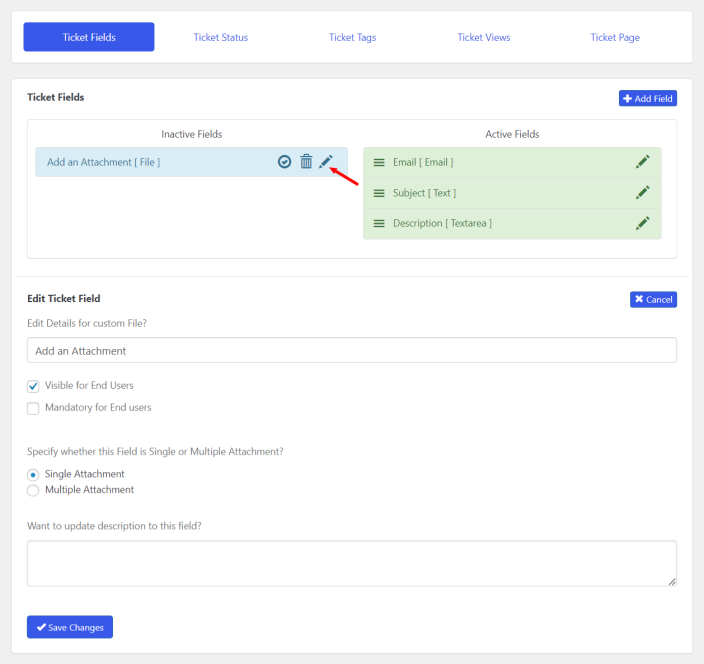
Editing a Ticket Field: To amend or update a ticket field, click on its edit icon. Both default and custom ticket fields are editable.
Below is a screenshot of an editable sample ticket field.
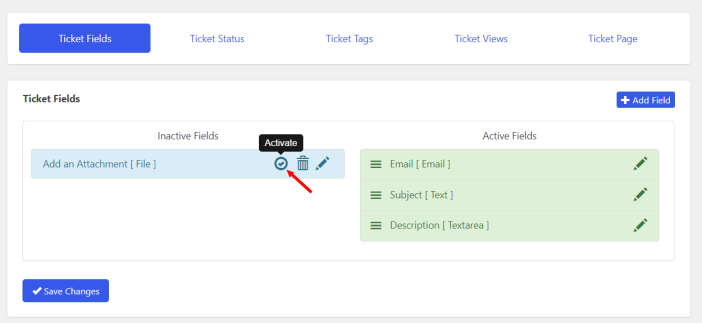
Activating a Ticket Field: All newly created ticket fields are initially displayed in the Inactive Fields column. A ticket field can be enabled by clicking the activate icon button as seen in the screenshot below. The hamburger icon located in the ticket field allows you to rearrange the ticket fields. The fields for tickets will show up on the support form according to this layout.
Deleting a Ticket Field: A ticket field can be deleted by clicking the delete icon next to the desired ticket field.
Note: Only the user-created ticket field(s) can be deleted, not the default ones.
Ticket Status
A ticket’s status is indicated by its Ticket Status. An agent can track the progress of a ticket using these statuses. Each ticket status is identified by a distinct color.
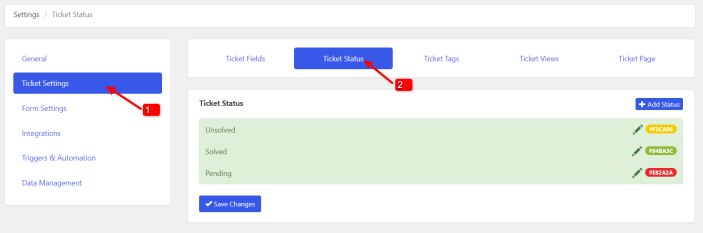
You can add, edit, remove, and customize a ticket status in this section.
You can configure using the following settings:
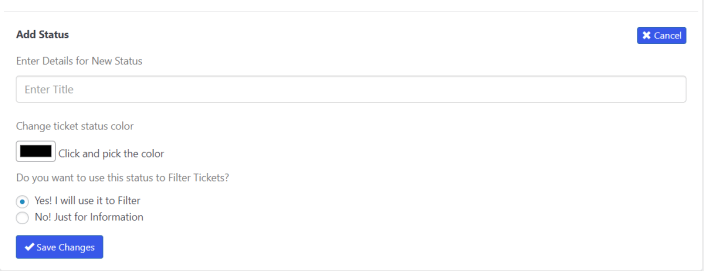
Adding a Ticket Status: To add a custom ticket status of your preference, click Add Status.
After that, choose a distinguishing color to indicate the ticket status, give the desired status title, and decide whether to filter tickets based on their status.
Editing & Deleting a Ticket Status: To edit or delete a ticket status, click on the respective button. Keep in mind that only the user-created ticket status can be removed.
Ticket Tags
Tickets, products, posts, and can all be filtered using ticket tags. The tickets may be filtered using these tags before being assigned to individual agents.
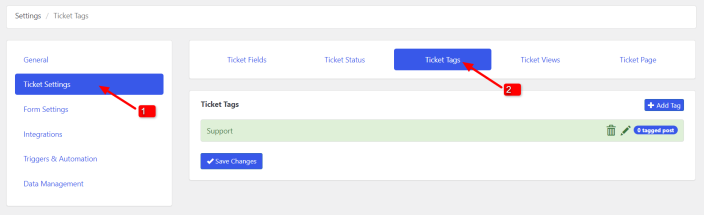
Regarding tags for a product, you can add, edit, remove, and configure them.
Here are the settings that are available:
Adding a Ticket Tag: To add a new ticket tag, click the Add Tag button in the dashboard’s upper right corner.
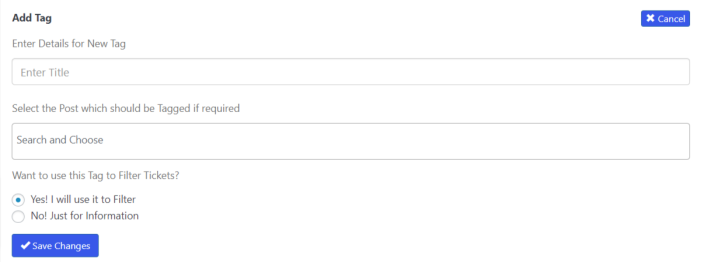
Enter a suitable title, then choose the product or related articles. As was previously mentioned, you have the choice to filter tickets using the recently created ticket tag.
Once all preferences have been configured, click Save Changes.
Changing or Removing a Ticket Tag: To update or delete a ticket tag, click on the respective icon.
Ticket Views
In the Tickets dashboard, tickets are organized into categories using ticket views that resemble menus.
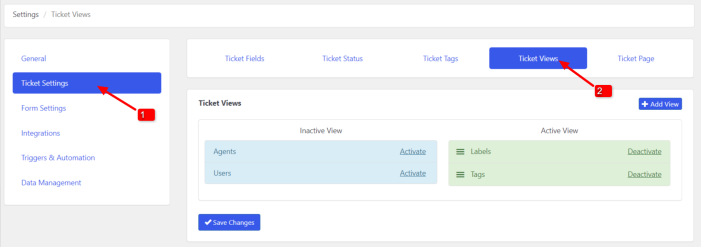
You can create, edit, remove, and customize ticket views in this section.
Adding a Custom Ticket View: To add a custom ticket view, click Add View.
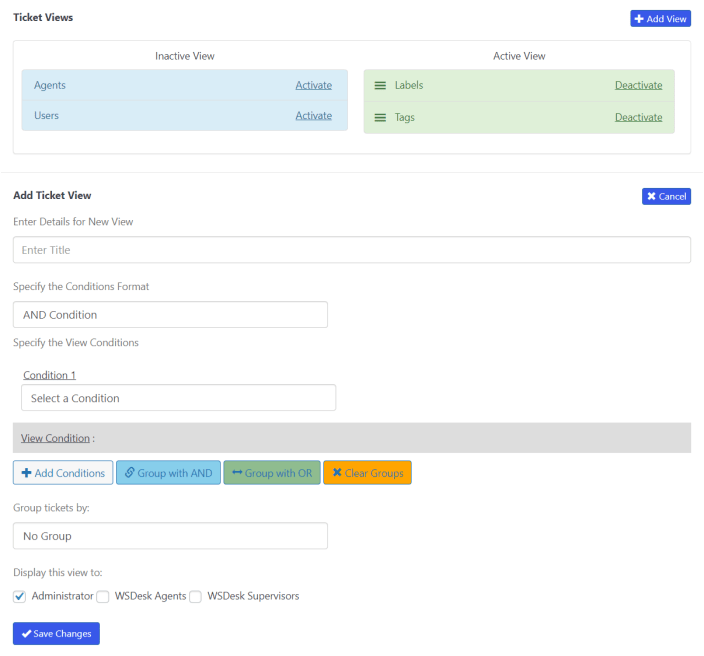
You can customize the following options when adding a new ticket view:
Title – Provide the Ticket View with a suitable title.
Specify the Conditions Format – There are two options for configuring the conditions format between AND and OR.
Select a Condition – You can choose a condition from the list of options.
Multiple condition addition and grouping – To add several conditions, click Add Conditions. The following conditions, including Ticket Status, Ticket Assignee, Ticket Tags, Email, Subject, and Request Type, can be grouped with the newly generated condition.
View Display – You can specify which user types will be able to view the newly created Ticket View using this setting. WSDesk Agents, WSDesk Supervisor, or Administrator are your options.
A ticket can be edited or deleted by clicking the respective icon.
Ticket Page
The columns on the Tickets dashboard are affected by the settings entered on this page. The default fields can be enabled or disabled, and you can also add custom ticket fields from the dashboard for ticket fields.
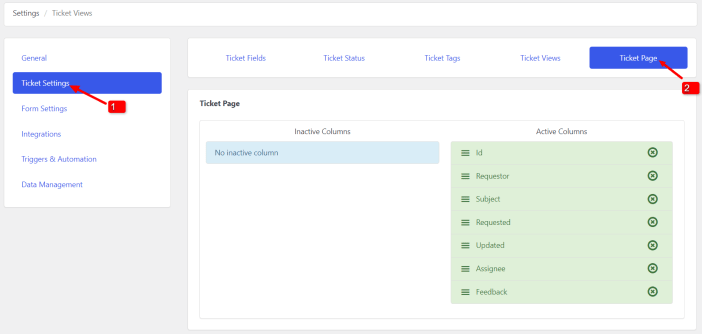
“Test” is a ticket field that was created in the Ticket Fields dashboard and is seen in the screenshot above. While ID, Requestor, Subject, Requested, Assignee, and Feedback are the default columns that can be enabled or disabled at any moment. By selecting the right checkbox next to a field in the Inactive column, you can enable a column. To turn them off, click the cancel icon next to the relevant field in the Active column.
Form Settings
↑ Back to topThis section helps you customize the support form’s display options.
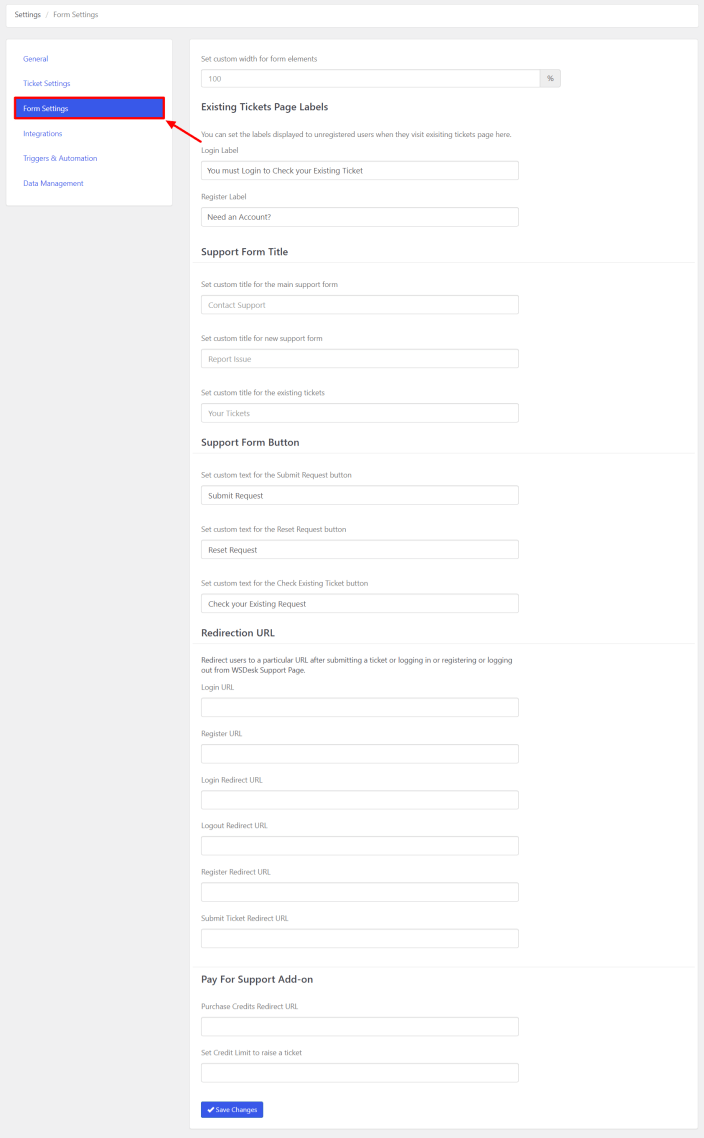
The size of the input fields can be customized, and you can also give the form buttons and support forms unique titles. The settings include the following:
Form width: This feature enables you to change the support form’s input fields’ width. The width size can be set in this field using percentage values.
Existing Tickets Page Labels
You may customize the labels that are shown to guests who visit the existing tickets page by making a few changes.
Support Form Title
The title of the support form can be customized.
- Main Support Form Title: This setting helps in creating a unique title for your main support form.
- New Support Form Title: This option allows you to give your support form a unique title.
- Existing Support Form Title: This enables you to set a unique title for the existing tickets form.
Support Form Button
Here, the Submit, Reset, and Existing Ticket buttons can be customized.
- Submit Request Button Text: Customize the text displayed on the Submit button.
- Reset Request Button Text: Customize the text displayed on the Reset button.
- Existing Ticket Button Text: Customize the text displayed on the Existing Ticket button.
Redirect URLs
When users take particular actions on the WSDesk Support Page, you will be able to redirect them to particular URLs.For each of the actions listed below, enter a URL to redirect to.
- Login URL: When a customer tries to raise a ticket by clicking the “Login” button, provide a link to a customized login page for them.
- Register URL: When visitors attempt to raise a ticket by clicking the “Register” button, add a link to a customized registration page for them.
- Login Redirect URL: Include a link that will redirect customers to a custom page when they login to raise a ticket.
- Logout Redirect URL: When logging out of WSDesk, customers can be led to a specific website, which you may add as the logout redirect URL.
- Register Redirect URL: If you want to redirect guest users to a specific page after they register for an account, add a custom link to that page.
- Submit Ticket Redirect URL: Add a custom link to the page that consumers should be led to after submitting a ticket in order to receive the submit ticket redirect URL.
Please keep in mind that the redirect only works when these actions are performed on the WSDesk support page.
Integrations
↑ Back to topWooCommerce Integration
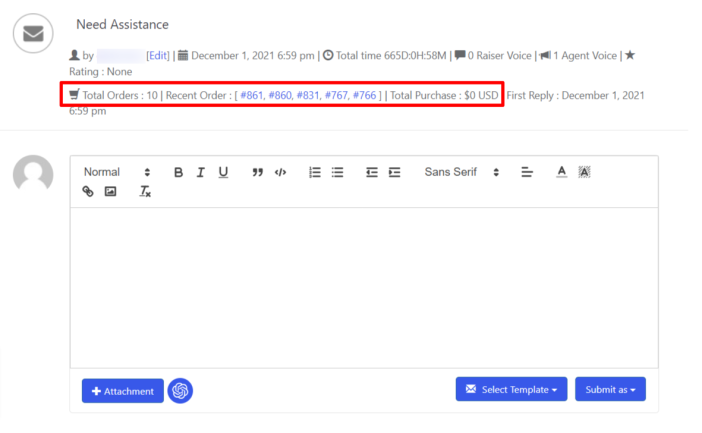
WSDesk is closely integrated with WooCommerce. In this method, your WooCommerce store’s support form allows consumers to submit tickets directly. Products, categories, tags, order information, and order costs are some of the elements of your WooCommerce store that WSDesk uses for integration.
The following configurations must be made in order to integrate WooCommerce:
1. WooCommerce Order details to be displayed in the customer ticket section:
Details of the WooCommerce order that will be shown in the section for customer tickets:
In the WSDesk Settings dashboard, a new section for WooCommerce settings pops up after WooCommerce has been installed on your WordPress website, as shown in the screenshot below (WordPress Admin > WSDesk > Settings > WooCommerce):
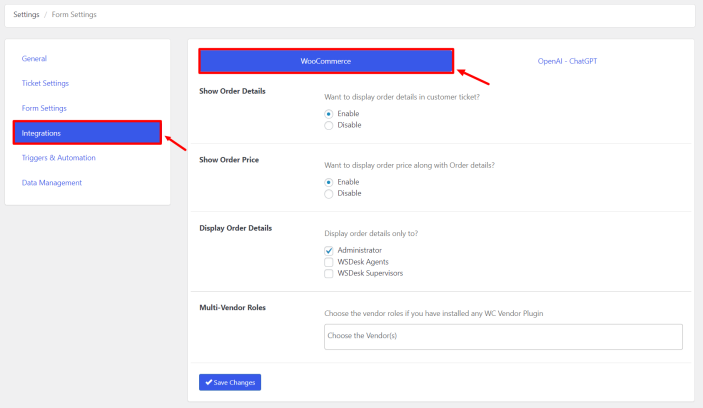
The customer ticket portion of this section is set up to provide information about WooCommerce orders. The following settings are included in it:
Show Order Details: This option lets you choose whether to display order details in the customer ticket area.
Show Order Price: This option lets you choose whether to display the order price and other order information in the customer ticket area.
Display Order Information: This feature enables you to control who may view an order’s details depending on their user roles.Multi-Vendor Roles: You can choose the vendor roles you wish to integrate from the list if you are using a multi-vendor WooCommerce plugin and would like to do so with WSDesk. All WordPress users on your website, WSDesk Agents, WSDesk Supervisors, and vendor roles specified by your multi-vendor plugin are included in this list.
The order data will appear in the customer ticket once these settings have been set up, as illustrated in the screenshot below:
2. Using WooCommerce Products, Order ID, Categories, and Tags to create Ticket Fields:
You may use your WooCommerce products, categories, and tags as ticket fields in the support form by integrating them with WSDesk. Your customers can submit a ticket using this feature based on the products, categories, and tags in your WooCommerce store. Additionally, it will be useful for filtering the tickets.
The configuration settings are as follows:
- Navigate to the WSDesk Settings > Ticket Fields tab.
- Go to the Add Ticket Field setting and choose the “Yes” checkbox to add a new field.
Additional settings are provided as follows:
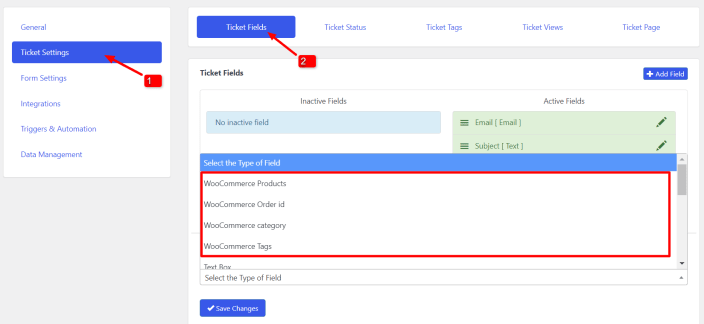
If WooCommerce is set up on your website, you should be able to see four additional options that can be utilized for WooCommerce integration.
These options include:
- WooCommerce Products
- WooCommerce Order ID
- WooCommerce Categories
- WooCommerce Tags
To proceed with the settings below, choose a field:
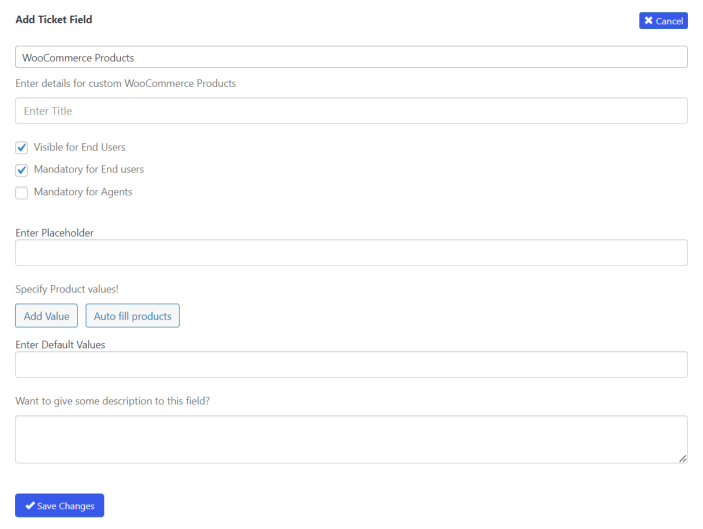
The Ticket field’s title, visibility, and restrictions can all be customized.
To automatically retrieve all the products from your WooCommerce store, select the Autofill products option or enter custom values for the products. According to your preferences, you are free to add or remove the values.
Add additional details like descriptions and default settings.
When submitting a support form ticket, customers will have the option of selecting a WooCommerce product.

OpenAI ChatGPT Integration
Because WSDesk is fully compatible with OpenAI ChatGPT, you can easily generate automated responses that are perfectly tailored to the particular help desk conversation. ChatGPT’s integration with WSDesk allows for the generation of automated responses, the correction of spelling and grammar mistakes, and the change of a casual tone to a more businesslike one.
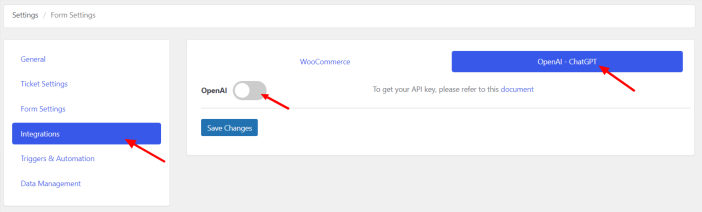
Simply toggle the switch and enter your OpenAI ChatGPT API key to connect the two services.
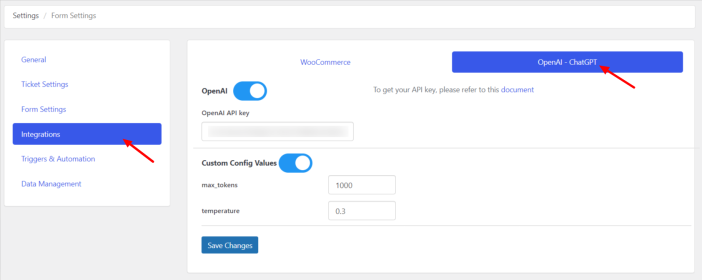
Custom Config Value
Max_tokens: Sets the maximum answer length. A larger value may provide longer answers, whereas a lower value may produce shorter ones.
Temperature: Temperature controls output text randomization. A higher value, like 0.8, fosters more creativity but reduces clarity. By default, WSDesk sets the token limit and temperature to 1000 and 0.3.
Undo: Reverts recent changes.
Restore: Replaces current content with original.
Spell Check: Check the text for spelling errors.
Change Text Tone to Business Tone: This makes the content sound more professional and acceptable for business use.
Generate Reply: Generates an AI-generated response based on input to help you write ticket responses.
Triggers and Automation
↑ Back to topAn activity that takes place as a result of a specific event is called a trigger. You may automate a number of replies in WSDesk with the help of these triggers.
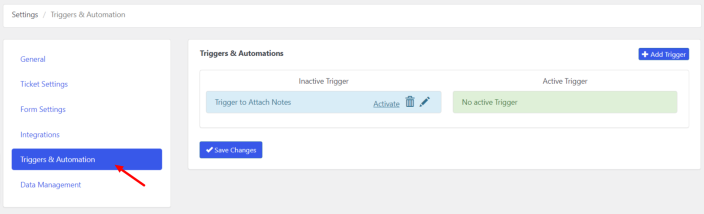
The following options are found in this section, which also allows you to add, edit, remove, and customize triggers:
Trigger Addition: To add a new trigger, click Add Trigger.
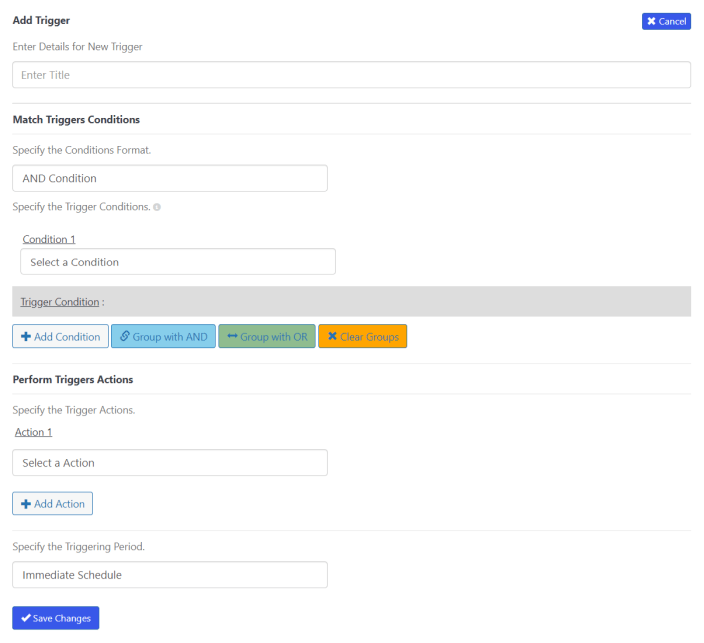
You can enter the title, specify the conditions format, select a condition, group conditions, specify the trigger action, specify the triggering period, and edit and delete a trigger. Google Chat Integration can also be added as an action from the perform triggers actions section.
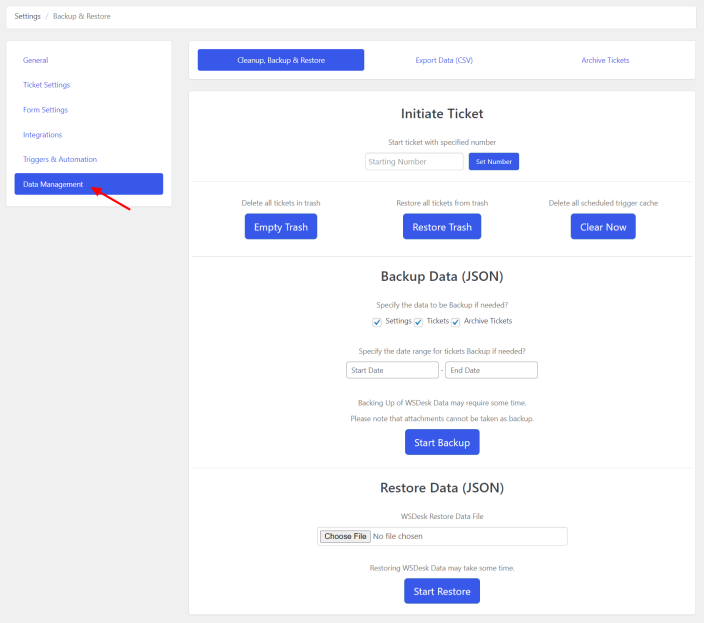
Data Management
↑ Back to topYou may manage all of your WSDesk data in this section. Tickets and plugin settings can be backed up and restored, and tickets can be archived.
Three tabs make up the Data Management section:
- Cleanup, Backup, and Restore
- Export Ticket Data (CSV)
- Archive Ticket
Cleanup, Backup, and Restore
The WSDesk – WordPress Helpdesk Plugin settings, ticket data, and other settings may all be cleaned up, backed up, and restored using the Backup and Restore section. Since JSON is used for this procedure, backing up and restoring the data is easier and quicker.
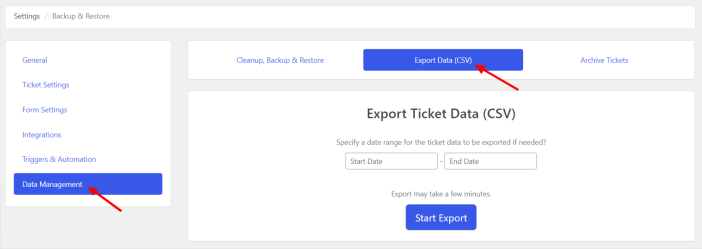
Export Data (CSV)
You can export the details of your tickets as a CSV file using the Export Data section. To export it as a CSV file, choose the date range, then click Start Export.
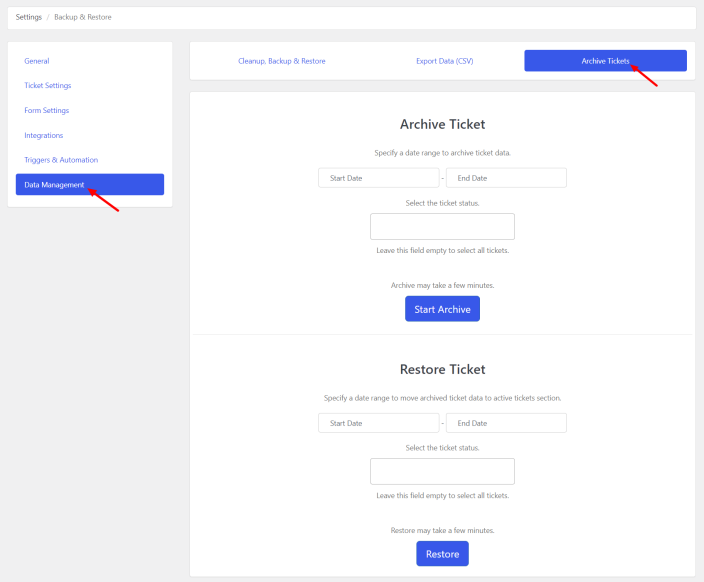
Archive Tickets
Old tickets can be archived for later use or for your records. You won’t have to sift through every ticket in order to find one, which will save you a lot more time. The dashboard for tickets will become lighter and more accurate. If you frequently use (or refer to) any older tickets, archiving them is preferable to backing them up.
The start and end date ranges, as well as the desired ticket status (optional), must be entered in the WSDesk Ticket Status section in order to archive WSDesk tickets.
Usage
↑ Back to topAgents
↑ Back to topSettings for adding and editing agent profiles are available under WSDesk > Agents within the WordPress admin dashboard. Additionally, you may set up and manage each agent’s assigned ticket tags, user permissions, and agent roles.

To add a new agent profile, click Add Agent/Supervisor. Under add user, click Create a new user and enter the profile name, add the WSDesk role, choose the profile rights that you want to add, and add tags.

Managing Agent Profiles
The name of an agent can be clicked to show further settings. You can revoke the user’s access to the WSDesk agent role, check reports, or modify the agent profile.

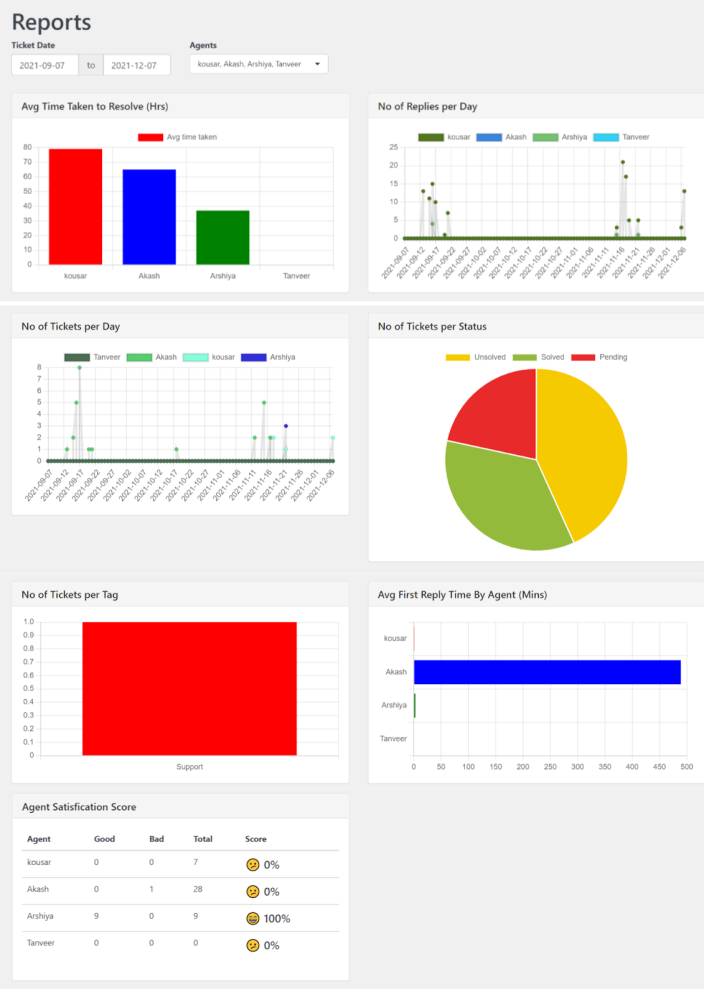
Reports
↑ Back to topYour WSDesk analytics may be tracked using the Reports dashboard (WordPress Admin > WSDesk > Reports). Information about the status of tickets, agent responses, and other information are included. You can filter reports depending on agents or time frames (Last 7 Days, Last 30 Days, and Custom date range).
The Reports dashboard is separated into four sections: Average Time to Resolve (Hrs), Number of Replies per Day, Number of Tickets per Day, Number of Tickets per Status, Number of Tickets per Tag, Average First Reply Time By Agent (Mins), and Agent Satisfaction Score.
All of your email-related settings may be found under the Email dashboard (WordPress Admin > WSDest > E-Mail). Additionally, IMAP emails and Google OAuth can be configured here. Email addresses can also be blocked or restricted.
The following settings are available:
Support Email
Your email address can be set up under the Support Email area, and you can also customize the automated and agent reply emails’ content.
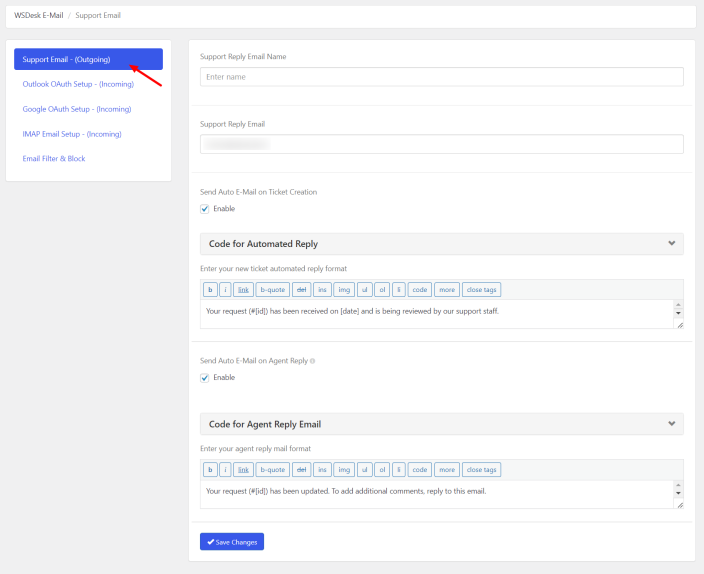
Support Reply Name and Email: Enter your preferred name and email address to be used for customer support.
Automated Email Reply: To allow and create automatic responses to customers after they raise an issue, check the Send auto email checkbox on the ticket creation form.
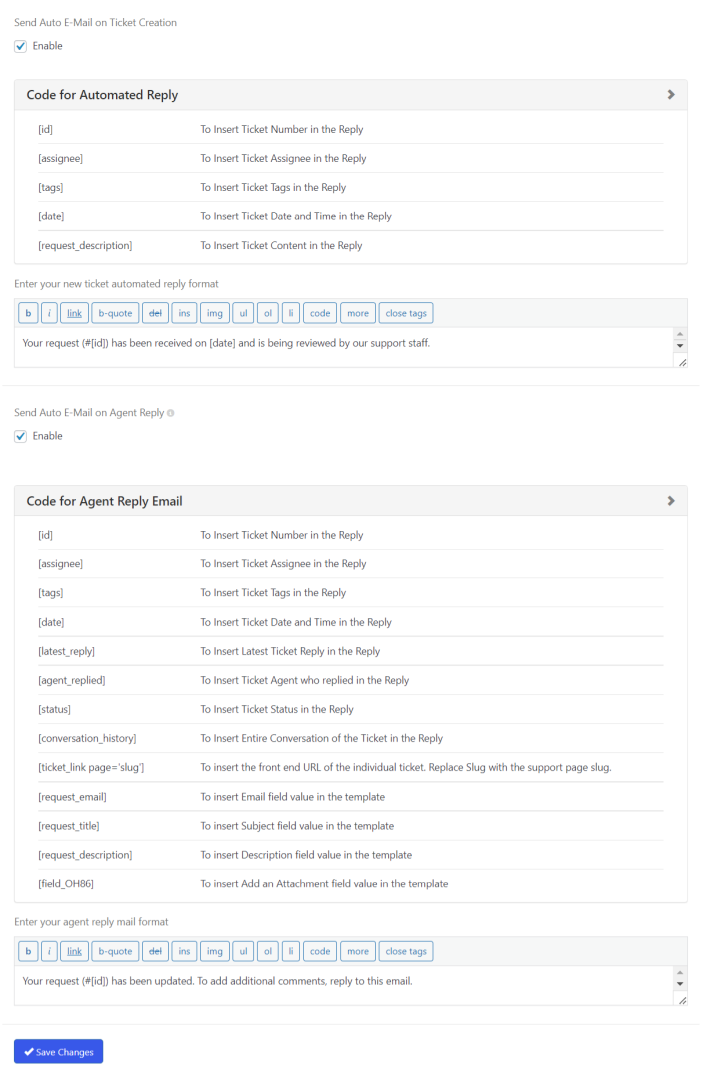
Reply emails can be written using unique codes. The section also provides a text editor for the body of the reply email.
Agent Reply: Activate this setting to create agent reply emails.
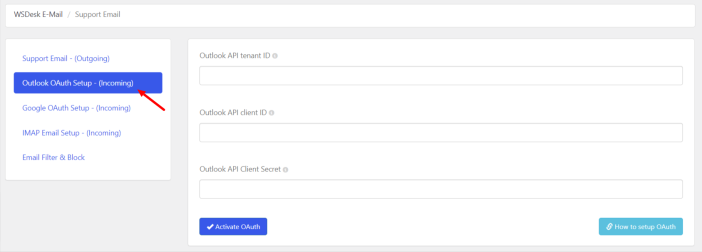
Outlook OAuth Setup
Outlook OAuth setup is a process that allows you to integrate your helpdesk with Microsoft Outlook, specifically to access Outlook email accounts and related services securely. It enables access to user data without exposing the user’s credentials, such as their username and password. Simply enter your Outlook API tenant ID, API client ID, and API Client Secret in order to activate OAuth in WSDesk.
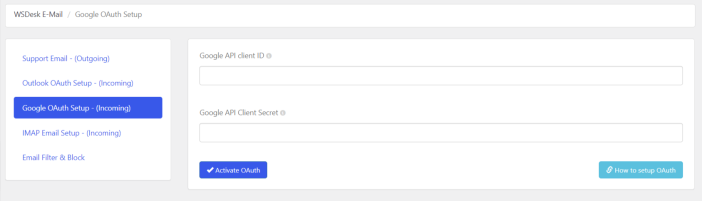
Google OAuth Setup
Without disclosing your login and password, Google OAuth is used to authorize access to data from your Google account on your website. Your Gmail account’s emails and other information can be easily accessed using this method. All you need is the Google API Client ID and Google API Client Secret in order to activate OAuth in WSDesk.
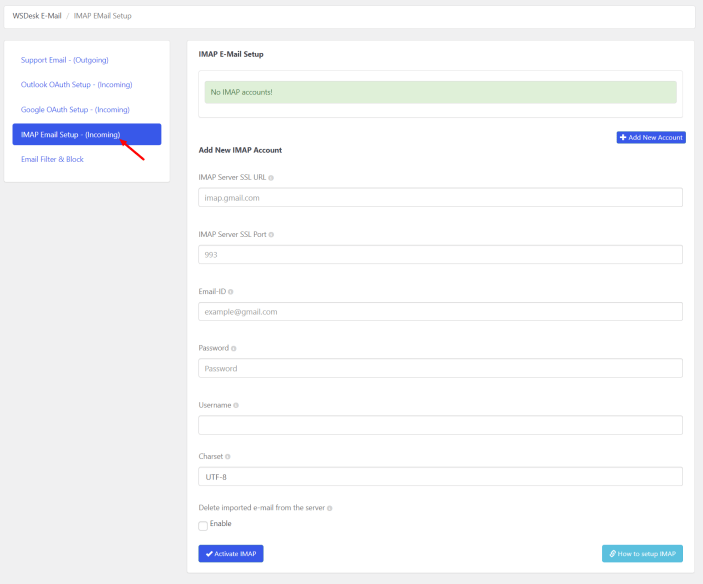
IMAP Email Setup
One of the most used email protocols nowadays is IMAP (Internet Message Access Protocol), which enables access to emails from any location in the world via a variety of devices. It is quicker and functional offline as well. A number of IMAP accounts can be added. A customer’s inquiry will be immediately transformed into tickets when they send an email to a specific address you’ve set here.
Enter the following information in the appropriate fields: IMAP Server SSL URL, SSL Port, email address, username, and the corresponding password. Using the plugin, you can also get rid of server-imported emails. The IMAP Email Setup in WSDesk is accomplished with the assistance of a hosting service provider.
Email Filter and Block
Unwanted emails can be filtered and blocked with the help of this section. In addition to providing options to prevent sending and/or receiving emails, these settings assist in adding or removing blocked email addresses.
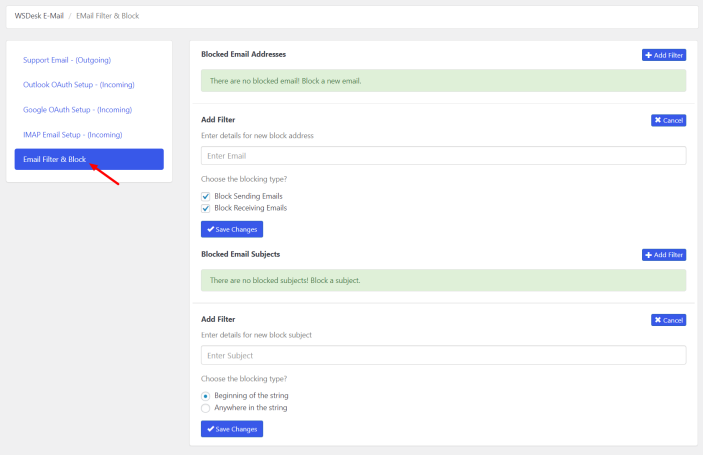
There are two ways to block or filter emails:
Using Email Addresses: Click the Add Filter button in the top right corner to add a new email address filter. Select the blocking type and add email addresses to the filter. Specifically, preventing emails from the entered email addresses from being sent or received.
Using Email Subject Line: To add a new block filter for email subject lines, click Add Filter in the right-hand corner of the given section. Select the blocking type when entering the subject text, which can be placed anywhere in the subject line or at the beginning. The blocked email subjects will be included in the Blocked Email Subjects list.
Save changes after finishing setting up all the preferences.
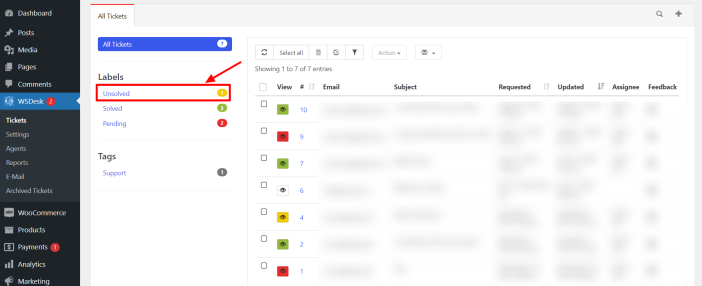
Tickets
↑ Back to topAll of the tickets created by your customers are displayed in the Tickets dashboard. The Ticket dashboard will be displayed depending on the specific settings you’ve configured.

Let’s analyze the ticket dashboard view to learn more.
The views produced in the Ticket Views area are displayed on the left. Tickets can be easily accessed by using these views to filter them. Any attribute that isn’t configured for filtering and is part of the Ticket Fields, Ticket Labels, or Ticket Tags won’t be included here.
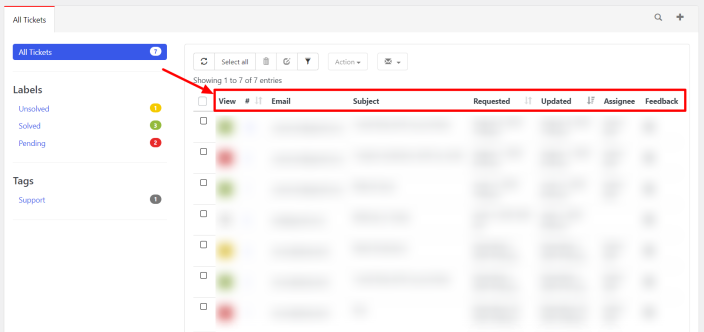
All of the customer-generated tickets are displayed in the right section. The tickets are selected depending on the most recently modified ticket. Ticket status color code, ticket number, requester username/email address, email subject, desired date, agent assigned, and customer feedback are all included in the ticket information.
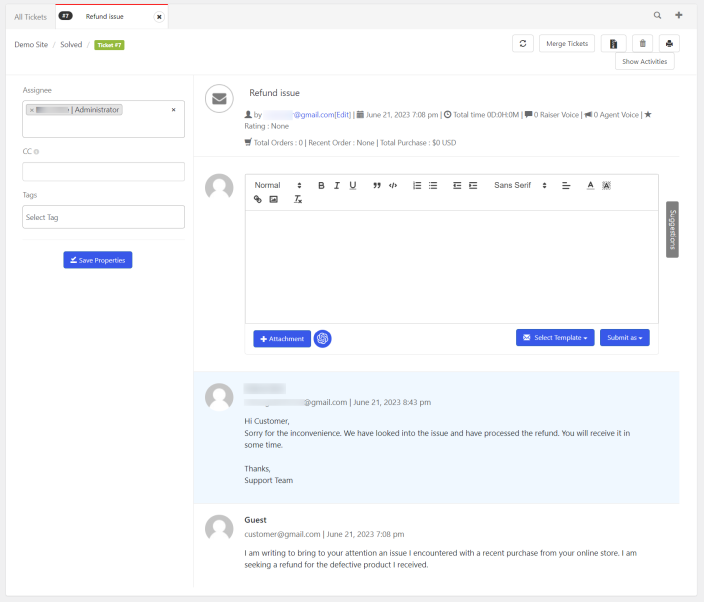
Viewing a Ticket
Click the viewing icon next to a ticket to see it quickly. This view offers some basic facts about the ticket, including the issue information, options to update the ticket status label, Ticket Tags, Ticket Assignee, and other information.
Click on the individual ticket row to view the full conversation between the ticket raiser and the agent.
Adding a New Ticket
This dashboard also allows for the creation of new tickets. In the dashboard’s upper right corner, click the + (plus) icon.
The following options are shown when you click the icon.
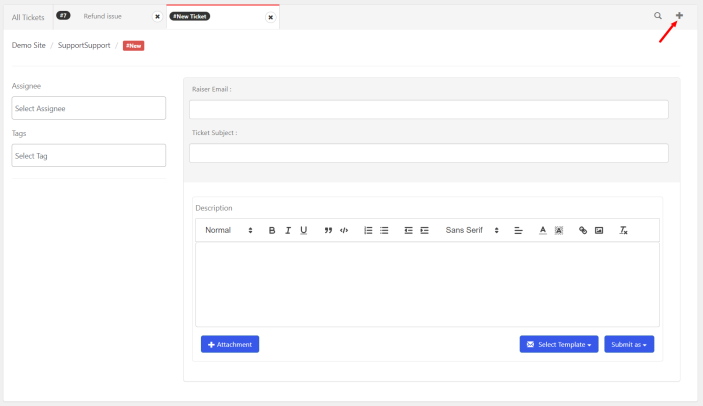
On this page add the assignee, tags, raiser email, ticket subject, and description, and submit the ticket with the needed status.
Creating Canned Responses
You can easily respond to tickets by creating a standard message template with canned responses. Go to the Tickets dashboard and click the message icon at the top of the dashboard in order to create a reply template.
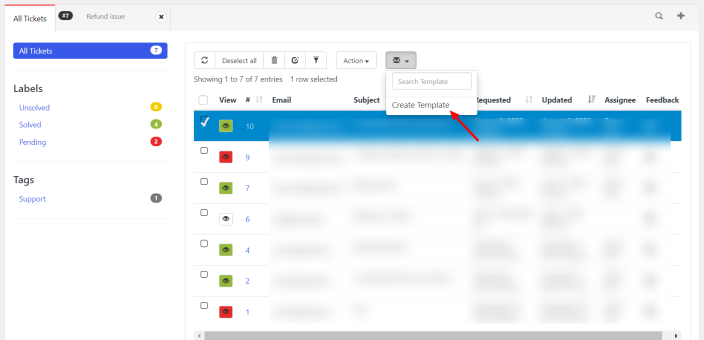
By clicking “Create Template”, you can make a new template or choose one that already exists. The following box appears, in which you can create the reply template by applying the shortcodes.

The example that follows demonstrates how you can use the message template while responding to tickets. An already-created template will be added to your reply text when you click on it. It won’t replace the text you’ve already typed.

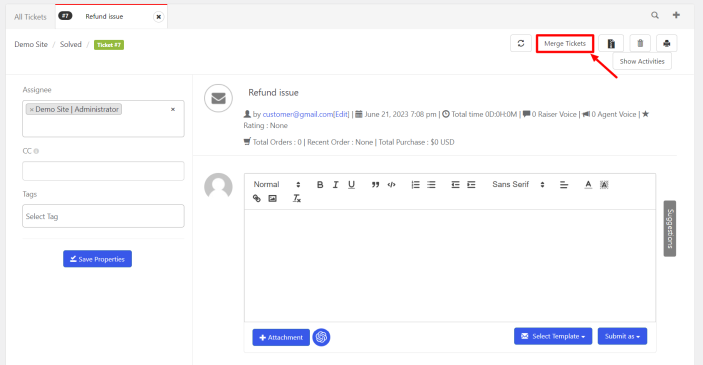
Merging Tickets
You may easily merge two or more tickets in WSDesk.To merge tickets, follow these simple steps:
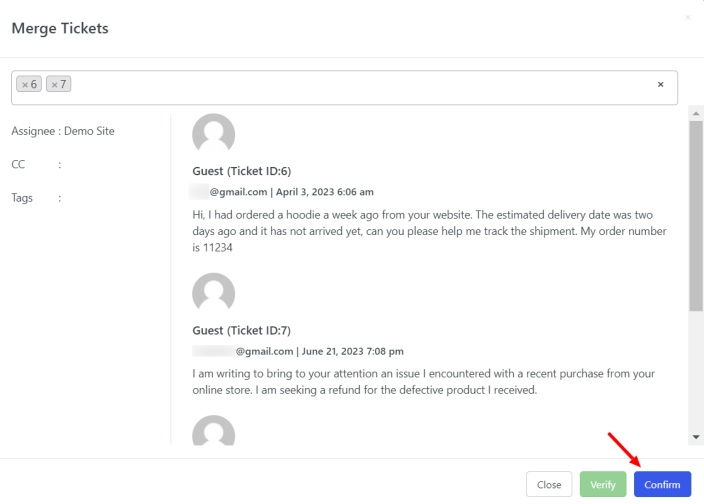
Create a ticket for the merge to take place. In other words, multiple tickets will be combined into this one. As seen in the screenshot below, click the Merge Ticket icon located in the top right corner.
You’ll see a pop-up box asking you to enter the ticket IDs for the tickets that need to be combined, as seen in the screenshot below.
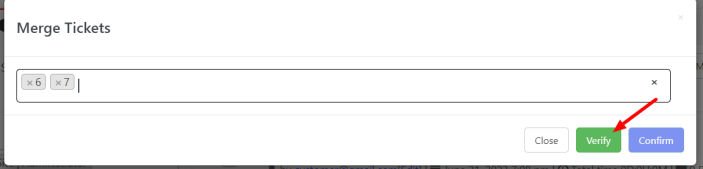
Add the ticket IDs that need to be combined, then click Verify.
Bulk Edit Tickets
Tick the corresponding checkboxes next to the tickets you want to edit on the Tickets dashboard, as seen in the screenshot below.
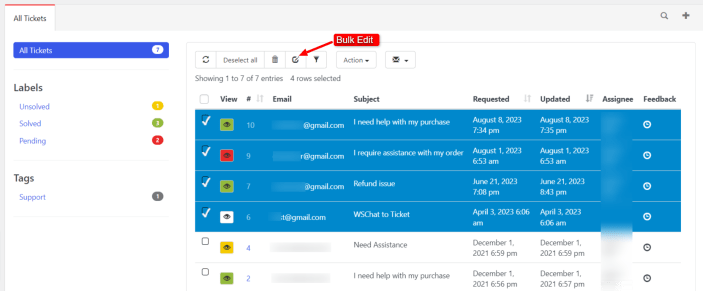
To edit the selected tickets, click the icon labeled “Edit Tickets” at the top of the page. The screenshot below demonstrates how you can edit/update tickets in bulk for the assignee, labels, tags, subject, and replies. Making the appropriate selection from the drop-down pick-up lists will allow you to edit properties like Assignee, Labels, and Tags in bulk.

Total Time Display on Tickets
On the individual ticket page, you can now see the Total Time since a ticket was created.
- The total Period for unresolved tickets is equal to the present time minus the creation time (in hours and minutes).
- The total time for resolved tickets is equal to the difference between the creation and resolution times (in hours and minutes).

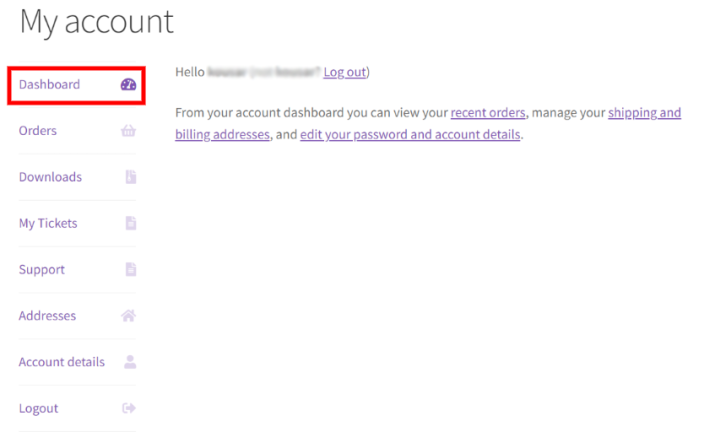
My Account Dashboard
To raise support tickets, check recent orders, update shipping and billing addresses, and edit password and account credentials, users can do so through the My Account Dashboard, which is located on the front end of your eCommerce store.
Support Forms
↑ Back to topThe plugin requires you to create three pages by placing the appropriate shortcodes. These pages are essential for end customers to submit, reply, and check their ticket status. Details of these shortcodes are given below.
The shortcode to place the WSDesk Ticket Submission Form on any page:
[wsdesk_support display=”form”]
- Customers can submit a ticket using the customer support page. It uses the shortcode [wsdesk_support display=”form”].
- Customers can view their current tickets on the existing ticket request page. The shortcode [wsdesk_support display=”check_request”].
- Customers can respond to tickets from the website’s front end using the customer ticket reply page. This page uses the shortcode [wsdesk_support display=”form_support_request_table”].
Your website’s theme primarily determines how the forms appear and function. Customers can select one of two button options on the support page for this plugin to create a new request or to view an existing request. The following image shows the front end of a sample support page:

- A customer may create a new request by clicking Submit Request. As seen in the screenshot, when you click this button, a support form is presented. Email, Subject, and Description are the three fields by default on the support form for tickets (HTML supported). Custom fields in your support form can be added, edited, or deleted.
- Clicking Check Your Existing Request enables customers to monitor the status of their current requests. Users who are not logged in to their account will be asked to do so if they check for an existing request. As seen in the screenshot below, the ticket information comprises the ticket number, subject of the request, request date, agent assignee, and ticket status.

There are alternative ways to display the support form and open tickets:
1. Including a support form alongside existing tickets
The Support page will typically be displayed using the two-button option. However, the plugin provides an additional option for displaying the support page at the front end. As opposed to the former two-button option, where the support form and information about existing requests were presented on two separate pages, they are all displayed on the same page.
To accomplish this, you must change the shortcode as indicated below on the support page:[wsdesk_support] should be changed to [wsdesk_support display=form].
The modifications to the support page will have the following effect:

2. Showing existing support tickets on a different page.
You can use the [wsdesk_support show=check_request] shortcode to display the list of existing requests on a separate page. By default, the existing request tickets list will remain visible on the main support page. As a result, to hide this, apply the following CSS code:
<style>
.support_option_choose{
display:none;
}
</style>
3. Showing details from additional fields on existing request tickets
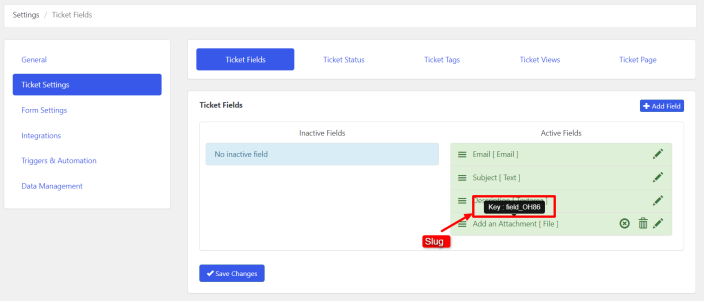
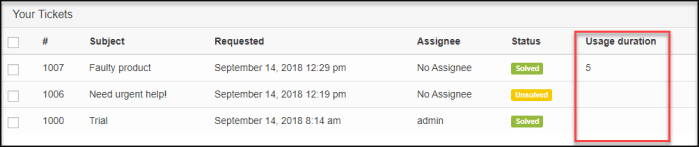
You can also present information from additional fields you added to the customers’ existing requests. Make use of the shortcode [wsdesk_support display=check_request fields=slug1,slug2] for this. The relevant slug for each ticket field whose content you want to display can be added to this shortcode. In the shortcode, commas should be used to separate the slugs. Hovering the mouse over the ticket field name will show the slug for each field.
As an example, we’re including the shortcode [wsdesk_support display=check_request fields=field IS58]. The data from this field will appear as a second column in the list of existing tickets, as shown in the screenshot below.
4. Presenting the support form by rearranging ticket fields
Depending on your preferences, you can vary the order of the ticket fields. This requires the addition of the [wsdesk_support display=form_only fields=request_email,request_title] shortcode.
The screenshot below shows an example support form with a custom ticket field reordering.

Note: If you are in the Visual mode in WordPress prior to 5.0, switch to Text mode. As the shortcodes can only be added in Text mode. In the Gutenberg editor, click the plus button, and search for Shortcode block. Add the shortcode you want to add to the editor and save and publish the post or page.