
The checkout process is one of the most important steps in the buyer journey — it’s the last chance you have to convince shoppers to make a purchase. But a whopping 63.23% of ecommerce shopping carts are abandoned. That’s a lot of online shoppers who decide to purchase a product but change their minds at the last second.
There are a variety of factors that impact abandoned carts (like shipping costs and payment options), but the checkout page itself also plays a role. If it’s too complicated, too long, or requires information that’s too personal, customers might leave and purchase a similar product elsewhere.
One of the best ways to optimize your checkout page is to customize fields based on your business needs and target audience. For example, if you don’t typically sell to companies, remove the Company Name field. If you send customers birthday surprises, include a Date of Birth field. If you sell pet products, it may make sense to ask for Type of Pet.
In this article, we’ll walk you through how to customize your checkout page to meet the needs of both your customers and business.
Checkout field modifications
↑ Back to topWooCommerce provides all the essential fields for your checkout page. By default, it asks shoppers for:
- Billing details
- First name
- Last name
- Company name
- Country
- Address
- Town/City
- District
- Postcode/ZIP
- Phone
- Email address
- Order notes
But there are a lot of ways you can edit the page to meet your needs, including:
- Editing the design
- Changing the text on the “Place Order” button
- Removing a field
- Making a field required (or not required)
- Changing input field labels and placeholder text
- Verifying a delivery preference
- Allowing customers to request a delivery date or deadline
- Setting a preferred contact method
These are just a few of the customizations you can make — WooCommerce provides nearly endless flexibility for every experience level. If you’re comfortable with development, you can customize using code snippets. Or if you prefer another method, there are several ways you can do this without requiring a single line of code.
Customize checkout fields with plugins
↑ Back to topWooCommerce provides a few excellent extensions for editing checkout fields without touching a line of code.
Checkout Field Editor
The Checkout Field Editor extension allows you to add and remove checkout fields, or update the type, label, and placeholder value with a few clicks. You can also mark each checkout field as “required” or “not required.”
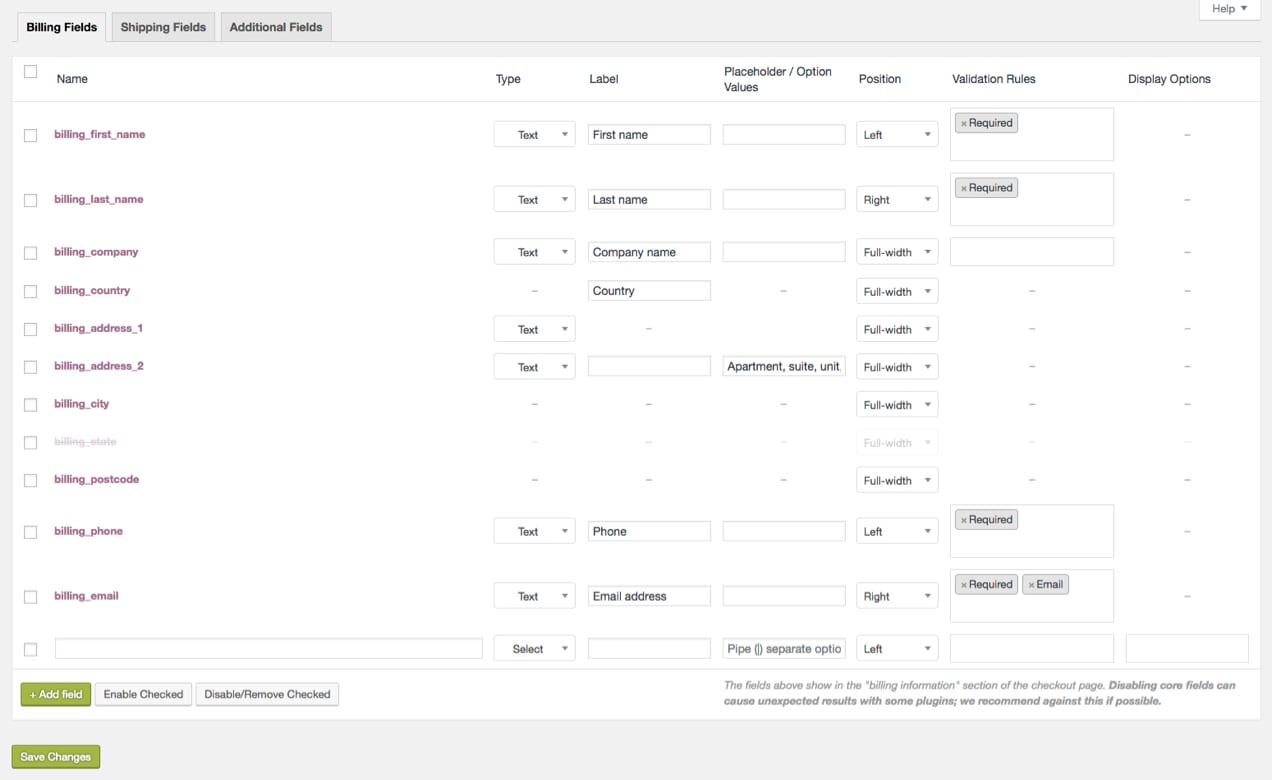
When adding a new field, you can choose from the following types:
- Text – standard text input
- Password – password text input
- Textarea – a larger text field
- Select – a dropdown box with options customers can choose from
- Multi-select – a box that allows shoppers to select multiple options
- Radio – a set of radio inputs that customers can choose from
- Checkbox – a checkbox field that allows for multiple selections
- Date picker – a text field with a date picker attached
- Heading – a heading for organizing a longer page
There are endless ways to use these to provide a top-notch experience for your customers. If people often give your products as gifts, you might offer a checkbox to add gift wrapping or a special note. Or you could use radio buttons to allow customers to select between plain packaging, birthday-themed packaging, or anniversary-themed packaging. You could make this field required, set the label to “Choose your package type”, and set the placeholder to “plain.”
Or, let’s say you sell graphic design services. You might use the date picker field to allow a client to choose their preferred date for a consultation phone call. You could also include text area fields that let them describe specifically what they’re looking for in a provider.
And to assist with more advanced customizations, Checkout Field Editor provides helpful documentation.
WooCommerce Checkout Add-Ons
The WooCommerce Checkout Add-Ons extension gives you the flexibility to offer free or paid add-ons at checkout. You can add several field types to your checkout page, including text fields, text areas, dropdowns, multi-selects, radio buttons, checkboxes, multi-checkboxes, and file uploads.
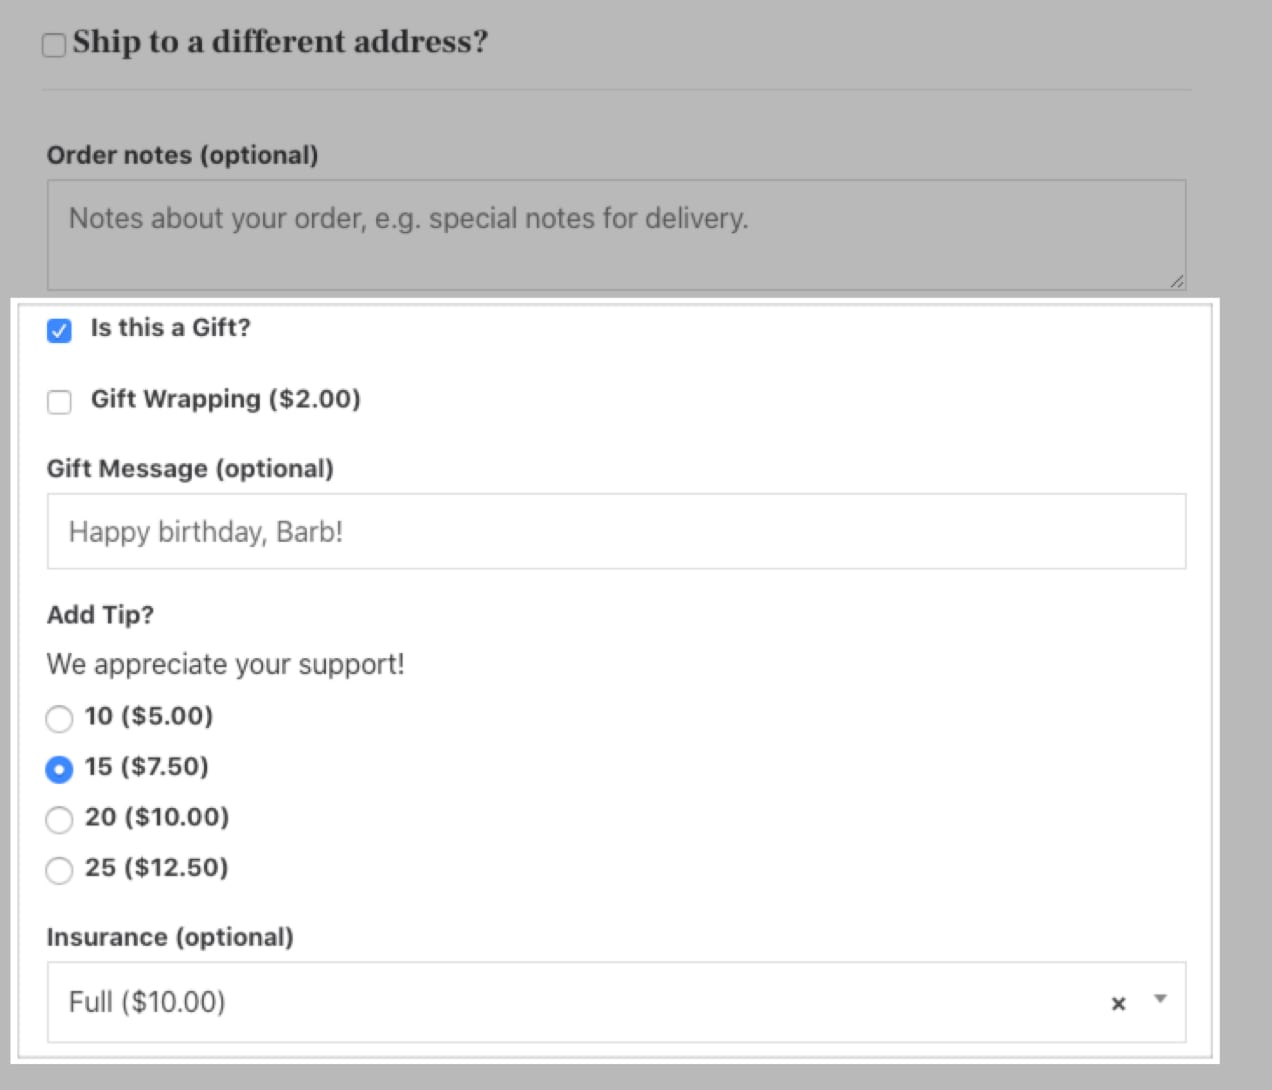
If you sell tech products or toys, you might give customers a chance to add on insurance for an extra fee. If you sell customized items, you might include a text field for personalization. Or if you sell time-sensitive products, you could offer an upgrade for rush fulfillment.
In your dashboard, you’ll also be able to sort and filter orders based on the options you’ve created. This might be helpful if you want to prioritize orders by delivery date or show only orders with expedited processing. Or you might want to pack gift-wrapped orders all at the same time.
WooCommerce One Page Checkout
Want to simplify your checkout process even further? The WooCommerce One Page Checkout extension turns any page into a checkout page.
According to a study by the Baymard Institute, one out of four shoppers abandon a cart due to a long or complicated checkout process. WooCommerce One Page Checkout combats this by allowing customers to add products to their cart and submit payment all on the same page.
You can even add checkout fields to landing pages, which is particularly helpful if you’re a service-based business, sell subscriptions, or offer appointment bookings. In those scenarios, you might not need individual product pages — adding the option for customers to check out on a landing page or offer comparison page takes out unnecessary additional steps.
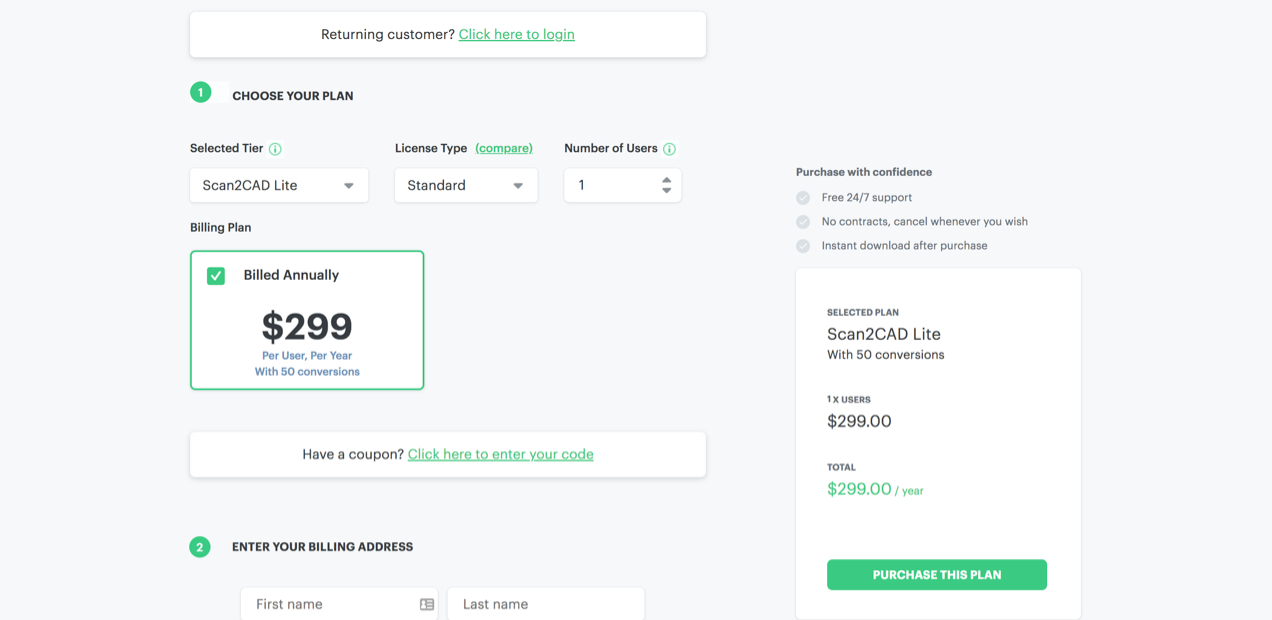
Scan2CAD uses this extension to create a super simple, custom checkout process. Customers can choose a plan, enter coupon codes, and add billing and payment information all on one, super-streamlined page.
WooCommerce Social Login
↑ Back to topForcing a customer to create an account on your website is a potential barrier to purchase because it adds steps. Giving them the ability to use their existing social media profiles to create an account helps break down this barrier.
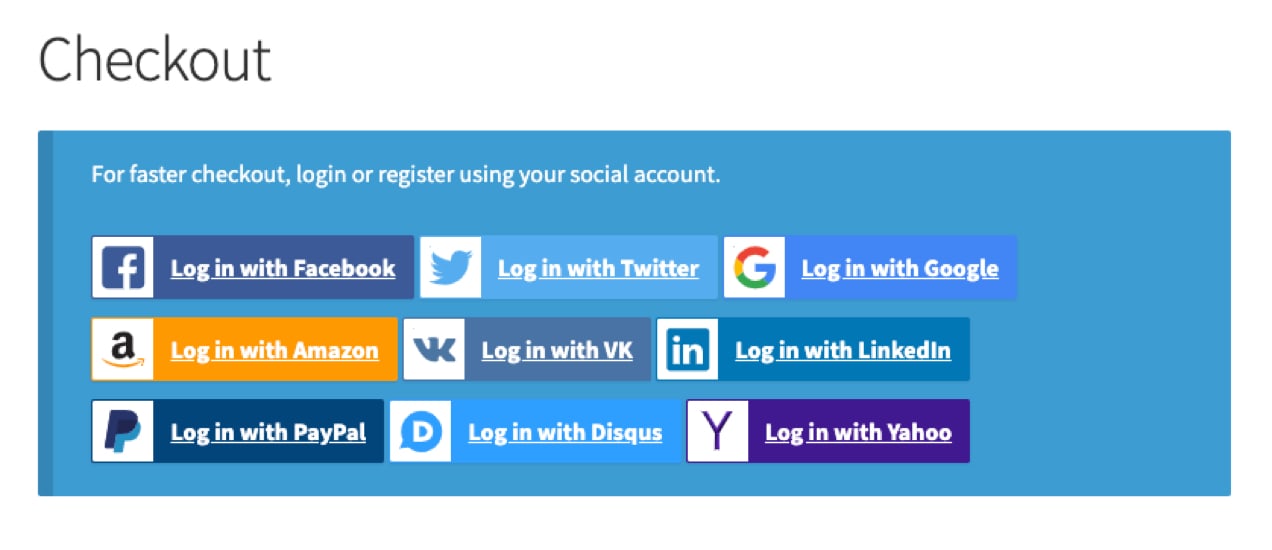
The WooCommerce Social Login extension makes this process as easy and secure as possible. Customers can log into your site using their Facebook, Twitter, Google, Amazon, LinkedIn, PayPal, Instagram, Disqus, Yahoo, or VK accounts instead of filling out a complicated account setup form.
Customize checkout fields using code snippets
↑ Back to topNote: If you’re unfamiliar with code and resolving potential conflicts, select a WooExpert or Developer for assistance. We’re unable to provide support for customizations under our Support Policy.
Code snippets are flexible ways for developers and store owners to customize WooCommerce checkout fields. Here’s a list of primary tags, including classes and IDs, that you can use to edit the visual design of your checkout page. Add the custom CSS to your child theme or the WordPress Customizer.
To see all of the classes and selectors, use your browser’s inspector on your website to find the exact area you’d like to customize.
<body class="woocommerce-checkout">
<div class="woocommerce">
<form class="woocommerce-checkout">
<div id="customer_details" class="col2-set">
<div class="woocommerce-billing-fields">
<p class="form-row">
<div class="woocommerce-shipping-fields">
<p class="form-row">
<div class="woocommerce-additional-fields">
<div id="order_review" class="woocommerce-checkout-review-order">
<table class="woocommerce-checkout-review-order-table">
<div id="payment">
<ul class="wc_payment_methods payment_methods methods">
<div class="form-row place-order">
For example, to change the background color of text input boxes and give them rounded corners, you would add this code if you’re using the checkout shortcode:
.woocommerce-checkout input[type="text"] {
border-radius: 10px;
background-color: #222;
}
And this code for the block-based checkout:
.wc-block-checkout input[type="text"] {
border-radius: 10px;
background-color: #222;
}
Remove a checkout field:
This is fairly straightforward, but be careful, as this change could cause conflicts with other extensions and plugins. Whenever making changes to the actual code of your store, we strongly recommend trying them first on a staging site.
Add the following code to your child theme’s functions.php file or using a code snippet plugin, which allows you to add code to your site without editing theme files. Note that pasting the entire code will remove all fields from the checkout page, so be sure to include only the fields you want to remove.
/**
 Remove all possible fields
 **/
function wc_remove_checkout_fields( $fields ) {

    // Billing fields
    unset( $fields['billing']['billing_company'] );
    unset( $fields['billing']['billing_email'] );
    unset( $fields['billing']['billing_phone'] );
    unset( $fields['billing']['billing_state'] );
    unset( $fields['billing']['billing_first_name'] );
    unset( $fields['billing']['billing_last_name'] );
    unset( $fields['billing']['billing_address_1'] );
    unset( $fields['billing']['billing_address_2'] );
    unset( $fields['billing']['billing_city'] );
    unset( $fields['billing']['billing_postcode'] );

    // Shipping fields
    unset( $fields['shipping']['shipping_company'] );
    unset( $fields['shipping']['shipping_phone'] );
    unset( $fields['shipping']['shipping_state'] );
    unset( $fields['shipping']['shipping_first_name'] );
    unset( $fields['shipping']['shipping_last_name'] );
    unset( $fields['shipping']['shipping_address_1'] );
    unset( $fields['shipping']['shipping_address_2'] );
    unset( $fields['shipping']['shipping_city'] );
    unset( $fields['shipping']['shipping_postcode'] );

    // Order fields
    unset( $fields['order']['order_comments'] );

    return $fields;
}
add_filter( 'woocommerce_checkout_fields', 'wc_remove_checkout_fields' );
Note: The Country field is required. If you remove it, orders cannot be completed and your checkout form will give the following error: “Please enter an address to continue.”
Make a required field not required:
In the below example, we’ll edit the Billing Phone field to make it not required. Add this code to your child theme’s functions.php file.
add_filter( 'woocommerce_billing_fields', 'wc_unrequire_wc_phone_field');
function wc_unrequire_wc_phone_field( $fields ) {
$fields['billing_phone']['required'] = false;
return $fields;
}
Alternatively, if you’d like to make a field required, change the “false” text to “true” (But don’t include the quotes).
Change input field labels and placeholders:
Add the following code to your child theme’s functions.php file to edit the labels and placeholders of your checkout fields. You can customize it to fit your needs.
add_filter('woocommerce_checkout_fields', 'custom_override_checkout_fields');
function custom_override_checkout_fields($fields)
 {
 unset($fields['billing']['billing_address_2']);
 $fields['billing']['billing_company']['placeholder'] = 'Business Name';
 $fields['billing']['billing_company']['label'] = 'Business Name';
 $fields['billing']['billing_first_name']['placeholder'] = 'First Name';
 $fields['shipping']['shipping_first_name']['placeholder'] = 'First Name';
 $fields['shipping']['shipping_last_name']['placeholder'] = 'Last Name';
 $fields['shipping']['shipping_company']['placeholder'] = 'Company Name';
 $fields['billing']['billing_last_name']['placeholder'] = 'Last Name';
 $fields['billing']['billing_email']['placeholder'] = 'Email Address ';
 $fields['billing']['billing_phone']['placeholder'] = 'Phone ';
 return $fields;
 }
Customize checkout fields with blocks
↑ Back to topWordPress blocks are, well, the building blocks of the pages on your site. You can use the block editor to drag and drop text, images, buttons, videos, and more to create and edit the pages on your site.
This also extends to the new Checkout block. While full customization isn’t yet possible, this block presents a lot of new options to modify the checkout experience without any coding knowledge. Now, you can toggle fields on and off so you only include what’s most relevant to what you’re selling for a simpler, faster customer process. And the best part? There are even more customization options on the horizon which don’t require any coding knowledge.
You can add WooCommerce Payments into the mix for a more seamless customer experience. Use this extension to keep customers on your site to pay rather than directing them to a third-party payment processor. Add express checkout options like Apple Pay that enable them to use existing accounts to skip a ton of steps and complete their purchase faster.
Many stores have already seen great success using the Checkout block with an average 12% increase in conversion rates.
Learn more about the Checkout block and, if you’re a developer, see how you can customize the Checkout block even further.
Start customizing
↑ Back to topThe checkout process can have a significant impact on your conversion rate, so you should make changes carefully, with a specific goal in mind.
Thankfully, WooCommerce gives you the flexibility to customize your checkout process to best serve your specific customers. Whether you need to make visual changes or add and remove checkout fields, you have lots of solutions to choose from.
Looking for a tool to make the process easier? Explore all of the checkout extensions we offer.
Feeling stuck with your ecommerce solution? Let’s talk.
About
Had trouble doing this and thanks finally I’m doing it like PRO.
Great to hear, Ofentse! Thanks for reading!
Remove field(s). You can remove field(s) from displaying in checkout page, order details page and emails. Removing core fields may leads to unexpected results with some plugins. We are not recommending this.
Absolutely, Olivia! We mentioned this in the post as well — removing some fields could conflict with plugins/extensions, so you should always be careful and test properly.
Hi Mariah, do you know if the address fields are required if the user is checking out with paypal or stripe?
Hi Mariah, do you know if the address fields are required for checking out with Paypal or Stripe? I don’t want to have people filling out a bunch of form fields. I would like to make it fast and easy for them. Also since I sell digital goods I don’t need their address, phone or even name but I am not sure if that would cause a problem with the payment gateways.
Tendência
An AI’s answer is only as up-to-date as the documentation it uses
By David Wilson •
Meet your customers where they’re already deciding with Reddit Ads for WooCommerce
By Patrick Allanach •
Why grüum evaluated Shopify and Magento — and chose to stay with WooCommerce
By Christina Bevitori •
Nunca perca uma novidade — junte-se à nossa lista de e-mails
Digite um e-mail válido.
Veja nossa política de privacidade. Você pode cancelar a inscrição a qualquer momento.
Houve um erro na inscrição; tente novamente mais tarde.
Obrigado por se inscrever!
E-mails serão enviados para
You're already subscribed!
E-mails são enviados para