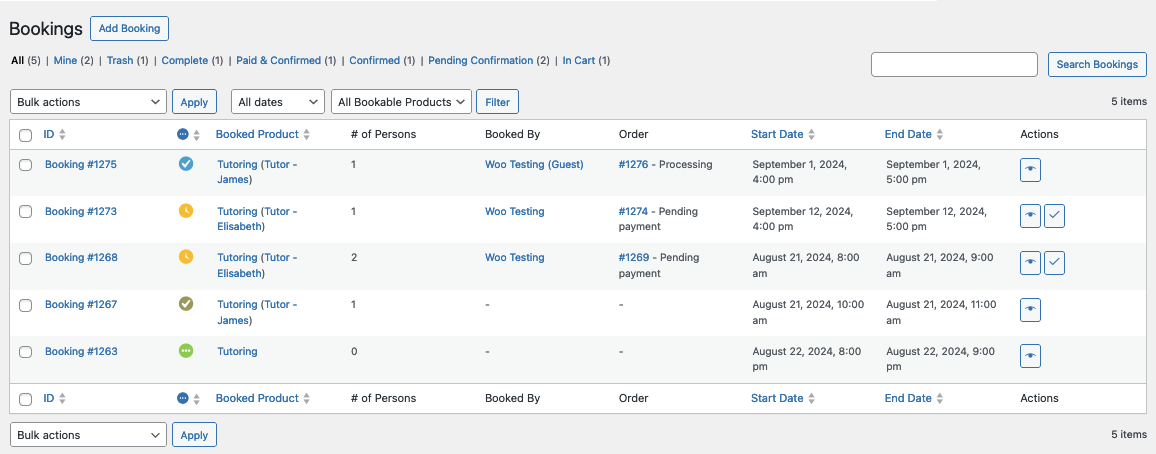
The Bookings > All Bookings page in the admin dashboard enables you to view all of a store’s created bookings, and manage multiple bookings at once.
View All Bookings
↑ Back to topTo view all of your bookings, follow these steps:
- Go to your site’s admin dashboard.
- In the left side menu, select Bookings > All Bookings.
There, you will see a list of all bookings, by default bookings are sorted by ID, with the most recently created bookings at the top.
Add a Booking
↑ Back to topIn the All Bookings view, you can click the Add Booking button to manually add a new booking to your store.
Learn more about how to manually create a booking.
Confirm a Booking
↑ Back to topYou can confirm bookings that require confirmation in two ways from the “Bookings” screen.
- Confirm a single booking by using the Confirm quick action.
- To confirm multiple bookings at once, use the Confirm Bookings bulk action.
Once confirmed, the user receives a “Booking Confirmed” email to pay. The customer can also pay from their My Account page. A link to their My Account page is also included in the email they receive.
Note: When Bookable products require confirmation, they must go through checkout separately from other products. This is because WooCommerce Bookings uses a special payment gateway to process these items, and doesn’t collect any payment to process orders with booking confirmation requests. As such, it’s not possible to add other products to the cart when there is a bookable product that requires confirmation in the cart already. You can, however, have multiple products requiring confirmation in the same order.
Booking Status
↑ Back to topThe Booking Status section shows the current state of each booking. Booking statuses are separate from order statuses.
- Pending Confirmation: Booking awaiting Admin approval. See the Confirm a Booking section above.
- Confirmed: Booking is confirmed but still requires payment.
- Unpaid: Booking requires payment.
- Paid: Booking has been paid.
- Cancelled: Booking has been canceled.
- Complete: Booking is paid, and the date is in the past. The assumption is that the experience/service was delivered.
- In Cart: Booking is currently in a customer cart. If not purchased, it is cleared after 60 minutes. Learn more about managing in-cart bookings
You can also change an individual booking’s status from the Edit Booking page.
Booking Statuses are different from Order statuses. Learn more about the relationship between bookings and orders.
Filtering Bookings
↑ Back to topIn the All Bookings view, you can select different options from the menu above the table to filter through the bookings in your store.

Available Filters
↑ Back to topThese are the available filters that can be used to display matching bookings.
- Status – Select a status from the list to show only bookings of that status.
- Date – Select a date from the dropdown to show bookings that were created within that period.
- Product / Resource – Select a product or a combination of a product and resource.
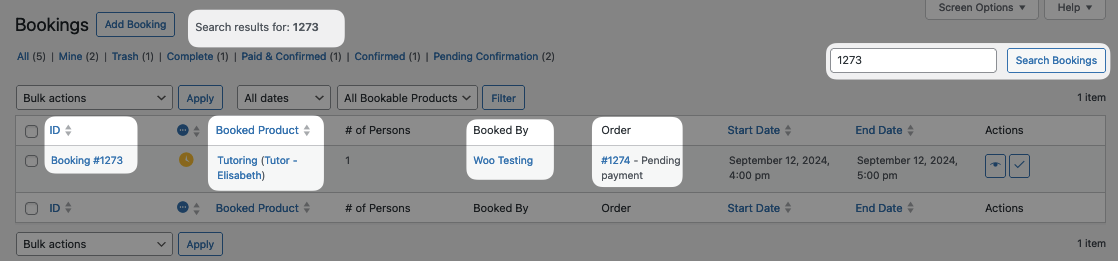
Search Bookings
↑ Back to topUsing the search box feature in the upper-right hand corner of the View All Bookings page, you can search through all your bookings. Follow these steps to do so:
- From the All Bookings view, type your request into the search field on the upper-right hand corner.
- Click on the Search Bookings button.
Accepted search criteria are:
- Booking ID#
- Connected Order # – Learn more about how bookings and orders are connected.
- Booked By – i.e. Name of the customer who made the booking.
- Booked Product Name
Import and Export Bookings
↑ Back to topBookings can be exported to a CSV file or imported in bulk from a CSV file directly from the All Bookings page. Use the Export button to download all bookings or a filtered subset, and the Import button to create or update bookings in bulk. For full details, see Import and Export Bookings.
Bulk Actions
↑ Back to topIn the All Bookings view, you can apply bulk actions to modify the bookings in your store. To use bulk actions, follow these steps:
- From the All Bookings view, select the Bulk Actions dropdown item.
- Select one of the available options from the dropdown menu.
- Check the box next to each Booking that you want to apply the action to.
- Click the Apply button next to the bulk action field.
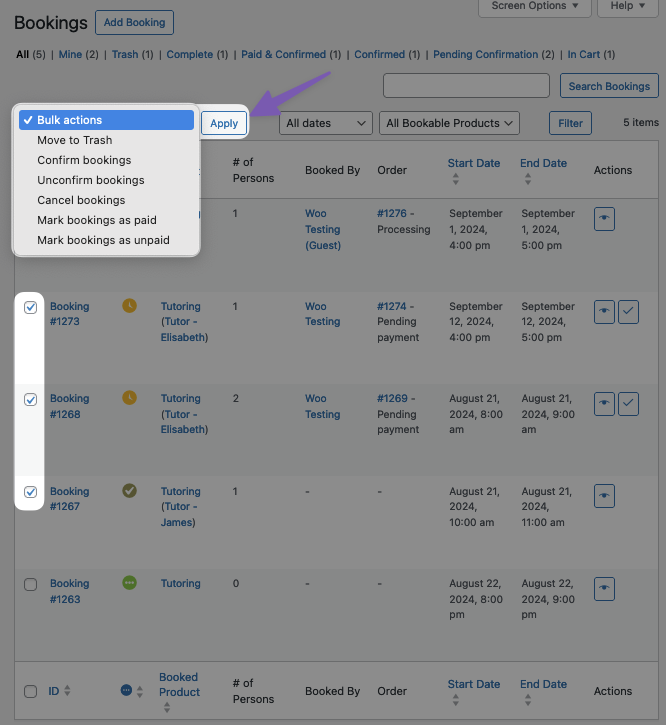
Available Bulk Actions
↑ Back to topThe bulk actions dropdown has the following options:
- Move to trash – Bookings are moved to trash but not deleted
- Confirm bookings – Confirming bookings sends a Booking Confirmed email to your customer letting them know the booking has been confirmed, with a link for payment.
- Unconfirm bookings – Unconfirming a booking sends your customer a Booking Pending Confirmation email.
- Cancel bookings – Canceling a booking sends a Booking Canceled email to the customer and shop admin. If the bookable product is the only product in the connected order, the order will also be canceled.
- Mark bookings as paid – Changes the selected bookings to the “Paid” status.
- Mark bookings as unpaid – Changes the selected bookings to the “Unpaid” status.
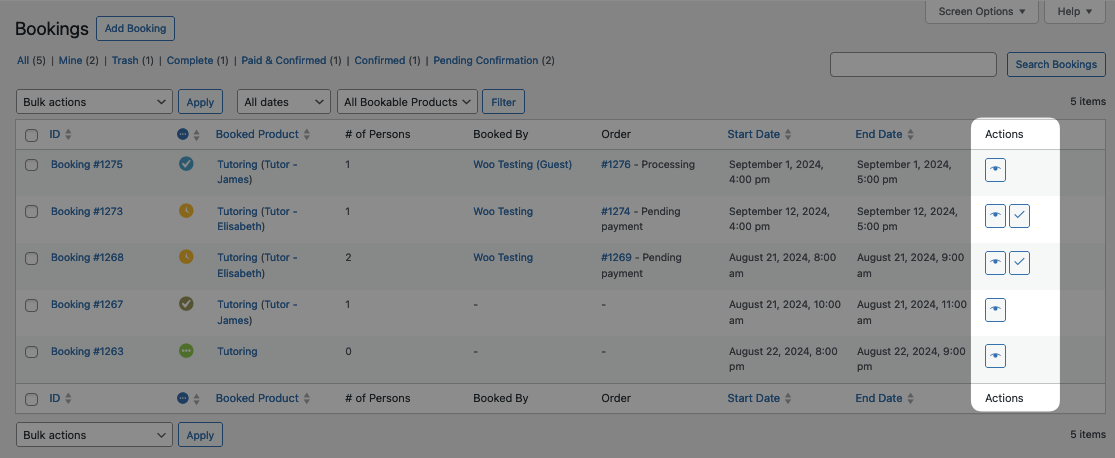
Quick Actions
↑ Back to topOn individual bookings, two icons give you the option to quickly perform two actions:
- Eye: View booking details. Learn more on viewing and editing a booking.
- Check mark: Confirms a pending booking and emails the user. If you confirm a booking in error, use the “Unconfirm bookings” bulk action to correct it.
Questions and support
↑ Back to topSomething missing from this documentation? Still have questions and need assistance?
- If you have a question about a specific extension or theme you’d like to purchase, contact us to get answers.
- If you already purchased this product and need some assistance, get in touch with a Happiness Engineer via our support page and select this product’s name from the Product dropdown.