Sometimes you may want bookings to use one available quantity of a resource per person, other times you may want a booking to completely block off a certain resource, what about when that resource is shared across products?
This Bookings use case will walk through how to use WooCommerce and WooCommerce Bookings to set up reservations with resources shared across products. Resources are physical items or people who are required for the booking, and who can only be used by one booking at once. Learn more about resources in bookings.
This scenario shows you how to create bookable products that use a shared resource, where one product uses one of the resource per person on the booking, and the other product reserves all of the resources with a single booking.
Scenario
↑ Back to topYou own “Arctic Adventures”, a business that offers snowmobile tours. You have 40 snowmobiles that can be rented at any given time.
You offer two packages: a Basic package and a Premium package.
- The Basic package is a mixed-group tour for up to 40 people which allows the customer to select the amount of snowmobiles they will be renting.
- The Premium package is a private tour, when someone books the premium package they reserve all 40 snowmobiles for that time period.
This example will show you how to configure both the Basic and Premium bookable products.
Conditions:
- Both snowmobile packages are sold in set 5-hour sessions. They are available every day with either a 6 a.m. booking or a 11 a.m. booking.
- If there are some snowmobiles already used by a basic package booking, then the premium package will not be available in that time slot, because it requires all 40 snowmobiles to be available.
- If there is a premium package booked, then all 40 snowmobiles are reserved, and the basic package would not be available at that time as there are no snowmobiles available.
Products Used
↑ Back to topSetup and Configuration
↑ Back to topTo set up this scenario, we’ll do the following:
- Create the premium package bookable product
- Configure the general settings for the premium package
- Set up resources for the premium package
- Set up availability for the premium package
- Set up persons for the premium package
- Complete setting up the Snowmobile resource
- Create the basic package bookable product
- Publishing both products
Once set up and published, your customers will see the packages for booking on your site.
Creating The Premium Package Product
↑ Back to topFor this scenario, we will require two separate products.
First we’ll create the Premium Package, where customers are reserving the full set of 40 snowmobiles as a block.
To create the product, run through this process:
- In the sidebar of your WordPress Admin, click on Products.
- Click on the Add New button on the top.
- Enter a title for the package – this one will be the Premium Package.
- Under Product data, select Bookable Product.
General Settings for the Premium Package
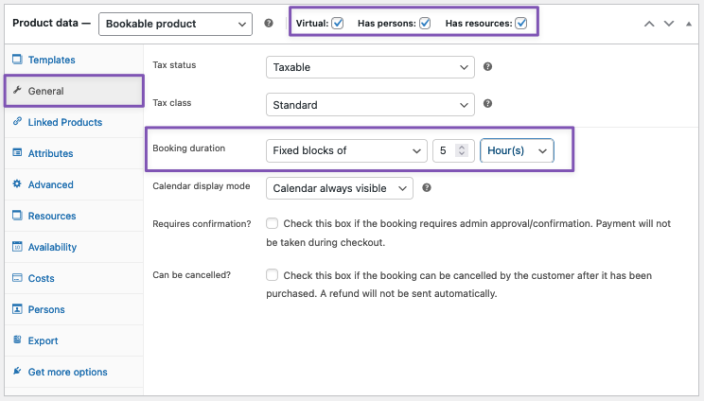
↑ Back to topOn your newly created Bookable Product (Premium Package), scroll down to the Product Data > General tab.
- Check the Virtual box to indicate that this product is virtual, as there is no physical item to be delivered. This will cause orders for these packages / bookings to be automatically marked as Complete once they are paid.
- Check the Has Persons box to indicate that this type of package has a number of persons. Although the Premium Package is for a specific number of persons (40), we will require this setting in order to assign the 40 snowmobiles to this package, as they are assigned on a per-person basis.
- Set the Booking Duration to be Fixed Blocks of 5 Hours, as both snowmobile packages are sold in 5 hour blocks.
Setting up Resources for the Premium Package
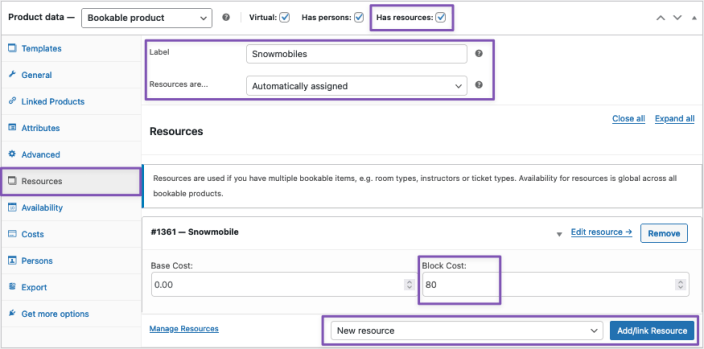
↑ Back to topIn the Product Data box, click on the Resources tab. This is where you attach a physical resource to your product and assign a price per resource.
- Enter a label for the resources – in this case, Snowmobiles. The snowmobiles are a physical item that can only be used by one visitor at a time; once they are assigned to a visitor as part of a package, they are “claimed” and cannot be used by any other customers.
- Set Resources are… to
Automatically assigned. This means that with every person added to the package, a snowmobile is automatically claimed. For the Premium Package, we will be setting it up so the package includes 40 people and thus claims all 40 snowmobiles. - Click the Add/link Resource button to add a new resource. Give it the name “Snowmobiles.”
- Set a price for the Snowmobile rental. In this case, we will use the Block Cost, which is a price-per-block booked. The price for the snowmobile rental for the 5-hour block is $80 in this scenario.
Additional detail is required to complete the Snowmobile Resource, but we will complete that in a future step.
Setting Availability for the Premium Package
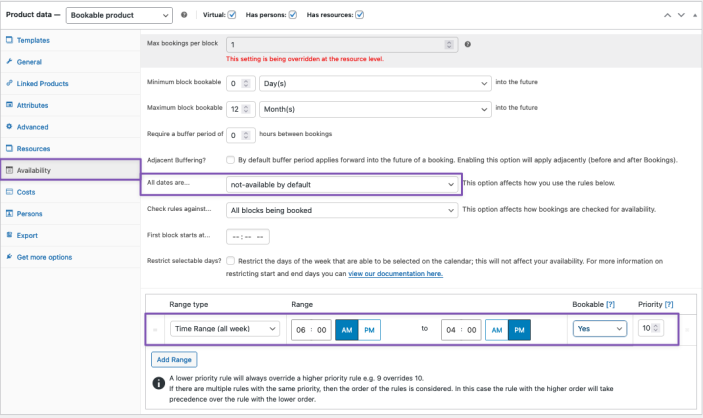
↑ Back to topIn the Product Data box, click on the Availability tab. Here, we will set the days and dates that the packages are available.
- The Max Bookings per Block setting is ignored when Resources are in use, so this setting is not required.
- Set Minimum block bookable and Maximum Block Bookable for allowed days in advance the room can be booked. In our example here, we are using a 0 day minimum, meaning same-day bookings are allowed, and a 12 month maximum, meaning tickets can be purchased for dates up to a year in advance.
- Setting the All dates are… to
not-available by defaultis often the best approach when creating complex availability rules. It’s easier to then add days and dates when the booking is available in the Range Box. In this case, we will take that approach and set this setting to not-available by default. - Use the Range Type and Days/Dates to set a daily Time Range of
6 a.m. to 4 p.m.and mark these times as available for booking by setting the Bookable column toYes. Note that since the packages are booked in 5 hour blocks, this results in two available booking times each day – 6 a.m. and 11 a.m.
Now our premium package’s availability is all set!
Setting up Persons for the Premium Package
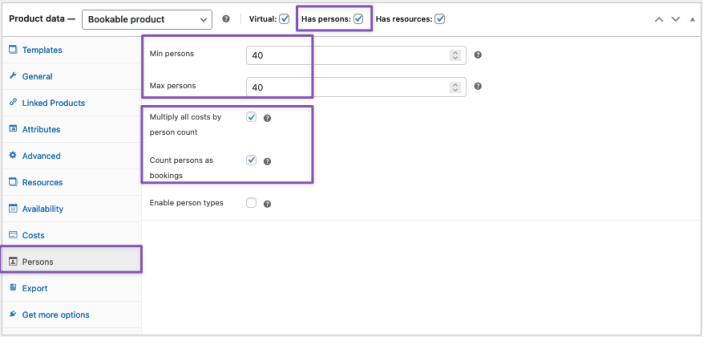
↑ Back to topIn the Product Data box, click on the Persons tab. Here, we will set the premium package to use all snowmobiles for every booking.
- Set both Min Persons and Max Persons to 40. This means that there has to be exactly 40 persons to book this reservation.
- Check the option to Multiply all costs by person count. This will charge for the booking 40 x the cost of the snowmobile rental, as it is the only assigned cost the moment. Setting up the price in this way allows you to change the snowmobile rental cost in the future and have the price of the package update accordingly.
- Check the option to Count persons as bookings to link the amount of resources and persons together – 40 snowmobiles and 40 persons. This ensures that when a booking of the Premium Package is made, 40 persons will automatically be added and that will use all 40 snowmobiles.
Complete Resource Setup
↑ Back to topNow that the Premium Package product is complete, we need to finish setting up the resource, Snowmobiles.
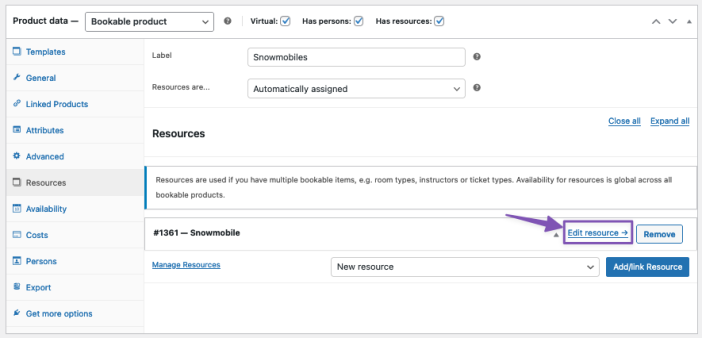
- Return to the Resources tab under Product Data on the Premium Package product editing page, and click Manage Resources near the bottom of the tab.
- A new browser tab opens and shows you the Bookable Resources you created near the start of this use case, in this case, “Snowmobiles.” Click the name of the resource to edit it.
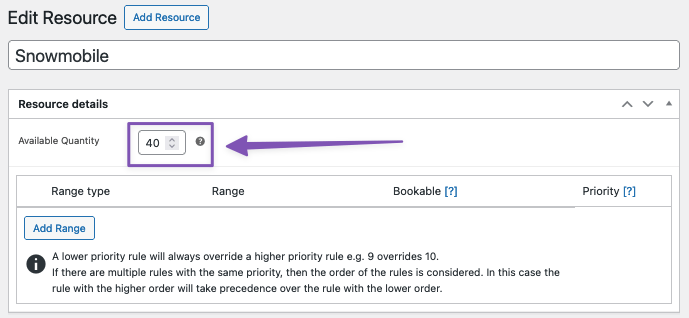
- Change the Available Quantity to
40. This tells Bookings that there are up to 40 physical snowmobiles available to be reserved with any bookings product that uses this resource. The 40 snowmobiles will be shared across all products that make use of this resource; this means that:- the Premium Package can only be booked if all 40 snowmobiles are available
- when the Premium Package is booked, any other products that require snowmobiles (i.e. the Basic Package) would not be available, as all snowmobiles are in use
Publishing the Product
↑ Back to topAs with all WooCommerce Products, you can optionally add a Product Image, Product Categories, and Product Tags for the Premium Package product.
Then, publish the product using the “Publish” button in the top right corner of the “Edit Product” page.
Setting up the Basic Package
↑ Back to topWe’ll now set up the second product, for the basic package. This package allows a variable number of persons to be booked between 1 and 40, based on the availability of snowmobiles. With a snowmobile reserved for each person on the booking.
To create the product, run through this process:
- In the sidebar of your WordPress Admin, click on Products.
- Click on the Add New button on the top.
- Enter a title for the package – this one will be the Basic Package.
- Under Product data, select Bookable Product.
To configure the basic package, work through the same steps above as for the premium package, with the following tweaks:
- General Settings: same as above for the premium package.
- Resources Settings: for the Basic Package, instead of clicking the button to add a new resource, use the dropdown to choose the existing Snowmobiles resource and then click to Add Resource. This ensures the two products share the same set of snowmobile resources.

- Availability Settings: same as above for the premium package.
- Persons Settings: For the Basic Package, set the Min Persons option to 1, and Max Persons to 40. This allows the Basic Package to be booked for a variable number of people between 1 and 40 and assign the matching number of snowmobiles to the booking. Note that any booking of the Basic Package will block the booking of the Premium Package in the same time slot, as not all 40 snowmobiles are available any longer.
Remember to publish the product once you’re finished setting it up!
Customer View
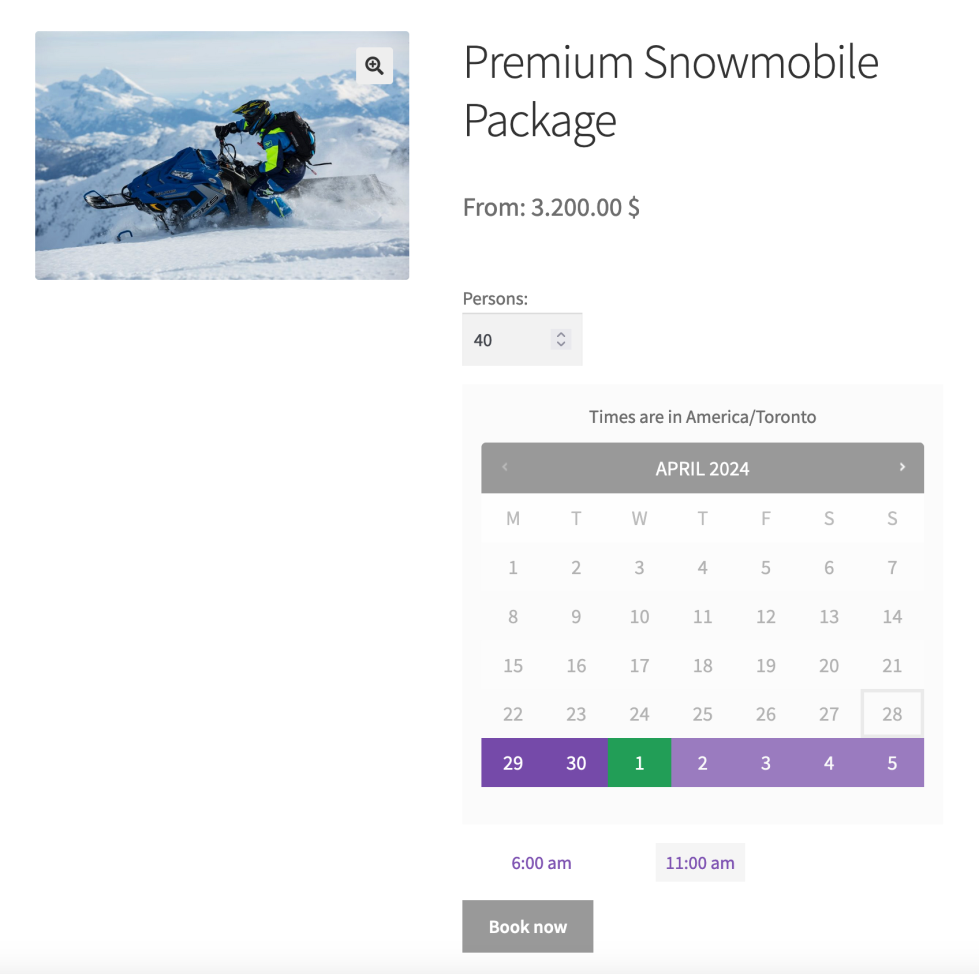
↑ Back to topOn your website, this is what customers will see for the Premium Package:
And this is what customers will see for the Basic Package:
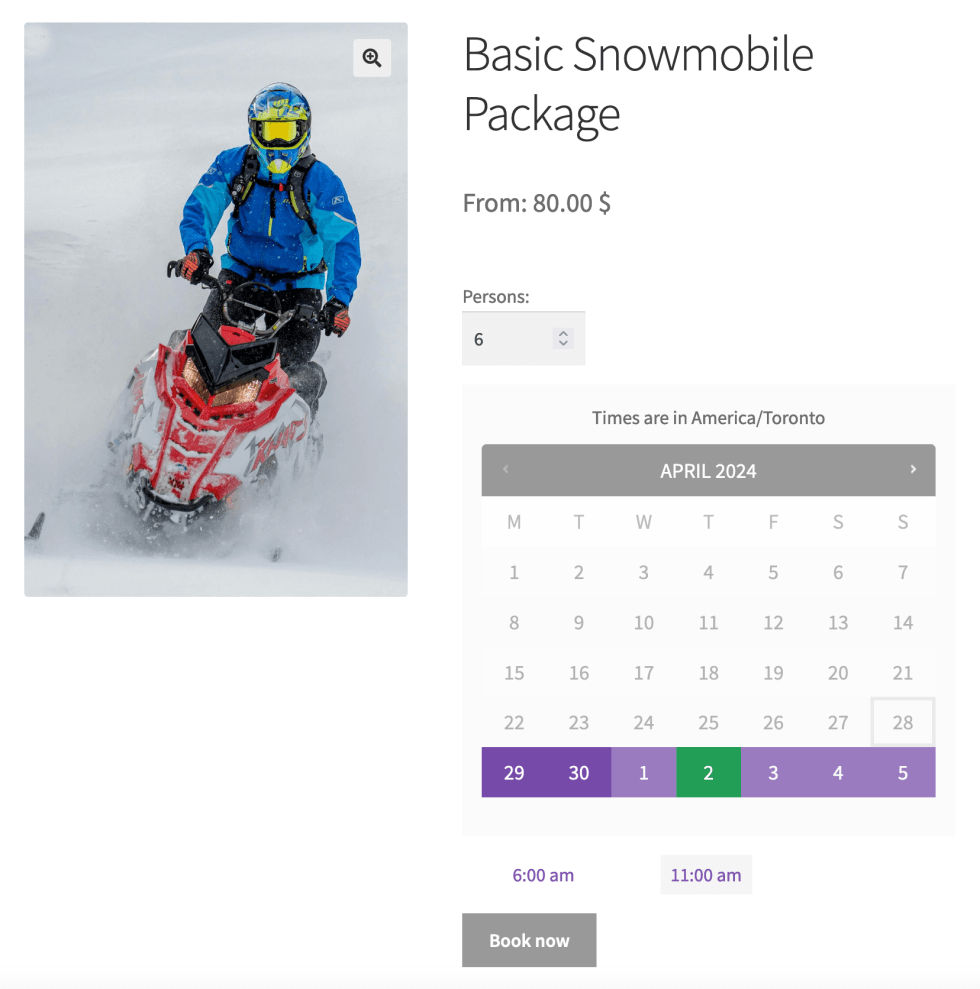
If a bookings is made for the premium package, the basic package will be unavailable for that time slot, and vice versa.
Questions and support
↑ Back to topSomething missing from this documentation? Still have questions and need assistance?
- If you have a question about a specific extension or theme you’d like to purchase, contact us to get answers.
- If you already purchased this product and need some assistance, get in touch with a Happiness Engineer via our support page and select this product’s name from the Product dropdown.
