Sell a monthly set of appointment coupons, then let customers choose their appointment times separately. This guide combines WooCommerce Bookings with recurring billing: each successful subscription order issues fresh coupons that pay for future bookings.
Scenario
↑ Back to topHarborline Coaching offers one-hour strategy sessions at $100 each. A customer buys four sessions per month for $400 per month. Each successful purchase or renewal issues four unique 100% discount coupons, and each code pays for one session.
The subscription pays for appointments; it does not reserve dates or create recurring bookings. Customers still choose available times and complete a booking order for each appointment.
Before you begin
↑ Back to topInstall and activate WooCommerce, WooCommerce Bookings, WooCommerce Subscriptions, Smart Coupons, and Min/Max Quantities. You need administrator access and coupons enabled under WooCommerce > Settings > General. Test the setup before accepting customer payments.
For automatic monthly charges, configure a payment gateway that supports automatic subscription renewals. With manual renewals, customers must pay each renewal order before it issues new coupons.
This coupon-renewal workflow uses the classic Simple subscription product type. If it is missing from the product type list, go to WooCommerce > Settings > Subscriptions > Subscription product creation, enable Simple subscription, and save. Subscriptions recommends Subscription plans for general product setup; Smart Coupons’ Send coupons on renewals? control used here is available on the classic subscription product types.
Set up the appointment and monthly plan
↑ Back to topCreate the appointment product
↑ Back to top- Go to Products > Add new product and name it One-Hour Strategy Session.
- Select Bookable product in Product data and enable Virtual, because no item needs shipping. Leave Has persons and Has resources unchecked for this one-to-one example.
- On General, set Booking duration to Fixed blocks of 1 Hour.
- On Availability, set Max bookings per block to 1, Minimum block bookable to 1 Day, and Maximum block bookable to 6 Months.
- Set All dates are… to not-available by default. Add three rules: Every Monday (Set time), Every Wednesday (Set time), and Every Friday (Set time). For each, set the time range to 09:00–17:00, Bookable to Yes, and Priority to 10.
- Set First block starts at… to 09:00 and leave the buffer at 0 Hours. Check the store timezone under Settings > General.
- On Costs, set Base cost to 0 and Block cost to 100. Add no cost rules.
- Select Publish.
The last one-hour appointment starts at 4 pm and ends at 5 pm. Tuesday and Thursday are unavailable. Store-wide availability rules or existing bookings can further restrict these times.
Create the appointment coupon template
↑ Back to topCreate one template that Smart Coupons will copy for every session purchased. Customers use the generated codes, rather than sharing the template code.
- Go to Marketing > Coupons and select Add coupon. Use monthly-session as the coupon code.
- On General, set Discount type to Percentage discount and Coupon amount to 100.
- Enable Auto generate?. Under Optional coupon code format, enter HLC- as the prefix.
- Leave Disable email restriction? unchecked. Generated codes will be restricted to the buyer or recipient’s email address.
- On Usage restriction, select only One-Hour Strategy Session under Products. Enable Individual use only so the code is used on its own.
- On Usage limits, set Usage limit per coupon, Limit usage to X items, and Usage limit per user to 1.
- Select Publish.
The item limit matters: one coupon covers one appointment, even if a customer puts several appointments in the cart. Product restrictions prevent it from discounting the monthly plan or unrelated products.
This example leaves coupon expiry and validity blank, so unused codes carry forward. Set a coupon validity period if your business requires unused sessions to expire, and explain that policy to customers.
Create the monthly plan
↑ Back to top- Go to Products > Add new product and name it Monthly Coaching Plan.
- Select Simple subscription in Product data and enable Virtual.
- On General, set Subscription price to 100 every month. Leave the sign-up fee and free trial at 0, and the subscription length unlimited.
- In Quantity rules, set Group of to 4. Leave the minimum and maximum quantity blank for this example.
- In Coupons, select the monthly-session template. Enable Send coupons on renewals?. This checkbox appears after you select a coupon on a subscription product.
- Add a description explaining the monthly total, how to book appointments, and your unused-session policy. Select Publish.
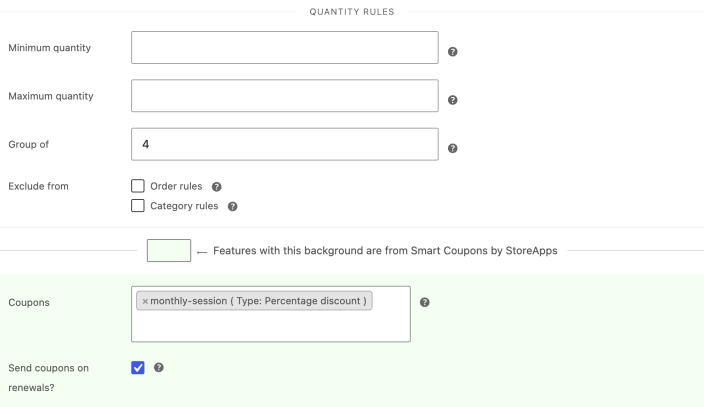
The subscription price is per session: $100 × 4 = $400 per month. Group of 4 allows multiples such as 4 or 8; eight sessions cost $800 per month and issue eight coupons. If you offer only four at a time, also set the minimum and maximum quantity to 4.
Check the customer experience
↑ Back to topPurchase the monthly plan
↑ Back to topOpen the Monthly Coaching Plan product. Its displayed unit price is $100 per month, and the starting quantity is 4. Explain the $400 monthly total in the product description so customers can recognize the full commitment.
Confirm the cart total
↑ Back to topFor quantity 4, the Cart block should show Total due today: $400 and Monthly recurring total: $400, before any applicable taxes or other charges. A quantity of 3 or 5 should be rejected because it is not a multiple of 4.
Confirm coupon delivery
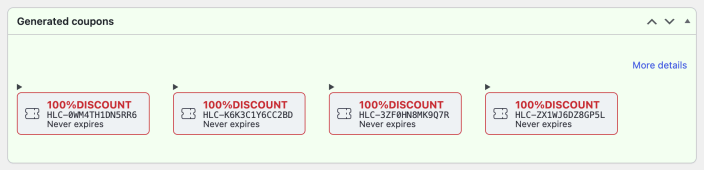
↑ Back to topOnce the purchase order reaches Processing or Completed, Smart Coupons generates four distinct codes. Customers can find them under My account > Orders > View on the purchase order, and receive coupon emails when those emails are enabled.
As the store administrator, open that order under WooCommerce > Orders and check its Generated coupons panel. Confirm that there are four new codes, rather than four copies of the same code.
Book an appointment with one coupon
↑ Back to top- Open One-Hour Strategy Session, choose an available date and time, and add the appointment to the cart.
- Apply one generated code in the cart or checkout. Use the billing email address associated with that coupon.
- Confirm that the $100 appointment is discounted to $0, then complete checkout to create the booking. Review any taxes, fees, or other cart items separately.
- Check the appointment under Bookings > All bookings and confirm the code has been used once under Marketing > Coupons.
A coupon does not guarantee a particular time slot. Customers must still book an available appointment, and a code that has reached its usage limit cannot pay for another booking.
Cancel a coupon-paid appointment
↑ Back to topFor a single appointment paid entirely by a coupon, there is no payment to refund on the booking order. To let the customer rebook:
- Open the appointment under Bookings > All bookings, set its status to Cancelled, and select Save Booking.
- Open its associated order under WooCommerce > Orders. When that order contains only this booking, Bookings also changes the order to Cancelled. Confirm the status was saved.
- Open the generated code under Marketing > Coupons and confirm its recorded use has been removed. The same code can be used again if it is still valid.
For an order containing other appointments or products, cancelling one booking may leave the order active. Review the remaining items before changing the whole order’s status; do not cancel an order for services the customer is keeping. Handle any actual payments and refunds separately from restoring a coupon. Changing an order to Refunded does not by itself release this percentage coupon’s recorded use.
The $400 subscription purchase is a separate order from the $0 appointment order. Cancelling an appointment does not cancel the customer’s monthly subscription.
Check the next renewal
↑ Back to topAfter a renewal order reaches Processing or Completed, it should contain a fresh set of four codes. A renewal order awaiting payment does not issue the new set. Customers find the codes under My account > Orders > View on the renewal order.
On a test store, verify both the initial purchase and a renewal. Compare the generated codes, redeem one for a $0 appointment, then cancel that appointment and confirm the code can be reused. Test your configured payment gateway separately before accepting live automatic payments.
Cancelling the subscription stops future renewals. Already-issued coupons remain available until they are used or expire; review those codes separately if your cancellation policy requires a different outcome.
If coupons or prices do not match
↑ Back to top- The plan totals $100 instead of $400: check that the unit price is $100 and the quantity is 4. Set Group of 4 on the subscription product, rather than on the appointment product.
- The renewal checkbox is missing: confirm the product type is Simple subscription and a coupon is selected in its General tab. This is a product setting, not a setting in the coupon editor.
- New codes are missing: check the purchase or renewal order’s status, the attached template’s Auto generate? option, and Send coupons on renewals? on the plan. Check the order’s Generated coupons panel before resending an email.
- A code is rejected: check its product restriction, buyer email, expiry, and usage limit. Use a generated code from the customer’s order.
- More than one appointment becomes free: set Limit usage to X items to 1 on the template and inspect the limits on codes already issued. Changing the template does not rewrite existing generated coupons.
- No appointment times appear: choose a future Monday, Wednesday, or Friday within the booking window and check the store timezone, availability rules, and existing bookings.
Questions and support
↑ Back to topSomething missing from this documentation? Still have questions and need assistance?
- If you have a question about a specific extension or theme you’d like to purchase, contact us to get answers.
- If you already purchased this product and need some assistance, get in touch with a Happiness Engineer via our support page and select this product’s name from the Product dropdown.