This scenario will walk you through how to use WooCommerce and WooCommerce Bookings to set up availability for multiple people, restrict specific dates and times, require customers to confirm bookings and offer a buffer period for cancellations.
Scenario
↑ Back to topJohn and Jane have a law office. Clients can choose who they want to make an appointment with and select a date and time, excluding holidays. The booking requires the law office to confirm the booking, and customers can cancel their meeting up to 7 days before the appointment. Note that because the law firm requires to approve the booking first before it’s fully booked, payment will not be taken at initial time of checkout.
Requirements:
- Their office is open from 10:00 to 13:00(10:00AM to 1:00PM) and from 15:00 to 18:00 (3:00PM to 6:00PM) for appointments, Monday to Friday.
- Meetings are 1 hour each.
- They also are closed on public holidays, for example, 25th December and 1st January will not be available for booking.
- They want to confirm each booking and they want their clients to be able to cancel the booking a minimum of 7 days prior to the appointment.

Setup and Configuration
↑ Back to topTo configure the requirements of John’s and Jane’s Law Office schedule, we’ll need to complete a few steps:
- Create and configure Resources – in this case, this will be the two lawyers Mr. John Doe and Ms. Jane Doe.
- Set up the law office’s global availability – This is under the “Store Availability” settings in Bookings > Settings. We’ll use this to configure the law offices hours/schedule.
- Create and configure the bookable product – We’ll create the a bookable product for client’s to schedule their law appointments with their lawyer.
Each of these steps is outlined in more detail in the rest of this document.
Configure the Resources
↑ Back to topBefore we create the appointment product, we’ll want to create the two resources (the lawyers), that customers choose from when booking an appointment. Follow these steps to create and configure John and Jane as resources for clients:
- Click on Bookings > Resources in the WordPress-Admin side bar.
- Click the Add Resource button.
- Enter the name of the first lawyer, Ms. Jane Doe in the Bookable Resource Name box at the top of the screen.
- Set the Available Quantity to
1. This ensures lawyers can only be booked in one session per booking block. - Click the Publish button to save the resource.
- Repeat steps 2 – 5 to add Mr. John Doe as a resource.
Here is an example, using Ms. Jane Doe’s resource configuration, of what the settings will look once complete:

Configure the Store Availability
↑ Back to topNext, we’ll set the law office’s hours in the general bookings settings under Bookings > Settings >Store Availability. We’ll want to configure this so that the law office is closed on Saturdays and Sundays, as well as December 25th and January 1st.
- Navigate to Bookings > Settings > Store Availability tab.
- Click the Add Range button three times to create three global availability rules.
- Select
Range of Daysin the Range type column for the first availability rule and then set the following:- Select
SaturdaytoSundayfor the Range. - Select
Nofor Bookable. - (Optional) Enter a title for the availability rule. For this example, we use
Weekend - Closed - Set priority to
10
- Select
- Select
Date Rangein the Range type column for the remaining two availability rules and then set the following:- Select, in the first Range,
December 25thtoDecember 25th. - Select, in the second Range,
January 1sttoJanuary 1st. - Select
Noin the Bookable column for both. - (Optional) Enter titles for the availability rules. For this example, we use
Holiday - Closed
- Select, in the first Range,
- Click the Save Changes button at the bottom of the screen.
Once complete, here is how the law office’s availability rules look:

Create and Configure the Lawyer – Appointment Bookable Product
↑ Back to topFinally, we create a configure the bookable product so that customers can book time with either John Doe or Jane Doe. For this bookable product’s requirements, we’ll need to configure the General settings tab, the Resource tab, and the Availability tab to meet the needs of the law office and its lawyers.
First, we’ll create the bookable product:
- Hover over Products and click Add New in your WordPress Admin. .
- Select Bookable Product from the product data dropdown menu.
- Tick/Check the boxes for Virtual (this is to remove shipping requirements) and Has Resources (this is to add the lawyers to appointments)
Next, we’ll configure the General settings tab:
This tab is where we’ll configure the appointment blocks. Remember, they are one (1) hour, need to be approved by store admin, and they need to allow for cancelation up to 7 days before the appointment. Follow these instructions to set this up:
- Click on the General tab in the bookable product settings.
- Set the Booking duration to
fixed blocks of(first field),1(second field),Hour(s)(third field). - Tick/Check the boxes for Requires confirmation? and Can be cancelled?.
- Set the Booking can be cancelled until field to
7(first field) ,Day(s)(second field).
Here’s how the law office’s general settings tab should look:

Now, we’ll add the resources, the lawyers, that we created early to the bookable product:
- Click the Resources tab.
- Enter a label for the resource. We’ll use
Lawyerfor our example. - Select
Customer selectedfrom the Resources are. . . dropdown menu. - Select
Ms. Jane Doefrom the dropdown in the Resources section. - Click the Add/link Resource button to add the lawyer as a resource to the product.
- Repeat steps 4 and 5 to add Mr. John Doe as a resource to the product.
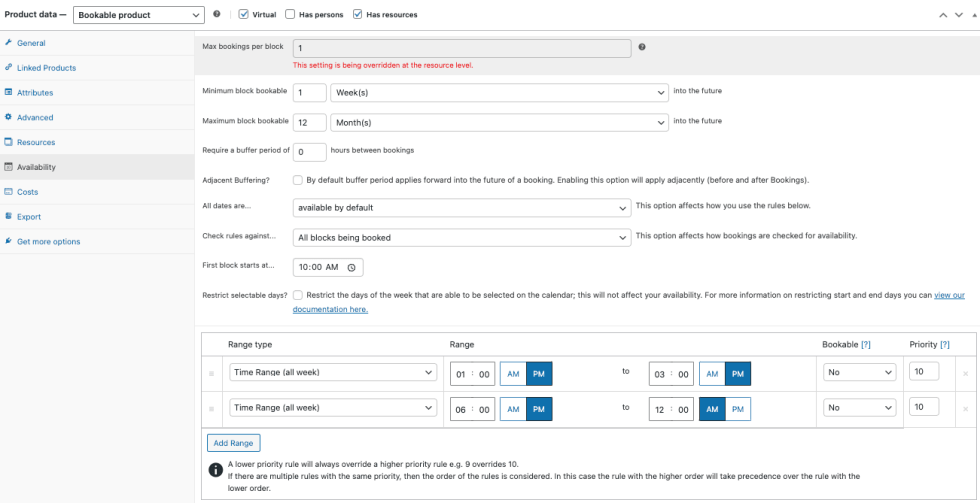
Finally, we’ll configure the bookable product’s availability:
- Click the Availability tab.
- Enter
1(first field) in the Minimum blocks bookable selector, then selectWeek(s)into the future (second field). This aligns with the cancelation policy. - Select
available by defaultfrom the All dates are . . . dropdown menu, as we’ve already set any specific closure requirements in the Store Availability settings. - Select
all blocks being bookedfrom the Check rules against… dropdown menu. - Enter
10:00AMin the First block starts at… field (that ensures no appointments can be made before the office opens). - Click the Add Range button, near the bottom of the settings, two times to create two custom availability rules.
- Select
Time Range (all week)for the Range type for both custom ruless, then:- Set the Range from
1:00PMto3:00PMin the first custom rule. - Set the Range from
6:00PMto12:00AMin the second custom rule. - Select
Noin the bookable column for both. - Set the Priority to
10
- Set the Range from
- Click the Publish button in the top of the product settings to make the bookable product available to clients.
Here’s how the Law Office’s Availability settings look:

A note about configuring Costs:
We don’t specifically cover the Costs tab in this use case, however, to set a cost for each bookable product you’ll want to click the Costs tab and enter the relevant information. You can find more information about entering costs by reading Costs for Bookable Products. For our example, we’ve set a flat Base cost for the product at $200.
Customer Experience
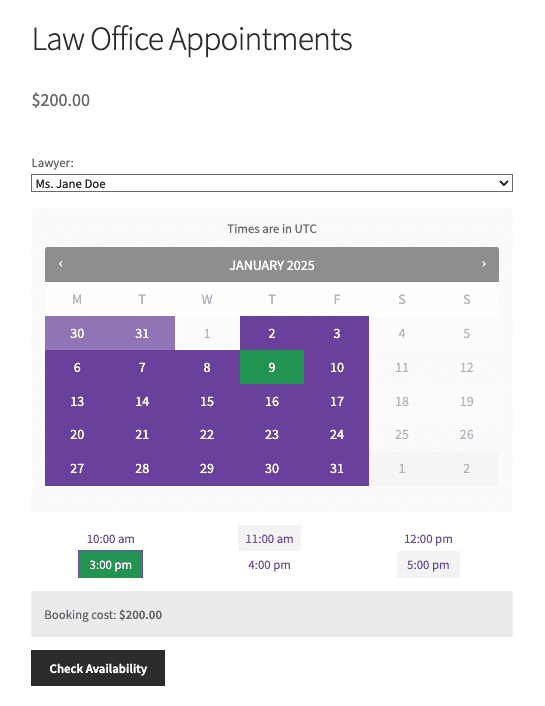
↑ Back to topNow that we’ve configured our bookable product, the lawyers’ clients can book appointments with both Mr. John Doe or Ms. Jane Doe. This how the booking calendar will look on the front end of the site (notice the closed hours and the lawyer selector we configured):

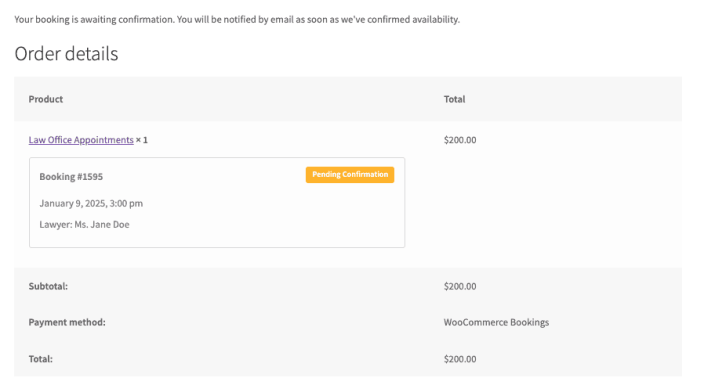
Notice in the image above, instead of the usual Book Now button, clients will be presented with a Check Availability button. This appears because all appointments need a confirmation by a store admin. At checkout, clients will not need to add their credit card information, since the appointment needs to be confirmed first. They’ll click a Request Confirmation button on checkout. Once clicked, they will see this pending confirmation screen:

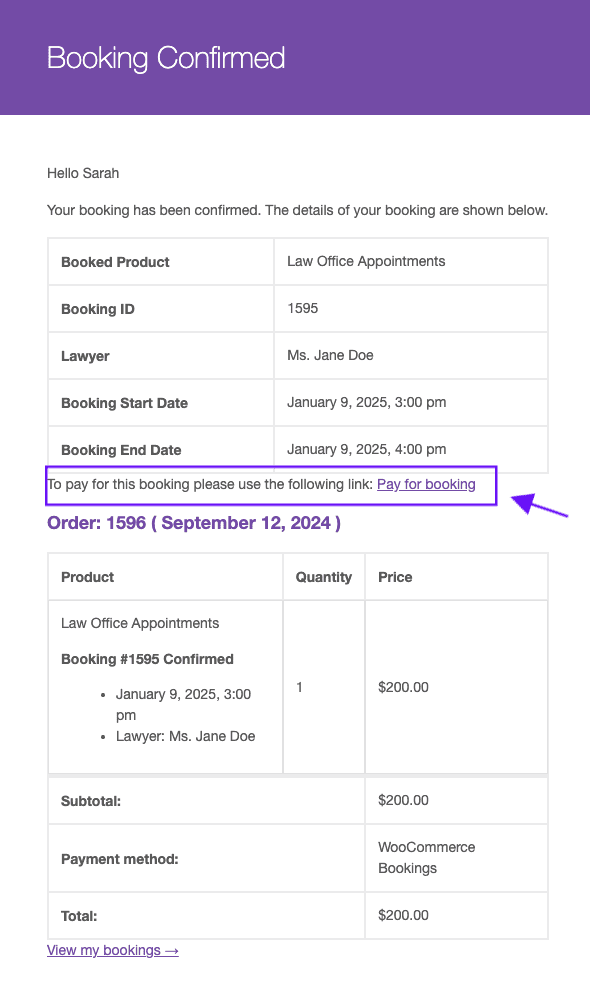
Once a store admin confirms the client’s booking, the client will receive an email that confirms the booking and asks them to pay for it:

From there, the customer pays and the booking is set to paid .
Store Admin Experience
↑ Back to topSince the law office requires confirmation of each booking before it’s confirmed, the store admin experience is slightly different than bookings that don’t require confirmation. These are the events that occur for store admin once a client sends an appointment request:
- The store admin s receives an email with details and a link to confirm the booking.
- The store admin navigates to Bookings in WordPress-Admin.
- The store admin will see
pending bookings(indicated by a small clock next to the booked product name). - Store admin clicks the check mark under the Actions column to confirm the booking:

- The customer receives an email to confirm the booking and prompts them to pay for the booking. Once the customer pays, the booking moves from
confirmedtopaidstatus.
This ends the process for booking an appointment.
Questions and support
↑ Back to topSomething missing from this documentation? Still have questions and need assistance?
- If you have a question about a specific extension or theme you’d like to purchase, contact us to get answers.
- If you already purchased this product and need some assistance, get in touch with a Happiness Engineer via our support page and select this product’s name from the Product dropdown.
