SMTP & Email Logs for WooCommerce
SMTP & Email Logs for WooCommerce enhances your store’s email delivery by integrating WooCommerce with authenticated SMTP providers.
Instead of relying on the default WordPress mail function, this extension routes WooCommerce emails through a configured email service provider. This helps ensure that transactional emails such as order confirmations, customer notifications, and status updates are delivered reliably.
The extension also records all outgoing emails in a centralized log so store administrators can review message activity, verify delivery status, and resend emails if needed.
Features
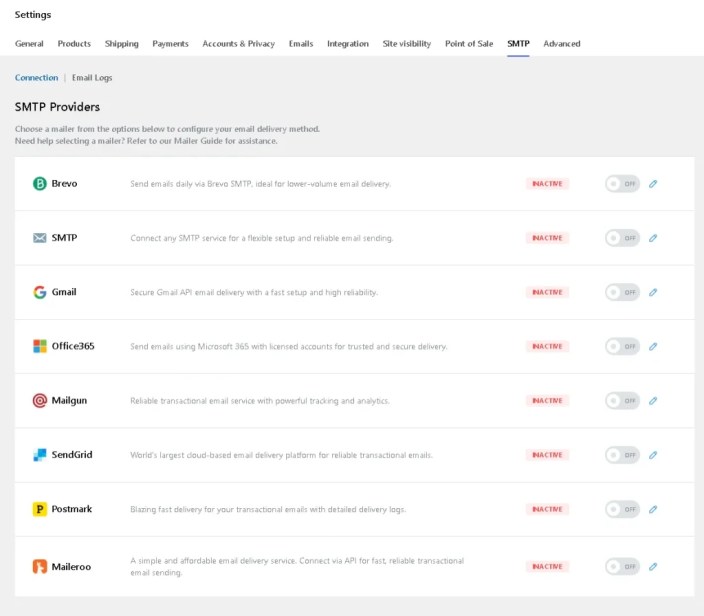
↑ Back to top- Multiple SMTP mailer integrations (Brevo, Gmail, Microsoft 365, Mailgun, SendGrid, Postmark, Maileroo, Custom SMTP)
- Centralized email log dashboard
- Order-based email logging
- Delivery status indicators (Success / Failed)
- Resend failed emails
- Export email logs
- Secure authentication using API credentials or SMTP configuration
- Email logs are visible within WooCommerce orders
- SMTP configuration directly within WooCommerce settings
Supported SMTP providers
↑ Back to top- This extension supports the following SMTP mailers:
- Brevo (formerly Sendinblue)
- Gmail / Google Workspace
- Microsoft 365 / Outlook
- Mailgun
- SendGrid
- Postmark
- Maileroo
- Other SMTP providers (manual configuration)
Note: You can enable one mailer at a time, and each mailer requires credentials that must be created within the provider’s account dashboard.
Installation
↑ Back to topTo start using SMTP & Email Logs, you can access store the functionality on the order confirmation page or the My subscriptions section in your account.
- Navigate to My subscriptions.
- Find the Add to store button next to the product you’re planning to install.
- Follow the instructions on the screen, and the product will be automatically added to your store.
- Alternative options and more information at: Managing WooCommerce.com subscriptions.
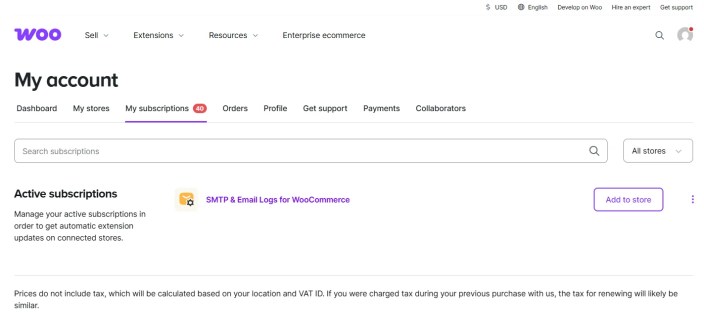
Adding a WooCommerce.com subscription to your store
Getting started
↑ Back to topWhat is SMTP?
↑ Back to topSMTP (Simple Mail Transfer Protocol) is the standard protocol used by email servers to send outgoing messages.
By default, WordPress uses the built-in PHP mail function to send emails. In many hosting environments, this method may cause email delivery issues because messages are sent without authentication.
Using an authenticated SMTP provider allows WooCommerce to send emails through a trusted email service. This improves delivery reliability and provides a clear record of outgoing email activity.
Once SMTP is configured, all WooCommerce transactional emails will be sent using the selected mailer connection.
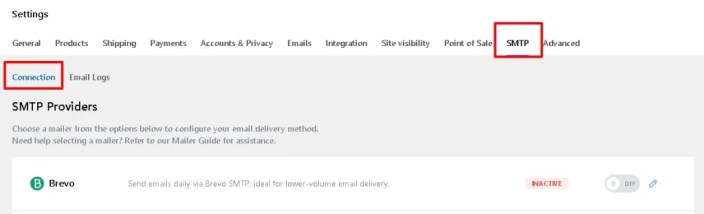
Setting up SMTP mailers
↑ Back to topTo configure your email provider:
- From your site’s WP Admin dashboard, navigate to WooCommerce → Settings → SMTP → Connection.
- Select your preferred Mailer Provider from Connections.
- Enter the required authentication details.
- Click Save Changes.
After saving the configuration, WooCommerce emails will be sent using the selected mailer.
Other SMTP providers
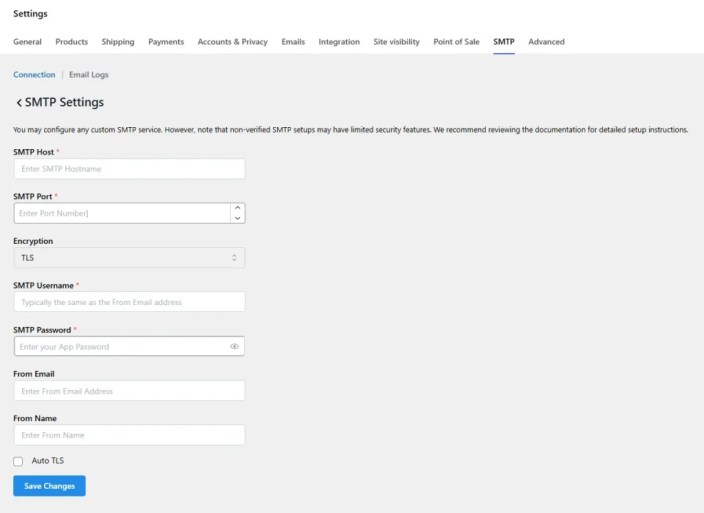
↑ Back to topIf your provider is not listed, you can configure a standard SMTP connection manually.
Get your SMTP credentials
Your email service provider will provide the following details in their SMTP configuration documentation:
- SMTP Host
- Encryption type
- SMTP Username (email used & same as Sender Email Address)
- SMTP Password (password to log in to your mail account)
- Sender email address
These details are typically available in the provider’s email configuration or account settings.
Add SMTP credentials in the plugin
- Navigate to WooCommerce → Settings → SMTP → Connection.
- Select Other SMTP.
- Enter the required SMTP credentials.
- Click Save Changes.
Brevo (formerly Sendinblue)
↑ Back to topTo connect your WooCommerce store with Brevo, you must generate an API key from your Brevo account.
Get your Brevo API Key
- Sign in to your Brevo account dashboard.
- Navigate to SMTP & API.
- Open the API Keys section.
- Click Generate a new API Key.
The generated API key allows your WooCommerce store to send emails through Brevo.
Official Brevo documentation for the generation of API keys.
Add the API Key in the plugin
After generating the API key:
- Navigate to WooCommerce → Settings → SMTP → Connection in your WordPress dashboard.
- Select Brevo as the mailer.
- Enter the following fields:
- API Key
- From Email
- Click Save Changes.

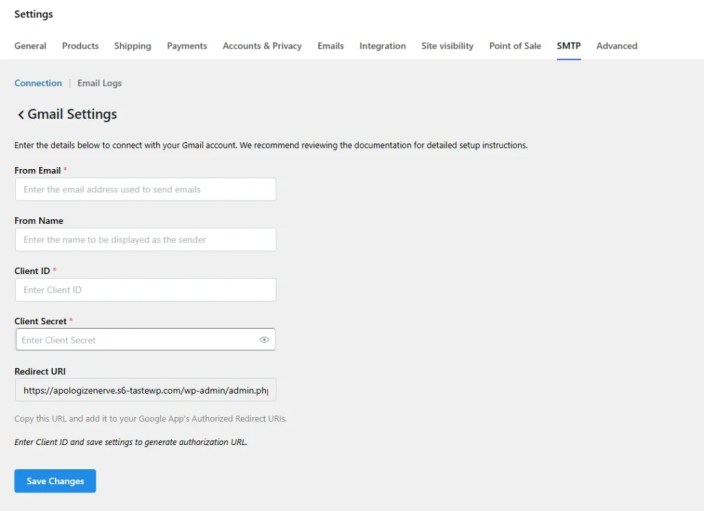
Gmail / Google Workspace
↑ Back to topGmail integration uses Google’s OAuth authentication system instead of traditional SMTP passwords.
This method allows secure authorization between your WooCommerce store and your Google account.
Create Gmail OAuth credentials
- Go to the Google Cloud Console.
- Create a new project or select an existing project.
- Navigate to APIs & Services → Library.
- Search for Gmail API and enable it.
- Navigate to APIs & Services → Credentials.
- Click Create Credentials.
- Select the OAuth Client ID.
- Choose Web Application as the application type.
- Add the Redirect URL provided by the plugin in the Authorized Redirect URIs section.
- Click Create.
Google will generate:
- Client ID
- Client Secret
The Client Secret is viewed once; make sure you copy & save it in a safe place.
Add Gmail credentials to the plugin
- Navigate to WooCommerce → Settings → SMTP → Connection.
- Select Gmail / Google Workspace.
- Enter the following fields:
- From Name
- From Email
- Client ID
- Client Secret
- Copy the Client ID and Client Secret from the Google Cloud Console and paste them into the corresponding fields.
- Click Save Changes.
Official Google documentation for Client ID & Client Secret generation.
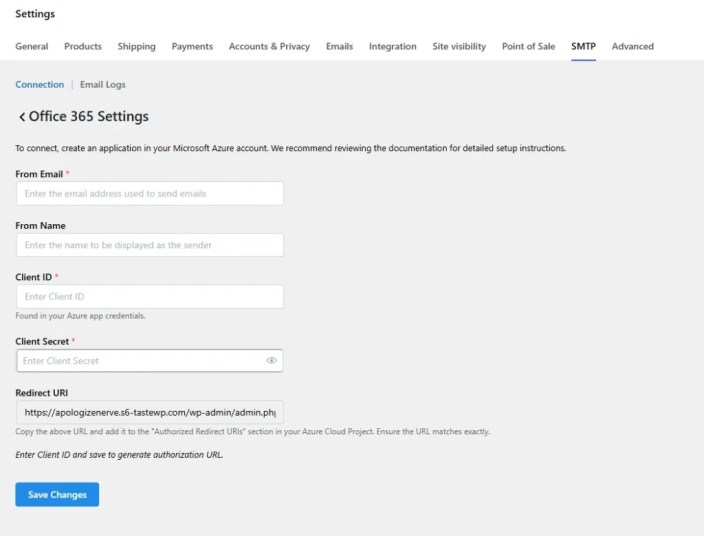
Microsoft 365 / Outlook
↑ Back to topMicrosoft email accounts use OAuth authentication configured through the Azure portal.
Create Microsoft OAuth credentials
- Go to the Microsoft Azure portal.
- Navigate to Microsoft Entra ID.
- Under Manage, on the left-hand side, select App Registrations.
- Click New Registration.
- Enter an application name.
- Select Web, from the drop-down below Redirect URI.
- Add the Redirect URL provided by the plugin.
- Complete the registration.
After the application is created:
- Open the registered application.
- Copy the Application (Client) ID.
- Navigate to Certificates & Secrets, under Manage on the left side of screen.
- Create a New Client Secret, by entering the Description & expiry.
The Client Secret Value is viewed once; make sure you copy & save it in a safe place.
Official Microsoft documentation for the generation of Client ID & Client Secret Value.
Add Microsoft credentials to the plugin
- Navigate to WooCommerce → Settings → SMTP → Connection.
- Select Microsoft 365 / Outlook.
- Enter the following fields:
- From Name
- From Email
- Client ID
- Client Secret Value
- Paste the credentials generated in the Azure portal.
- Click Save Changes.
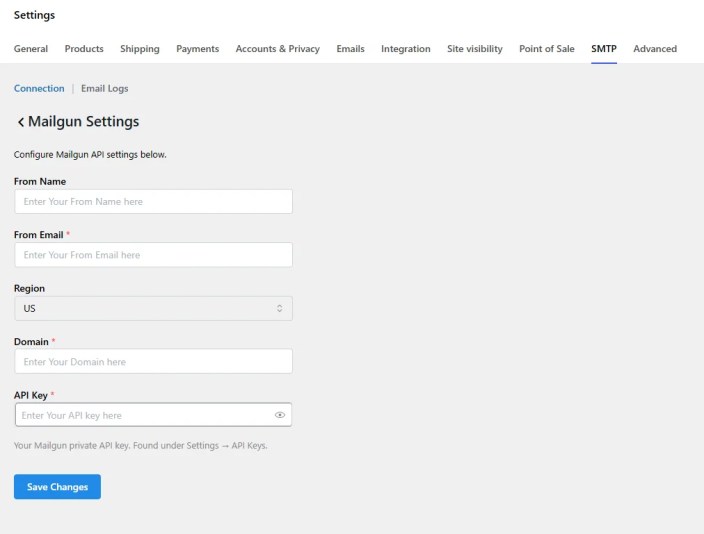
Mailgun
↑ Back to topMailgun requires an API key and a verified sending domain.
Generate your Mailgun API Key
- Sign in to your Mailgun dashboard.
- Navigate to Settings.
- Open the API Keys section.
- Copy the Private API Key.
Official Mailgun documentation for the generation of an API key.
Get your Mailgun sending domain
- Navigate to Sending → Domains in the Mailgun dashboard.
- Select the domain configured for sending emails.
The domain must be verified by adding the required DNS records provided by Mailgun.
Add Mailgun credentials in the plugin
- Navigate to WooCommerce → Settings → SMTP → Connection.
- Select Mailgun.
- Enter the following fields:
- From Name
- From Email
- Domain
- Region
- API Key (obtained from the Mailgun dashboard)
- Click Save Changes.
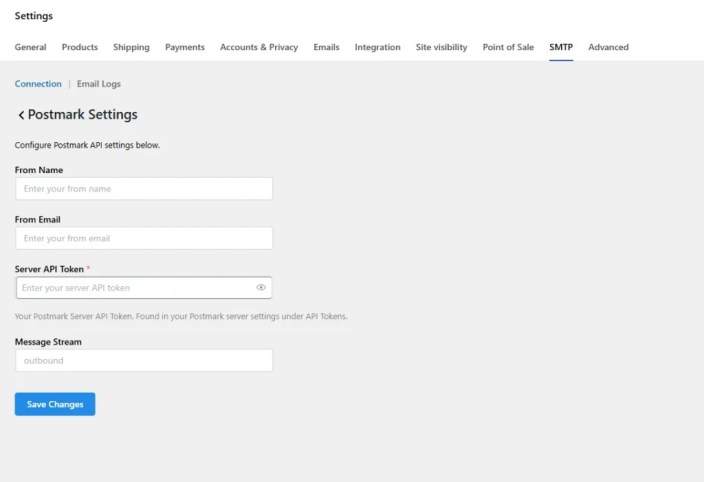
Postmark
↑ Back to topPostmark uses a Server API Token for authentication.
Get your Postmark Server API Token
- Sign in to the Postmark dashboard.
- Navigate to Servers.
- Select the server used for sending emails.
- Open the API Tokens section.
- Copy the Server API Token.
Find your Message Stream
- Inside the server configuration page, navigate to Message Streams.
- Locate the stream used for transactional emails.
Add Postmark credentials in the plugin
- Navigate to WooCommerce → Settings → SMTP → Connection.
- Select Postmark.
- Enter the following fields:
- From Name
- From Email
- Server API Token (Paste the values obtained from the Postmark’s dashboard.)
- Message Stream
- Click Save Changes.
Official Postmark documentation for the generation of Server API tokens.
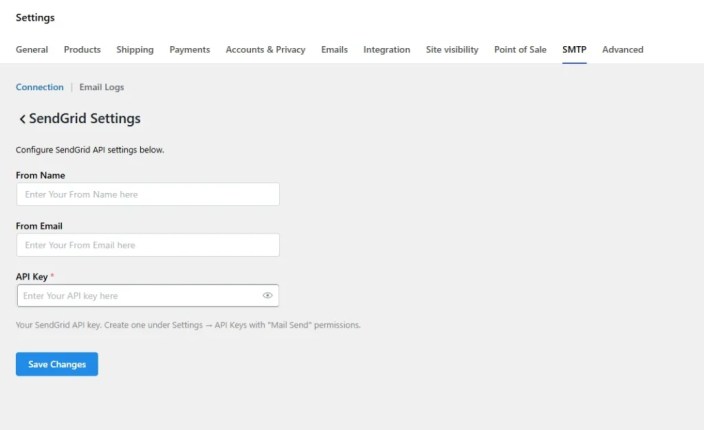
SendGrid
↑ Back to topSendGrid uses API keys to allow applications to send emails.
Create a SendGrid API Key
- Sign in to the SendGrid dashboard.
- Navigate to Settings → API Keys.
- Click Create API Key.
- Assign permissions that allow sending emails.
Official SendGrid documentation.
Add the API Key in the plugin
- Navigate to WooCommerce → Settings → SMTP → Connection.
- Select SendGrid.
- Enter the following fields:
- From Name
- From Email
- API Key (obtained from SendGrid’s dashboard)
- Click Save Changes.
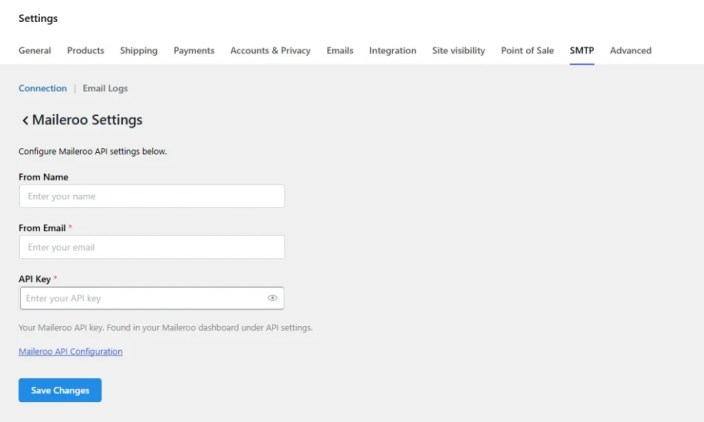
Maileroo
↑ Back to topMaileroo provides API-based email delivery.
Generate your Maileroo API Key
- Sign in to the Maileroo dashboard.
- Navigate to Settings.
- Open API Keys.
- Generate a new API key.
Official Maileroo documentation.
Add the API Key in the plugin
- Navigate to WooCommerce → Settings → SMTP → Connection.
- Select Maileroo.
- Enter the following fields:
- From Name
- From Email
- API Key (obtained from Maileroo’s dashboard).
- Click Save Changes.
This flexibility allows store owners to leverage their preferred email infrastructure while ensuring delivery reliability.
Email logs
↑ Back to topOnce SMTP is configured, all WooCommerce emails are automatically logged.
Logs are available in your WP Admin dashboard under:
WooCommerce → SMTP → Email Logs
Email activity related to orders is also available inside the order details screen.
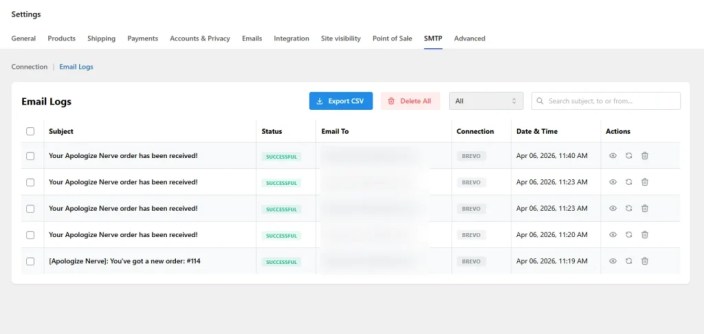
Users also see their logs on their respective order page that are saved in your WP Admin dashboard under WooCommerce > Orders > View Order > Email Logs (SMTP and Email Logs).
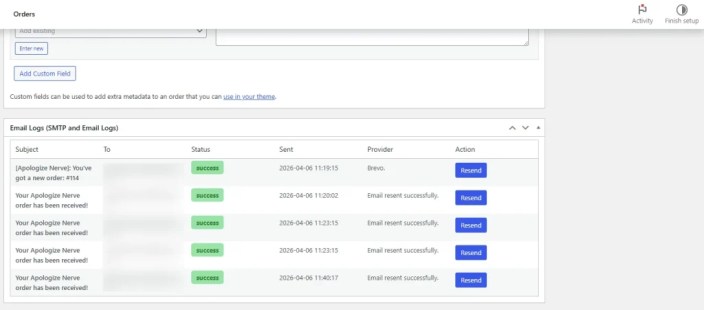
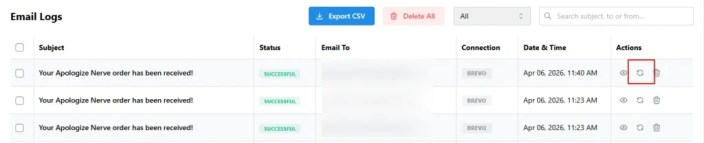
Each log entry includes:
- Email Subject
- Status (Success/Failed)
- Recipient Email Address (To)
- Provider (Email service provider being used)
- Timestamp (Sent)
- Actions (Resend) & (Delete)
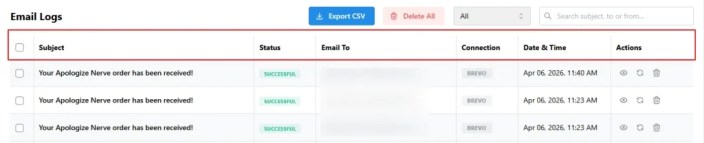
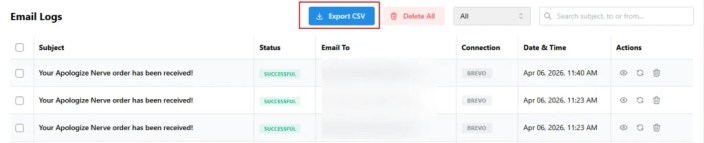
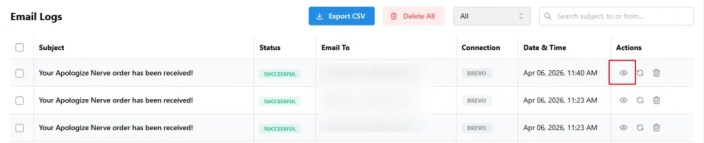
View Email logs
↑ Back to topTo view logged emails:
- Navigate to WooCommerce → SMTP → Email Logs.
Each entry contains:
- Email subject
- Recipient email address
- Connection (Email service provider being used to send the email)
- Status (Delivery status)
- Date & Time
- Available actions such as view, resend, and delete.
Opening a log entry displays the complete email content, including headers and attachments.
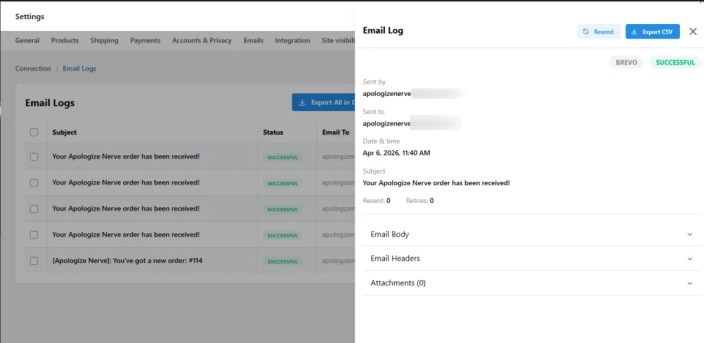
Note: Email logs will be available within each individual order’s settings, corresponding to its respective order status.
Resend emails
↑ Back to topIf an email fails due to a configuration issue or connection error, it can be re-sent from the email log.
How to resend an email
↑ Back to top
- Navigate to WooCommerce → SMTP → Email Logs.
- Locate the email marked as Failed.
- Click the Resend action button.
The plugin will attempt to send the message again using the currently configured SMTP connection.
Note: If emails continue to fail, verify the SMTP configuration and authentication credentials.
Export email logs
↑ Back to topThe extension allows exporting email logs for record-keeping or troubleshooting.
How to export logs
↑ Back to top
- Navigate to WooCommerce → SMTP → Email Logs.
- Click the Export CSV option available in the header.
The system will generate a downloadable CSV file containing the email log records.