This scenario will walk you through how to use WooCommerce, WooCommerce Bookings and WooCommerce Product Vendors to sell bookable products from other vendors on your website. Vendors can take a commission for each reservation.
Scenario
↑ Back to topMatty owns a restaurant and one of his chefs offers a family friendly cooking class for adults and children. Since the chef would like to utilize the restaurant’s kitchen, Matty is taking some commission from each booking for the use of the space. Matty sets up a bookable product that utilizes Product Vendors so that bookings are associated with the specific vendor (the chef) and commissions can easily be paid out manually or automatically. In the future, he would like to bring in guest chefs to teach ongoing booking classes and set them up as vendors on his website.
- Matty has 25% revenue on each booking. The vendor gets 75% commission.
- The cooking classes are held every Saturday at 11 am and are 2 hours long.
- It’s a small restaurant and can only hold up to 18 seats
- Classes include an adult and child pricing.

Products Used
↑ Back to topVendor Setup and Configuration
↑ Back to topFirst, we’ll set up the user and profile for the vendor, then create a bookable product for the cooking class.
Create the Product Vendor Account
↑ Back to top- In the sidebar of your WordPress Admin, click on Users > Add New User.
- On the Add New User page, fill out the fields as desired, including username and email. This will be your Product Vendor’s account.
- Check the box to Send user notification so that the vendor receives the log in information.
- Under the Role dropdown, select
Vendor Admin. This will give your Product Vendor the ability to administrate their products. - To save, click the Add New User button.
Create the Product Vendor Profile
↑ Back to top- In the sidebar of your WordPress Admin, go to Products > Vendors.
- Under Add New Vendor, add the name and email of your vendor, in our use case, this would be the chef’s name and email.
- Click the Add New Vendor button.
- From the right-hand table, click on your newly created vendor name to edit their profile. You’ll be routed to the Edit Vendor page where you can add profile details such as their logo, public vendor profile description, commission, etc.
- In the Vendor Admins field, add the vendor’s email address. Adding a vendor to the Vendor Admins field will allow the user to administrate their products.
- For our use case, the chef will receive a 75% commission. Under the Commission field, enter
75and keep the Commission Type drop down asPercentage. - Under Tax Handling, you can choose if you keep the taxes, included in the commission, or split. More on vendor tax handling can be found here.
- For our use case, the restaurant owner would like to automatically send commissions to the vendor instantly. To enable this, check the box under Instant Payout and add the vendor’s PayPal Email address. Note that automated payouts to vendors can only be done with PayPal accounts. Full details on how to set up the Instant Payouts are here.
- Finally, check the box for Enable Bookings Feature. This allows the vendor to log in and create their own bookable product.
- Click the Update button to save.
Bookable Product Setup and Configuration
↑ Back to topNow that our chef has a vendor profile set up, let’s get the cooking class product created.
Create the Bookable Product
↑ Back to top- In the sidebar of your WordPress Admin, go to Products > Add New.
- Under Product data select
Bookable product. - Select the options for Virtual and Has Persons for this use case.
- On the right-hand side of the product editor, scroll down the widgets to Vendors and select the vendor you just created in the steps above. This setting assigns the bookable product to the vendor.
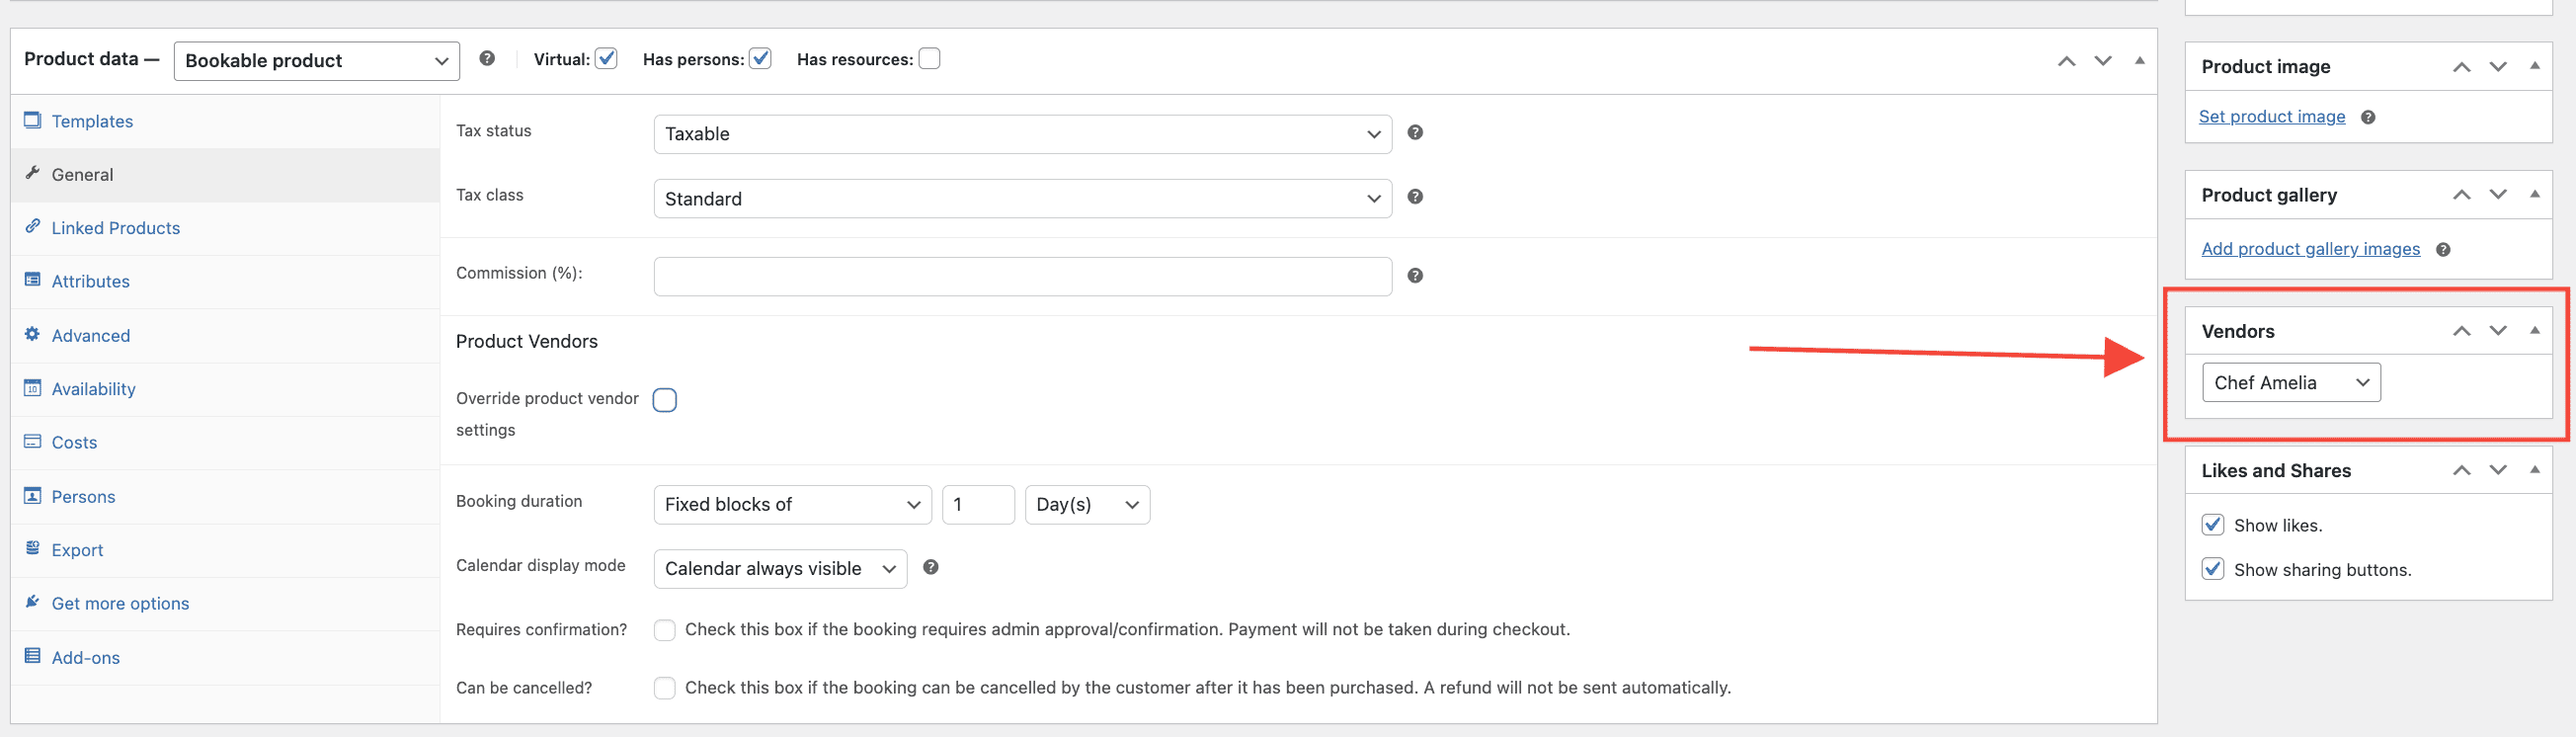
Configure the General Tab
↑ Back to top- For our use case, we want to keep the default product vendor settings, so we do not need to make any changes under the Product Vendors settings.
- Set Booking duration to
Fixed block of 2 Hours. - Publish the product to save.
Configure the Availability Tab
↑ Back to top- Click into the Availability tab.
- Set Max bookings per block to
18. - Set All dates are…
not-available by default. - Set First block starts at …
11:00 AM - To add specific date and time ranges, click the Add Range button to add a range rule.
- Under Range Type, select
Saturdayand Range as11 AM - 1 PM, and Bookable asYes.
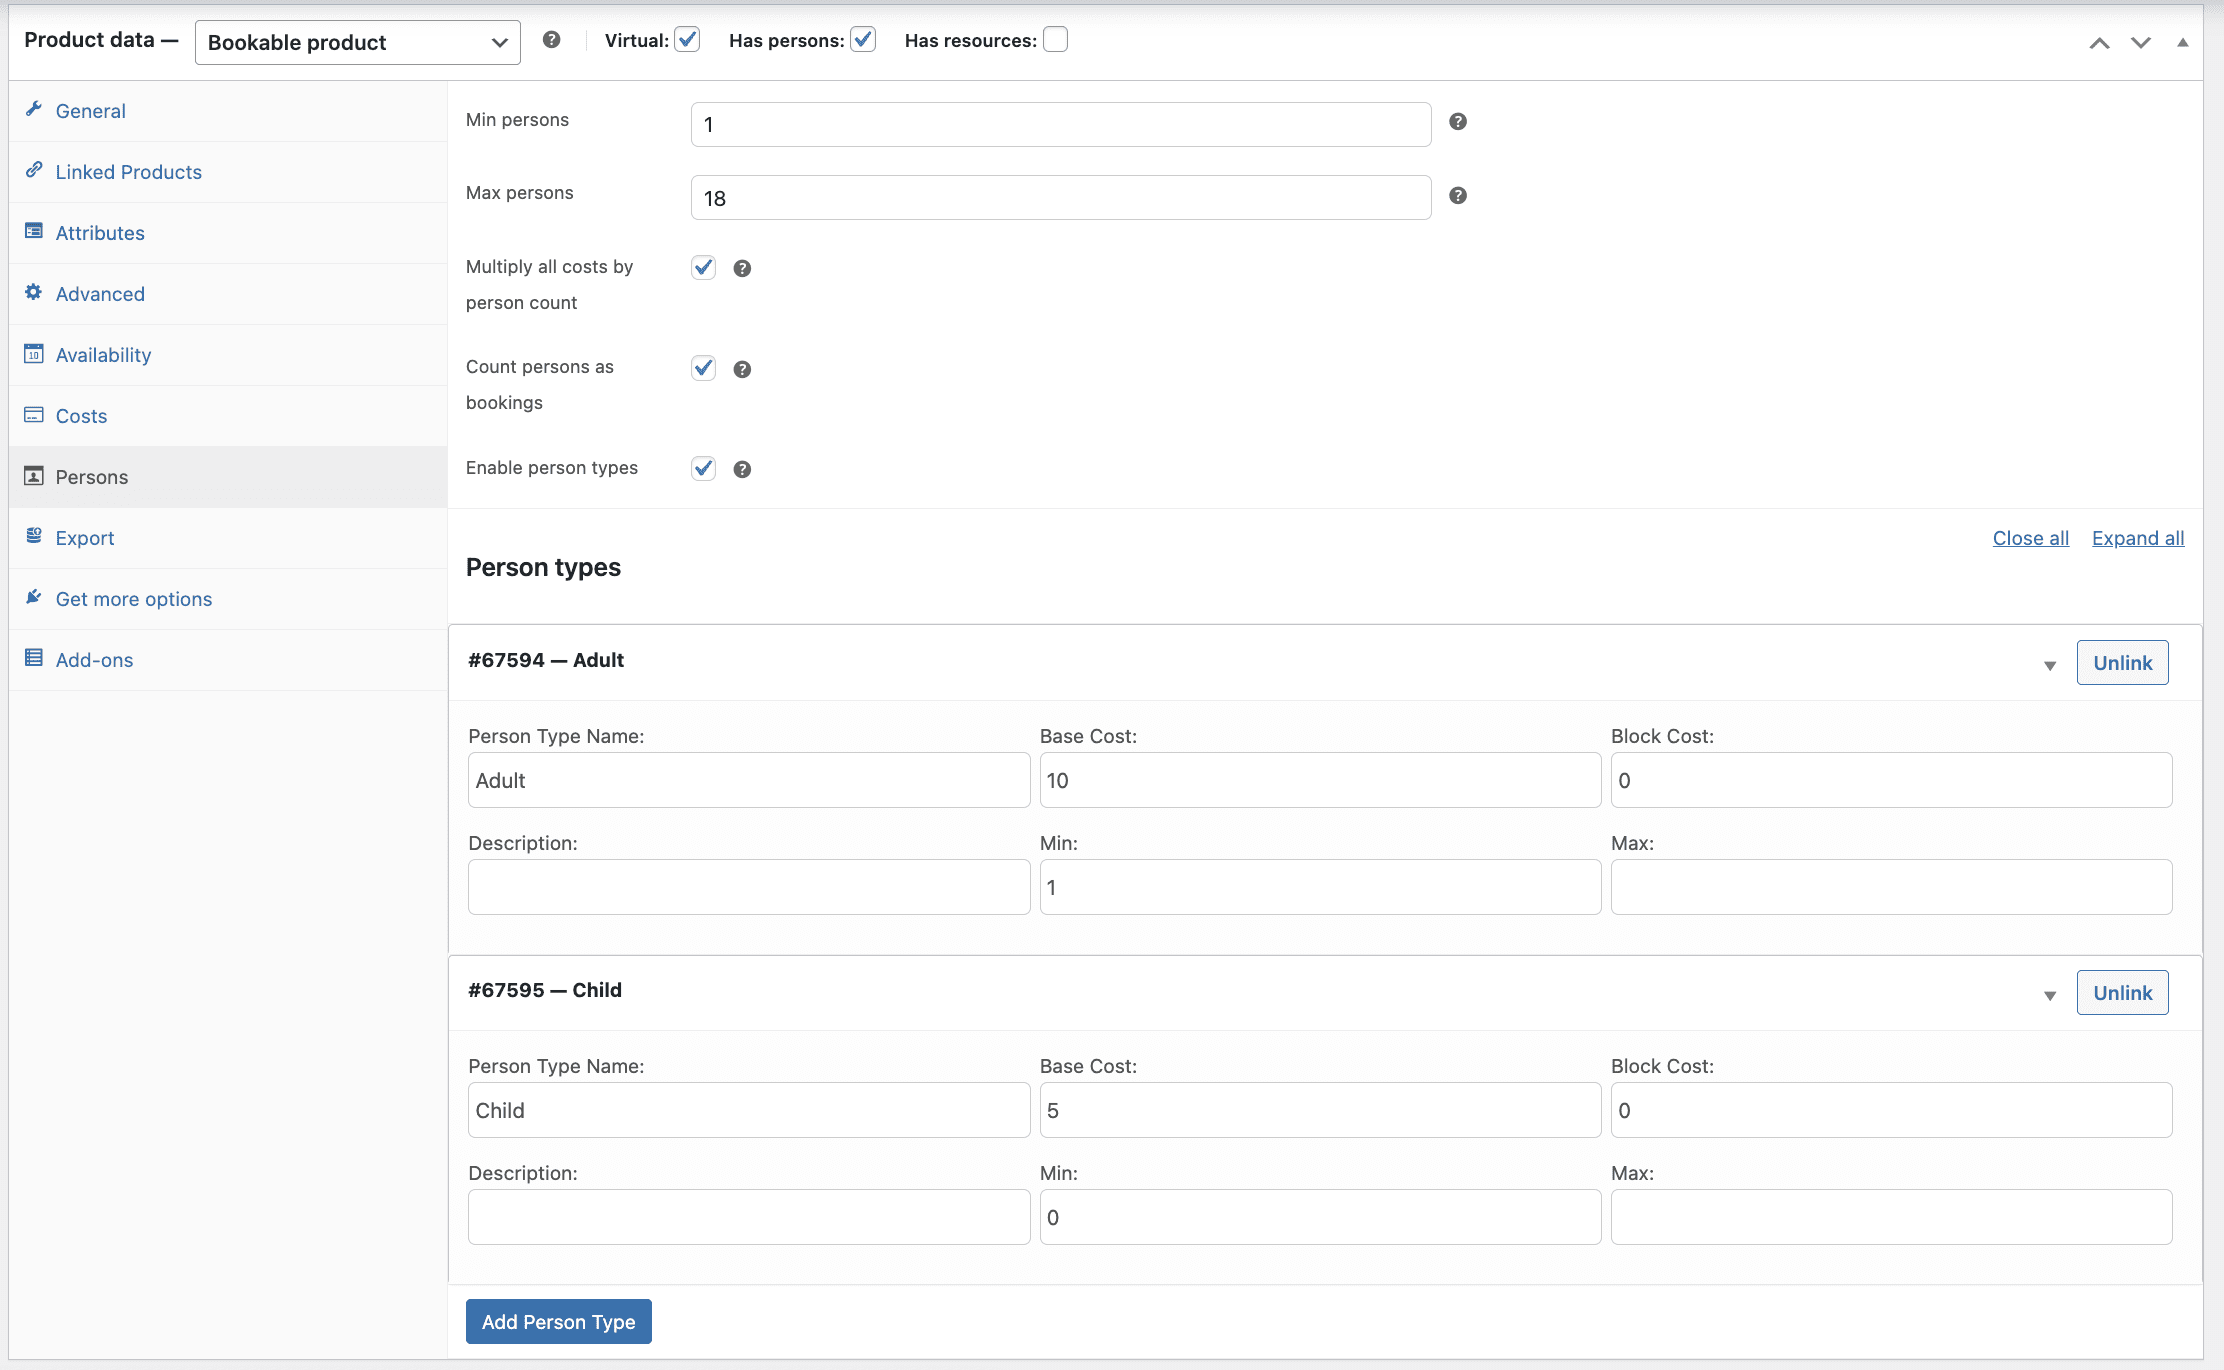
Configure the Persons Tab
↑ Back to top- Click into the Persons tab.
- Set Min persons to
1and Max persons to18. - Check the box for Multiply all costs by person count.
- Check the box Count persons as bookings. This allows you to tie a person to a booking so for each person added will count toward filling up one of the 18 spots.
- Check the box to Enable person type.
- Under the Person Types rules, click the Add person type button.
- In the Person Type Name field, enter
Adult - In the Base Cost field add the price per adult. In our use case it is
10. - In the Min field, include a minimum number of adults. In our use case we want to make sure there is at least one adult supervising the child).
- Repeat Steps 6-9 to add Child.
- Update the booking product to save.
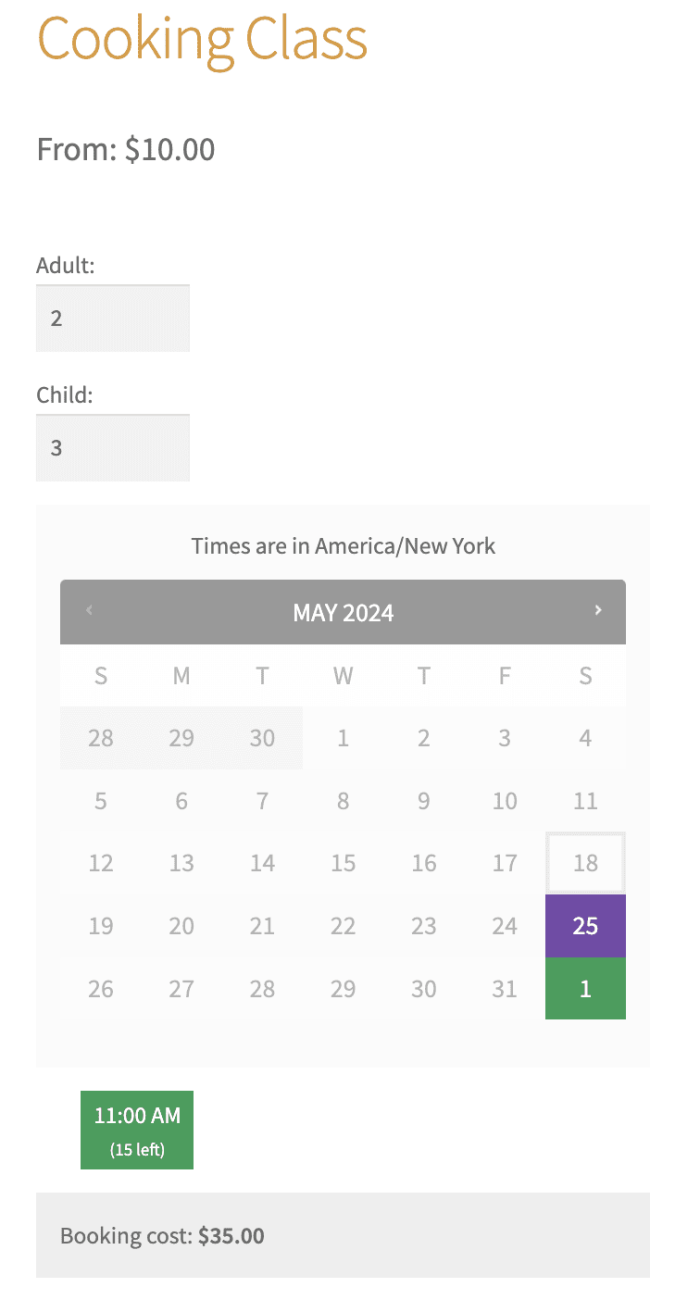
Customer View
↑ Back to topOn the front end, the customer can select the number of adults and children for their cooking class. You will notice in the screenshot that customers can see how many slots are left for that date when others have booked already:
Questions and Support
↑ Back to topSomething missing from this documentation? Do you still have questions and need assistance?
- Have a question before you buy this extension? Please fill out this pre-sales form – please include the name of this extension in your query.
- Already purchased and need some assistance? Get in touch with a Happiness Engineer via the WooCommerce.com Support page and choose this extension name from the “I need help with” dropdown