Introduction
↑ Back to topWelcome to the official documentation for Nexora Shop – WooCommerce Theme.
Thank you for choosing Nexora Shop! We’ve put a lot of thought and care into crafting this theme, and we’re excited to have you onboard. This documentation will guide you through the core features of Nexora Shop and help you customize it to build a powerful eCommerce store.
About the theme
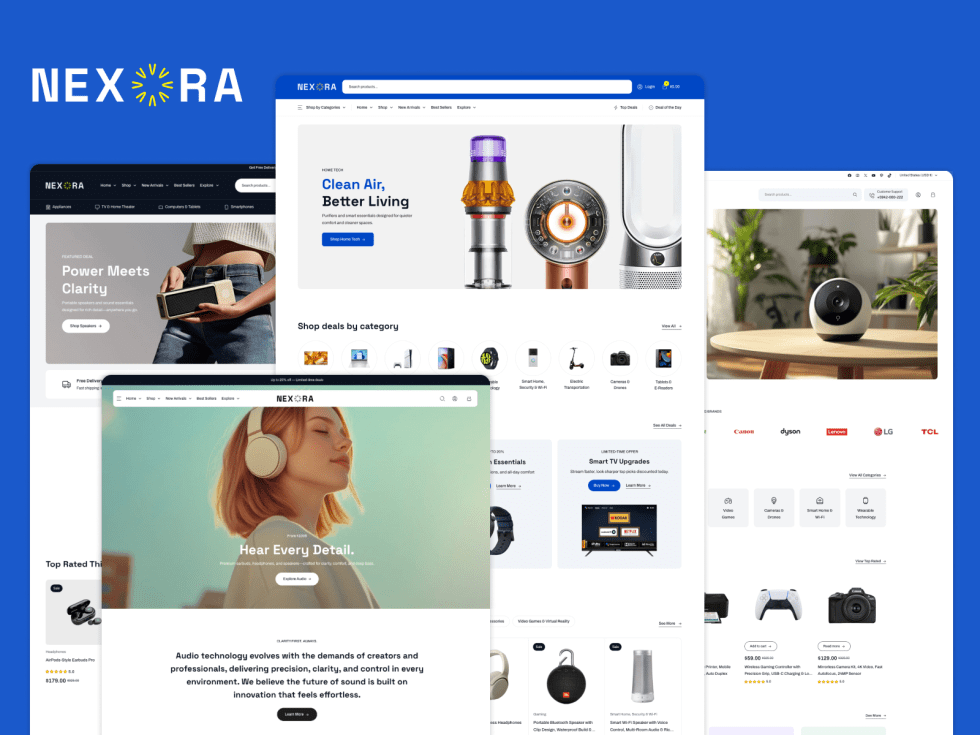
↑ Back to topNexora Shop is a modern WooCommerce theme built for electronics, multi-category mega stores, and high-converting Nexora Shopal eCommerce websites. Whether you’re building a large-scale marketplace like Amazon or a focused deal-driven store, Nexora Shop provides the flexibility and performance you need.
Built as a block theme with Full Site Editing (FSE) support, it leverages theme.json and custom block styles to offer deep customization without complexity. Styles are generated and loaded efficiently to ensure optimal performance, while maintaining design consistency across all pages. All assets are optimized for speed, helping you deliver a fast and smooth shopping experience.
Theme Philosophy
↑ Back to topWordPress theme development has evolved, but its core philosophy remains the same: a theme should control how your website looks — not how it works.
When themes start adding functionality, it creates dependency and makes it harder to switch themes or scale your website in the future. That’s why Nexora Shop strictly focuses on presentation and styling.
For example, Nexora Shop does not create or manage features like contact forms, wishlists, or analytics. Instead, it seamlessly integrates and styles popular plugins that provide these functionalities.
You are free to use plugins such as WPForms or any other tool — and Nexora Shop will ensure they match your store’s design beautifully.
This approach keeps your website modular, flexible, and future-proof.
System Requirements
↑ Back to topNexora Shop is a WooCommerce-based theme, so your server should meet WooCommerce’s official requirements. You can review them here:
https://woocommerce.com/document/server-requirements/
For best performance, we recommend:
- WordPress version 6.3 or later
- PHP version 7.4 or later
- Database: MySQL 5.7 or higher, or MariaDB 10.4 or higher
- Memory limit: At least 256 MB
- HTTPS enabled
You may also review the official WordPress requirements:
https://wordpress.org/about/requirements/
Required Plugins
↑ Back to topWooCommerce – Required to power your online store. All layouts, product grids, and checkout experiences are built using WooCommerce blocks.
Recommended Plugins
↑ Back to topTo enhance your store functionality, we recommend the following plugins:
- WPForms – For creating contact forms and lead capture forms
- MAS Static Content – For building flexible megamenus and reusable content blocks
- Stackable – For countdown timers and advanced block features
These plugins are fully compatible and styled to match the Nexora Shop theme.
Need Help?
If you need assistance, please refer to our support policy:
https://madrasthemes.com/support-policy/
Our team is always here to help you get the most out of Nexora Shop.
Installation
↑ Back to topIn this chapter, we’ll guide you through installing the Nexora Shop theme on your WordPress website. If you encounter any issues during installation, please feel free to contact our support team for assistance.
While installation services are typically outside the standard support scope, we offer a one-time free installation service for all our customers. To use this service, reach out via our contact page and share your WordPress admin details. We will set up the theme to match our demo. This service is usually completed within 3 business days.
Installation Video
↑ Back to topInstalling the Theme
Once you have downloaded the nexora-shop.zip file, you’re ready to install the theme.
Using WordPress (Recommended)
- Go to Appearance → Themes in your WordPress dashboard
- Click Add Theme at the top
- Click Upload Theme
- Click Select File and choose
nexora-shop.zip - Click Install Now
- After installation, you’ll see a success message

Installing via FTP
- Unzip the
nexora-shop.zipfile on your computer - Connect to your server using an FTP client (e.g., FileZilla)
- Navigate to
wp-content/themes/ - Upload the extracted
nexora-shopfolder - Go to Appearance → Themes and confirm the theme is listed
Installing Plugins
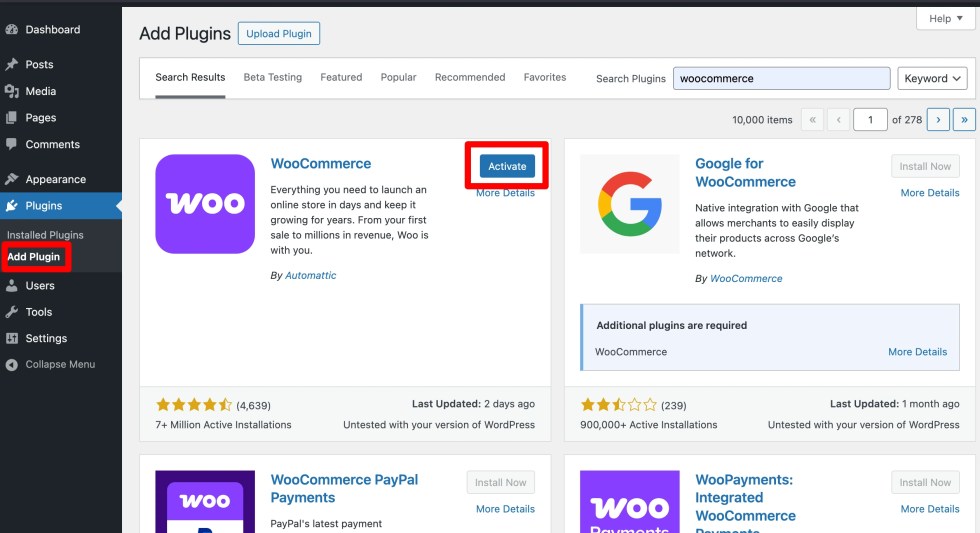
↑ Back to topWhile Nexora Shop can run without additional plugins, we strongly recommend installing WooCommerce to unlock all eCommerce features and layouts.
Steps to Install WooCommerce
- Go to Plugins → Add New
- Search for WooCommerce
- Click Install Now
- Click Activate
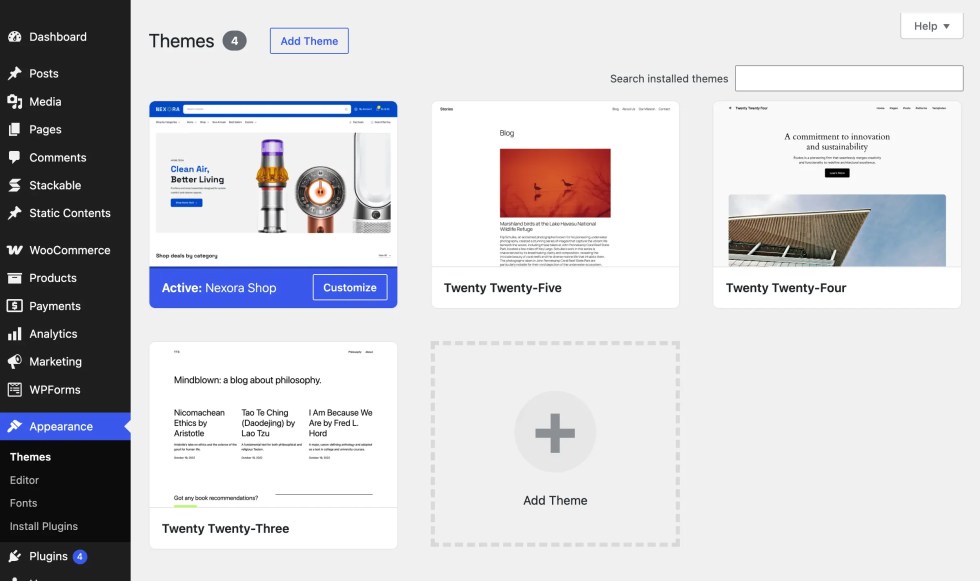
Activating the Theme
↑ Back to topBefore activating Nexora Shop, it’s recommended to activate WooCommerce to ensure all product blocks and layouts work correctly.
Steps to Activate nexora-shop
- Activate WooCommerce (complete onboarding if prompted)
- Go to Appearance → Themes
- Locate Nexora Shop
- Click Activate
- You’ll see a confirmation message once activated
Using Demo Content
↑ Back to topA theme’s demo content is a great way to get started quickly. Nexora Shop’s homepages and internal pages are built using Patterns, so you don’t need to import every page or add demo products all at once. You can simply insert the Starter patterns you need and build pages easily.
Starter Patterns
We recommend importing demo products and blog posts only if your website is empty.
If you already have products or posts, you can skip the demo import and use the available page patterns to create only the pages you want.
Demo Shop Products
↑ Back to topNexora Shop includes demo shop products to help you quickly visualize how your store will look. These products are fully WooCommerce-compatible and showcase product grids, categories, and single product layouts.
Key Points:
- Demo products are optional – use them only if your store has no real products yet.
- Importing demo products helps you understand the full design and layout potential of Nexora Shop.
- You can replace demo products anytime without affecting the theme styling.
Demo Blog Posts
↑ Back to topNexora Shop also includes demo blog posts to help you preview the blog layout and article styling. They make it easier to see how your blog pages will look before adding real content.
Key Points:
- Demo blog posts are optional – import them only on a new/empty site.
- They help you visualize the blog page structure and styling used in Nexora Shop.
- You can replace demo posts with your own content whenever you’re ready, without affecting the design.
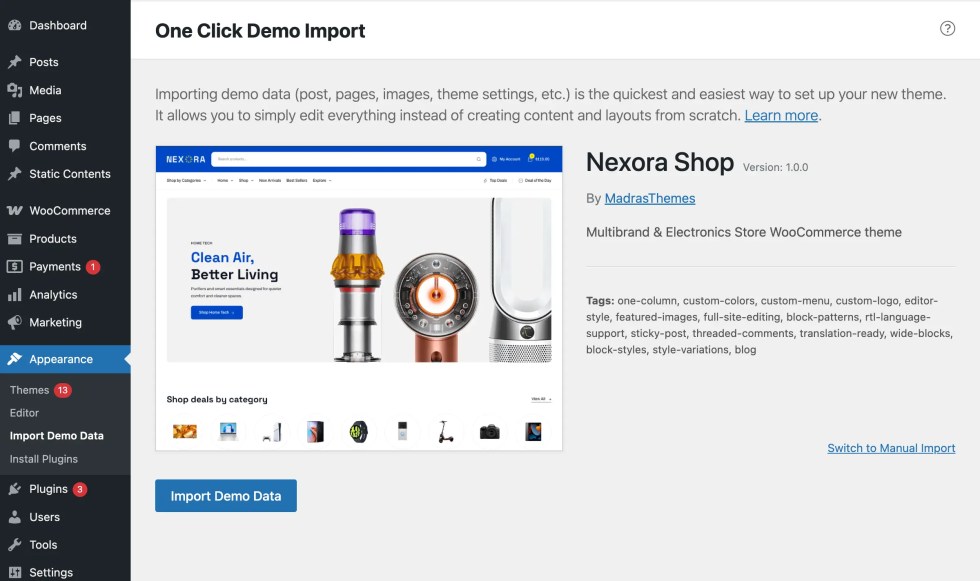
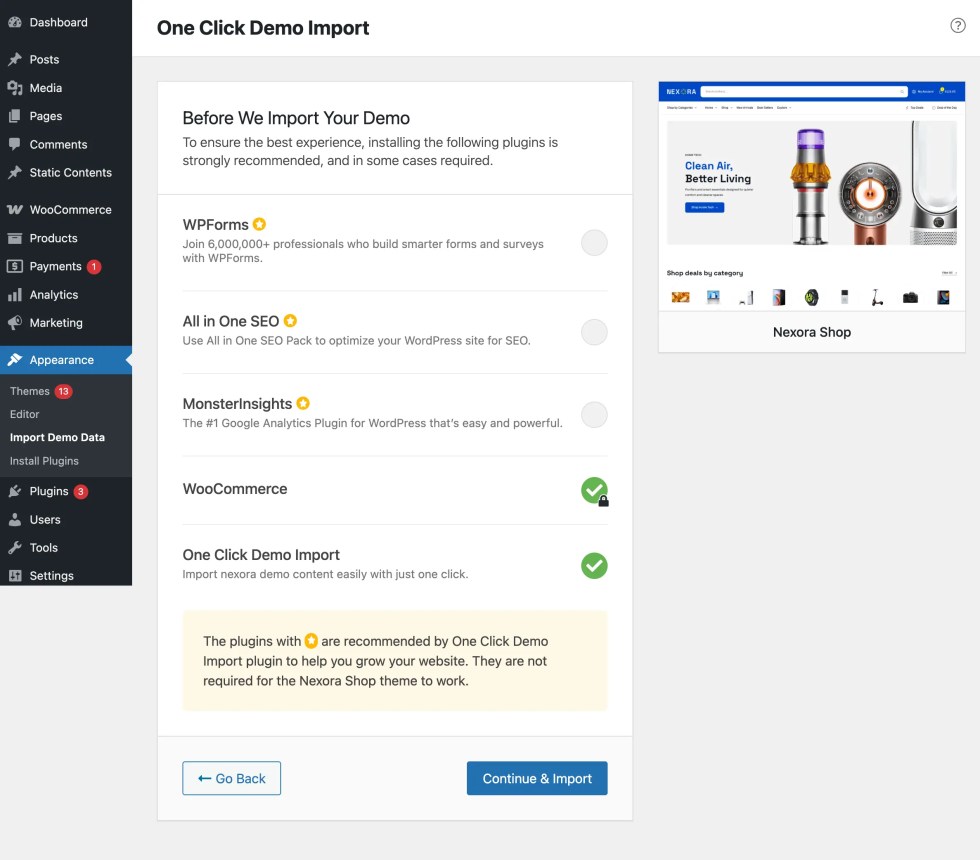
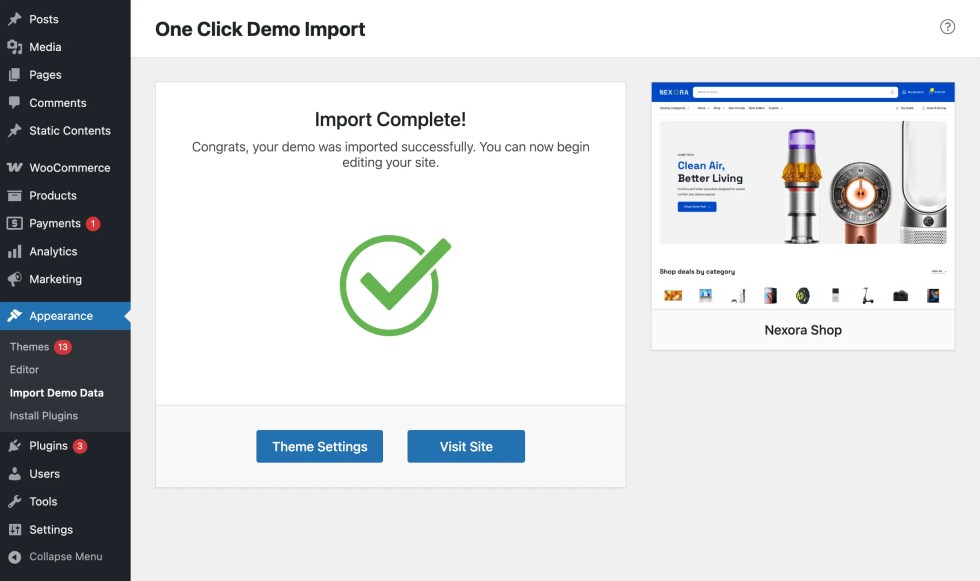
One Click Demo Import
↑ Back to topYou can use a one-click import plugin to import all demo content for Nexora Shop, including Home pages, Static pages, and Menus, so your site looks exactly like the Nexora Shop demo (placeholder link).
How to Import Demo Content
↑ Back to top- Ensure that you have installed Nexora Shop and all recommended plugins from Appearance → Install Plugins.
- Go to Appearance → Import Demo Data.
- Click Import Demo Data to begin the process.
- The importer will automatically load all demo pages, menus, and settings—just click once and wait for the process to finish.
Updating the Theme
↑ Back to topKeeping your Nexora Shop theme up to date ensures you benefit from the latest features, performance improvements, and security updates. There are multiple ways to update the theme depending on your setup.
Recommended Update Methods
↑ Back to topVia WordPress Dashboard (Zip Upload)
- Download the latest version of
nexora-shop.zip - Go to Appearance → Themes
- Click Add New → Upload Theme
- Upload the new
.zipfile - WordPress will detect the existing version and prompt you to replace it
- Click Replace current with uploaded to complete the update
Via FTP
- Unzip the latest
nexora-shop.zipfile - Connect to your server using an FTP client (e.g., FileZilla)
- Navigate to
wp-content/themes/ - Upload the updated
nexora-shopfolder and overwrite the existing one - Verify the update from your WordPress dashboard
Important Notes
- Backup first: Always take a full backup (files + database) before updating
- Child theme safe: If you’ve used a child theme for customizations, your changes will remain safe
- Clear cache: After updating, clear your website cache and browser cache to see the latest changes
Regular updates help keep your store secure, fast, and compatible with the latest version of WordPress and WooCommerce.
Setup Pages
↑ Back to topHome Pages
↑ Back to topHomepage Setup
Nexora Shop includes:
- 4 beautifully designed homepage layouts
- 4 unique header layouts
- 4 global footer layout
- 97 professionally crafted block patterns
- All homepages are built as block patterns, allowing you to quickly create a complete layout without assembling sections manually.
Since all homepages are registered as patterns, you can assign them to a page in just a few clicks.
Creating and Assigning Your Homepage
Follow these steps to set up your homepage:
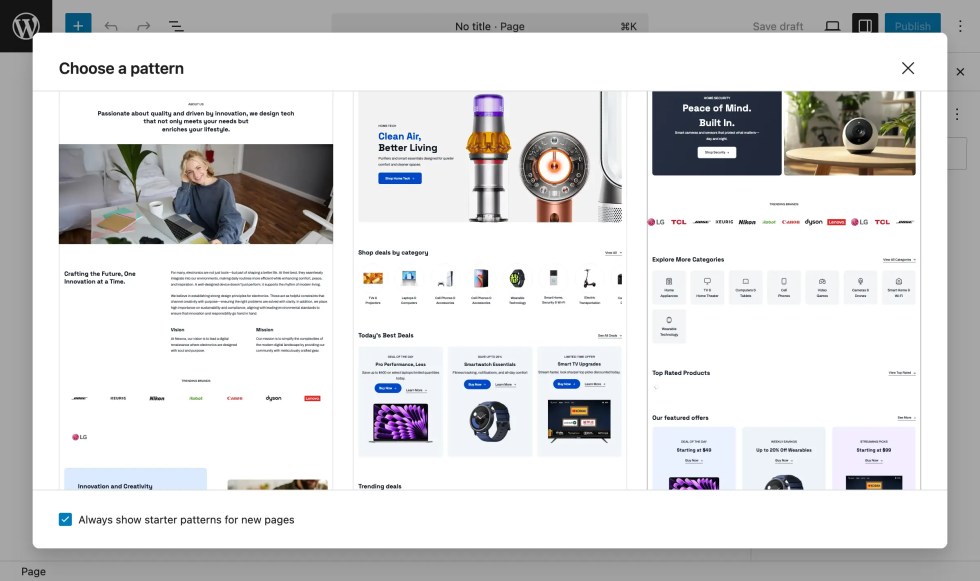
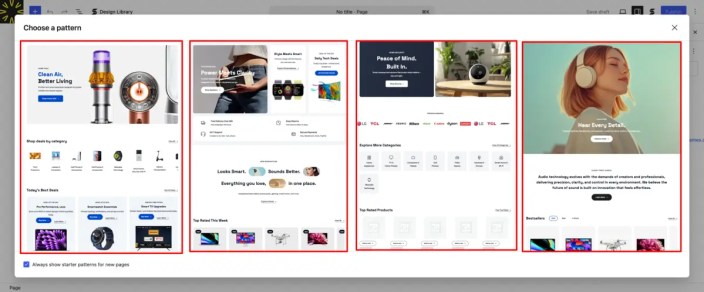
Step 1: Create a Homepage
- Go to Pages → Add New.
- When the “Choose a Pattern” pop-up appears, select one of the ready-made Nexora Shop Homepage Patterns.
This instantly loads a full homepage layout. - Or close the pop-up to start from a blank page.
- Enter a page title (for example: Home).
- In the right sidebar under Template, select:
- Canvas Template – if you want to manually add header & footer as patterns
- Page No Title Template – if you want to use the global header & footer across the site
- Click Publish.
💡 Tip: Selecting a full homepage pattern automatically loads all sections — banners, product grids, categories, deals, and more.
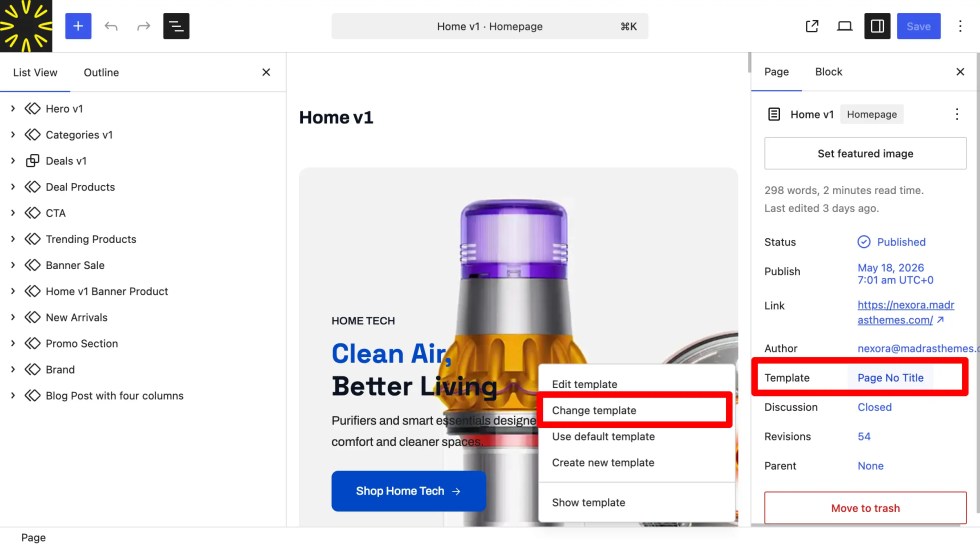
Step 2: Assign a Template to the Homepage
- Open the page you created.
- In the Page settings panel, find the Template section.
- Click Change Template and select the layout you prefer:
- Canvas Template – manually insert separate header and footer
- Page No Title Template – automatically loads the site-wide global header and footer
- Canvas Template – manually insert separate header and footer
- Click Preview to see how it looks.
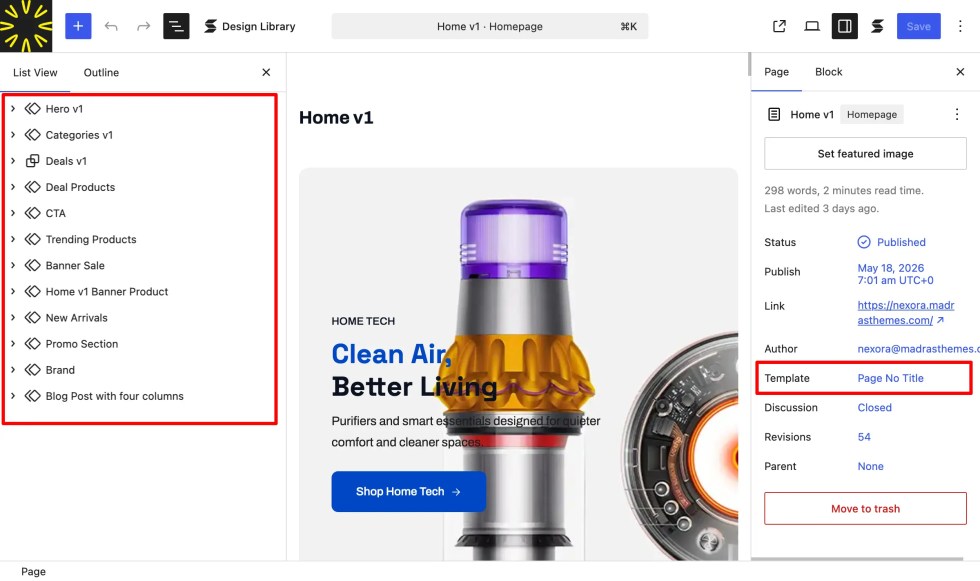
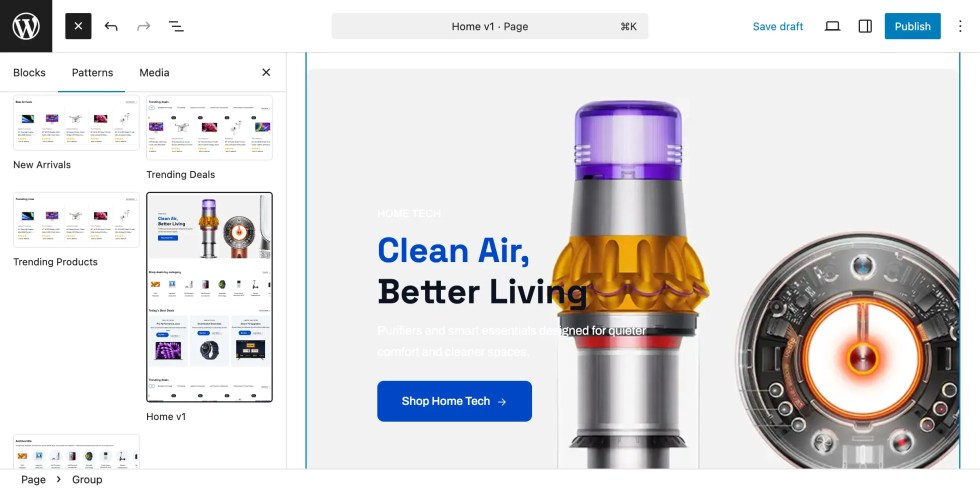
Add Patterns to Your Page
Nexora Shop provides complete homepage patterns so you can instantly load a ready-made layout.
To insert a homepage or add sections:
- Open the Block Inserter (+).
- Go to Patterns → Nexora Shop.
- Choose your desired Home pattern (e.g., Home v1, Home v2, etc.).
You may also add smaller section patterns — like featured categories, trending products, banners, or offer blocks — to build a custom homepage.
About the Header
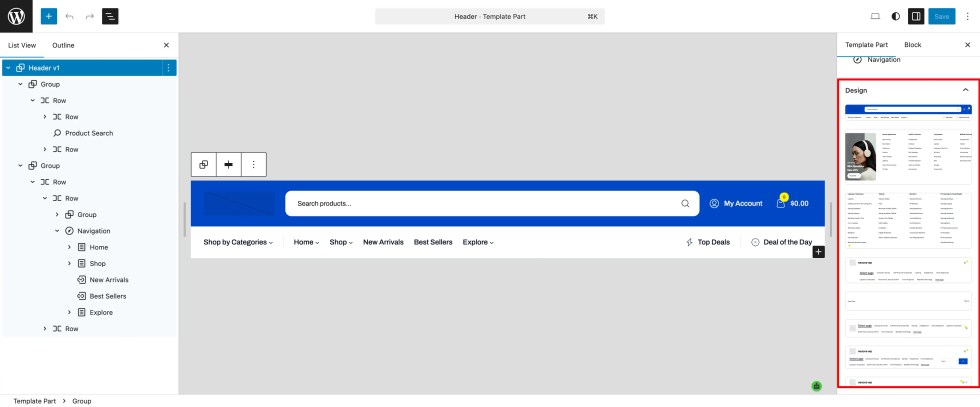
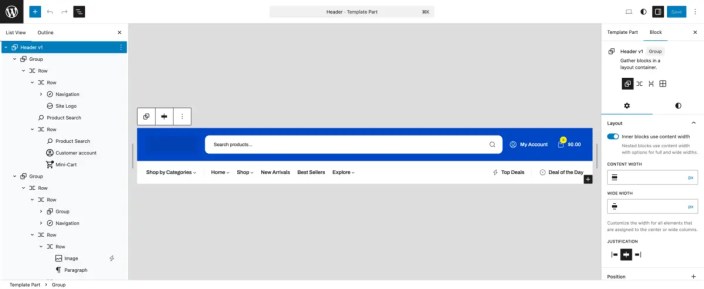
↑ Back to topNexora Shop’s header is built entirely with WordPress blocks and is fully customizable in the Site Editor.
- Go to Appearance → Editor → Templates → Header.
- Choose from available Header patterns or customize the existing one.
- You can edit elements like:
- Logo
- Navigation menu
- Search bar
- Mini cart
- Account icon
This makes it easy to adapt the header style to match your chosen homepage layout.
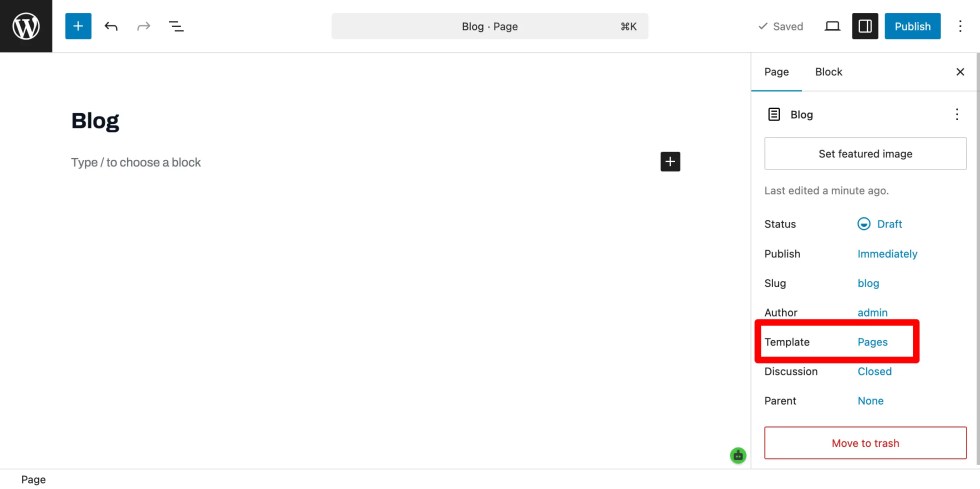
Creating a Blog Page
To create a dedicated blog page:
- Go to Pages → Add New.
- Title it Blog.
- Keep the Template as Default.
- Publish the page.
💡 Tip: This keeps your blog posts separate from the homepage and organizes content cleanly.
Static Pages
Set Static Pages for Homepage and Blog
Finally, configure WordPress to use your pages as the homepage and blog:
- Go to Settings → Reading in your WordPress dashboard
- Under Your homepage displays, select A static page
- For Homepage, choose your Home page
- For Posts page, choose your Blog page
- Click Save Changes
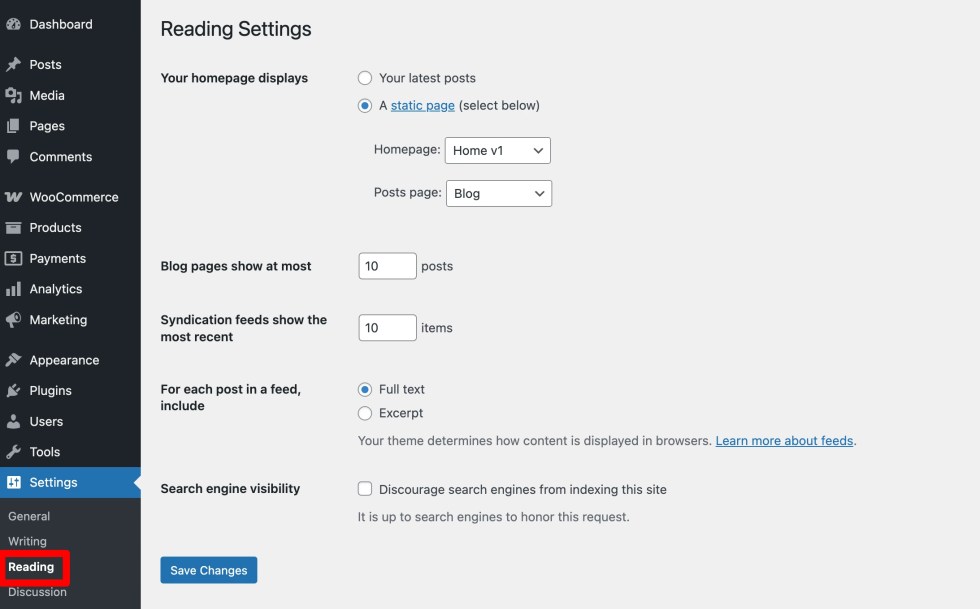
Your site is now ready with:
- A fully designed homepage using the Nexora Shop layout
- A global header and footer applied across the entire site
- A dedicated blog page for your content
You can now start adding products, customizing content, and building your store with Nexora Shop.
Inner Pages
↑ Back to topNexora Shop includes essential inner page layouts to help you build a complete and professional eCommerce website.
All pages are built using blocks, making them fully customizable through the WordPress Editor.
Blog Page
↑ Back to topThe Blog Page is used to display your posts.
- Clean layout for articles and updates
- Supports:
- Categories
- Tags
- Featured images
- Designed to match your store’s overall look
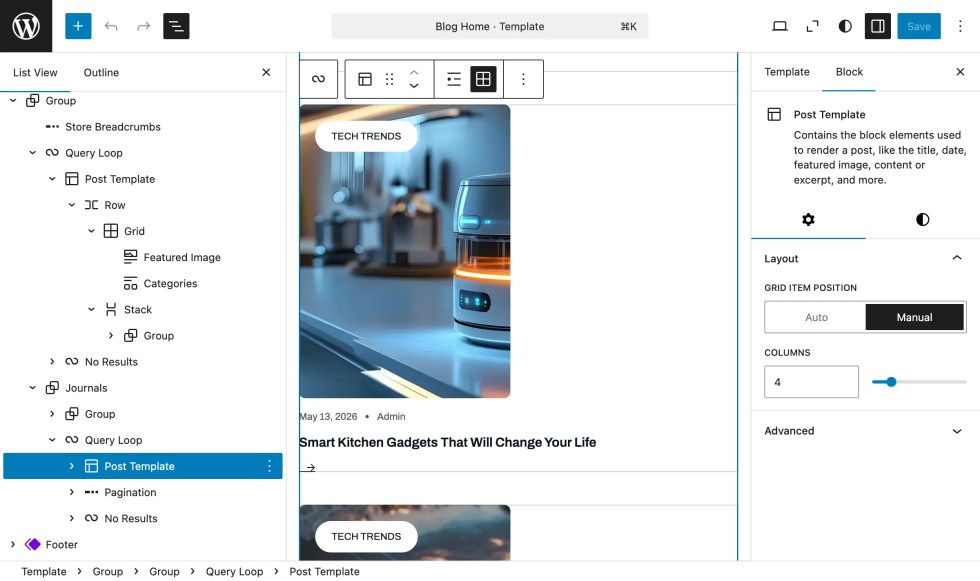
💡 Tip: Use your blog to share updates, promotions, and improve SEO.
404 Page
↑ Back to topThe 404 Page appears when a page is not found.
- Helps users navigate back to your site
- Can include:
- Search bar
- Navigation links
- Call-to-action buttons
- Fully customizable via the editor
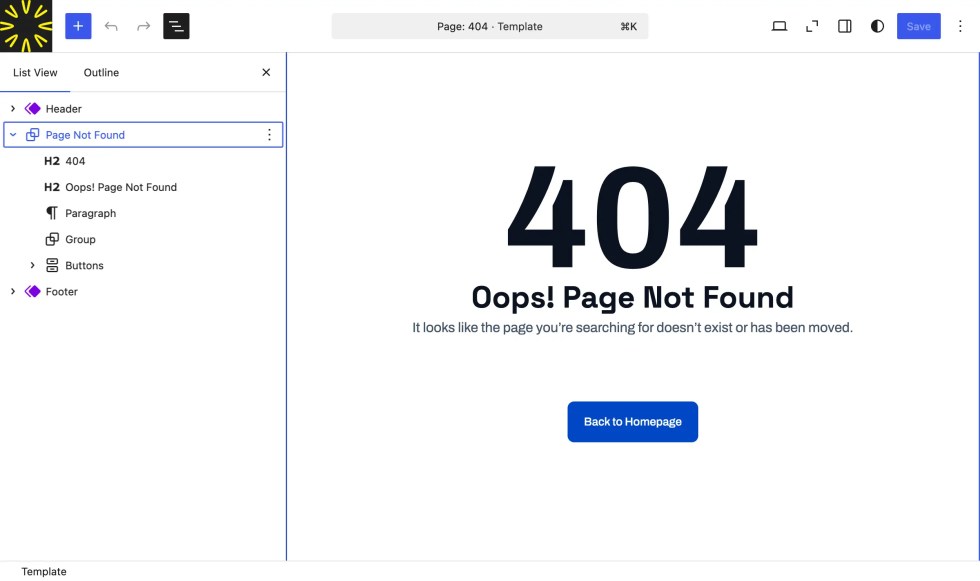
💡 Tip: A good 404 page improves user experience and reduces bounce rate.
Header & Footer
↑ Back to topHeader
↑ Back to topThe header is a key part of your website. It appears on every page and helps users navigate your store.
In Nexora Shop, the header is fully block-based and is used as a single global header across the entire website.
Accessing and Editing the Header
- Go to Appearance → Editor
- Navigate to Template Parts → Header
- Click on Header to edit it
Key Features
The header includes essential elements for your store:
- Logo – Displays your brand identity and links to the homepage
- Navigation Menu – Add links to pages, categories, or custom URLs
- Search Bar – Helps users quickly find products
- Mini Cart – Shows selected items for quick checkout access
- Account Icon / Login – Allows users to access their account
Customizing the Header
You can fully customize the header using the Block Editor:
- Add, remove, or rearrange elements
- Modify spacing, colors, and typography
- Adjust layout for better usability
All changes made to the header will automatically apply across all pages, since Nexora Shop uses a single global header.

💡 Tip: Keep your header simple and clean to improve navigation and conversion rates.
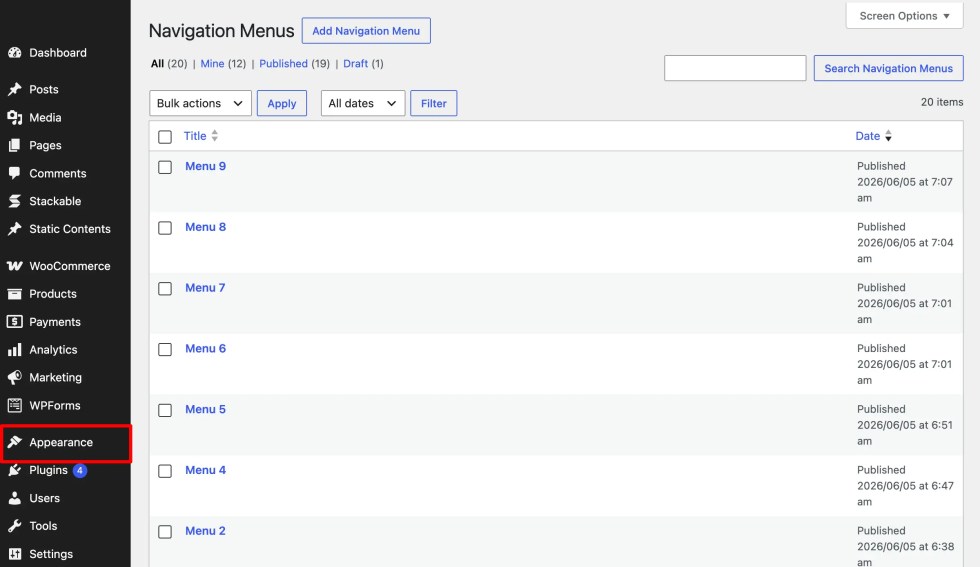
Navigation
↑ Back to topThe navigation menu is an essential part of your store, helping visitors browse products, categories, and pages easily.
In Nexora Shop, navigation is block-based and managed through the Site Editor, allowing full control over your menu structure.
Accessing the Navigation
- Go to Appearance → Editor
- Open the Header template part
- Select the Navigation block
Alternatively:
- Go to Appearance → Editor → Navigation
- View or manage all navigation menus
Editing the Menu
- Click on any menu item to edit its label or link
- Use the + (Add Block) button to add new menu items
- Drag and rearrange items as needed
- To create dropdown menus, place items under a parent item
Assigning the Menu
- Go to Appearance → Editor
- Open Template Parts → Header
- Select the Navigation block
- Choose or replace it with your desired menu
Since Nexora Shop uses a single global header, the navigation menu will appear consistently across all pages.
💡 Tip: Keep your navigation simple and organized to improve user experience and help customers find products quickly
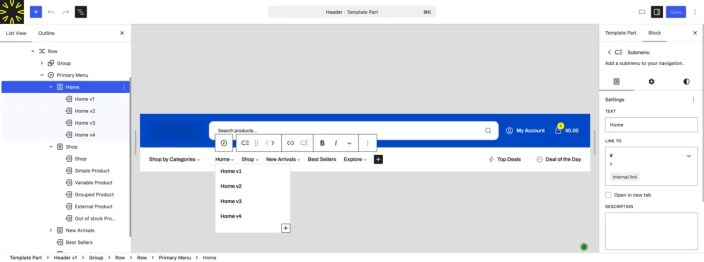
Adding Megamenu
↑ Back to topNexora Shop supports Megamenu dropdowns using the MAS Static Content plugin.
This allows you to create rich, multi-column dropdown menus with images, links, and custom layouts.
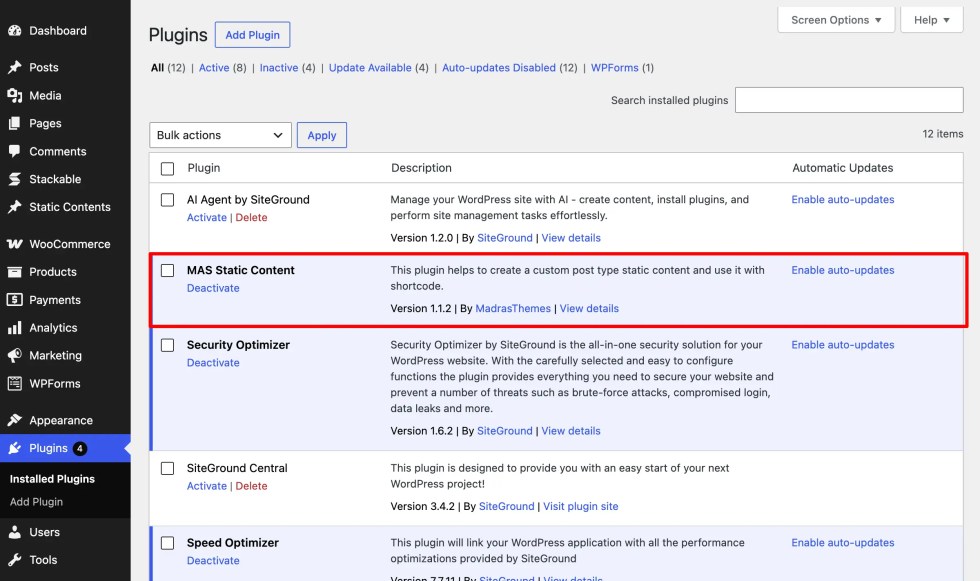
Install MAS Static Content Plugin
- Go to Plugins → Add New
- Search for MAS Static Content
- Click Install Now
- Click Activate
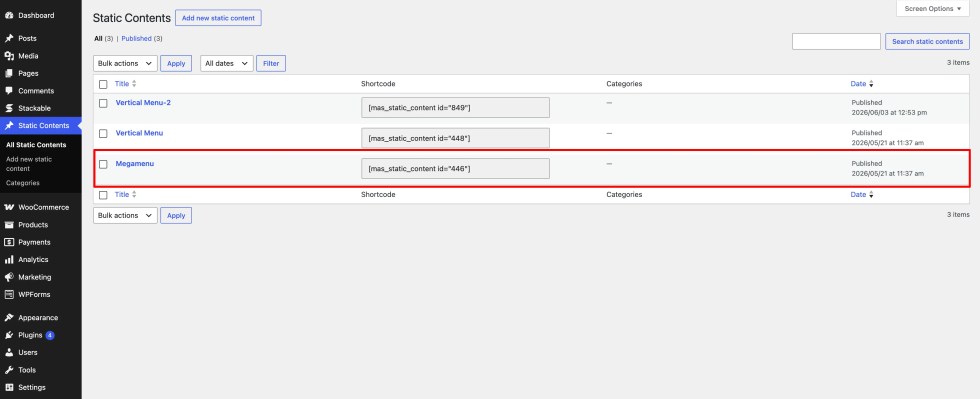
Create the Megamenu Content
- Go to Static Contents in your WordPress dashboard.
- Click Add New at the top.
- Enter a name for your static content, such as “Megamenu”.
- Use the Gutenberg block editor to design your mega menu layout.
- Click Publish to save the content.
Configure Megamenu Settings
After creating the content:
- Go to Appearance → Editor → Header
- Select the Navigation block
- Choose the menu item where you want the megamenu
- Enable or assign the Static Content (Megamenu) to that menu item
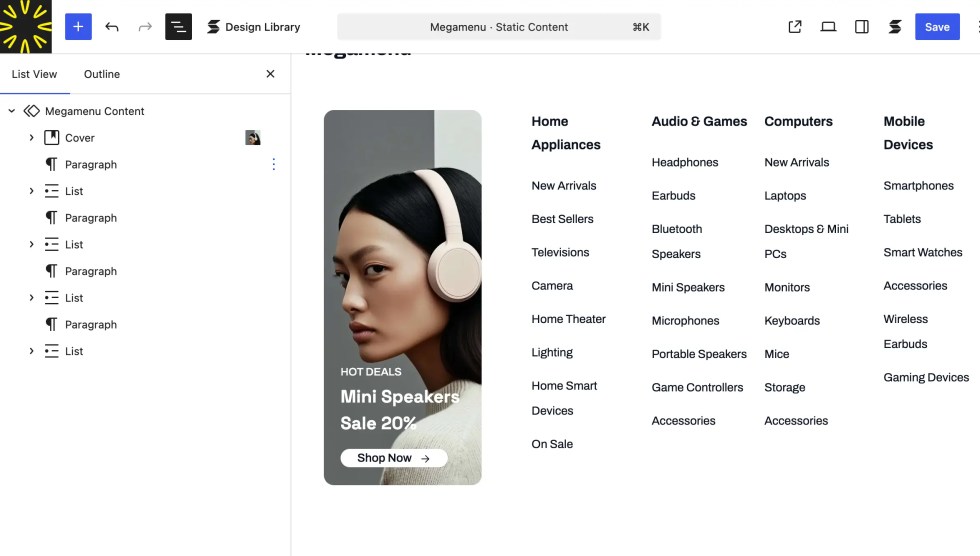
Result
Your megamenu will now appear as a dropdown layout under the selected menu item.
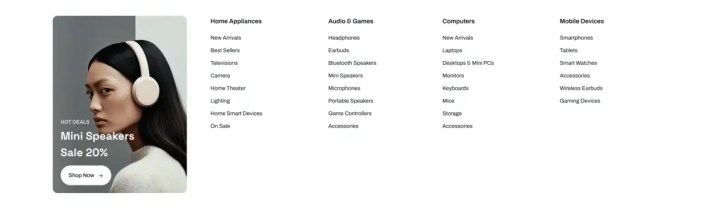
💡 Tip: Use megamenus for categories, featured products, or promotional sections to improve navigation and conversions.
Footer
↑ Back to topThe footer appears at the bottom of every page and is used to display important links and information about your store.
In Nexora Shop, the footer is block-based and is used as a single global footer across the entire website.
Accessing and Editing the Footer
- Go to Appearance → Editor
- Navigate to Template Parts → Footer
- Click on Footer to edit it
Customizing the Footer
- Use the block editor to add, remove, or rearrange elements like menus, text, or widgets.
- You can include key elements such as:
- Quick Links: About, Contact, Privacy Policy, Terms & Conditions, etc.
- Social Icons: Link to your social media profiles.
- Newsletter Signup: Collect customer emails for updates.
- Copyright Notice: Add your store name, current year, and legal details.
- You can also apply a Footer pattern to instantly load a pre-designed layout.
Multiple Footer Designs
- Nexora Shop includes multiple footer variations designed to match different homepage layouts.
- You can easily switch between them by selecting another Footer pattern from the Template Parts section.
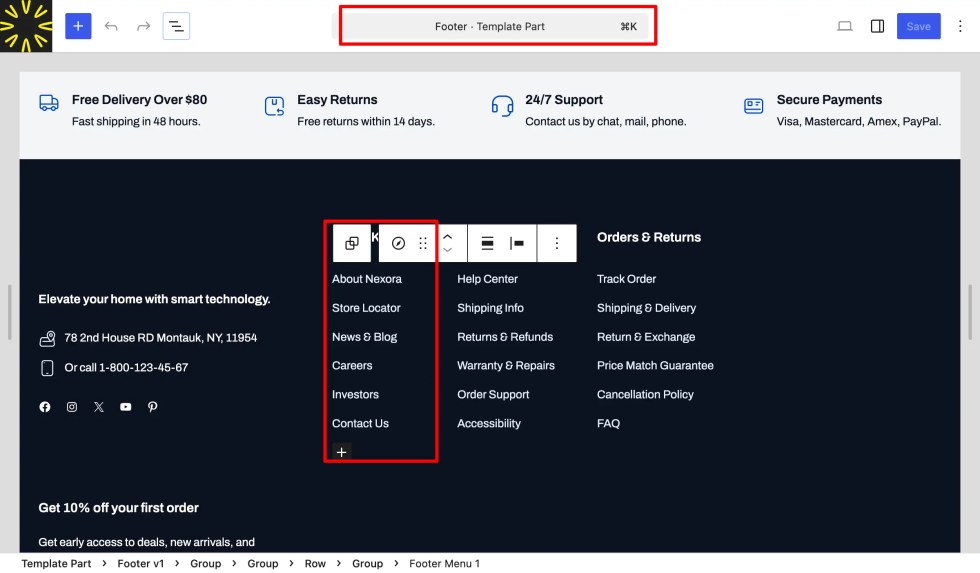
💡 Tip: Keep your footer simple and consistent to improve usability and trust.
WooCommerce Setup
↑ Back to topShop Page
↑ Back to topThe Shop page is the core of your online store, helping customers browse products across electronics, multi-category departments, and promotional collections in a clear and conversion-focused layout. In Nexora Shop, the Shop page is built with WooCommerce blocks and styled to match the theme’s modern marketplace design.
Setting Up the Shop Page
- Go to Pages → Add New.
- Enter a title, such as Shop.
- Leave the template set to Default.
- Click Publish to save the page.
Assigning the Shop Page in WooCommerce
- Go to WooCommerce → Settings → Products.
- Under the General tab, locate the Shop page option.
- Select the Shop page you created from the dropdown.
- Click Save Changes.
Customizing the Shop Layout
- Go to Appearance → Editor → Templates.
- Open the Shop or Archive Product template.
- Use the block editor to customize the layout. For example, you can:
- Adjust the number of products displayed per row.
- Update sorting and filtering options.
- Add promotional banners, category highlights, or featured deal sections above the product grid.
- Save your changes when finished.
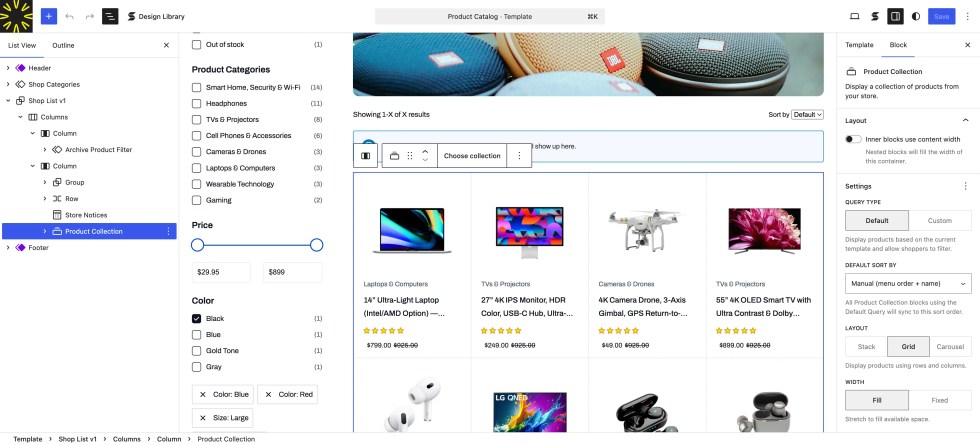
Features of the Shop Page
- Responsive Product Grid – Displays products neatly across desktop, tablet, and mobile devices.
- Product Filters & Sorting – Helps customers quickly find the right products.
- Promotional Layout Support – Ideal for showcasing deals, offers, featured categories, and campaign banners.
- Add to Cart – Makes the shopping experience faster and more convenient.
- Category-Based Browsing – Perfect for electronics stores and large multi-category shops.
💡 Tip: For a better shopping experience, you can also add a Product Filter Sidebar with options such as categories, price filters, attributes, or promotional product groups.
Products
↑ Back to topThe Products section is where you manage and showcase everything you sell in your store. In Nexora Shop, products are powered by WooCommerce and displayed using high-performance, block-based layouts designed for electronics stores, multi-category marketplaces, and promotion-driven eCommerce websites.
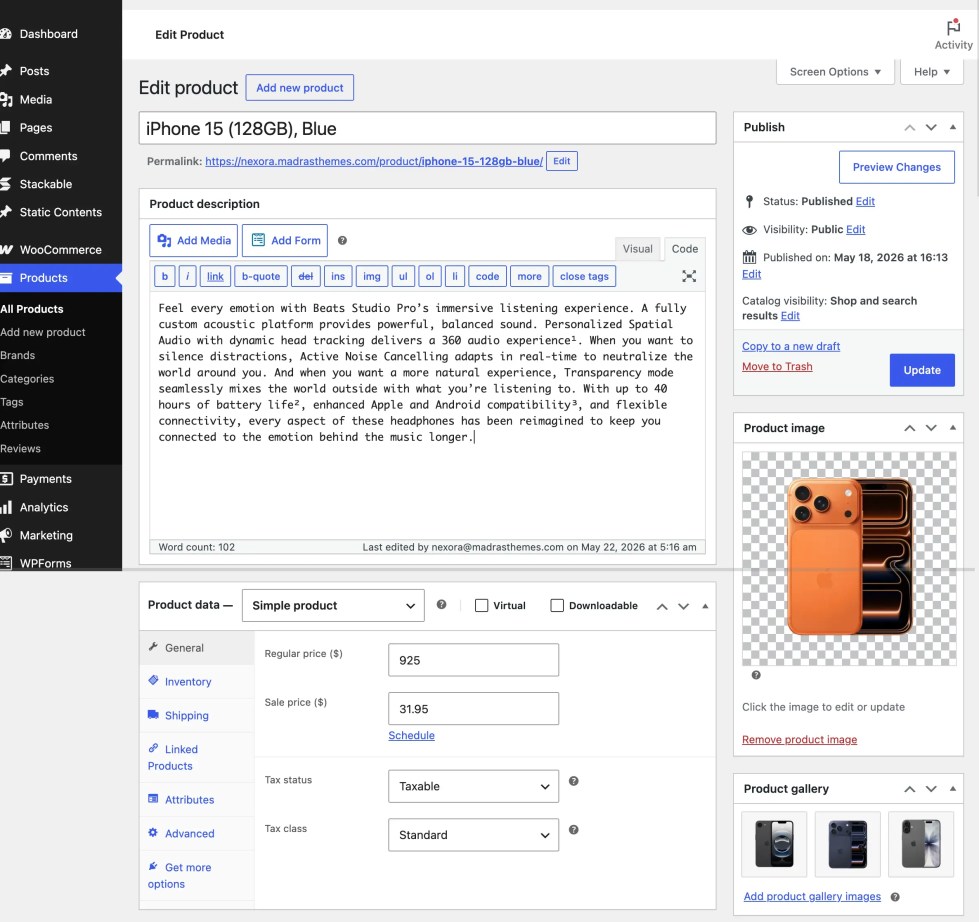
Adding a New Product
- Go to Products → Add New in your WordPress dashboard.
- Enter the Product Name and Description.
- Configure the Product Data:
- Set Regular Price and Sale Price for promotional campaigns.
- Manage Inventory (SKU, stock status, stock quantity).
- Add Shipping details (weight, dimensions, etc.).
- Configure Linked Products for upsells and cross-sells.
- Add a Product Image and Product Gallery.
- Assign relevant Categories and Tags to organize your catalog.
- Click Publish to make the product live.
Customizing the Product Page
- Go to Appearance → Editor → Templates → Single Product.
- Customize the layout using blocks such as:
- Product Title
- Product Price
- Product Image Gallery
- Add to Cart Button
- Product Description
- Related Products, Upsells, or Cross-sells
- Rearrange, remove, or add sections to match your store’s design and conversion goals.

Product Display Features
- High-Converting Layouts: Designed for electronics and deal-focused stores.
- ProMotional Badges: Highlight discounts, flash sales, and limited-time offers.
- Add to Cart & Wishlist: Enables fast and convenient shopping.
- Category-Based Navigation: Ideal for large multi-category catalogs.
- Optimized Performance: Fast-loading layouts for better user experience and SEO.
💡 Tip: Use clear product images, highlight key specifications, and leverage sale pricing to increase conversions—especially for electronics and promotional campaigns.
Single Product Page
↑ Back to topThe Single Product Page is where customers explore product details and make purchase decisions. In Nexora Shop, this page is designed for high conversions, combining performance, clean layout, and promotional elements—perfect for electronics, multi-category stores, and deal-driven eCommerce websites.
Built with WooCommerce blocks and fully customizable via the WordPress Site Editor, you have complete control over how each product is presented.
Accessing and Editing the Single Product Page
- Go to Appearance → Editor → Templates → Single Product.
- Open the template to customize the layout.
- Use the block editor to add, remove, or rearrange sections as needed.
Key Sections of the Single Product Page
- Product Title: Clearly displays the product name.
- Product Image Gallery: High-quality images with zoom and gallery support.
- Price & Sale Price: Highlights discounts, offers, and deal pricing.
- Add to Cart Button: Enables quick and seamless purchases.
- Product Description & Short Description: Showcases features, specs, and key selling points.
- Product Meta: SKU, categories, and tags.
- Upsells & Related Products: Encourages higher cart value through recommendations.
- Customer Reviews: Builds trust with ratings and feedback.
Customization Tips
- Prioritize images, pricing, and offers to maximize conversions.
- Add promotional elements like:
- Deal countdown timers
- Limited-time offer banners
- Trust badges (secure checkout, warranty, etc.)
- Include product videos or feature highlights for electronics.
- Keep layouts clean and focused for better user experience.
Features
- Conversion-Focused Design: Built for promotional and deal-driven stores.
- Responsive Layout: Optimized for desktop, tablet, and mobile devices.
- Fast Add to Cart & Wishlist: Improves shopping flow and engagement.
- Performance Optimized: Lightweight and fast-loading structure.
- Pattern Support: Easily insert banners, promo sections, or feature highlights.
💡 Tip: For electronics stores, highlight key specifications, offers, and urgency (limited deals) to increase conversions. You can also create multiple Single Product templates for different product types like gadgets, accessories, or bundles.
Cart Page
↑ Back to topThe Cart Page is where customers review their selected products, update quantities, apply discounts, and proceed to checkout. In Nexora Shop, the Cart Page is optimized for speed, clarity, and conversions, ensuring a smooth transition from browsing to purchase—especially for deal-driven and electronics stores.
Accessing and Editing the Cart Page
- Go to Pages → All Pages and open the Cart page (automatically created by WooCommerce).
- Use the block editor to add custom content such as banners, offers, or trust elements.
- To customize the layout globally, go to Appearance → Editor → Templates → page-cart.
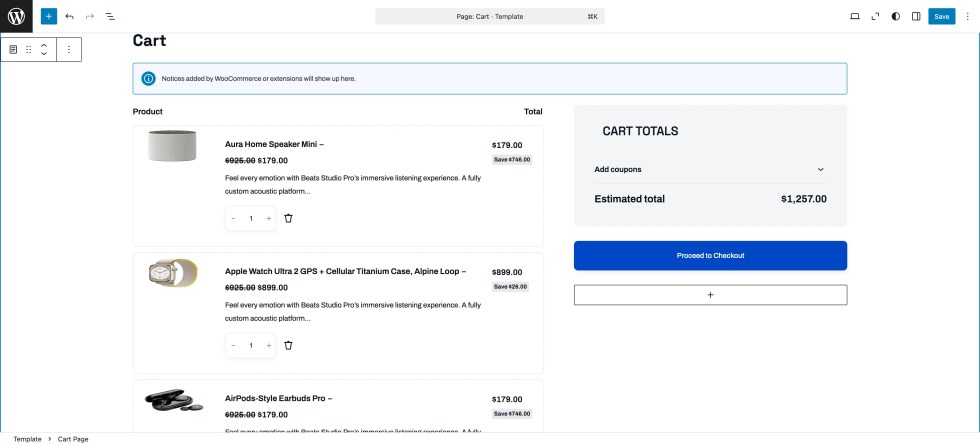
Key Features of the Cart Page
- Product Summary: Displays selected products with images, titles, prices, and quantity controls.
- Update & Remove Items: Customers can easily modify their cart.
- Coupon & Promotions: Apply discount codes or promotional offers.
- Cart Totals: Clear breakdown of subtotal, shipping, taxes, and final total.
- Checkout CTA: Prominent Proceed to Checkout button for faster conversions.
Customization Tips
- Add promotional banners like “Limited Time Offer” or “Free Shipping Above ₹X”.
- Include trust badges (secure checkout, warranty, return policy) to build confidence.
- Highlight savings or discounts to reinforce purchase decisions.
- Optionally show recommended or upsell products to increase order value.
Features
- Conversion-Optimized Layout: Designed to reduce friction and improve checkout rates.
- Responsive Design: Works seamlessly across all devices.
- Fast Performance: Lightweight and optimized for quick loading.
- Flexible Blocks: Easily extend the page using WooCommerce blocks and patterns.
💡 Tip: Keep distractions minimal on the Cart Page. Focus on clarity, pricing, and urgency (offers/discounts) to push users toward completing their purchase.
Checkout Page
↑ Back to topThe Checkout Page is where customers complete their purchase by entering their details, selecting a payment method, and placing the order. In Nexora Shop, the Checkout Page is optimized for speed, trust, and conversions, ensuring a smooth and distraction-free experience—especially important for high-value electronics and promotional purchases.
Accessing and Editing the Checkout Page
- Go to Pages → All Pages and open the Checkout page (automatically created by WooCommerce).
- Use the block editor to add custom content such as trust badges, offers, or notices.
- To customize the layout globally, go to Appearance → Editor → Templates → Checkout.
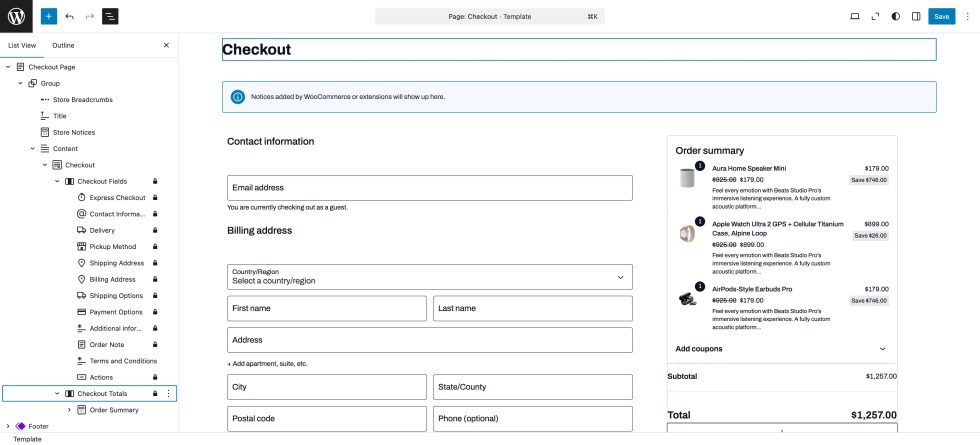
Key Features of the Checkout Page
- Billing & Shipping Details: Customers enter contact and delivery information.
- Order Summary: Displays selected products, quantities, pricing, and totals.
- Payment Methods: Supports all WooCommerce-enabled gateways (cards, UPI, wallets, etc.).
- Place Order Button: Final step to confirm the purchase.
- Order Notes: Optional field for customer instructions.
Customization Tips
- Add trust signals such as:
- Secure payment badges
- Warranty or return policy highlights
- Delivery guarantees
- Highlight offers or savings (e.g., “You saved ₹X on this order”).
- Keep the layout clean and distraction-free to reduce cart abandonment.
- Avoid unnecessary fields to make checkout faster.
Features
- Conversion-Focused Design: Built to minimize friction and maximize completed orders.
- Responsive Layout: Seamless experience across all devices.
- Fast Performance: Optimized for quick loading and smooth checkout flow.
- Flexible Customization: Easily extend using WooCommerce blocks and patterns.
💡 Tip: For electronics and high-value purchases, clearly display security, warranty, and return policies to build trust and improve conversion rates.
Customisations
↑ Back to topSite-level Customizations
↑ Back to topNexora Shop provides powerful site-level customization options that allow you to control the overall look, branding, and user experience of your store. These settings apply globally, ensuring a consistent, modern, and conversion-focused design—ideal for electronics stores, multi-category marketplaces, and promotional eCommerce websites.
Site Logo
↑ Back to topTo display your logo, you can use the Site Logo block or an Image block.
Steps to Update the Logo
- Go to Appearance → Editor.
- Open the Header template part.
- Click on the existing logo image.
- In the toolbar or sidebar, click Replace or Upload.
- Choose:
- Upload – Select a new logo from your computer.
- Media Library – Choose an existing logo.
- Adjust the Image Width from the settings panel.
- Click Save to apply changes globally.
💡 Tip: Use a high-resolution logo with a transparent background for a clean and professional appearance.
Header
↑ Back to top- Go to Appearance → Editor → Patterns → All Template Parts → Header.
- Customize using blocks such as:
- Logo
- Navigation Menu
- Search Bar (important for large product catalogs)
- Mini Cart
- Account / Login Icon
- You can apply pre-built Header patterns or customize your own layout.
💡 Tip: For better UX in large stores, prioritize search, categories, and cart visibility in the header.
Primary Color
↑ Back to top- Go to Appearance → Editor → Styles → Colors.
- Edit colors from the Theme palette (defined in
theme.json). - Click any color to modify it using the color picker.
- Add new colors using the + (Custom) option.
- Click Save to apply changes across your site.
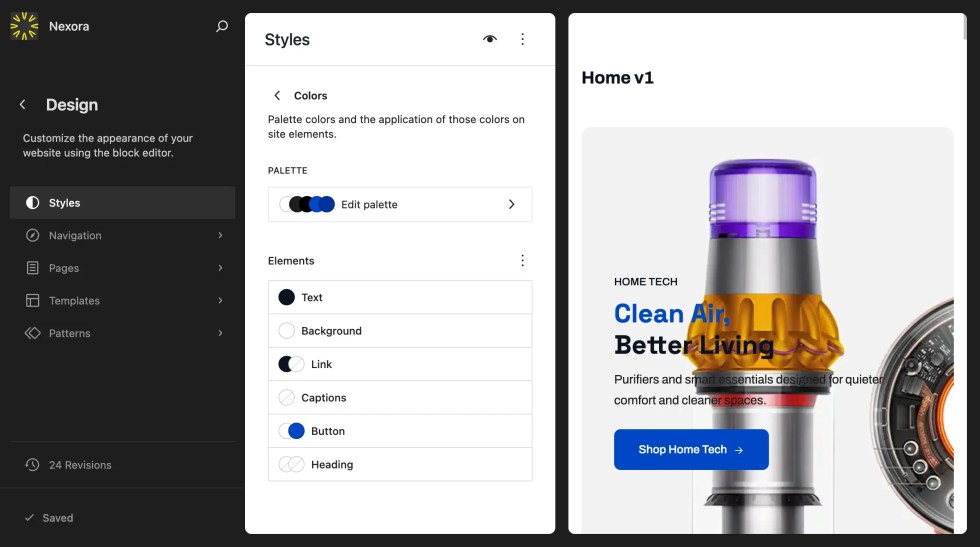
💡 Tip: Use bold, high-contrast colors for buttons, offers, and promotional highlights to increase conversions.
Font & Typography
↑ Back to top- Go to Appearance → Editor → Styles → Typography.
Customize Body Text
- Click Text (Aa) to adjust:
- Font family
- Weight and style
- Line height
- Letter spacing
Customize Headings
- Click Headings (Aa) to control H1–H6 styles globally.
Customize Other Elements
- Adjust typography for:
- Links
- Buttons
- Captions
Font Size Presets
↑ Back to top- Configure predefined sizes under Font Size Presets.
- Click Save after making changes.
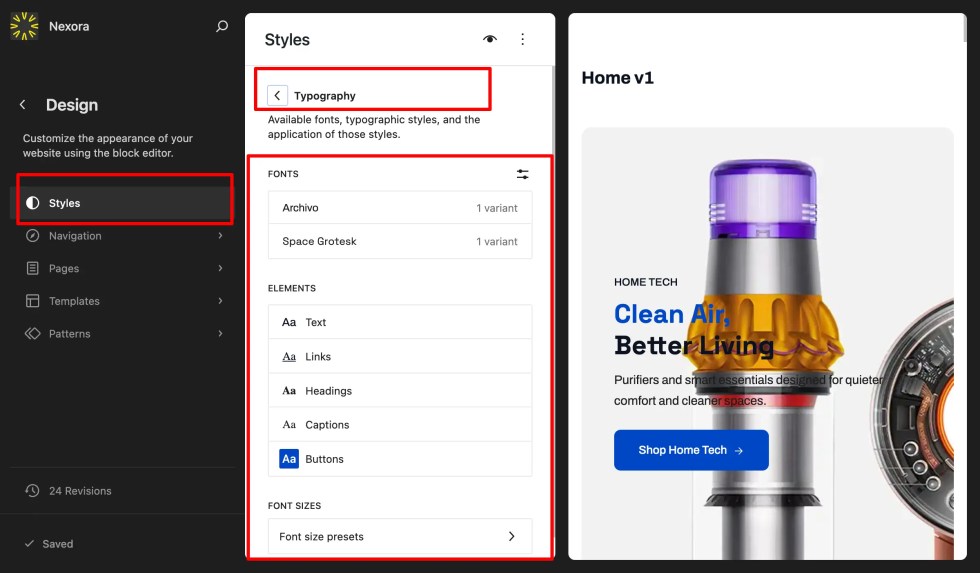
💡 Tip: Maintain a clear visual hierarchy—especially for product titles, pricing, and promotional text.
Footer
↑ Back to top- Go to Appearance → Editor → Patterns → All Template Parts → Footer.
- Customize using blocks such as:
- Navigation / Quick Links
- Social Media Icons
- Newsletter Signup
- Contact Information
- Copyright
- You can also apply pre-designed Footer patterns.

💡 Tip: Use the footer to build trust—include contact details, policies, and support links, especially for high-value purchases.
By customizing these elements, you can create a consistent, professional, and high-converting shopping experience tailored to your brand.
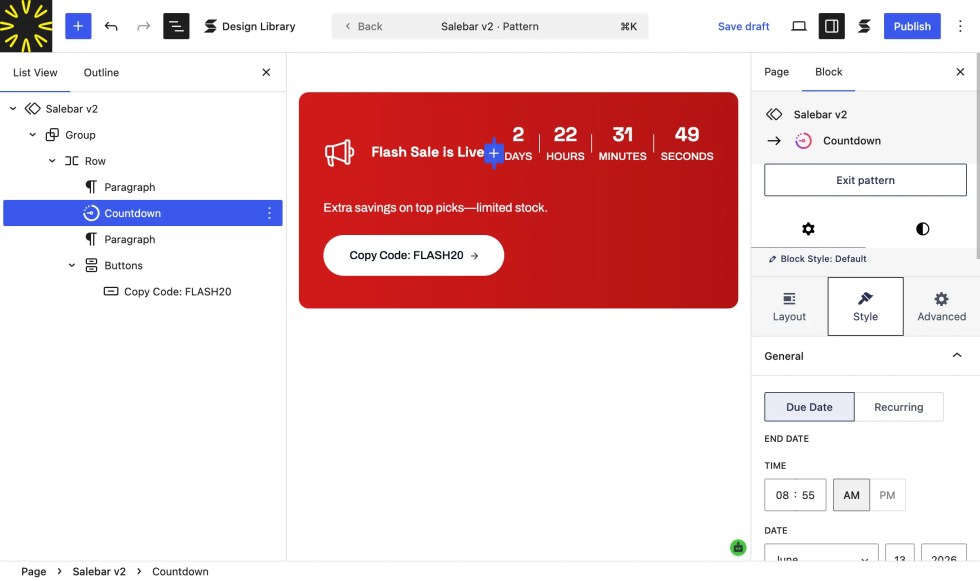
Adding Countdown Timer
↑ Back to topThe Countdown Blocks section allows you to display attractive timers that create urgency for sales, promotions, or upcoming launches. In Nexora Shop, countdowns are added using the Stackable plugin and seamlessly integrate with your page or product designs.
Installing the Stackable Plugin
- Before using the Countdown Block, make sure the Stackable – Page Builder Gutenberg Blocks is installed and activated.
- Go to Plugins → Add New in your WordPress dashboard.
- Search for “Stackable – Gutenberg Blocks”.
- Click Install Now, then Activate.
- Once activated, you’ll have access to the Countdown Block.
Adding a Countdown Block
- Go to Pages → Edit with Block Editor (or edit any post or product page).
- Click the “+” (Add Block) button and search for Countdown.
- Select the Stackable Countdown Block from the list.
- Configure the Countdown Settings in the right sidebar:
- End Date & Time – set the exact time the countdown should stop.
- Labels – toggle day/hour/minute/second labels on or off.
- Expiry Action – choose what happens when the timer ends (e.g., show a message or hide the block).
Customize the appearance:
- Adjust colors, spacing, and typography.
- Choose from Stackable’s design presets for quick styling.
- Click Update or Publish to save your changes.
WPForms Integration
↑ Back to topNexora Shop supports WPForms — a powerful drag-and-drop form builder for WordPress. It allows you to easily create contact forms, inquiry forms, support forms, and lead generation forms—perfect for electronics stores, multi-category marketplaces, and promotional campaigns.
Creating Forms
↑ Back to topBefore creating a form, make sure the WPForms plugin is installed and activated.
- Go to Plugins → Add New.
- Search for WPForms.
- Click Install Now, then Activate.
To create a new form:
- Navigate to WPForms → Add New.
- Enter a name for your form.
- Choose a template, such as:
- Simple Contact Form
- Newsletter Signup Form
- Support / Inquiry Form
- Blank Form (for full customization)

Customizing Your Form
- Use the drag-and-drop builder to add and arrange fields.
- Common fields include:
- Name
- Phone Number
- Message
- Dropdowns (for product inquiries or categories)
- Configure:
- Notifications (send emails to admin or customer)
- Confirmations (success message or redirect)
- Spam Protection (reCAPTCHA, etc.)
Where to Use Forms in Nexora Shop
- Contact Page – General inquiries and support.
- Product Pages – “Ask About This Product” forms.
- Landing Pages – Lead generation for promotions or deals.
- Footer / Popups – Newsletter signup for offers and updates.
Features
- Drag-and-Drop Builder: Easy to create forms without coding.
- Responsive Design: Works perfectly on all devices.
- Email Notifications: Stay updated with customer inquiries.
- Marketing Integration: Connect with email tools for campaigns.
- Spam Protection: Keeps your forms secure.
💡 Tip: Use forms strategically to capture leads during promotional campaigns—for example, offer a discount in exchange for email signup.
FAQs
↑ Back to topGeneral
↑ Back to top
Where is my license key?
Nexora Shop does not require a license key to function. You can install and use the theme directly after purchase.
Where is the header configuration?
The header and navigation menus can be configured via:
Appearance → Editor → Patterns → Header
Here, you can customize elements like logo, menu, search, account, and cart.
How can I configure the footer on my website?
To customize the footer:
Go to Appearance → Editor
Navigate to Patterns → Footer
Edit the layout, links, and content as needed
How can I add page patterns to my website?
To add patterns:
Go to Appearance → Editor
Open any page
Click on + (Add Block) → Patterns
Select and insert the desired pattern into your layout
Does Nexora Shop support multi-vendor functionality?
Nexora Shop is a WooCommerce-based theme and supports all default WooCommerce features.
Multi-vendor functionality is not included by default. However, you can use third-party plugins like Dokan to enable multi-vendor features.
⚠️ Compatibility with third-party multi-vendor plugins may vary.
Where can I get support for the theme?
You can reach out to our support team via:
👉 https://madrasthemes.com/support/
License
↑ Back to top
What is the theme's license?
The theme is distributed under the GPL v2.0 license, allowing you to use, modify, and distribute it as per GPL terms.