
This guide explains how to connect B2B for WooCommerce (Version 4.0.0 or above) to Claude or Codex through the Model Context Protocol (MCP).
After connecting, an authorized store manager can use normal-language requests to inspect and manage supported B2B features, including customer roles, pricing rules, product visibility, quotation rules, quotes, cart discounts, registration requests, order restrictions, and approved B2B settings using Claud or Codex AI.
Values used in this guide
Replace these example values with your own:
| Example | Replace with |
|---|---|
| https://yourwebsite.com | Your store URL, without a trailing slash |
| mcp_store_user | The WordPress username created for MCP. It can be admin or anyother username that you want to create |
| xxxx xxxx xxxx xxxx xxxx xxxx | That user’s WordPress Application Password |
| addify-b2b-store | Any friendly connection name you prefer |
Your Addify MCP endpoint is:
https://yourwebsite.com/wp-json/addify-b2b-mcp/mcp
Do not use your normal WordPress password in the connection settings.
Part 1: Prepare the WooCommerce store
↑ Back to topStep 1: Check the permalinks
↑ Back to top- Sign in to WordPress Admin.
- Go to Settings → Permalinks.
- Select any structure except Plain. Post name is a suitable option.
- Click Save Changes, even if the correct structure is already selected.
Step 2: Check the MCP Adapter
↑ Back to topUse one of these methods:
- Download the latest release from the official WordPress MCP Adapter releases page, then install and activate its plugin ZIP; or
- Enable WooCommerce’s MCP integration if your WooCommerce version includes the shared MCP Adapter.
The B2B plugin uses the shared WordPress/WooCommerce MCP Adapter. It does not install a second copy.
Step 3: Enable the Addify MCP server
↑ Back to top- Go to B2B → AI Assistant.
- Find Model Context Protocol (MCP).
- Turn on Enable MCP tools.
- Leave Allow MCP write requests turned off for the first connection test.
- Under Execution style, select Approval Mode (Recommended).
- Under Allowed B2B Features, enable only the features Claude or Codex should be allowed to access.
- Click Save AI Assistant Settings.
- Reload the page.
- Confirm that the MCP status says the server is enabled and displays this endpoint:
/wp-json/addify-b2b-mcp/mcpThe server ID is:
addify-b2b-mcp-serverThe AI provider used by the plugin’s built-in chat assistant is separate from MCP. Claude or Codex uses its own model and calls the plugin’s MCP tools.
Step 4: Create an Application Password
↑ Back to top- Go to Users → Add New User or use any existing admin user.
- Open Users → Profile for the MCP user.
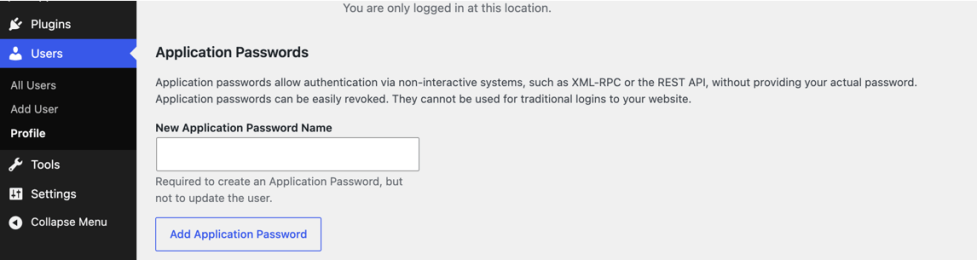
- Scroll to Application Passwords.
- Enter a name such as Claude MCP or Codex MCP.
- Click Add New Application Password.
- Copy the generated password immediately.
- Store it securely. WordPress will not show it again.
Application Passwords are separate from the user’s normal login password and can be revoked without changing the login password.
Step 6: Check the WordPress REST API
↑ Back to topOpen this address in a browser:
https://yourwebsite.com/wp-json
You should see a JSON response. If this address returns a normal website 404 page, fix the permalink or server rewrite configuration before continuing.
Do not expect the MCP endpoint itself to display a normal web page. Depending on the request, an authentication error, method error, or MCP protocol response can be normal.
Part 2: Connect Claude
↑ Back to topYou may connect with Claude Desktop or Claude Code. You only need one method.
Method 1: Claude Desktop
↑ Back to topStep 1: Open the Claude configuration
- Open Claude Desktop.
- Go to Claude → Settings → Developer.
- Under Local MCP servers, select Edit Config.
Step 2: Add the server
Add the following entry to the mcpServers object. Replace the URL, username, and Application Password first.
{
  "mcpServers": {
    "addify-b2b-store": {
      "command": "npx",
      "args": ["-y", "@automattic/mcp-wordpress-remote@latest"],
      "env": {
        "WP_API_URL": "https://yourwebsite.com/wp-json/addify-b2b-mcp/mcp",
        "WP_API_USERNAME": "mcp_store_user",
        "WP_API_PASSWORD": "xxxx xxxx xxxx xxxx xxxx xxxx"
      }
    }
  }
}
If your configuration already contains other MCP servers, add addify-b2b-store inside the existing mcpServers object. Do not replace the other entries, and make sure the JSON commas remain valid.
Step 3: Restart Claude Desktop
- Save the configuration file.
- Fully quit Claude Desktop.
- Open Claude Desktop again.
- Return to Settings → Developer.
- Confirm that addify-b2b-store shows a running or connected status.
Step 4: Perform a read-only test
Start a new conversation and enter:
Use the Addify B2B MCP tools to list the B2B customer roles in my WooCommerce store. This is a read-only request. Do not make any changes.
Claude may ask for permission before calling a tool. Review the request and allow it.
Method 2: Claude Code
↑ Back to topStep 1: Add the server
Open a terminal on the computer where Claude Code is installed and run this command after replacing the three connection values:
claude mcp add addify-b2b-store \
  --scope user \
  --transport stdio \
  --env 'WP_API_URL=https://yourwebsite.com/wp-json/addify-b2b-mcp/mcp' \
  --env 'WP_API_USERNAME=mcp_store_user' \
  --env 'WP_API_PASSWORD=xxxx xxxx xxxx xxxx xxxx xxxx' \
  -- npx -y @automattic/mcp-wordpress-remote@latest
Step 2: Confirm the connection
Run:
claude mcp list
The addify-b2b-store entry should show Connected. Inside Claude Code, you can also run:
/mcp
Step 3: Perform a read-only test
Enter:
Use the Addify B2B store tools to show the B2B dashboard summary. Do not change the store.
Official reference: Connect Claude Code to tools via MCP.
Part 3: Connect Codex
↑ Back to topThe easiest method is to add the server with Codex CLI. The Codex desktop app, CLI, and IDE extension share the MCP configuration on the same Codex host.
Step 1: Add the server
↑ Back to topOpen a terminal on the computer where Codex is installed. Replace the URL, username, and Application Password, then run:
<!-- wp:paragraph -->
<p>codex mcp add addify-b2b-store \<br>  --env 'WP_API_URL=https://yourwebsite.com/wp-json/addify-b2b-mcp/mcp' \<br>  --env 'WP_API_USERNAME=mcp_store_user' \<br>  --env 'WP_API_PASSWORD=xxxx xxxx xxxx xxxx xxxx xxxx' \<br>  -- npx -y @automattic/mcp-wordpress-remote@latest</p>
<!-- /wp:paragraph -->
Step 2: Confirm the connection
↑ Back to topRun:
codex mcp list
Confirm that addify-b2b-store is listed.
Step 3: Restart Codex
↑ Back to topIf the Codex desktop app or IDE extension was open when you added the server:
- Open Settings → MCP servers.
- Confirm that addify-b2b-store is enabled.
- Restart Codex or restart the IDE extension.
- Type /mcp in the composer to view the connected servers.
Step 4: Perform a read-only test
↑ Back to topStart a new task and enter:
Use the Addify B2B MCP tools to list the B2B customer roles in my WooCommerce store. This is a read-only request. Do not make changes.
Official reference: Connect Codex to MCP servers.
Part 4: Safely test a store change
↑ Back to topComplete the read-only test before enabling writes.
Step 1: Enable guarded write requests
↑ Back to top- In WordPress Admin, go to B2B → AI Assistant.
- Keep Execution style set to Approval Mode.
- Turn on Allow MCP write requests.
- Click Save AI Assistant Settings.
- Reload the page.
Step 2: Request a test role
↑ Back to topAsk Claude or Codex:
Create a B2B user role titled Test Dealer. Show me what will happen and submit it for approval. Do not apply it automatically.
The plugin automatically:
- Creates the role slug from the title, such as test_dealer.
- Copies the WordPress Customer role capabilities by default.
- Records the request in the audit history.
Step 3: Review and approve the request
↑ Back to top- In WordPress Admin, go to B2B → AI Assistant.
- Open Activity & Audit Log.
- Review the requested action, target, risk, and proposed values.
- Click Approve to apply it, or Deny to reject it.
- Open the appropriate B2B settings screen and confirm the result.
Execution styles
↑ Back to top| Mode | Result |
|---|---|
| Advisory Mode | Returns complete numbered instructions and does not modify the store. |
| Approval Mode | Queues write requests in Activity & Audit Log for an administrator to approve or deny. Recommended for production. |
| Automatic Mode | Applies enabled write requests immediately and records them in audit history. Use only after testing. |
The Allow MCP write requests switch is an additional safety control. When it is off, MCP cannot submit store changes even if the selected execution style normally allows changes.
Example requests
↑ Back to topRead-only requests
↑ Back to topShow my B2B dashboard summary for the last 30 days.
List all B2B customer roles and their slugs.
List the active role-based pricing rules.
Show pending B2B registration requests.
Write requests
↑ Back to topUse Approval Mode for these examples.
Create a B2B role named Wholesale Gold and submit it for approval.
Create a quote for customer@customeremail.com containing 5 units of Blue T-Shirt and submit it for approval.
For quote creation:
- If the email belongs to a WordPress user, the plugin uses that user’s ID.
- If the email does not belong to a user, the plugin prepares the quote for guest customer ID 0.
- If several products match a product name, the plugin asks you to choose the correct product before it creates or queues the quote.
Create a 10% cart discount for the Wholesale Gold role and submit it for approval.
Always review the exact target, values, dates, product IDs, role IDs, and customer details before approving a write request.
Optional: Use the WooCommerce MCP endpoint
↑ Back to topIf WooCommerce MCP integration is enabled, the guarded Addify tools are also available through:
This alternative uses a WooCommerce REST API key in the X-MCP-API-Key header instead of a WordPress Application Password. The header value has this format:
consumer_key:consumer_secret
The key owner must have permission to manage WooCommerce. The key’s Read, Write, or Read/Write scope is enforced. Use the dedicated Addify endpoint described earlier unless you specifically need one shared WooCommerce MCP connection.
Troubleshooting
↑ Back to topThe REST API or MCP endpoint returns 404
↑ Back to top- Go to Settings → Permalinks.
- Select anything except Plain.
- Click Save Changes.
- Test https://yourwebsite.com/wp-json/ again.
- If it still returns a website 404 page, ask the hosting provider to enable WordPress rewrite rules and REST API access.
The plugin says “MCP Adapter not detected”
↑ Back to top- Confirm WordPress is version 6.9 or later.
- Install and activate the official WordPress MCP Adapter, or enable the WooCommerce MCP integration that supplies it.
- Reload B2B → AI Assistant.
Claude or Codex reports “Failed to connect”
↑ Back to top- Confirm Node.js and npx are installed:
node –version
npx –version
- Check that WP_API_URL contains the complete endpoint and no trailing spaces.
- Check that the WordPress username is correct.
- Generate a new Application Password and replace the old value.
- Restart the AI client after changing its configuration.
Authentication returns 401
↑ Back to top- Use the WordPress username, not the email address unless the username is the email.
- Use the generated Application Password, not the normal login password.
- Confirm HTTPS is working correctly.
- Check whether a security plugin, proxy, CDN, or web server is removing the HTTP Authorization header.
A tool returns 403
↑ Back to top- Confirm Enable MCP tools is on.
- Confirm the MCP user has manage_woocommerce.
- Confirm the requested feature is enabled under Allowed B2B Features.
- For a write request, confirm Allow MCP write requests is on.
- If using the WooCommerce endpoint, confirm the API key has the required Read or Write scope.
The server connects but no Addify tools appear
↑ Back to top- Confirm at least one feature is enabled under Allowed B2B Features.
- Save the settings and reload WordPress Admin.
- Restart Claude or Codex so it refreshes the tool list.
- Check /mcp in the AI client.
A requested change was not applied
↑ Back to top- In Advisory Mode, the plugin only returns instructions.
- In Approval Mode, open B2B → AI Assistant → Activity & Audit Log and approve the pending request.
- If writes are disabled, enable Allow MCP write requests before trying again.
A firewall or security service blocks the connection
↑ Back to topAsk the host or security provider to allow authenticated requests to:
/wp-json/addify-b2b-mcp/mcp
The route must accept MCP HTTP requests and WordPress Application Password authentication. Do not disable the entire firewall just to test MCP.
Security recommendations
↑ Back to top- Use a dedicated MCP user rather than a personal administrator account.
- Give the user only the permissions it needs. The plugin requires manage_woocommerce.
- Begin with MCP writes disabled.
- Use Approval Mode on production stores.
- Enable only the B2B features customers need.
- Test write workflows on a staging store first.
- Review Activity & Audit Log regularly.
- Never share an Application Password in a support ticket, screenshot, chat message, or published configuration.
- Revoke unused passwords under Users → Profile → Application Passwords.
- If a computer containing the MCP configuration is lost or compromised, revoke that Application Password immediately.
Disconnect the store
↑ Back to topFrom WordPress
↑ Back to top- Go to B2B → AI Assistant.
- Turn off Enable MCP tools and save.
- Go to the MCP user’s WordPress profile.
- Revoke the relevant Application Password.
From Claude Code
↑ Back to topclaude mcp remove addify-b2b-store
From Codex
↑ Back to topcodex mcp remove addify-b2b-store
For Claude Desktop, remove the addify-b2b-store entry from the mcpServers configuration and restart Claude.

