
The WooCommerce B2B extension provides you with a complete wholesale solution to manage B2C and B2B customers.
Installation
↑ Back to top- Download the .zip file from your WooCommerce account.
- Go to WordPress Admin > Plugins > Add New and upload the plugin file you have downloaded.
- Install Now and activate the extension.
Configuration & setup
- After activating the WooCommerce B2B extension, you can see a new “B2B” tab in the WordPress admin menu.
- Click to view settings and get started with:
- AI Assistant
- User Role Manager
- B2b Registration
- Catalog Visibility
- Hide Prices & Request a Quote
- Role Based & Wholesale Pricing
- Tax Exemption
- Restrict Shipping & Payment Method by User Role
- Order Restrictions (Based on User Role & Cart)
- Cart Discounts (Based on cart quantity and amount)
- FAQs
Let’s explore the WooCommerce B2B extension in detail.
1. AI setup guide – B2B for WooCommerce
↑ Back to topThe B2B for WooCommerce’s smart AI Assistant simplifies wholesale store management through natural language commands directly inside your WordPress dashboard. Powered by OpenAI, Google Gemini, and Anthropic Claude, it lets you configure pricing, quote rules, and user roles in seconds. Built-in approval modes and granular permission toggles ensure you maintain complete control over every store update.
NOTE: If you have already configured AI API keys using the default WordPress Connector, B2B for WooCommerce will automatically inherit those AI models allowing you to control extension using simple text prompts.
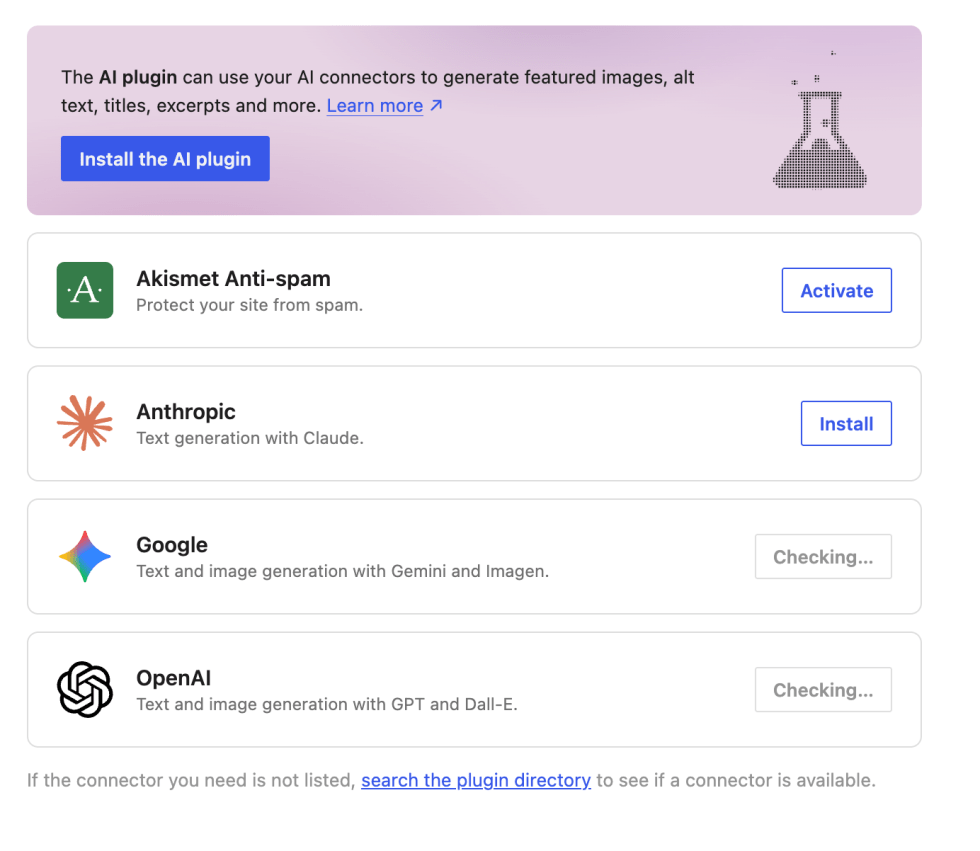
1.1 Accessing the AI assistant
↑ Back to topTo access and configure the AI integration, navigate to B2B > AI Assistant from your WordPress Admin side menu.
1.2 AI model & connection
↑ Back to topThe integration supports all current and future models provided by OpenAI, Google Gemini, and Anthropic Claude. Store owners must enter a valid secret API key from their preferred provider.
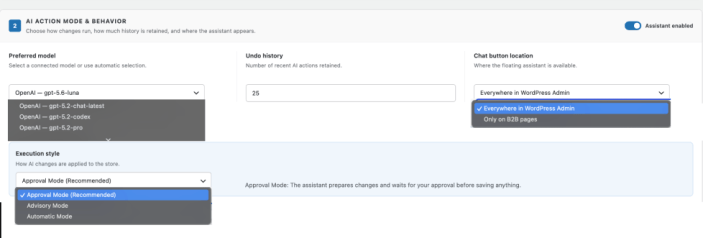
Pause AI toggle: Located at the top right of the settings header (Pause AI: Active / Paused). Switching this toggle to “Paused” immediately halts all API usage, completely disabling AI Assistant operations across the store until re-enabled.
1.2.1 ChatGPT (OpenAI) key setup:
Log in to the OpenAI API Keys Dashboard to create a key. Paste it into the OpenAI card. Review rates in the OpenAI Documentation.
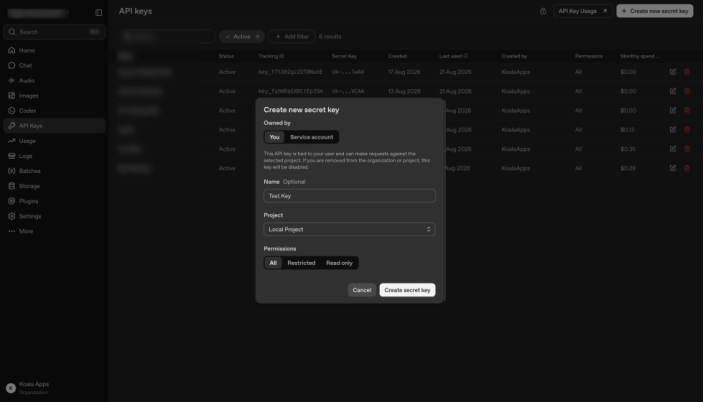
1.2.2 Google Gemini key setup:
Generate a key in Google AI Studio and paste it into the Gemini card. Review quotas in the Gemini API Documentation.
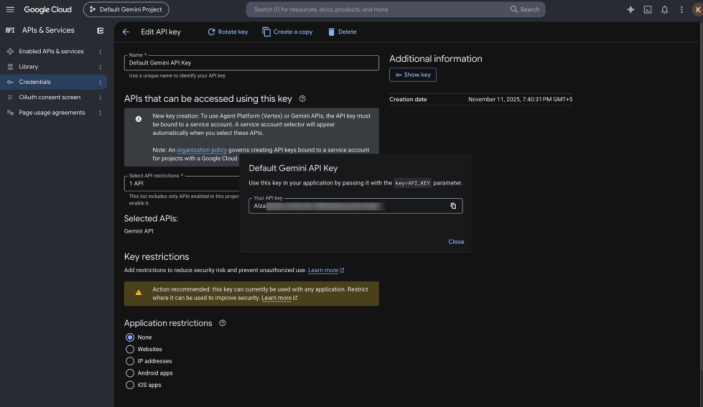
1.2.3 Anthropic claude key setup:
Create a key in Claude Console Settings and enter it into the Claude card. See the Claude Platform Documentation.
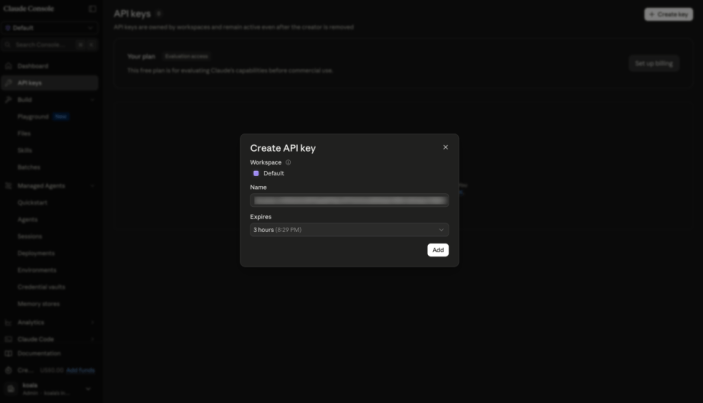
1.3 AI action modes & other settings
↑ Back to top| Execution Style | Behavior & Safety Mechanism |
| Approval Mode (Recommended Mode) | Displays a visual preview of proposed changes in the chat widget. Requires explicit store admin approval before writing updates to the store. |
| Suggestion Mode | Operates as an instructional assistant, providing step-by-step guidance so admins can apply configurations manually. |
| Auto-Apply Mode | Instantly executes store changes, pricing rules, and settings directly based on prompt commands. |
- Undo History (Rollback Depth): Enter a custom numerical limit to define how many historical AI actions are saved for 1-click reversal (e.g., entering 25 allows you to roll back any of the last 25 executed actions).
- Chat Button Location: Choose whether the floating AI assistant launcher appears in all B2B extension page in Admin panel or restricted to B2B AI Assistant Page Only.
1.4 Allowed B2B features (granular access)
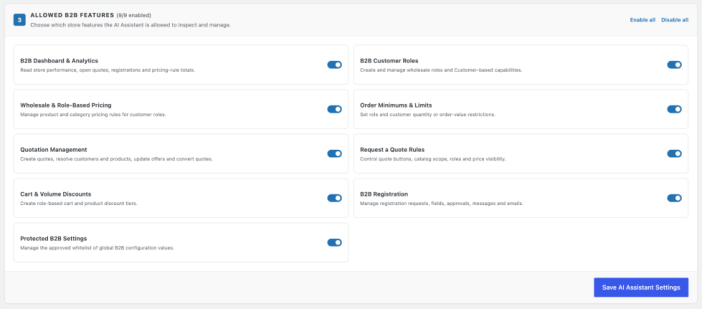
↑ Back to topControl which store features the AI Assistant is permitted to inspect and manage using individual toggles:
- B2B Dashboard & Analytics: Read store performance, open quotes, user registrations, and pricing-rule totals.
- B2B Customer Roles: Create and manage wholesale roles and customer-based capabilities.
- Wholesale & Role-Based Pricing: Manage product and category pricing rules for specific customer roles.
- Order Minimums & Limits: Set role-based and customer-level quantity or order-value restrictions.
- Quotation Management: Create quotes, resolve customer/product assignments, update offers, and convert quotes.
- Request a Quote Rules: Control quote buttons, catalog visibility scope, customer roles, and price display behavior.
- Cart & Volume Discounts: Create role-based cart rules and multi-tiered product discounts.
- B2B Registration: Manage wholesale registration requests, custom fields, approval workflows, system messages, and emails.
- Protected B2B Settings: Manage the approved whitelist of global B2B configuration values.
Note: Disabling any feature toggle prevents the AI Assistant from modifying or executing operations for that specific module.
1.5 MCP documentation:
↑ Back to topYou can view the separate guide on how to connect operate B2B for WooCommerce with Claud or Codex using Model Text Protocols.
2. User role manager
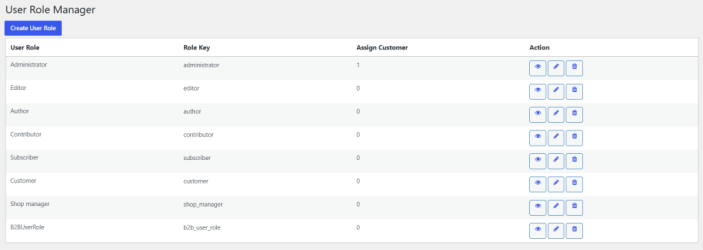
Select User Role Manager from the B2B dropdown menu to open the User Role Manager screen. Here, you can create user roles based on your business requirements. You can also view the details of all previously created user roles in a grid view.
2.1 Creating new user role
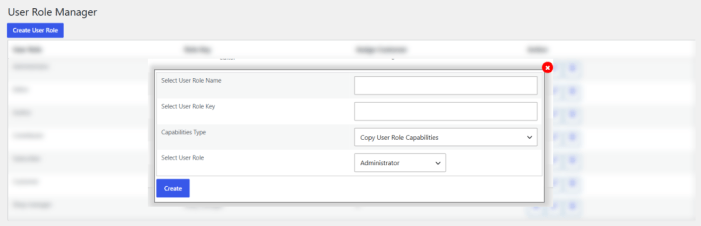
↑ Back to topCreate User Role: Click this option to create a new user role. A popup will open where you can add the following details:
- Select user role name: Select the name of the user role.
- Select user role key: Enter or select a unique key for the user role.
- Capabilities type: Select the capability type to define the permissions available for the user role.
- Copy User Role Capabilities: Choose this if you want to add copy user role capabilities. Once you select this, the select user role field will open where you can:
- Select user role: Select the user role from the dropdown menu.
- Add Custom Capabilities: If you choose this option. Selecting the custom capabilities field will open, where you can:
- Select custom capabilities: Select custom capabilities from the dropdown menu
- Copy User Role Capabilities: Choose this if you want to add copy user role capabilities. Once you select this, the select user role field will open where you can:
- Create: After adding all the required details, click the Create button to create and save the new user role.
2.1.1 Grid Details
- User Role: Shows the name of the user role.
- Role Key: Displays the key of the user role.
- Assign Customer: Shows the count of customers who will be assigned to this user role.
- Action: Here you can edit, delete, and view the user role as needed.
3. B2B registration fields
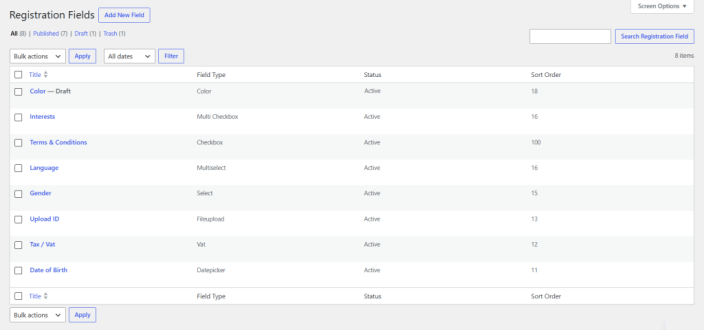
Select the Registration Fields option from the B2B dropdown menu to open the Registration Fields screen. Here, you can view all previously created registration fields in a grid view and create new fields based on your business requirements.
Grid Details:
In this grid view, you can:
- Title: View the title of the field.
- Field type: View the field type, such as text, numeric, etc.
- Status: View the field status, such as optional or mandatory, etc.
- Depends on: View the name of the field that this field depends on, if applicable.
- Sort Order: View the order in which the field is displayed.
3.1 Adding new registration field
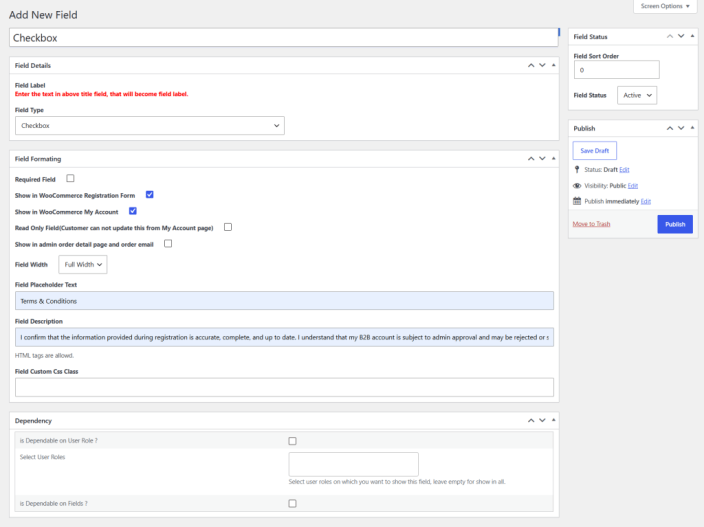
Click on the Add new field option to add new fields by adding the following settings:
- Add Title: Add the title of the field.
Field Details
- Field label: Add a custom label that is displayed above the field.
- Field Type: Select a field type from the dropdown, such as
- Text
- Textarea
- Select box
- Multi-select box
- Radio Button
- Number
- Password
- File Upload
- Color Picker
- Date Picker
- Time Picker
- Google reCAPTCHA
- Heading
- Description
Field Formating
- Required Field: Enable this if you want to make the field required.
- Show the WooCommerce Registration form: Enable this option if you want to display the fields in the WooCommerce registration form.
- Show in WooCommerce My Account: Enable this to show the field on the My Account page.
- Read-only field (Customer cannot update this from the My Account page): Enable this to make fields read-only.
- Show in Admin Order detail page and order email: Enable this to show the field in an admin order detail page and order email.
- Field Width: Set the field width from the dropdown, such as half or full width.
- Field Placeholder Text: Add placeholder text to help users understand what information to enter in the field.
- Field Description: Add a description to guide users about the information required in the field.
- Field Custom CSS Class: Add a custom CSS class to apply additional styling to the field.
Dependency
- Is Dependent on User Role: Enable this option if you want to display the field based on a specific user role. Once enabled, you can:
- Select User Role: Select the user role for which you want to display the field. If left empty, the field will be displayed to all users.
- Publish: After applying all the required settings, click the Publish button to create and apply the field.
3.2 General settings for registration fields
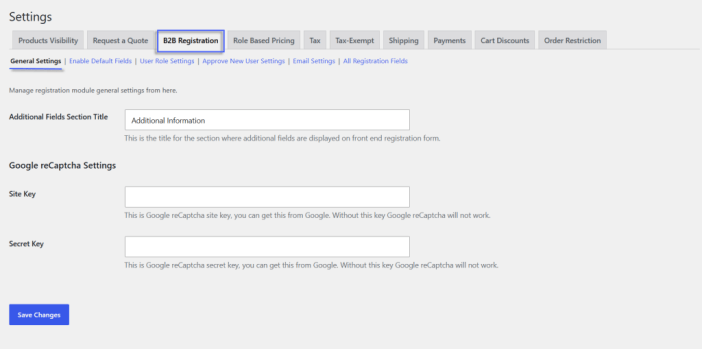
In this section, you can configure the following settings for B2B registration.
3.2.1 General Settings:
To configure the general settings, you can:
- Additional Fields Section Title: Enter the custom title for the section where additional fields are displayed on the front-end registration form.
3.2.2 Google reCAPTCHA settings
- Site Key: Enter the site key for Google reCAPTCHA. You can get this key from your Google reCAPTCHA account.
- Secret Key: Enter the secret key for Google reCAPTCHA. You can get this key from your Google reCAPTCHA account.
- Save Changes: Click Save Changes to save and apply the changes.
Note – You can get the Google reCaptcha keys for your store from here
3.3 Default fields for registration fields
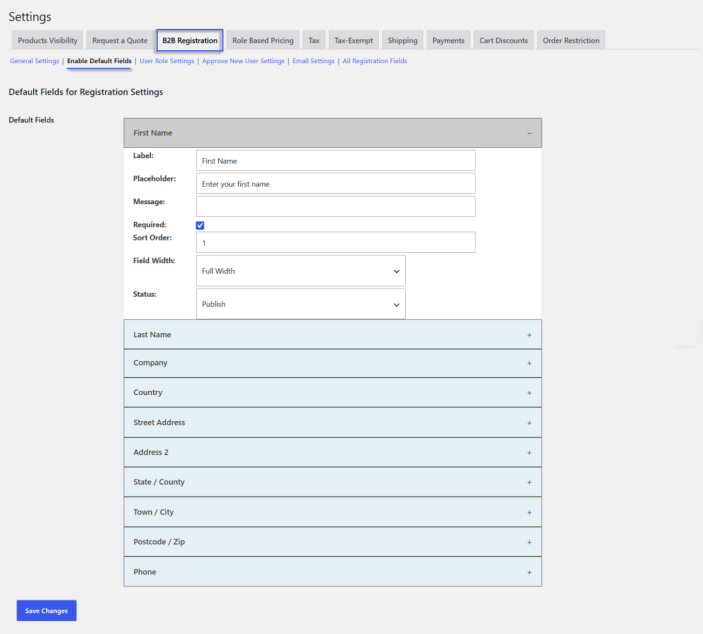
To add the default field settings, you can:
- Default Fields: Manage the default registration fields displayed on the front-end registration form. For each field, you can:
- Label: Enter the label to be displayed for the field.
- Placeholder: Add custom placeholder text to help users understand what information to enter.
- Message: Add a custom message to display for the field.
- Required: Enable this option to make the field mandatory. Disable it to make the field optional.
- Sort: Set the display order of the field by entering a number, such as 1, 2, 3, etc.
- Field Width: Set the field width by selecting Half Width or Full Width.
- Status: Set the field status to Publish to display it on the registration form or Unpublish to hide it.
- Save Changes: Click Save Changes to save and apply the changes.
3.4 Enable user role selection on registration
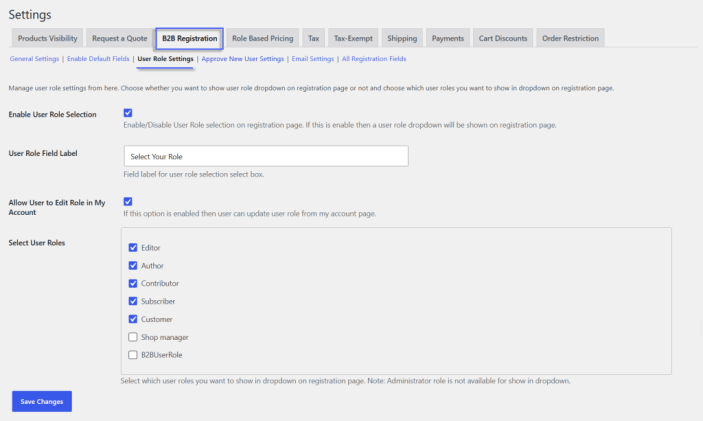
In User Role settings, you can configure the following:
- Enable User Role Selection: Enable this option to display a user role dropdown on the registration page. Disable it to hide the user role selection field.
- User Role Field Label: Add a custom label for the user role field that is displayed on the registration field.
- Allow User to Edit Role in My Account: Enable this option to allow users to update their selected user role from the My Account page.
- Select User Roles: Select the user roles you want to make available in the registration page dropdown
- Note: The Administrator role is not available for selection in the registration dropdown.
- Save Changes: Click Save Changes to save and apply the changes.
3.5 Enable approval on new registration
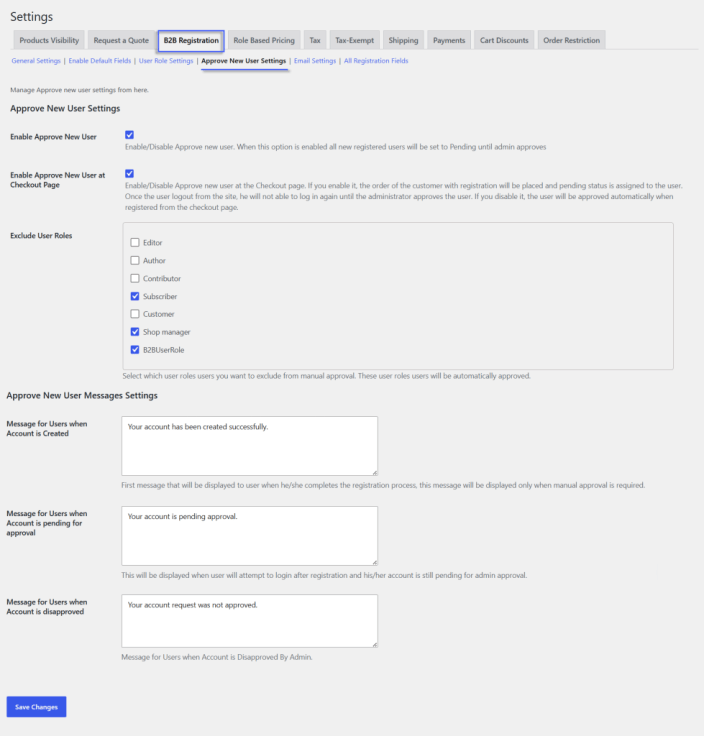
↑ Back to topTo approve new user settings, you can:
- Enable Approve New User: Enable this option to require administrator approval for newly registered users. When enabled, all new users will be assigned a Pending status until the administrator approves their accounts.
- Enable Approve New User at Checkout Page: Enable this option to approve a new user at checkout.
- Exclude User Roles: Select the specific user roles that should be excluded from manual approval. Users with the selected roles will be approved automatically.
3.5.1 Approve new user messages settings
- Message for Users when Account is Created: Add the custom message to display after a user completes registration when manual approval is required.
- Message for Users when Account is Pending for Approval: Add the custom message to display when a user tries to log in while their account is still pending administrator approval.
- Message for Users when Account is Disapproved: Add the custom message to display when an administrator disapproves the user’s account.
- Save Changes: Click Save Changes to save and apply the changes.
3.6 Email settings for registration
↑ Back to topTo configure the email settings, you can:
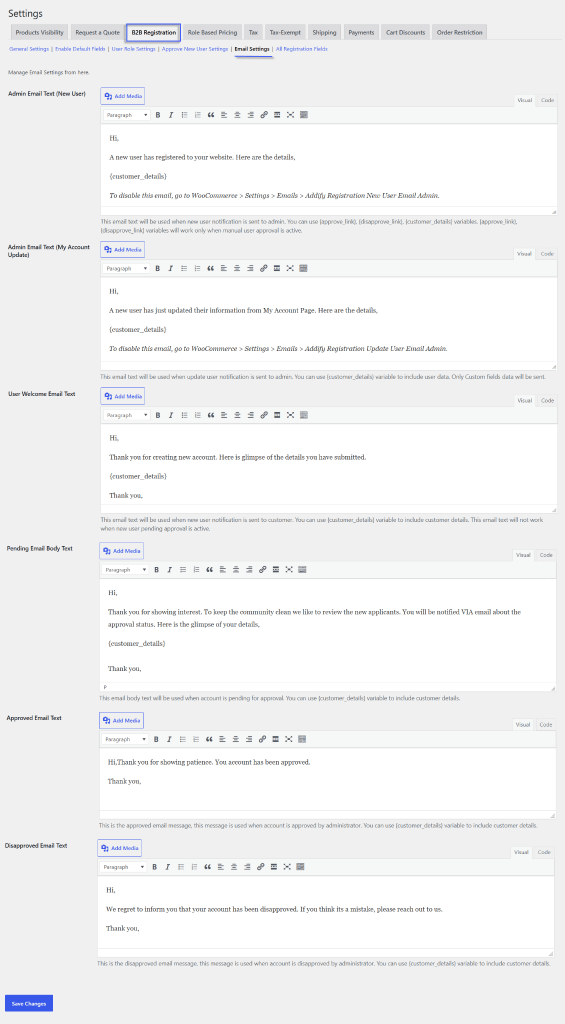
- Admin Email Text (New User): Add the custom email content to be sent to the administrator when a new user registers.
- Admin Email Text (My Account Update): Add the custom email content to be sent to the administrator when a user updates their account details.
- User Welcome Email Text: Add the custom welcome email content to be sent to the customer after registration.
- Pending Email Body Text: Add the custom email content to be sent to the user when their account is pending administrator approval.
- Approved Email Text: Add the email content to be sent to the user when their account is approved by the administrator.
- Disapproved Email Text: Add the custom email content to be sent to the user when their account is disapproved by the administrator.
- Save Changes: Click Save Changes to save and apply the changes.
3.7 Know incompatibilities & technical limitations
↑ Back to top3.7.1 Fields Sorting:
Here is how the sorting order works.
- The defaults are always displayed first, but due to technical limitations, you cannot sort the new custom fields with the default fields
- The user roles dropdown is always displayed at the end of default fields
- The new custom fields are displayed under the user roles dropdown, and you can easily sort these custom fields
4. Catalog visibility
↑ Back to topClick on the product visibility option and configure the following settings.
4.1 General Settings
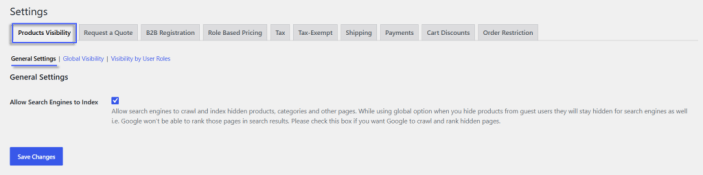
↑ Back to topIn the general settings, you can:
- Allow Search Engines to Index: Enable this to allow search engines to crawl and index the hidden products, categories, and other pages.
4.2 Global visibility
↑ Back to topOpen this tab to configure the following settings globally.
Global Visibility Settings
- Enable Global Visibility: You can enable or disable global visibility as needed.
- Show/hide: Use this option to show or hide the product.
- Select Product: Select a specific product to which you want to apply the global rule.
- Select Categories: Select a specific category to which you want to apply the global rule.
- Redirection Mode: Use this redirection mode to inform the customer about the restricted products. You can choose your desired option from the dropdown, such as
- Custom URL: Select this if you want to add a custom URL for redirection. Once you select this, you can:
- Custom URL: Add a custom URL of any product or page.
- Custom Message: Select this if you want to add a custom message to inform the customer about redirection. Once you select this:
- Custom Message: Add the custom text for the message.
- Custom URL: Select this if you want to add a custom URL for redirection. Once you select this, you can:
- Save Changes: Click on Save Changes to implement this.
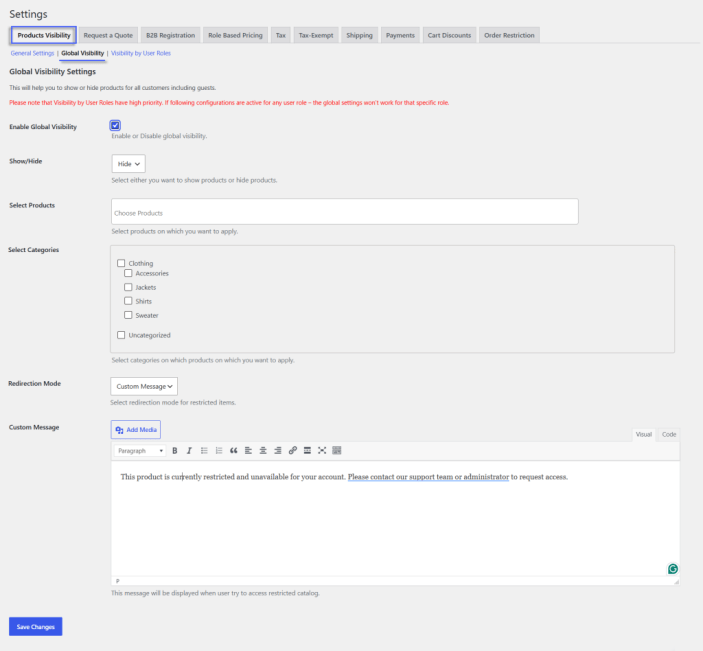
4.3 Product visibility by user roles
Open this tab to select the specific user role for which the product visibility rule will be applied.
- Visibility By User Role: Select the specific user role where you want to apply the product visibility rule for. Once you enable this, you can:
- Show/hide: Use this option to show or hide the product.
- Select Product: Select a specific product to which you want to apply the global rule.
- Select Categories: Select a specific category to which you want to apply the global rule.
- Redirection Mode: Use this redirection mode to inform the customer about the restricted products. You can choose your desired option from the dropdown, such as
- Custom URL: Select this if you want to add a custom URL for redirection. Once you select this, you can:
- Custom URL: Add a custom URL of any product or page.
- Custom Message: Select this if you want to add a custom message to inform the customer about redirection. Once you select this:
- Custom Message: Add the custom text for the message.
- Custom URL: Select this if you want to add a custom URL for redirection. Once you select this, you can:
- Save Changes: Click Save Changes to save and apply the changes.
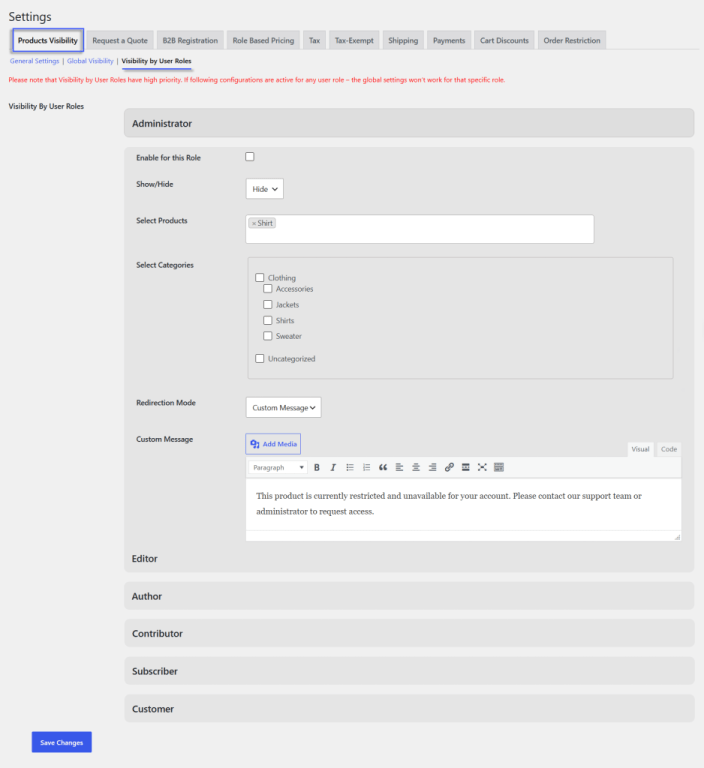
5. Hide price and request a quote
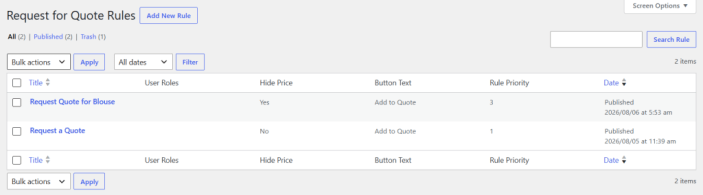
↑ Back to topClick Quote Rules from the B2B dropdown menu. By default, the Quote Rules screen will open, displaying all existing rules in a grid view. Moreover, you can also create a new rule using the Add New Rule button.
Grid Details:
The following rule details will be displayed in the grid:
- Title: Displays the title of the rule.
- User Role: Displays the user role to which the quote rule is applied.
- Hide Price: Displays the hide price status as Yes or No.
- Button Text: Displays the button text, such as Request a Quote or Add Quote.
- Rule Priority: Displays the priority assigned to the rule.
- Date: Displays the date when the rule was published.
5.1 Creating new hide price and quote rule
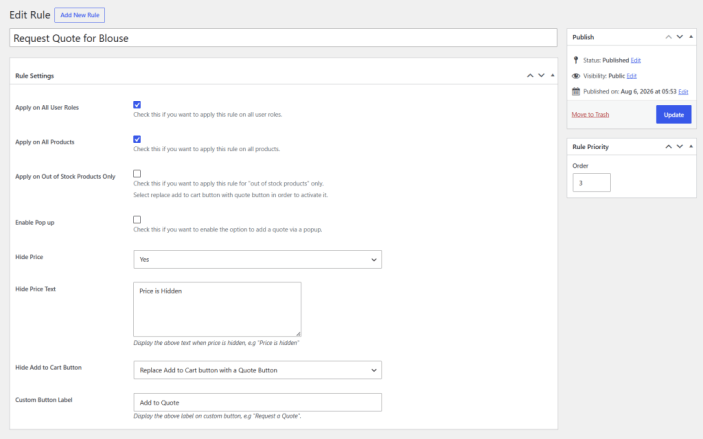
↑ Back to topTo create a new rule, you can configure the following settings:
- Add Title: Add a custom title for the quote rule.
Rule Settings
- Apply on all user roles: Enable this if you want to apply this rule to all user roles. If you disable this, you can:
- Quote for user role: Select the specific user role where you want to apply the rule.
- Apply on all products: Enable this option if you want to apply the rule on all products. If you disable this, you can:
- Quote Rule for selected products: Select specific products where the quote rule will be applied.
- Quote Rule for selected categories: Select specific categories where the quote rule will be applied.
- Quote Rule for selected brands: Select specific brands where the quote rule will be applied.
- Apply on out-of-stock products only: Enable this if you want to apply the quote rule to out-of-stock products.
- Enable popup: Enable this option if you want to add the quote option via a popup.
- Hide Price: You can select an option from the dropdown to choose whether to hide or display the product price:
- No: Select this option to display the product price.
- Yes: Select this option to hide the product price.
- Hide Add to Cart Button: You can hide, replace, or keep the Add to Cart button by selecting the following option in a dropdown:
- Replace Add to Cart button with the Quote button: Choose this if you want to replace the cart button with quote button.
- Keep Add to Cart button with a Quote button: Choose this if you want to keep the Add to Cart button and add a Quote button alongside it.
- Replace Add to Cart button with a custom button: Choose this if you want to replace the Add to Cart button with a custom button. When you select this option, the custom button link field will open where:
- Custom button link: You can add the link for the custom button for redirection.
- Keep Add to Cart button and add a new custom button: Choose this if you want to keep the Add to Cart button and add a new custom button. When you select this option, the custom button link field will open where:
- Custom button link: You can add the link for the custom button for redirection.
- Custom Button label: Add the custom label for the quote button.
- Publish: After configuring all the required settings, click the Publish button to save and activate the Quote rule.
5.3 Add custom fields to quote form
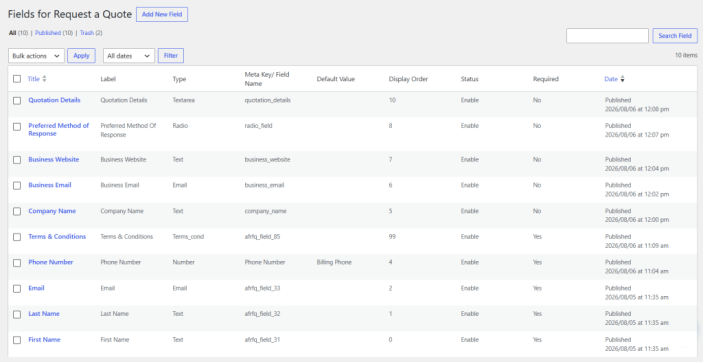
↑ Back to topSelect the Quote Fields option from the B2B drop-down menu. By default, the Fields for Request a Quote screen will open, where you can view all previously created fields in a grid. You can also add new fields from this screen.
Grid Details
- Title: Display the title of the field.
- Label: Display the field label.
- Type: Show the type of field, such as text, email, etc.
- Metakey/Field Name: Show the field name/meta key, such as abc_field_123, etc. This name is a unique name that is stored in the database.
- Default Value: Show default value based on your requirements.
- Display Order: Show the order of fields, such as 0, 1, 2, etc.
- Status: Show the field status, like enabled or disabled, etc.
- Required: Display the required fields, such as yes or no, etc.
- Date: Display the publish date of the fields.
5.3.1 Creating new field for quote form
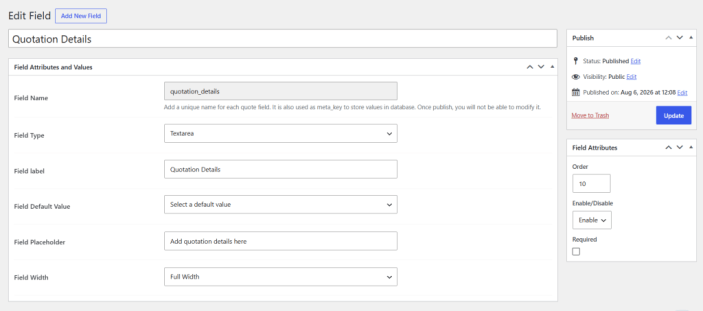
Click on “Add New Fields” to create new fields based on your business needs. To create this, you can configure the following settings:
- Add Title: Add the custom title for the field.
Field Attributes and Values
- Field Name: Add the unique name of the field, and this name is also used as a meta-key that is stored in a database. Once published, you will be unable to modify this.
- Field Type: Set the field type, such as
- Text
- Number
- File
- Time
- Date
- Date Time
- Testarea
- Select dropdown
- Multi-select
- Radio
- Checkbox
- Terms & Conditions
- Field Label: Add the custom field label that is displayed above the fields.
- Field Default Value: Set the default value of fields based on your requirements. You can select the value from a dropdown such as
- Username
- First Name
- Last Name
- Nickname
- Display Name
- Billing First Name
- Billing Last Name
- Billing Company
- Billing Address 1
- Billing Address 2
- Billing City
- Billing postcode
- Billing phone
- Billing Email
- Shipping First Name
- Shipping Last Name
- Shipping Company
- Shipping Address 1
- Shipping Address 2
- Shipping City
- Shipping postcode
- Shipping phone
- Shipping Email
- Field Placeholder: Add custom placeholder text to help customers easily understand what information to enter in the field.
- Field Width: Set the field width according to your requirements.
Field Attributes
↑ Back to topSet the fields attribute
- Order: Use this to select the order of fields.
- Enable/Disable: Use this to enable or disable any field.
- Required: Make the fields required or optional.
- Publish: After configuring all the settings, click the Publish button to save and apply the changes.
5.4 Managing submitted quotes
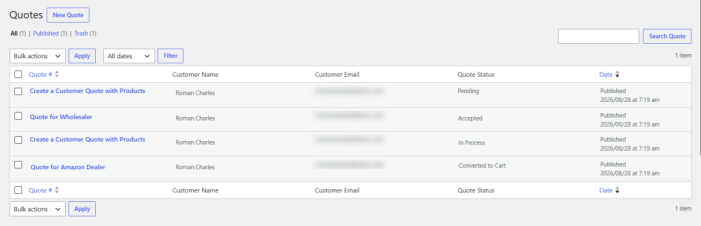
↑ Back to topSelect the “All Quotes” option from the B2B dropdown menu. The quotes screen will open where you can view all quote details in a Grid view. In this screen, you can also create a NEW Quote.
Grid Details
In the grid, you can view the
- Quote: View the name of the quotes.
- Customer Name: View the user name.
- Customer Email: View the user’s email.
- Quote status: View the quote status, such as approved, pending, or in progress, etc.
- Date: View the publish date of the quote.
5.5 Creating a new quote
Click the New Quote button to create a new quote by configuring the following settings:
- Quote Title: Add the custom title for the quote.
Customer Information
Quote ID: The quote ID will be automatically generated and displayed in this section.
- Quote Username: Select the quote username from the dropdown.
- First Name: Add the first name of the customer.
- Last Name: Add the last name of the customer.
- Email: Add the email of the customer.
Quote Details
- Thumbnail: Show the thumbnail of the product.
- Item: Show the name and link of the product.
- Cost: Show the cost of the product.
- Off. price: Show the offer price of the product.
- Qty: Show the quantity of the product.
- Subtotal: Show the subtotal according to the selected quantity.
- Off. Subtotal: Show the subtotal of the offer price according to the selected quantity.
- Add product: Click on the Add product button; the popup will open where you can add the product from the list, and the added product will be displayed in the quote details.
- Convert to Cart: Click this button to convert the quote into a cart. Once you click this button, the following options will be available:
- Enable Link Expiration: Enable this option to set an expiration date for the cart conversion link. Once enabled, the Cart Link Expiry Time field will appear.
- Cart Link Expiry Time: Set the number of days after which the cart conversion link will expire.
- Cart Link for Reference: Generate a cart link containing the quoted products. You can copy or regenerate the link as needed.
- Enable Link Expiration: Enable this option to set an expiration date for the cart conversion link. Once enabled, the Cart Link Expiry Time field will appear.
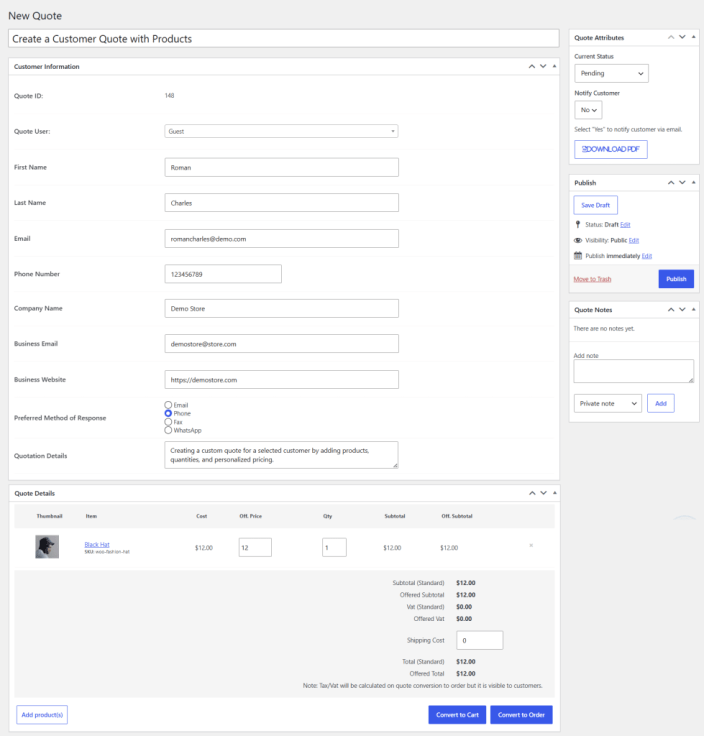
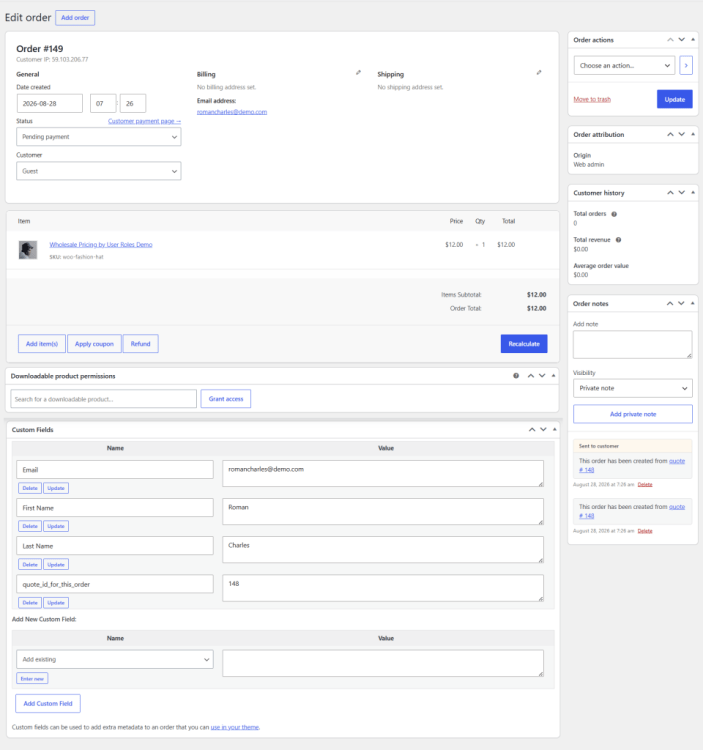
- Convert to Order: Use this button if you want to convert the quote into an order. When you click this button, the order screen will open, where you can add the following order details:
5.5.1 Quote covert to order
- General
- Date created: Set the created date of the order.
- Status: Set the order status from the dropdown, such as
- Pending payment
- Processing
- On hold
- Completed
- Cancelled
- Refunded
- Failed
- Draft
- Customer: Set the specific customer from the dropdown, and only the selected customer can view these orders.
- Billing
- Address: Set the billing address.
- Email Address: Set the email address.
- Shipping
- Address: Set the shipping address.
- Item: Show the item/product link and name.
- Price: Show the price of the product.
- Qty: Show the quantity of selected items.
- Total: Show the total price according to the selected quantity.
- Sales tax: Show the sales tax.
- Add items: If you want to add new items, click on the “Add items” button. The following options will be available:
- Add product: Select this if you want to add the new products.
- Add Fee: Select this to enter the fixed or percentage fee amount.
- Add Shipping: Select this to add the shipping charges.
- Add Tax: Select this to add the tax amount as needed.
- Cancel: Click Cancel to close.
- Save: Click Save to implement all changes.
- Refund: Click the refund button to refund the order amount. When you click on this option, the following fields will open:
- Refund amount: Add the total amount of the refund.
- Reason for refund: Add the reason for the refund.
- Recalculate: Click this button to recalculate the amount.
- Downloadable Product Permissions: Search and select a downloadable product for which you want to grant access.
- Grant Access: Click this button to grant the selected customer access to the downloadable product.
Custom Field
You can add custom fields according to your business requirements.
- Add Custom Field: Click this button to add a new custom field. When you click this button, the following fields will open:
- Name: Name of the field, such as first name, Last name, email, etc.
- Value: Add the value of the fields.
- Update: After applying all modifications, click the Update button to save and apply all changes.
- Publish: After adding all the required settings, click the Publish button on the New Quote screen. The quote will be created and displayed in the Quotes Grid.
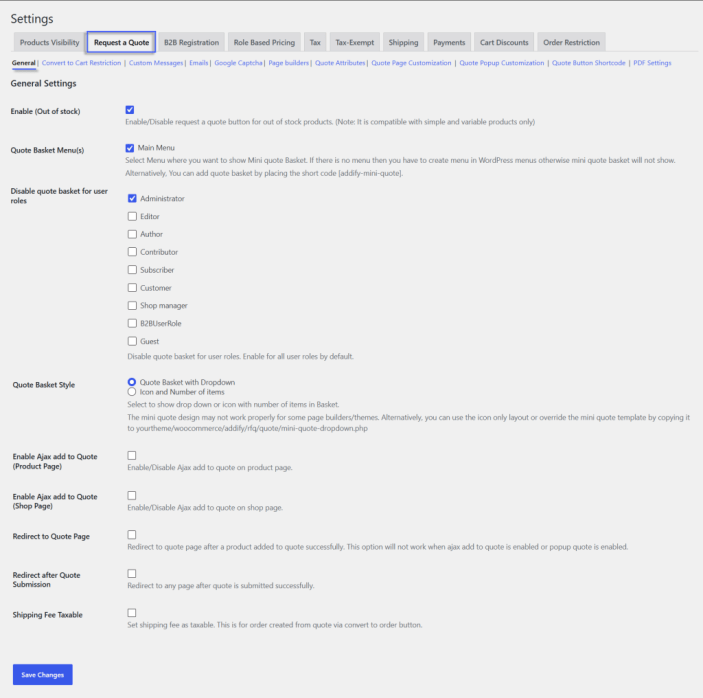
5.6 General settings & mini quote configuration
↑ Back to topClick on this option from the settings screen and configure the following settings:
General Settings
In this tab, you can perform the following settings:
- Enable (Out of stock): Enable/disable the quote button on out-of-stock products.
- Quote Basket Menu: Select the menu where you want to show the quote basket.
- Disable Quote Basket from: Use this to disable the quote basket by user role
- Quote Basket style: You can choose your desired style of the quote basket by selecting the following options, such as
- Quote Basket with Dropdown
- Icon and Number of items
- Enable Ajax Add to quote (Product page): Enable/disable this to add the Ajax Add to quote on the product page.
- Enable Ajax Add to quote (Shop page): Enable/disable this to add the Ajax Add to quote on the Shop page.
- Redirect to the quote page: Enable this to redirect the user to the quote page.
- Redirect after submission: Enable this to redirect the user to any page after submitting the quote successfully.
- URL for Redirection: Add a custom URL for redirection.
- Shipping Fee taxable: Enable this if you want to add tax to the shipping fee.
- Save Changes: Click on Save Changes to implement these modifications.
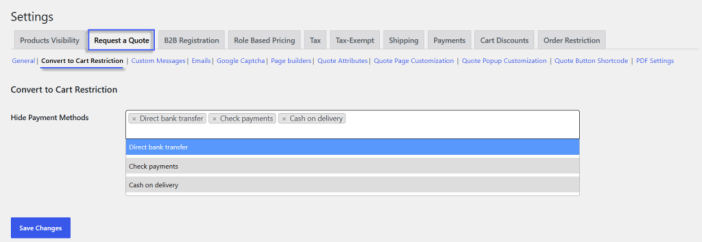
5.7 Quote convert to cart restriction
In this section, you can:
- Hide Payment Method: Select a specific payment method that you want to hide.
- Save Changes: Click Save Changes to save and apply the changes.
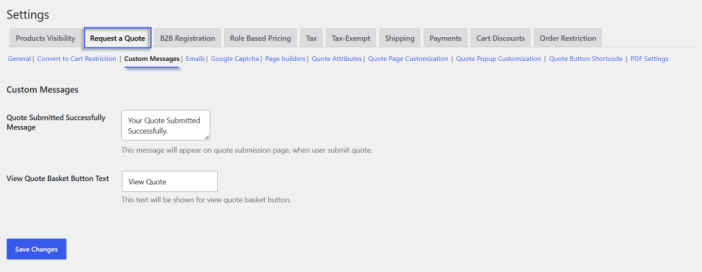
5.8 Custom messages for quote system
↑ Back to topOpen this section if you want to display the custom message to the customer. You can:
- Quote Submitted Successfully Message: Add a custom message that will be displayed on the quote page when the customer submits the quote successfully.
- View Quote basket button text: Add the custom text for the button that is displayed on the quote basket.
- Save Changes: Click Save Changes to save and apply the changes.
5.9 Quote emails manager
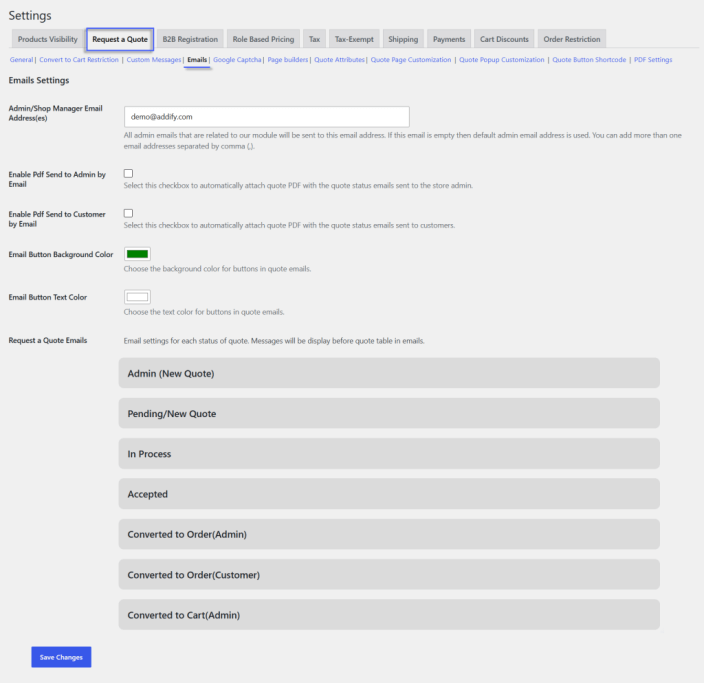
↑ Back to topIn this section, you can configure the following email settings:
- Admin/Shop Manager Email Address: Add the Admin/shop manager email address.
- Enable PDF send to Admin by email: Enable this if you want to send the PDF to the admin email.
- Enable PDF send to Customer by email: Enable this if you want to send the PDF to the customer email.
- Email Button Background color: Add the custom background color for the email button.
- Email Button text color: Add a custom color for the email button text.
- Request a Quote Email: Email settings for each quote status.
- Save Changes: Click Save Changes to save and apply the changes.
5.10 Google captcha settings
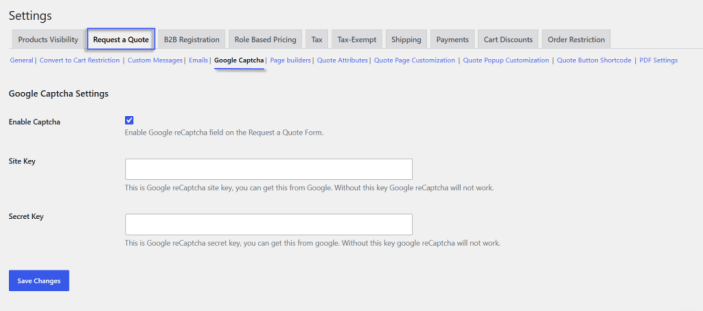
↑ Back to topConfigure the Google CAPTCHA setting by:
- Enable Captcha: Enable the Google reCAPTCHA on the Quote form for extra security.
- Site Key: Add the site key for reCAPTCHA.
- Secret Key: Add the secret key for reCAPTCHA.
- Save Changes: Click Save Changes to save and apply the changes
Note – You can get the Google reCaptcha keys for your store from here
5.11 Page builder configuration
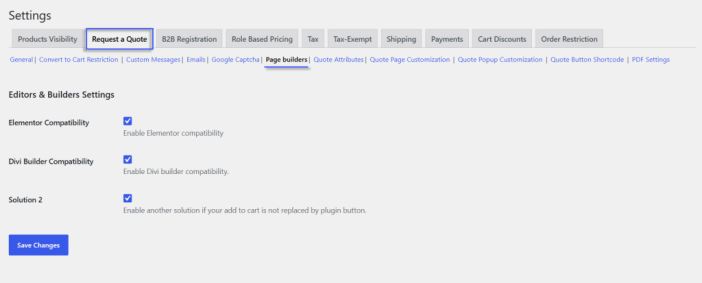
↑ Back to topConfigure the following page builder settings:
- Elementor Compatibility: Enable this for Elementor compatibility.
- Divi Builder Compatibility: Enable this for Divi Builder compatibility.
- Solution 2: Enable this for another solution if your Add to Cart is not replaced by the plugin button
- Save Changes: Click Save Changes to save and apply the changes.
5.12 Quote Attributes (Tax, offered price & other quote settings)
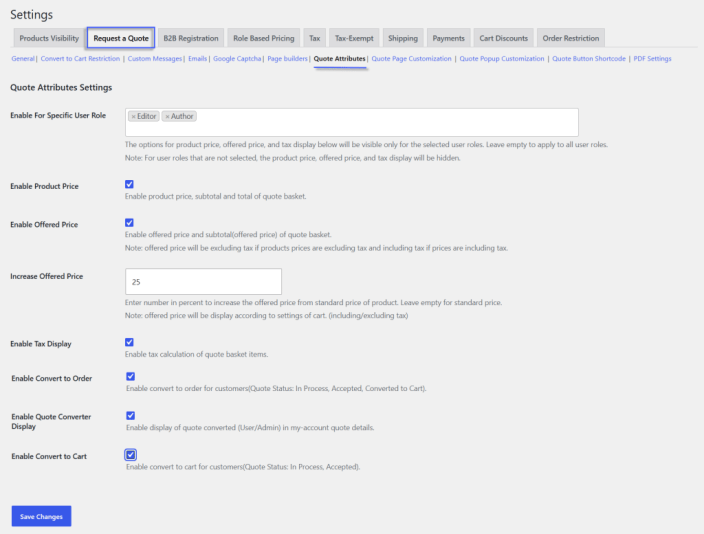
Open this section to configure the settings of Quote attributes by:
- Enable for Specific User Role: Enable this to display the product price, offered price, and tax display to specific users.
- Enable Product Price: Enable this to display the product price, subtotal, and total of the quote basket.
- Enable Offered Price: Enable this offered price and subtotal of the quote basket.
- Increased Offered Price: Add the number to increase the offered price.
- Enable Tax Display: Enable this to calculate the tax of quote basket items.
- Enable Convert to Order: Enable this if you want to convert the quotes into an order.
- Enable Convert to Quote Display: Enable this to display the quote converted in my account quote details.
- Enable Convert to Cart: Enable this to convert the cart for the customer.
- Save Changes: Click Save Changes to save and apply the changes.
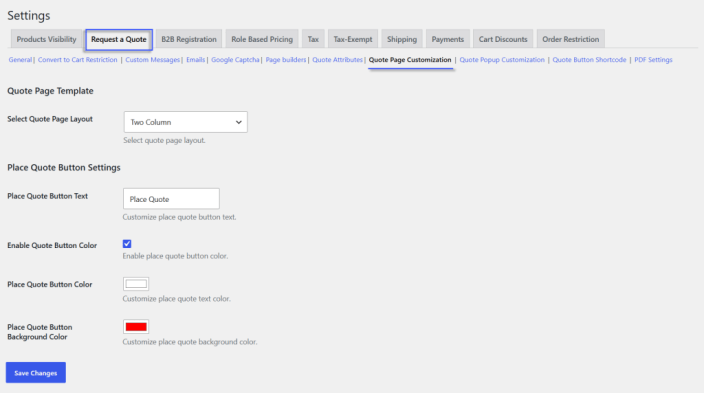
5.13 Quote page customization
To customize the quote page, you can:
- Select Quote Page Layout: Select the layout for the quote page from the available options, such as One Column or Two Column.
- Enable Table Header Color: Enable this option to customize the color of the quote table header.
- Table Header Text Color: Set the custom text color for the quote table header.
- Table Header Background Color: Set the custom background color for the quote table header.
5.13.1 Place Quote Button Settings
- Place Quote Button Text: Enter the custom text to display on the Place Quote button.
- Enable Quote Button Color: Enable this option to add a custom color for the Place Quote button.
- Place Quote Button Color: Set the custom text color of the Place Quote button.
- Place Quote Button Background Color: Set the custom background color of the Place Quote button.
- Save Changes: Click Save Changes to save and apply the changes.
5.14 Quote popup customization
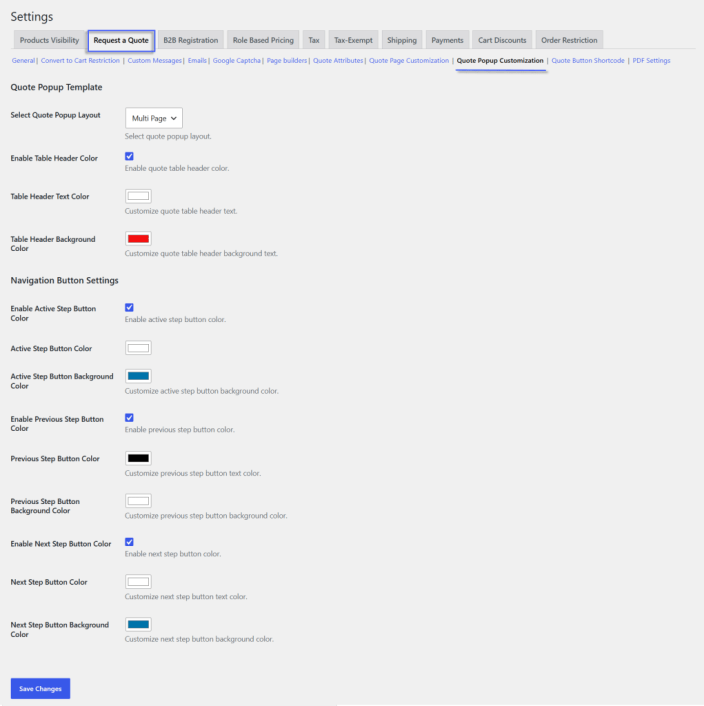
In the quote popup template, you can:
- Select Quote Popup Layout: Select the layout for the quote popup from the dropdown, such as
- Single Page
- Multi-page.
- Enable Table Header Color: Enable this option to customize the color of the quote table header.
- Table Header Text Color: Set the text color of the quote table header according to your business requirements.
- Table Header Background Color: Set the background color of the quote table header.
5.14.1 Place Quote Button Settings
- Place Quote Button Text: Enter the custom text that displays on the Place Quote button.
- Enable Quote Button Color: Enable this option to add the custom button color for the Place Quote.
- Place Quote Button Color: Set the custom text color of the Place Quote button.
- Place Quote Button Background Color: Set the background color of the Place Quote button.
5.14.2 Navigation Button Settings
- Enable Active Step Button Color: Enable this option to customize the color of the active step button.
- Active Step Button Color: Set the custom text color of the active step button.
- Active Step Button Background Color: Set the custom background color of the active step button.
- Enable Previous Step Button Color: Enable this option to customize the color of the Previous Step button.
- Previous Step Button Color: Set the text color of the Previous Step button.
- Previous Step Button Background Color: Set the background color of the Previous Step button.
- Enable Next Step Button Color: Enable this option to customize the color of the Next Step button.
- Next Step Button Color: Set the text color of the Next Step button.
- Next Step Button Background Color: Set the background color of the Next Step button.
- Save Changes: Click Save Changes to save and apply the changes.
5.15 Display quote button with shortcode
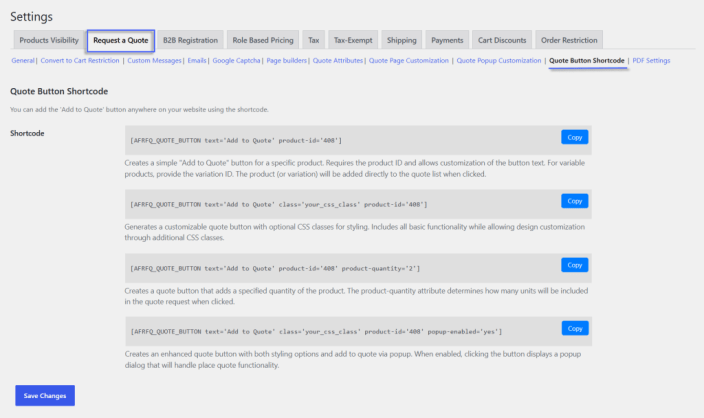
↑ Back to topIn this section the multiple shortcodes will be available. You can use this shortcode to display the Quote button anywhere in your store/website.
5.15.1 Shortcodes
You can copy your desired shortcode to display the quote button.
5.16 Customize quote PDF
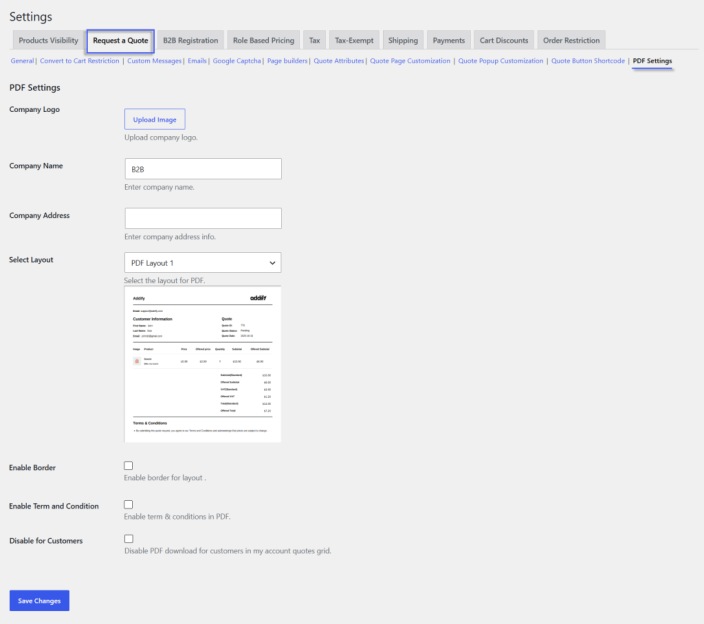
↑ Back to topYou can configure the following settings:
- Company logo: Upload the company logo from your computer.
- Company Name: Add the name of the company.
- Company Address: Add the address of the company.
- Select Layout: Select the PDF layout from the dropdown, such as
- PDF Layout 1
- PDF Layout 2
- PDF Layout 3
- Enable Border Color: Enable this to add the border color.
- Border color: Add a custom color for the border.
- Text Color: Add a custom color for text.
- Enable Terms & Conditions: Enable this if you want to add the terms & Conditions.
- Terms and Conditions text: Add the custom color for Terms & Conditions text.
- Disable for Customer: Check this if you want to disable the PDF download for customers.
- Save Changes: Click Save Changes to save and apply the changes.
6. Role based & wholesale pricing
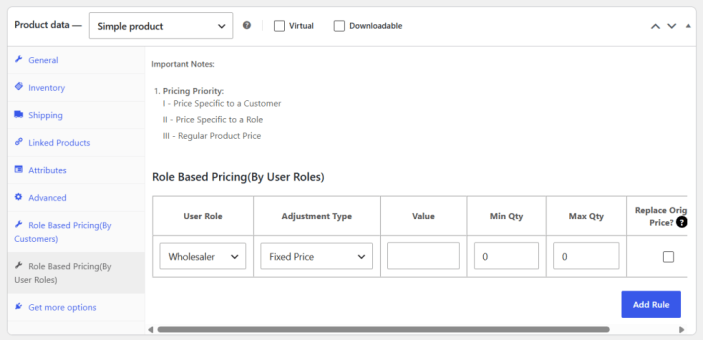
↑ Back to top6.1 User roles or specific customers based pricing (Product level)
From the admin panel, go to the product page for which you want to set different prices for different user roles or customers.
The product level settings allow you to,
- Select user role and customer for which you want to change the prices
- Set a fixed price or increase/decrease price by a percentage or a fixed amount
- Tiered Pricing:
- Add multiple rows
- Select the customer/user role,
- Add min and max quantity range
- Add price adjustment based on quantity range
6.2 Adjust prices for variations (Product Variation level)
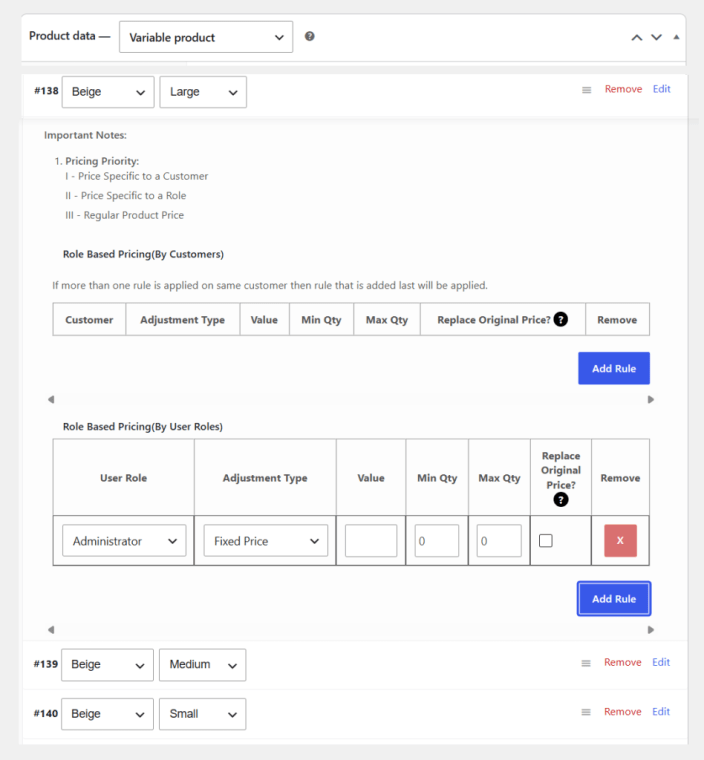
To update the price for any variation, go to the product edit page and edit the variation. Under the variations settings, you can see the new “Price by User Roles” section. From here you can update the price for each variation. Please note, currently, there is no option to update prices in bulk for attributes and variations.
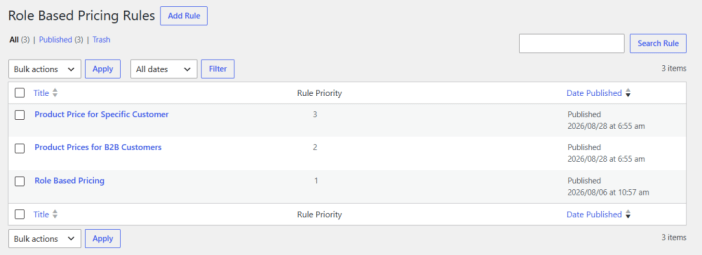
Click the Role-Based Pricing Rule option from the B2B dropdown menu. By default, the Role-Based Pricing Rule view opens, where you can view all previously created rules in a grid. From this view, you can also create a new Role-Based Pricing Rule.
Grid Details
↑ Back to top- Title: Display the title of the rule.
- Rule Priority: Show the priority of the rule.
- Data Published: Show the published date of the rule.
6.3 Rule based price adjustments (Global rules)
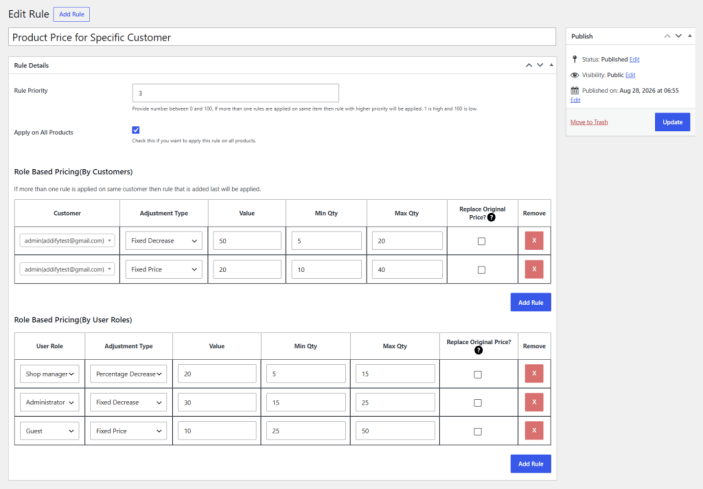
↑ Back to topTo add a new rule, click on the “Add Rule” button. The system redirects you to the Add Rule view, where you can configure the following details:
- Add title: Add the custom title for the rule.
Rule Details
- Rule Priority: You can add the rule priority to handle multiple rules simultaneously.
- Apply on all products: Enable this if you want to apply the rule to all products. If you disable this, you can:
- Select products: Select the specific product from the list where the rule will be applied.
- Select Categories: Select specific categories from the list where the rule will be applied.
- Role-Based Pricing by Customer: You can create a rule for a specific customer. To create this, you can
- Add Rule: Click on the Add Rule button; the Add Rule row will open where you can add the following details:
- Customer: Select the specific customer for whom you want to set a special price.
- Adjustment Type: Choose your desired adjustment product price type from the dropdown, such as
- Fixed Price: Choose this if you want to offer a fixed price.
- Fixed Increase: Choose this if you want a fixed increase in product price.
- Fixed Decrease: Choose this if you want a fixed decrease in product price.
- Percentage Increase: Choose this if you want a percentage increase in product price.
- Percentage Decrease: Choose this if you want a percentage decrease in product price.
- Value: Enter the price or discount value according to the selected adjustment type.
- Min Qty: Enter the minimum quantity required for the rule to apply.
- Max Qty: Enter the maximum quantity allowed for the rule.
- Replace Original Price: Enable this option to replace the original product price with the rule price.
- Remove: Click the cross (X) icon to remove the rule
- Add Rule: Click on the Add Rule button; the Add Rule row will open where you can add the following details:
- Role-Based pricing by User-Role: Create pricing rules for specific user roles. To create this, configure the following settings:
- Add Rule: Click the Add Rule button; the add rule row will open where you can add the following details:
- User Role: Select the user role for which the pricing rule should apply.
- Adjustment Type: Choose your desired adjustment type for price from the dropdown, such as
- Fixed Price: Choose this if you want to offer the fixed price.
- Fixed Increase: Choose this if you want a fix increase in product price.
- Fixed Decrease: Choose this if you want a fix decrease in product price.
- Percentage Increase: Choose this if you want a percentage increase in product price.
- Percentage Decrease: Choose this if you want a percentage decrease in product price.
- Value: Enter the price or discount value.
- Min Qty: Set the minimum quantity required for the rule.
- Max Qty: Set the maximum quantity allowed for the rule.
- Replace Original Price: Enable this option to replace the original product price.
- Remove: Click the cross (X) icon to remove the rule
- Add Rule: Click the Add Rule button; the add rule row will open where you can add the following details:
- Publish: After configuring all the required settings, click the Publish button to save and activate the Role-based pricing rule.
6.4 Additional information (role-based pricing)
↑ Back to top6.4.1 Understand the Priorities
The plugin has specific priorities to handle overlapping price adjustments. Here is how the default priorities work.
1. Product-Level Settings
1a. Price set for specific customer
1b. Price set for specific user role
2. Rule-Based Settings
2a. Price set for specific customer
2b. Price set for specific user role
6.5 General settings for role-based pricing
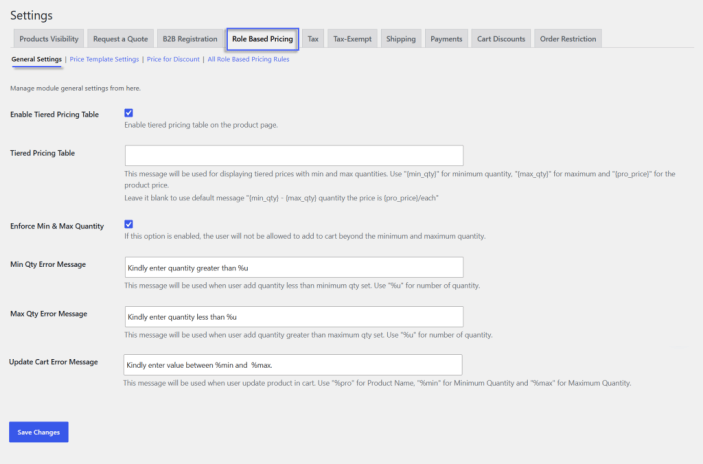
↑ Back to topTo configure the Role-Based pricing, you can configure the following settings:
General Settings
You can:
- Enable Tiered Pricing Table: Enable this option to display the tiered pricing table on the product page.
- Tiered Pricing Table: Enter a custom message to display tiered prices along with the minimum and maximum quantities.
- Enforce Min & Max Quantity: Enable this option to prevent customers from adding a quantity below the minimum or above the maximum quantity allowed.
- Min Qty Error Message: Enter the message to display when a customer enters a quantity lower than the minimum quantity.
- Max Qty Error Message: Enter the custom message to display when a customer enters a quantity greater than the maximum quantity.
- Update Cart Error Message: Enter the custom message to display when a customer updates the product quantity in the cart, and the quantity does not meet the configured limits.
6.6 Price template configuration
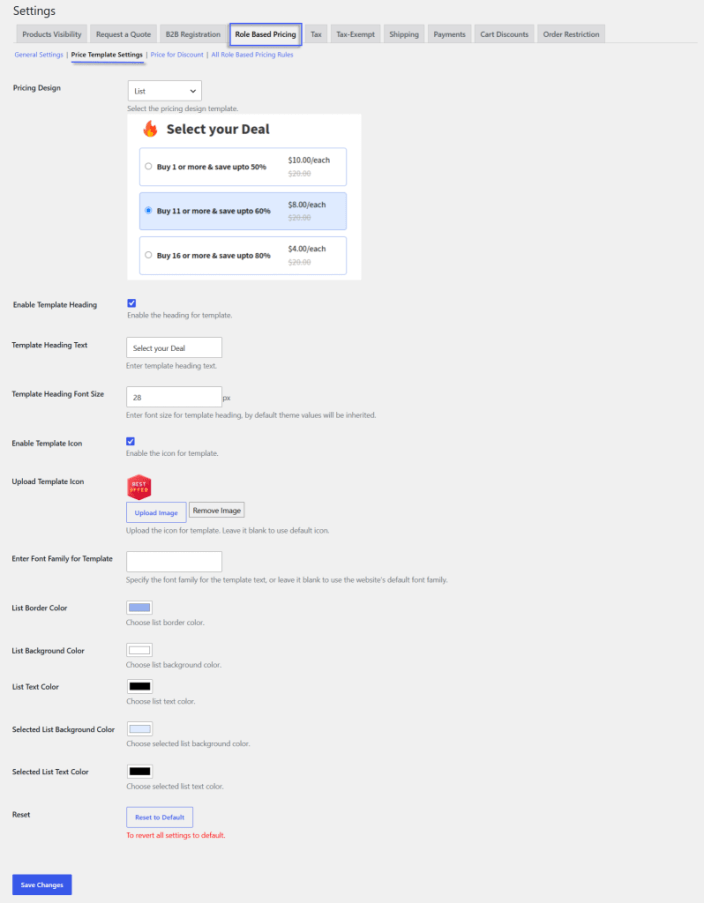
To configure the Price Template Settings, you can:
- Pricing Design: Select your desired pricing design template that you use to display tiered pricing, such as Default Template, Table, List, or Card.
- Enable Template Heading: Enable this option to display a heading for the selected pricing template.
- Template Heading Text: Enter the custom text you want to display as the template heading.
- Template Heading Font Size: Set the font size of the template heading in pixels. Leave it unchanged to inherit the font size from your website theme.
- Enable Template Icon: Enable this option to display an icon with the selected pricing template.
- Upload Template Icon: Upload a custom icon for the pricing template. Leave this field blank to use the default icon.
- Enter Font Family for Template: Specify the font family for the pricing template text. Leave it blank to use the website’s default font family.
- List the Border color: Choose the background color for the list border.
- List Background color: Choose the custom color for list background.
- List the text color: Choose the custom color for list text.
- Select List background color: Choose the custom background color for the selected list.
- Select List text color: You can add the custom color for the selected list.
- Reset: Click Reset to Default to restore all pricing design settings to their default values.
6.7 Apply discounts on standard or special prices
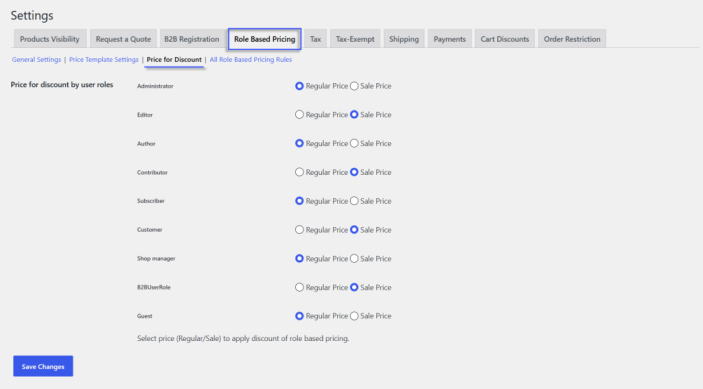
↑ Back to topUse this section to set the price type for discounts for specific user roles by configuring the following settings:
- Price for Discount by User Roles: Select the price type, Regular Price or Sale Price, for each user role. The selected price will be used as the base price when applying role-based discounts.
- User Roles: Configure the pricing basis for all user roles:
- Regular Price: Select this option to apply the role-based discount to the product’s regular price.
- Sale Price: Select this option to apply the role-based discount to the product’s sale price.
6.8 Import product prices using CSV file
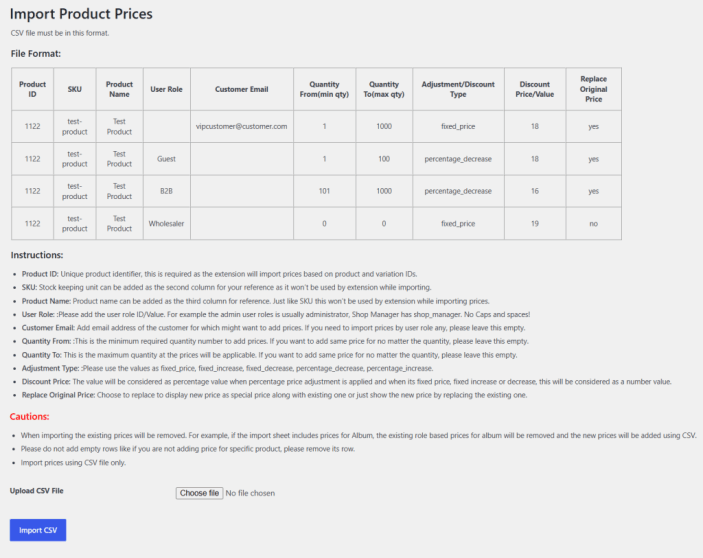
↑ Back to topSelect the Import Product Price option from the B2B dropdown menu to open the Import Product Price screen. Here, you can import product prices using a CSV file.
Before importing the file, check the CSV format provided on the screen and make sure your CSV file follows the same format. The file must contain the required fields and data in the specified format for the prices to be imported successfully.
File Format Detail
- Product ID: Add the ID of the product, and the product ID must be unique.
- SKU: Enter the product SKU for reference. This field is not used for importing prices.
- Product Name: Add the name of the product.
- User Role: Add a specific user role to which the price will be applied.
- Customer Email: Add a specific customer email address to which the specific price will be applied.
- Quantity from (min qty): Add the minimum quantity at which the price will be applied.
- Quantity to (max qty): Add the maximum quantity at which the price will be applied.
- Adjustment/discount type: Add the specific adjustment or discount type, such as a fixed or percentage discount.
- Discount price/value: Add the discount value or price.
- Replace original price: Add the new price or discounted price that replaces the original price.
- Upload CSV File: Select the CSV file from your computer to upload. Make sure the file is in CSV format. Otherwise, an error message will be displayed.
- Import CSV File: After selecting the CSV file, click the Import CSV button to import the product prices.
6.9 Understanding the pricing priorities
The plugin has specific priorities to handle overlapping price adjustments. Here is how the default priorities work.
1. Product Level Settings
1.1 Price set for specific customer 1b. price set for specific user role
2. Rule-Based Settings
2a. Price set for specific customer 2b. Price set for specific user role When product A price is configured using (1a) – no matter what you set in (1b, 2a & 2b), it will not work because the customer pricing has 1st priority. When product A price is configured using (1b) – no matter what you set in (2a & 2b) it will not work because the product level role-based pricing has 2nd priority. When product A price is configured using (2a) – no matter what you set in (2b) it will not work because in rule-based setting the customer pricing has 3rd priority.
6.10 Common issues & their fixes:
↑ Back to topCustomer-specific pricing is working, but role-based pricing is NOT working
When you configure customer-specific pricing, the rule-based pricing will not work for that specific customer; however, it will work for the rest of the customers and user roles.
How to create user roles? I cannot see the wholesale user role after installing this extension.
Role-based pricing doesn’t create new user roles. To set-up new user roles or make amends to existing ones, use user role manager, which is built into the B2B for WooCommerce extension.
After setting up the role-based pricing, the add to cart button is not working.
When you configure a minimum quantity greater than 1. On the front end, the product will not be added to the cart unless the customer enters a quantity greater than the minimum limit or less than the maximum limit. You are not seeing any notification, probably because you have not added any minimum/maximum quantity error message. Go to backend > Role-based pricing and navigate to the “settings” page to add custom messages for minimum and maximum quantities.
7. Tax exemption
↑ Back to topOpen this section from the Settings tab and configure the following tax-exempt settings:
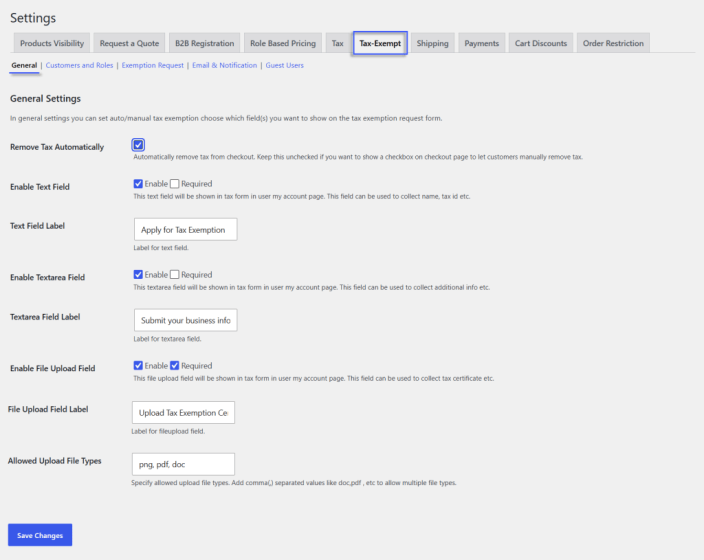
7.1 General settings and tax exemption form customization
↑ Back to topYou can:
- Remove Tax Automatically: Enable this option to automatically remove tax from the checkout.
- Enable VAT Field: Enable this option to display a VAT field in the tax exemption form on the customer’s My Account page. You can also mark the field as Required to make it mandatory.
- VAT Field Label: Enter a custom label for the VAT field. If left blank, the default label “VAT” will be used.
- Enable Text Field: Enable this option to display a text field in the tax exemption form. You can also mark it as Required.
- Text Field Label: Enter a custom label for the text field.
- Enable Textarea Field: Enable this option to display a textarea in the tax exemption form for collecting additional information. You can also mark it as Required.
- Textarea Field Label: Enter a custom label for the textarea field.
- Enable File Upload Field: Enable this option to allow customers to upload documents, such as tax certificates, through the tax exemption form. You can also mark it as Required.
- File Upload Field Label: Enter a custom label for the file upload field.
- Allowed Upload File Types: Specify the file types customers are allowed to upload. Enter multiple file types separated by commas, such as doc, pdf, and jpg.
- Save Changes: Click the Save Changes button to save and apply all changes.
7.2 Customers and user roles (Exempted by admin)
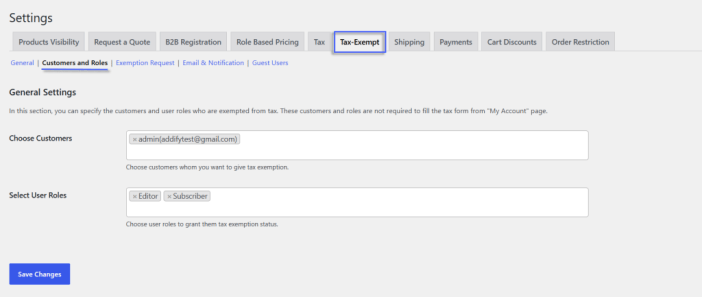
↑ Back to topIn this section, you can:
- Choose Customers: Select the specific customers you want to give tax exemption status.
- Select User Roles: Select the user roles you want to give tax exemption status
- Save Changes: Click the Save Changes button to save and apply all changes.
7.3 Exemption request configuration
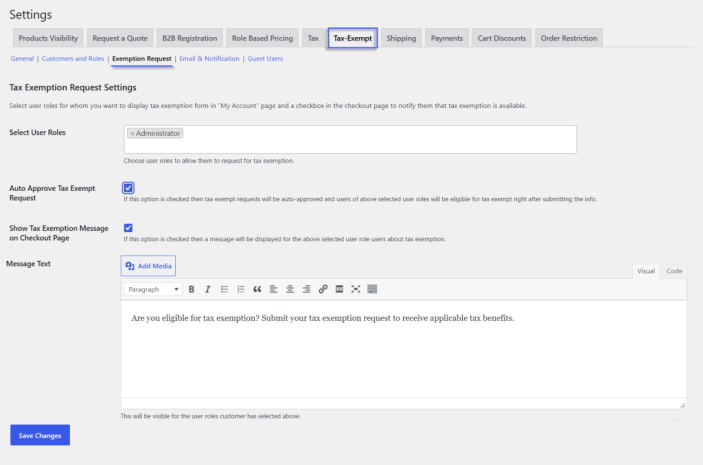
↑ Back to topIn this section, you can configure which user roles can request tax exemption and whether tax exemption options and messages are displayed on the My Account and checkout pages. You can add the following settings here:
- Select User Roles: Select the specific user roles that can request tax exemption, such as
- Auto Approve Tax Exempt Request: Enable this option to automatically approve tax exemption requests submitted by the selected user roles.
- Auto Approve Tax Exempt Request (Valid VAT): Enable this option to automatically approve tax exemption requests after the customer’s VAT number has been successfully validated.
- Show Tax Exemption Message on Checkout Page: Enable this option to display a tax exemption message on the checkout page for users belonging to the selected roles.
- Message Text: Enter the custom message you want to display on the checkout page for users belonging to the selected roles
- Save Changes: Click the Save Changes button to save and apply all changes.
7.4 Tax email & notifications
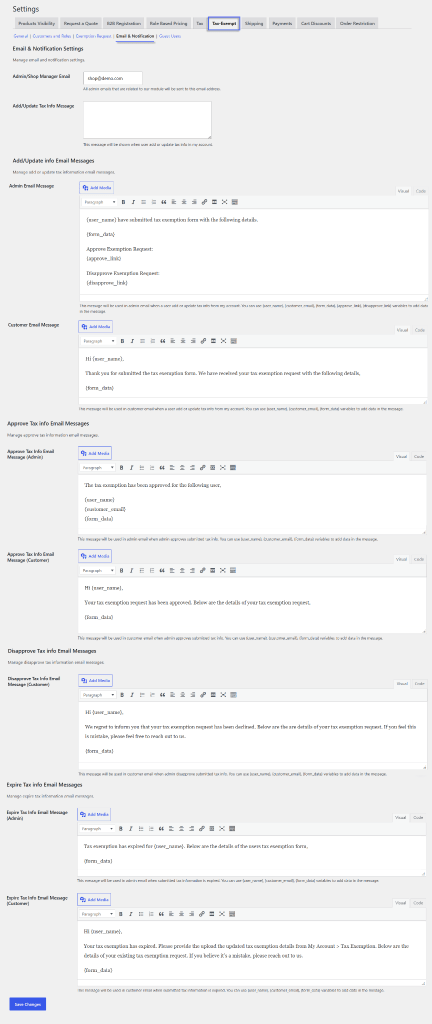
↑ Back to topIn this section, you can manage email and notification by using the following settings:
- Admin/Shop Manager Email: Enter the email address where all admin notifications related to the module will be sent.
- Add/Update Tax Info Message: Enter the message to display when a customer adds or updates their tax information from the My Account page.
7.4.1 Add/Update Info Email Messages
To Add/update the custom email messages, you can:
Admin Email Message: Enter the custom message to send to the administrator when a customer adds or updates tax information from the My Account page.
- Customer Email Message: Add the custom message to send to the customer when they add or update their tax information.
7.4.2 Approve tax info email messages
You can:
- Approve Tax Info Email Message (Admin): Enter the custom message to send to the administrator when submitted tax information is approved.
- Approve Tax Info Email Message (Customer): Enter the message to send to the customer when the administrator approves their submitted tax information.
7.4.3 Disapprove Tax Info Email Messages
- Disapprove Tax Info Email Message (Customer): Enter the custom message to send to the customer when the administrator disapproves their submitted tax information.
7.4.4 Expire tax info email messages
Use this section to customize email notifications when submitted tax information expires.
- Expire Tax Info Email Message (Admin): Add the custom message to send to the administrator when a customer’s submitted tax information expires.
- Expire Tax Info Email Message (Customer): Add the custom message to send to the customer when their submitted tax information expires.
- Save Changes: Click the Save Changes button to save and apply all changes.
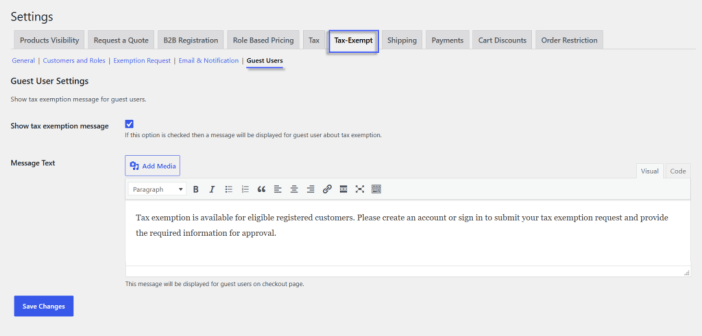
7.5 Tax exempt settings for guest user
↑ Back to topOpen this section to configure the tax exemption message that is displayed to guest users.
- Show Tax Exemption Message: Enable this option to display a tax exemption message to guest users on the checkout page.
- Message Text: You can add the custom message you want to display to guest users about the available tax exemption.
- Save Changes: Click the Save Changes button to save and apply all changes.
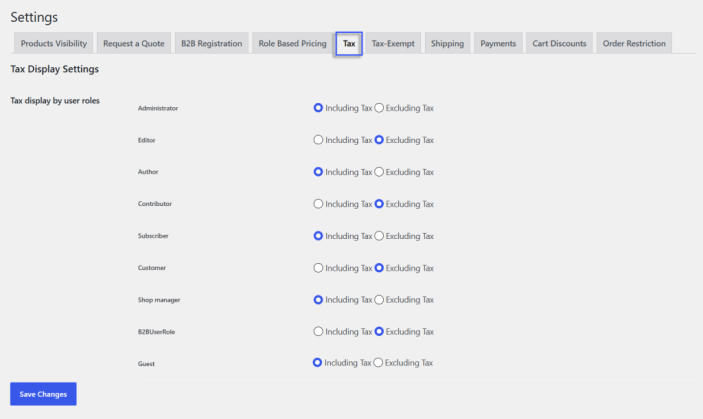
7.6 Display price with or without tax by user roles
↑ Back to topOpen this section from the Settings tab and configure the following tax-related settings.
- Tax Display by User Roles: Use this section to configure whether prices are displayed with or without tax for specific user roles. You can configure the tax display option for the all user roles:
- Including Tax: Select this option to display product prices with the applicable tax included.
- Excluding Tax: Select this option to display product prices without tax.
- Save Changes: Click the Save Changes button to save and apply all changes.
8. Restrict shipping & payment methods by user roles
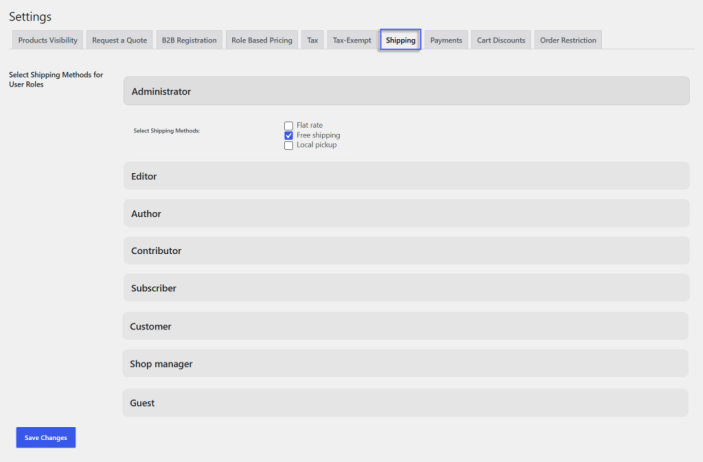
↑ Back to top8.1 Restrict shipping method by user roles
↑ Back to topOpen this section in a Settings tab, and configure which shipping methods are available for each user role. You can
- Select Shipping Methods for User Roles: Select the shipping methods you want to make available for each user role. You can also configure shipping methods separately for each role
- Select Shipping Methods: For each user role, you can select the applicable shipping methods, such as Flat Rate, Free Shipping, or Local Pickup.
- Save Changes: Click the Save Changes button to save and apply all changes.
8.2 Restrict payment method by user roles
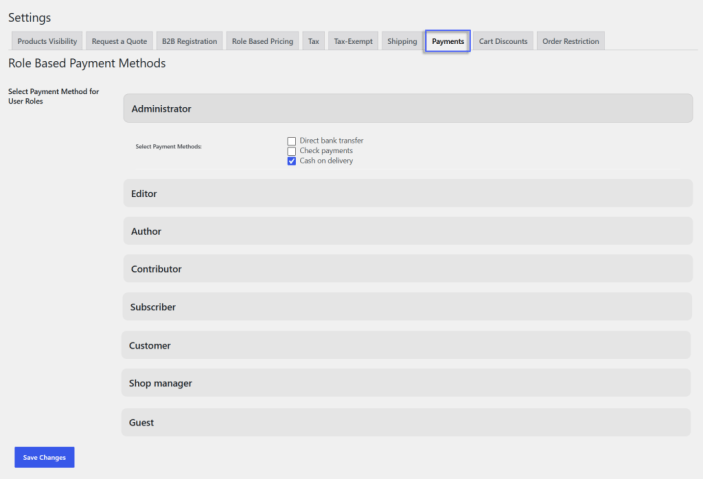
↑ Back to topOpen this section from the Settings tab and configure which payment methods are available for each user. You can
- Select Payment Method for User Roles: Select the payment methods you want to make available for a specific user role. You can configure payment methods separately for each role.
- Select Payment Methods: For each user role, select the applicable payment methods, such as Direct Bank Transfer, Check Payments, or Cash on Delivery.
- Save Changes: Click the Save Changes button to save and apply all changes.
9. Order restriction (Based on cart & user roles)
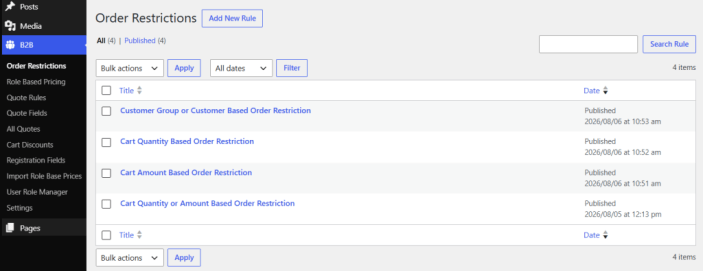
↑ Back to topClick Order Restriction from the B2B dropdown menu. By default, the Order Restriction view opens, where you can view all previously created rules in a grid. From this view, you can also create a new order restriction rule.
Grid Details:
- Title: Displays the title of the order restriction rule.
- Date: Displays the date of rule creation.
9.1 Create order restriction rules
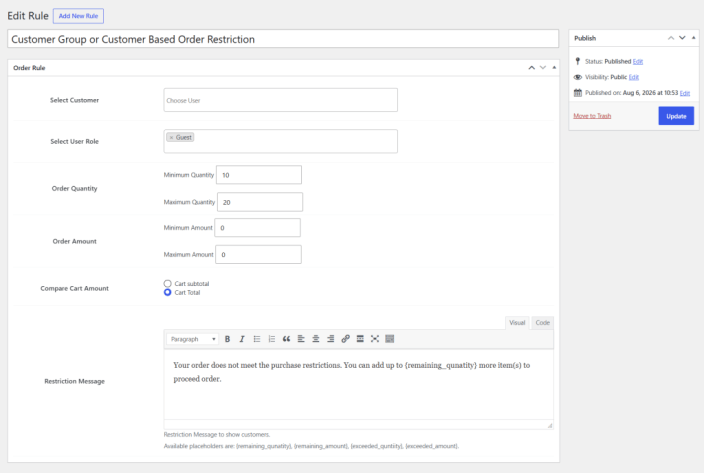
↑ Back to topTo create a new rule, click on the Add New Rule button. The system will redirect you to the Add New Rule view, where you can configure the following details:
- Add Title: Add the custom title for the new rule.
Order Rule
Select Customer: Choose a specific customer who can view the orders.
- Select User Role: Choose the specific user role that will be able to view the orders.
- Order Quantity: Set the order quantity that is allowed by:
- Minimum Quantity: Add the minimum order quantity.
- Maximum Quantity: Add the maximum order quantity.
- Order Amount: Add the order amount that is allowed by:
- Minimum Amount: Enter the minimum order amount.
- Maximum Amount: Enter the maximum order amount.
- Compare Cart Amount: You can compare the cart amount based on:
- Cart Subtotal
- Cart total
- Restriction Message: Add a custom message that will be displayed on the restricted products where the order restriction is applied.
- Publish: After configuring all the required settings, click the Publish button to save and activate the order restriction rule.
9.2 General settings
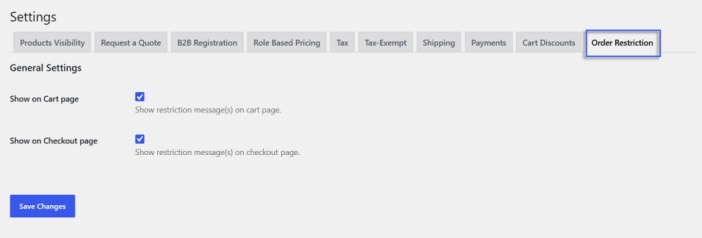
Open this section from the Settings tab and configure the following settings:
General Settings
- Show on Cart Page: Enable this option to display restriction messages on the Cart page.
- Show on Checkout Page: Enable this option to display restriction messages on the Checkout page.
- Save Changes: Click the Save Changes button to save and apply all changes.
10. Cart discounts (Based on cart quantity or amount)
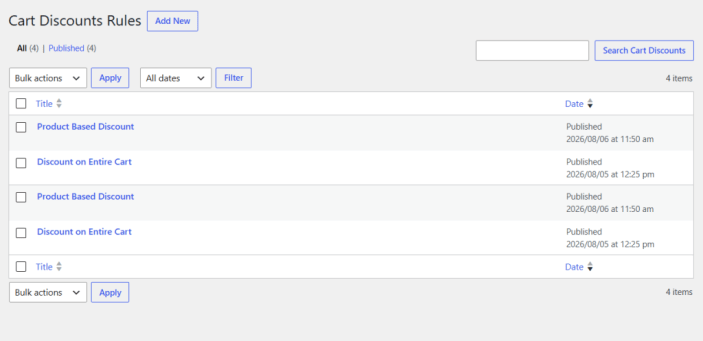
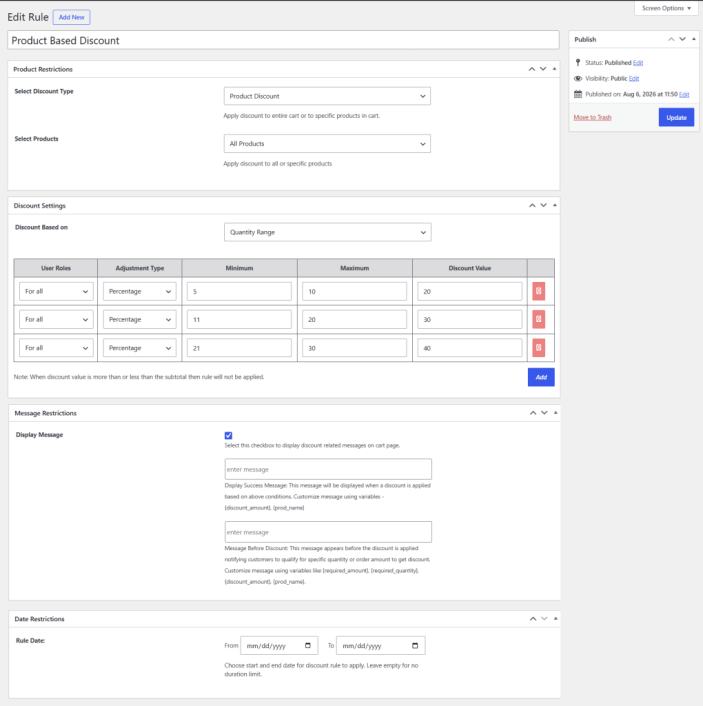
↑ Back to topClick the Cart Discount option from the B2B dropdown menu to open the Cart Discount Rule screen. Here, you can view all created discount rules in a grid view and create a new discount rule by clicking the Add New button.
Grid Details
- Title: Displays the title of the rule.
- Date: Displays the publish date of the rule.
10.1 Cart based discount rule
↑ Back to topTo create a new rule, click the Add New button and configure the following settings:
- Add Title: Add a custom title for the rule.
Product Restriction
- Select Discount Type: Select the type of discount from the dropdown, such as
- Product discount: Select this option if you want to apply the discount to specific products.
- Select Products: Select products from the list to which the order discount rule will be applied.
- Entire Cart Discount: Choose this if you want to apply the discount on the entire cart.
- Product discount: Select this option if you want to apply the discount to specific products.
Discount Settings
- Discount Based on: Select the discount basis from the dropdown to apply the discount accordingly, such as:
- Amount Range: Select this option to apply the discount based on the order amount range.
- Quantity Range: Select this option to apply the discount based on the product quantity range.
- Add: Click the Add button to open a discount setting row where you can add the following details:
- User Role: Select the user role that can avail of the discount rule.
- Adjustment Type: Select the discount type, such as Fixed or Percentage.
- Minimum: Set the minimum amount or quantity required for the discount to apply.
- Maximum: Set the maximum amount or quantity up to which the discount will apply.
- Discount Value: Enter the discount value to be applied.
- Delete: Click the Delete button to remove the discount setting.
Message Restriction
- Display Message: You can enable or disable the discount-related messages on the cart page. If you enable this, you can:
- Enter Message: Add a custom message that is displayed to the customer when the discount is applied based on the above condition.
- Enter Message: Add a custom message that is displayed to the customer before applying the discount.
Date Restriction
You can add a custom date when the discount rule is applied.
- From Date: Choose the start date for the discount rule to apply.
- To Date: Choose the end date for the discount rule to apply.
- Publish: After applying all the required settings, click the Publish button to create and apply the discount rule.
10.2 General discount settings
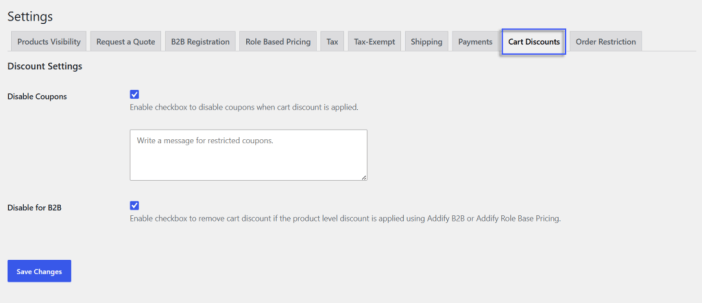
↑ Back to topOpen this section in a Settings tab and configure how coupons and cart discounts work with role-based and product-level discounts.
- Disable Coupons: Enable this option to disable coupons when a cart discount is applied. Once you enable this:
- Restricted Message: You can add a custom message for the coupon restriction.
- Disable for B2B: Enable this option to turn off the cart discount when a product-level discount is applied using Addify B2B or Addify Role-Based Pricing.
- Save Changes: Click the Save Changes button to save and apply all changes.
11. FAQs
↑ Back to top1. How can B2B Wholesale for WooCommerce benefit your stores?
Ans: B2B Wholesale for WooCommerce is a perfect wholesale solution that can easily manage your B2B and B2C customers for a WooCommerce store. With this feature, you can easily handle role-based pricing, wholesale discounts, order restrictions, quote rules, custom registration fields, product visibility rules, tax exemptions, and role-based shipping and payment methods, all in one place.
2. How can I set different prices for different WooCommerce wholesale customers?
Ans: This module provides Role-Based Pricing Rules that allow you to create different prices based on customer roles or individual customers. You can apply fixed prices, fixed increases or decreases, and percentage-based increases or discounts. Moreover, it also allows you to set minimum and maximum quantities and apply pricing rules based on specific products or categories.
3. Can I create a WooCommerce request a quote system for B2B customers?
Ans: Yes. The extension includes Quote Rules that can replace or add a Request a Quote button, hide product prices, and apply quote rules to specific user roles, products, categories, brands, or out-of-stock products. Customers can simply submit quotes, and the store admins can manage quotes and convert them into carts or orders.
4. Is it possible to restrict WooCommerce shipping and payment methods by user role?
Ans: Yes. With this, you can configure role-based shipping and payment methods and select which options are available to each user role. For example, you can offer specific shipping methods to wholesale customers and limit payment options such as direct bank transfer, check payments, or cash on delivery based on the customer’s role.
5. Can I offer wholesale discounts based on quantity or order amount?
Ans: Absolutely. It offers you a Cart Discount feature that allows you to create discounts based on order amount ranges or product quantity ranges. You can set fixed or percentage discounts for specific user roles, define minimum and maximum limits, schedule discounts with start and end dates, and display custom discount messages on the cart page.
6. Is the Tax Exemption feature compatible with the AvaTax plugin?
Ans: Yes, the Tax Exemption feature is partially compatible with the WooCommerce AvaTax plugin because the option to manually remove tax at checkout is not compatible with AvaTax. It also allows you to remove tax automatically by enabling the automatic tax removal.
You can go to WooCommerce > Tax Exemption > General and enable the Remove Tax Automatically option.
7. Can I apply a partial tax exemption?
Ans: No, partial tax exemption is not currently supported. For example, if the total tax is 14% and you want to exempt only 7%, the entire 14% tax will be removed. Similarly, if you apply separate state and federal taxes, both taxes will be removed. Currently, it is not possible to remove one tax while keeping the other.
8. Is the Request a Quote feature compatible with WooCommerce Product Add-Ons?
Ans: With the release of version 2.2.0, the extension is now compatible with WooCommerce Product Add-Ons with the following limitations.
- The File Upload field cannot be carried forward with a quote.
9. Is the Request a Quote feature using reCAPTCHA v2 or V3?
Ans: The extension currently supports the Google reCAPTCHA v2 version only.
10. What can you do when the Quote emails are not working?
Ans: You would need to configure the emails from Request a Quote > Settings > Emails. Here you can enable notifications for admins and customers for different quote statuses and customize the messages as well. If you have already configured the above and the emails are still not working, there is a high possibility that your website emails are not working. We would recommend you please test the email configurations by using the following steps.
- Disable our extension
- Confirm if the new user account email is enabled in WooCommerce > Settings > Email > “New account.”
- Create a new user account and see if you receive a new account email notification.
If it doesn’t work, please check the email configurations. As soon as your website emails start working, our extension quote emails should start working as well. If it doesn’t, please create a ticket using this link, and don’t forget to mention that you have already tried these steps.
11. How can I allow only registered users to submit quotes?
Ans: If you want to enable the request for a quote for registered users only, you would need to create 2 rules.
- Create your first rule for guest users and replace “Add to cart” with a custom button to give it a suitable title like “login/register to quote,” and add the URL of your login/registration page.
- Create another rule, and this time select the registered user roles and replace “Add to cart” with the quote button. By doing this, only the registered users will see the quote button, whereas the guest users will see the login/register button.
12. How to override quote email templates?
Ans: You can find the email templates under the following address: plugins/woocommerce-request-a-quote/includes/emails/templates.
All templates have instructions to override them in the file comments. For example, the customer quote email template can be overridden by copying it to yourtheme/woocommerce/addify/rfq/emails/customer-info.php.
13. Why isn’t the ” Add to Quote” button appearing on the front end?
Ans: Please make sure you have created a new rule and correctly applied it to your products. Also, please make sure that your product does not have an empty Price Field. Due to technical limitations, it’s mandatory to add a Standard price to your products in order to show the quote button. You can add “0” in the price field. If you wish to hide the price, you can hide it using the same rule settings: WooCommerce > Request a Quote > Create a new rule > Rule settings > Hide price.

