
Introduction
↑ Back to topWelcome to the DigiX setup guide. DigiX is a WordPress block theme for stores selling digital products, website templates, and creative resources. This guide takes you from installing the theme to building pages, customizing your design, and checking your store before launch.
How DigiX works
↑ Back to topDigiX controls your store’s appearance. WordPress provides the block editor and Site Editor; WooCommerce manages products, orders, payments, and downloadable files. You do not need a separate page builder.
Choose your setup route: import the optional demo on a new site, or start with your own content and use DigiX patterns to build pages. Activating the theme alone does not import the demo.
Before you begin
↑ Back to top- Have the digix.zip theme file and a WordPress administrator account ready.
- The theme declares WordPress 6.6 and PHP 7.4 as minimum versions. Your installed WooCommerce version may require newer versions. Use a supported hosting configuration that meets the requirements of both.
- Back up an existing website and use a staging site for major changes.
- Use HTTPS and complete WooCommerce’s store setup before accepting orders.
These screenshots show DigiX’s WordPress admin. Labels can vary with your WordPress or WooCommerce version. Red outlines identify the controls used in the instructions. Select a screenshot to open the full-resolution image.
Installation
↑ Back to topInstall and activate the theme
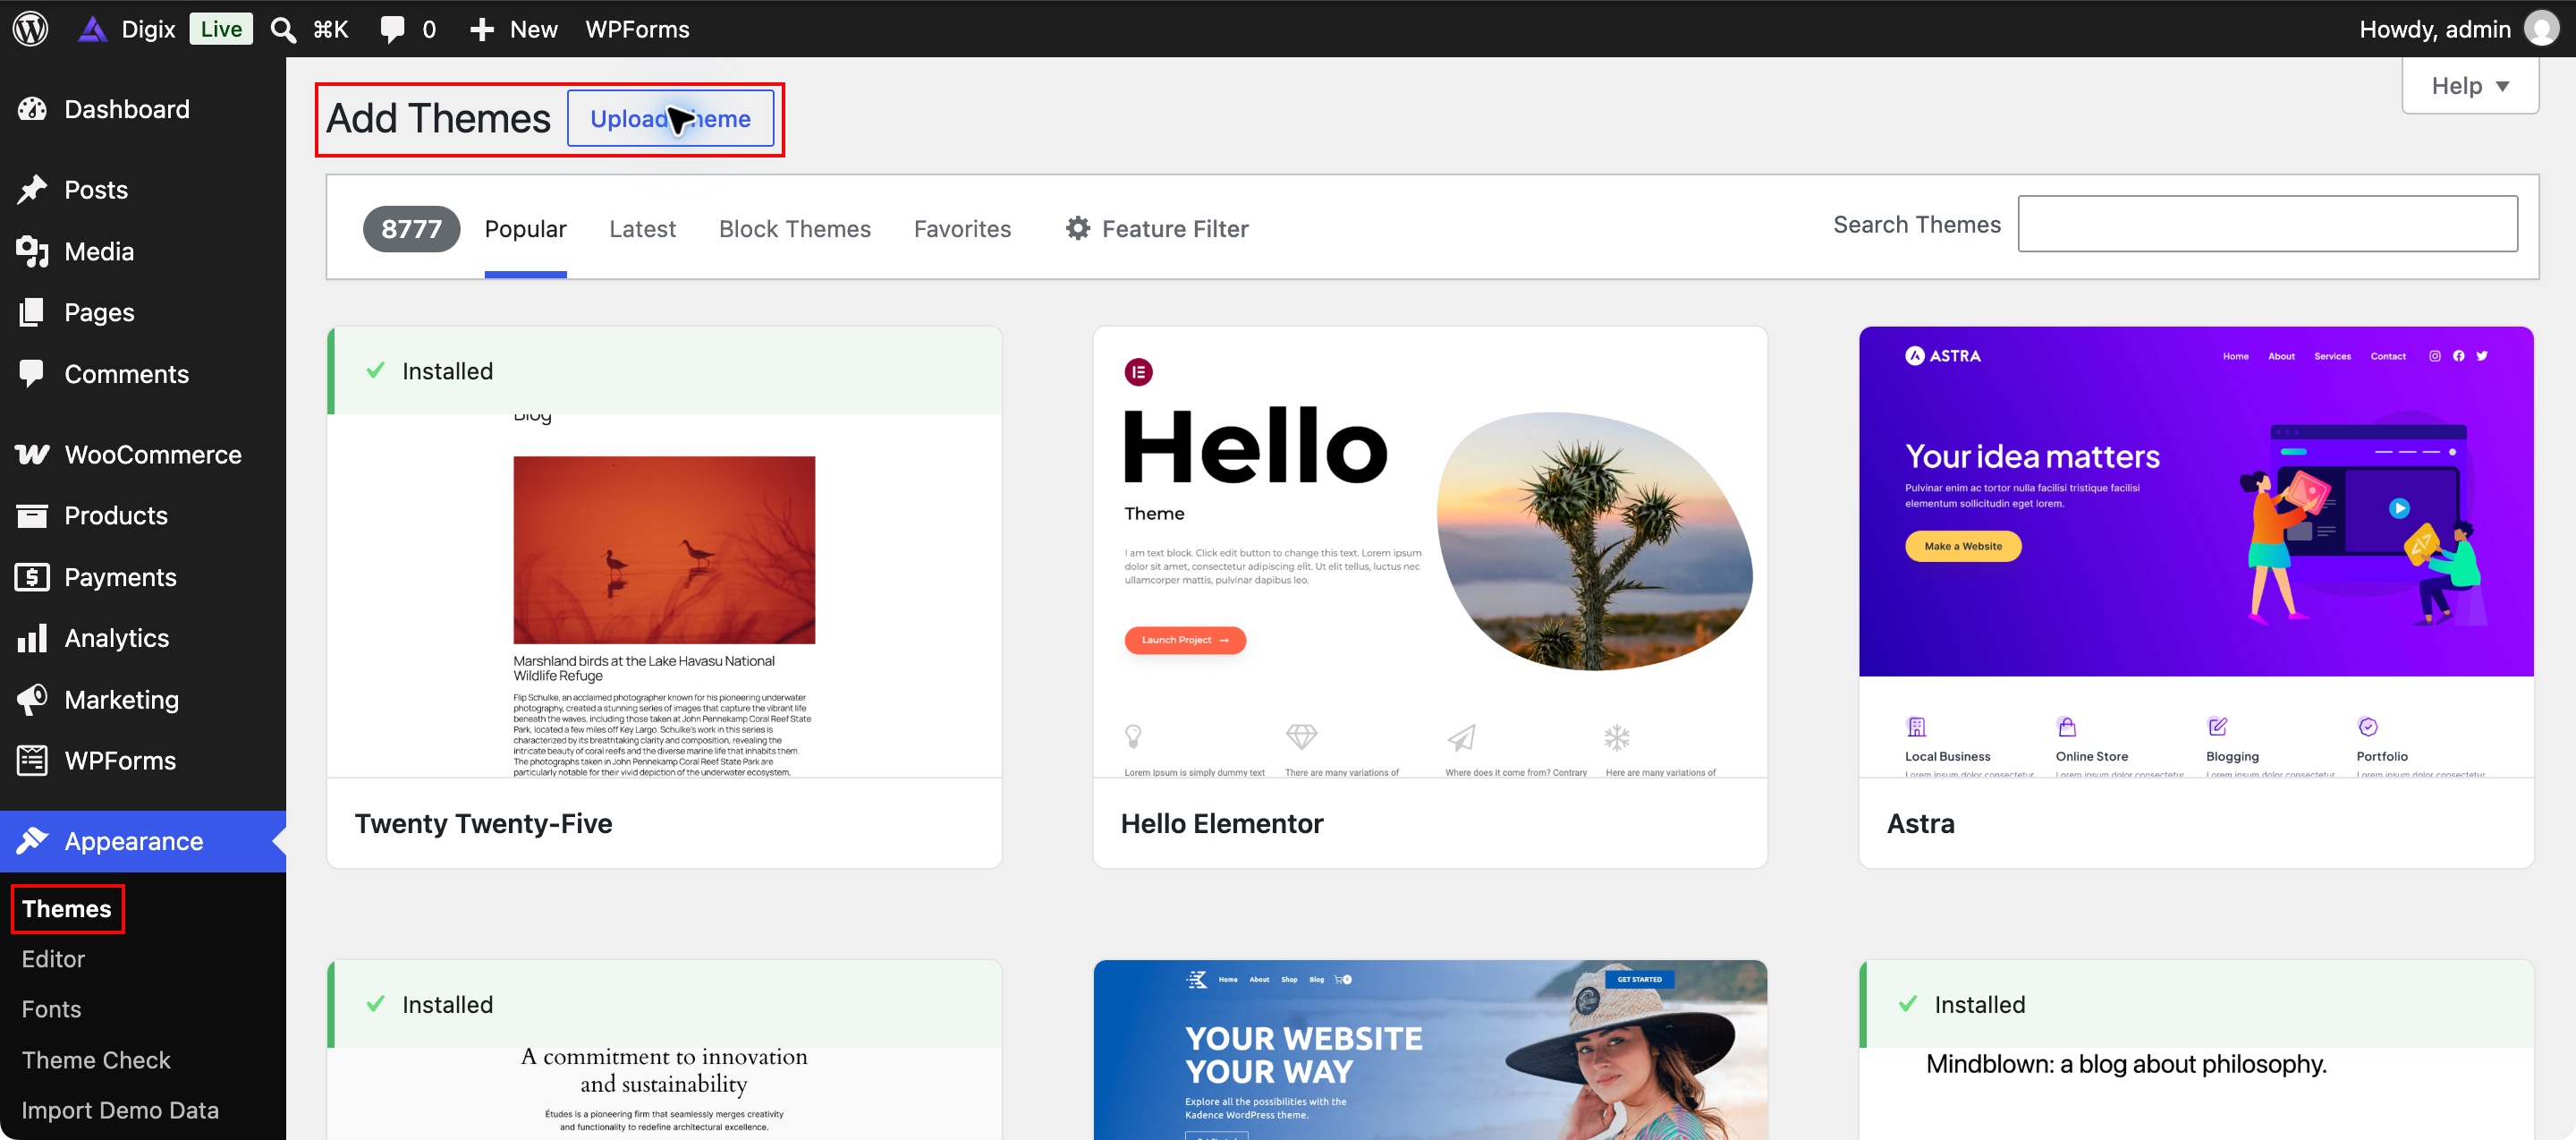
↑ Back to top- Open your WordPress dashboard and go to Appearance → Themes.
- Select Add Theme or Add New Theme, then Upload Theme.
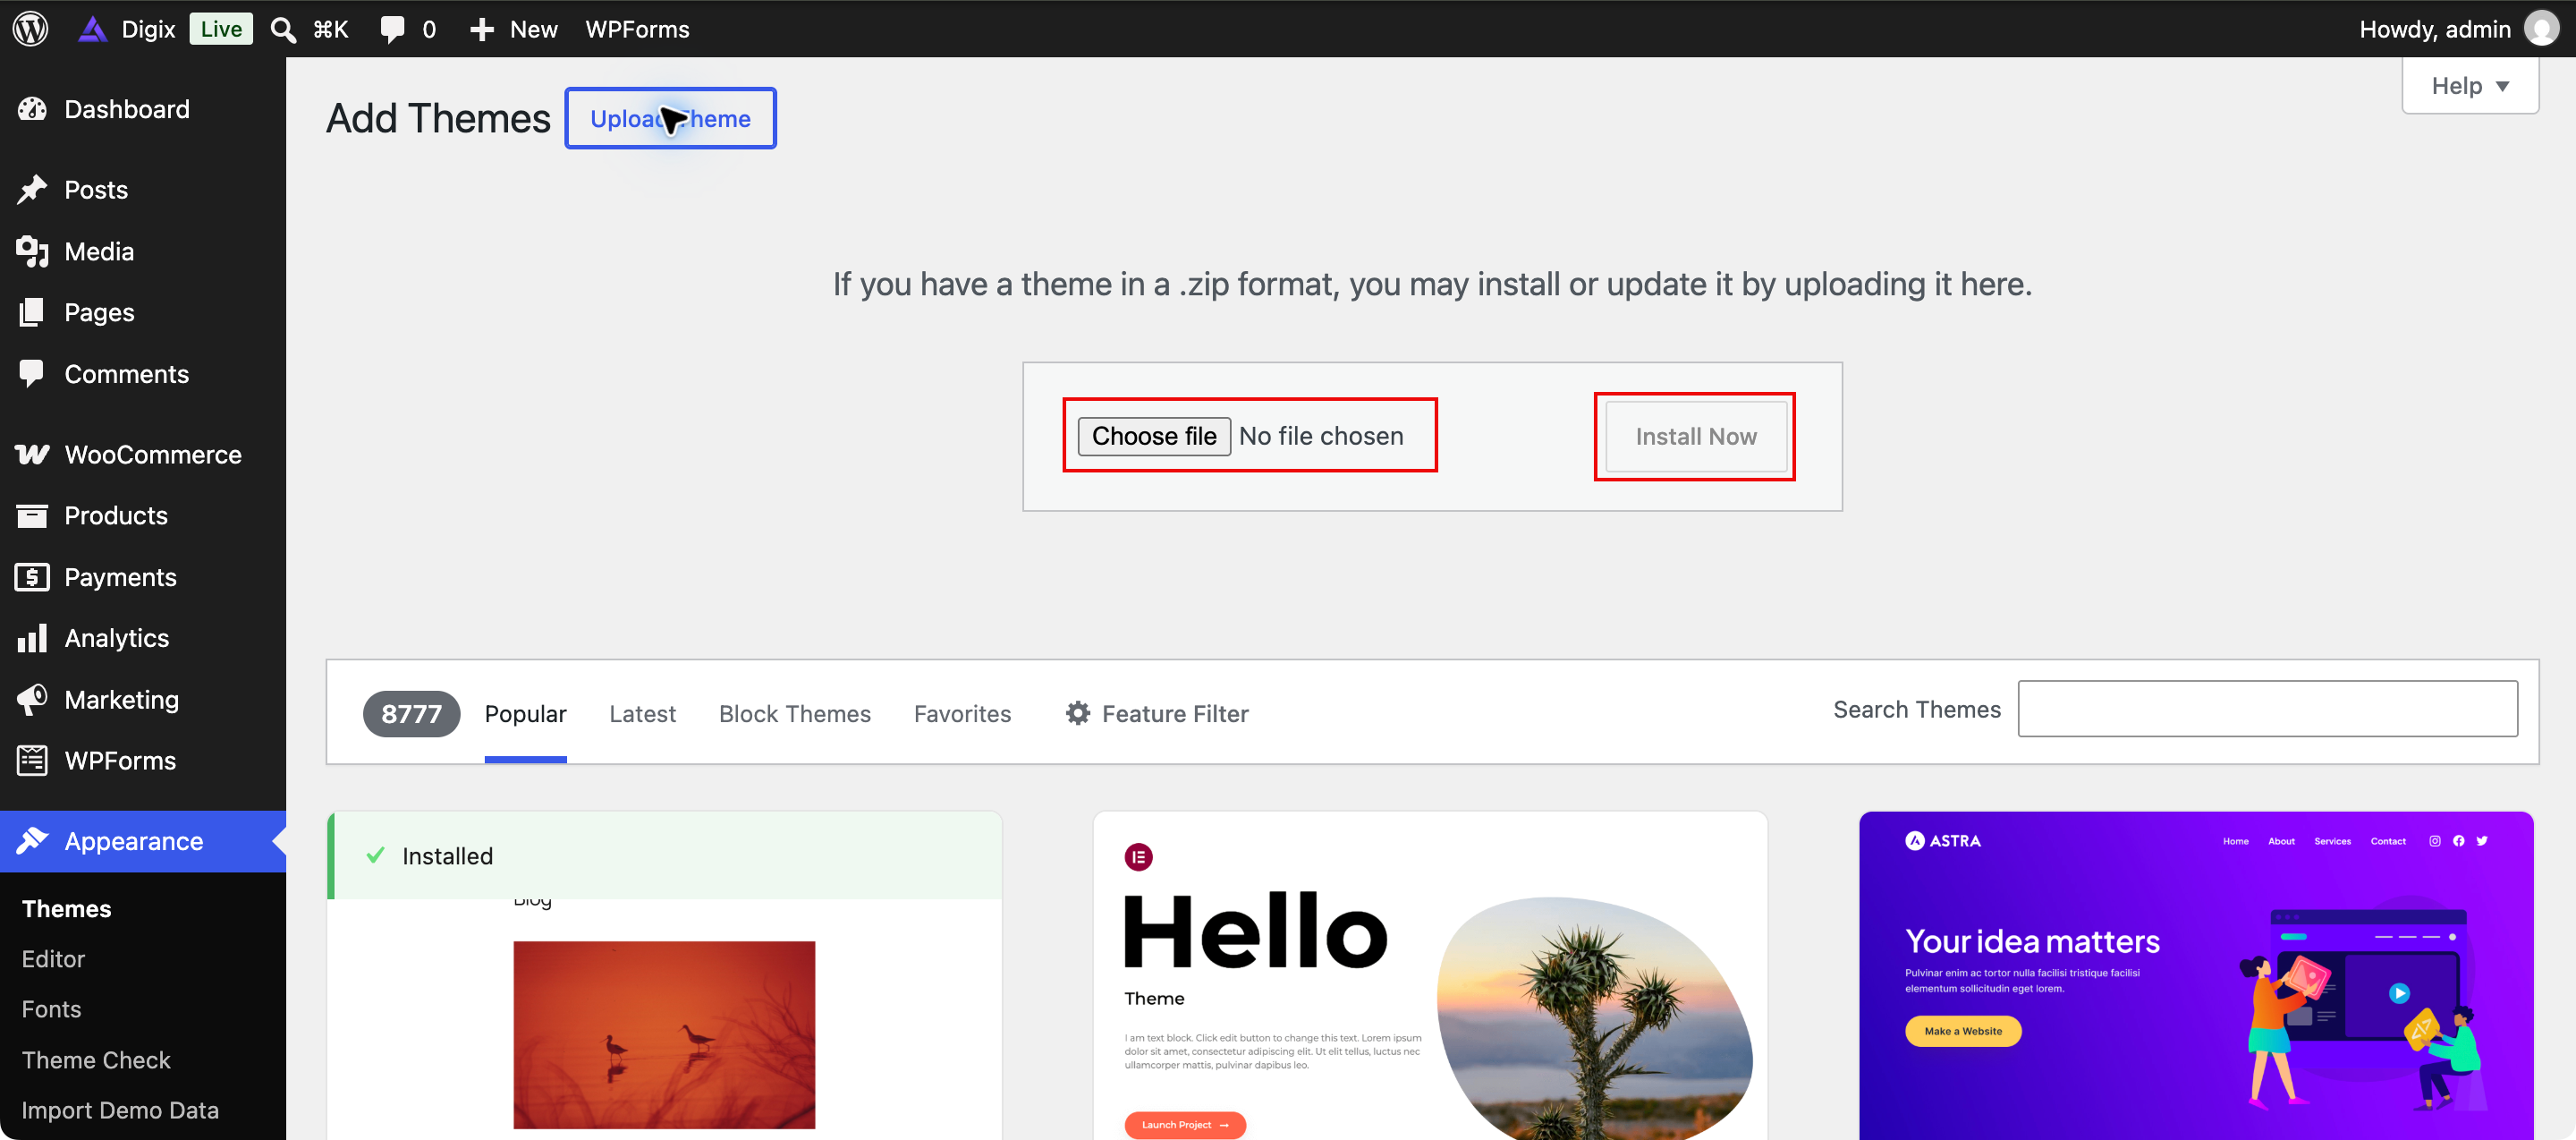
- Select Choose file and choose digix.zip. Upload the installable theme ZIP, not a folder containing several files.
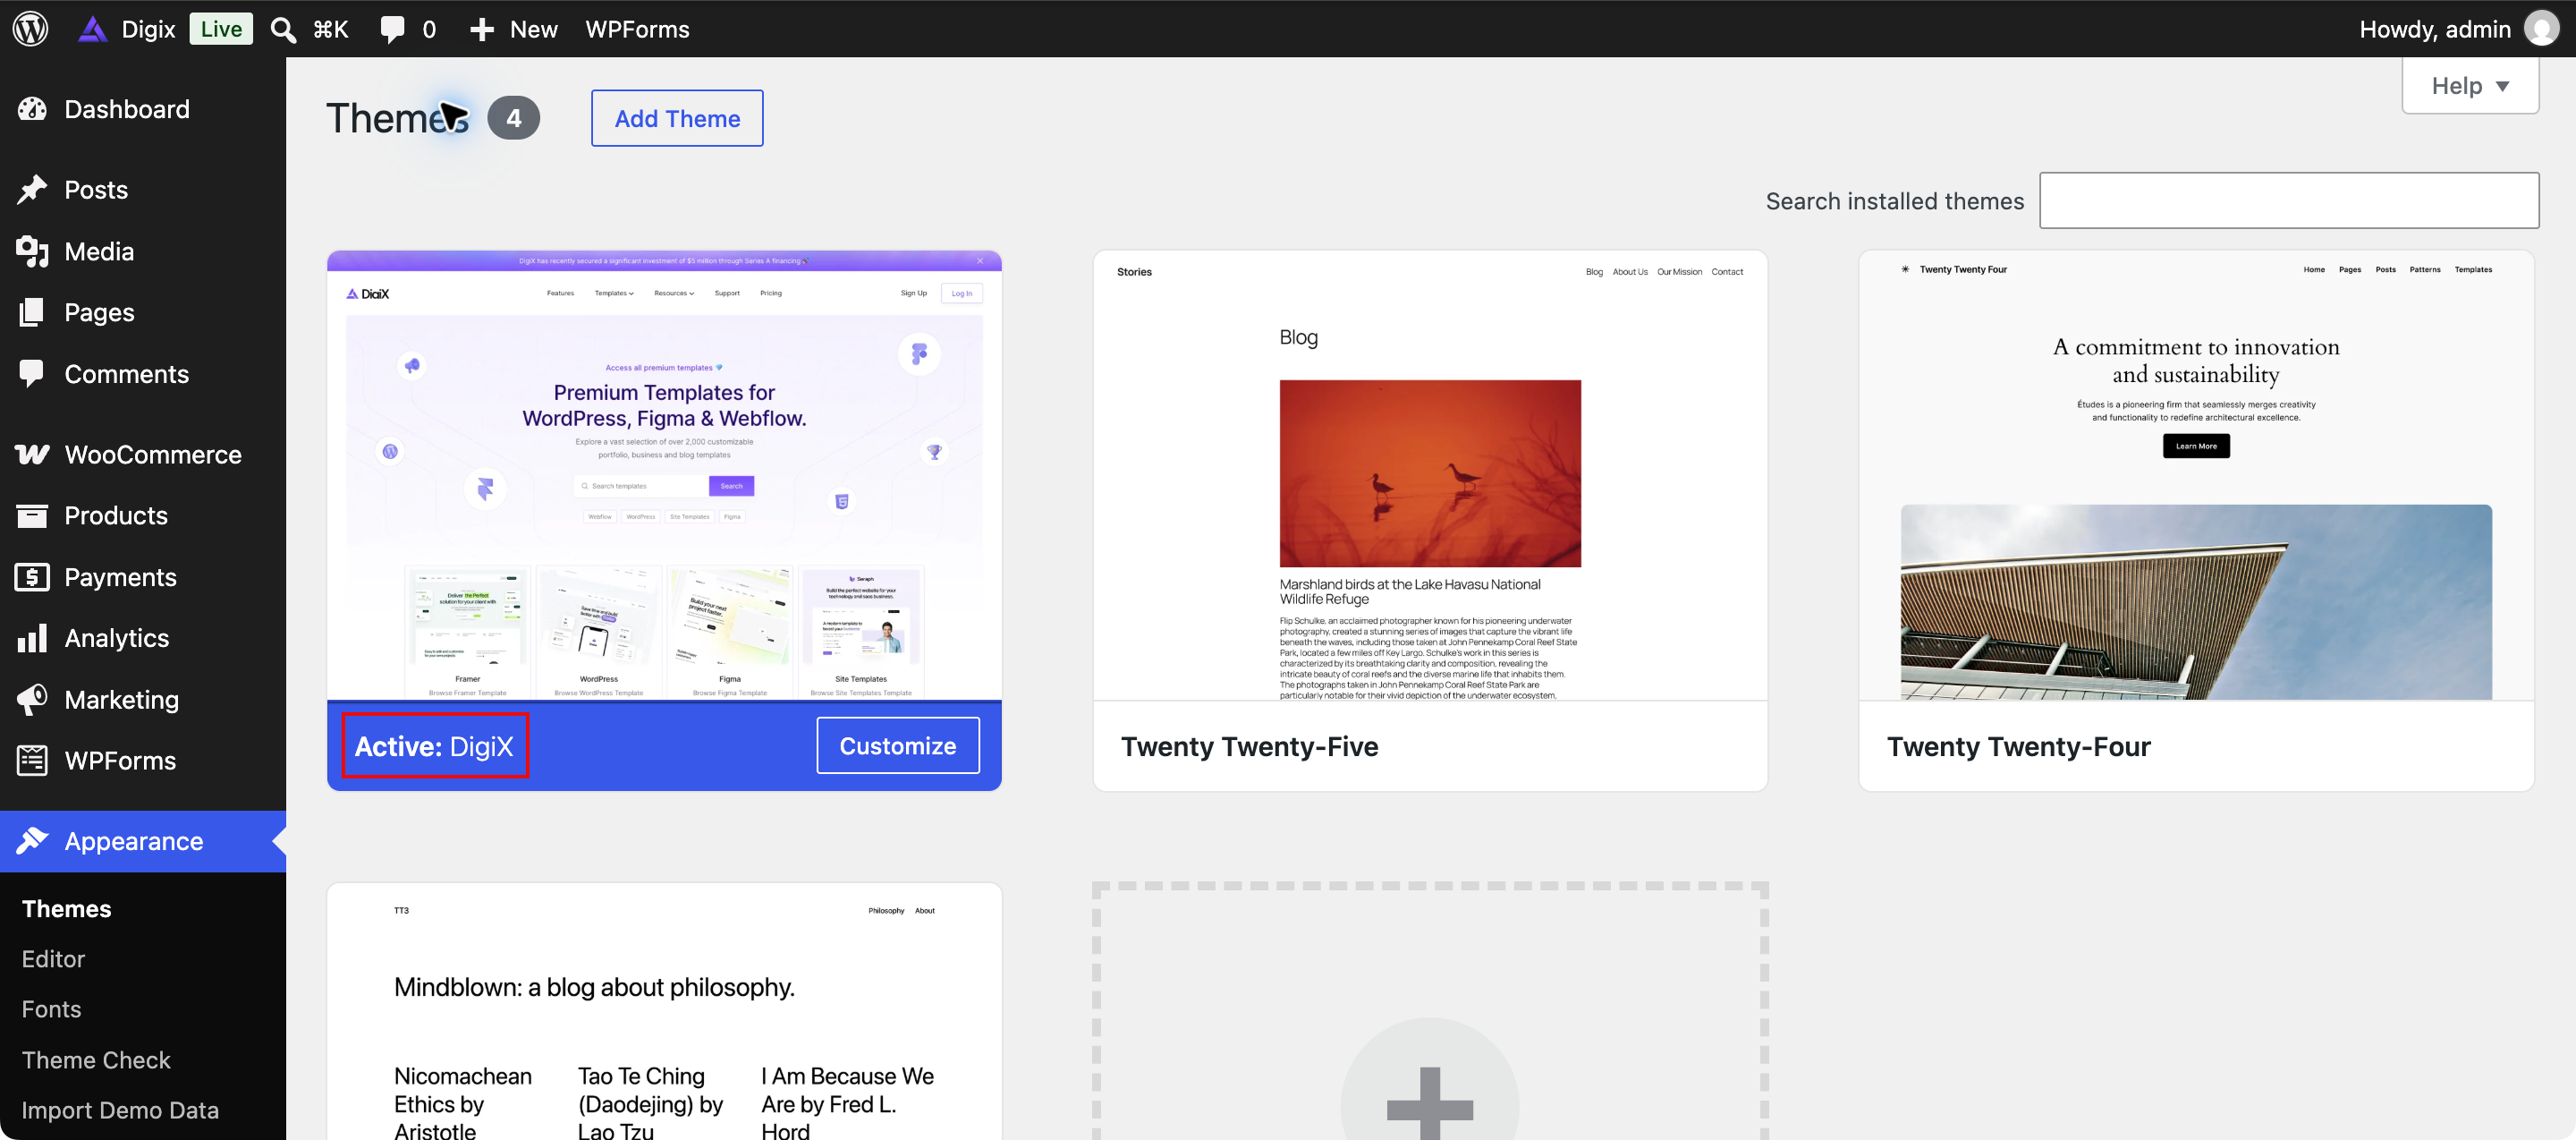
- Select Install Now. When installation finishes, select Activate.
- Visit your site to confirm that DigiX is active.
Install plugins with DigiX’s setup installer (TGM)
↑ Back to topDigiX includes a built-in plugin setup screen powered by TGM Plugin Activation. After activating the theme, use its plugin setup notice or open Appearance → Install Plugins to install the plugins recommended for your site.
- WooCommerce: required for product, shop, cart, checkout, and customer account functionality.
- One Click Demo Import: optional; use it when importing the supplied demo.
- WPForms: used for the supplied contact forms. Configure it if you use those forms.
- Open Appearance → Install Plugins.
- Select the listed plugins you need for your setup.
- Choose Install from Bulk actions, then select Apply.
- When installation finishes, return to the plugin installer. Select any installed but inactive plugins, choose Activate, and select Apply.
- Confirm that the required plugins are active before continuing to store setup or demo import.
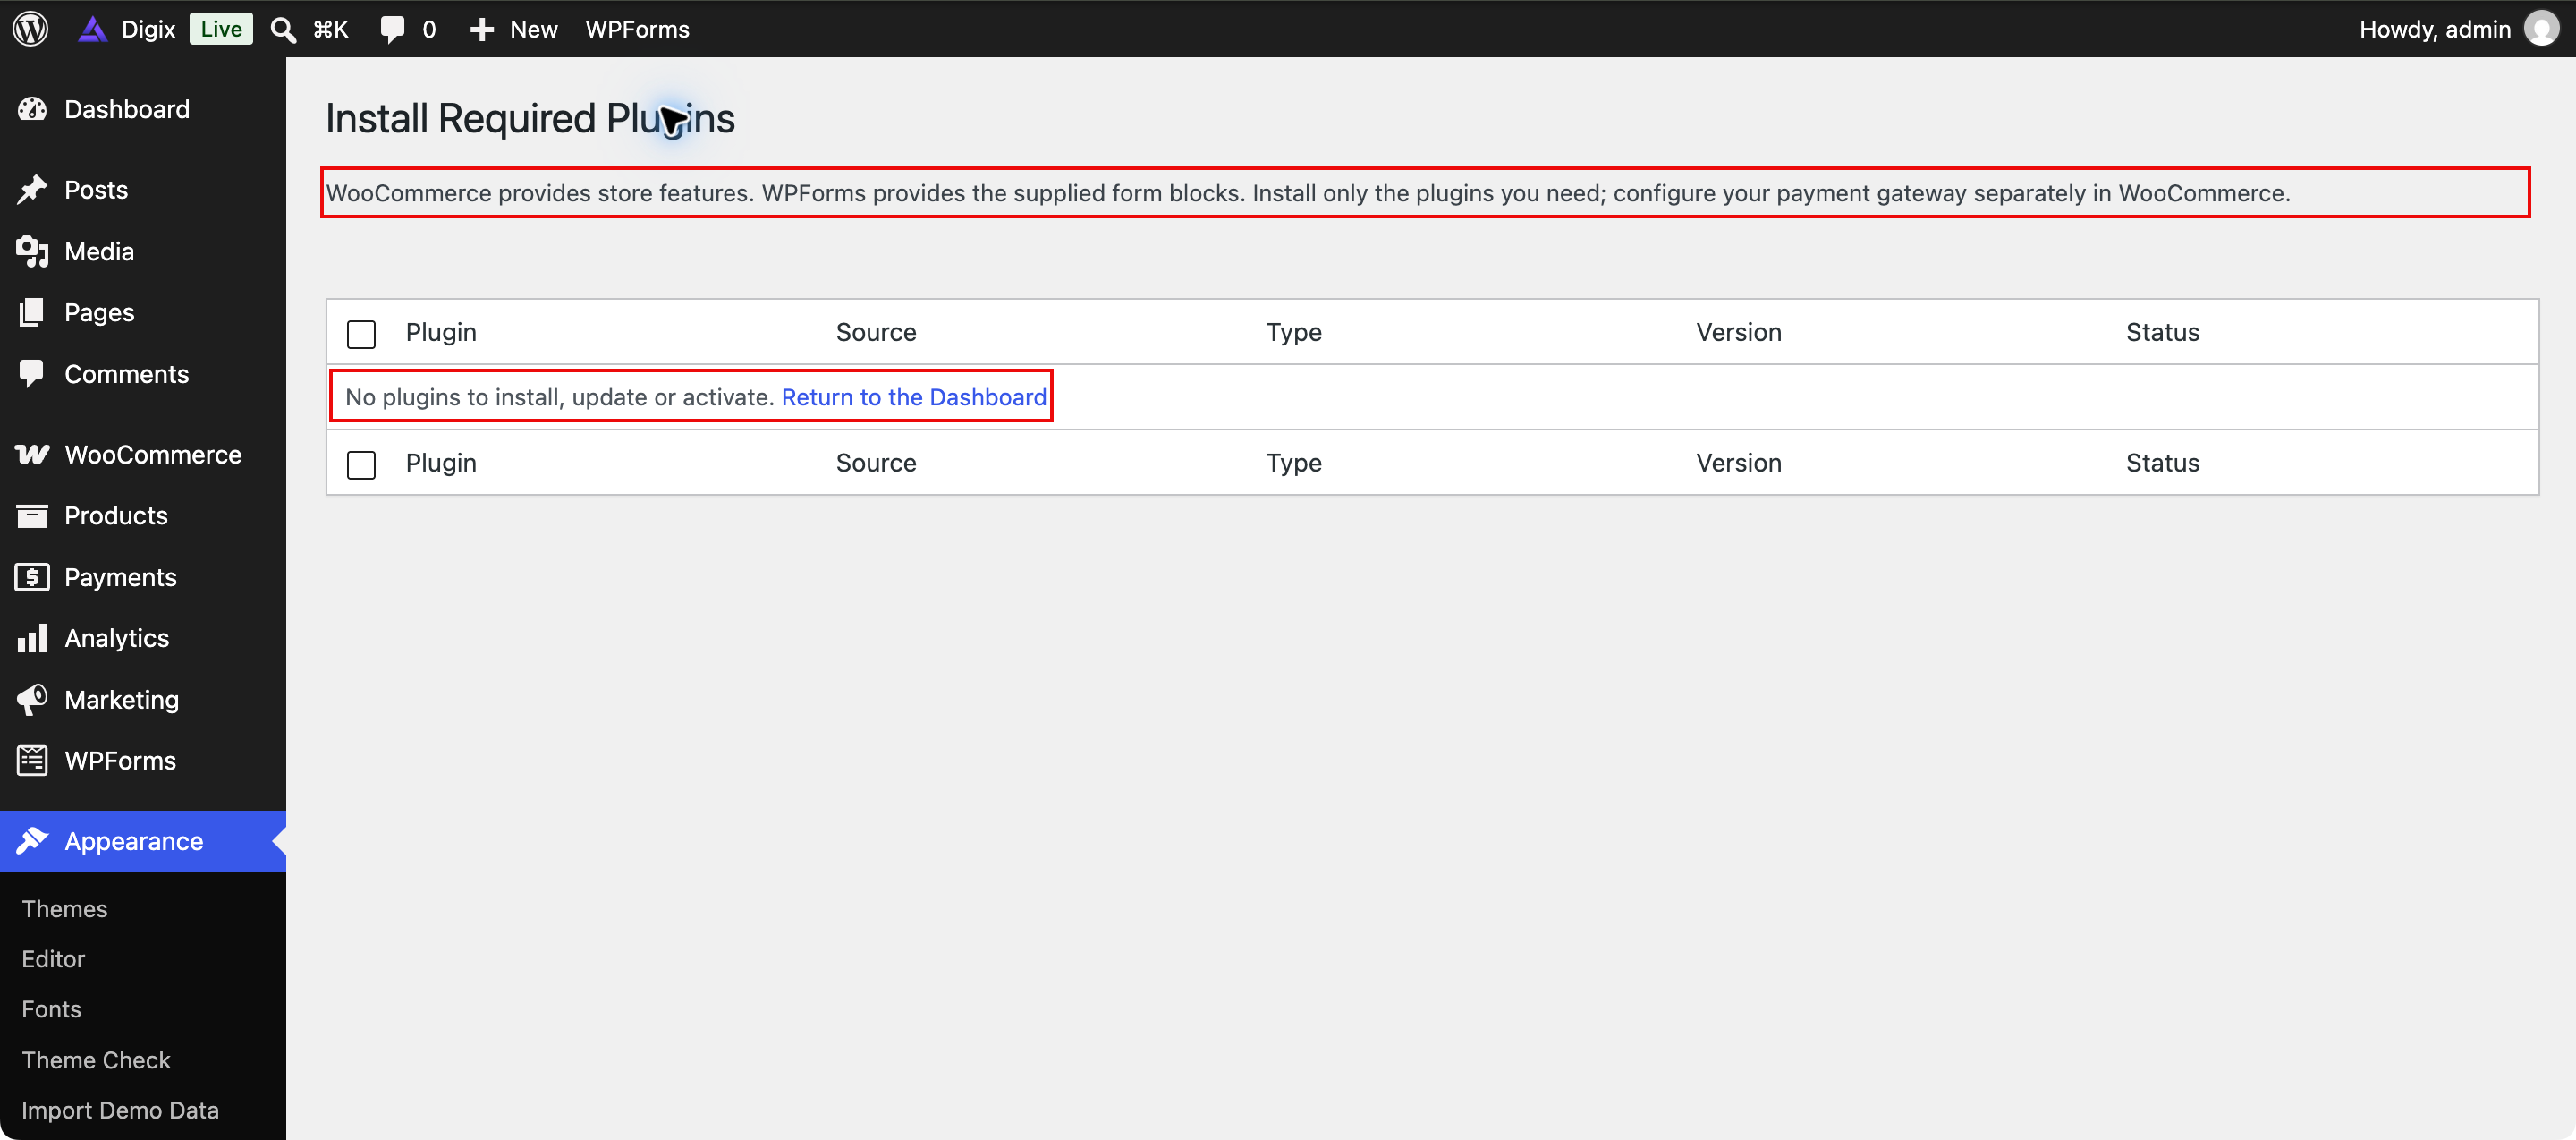
If the screen says No plugins to install, update or activate, the listed plugins already need no action. This is the completed state shown below. You do not need to reinstall them. Payment gateways and email marketing services still require their own configuration.
Demo content
↑ Back to topImport the DigiX demo
↑ Back to topThe demo provides sample pages, products, images, and layouts to help you get started. Import it on a fresh site where possible. Importing into a populated site can add duplicate content.
- Activate DigiX, WooCommerce, and One Click Demo Import. Activate WPForms if you want to use the supplied forms.
- Go to Appearance → Import Demo Data.
- Select Import Demo Data for DigiX and follow the importer’s prompts.
- Keep the page open and wait for the completion message. Do not start a second import while the first is running.
- Open the front end and check the homepage, menus, product images, and store pages.
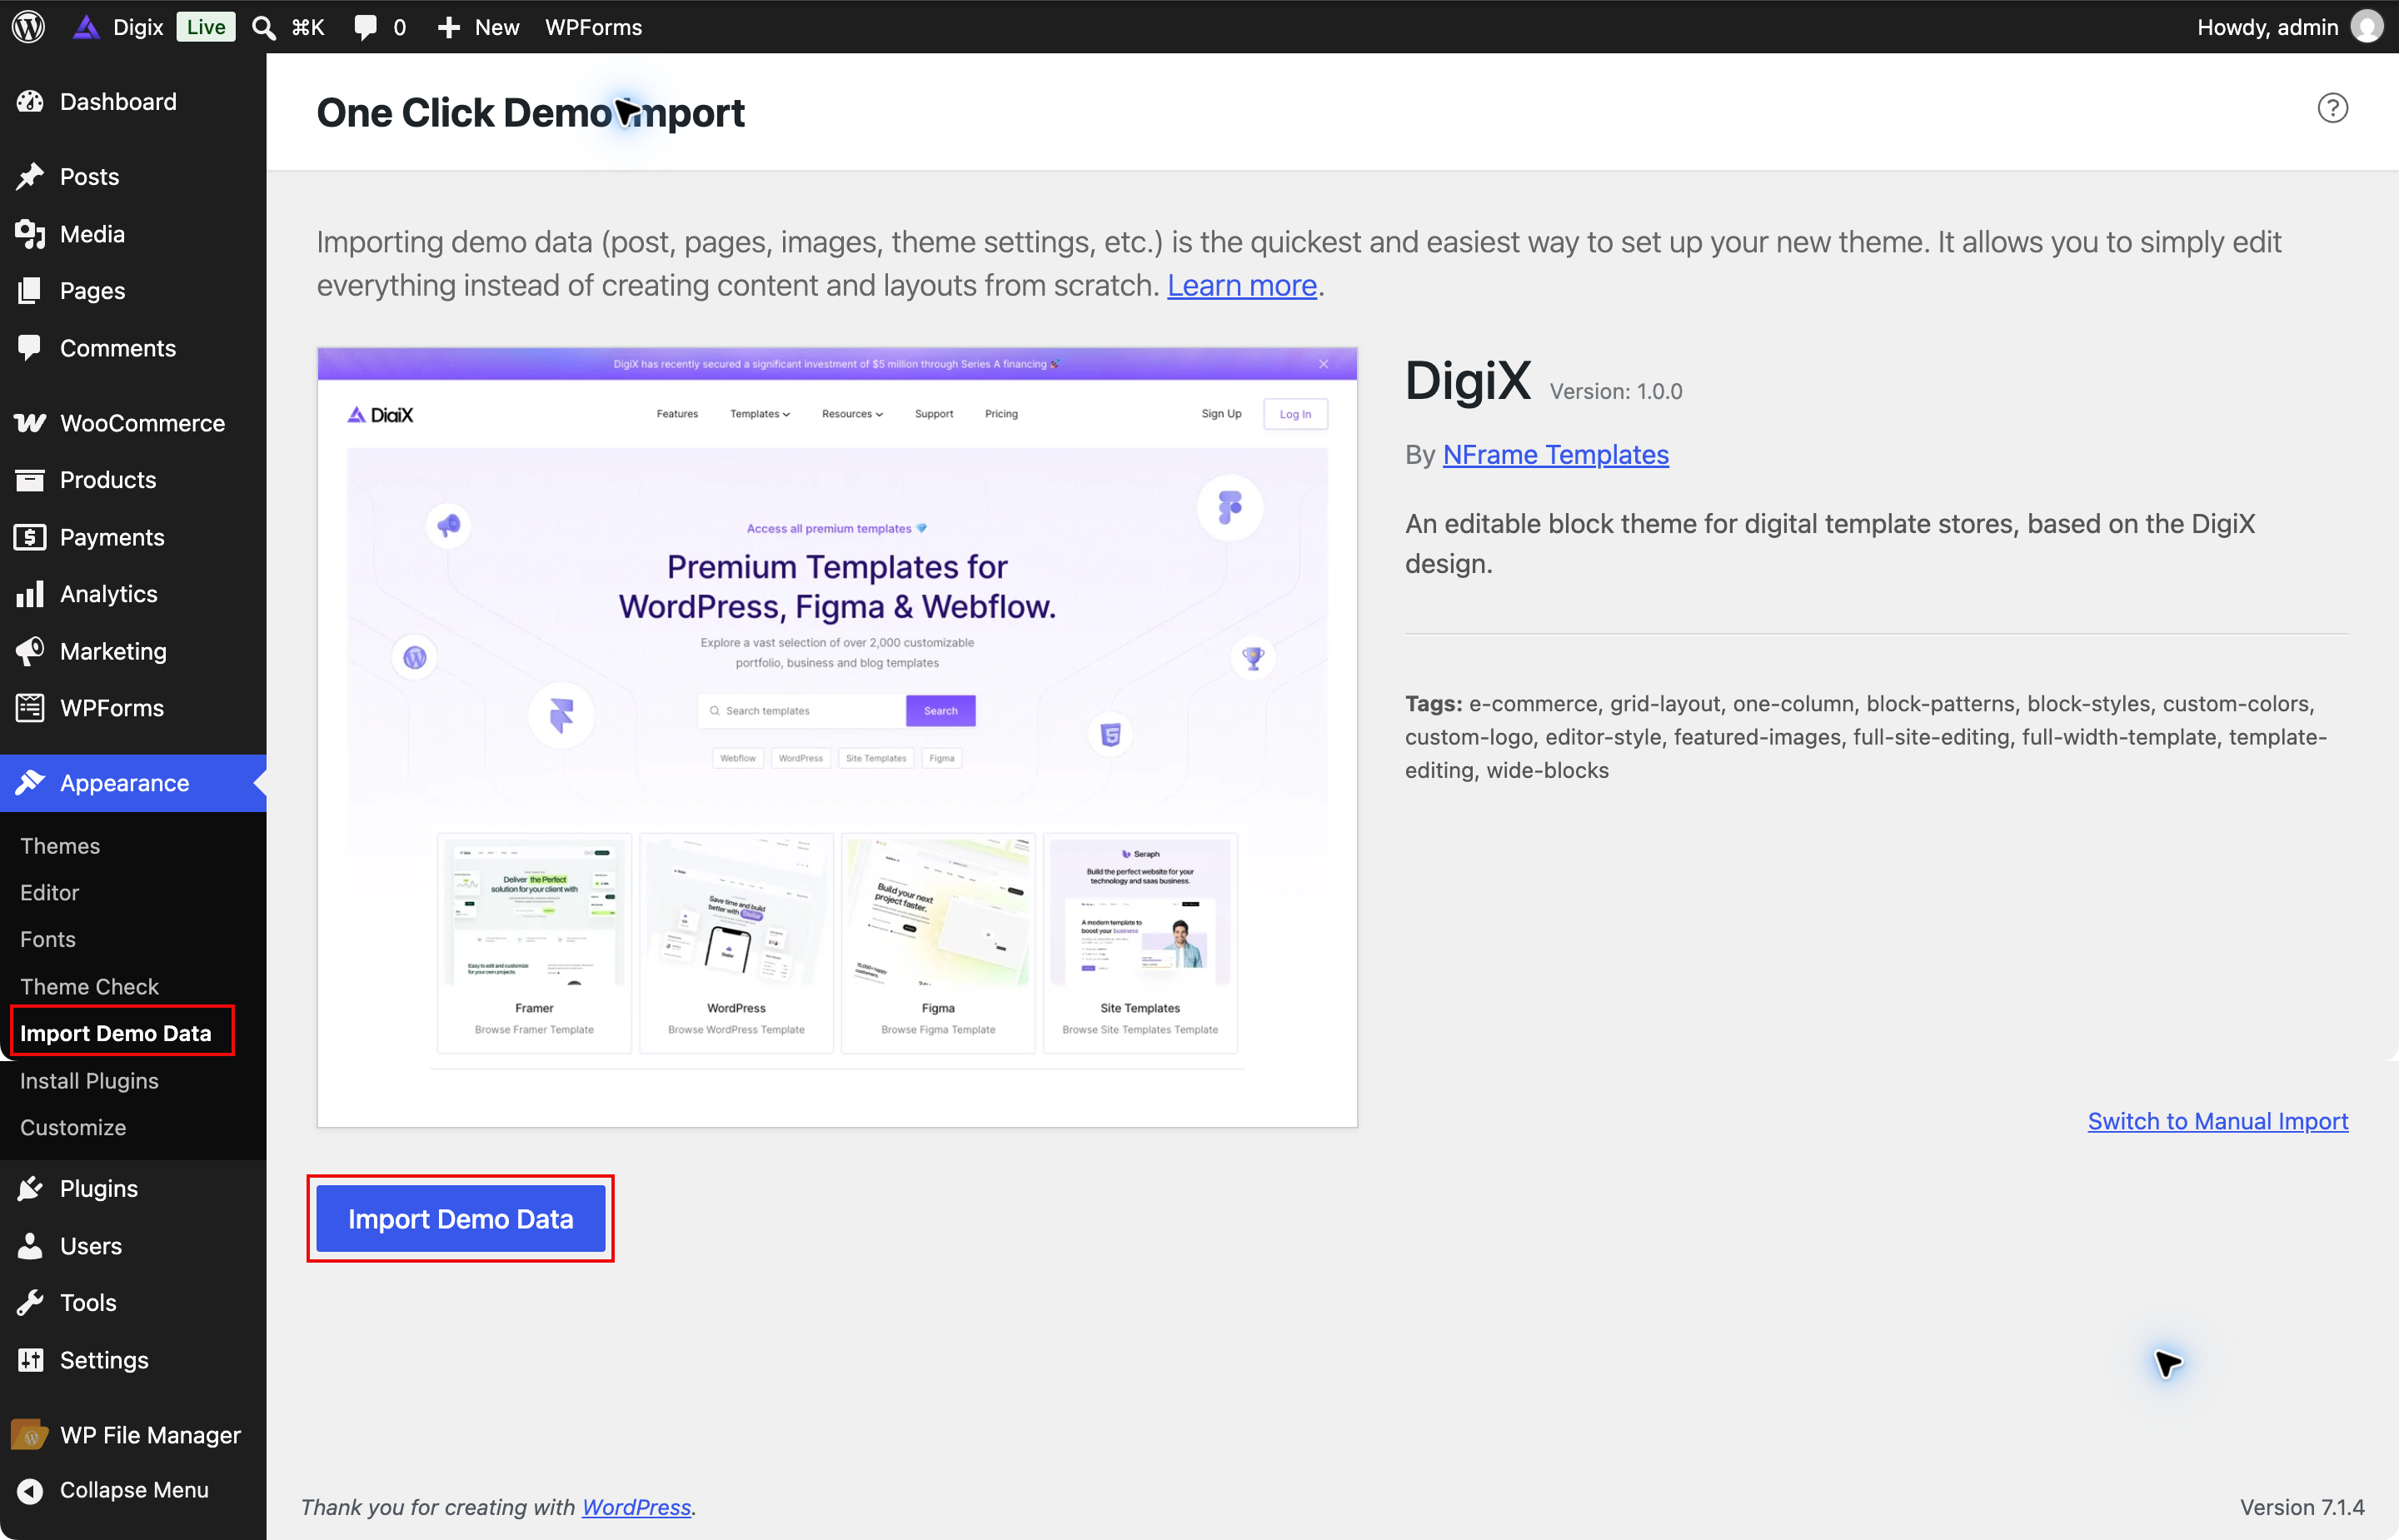
Import timing: completion time depends on hosting, network access, and media downloads. If it stops, read the error and check what has already imported before retrying.
Replace sample content
↑ Back to topBefore launch, replace demo products, prices, images, promotional claims, contact details, form recipients, and links. Example pricing cards are design content; they do not create subscriptions or payment plans.
Start without the demo
↑ Back to topYou can skip the import. Create your own pages, add your catalog in WooCommerce, insert DigiX patterns, and assign your homepage and store pages as described below. Theme styling works with your content; demo products and images are not added automatically.
Pages and homepage setup
↑ Back to top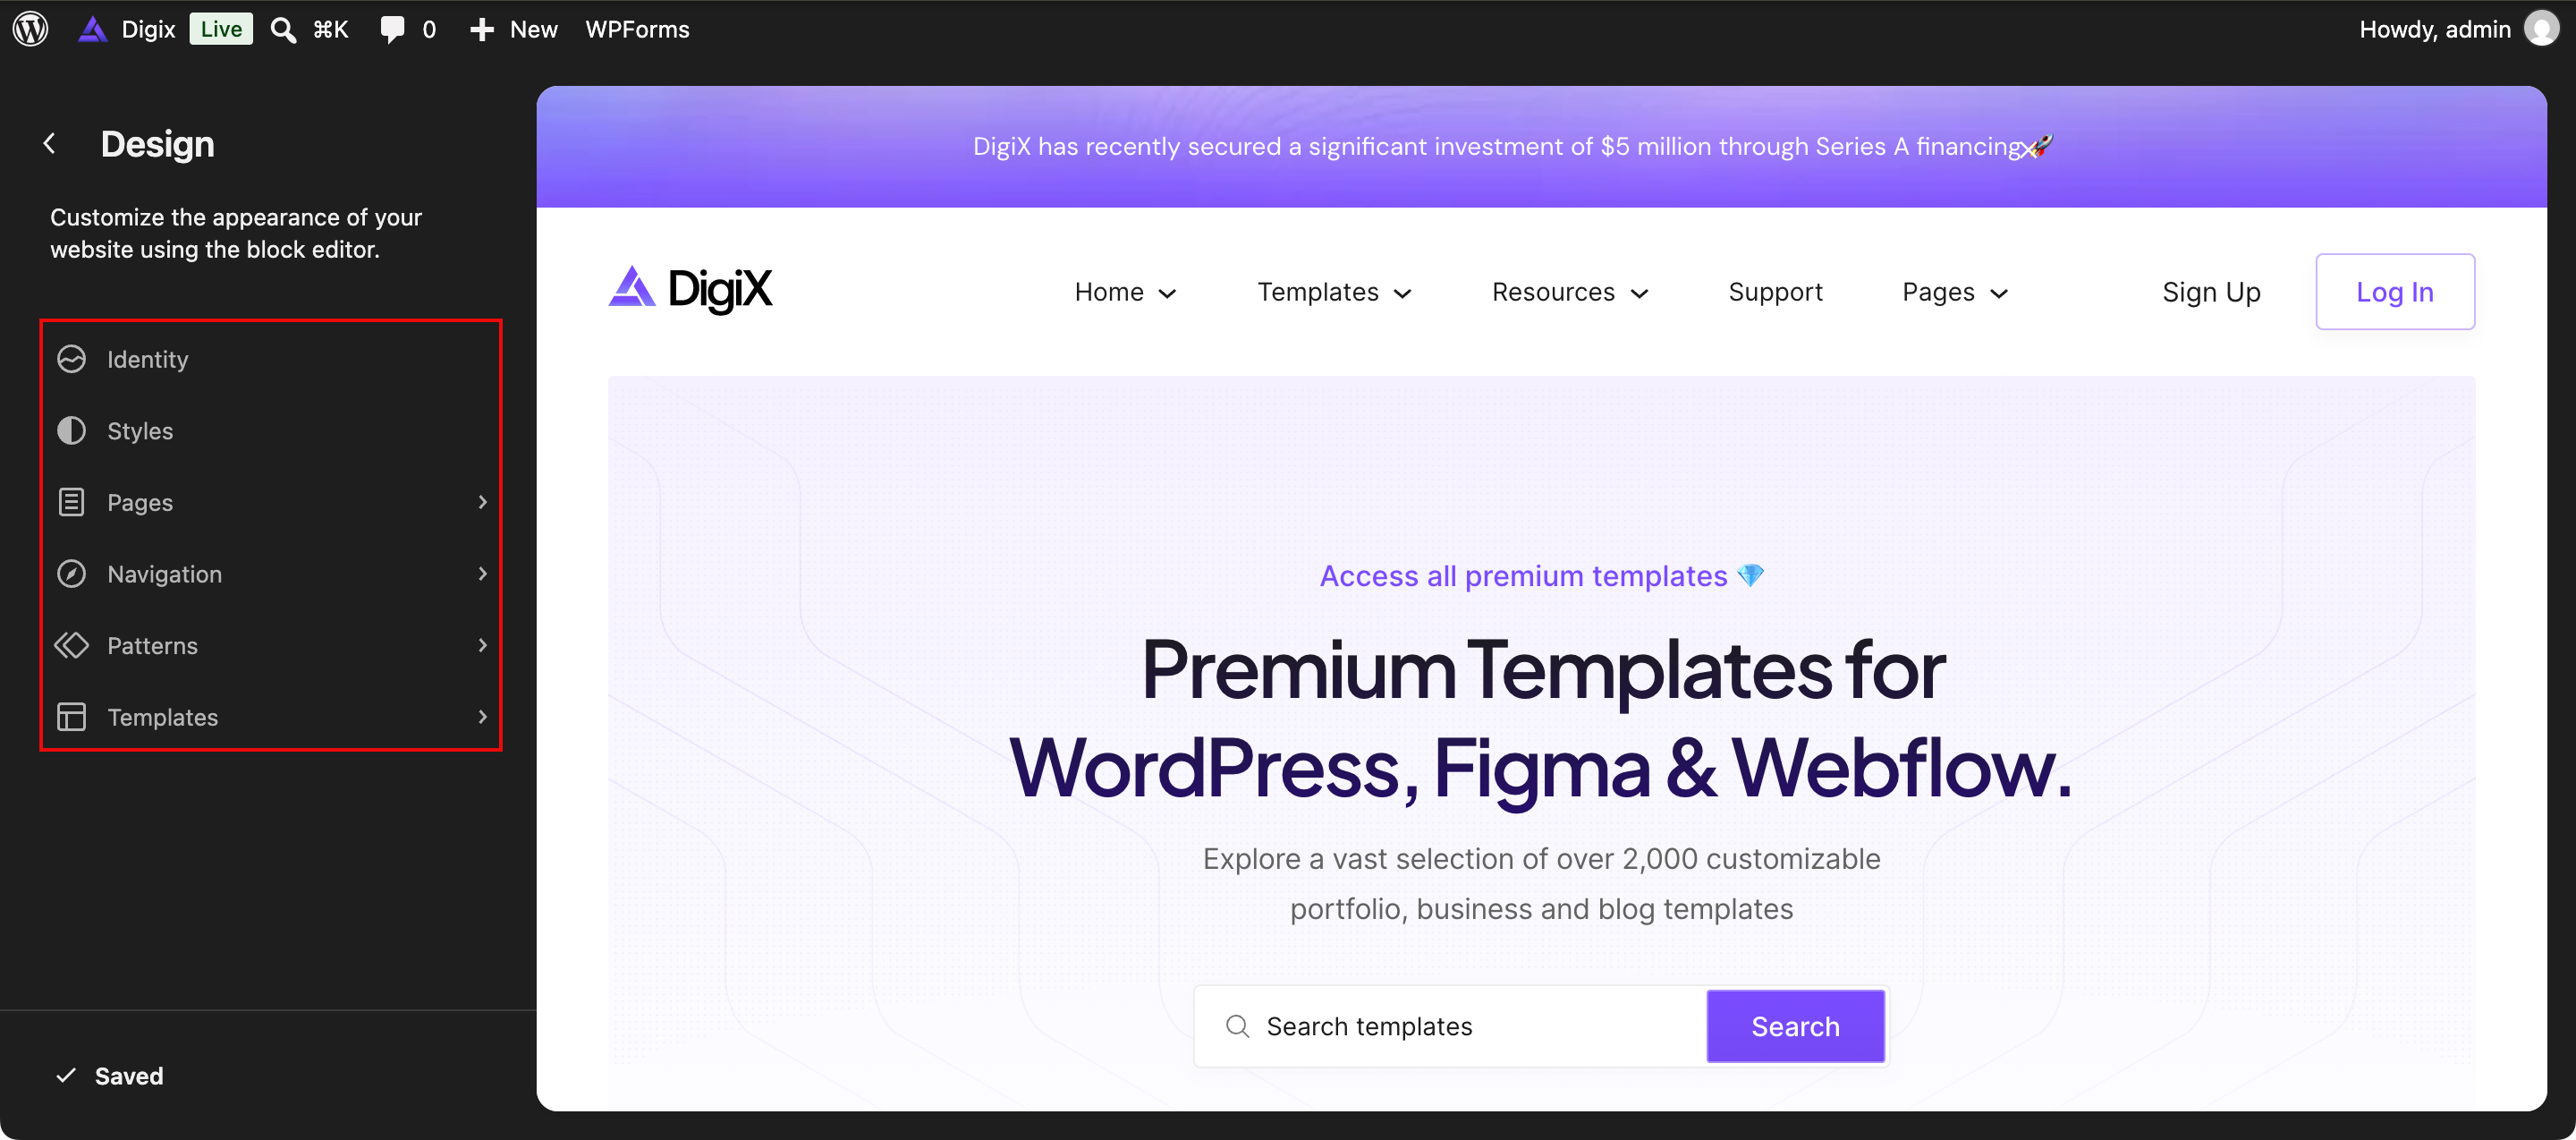
Create a page with patterns
↑ Back to top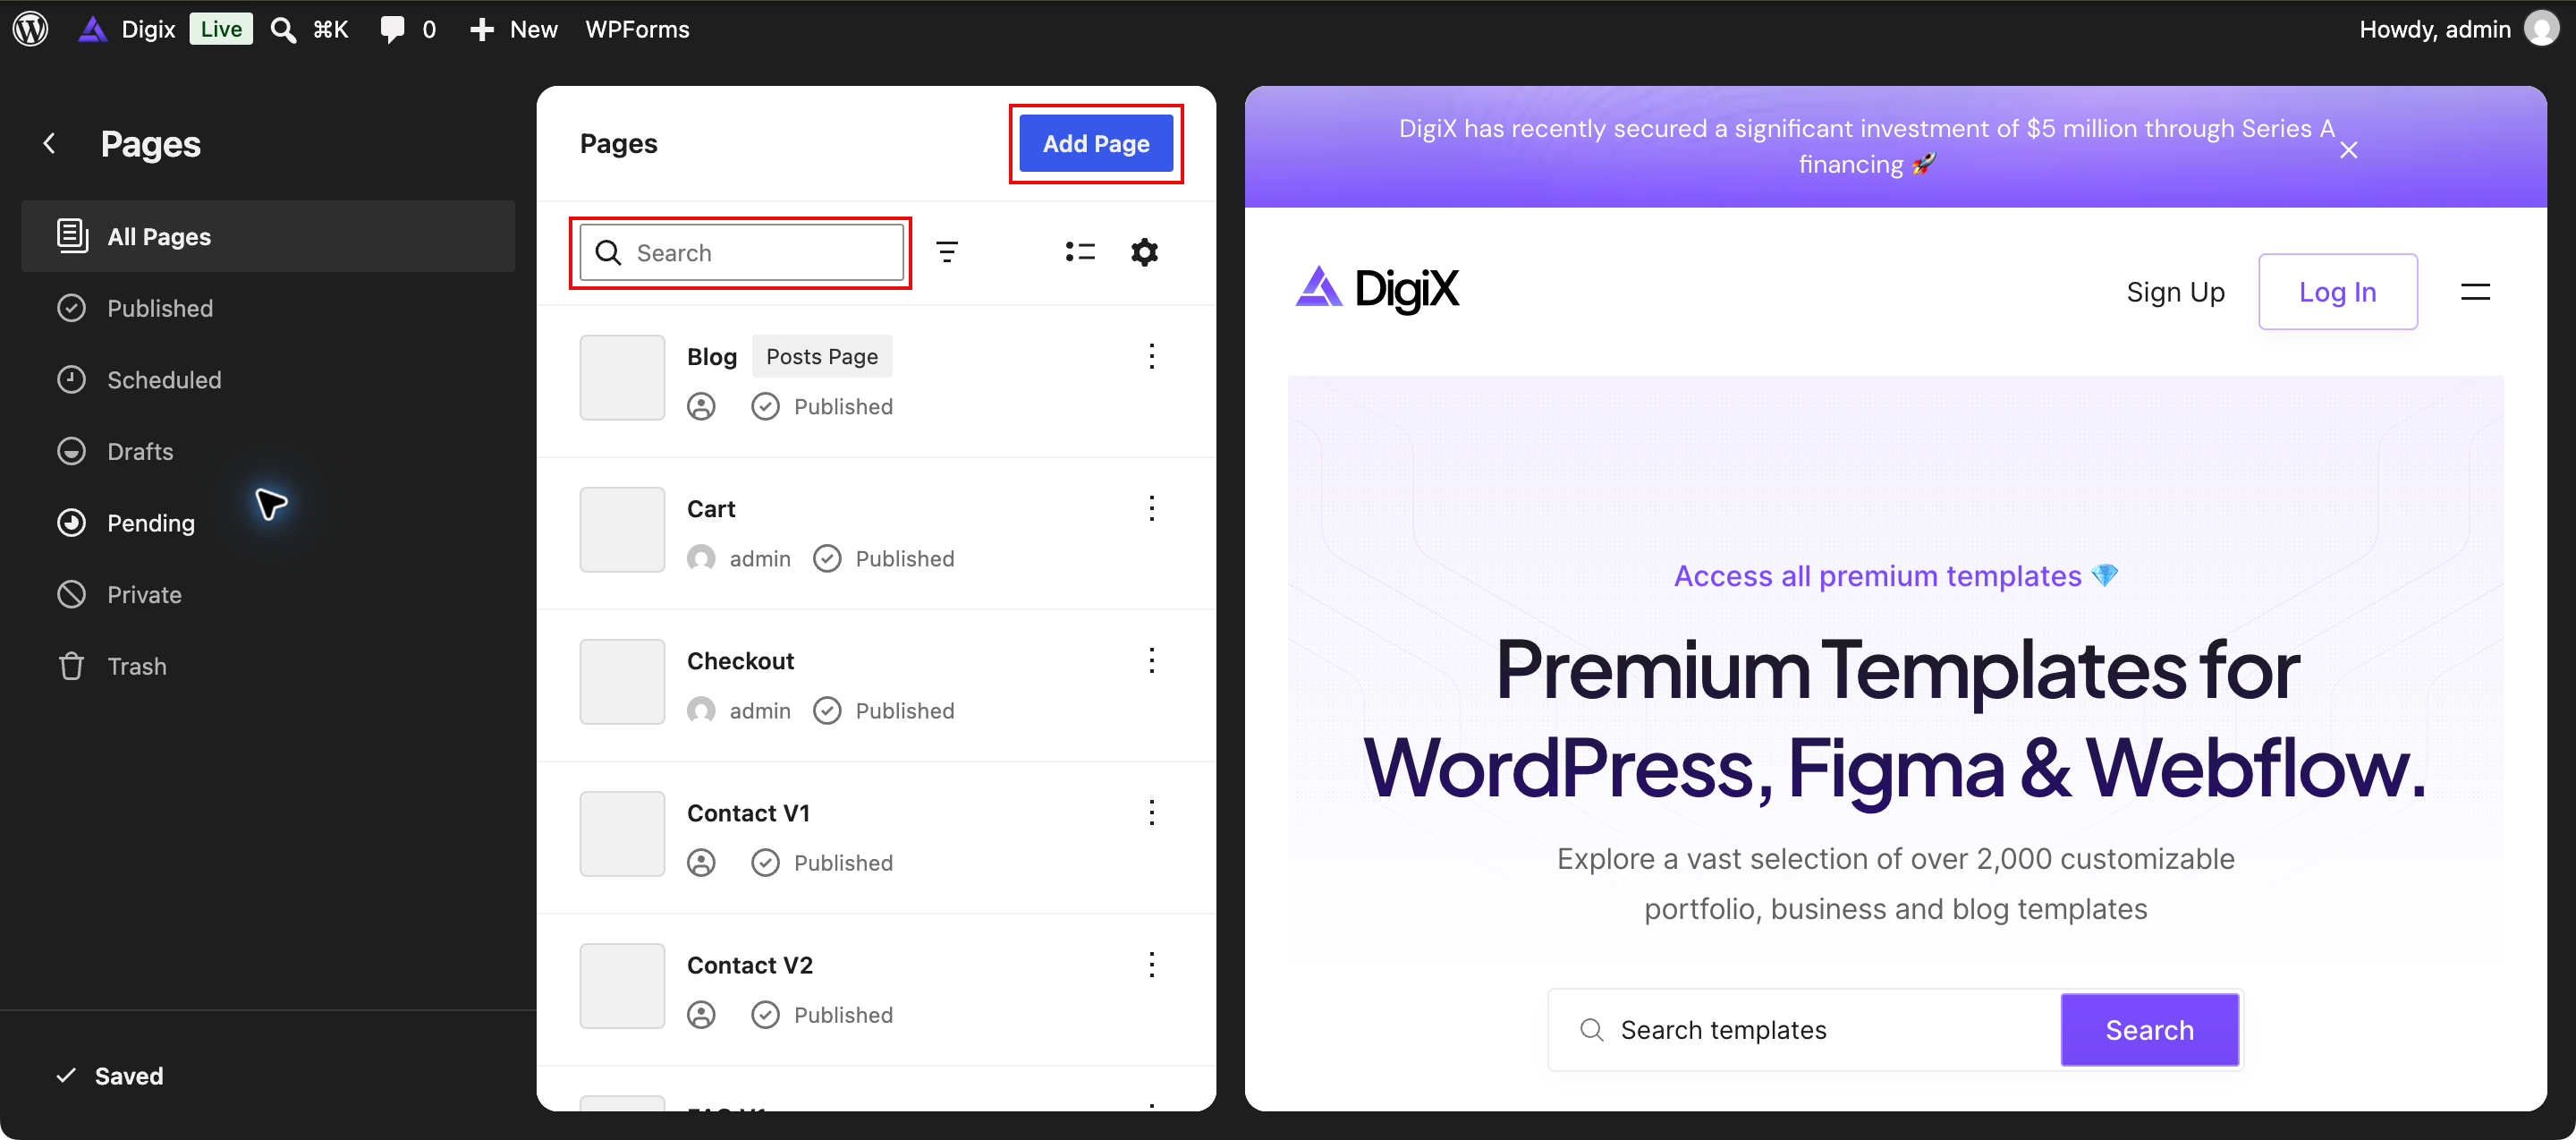
- Go to Pages → Add New and enter a page title.
- Open the + block inserter → Patterns and browse the DigiX designs.
- Insert the sections you want, then replace their text, images, and button links.
- Use List View to select nested blocks and rearrange sections.
- Preview the page and select Publish when it is ready.
To browse the theme’s pattern library, go to Appearance → Editor → Patterns → DigiX. Keep Search empty to browse all DigiX patterns. Use the page controls at the bottom to see the remaining designs. The screenshot shows one page of the complete, unfiltered library.
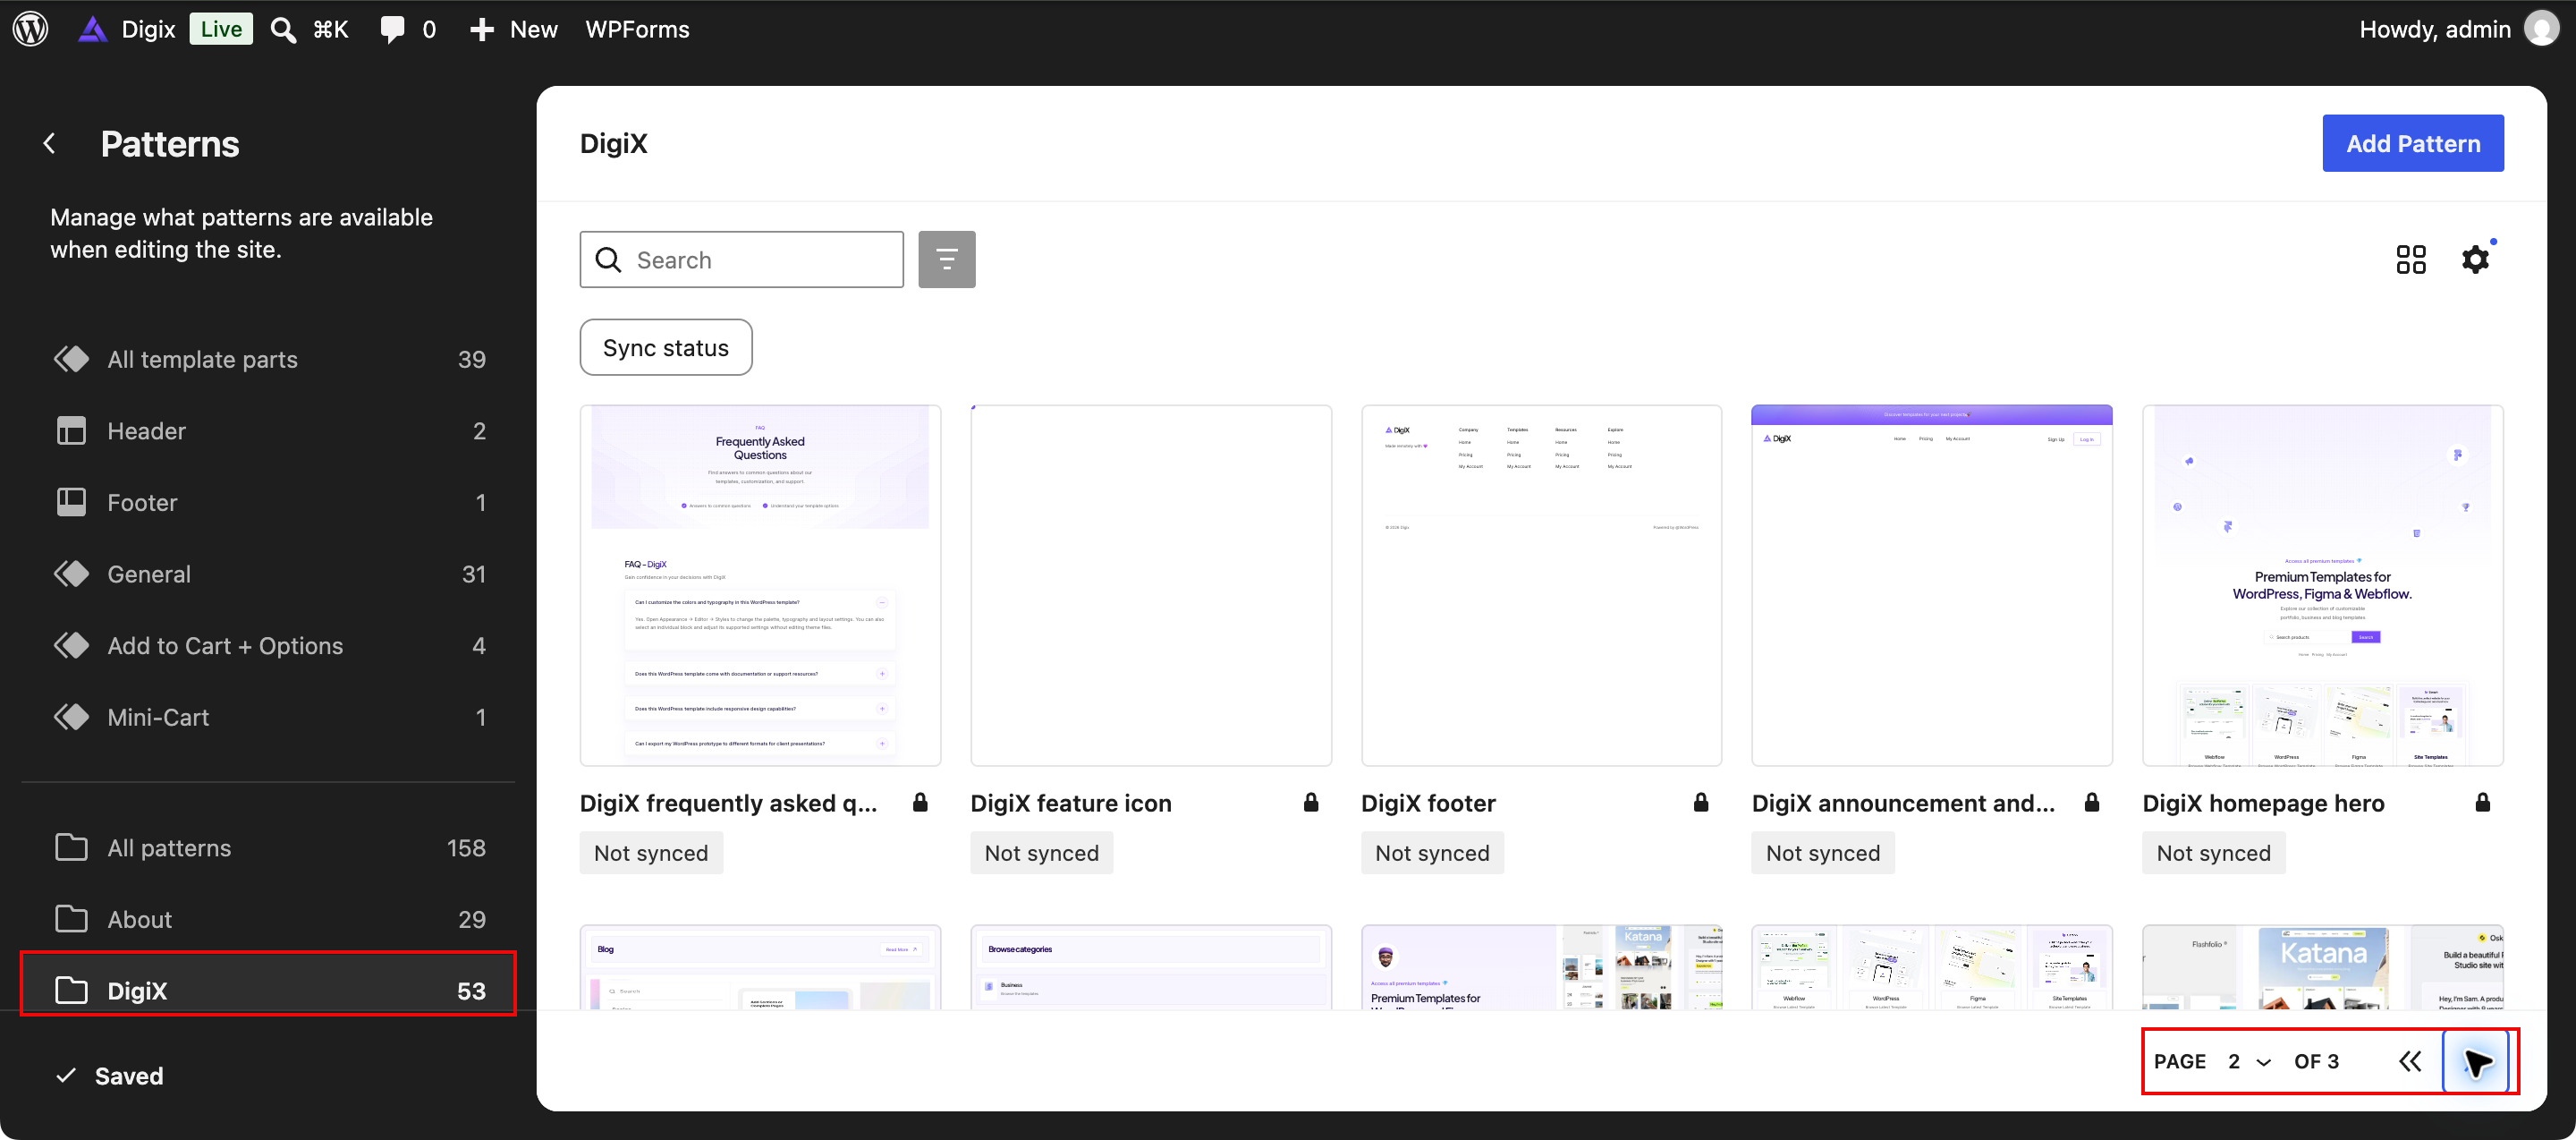
Patterns and templates are different: a pattern inserts blocks into your page. A template controls the surrounding layout. An unsynced pattern becomes independent after insertion; a synced pattern or shared template part can affect several pages. Review the Save panel before confirming shared changes.
Choose the homepage
↑ Back to top- Publish the page you want to use as your homepage.
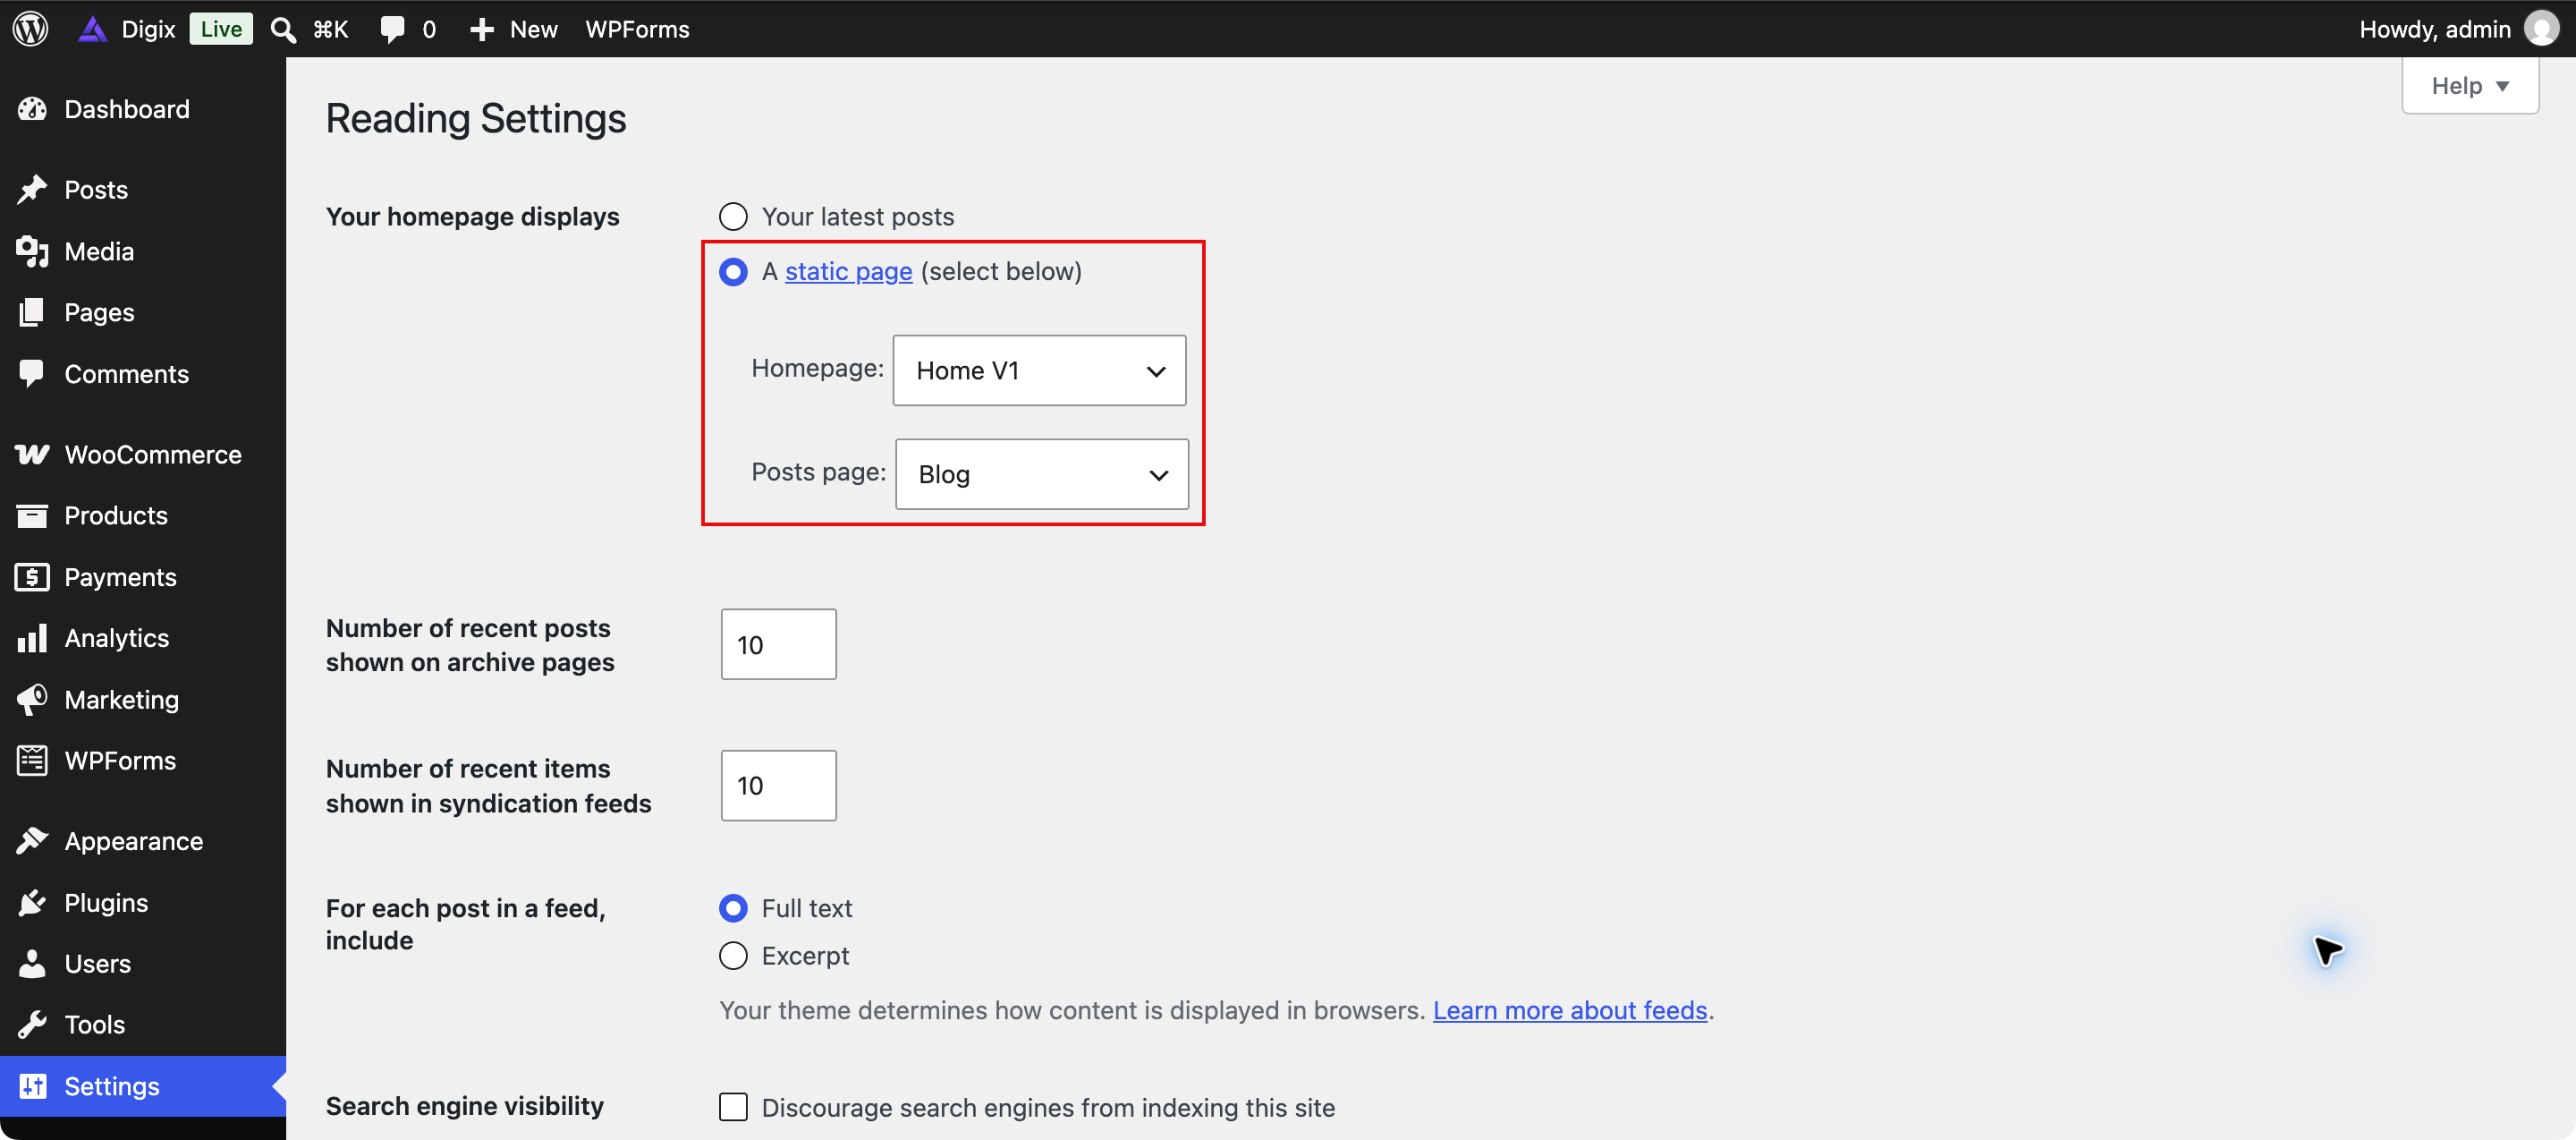
- Go to Settings → Reading.
- Under Your homepage displays, choose A static page.
- Select your page in the Homepage field. After demo import, this may be Home V1 or Home V2.
- Select Save Changes and open the site’s main URL to check the result.
Edit Home V1 or Home V2
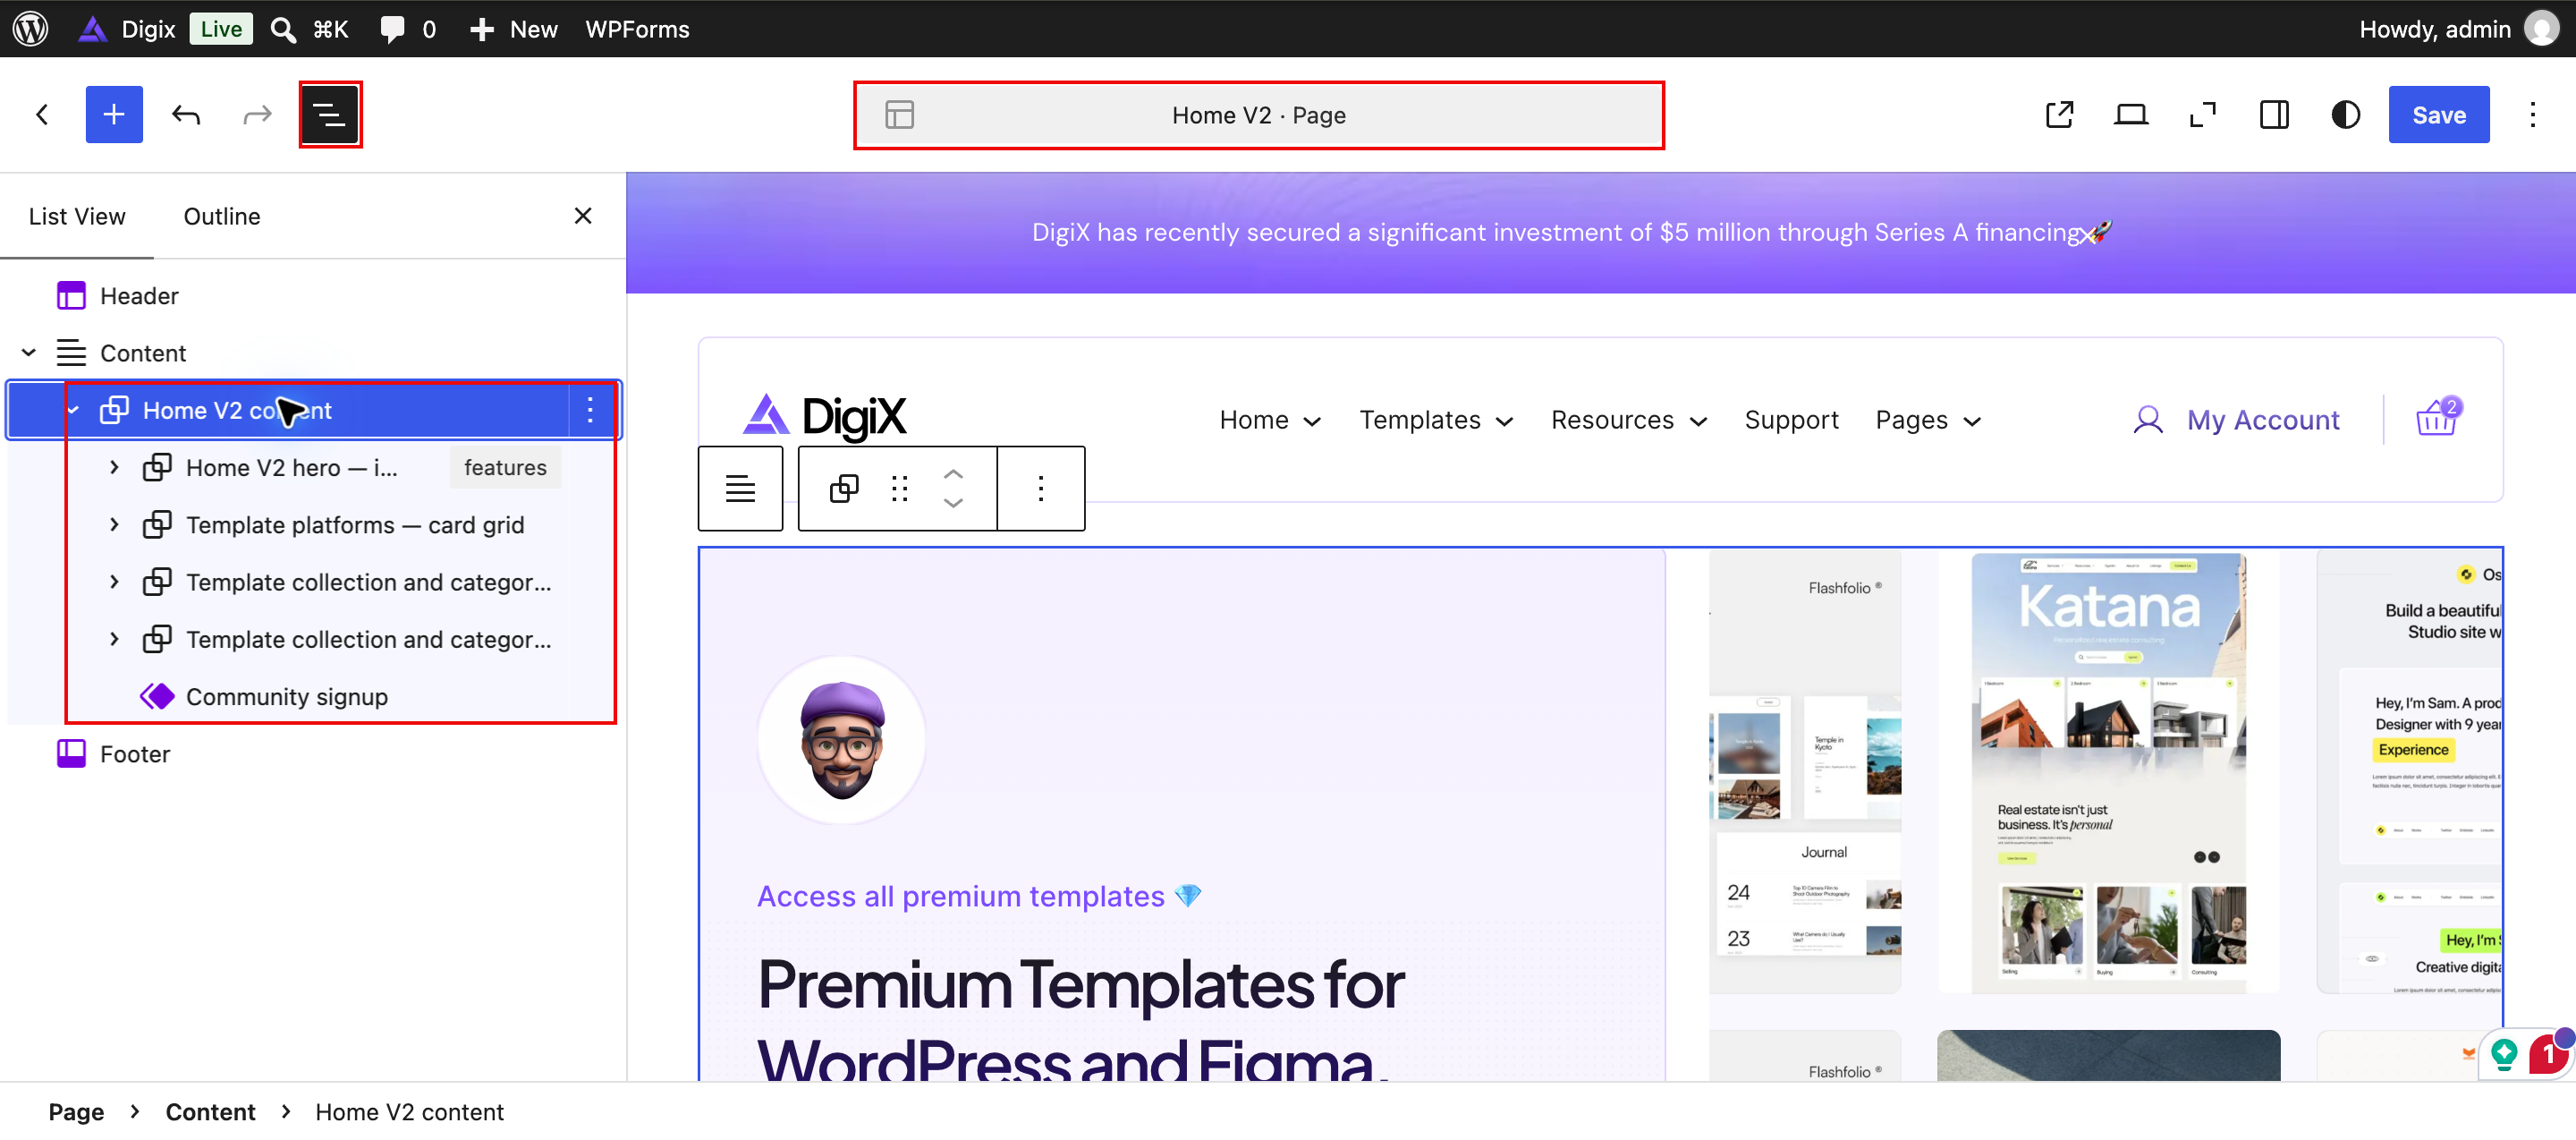
↑ Back to top- Open your homepage under Pages and select Edit.
- Open List View and expand the page content to locate the hero, product collections, category cards, or community section.
- Select the text, image, or button you want to change. Replace example content and check each link.
- Preview and save the page. Editing a page does not automatically make it the homepage; use Settings → Reading for that assignment.
Create a blog
↑ Back to top- Create and publish a page named Blog.
- In Settings → Reading, select it as the Posts page and save.
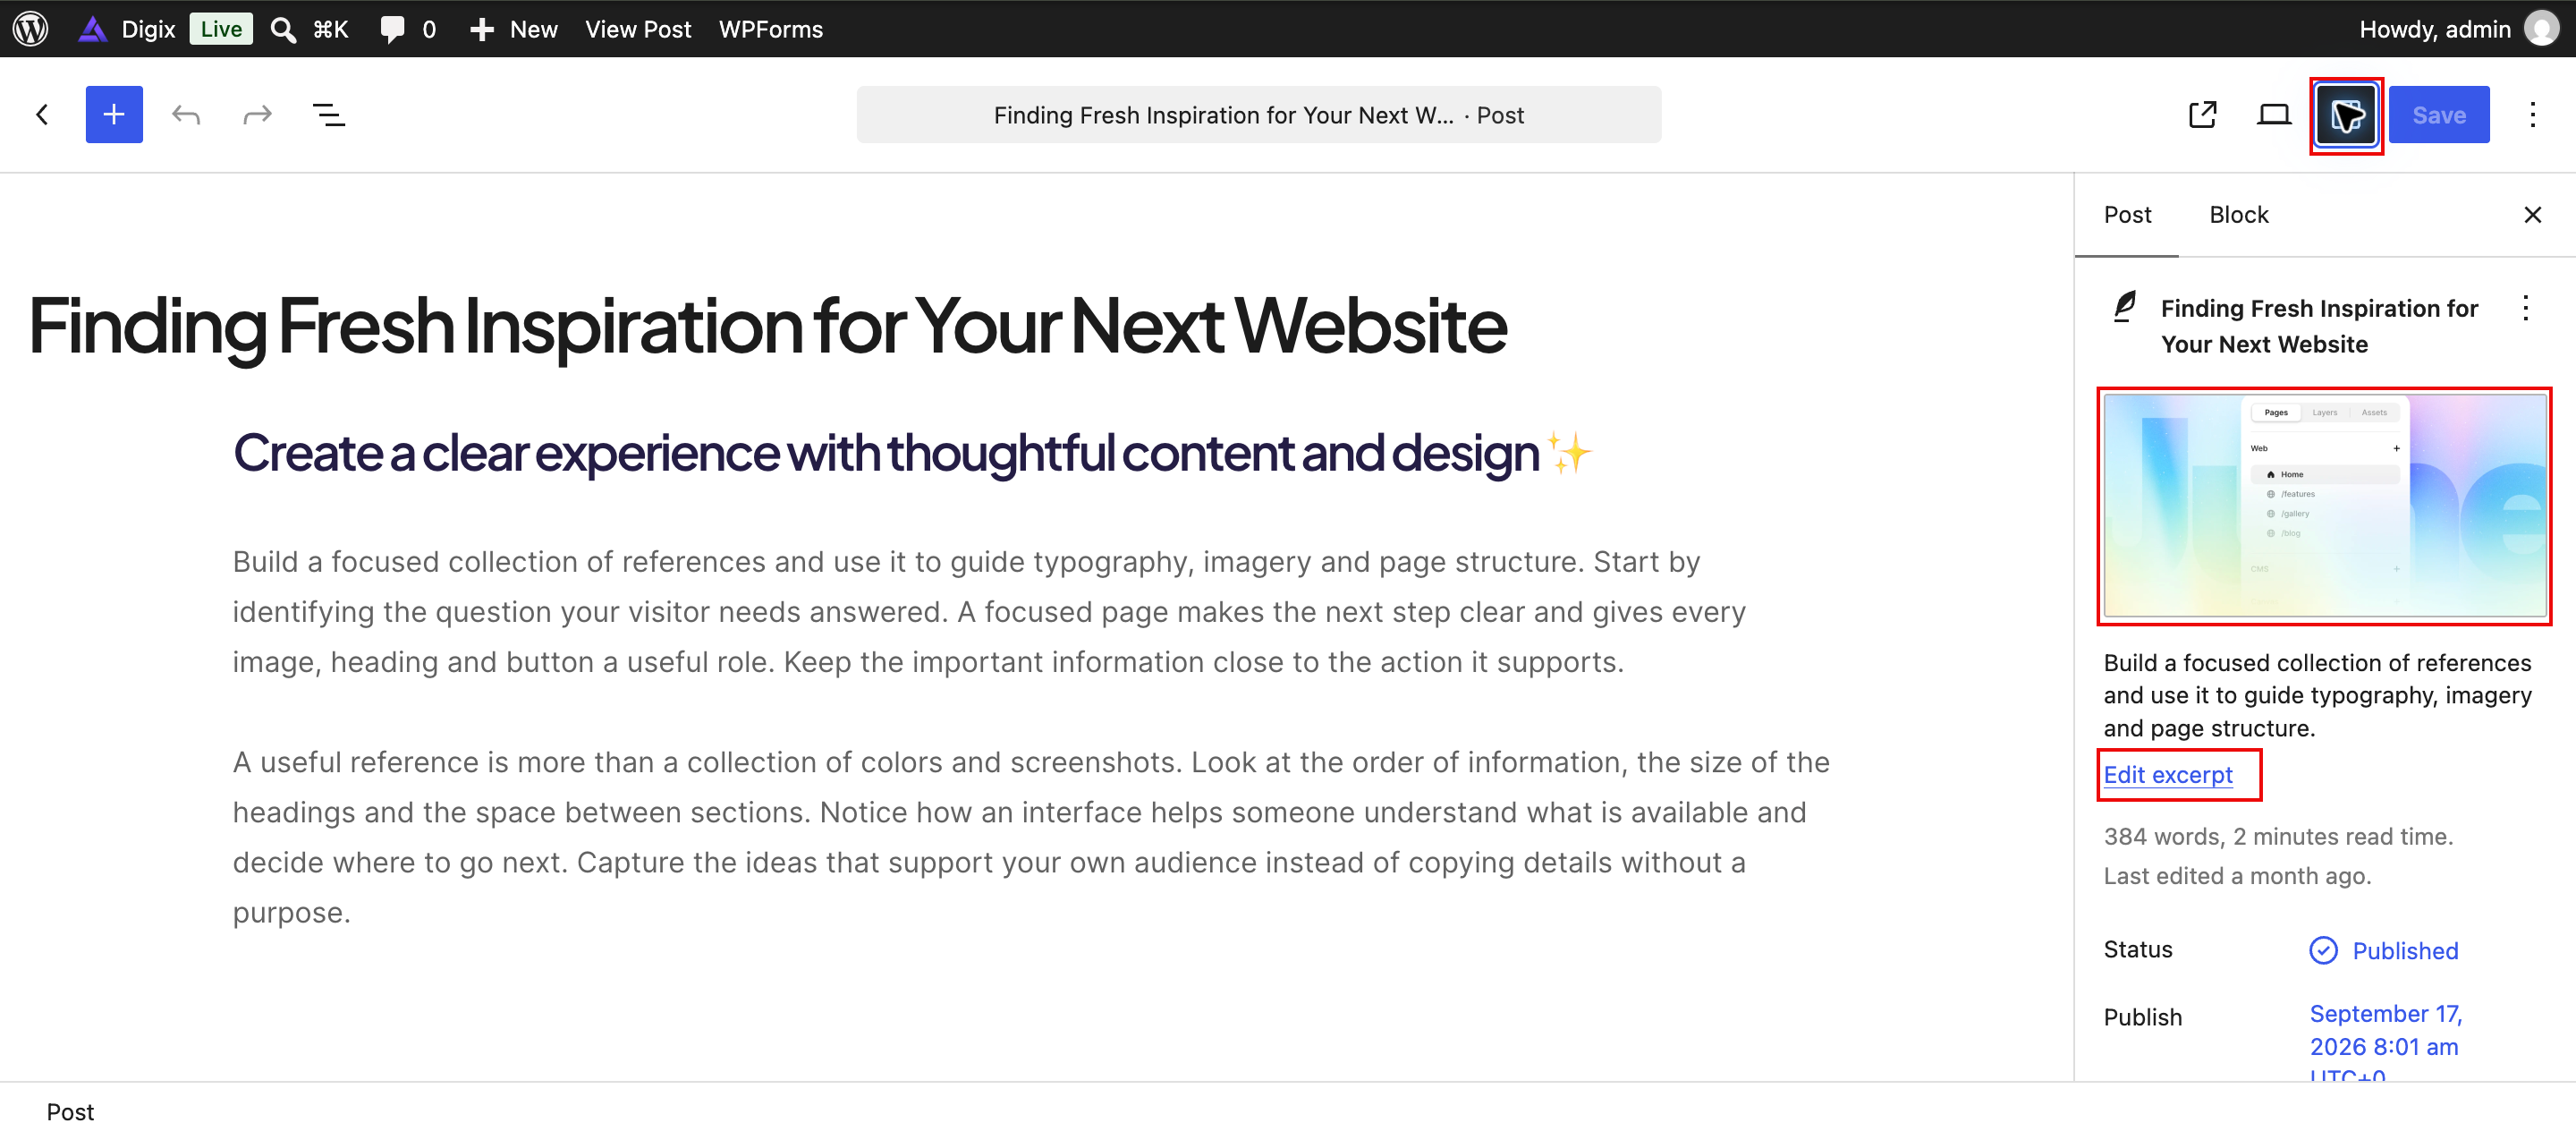
- Add articles under Posts → Add New. Enter the article content, categories, excerpt, and a featured image where appropriate.
The assigned posts page displays the blog index. Edit individual articles under Posts; edit the shared blog layout through the relevant Site Editor template.
Open an article under Posts. Edit its title and body, then use the post settings to set a Featured image and Excerpt. The excerpt supplies a concise introduction where the layout displays it. Save and check both the article and its blog card.
Contact, FAQ, and support pages
↑ Back to topCreate a page and insert the relevant DigiX patterns, or edit the imported page. Replace all example questions, answers, addresses, and links. A form layout needs a configured form plugin; see Forms and newsletter signup below.
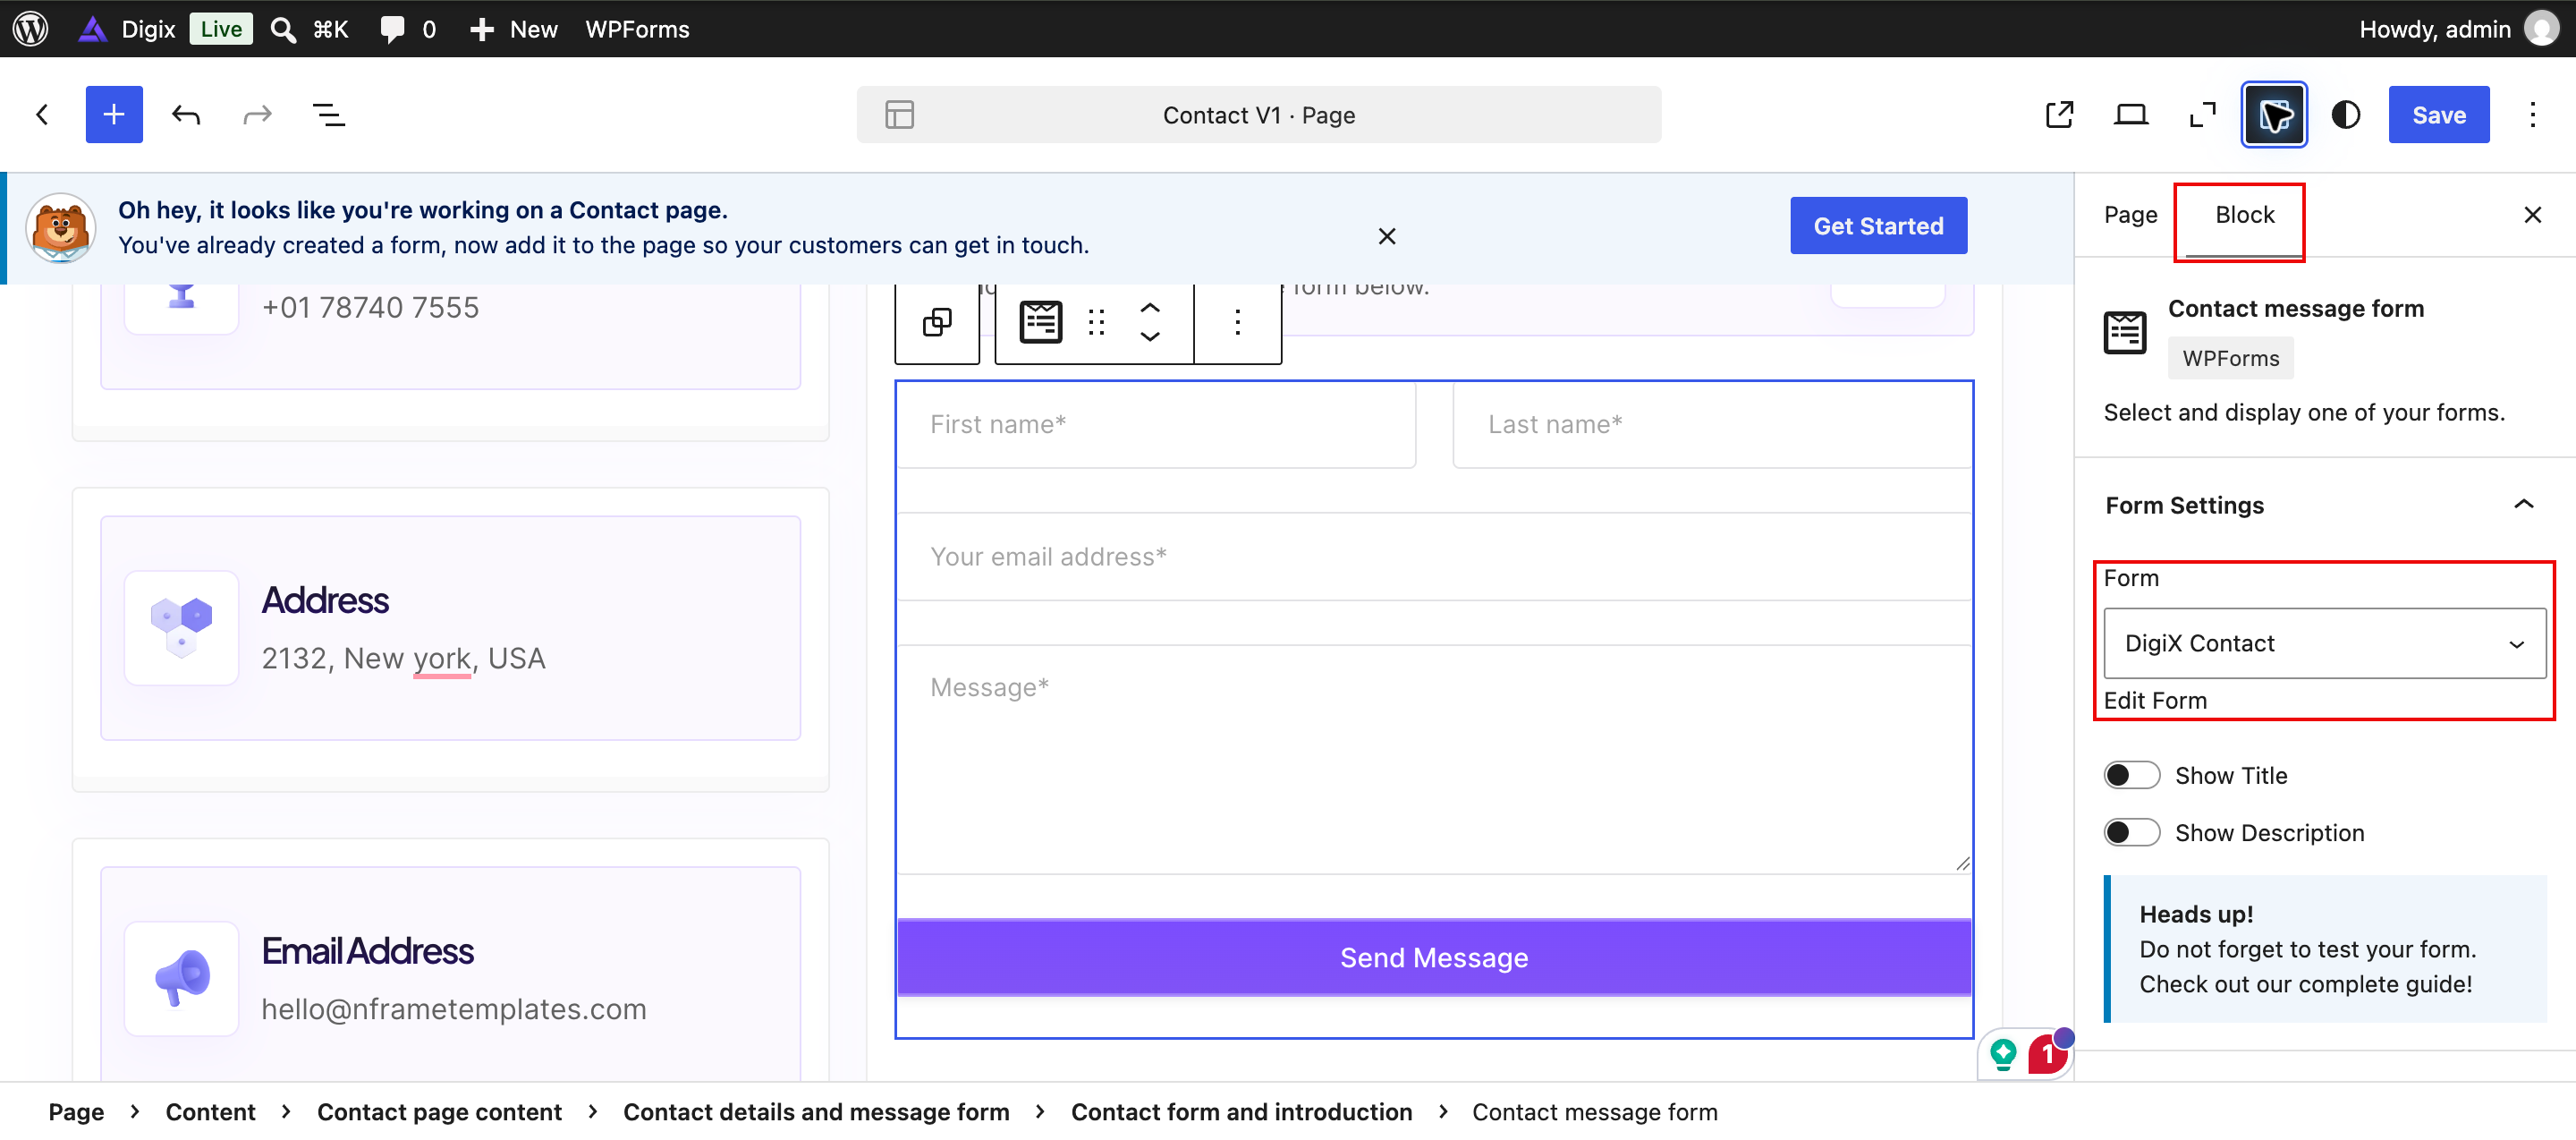
For a contact page, select the WPForms block and choose the intended form in Form Settings. Use Edit Form to configure its fields and notifications. Update the surrounding contact information separately.
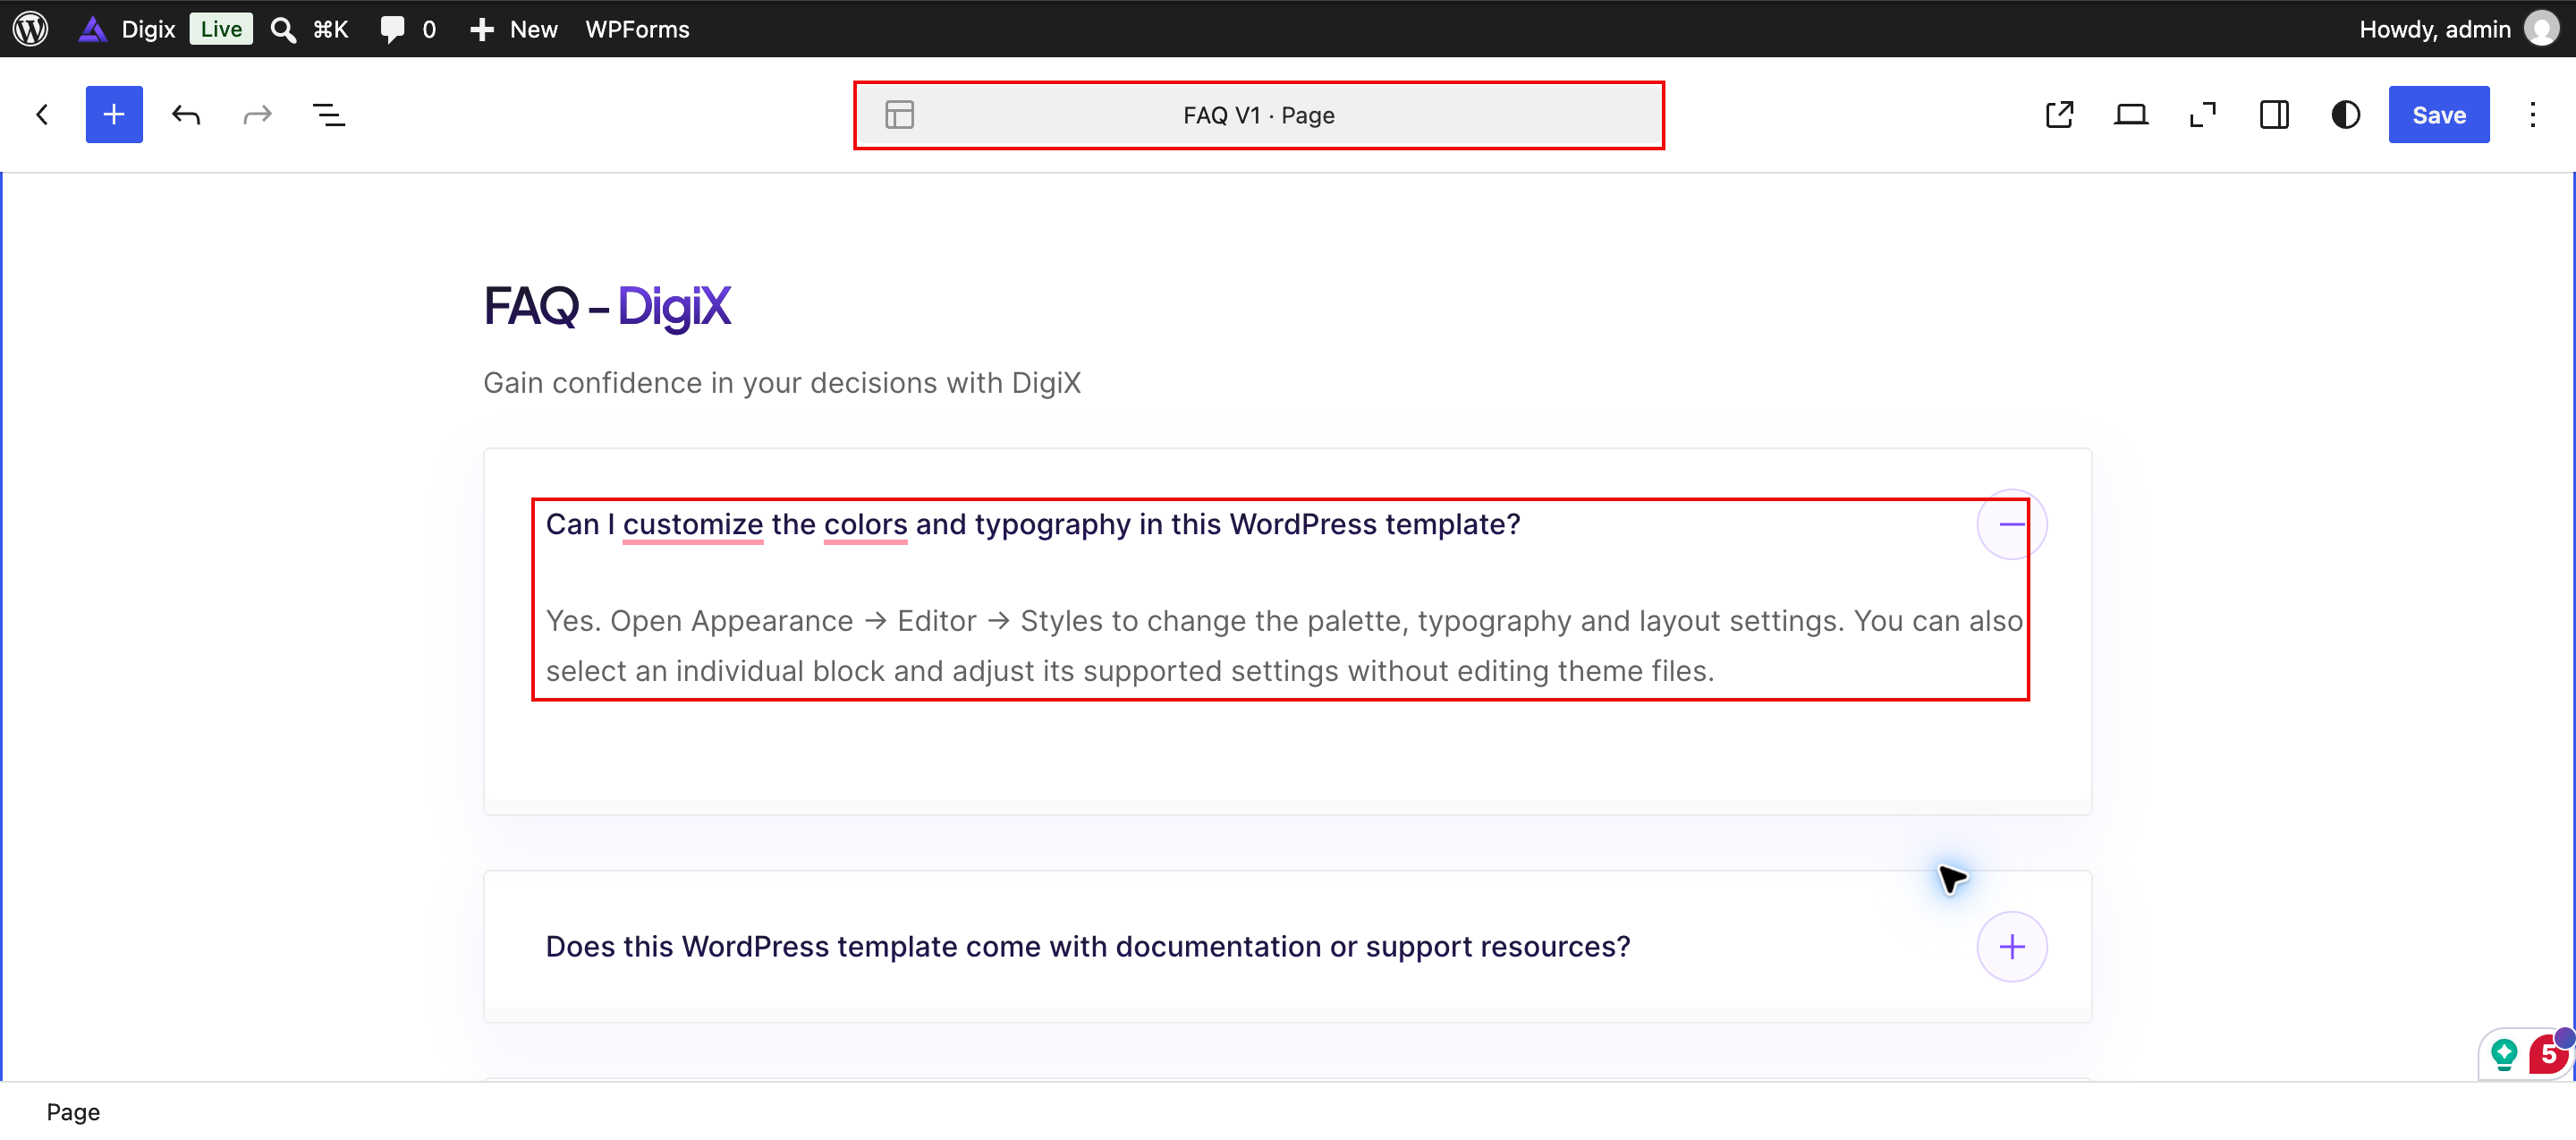
On an FAQ page, select a question and replace its text, then open its answer and update the content. Repeat for each item. Preview the page to check the expand/collapse behavior and keyboard access before saving.
Choose and edit a template
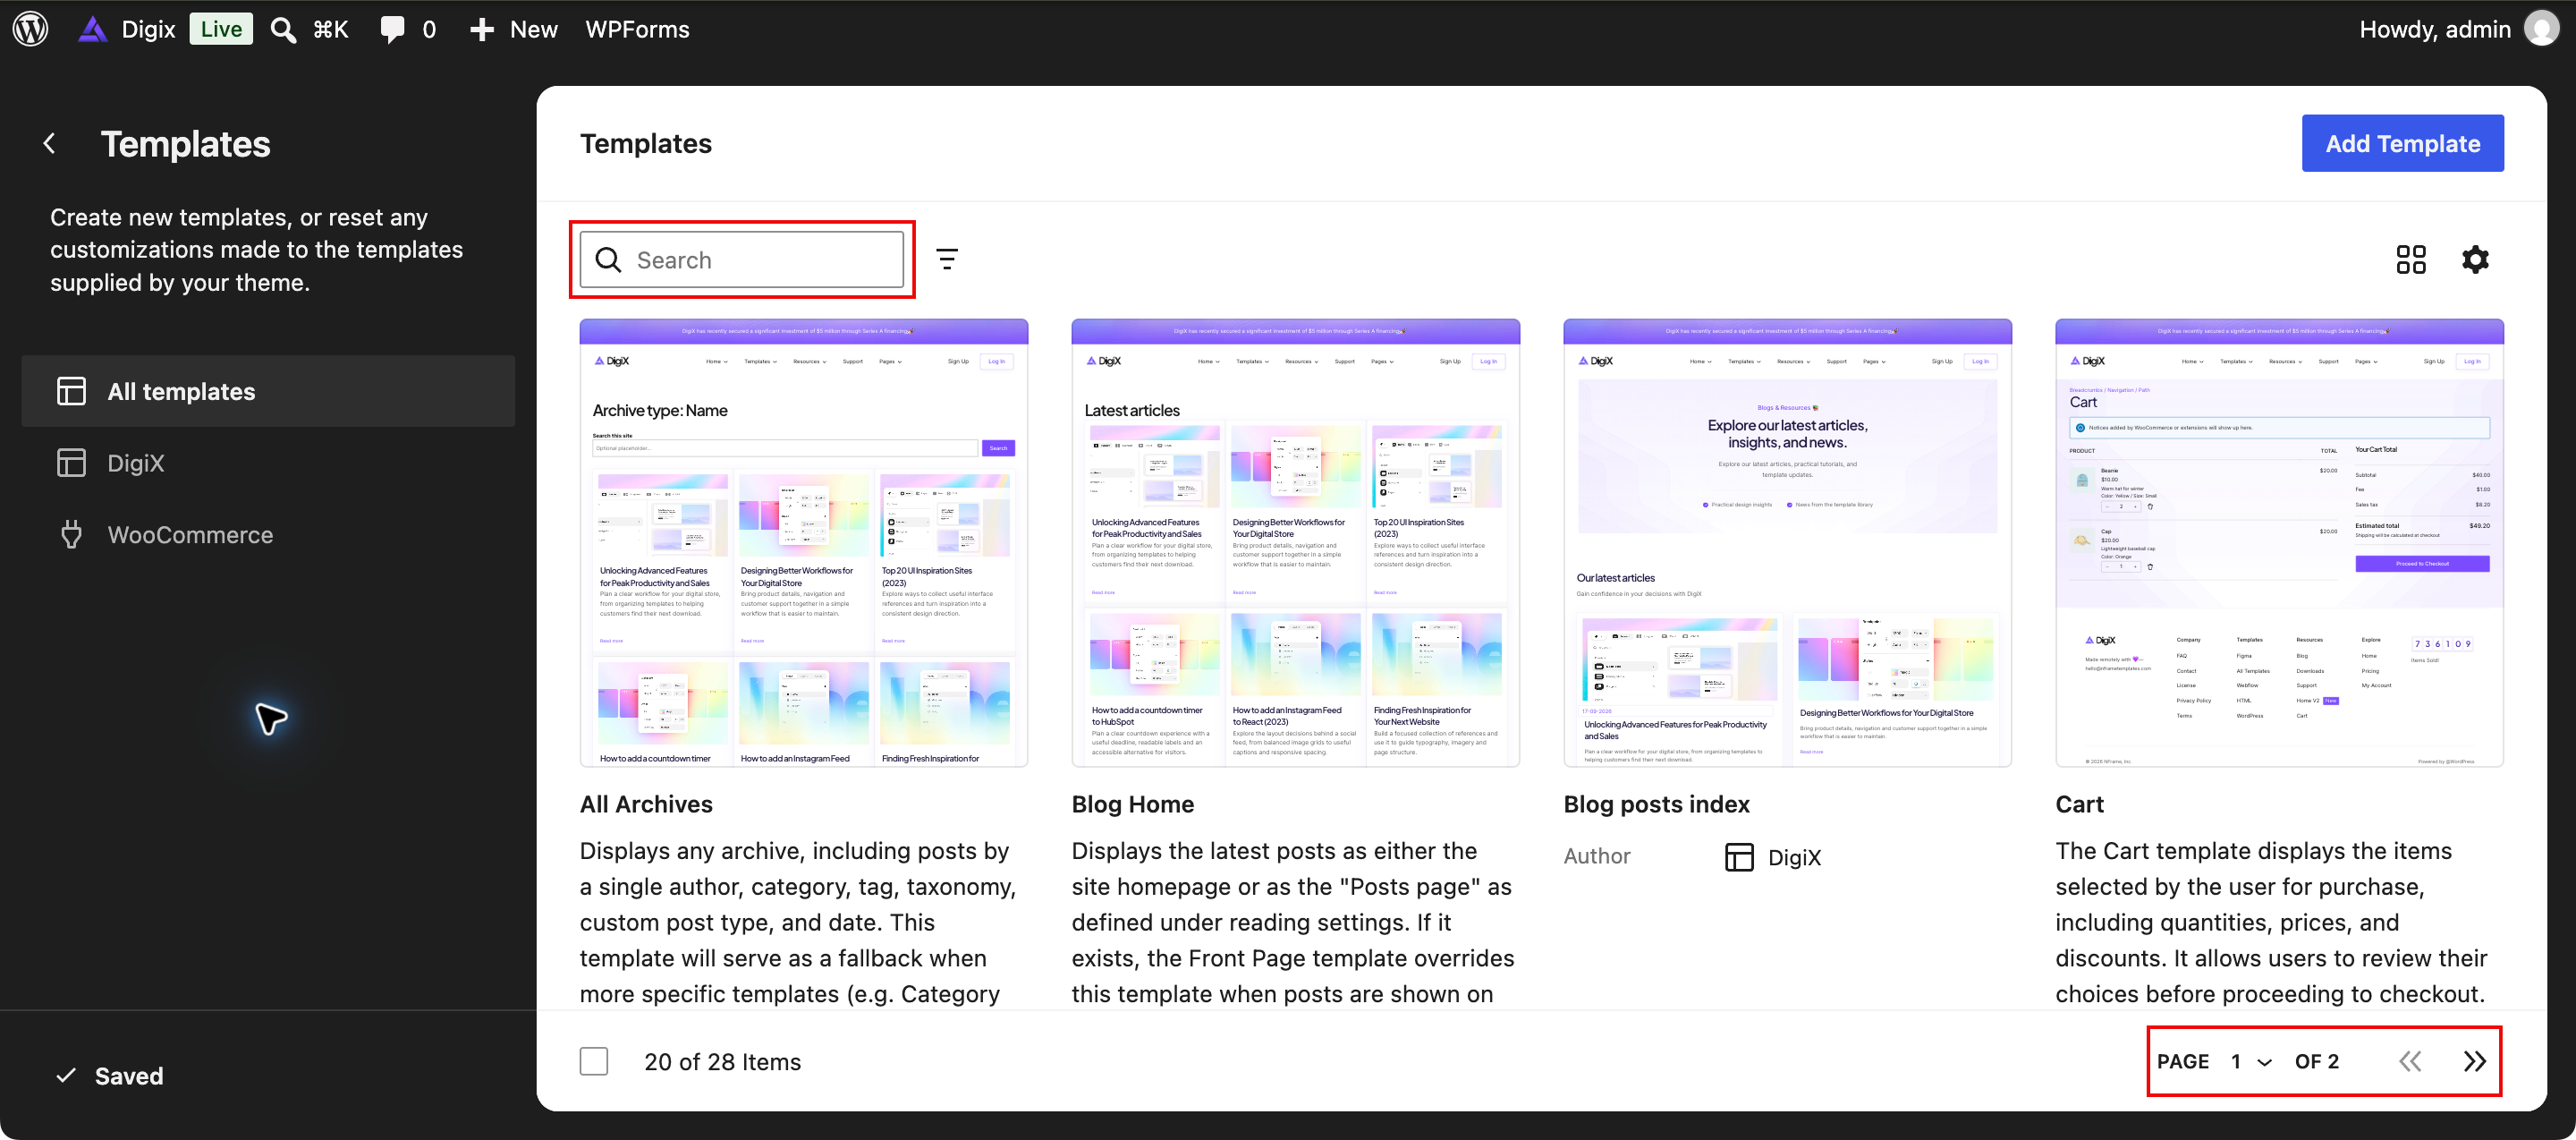
↑ Back to top- Open Appearance → Editor → Templates.
- Use Search to find the layout you need, such as a blog, archive, product, cart, checkout, or 404 template.
- Open the template, use List View to locate a block, and edit the relevant content or settings.
- Review the pages affected by this shared template before saving.
For an individual page, select its template in the page editor’s settings. Page content and the shared template are separate: changing a template can affect every page that uses it.
Edit the 404 page
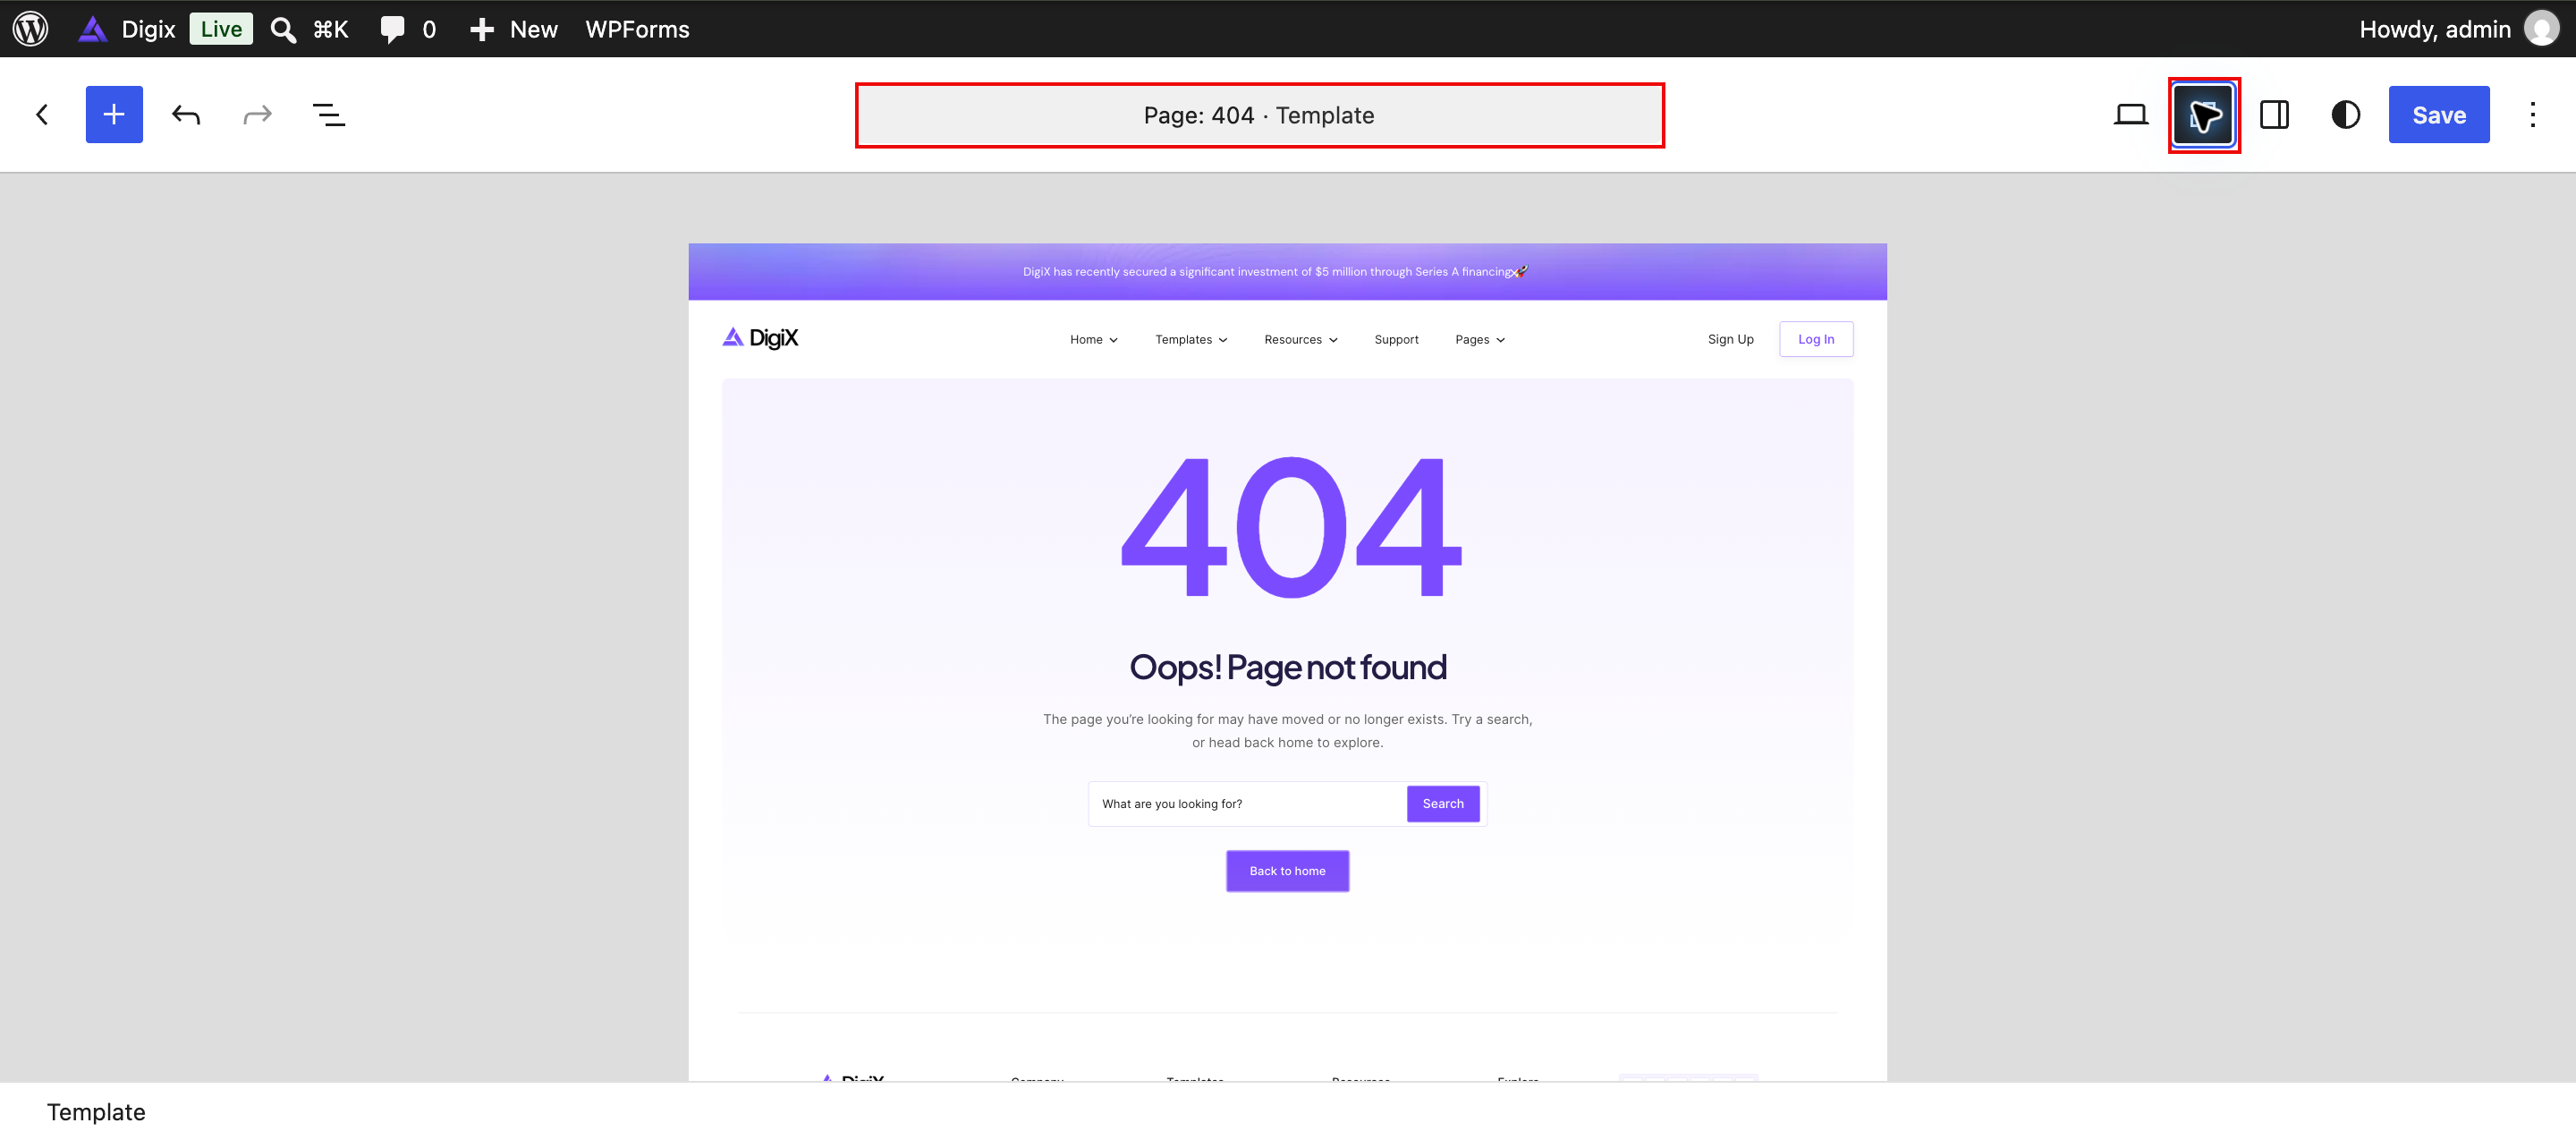
↑ Back to topSearch the template library for 404, open the template, and edit its message, search block, or return-home link. Keep a clear route back to your store. Save and test an address that does not exist on your site.
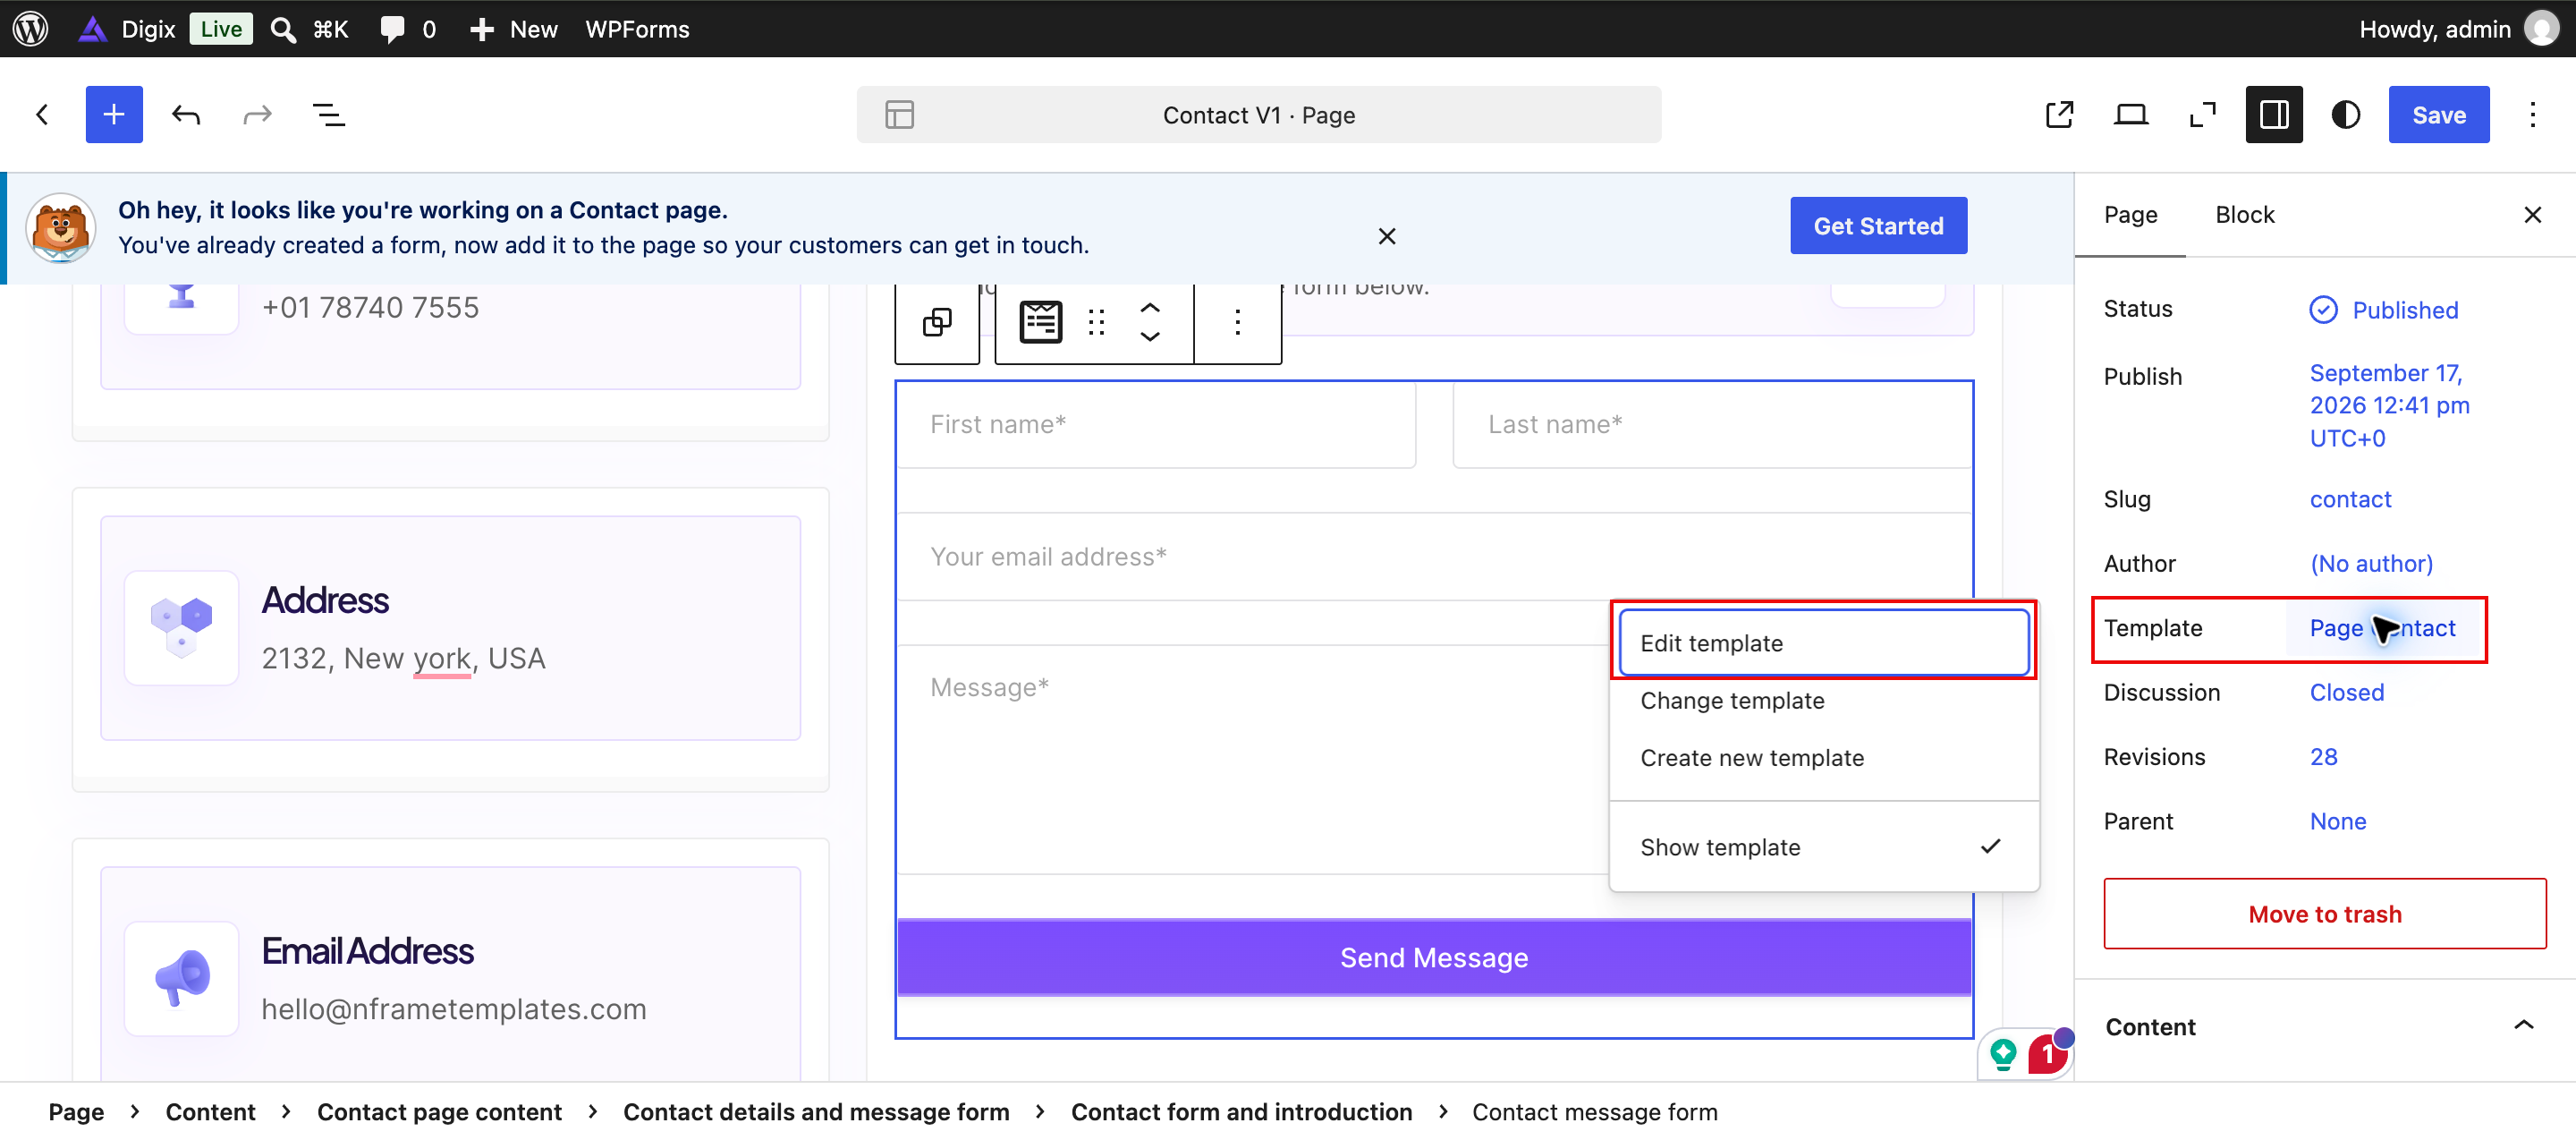
In the page editor, open the Page settings and select Template. WordPress can automatically use a page-specific template; in that case Change template may be unavailable. Use Edit template to change that layout, and review the scope before saving.
Header, footer, and navigation
↑ Back to topChange your logo and header
↑ Back to top- Go to Appearance → Editor → Patterns.
- Open Header under template parts and select the header used by your site.
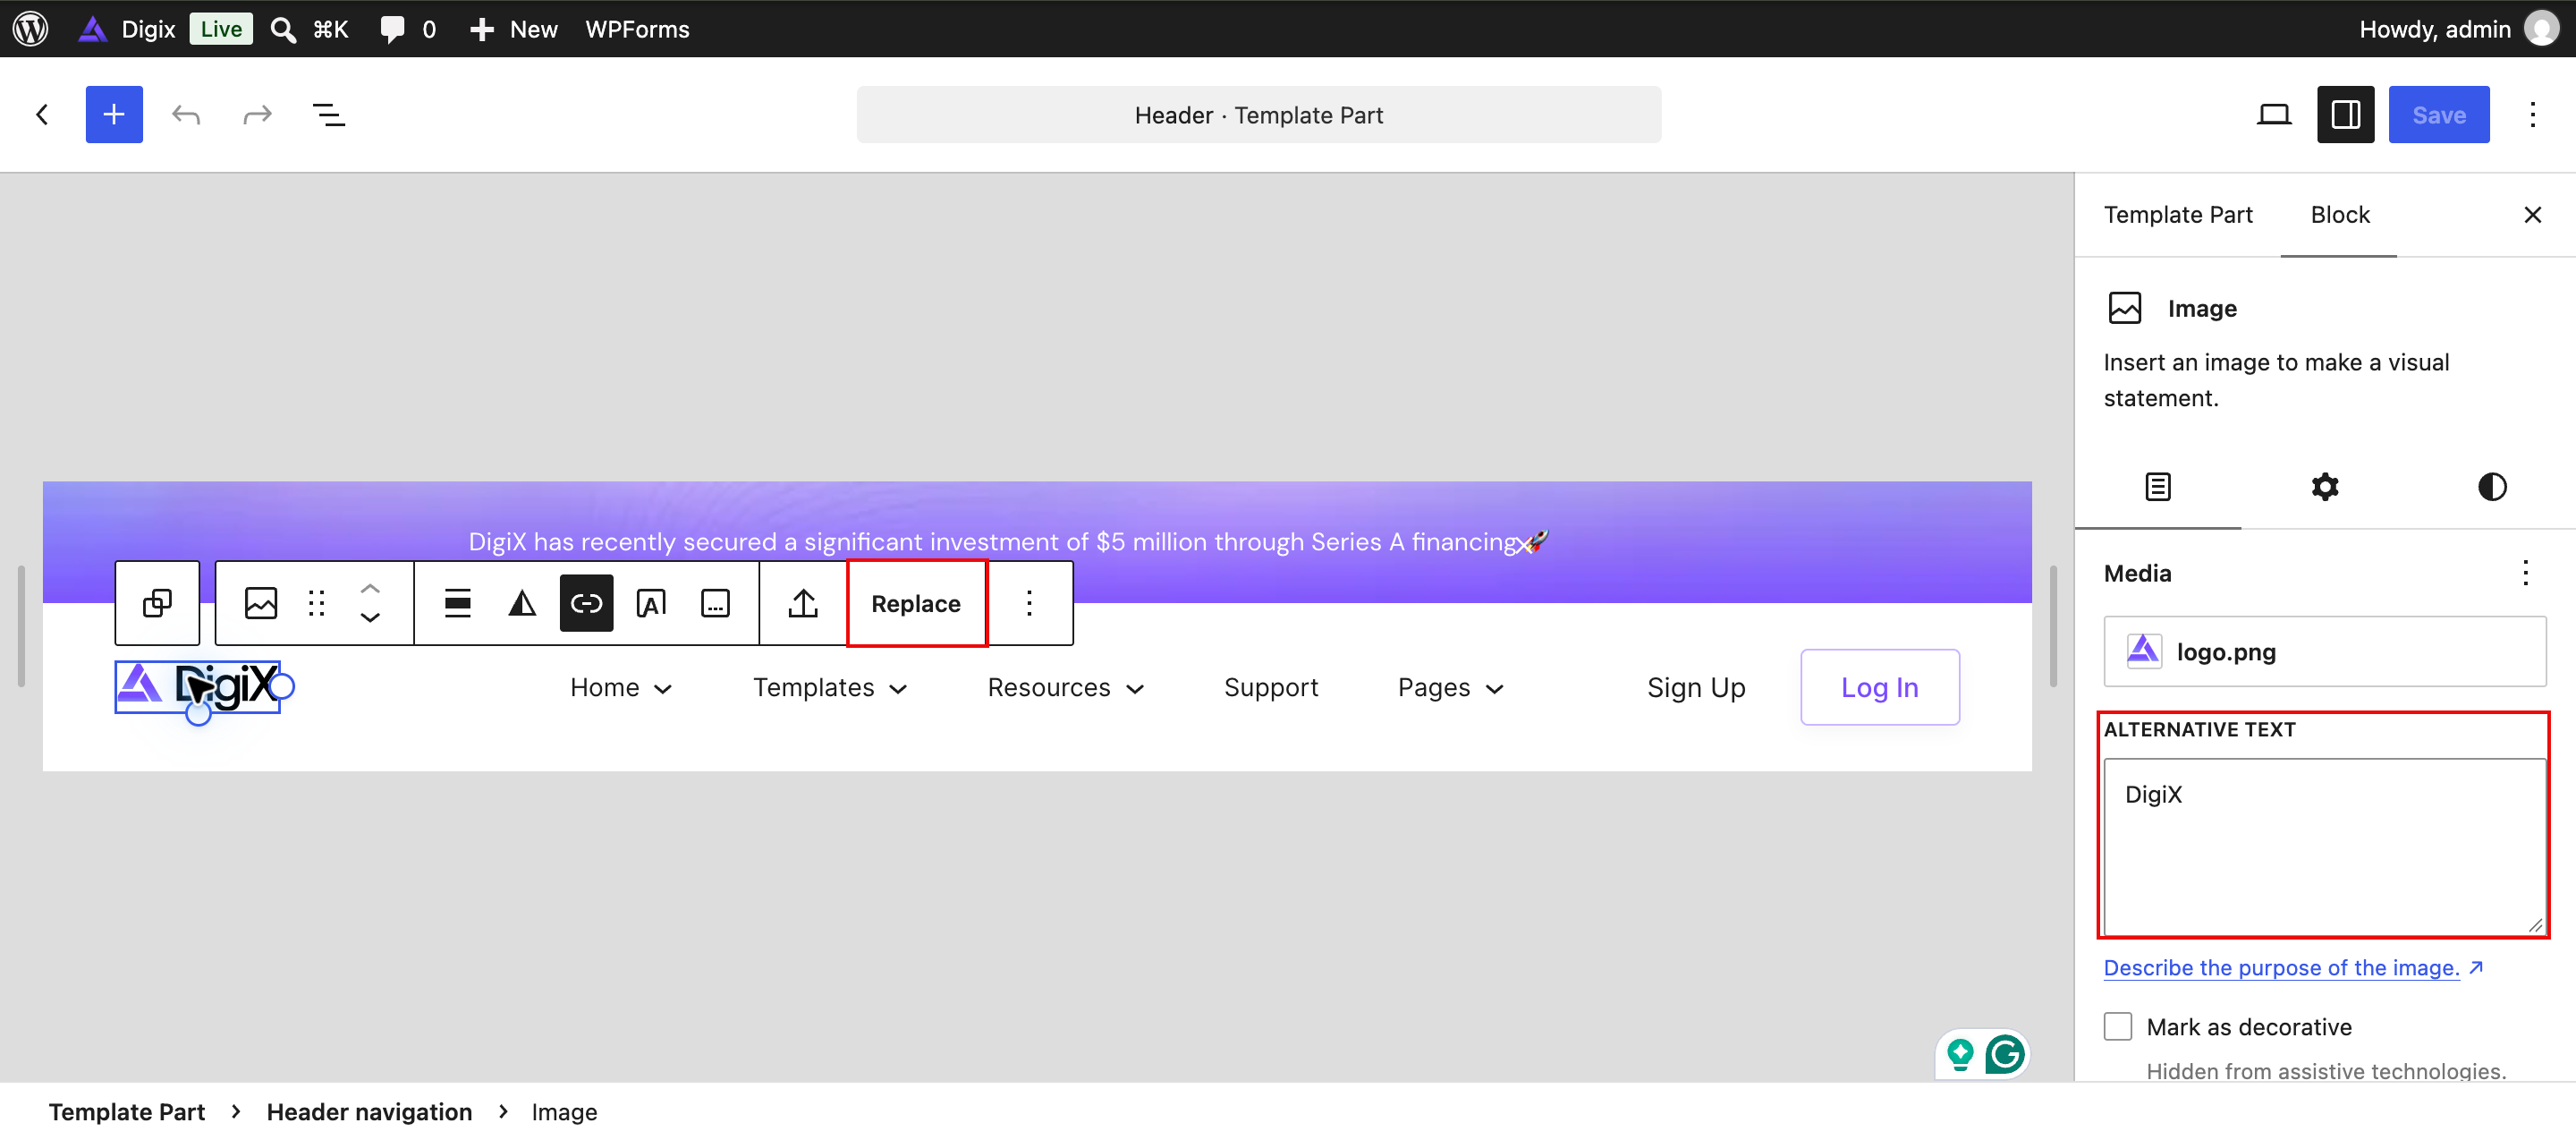
- Select the existing logo Image block and use Replace to choose your logo. If you use a Site Logo block instead, update that block’s image. Check that the logo links to your homepage.
- Edit the header’s text and links where needed. Use List View to find nested blocks.
- Select Save, review the listed changes, and confirm.
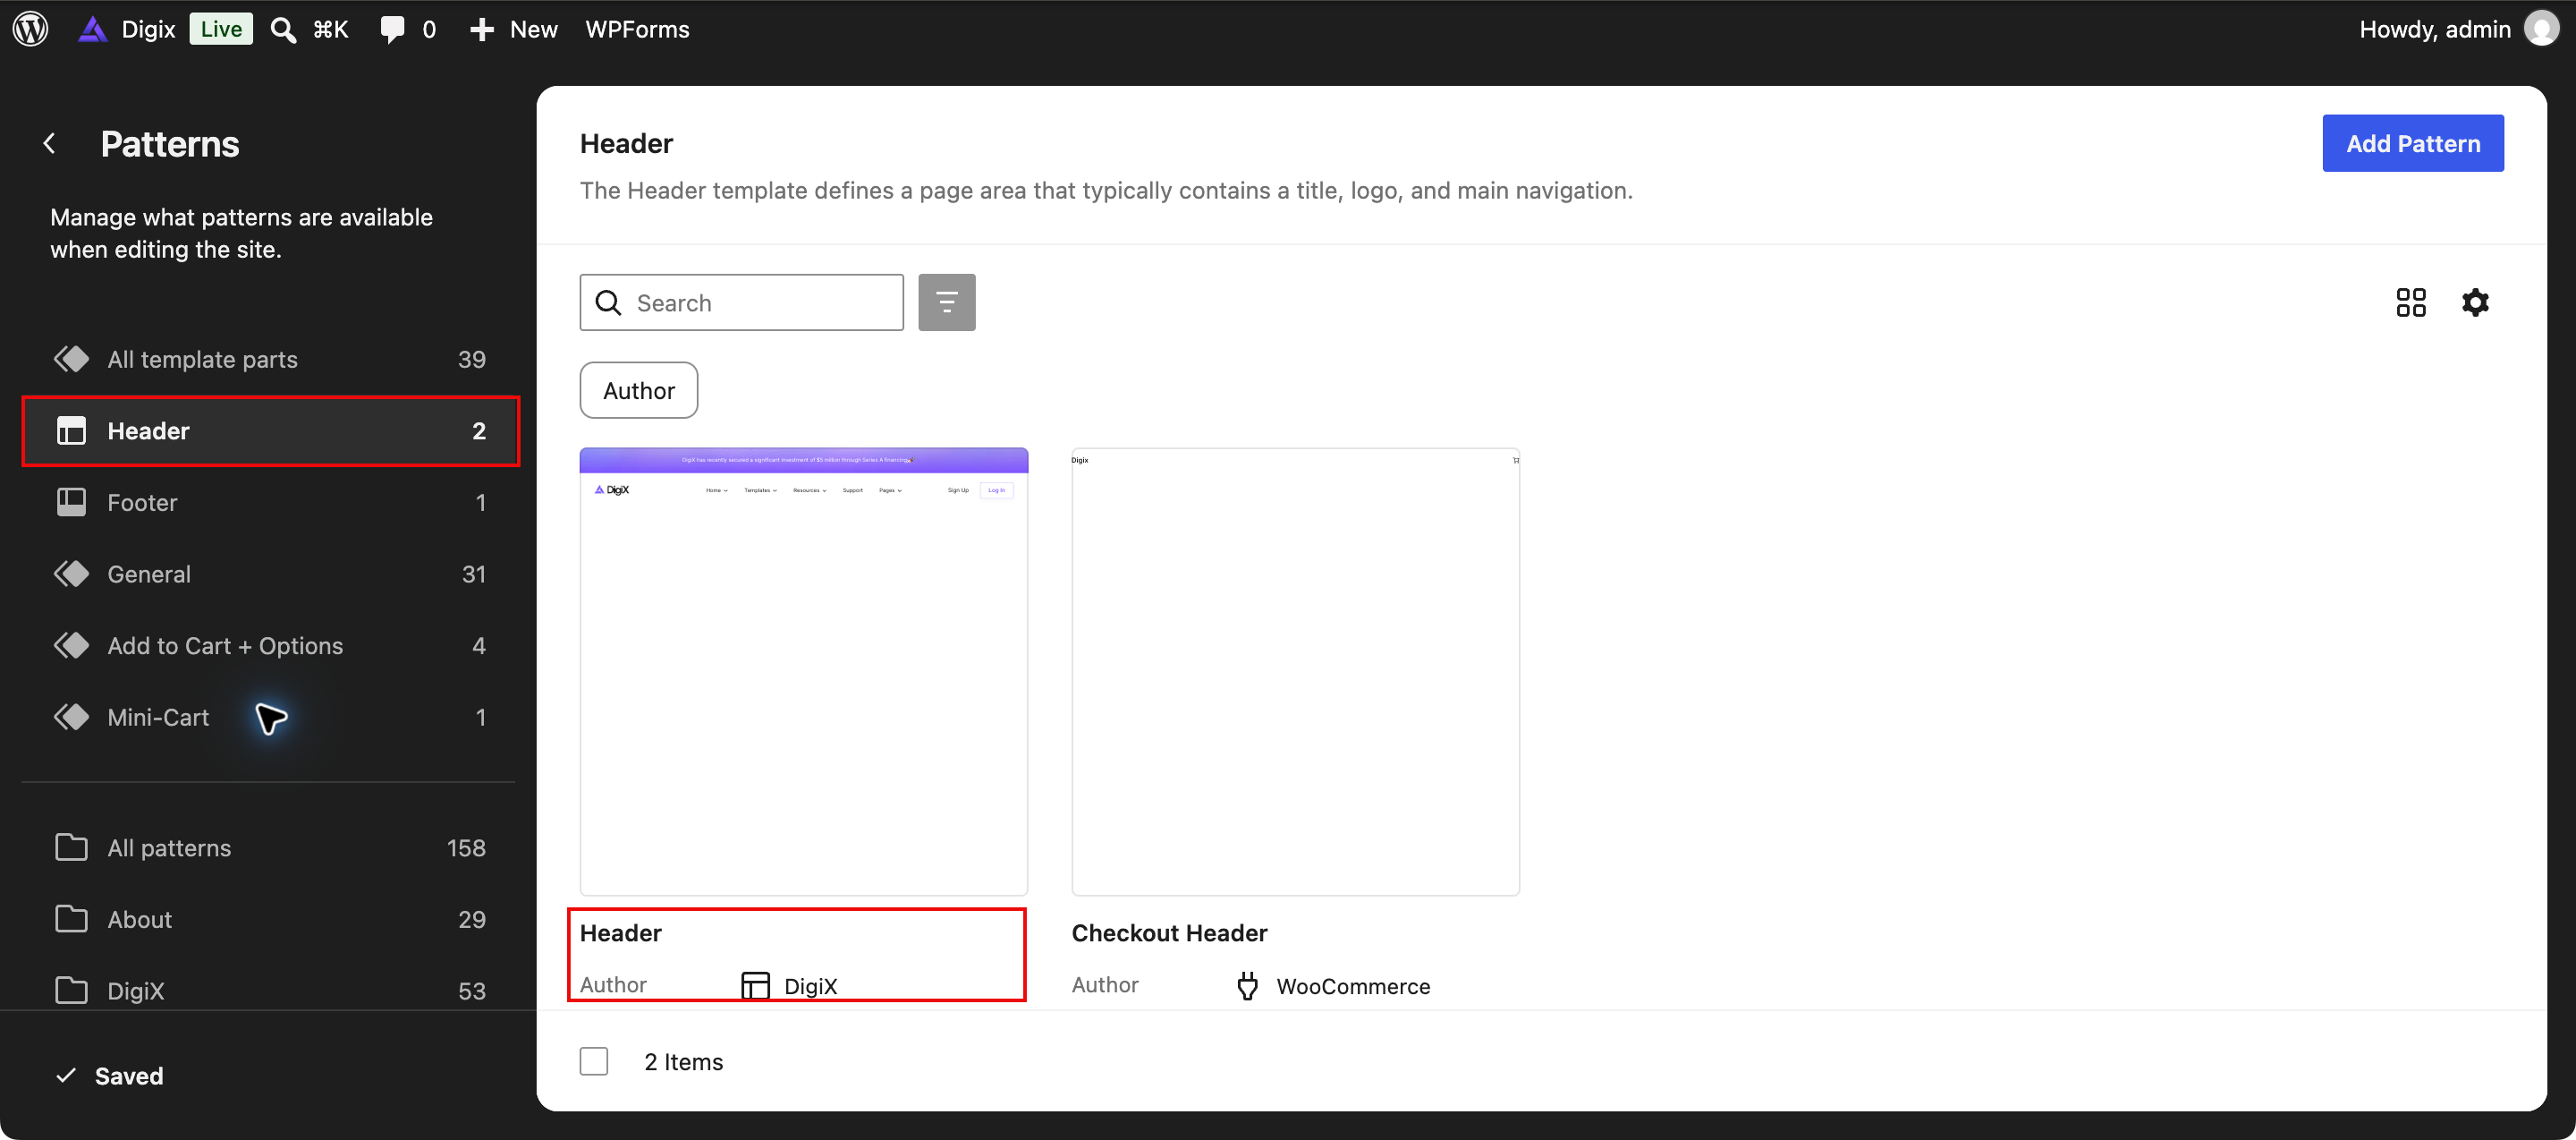
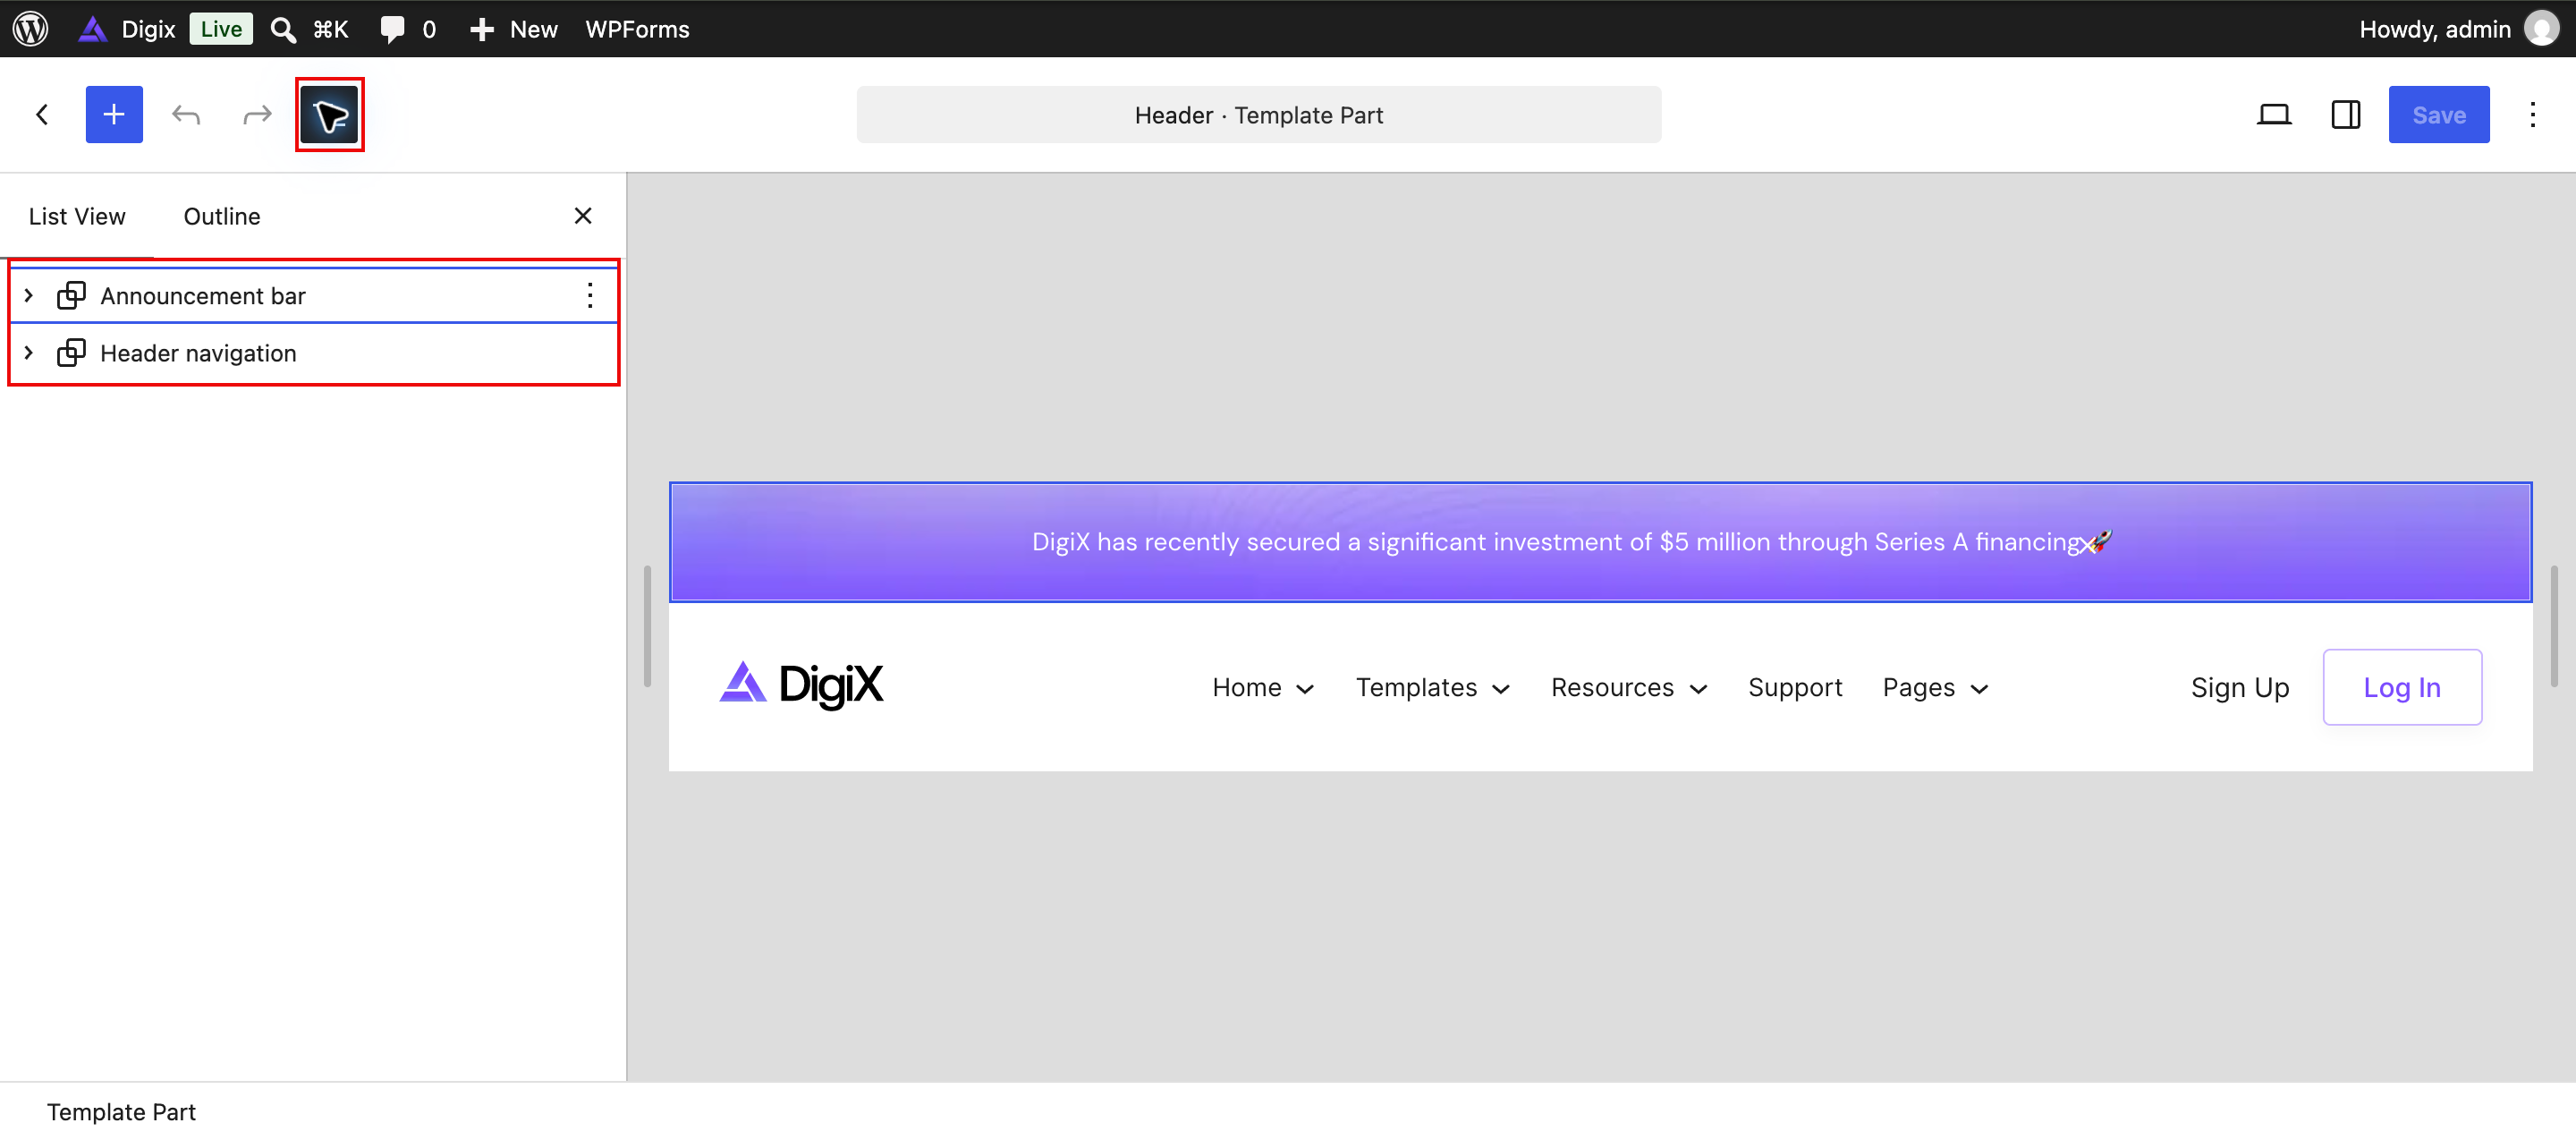
WooCommerce may provide a separate checkout header. Check both your storefront and checkout after changing shared branding.
Select the logo Image block and choose Replace in its toolbar. Set a concise brand name in Alternative text. Use the link control to check the homepage destination, and keep the logo’s proportions when resizing.
Edit the navigation
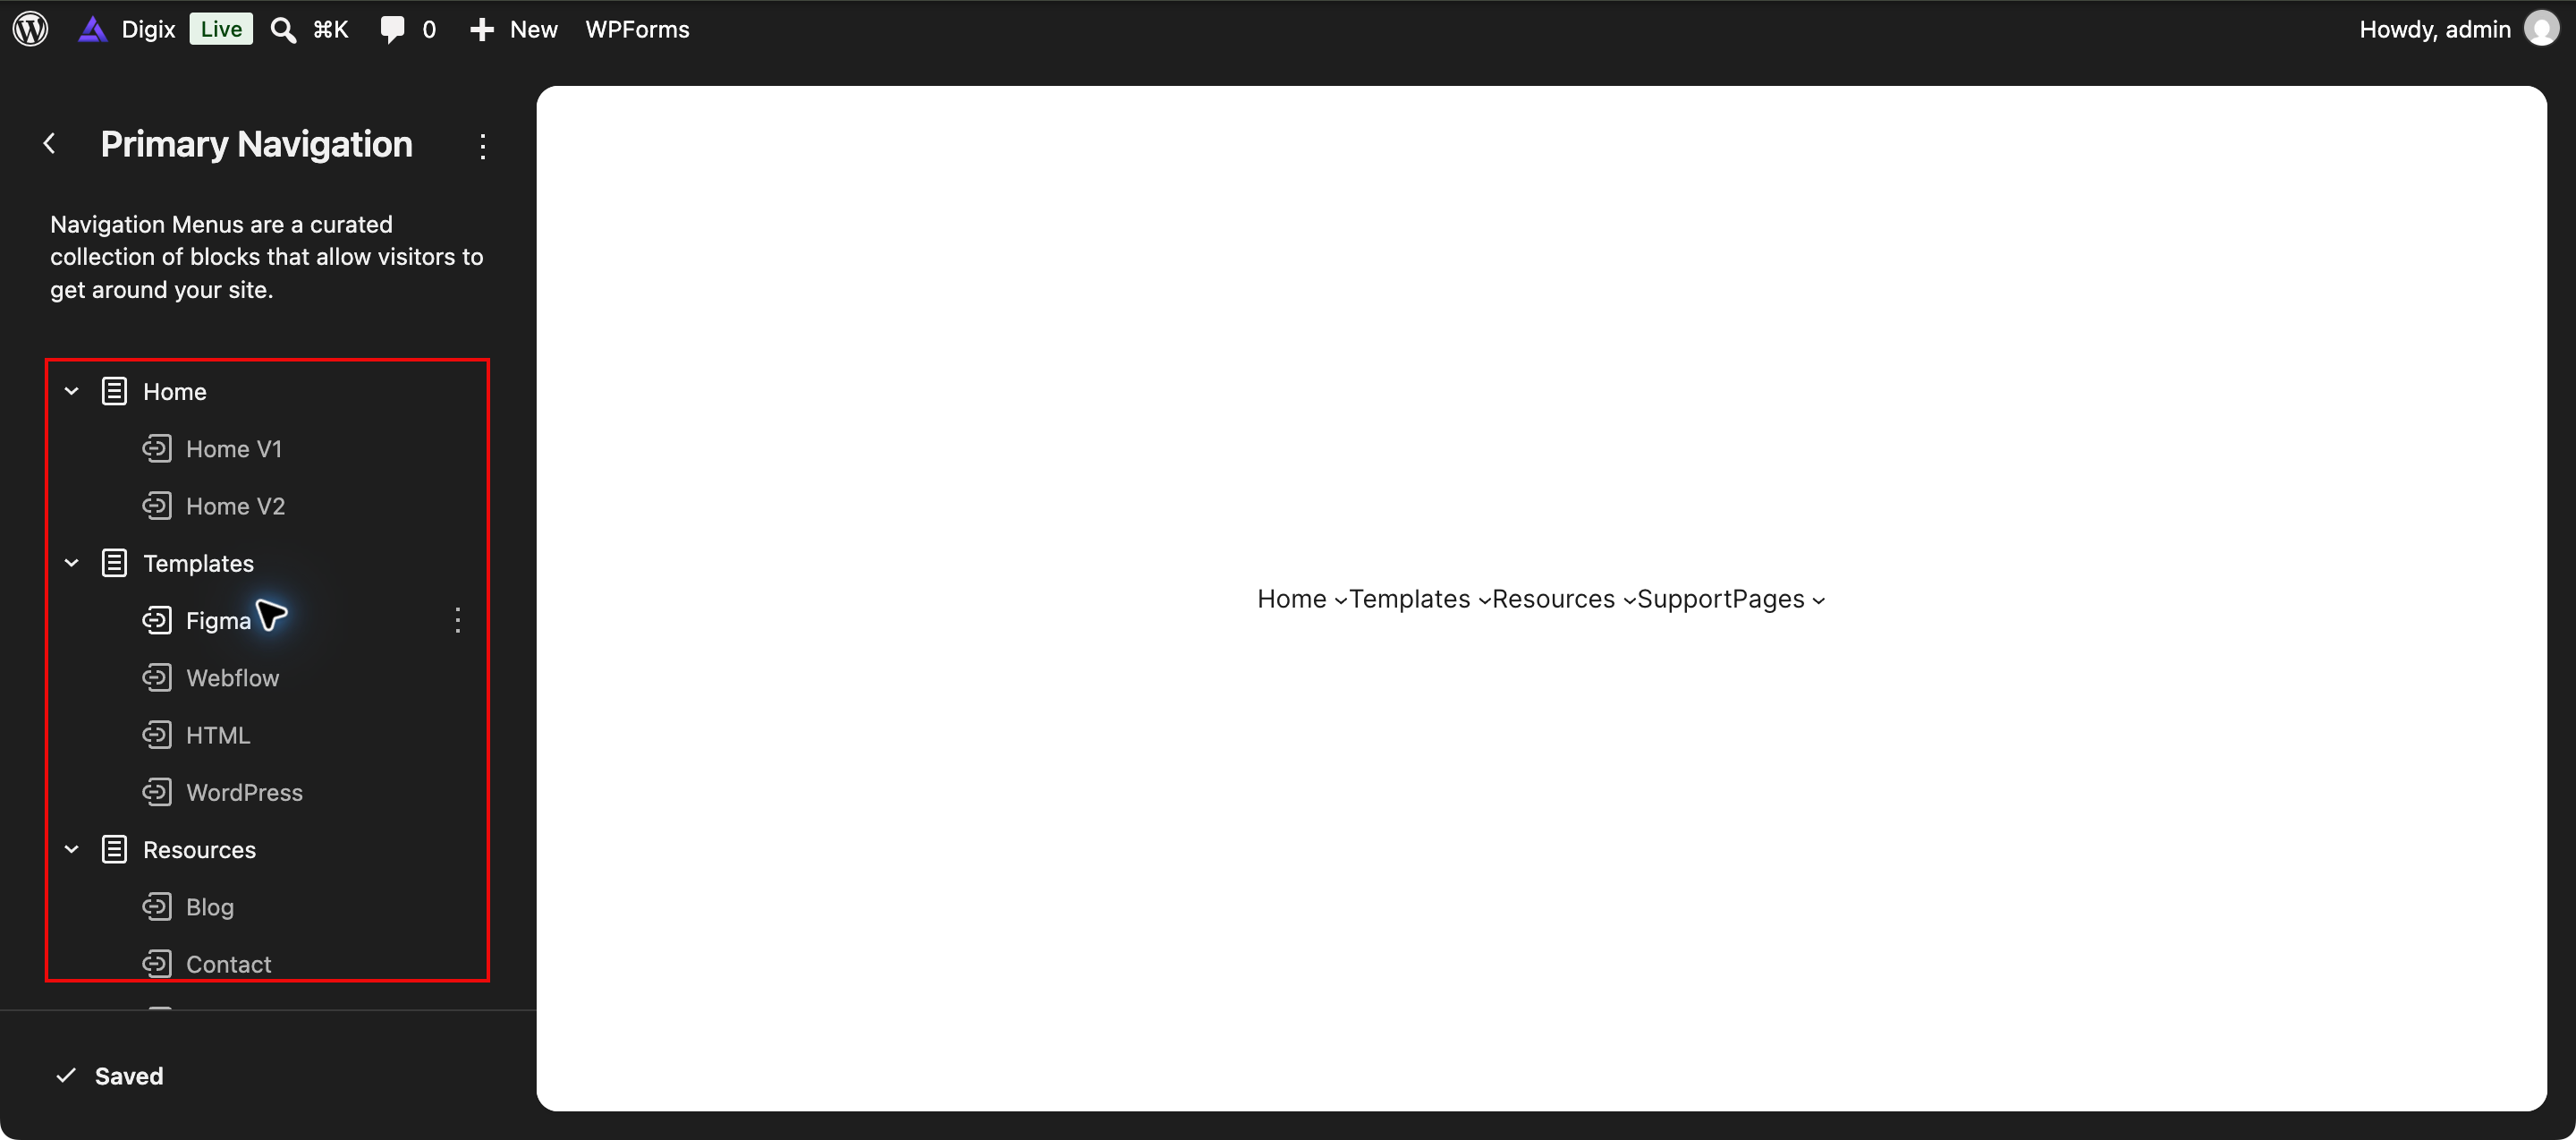
↑ Back to top- Open Appearance → Editor → Navigation and select your menu, or select its Navigation block while editing the header.
- Add or edit page links and custom links. Check each destination URL.
- Reorder links and place submenu items under the correct parent.
- Save your changes and test the menu on desktop and mobile.
Use a menu containing your own published pages. Replace imported links that still point to sample content or another website.
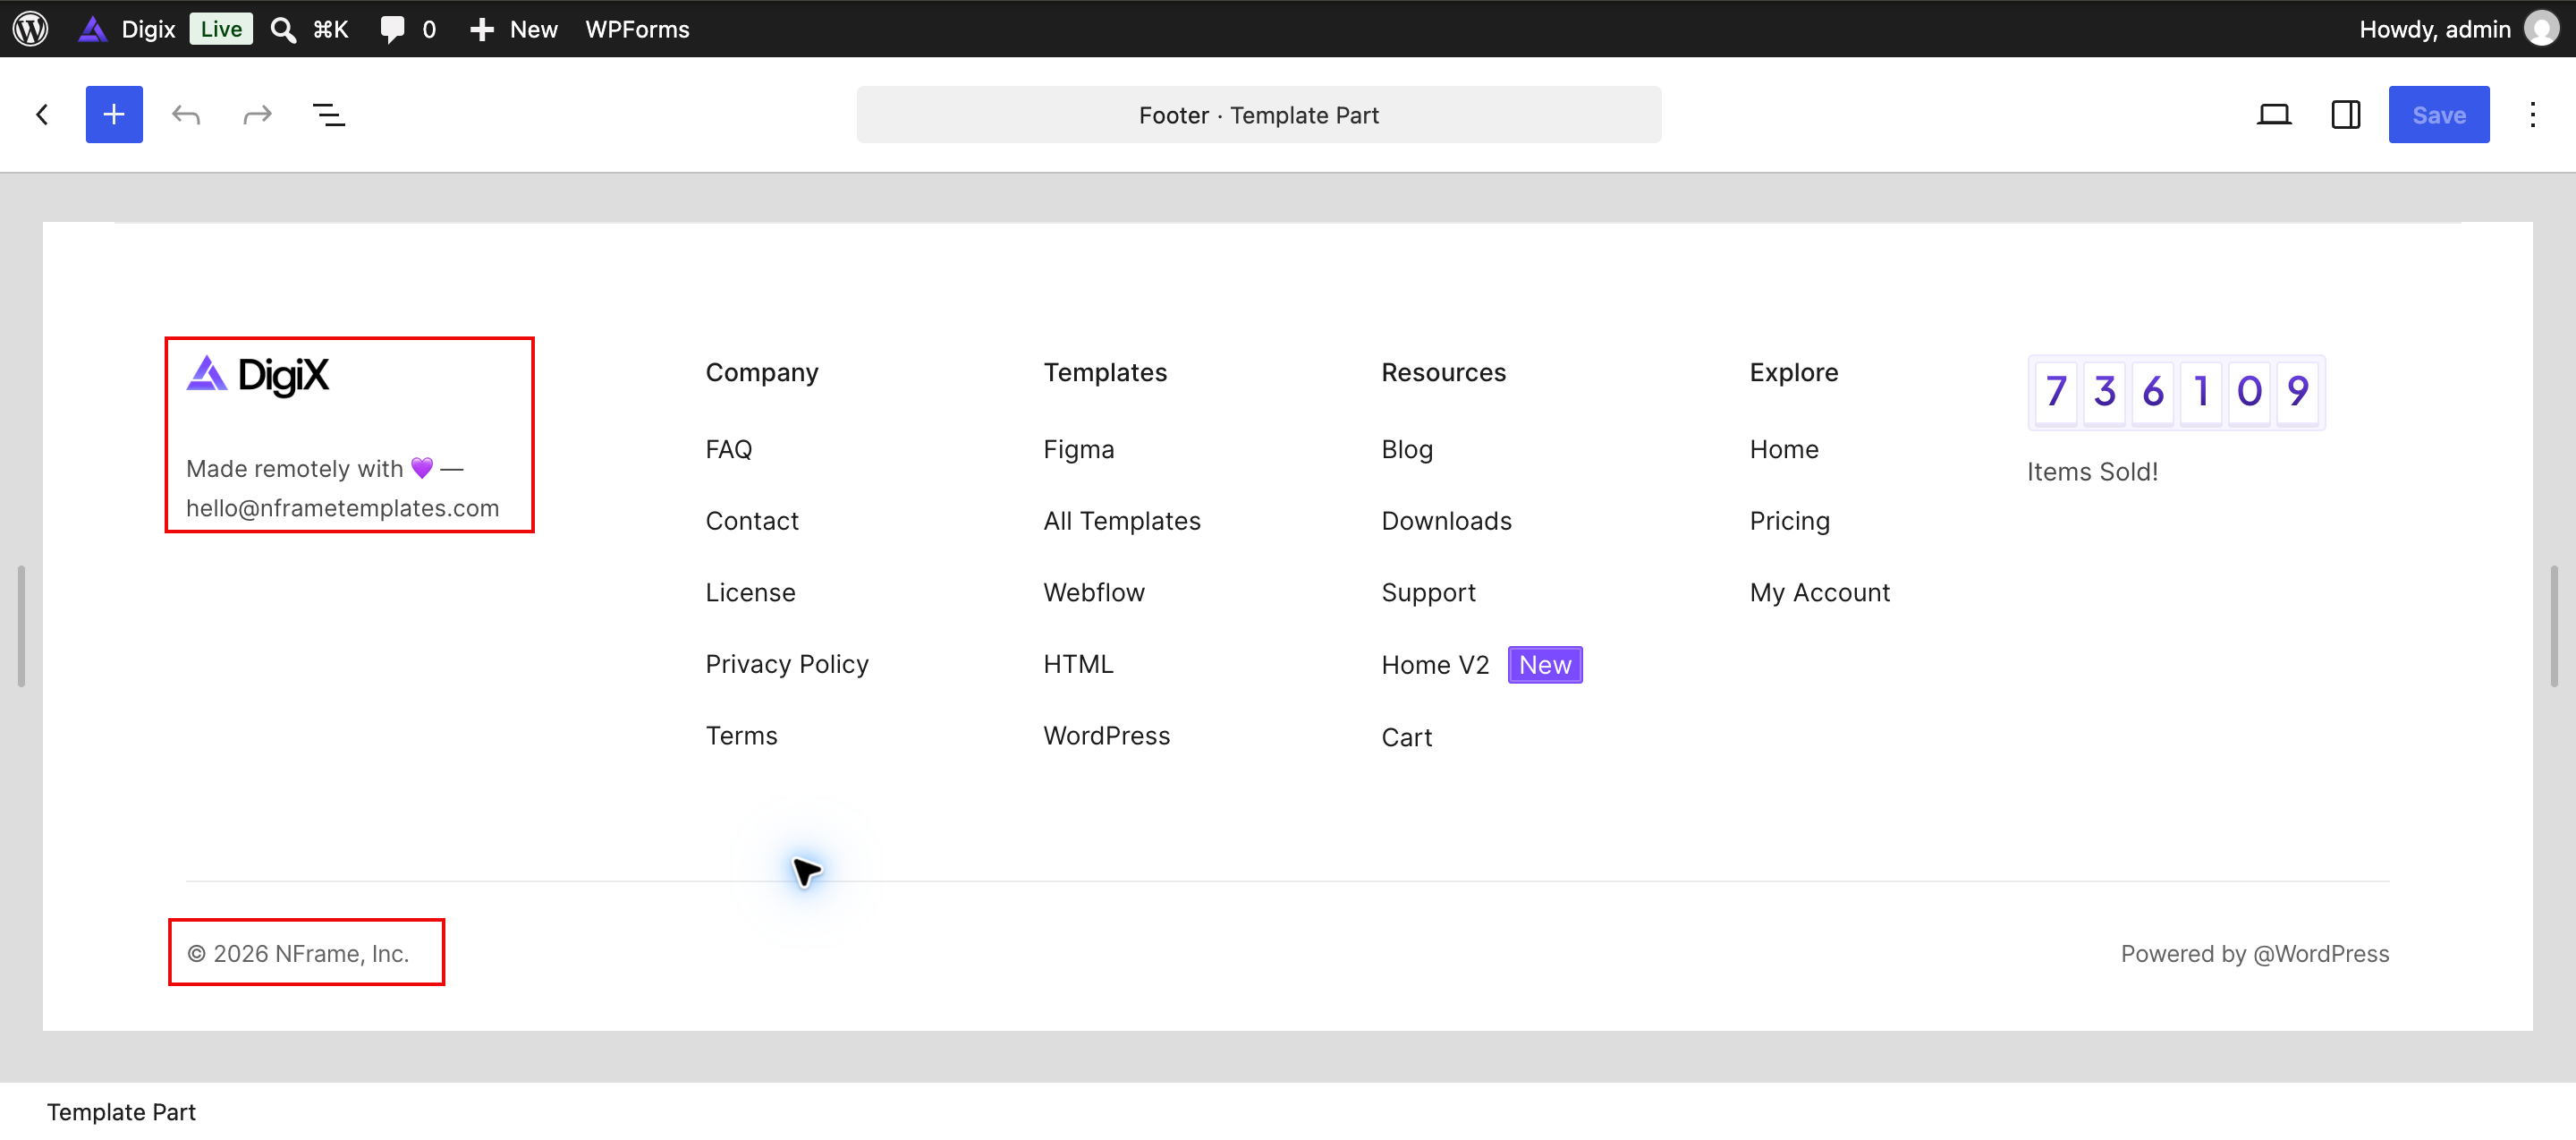
Edit the footer
↑ Back to top- Open Appearance → Editor → Patterns → Footer.
- Select the footer and update the store information, copyright text, social links, and legal links.
- Configure any newsletter form separately.
- Save and check pages that use the footer.
Colors, typography, and images
↑ Back to topGlobal styles
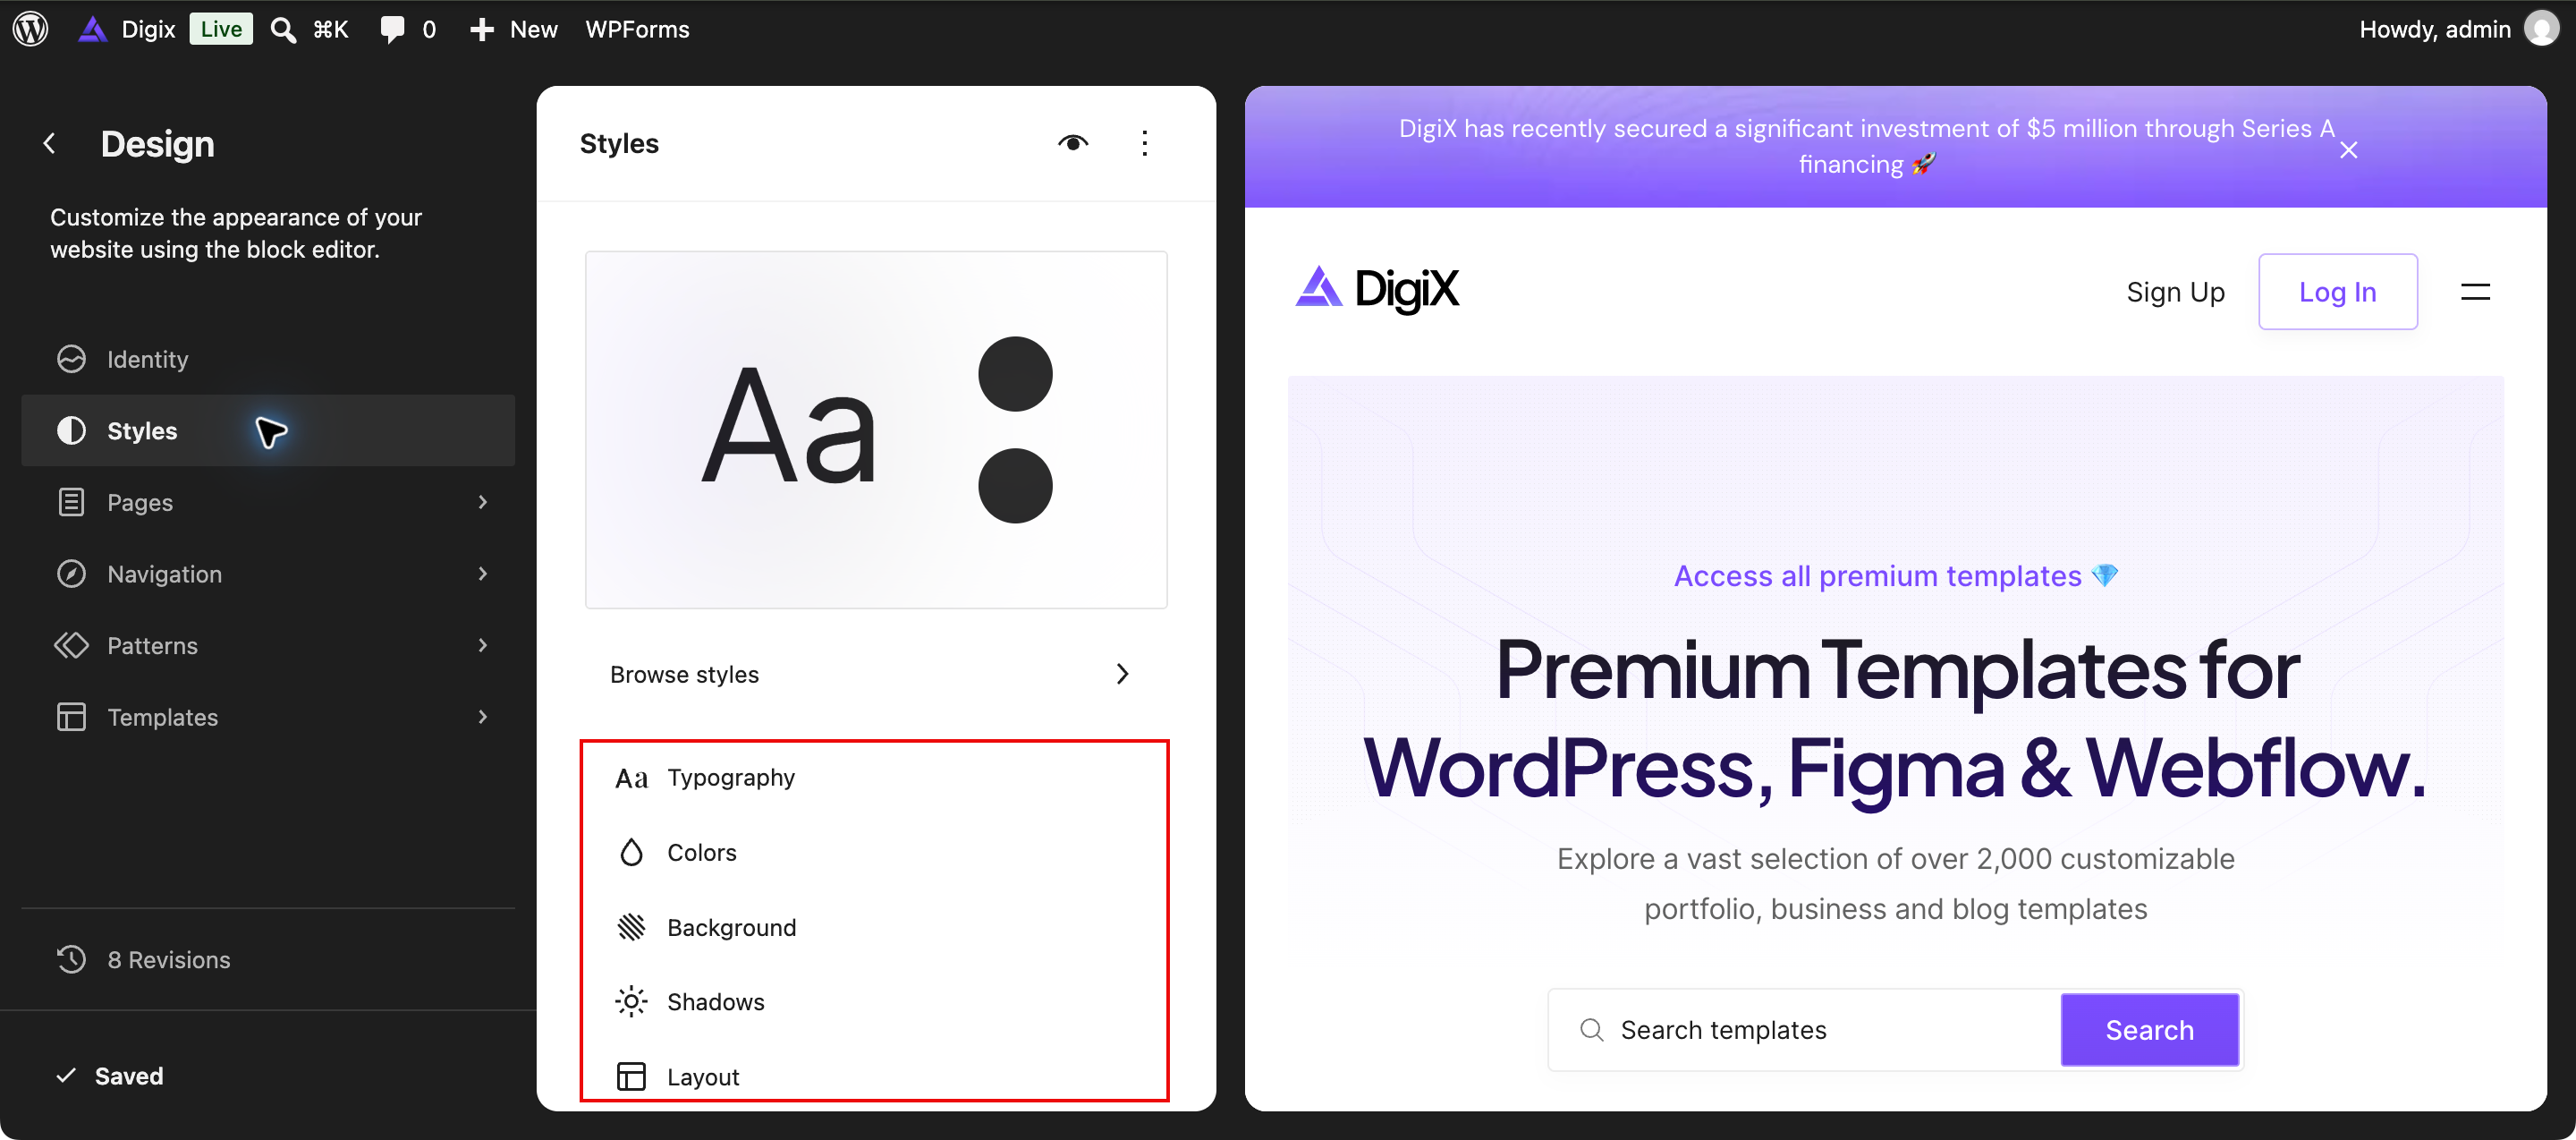
↑ Back to top- Go to Appearance → Editor → Styles.
- Use Typography to adjust available text settings.
- Use Colors to adjust the site palette and available element colors.
- Review other available controls, such as Layout.
- Save, then check a homepage, product page, and checkout to confirm the result.
Set your colors
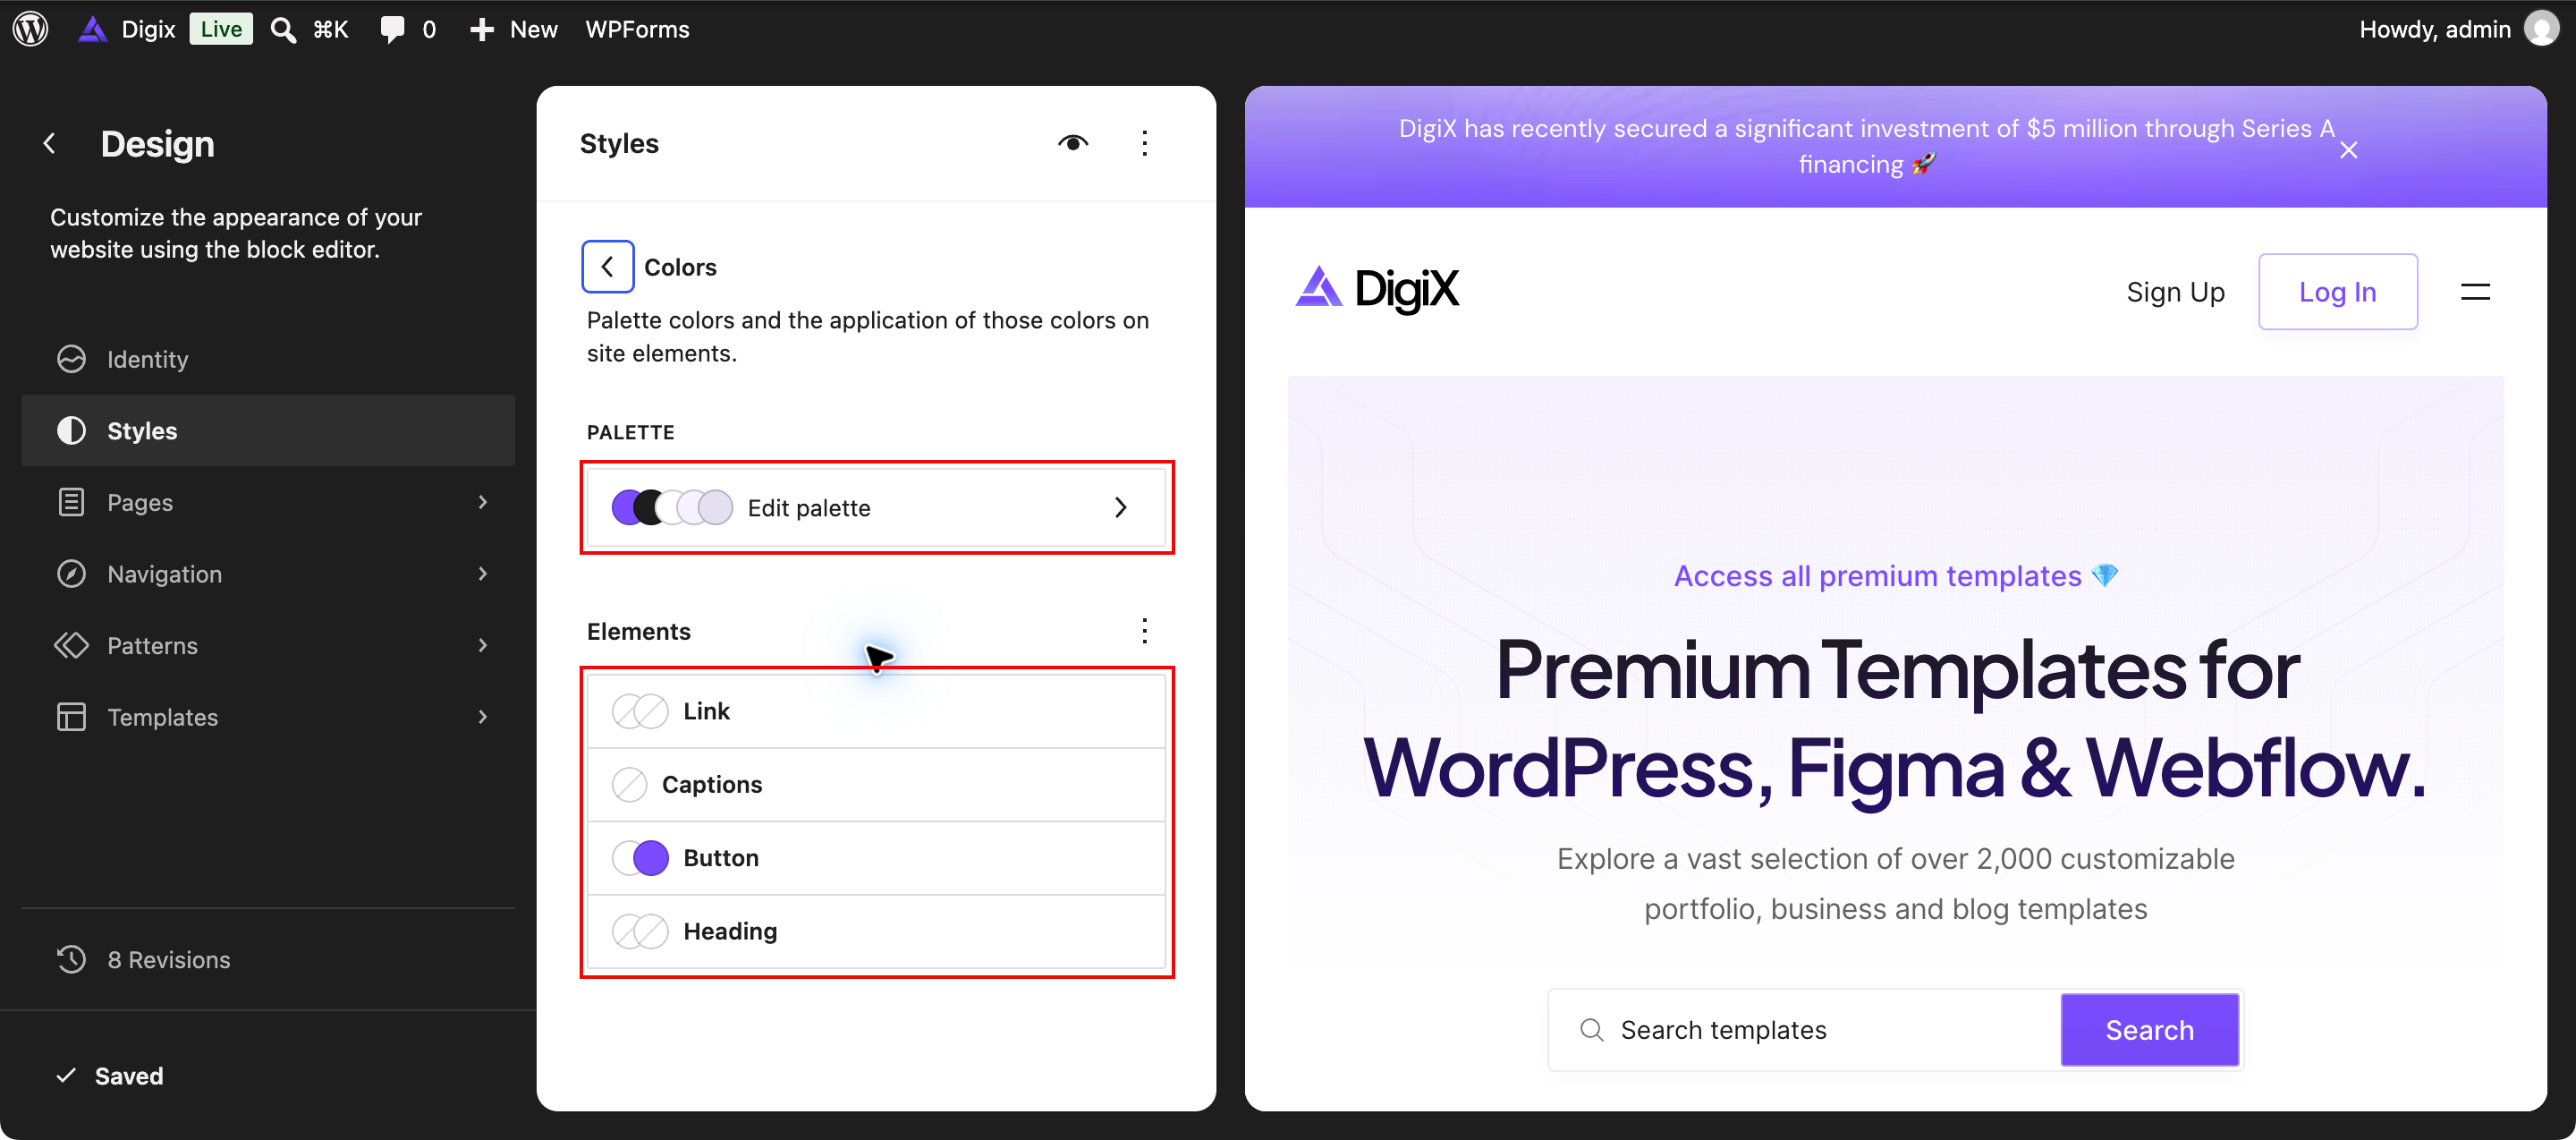
↑ Back to topIn Styles → Colors, select Edit palette to review the available colors. Use the element controls for links, buttons, captions, and headings. Check text contrast and button states before saving.
Set your fonts
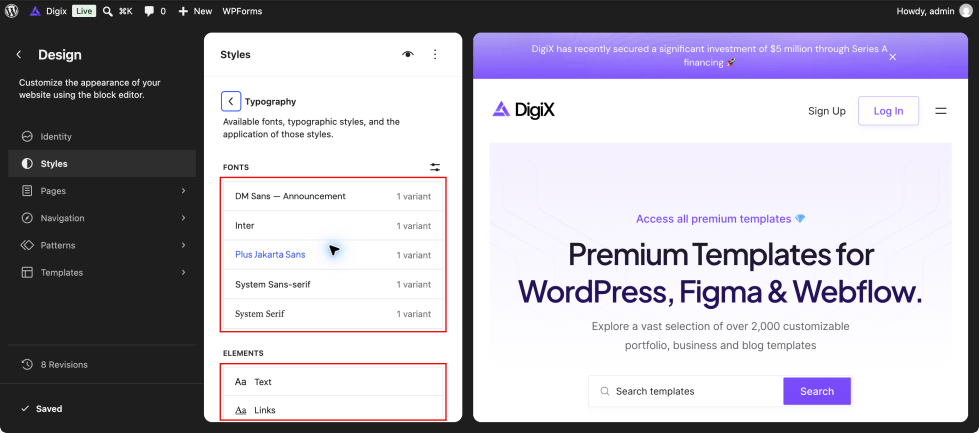
↑ Back to topIn Styles → Typography, review the available fonts and choose the element you want to change. Apply your font family, size, and other available text settings, then check headings and body copy on both desktop and mobile.
Global styles apply across the site. A block with its own explicit setting can override a global choice. If one block looks different, inspect that block’s settings before adding custom CSS.
Replace images without stretching
↑ Back to topSelect an Image block and use Replace. For products, use the product image and gallery fields. Keep the original proportions unless you intentionally crop the image. Choose an image large enough for its displayed size and add descriptive alternative text where useful.
WordPress can serve different sizes of the same uploaded image on different screens. You normally replace the image once in its block or product field. Separately inserted image blocks are independent and must be updated separately.
WooCommerce setup
↑ Back to topAssign the store pages
↑ Back to top- Complete WooCommerce’s setup so the necessary store pages exist.
- Open WooCommerce → Settings → Products and check the Shop page assignment.
- Open WooCommerce → Settings → Advanced and check the Cart, Checkout, and My Account assignments.
- Save changes and visit each page from the front end.
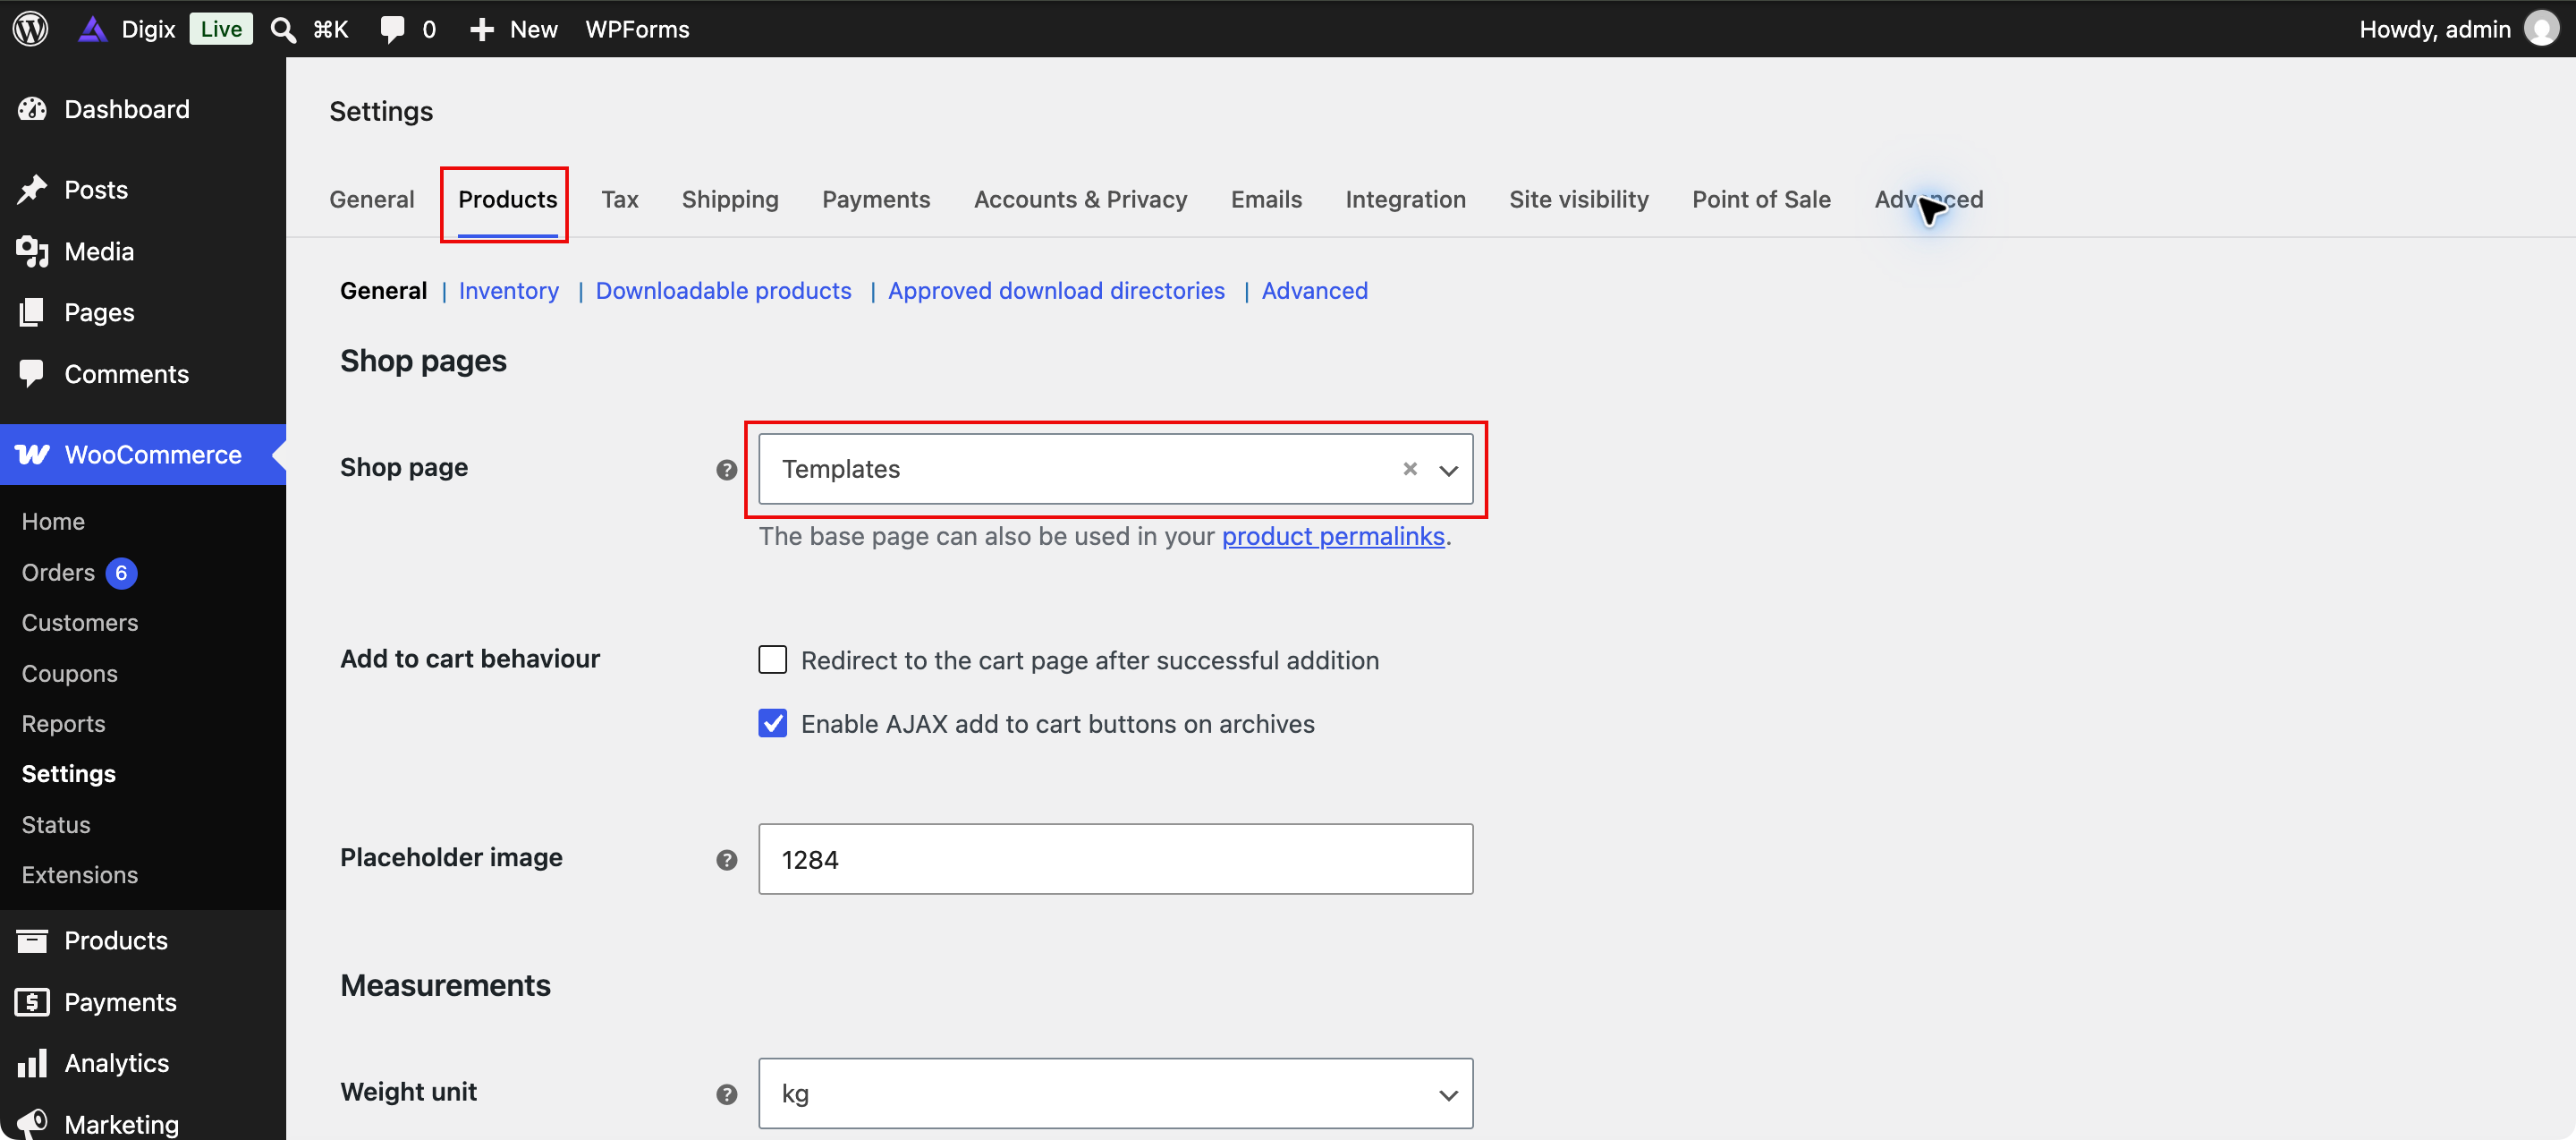
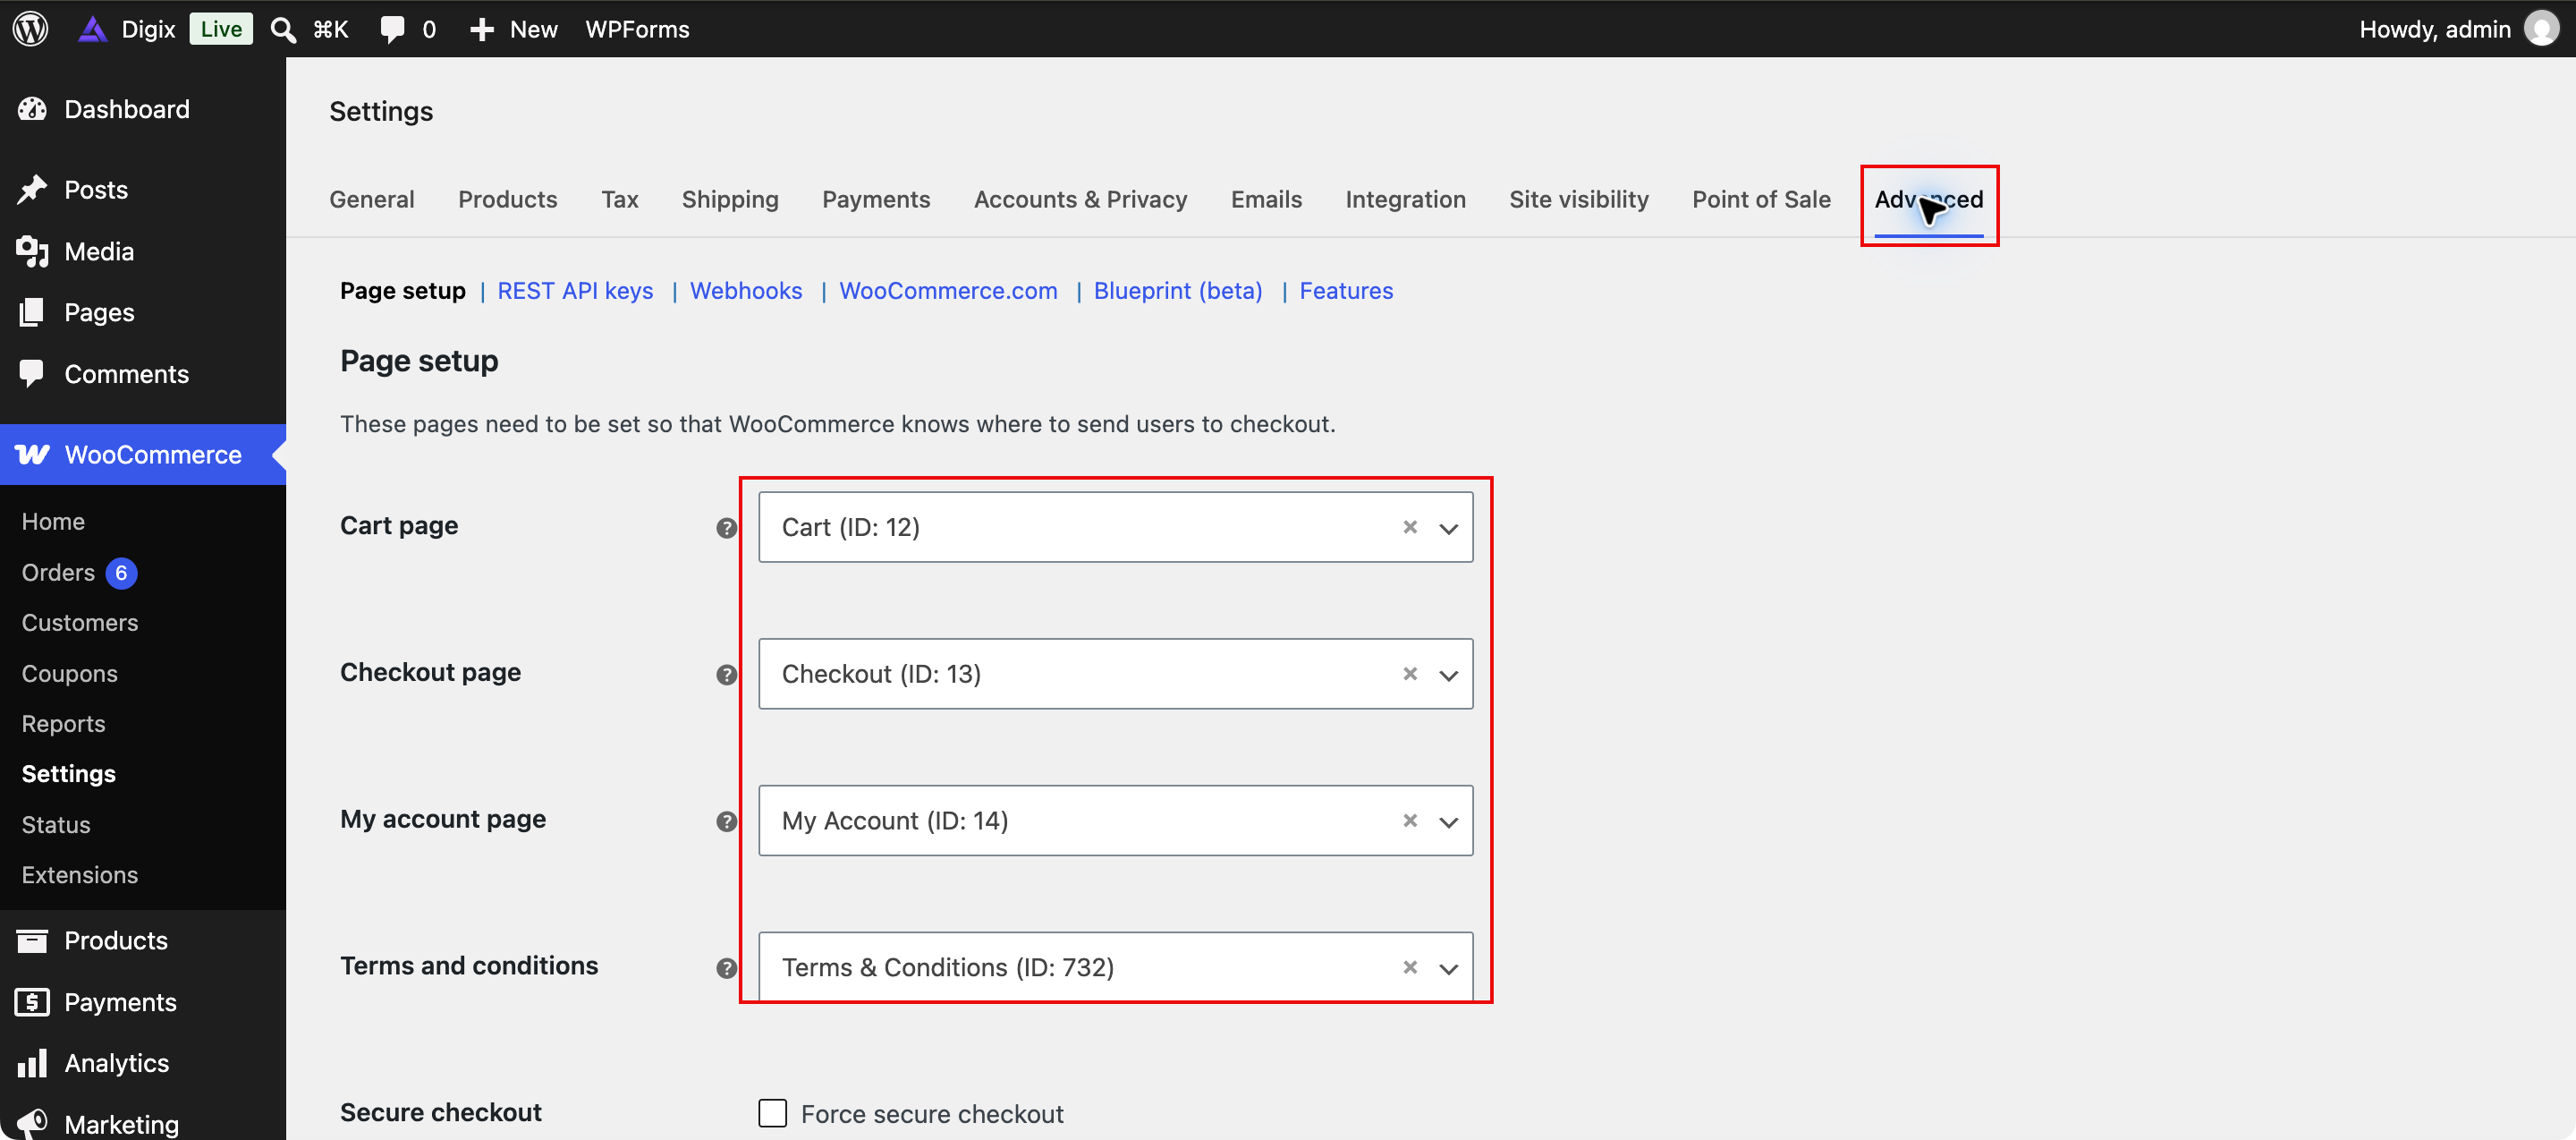
Use the correct WooCommerce block or supported shortcode for the page’s purpose. Do not place duplicate cart or checkout interfaces on the same page. DigiX supplies presentation; WooCommerce supplies the store behavior.
Customize Cart and Checkout layouts
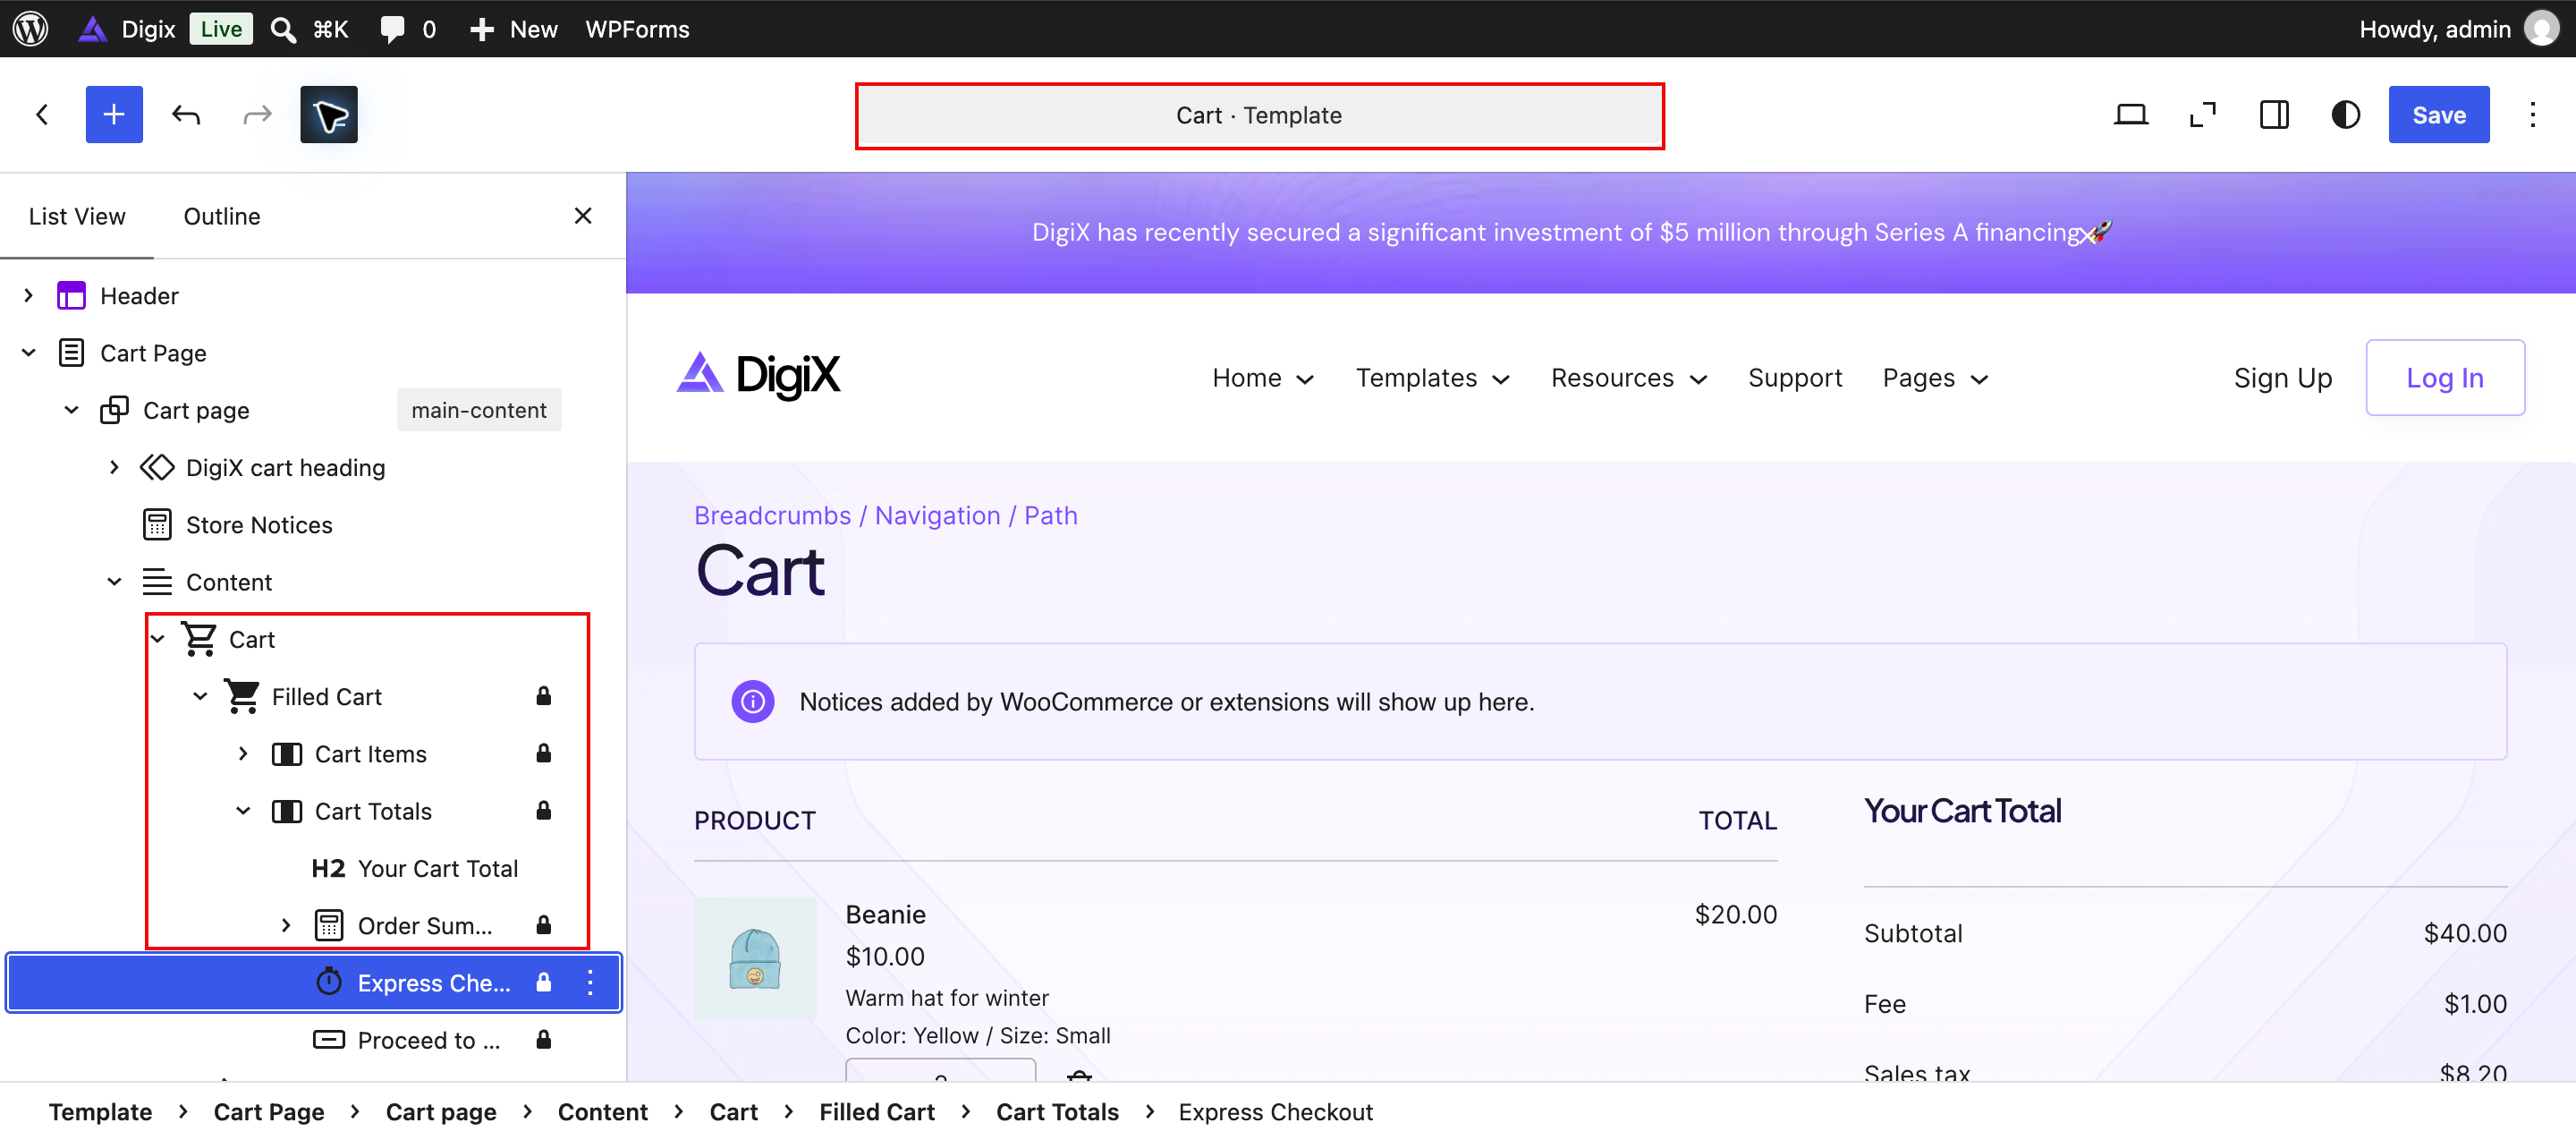
↑ Back to top- Open Appearance → Editor → Templates and find the Cart template.
- Use List View to select the Cart block or one of its supported inner blocks.
- Adjust the available design settings without removing required cart functionality.
- Preview both a filled and an empty cart, then review and save your changes.
WooCommerce may display example products in the editor. These previews do not add products to your catalog.
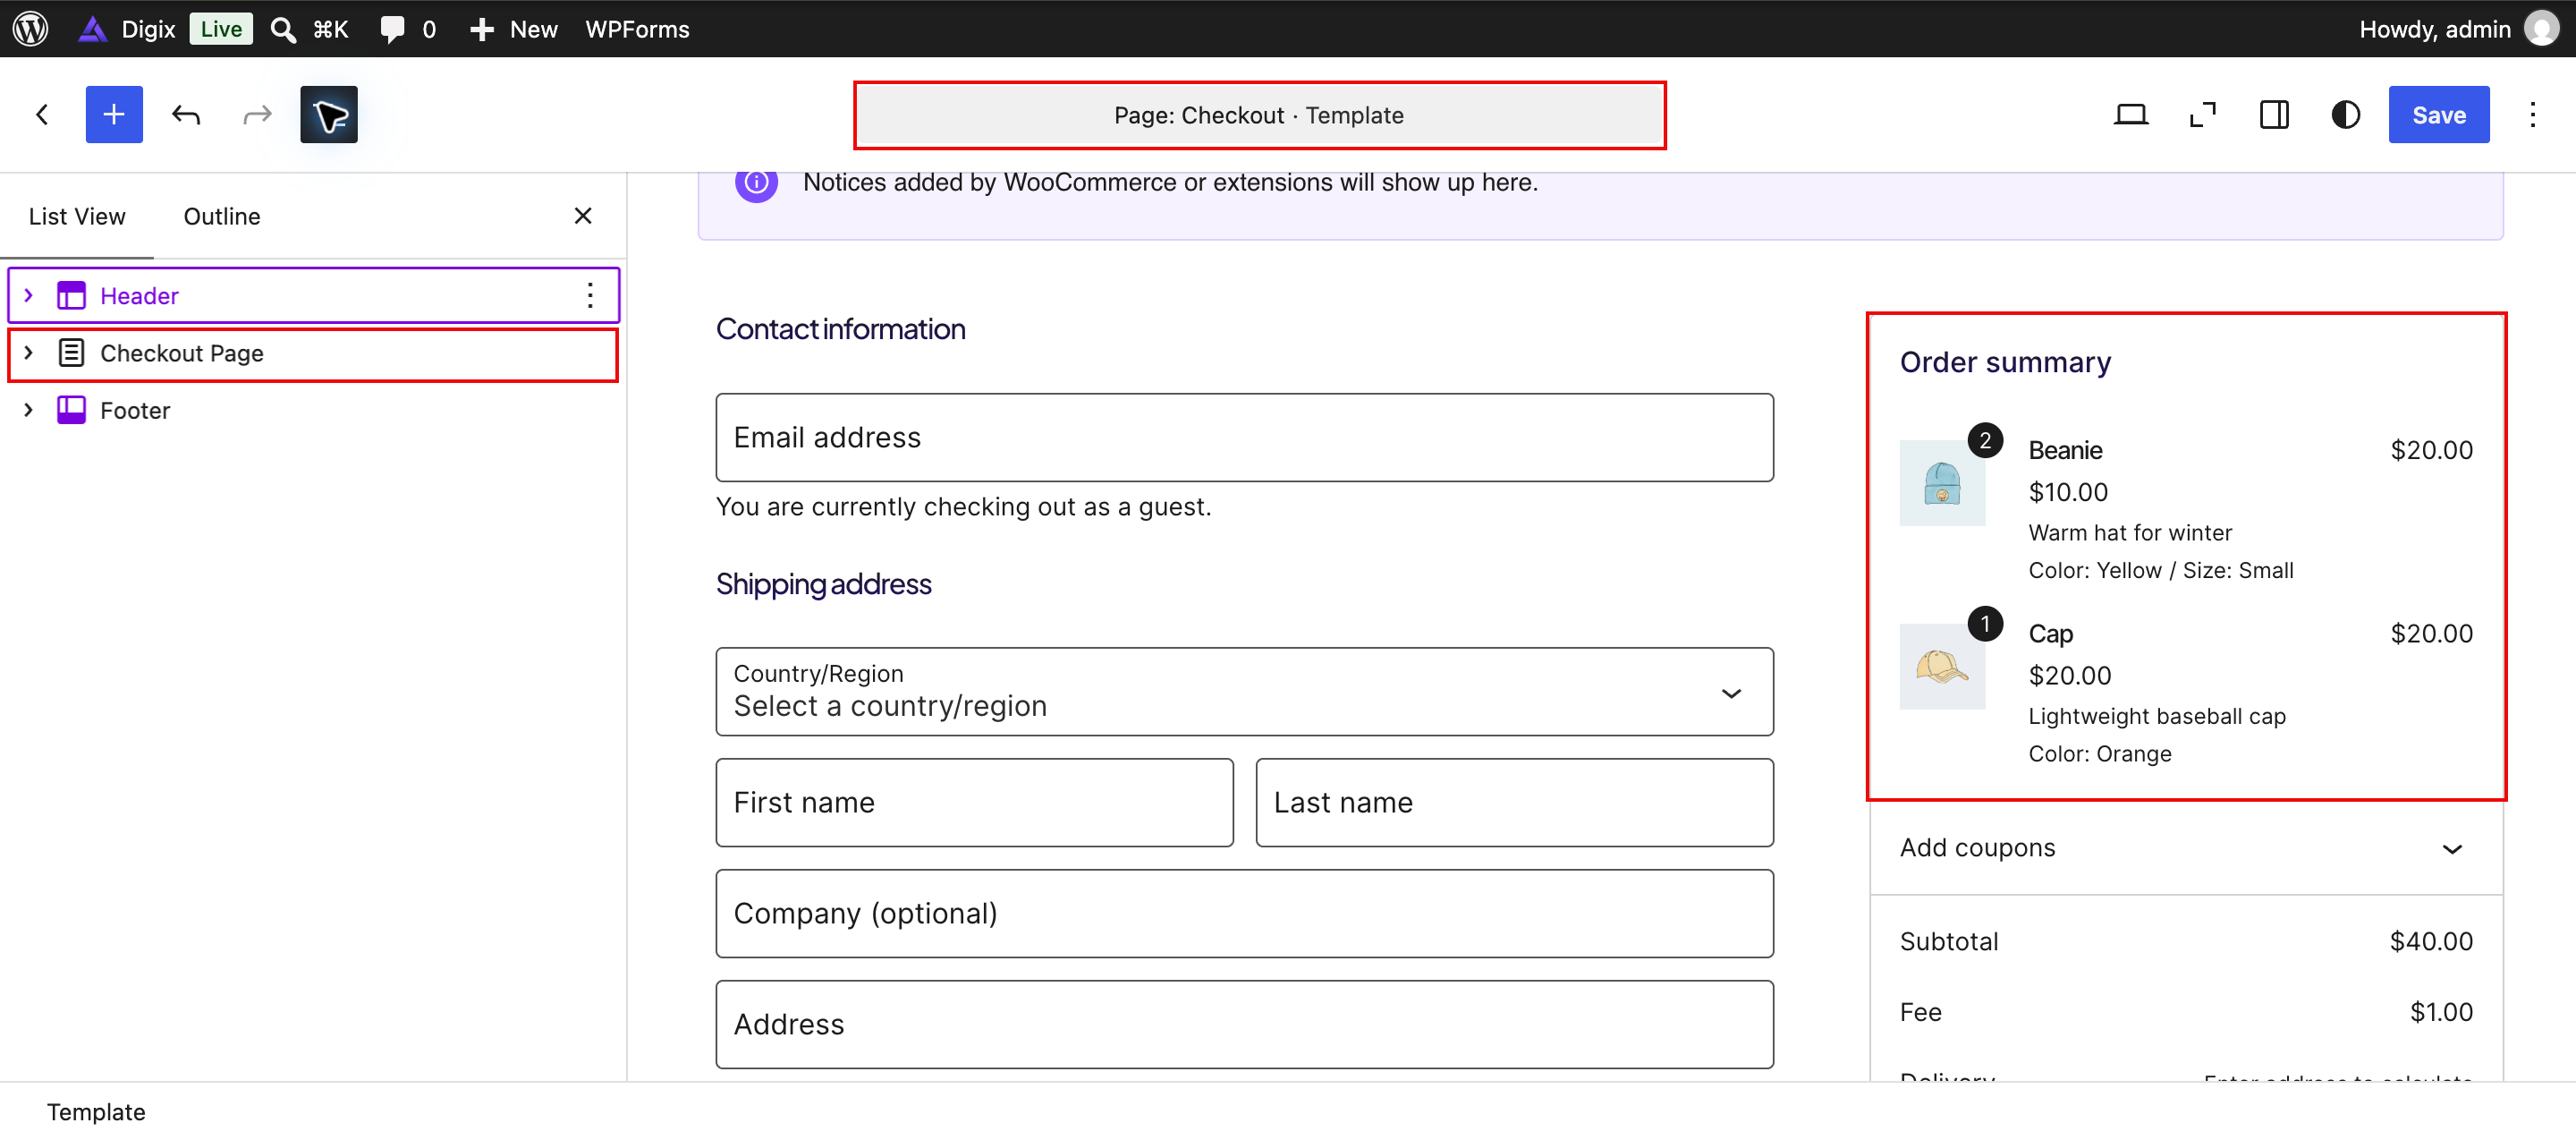
Open the Checkout template in the same way. Select the Checkout block, then use List View to locate contact information, address fields, and the order summary. Keep the required checkout blocks intact. Test checkout on the front end after saving.
Configure your store
↑ Back to top- General: review the store address, selling locations, and currency.
- Payments: install and configure your chosen gateway, then test it.
- Shipping: configure zones and methods if you sell physical products.
- Tax: configure settings appropriate to your business.
- Accounts and privacy: review account creation, guest checkout, and privacy options.
- Emails: check sender details and order notifications.
Payment credentials and service connections are not configured by importing the theme demo.
Customer accounts
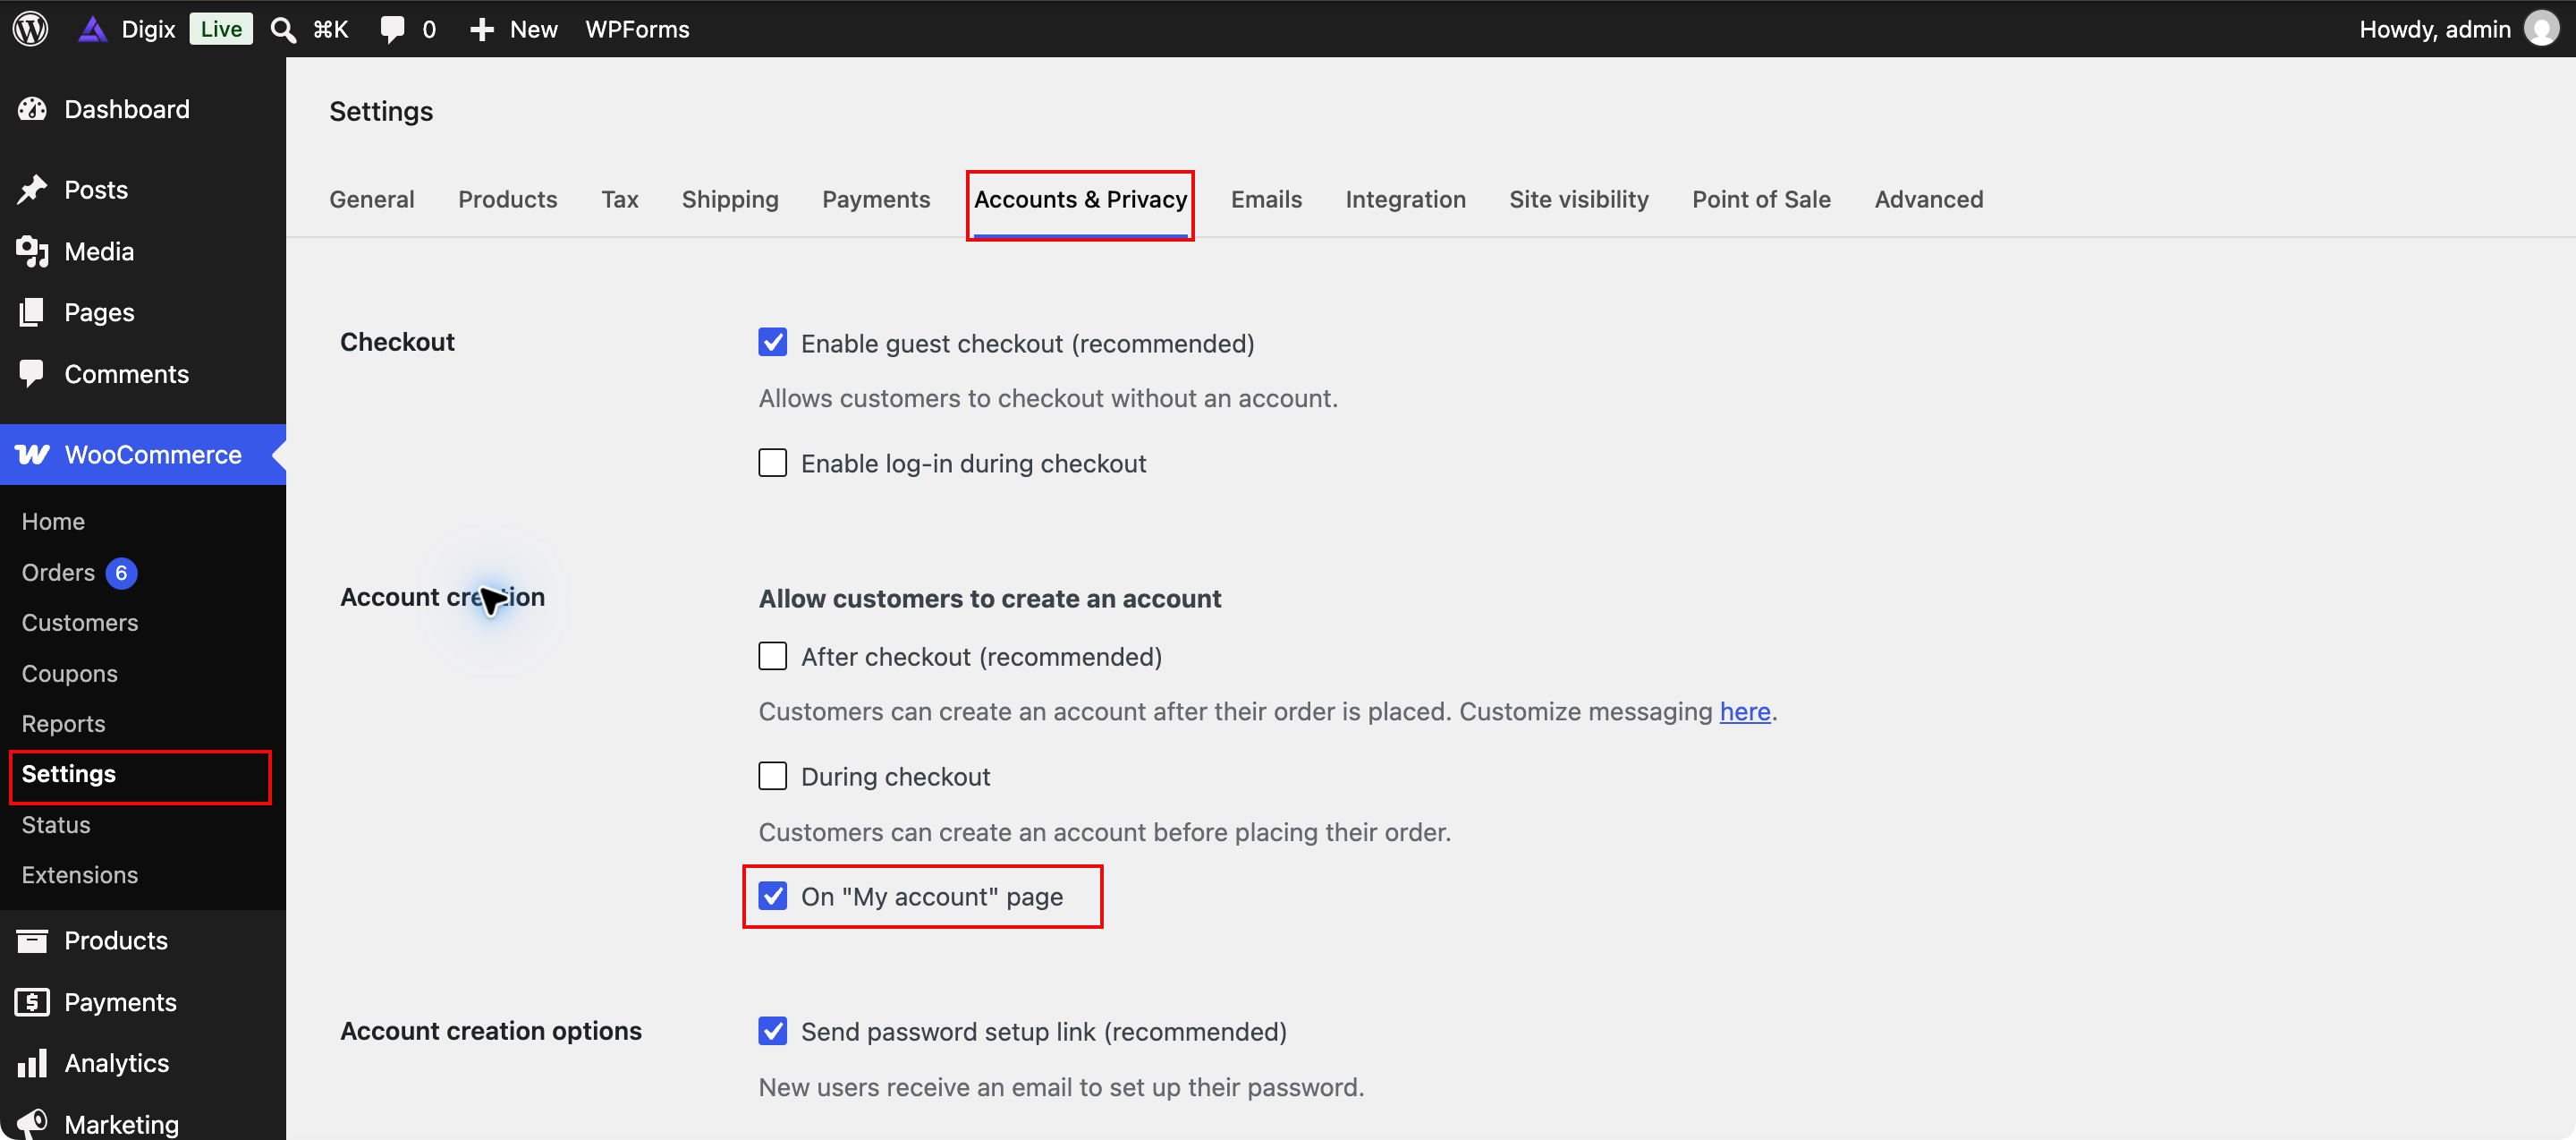
↑ Back to topGo to WooCommerce → Settings → Accounts & Privacy. Choose whether customers can register during checkout or on the My account page. Review login and privacy options, save, and test the account page while logged out.
Payment providers
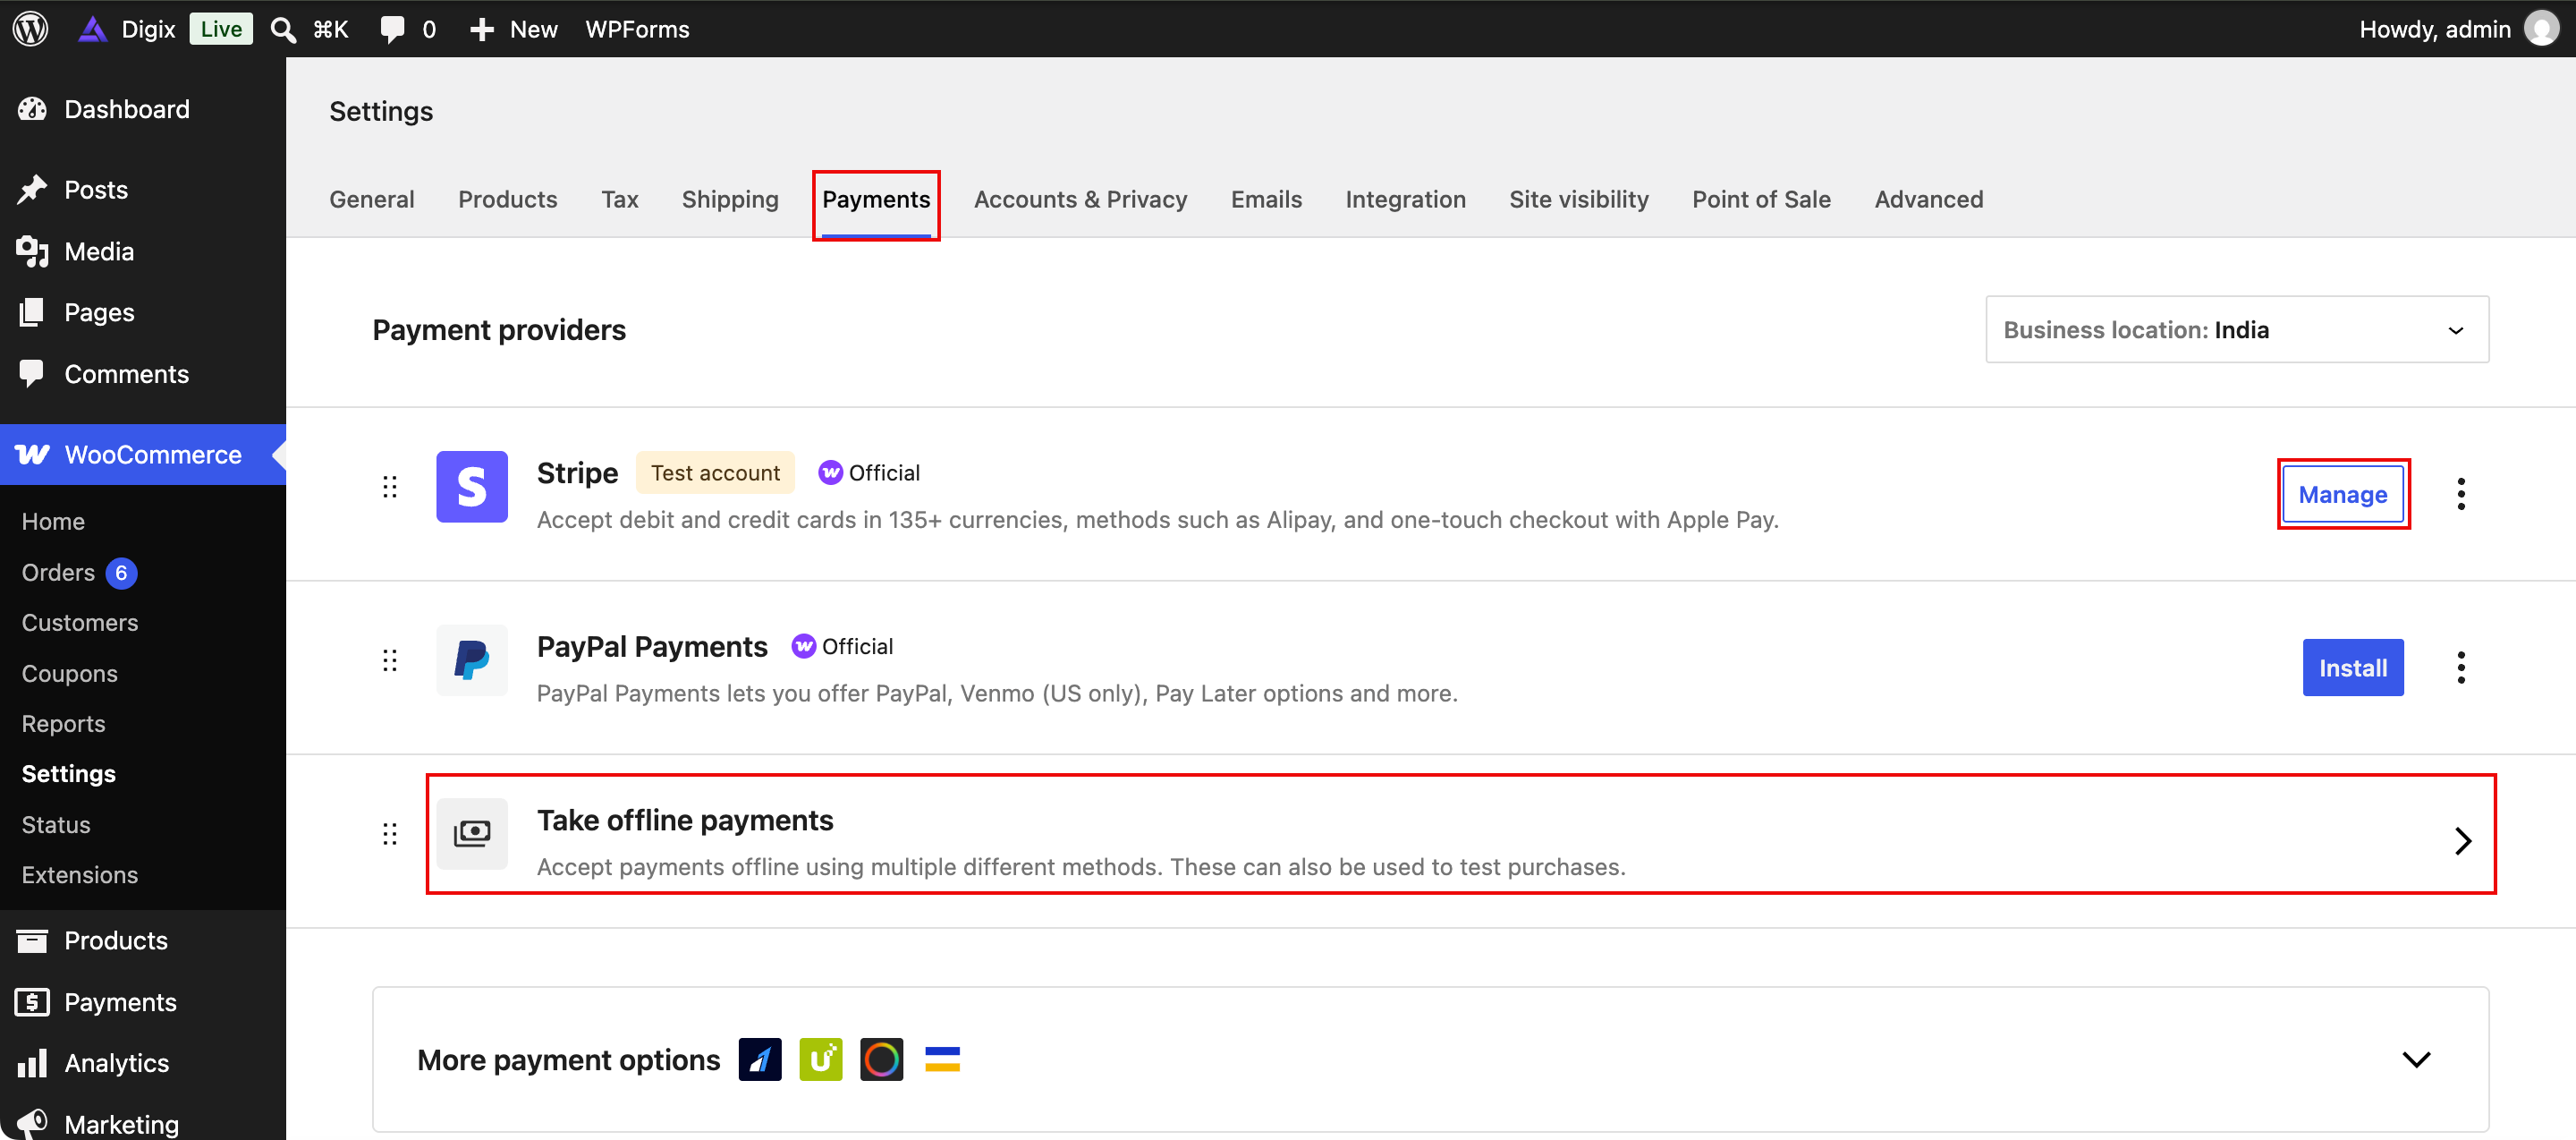
↑ Back to topOpen WooCommerce → Settings → Payments. Install or manage your chosen provider and complete its own setup. Available providers depend on your location and installed plugins; the examples shown are not included payment services. Use the provider’s test mode to complete a purchase before accepting live payments.
Products and digital downloads
↑ Back to topAdd your first product
↑ Back to top- Go to Products → Add New.
- Enter a product name, main description, and short description.
- Select the appropriate Product data type and enter pricing and stock information.
- Choose categories and tags, then add the product image and gallery.
- Publish and check the product page and catalog card.
Product images and gallery
↑ Back to topIn the product editor, use Product image to choose the main catalog image. Select the current image to replace it, or use Set product image when none exists. Upload a sharp image with suitable proportions and useful alternative text.
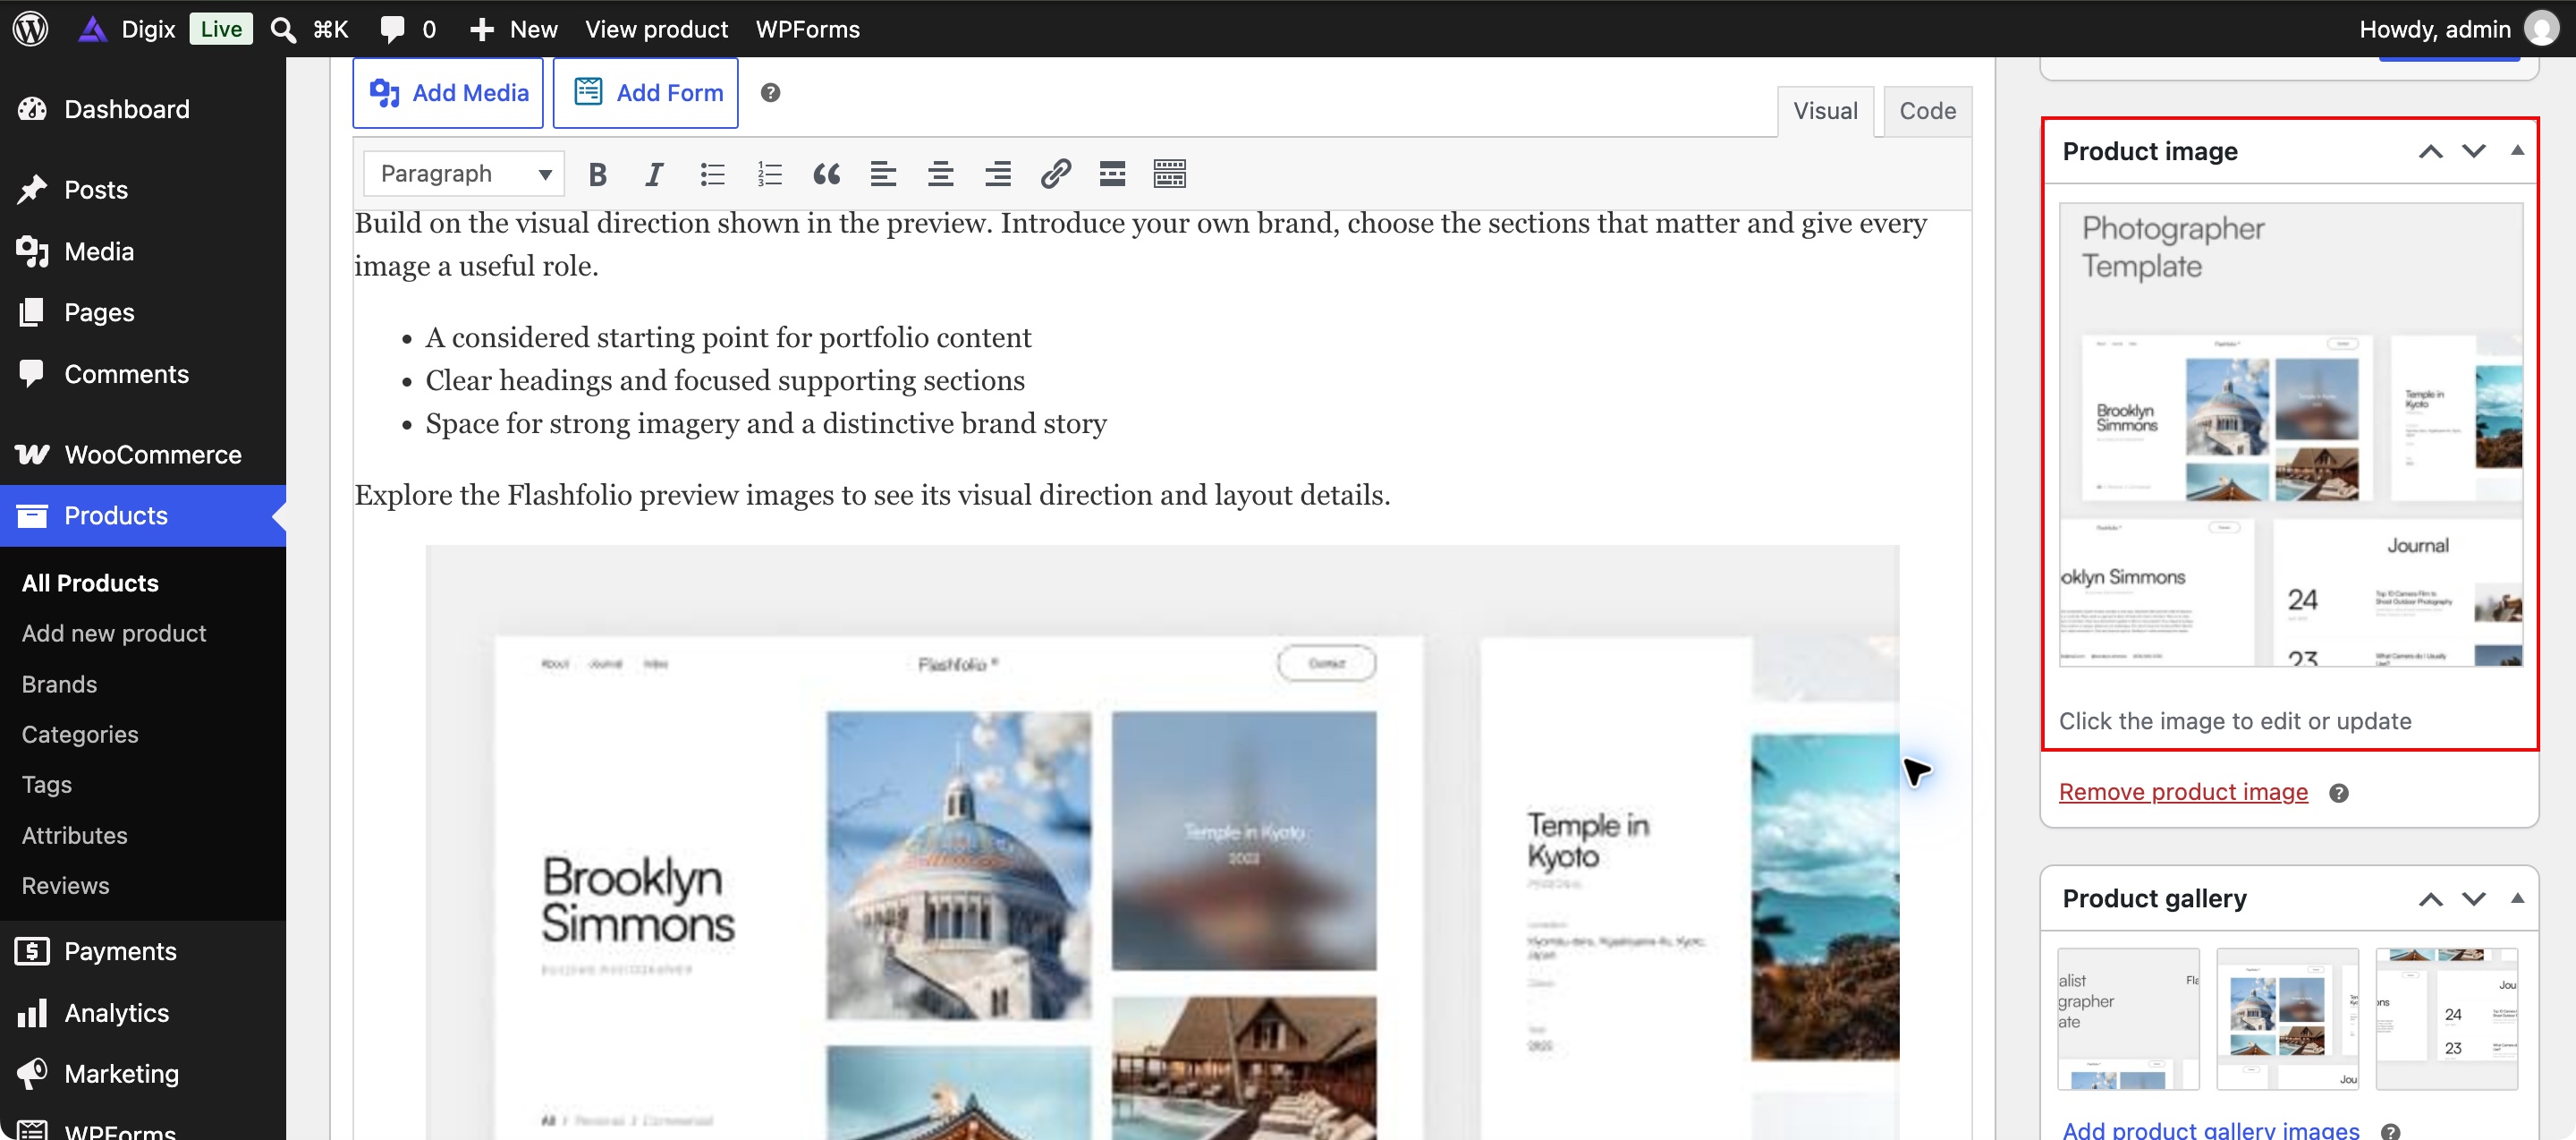
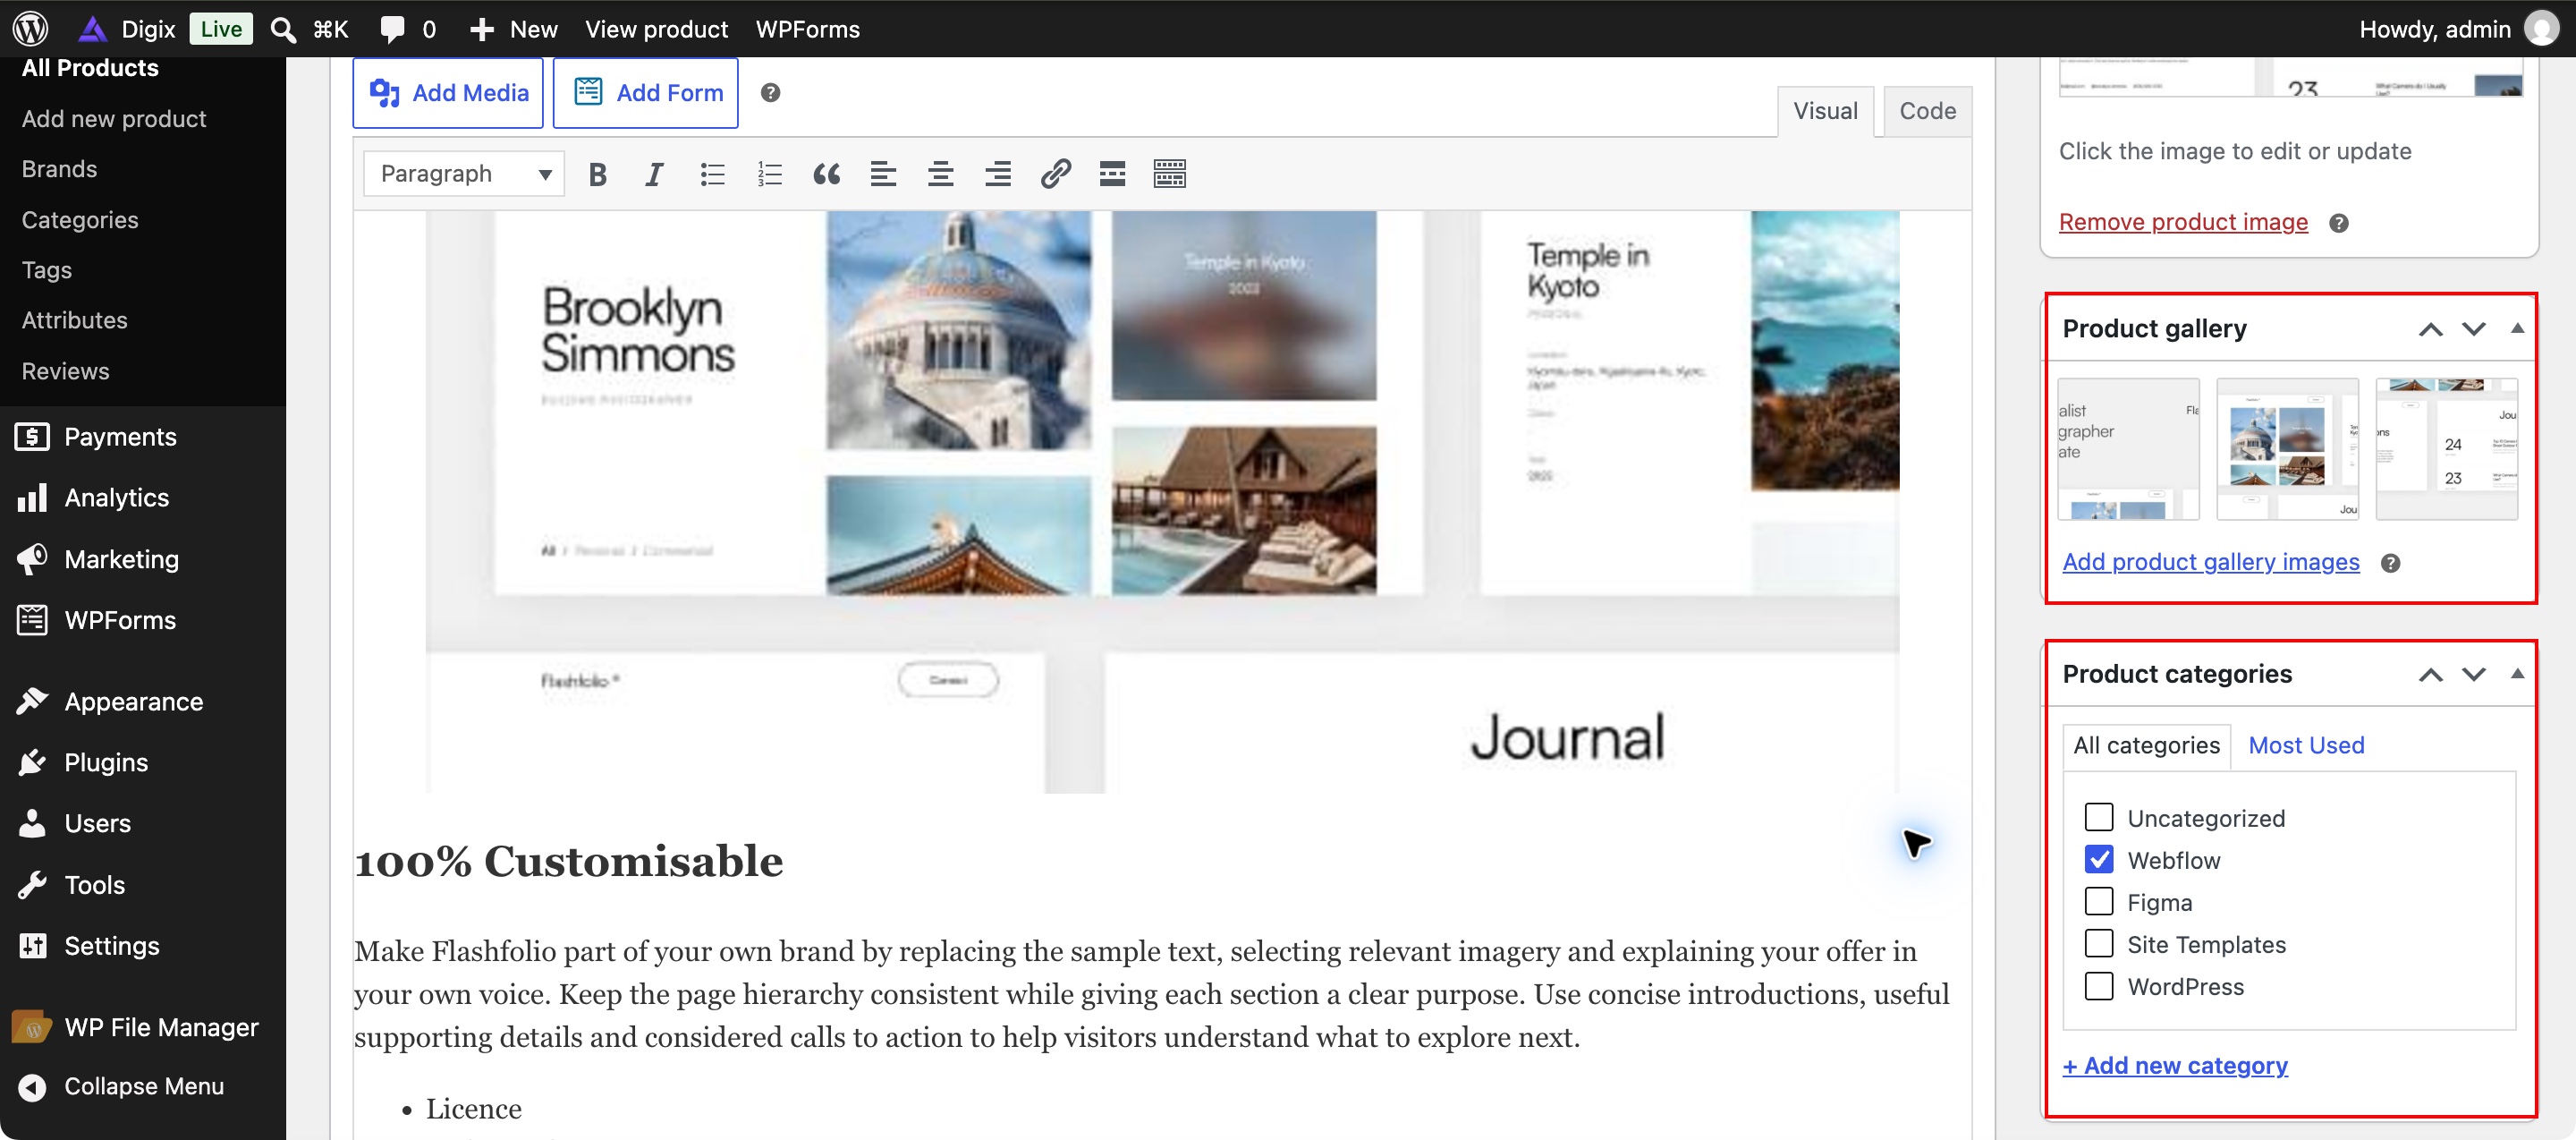
Use Add product gallery images to add supporting views. Reorder the gallery to tell a clear story, then select the relevant Product categories. Update the product and check its gallery and catalog card on desktop and mobile.
Inventory and availability
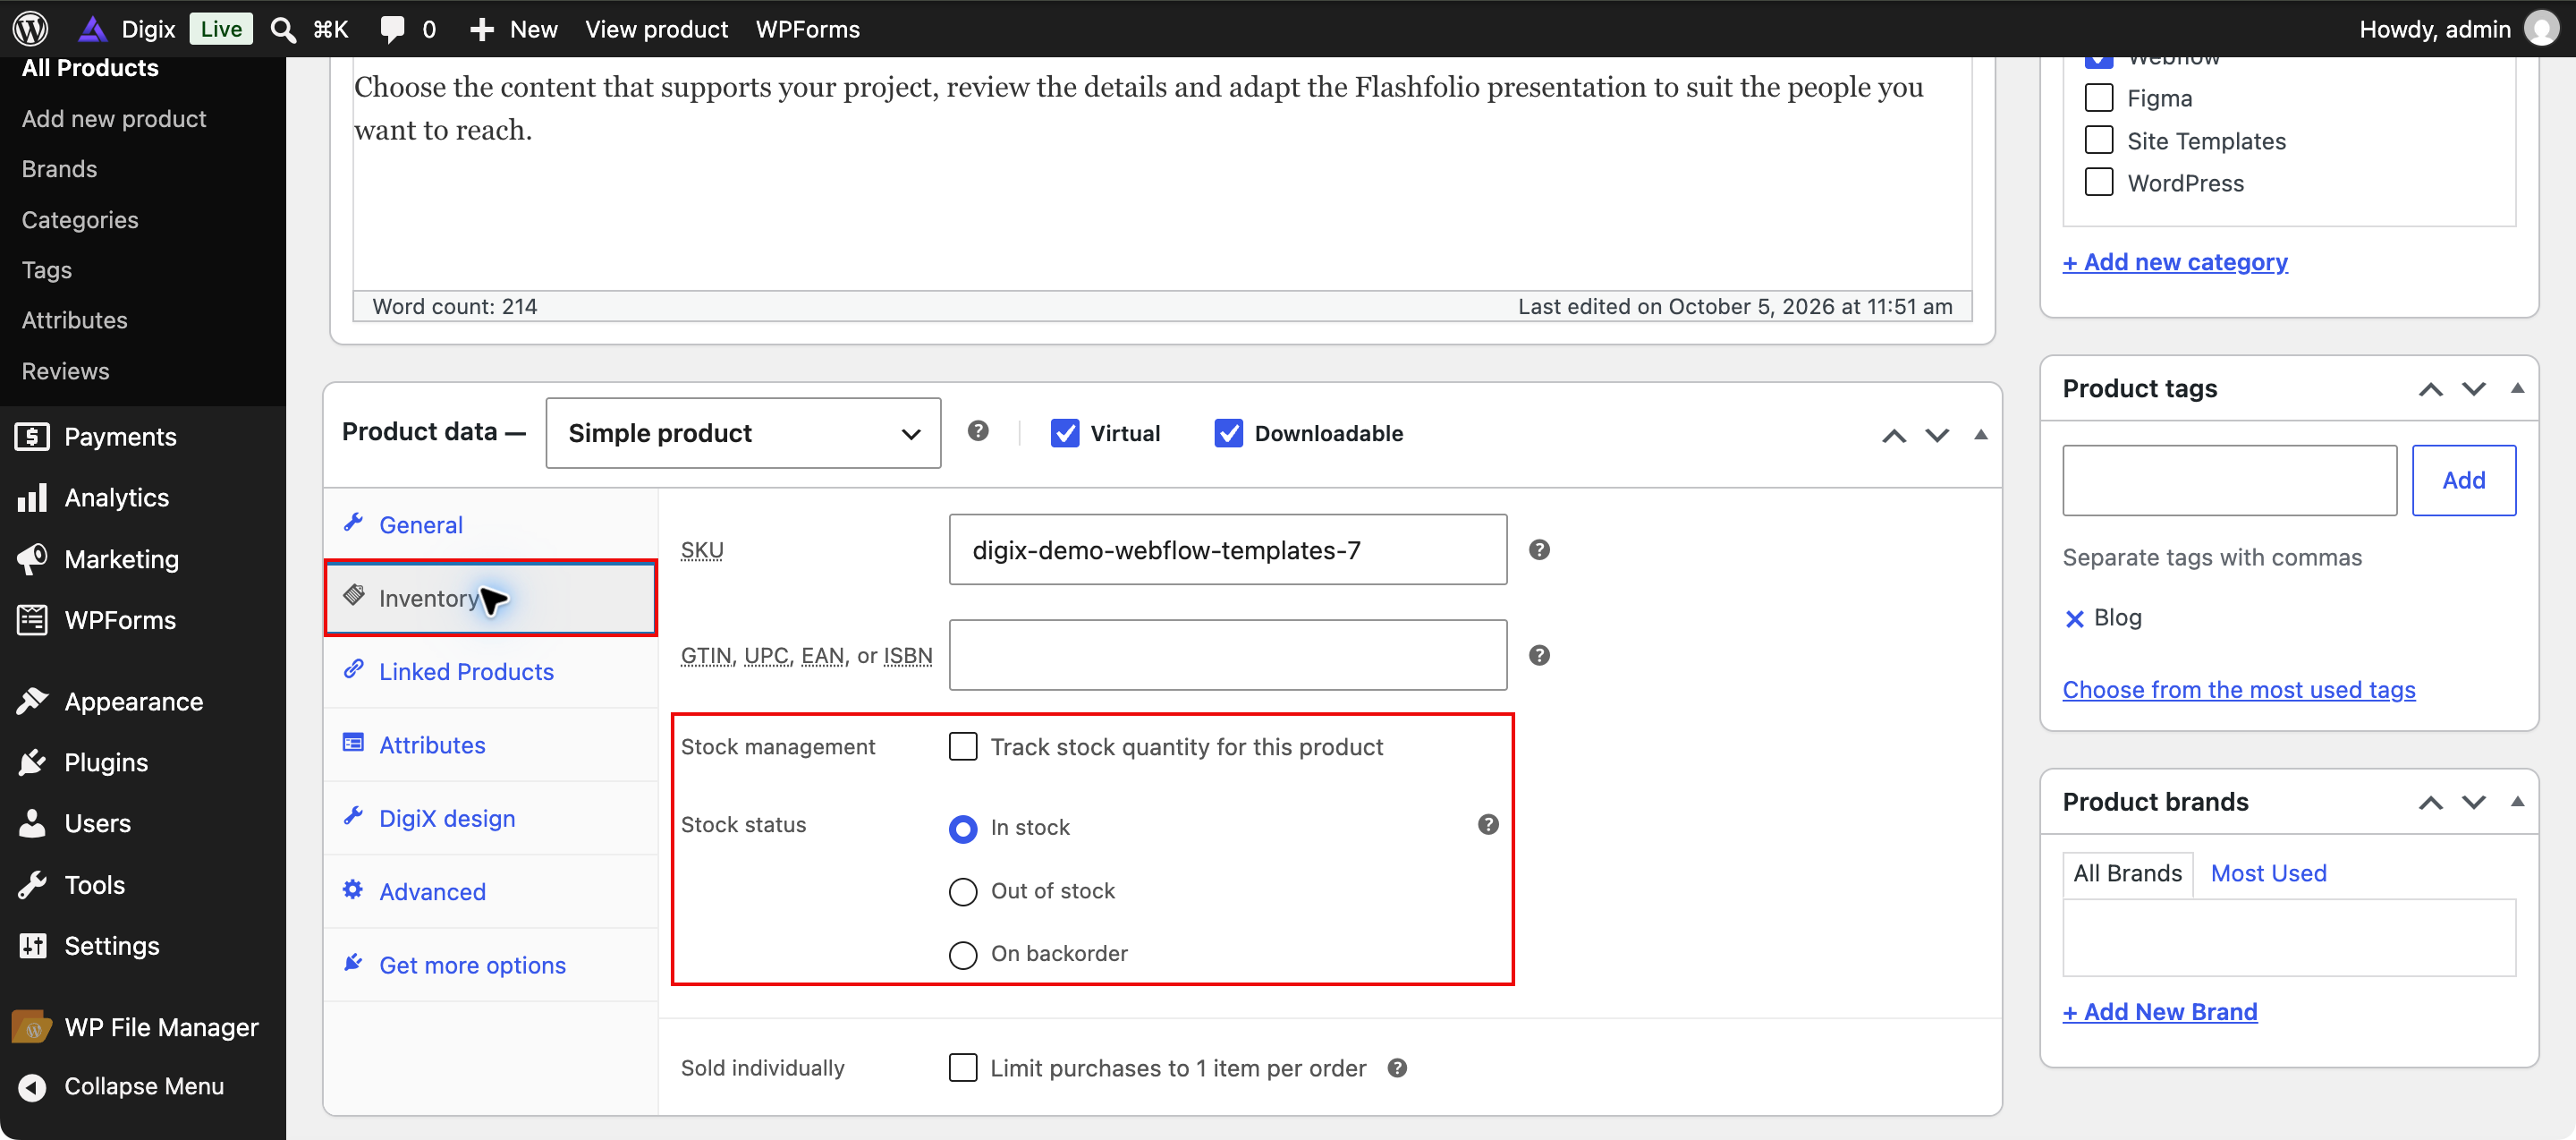
↑ Back to topOpen Product data → Inventory. Enter an SKU if needed. Enable stock tracking when you need quantities, or choose the appropriate Stock status. Check that purchasable products have a valid price and availability before publishing.
Attributes
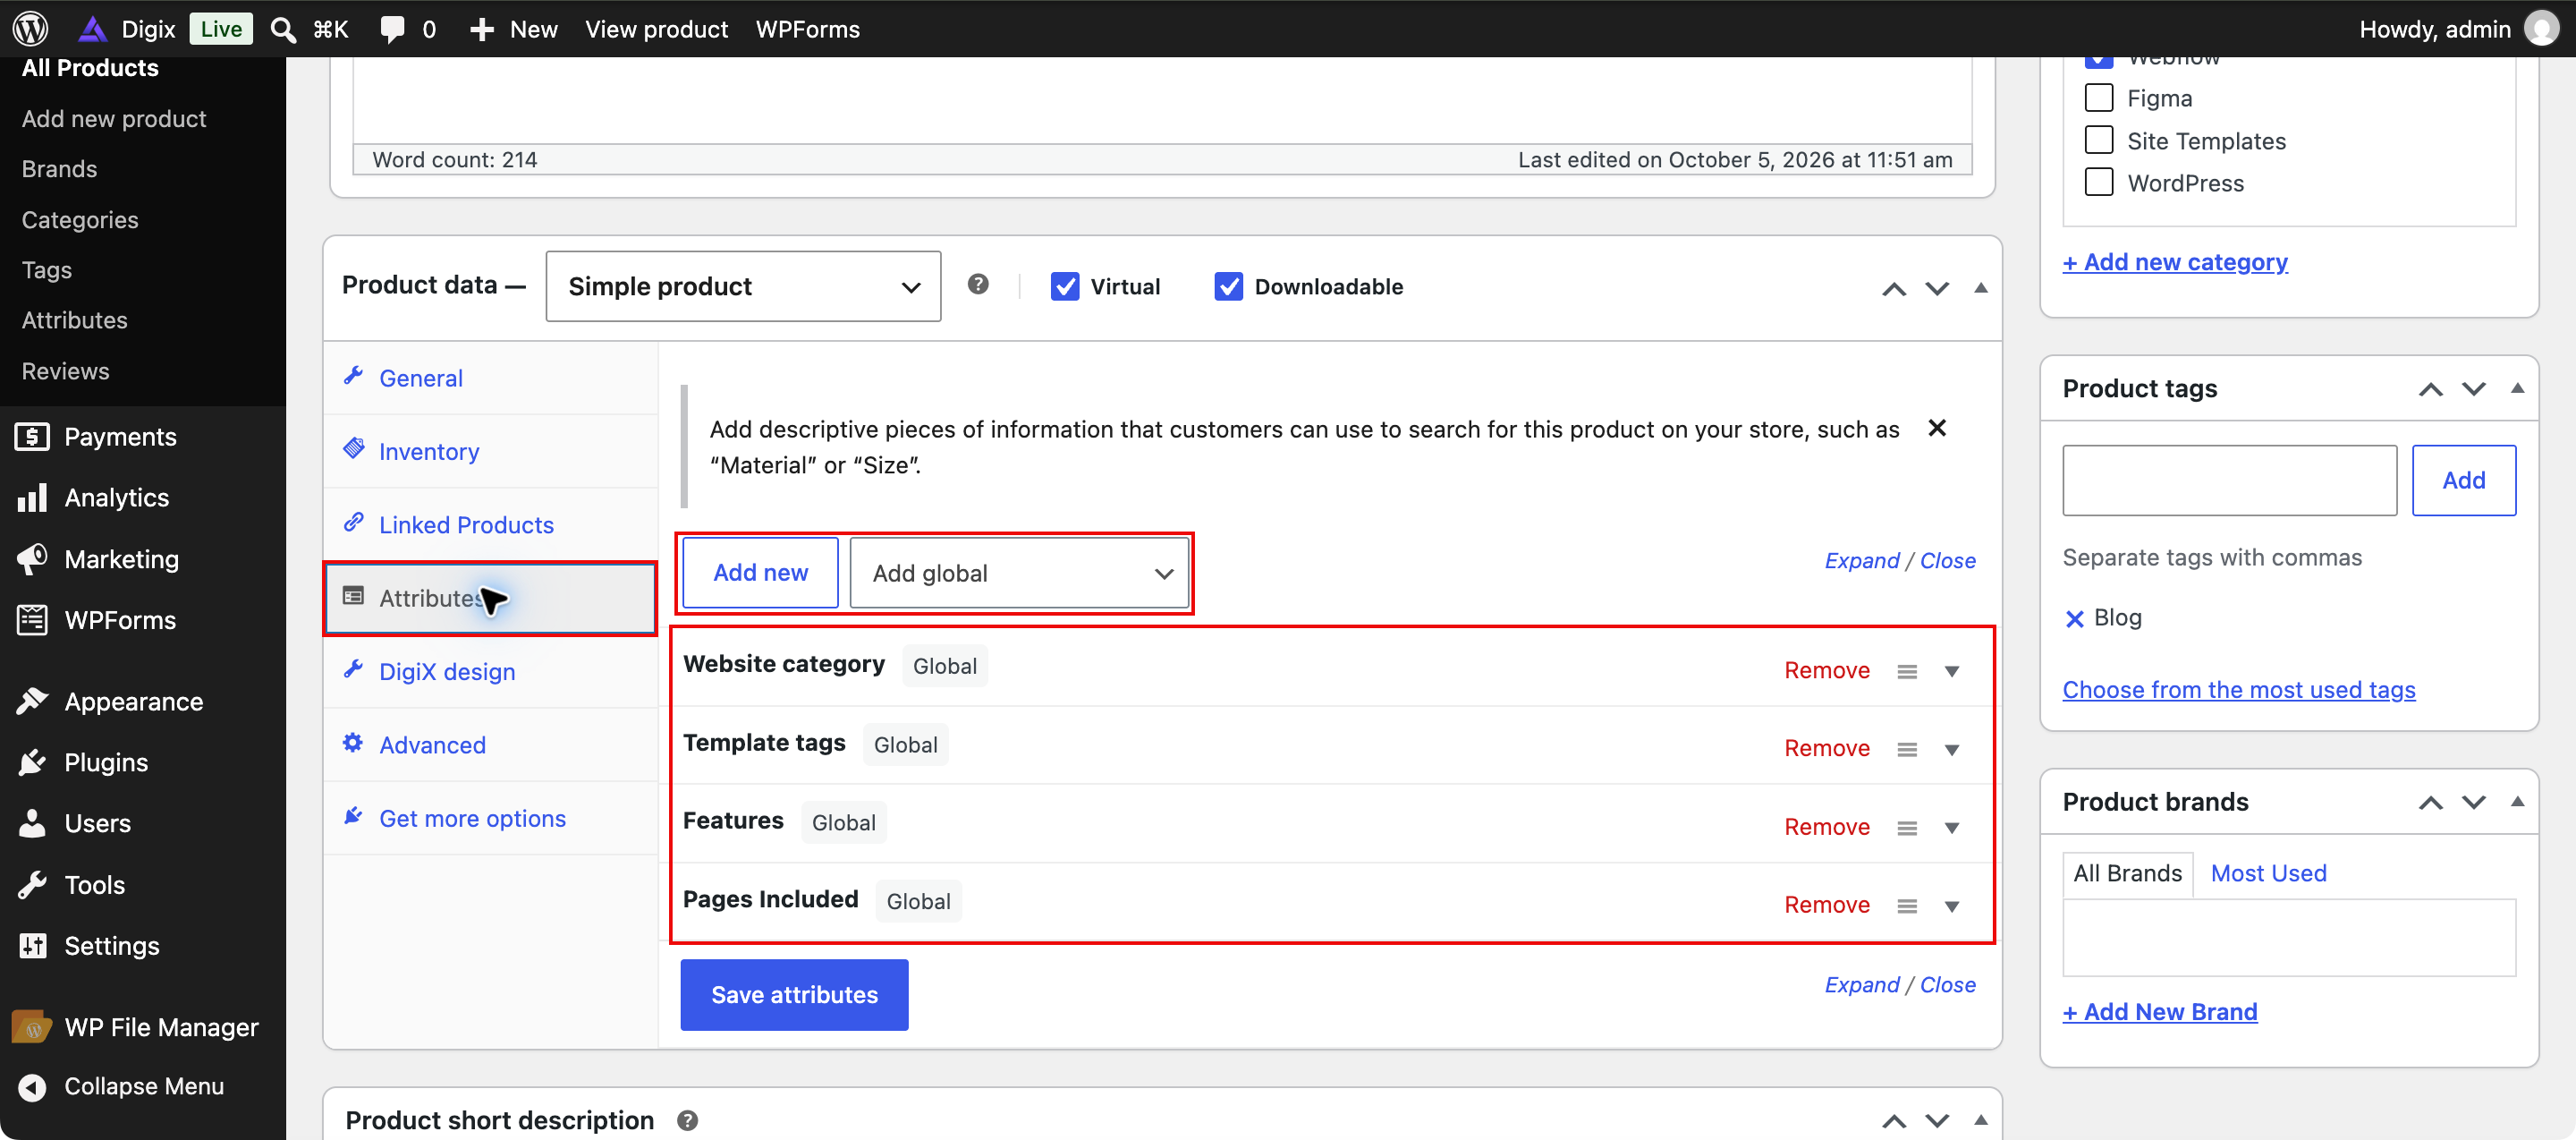
↑ Back to topOpen Product data → Attributes. Add a custom attribute or choose an existing global attribute, enter its values, and save the attributes. For a variable product, enable the appropriate attributes for variations and configure the resulting variations separately. The example attribute names shown are not required for every product.
Sell downloadable files
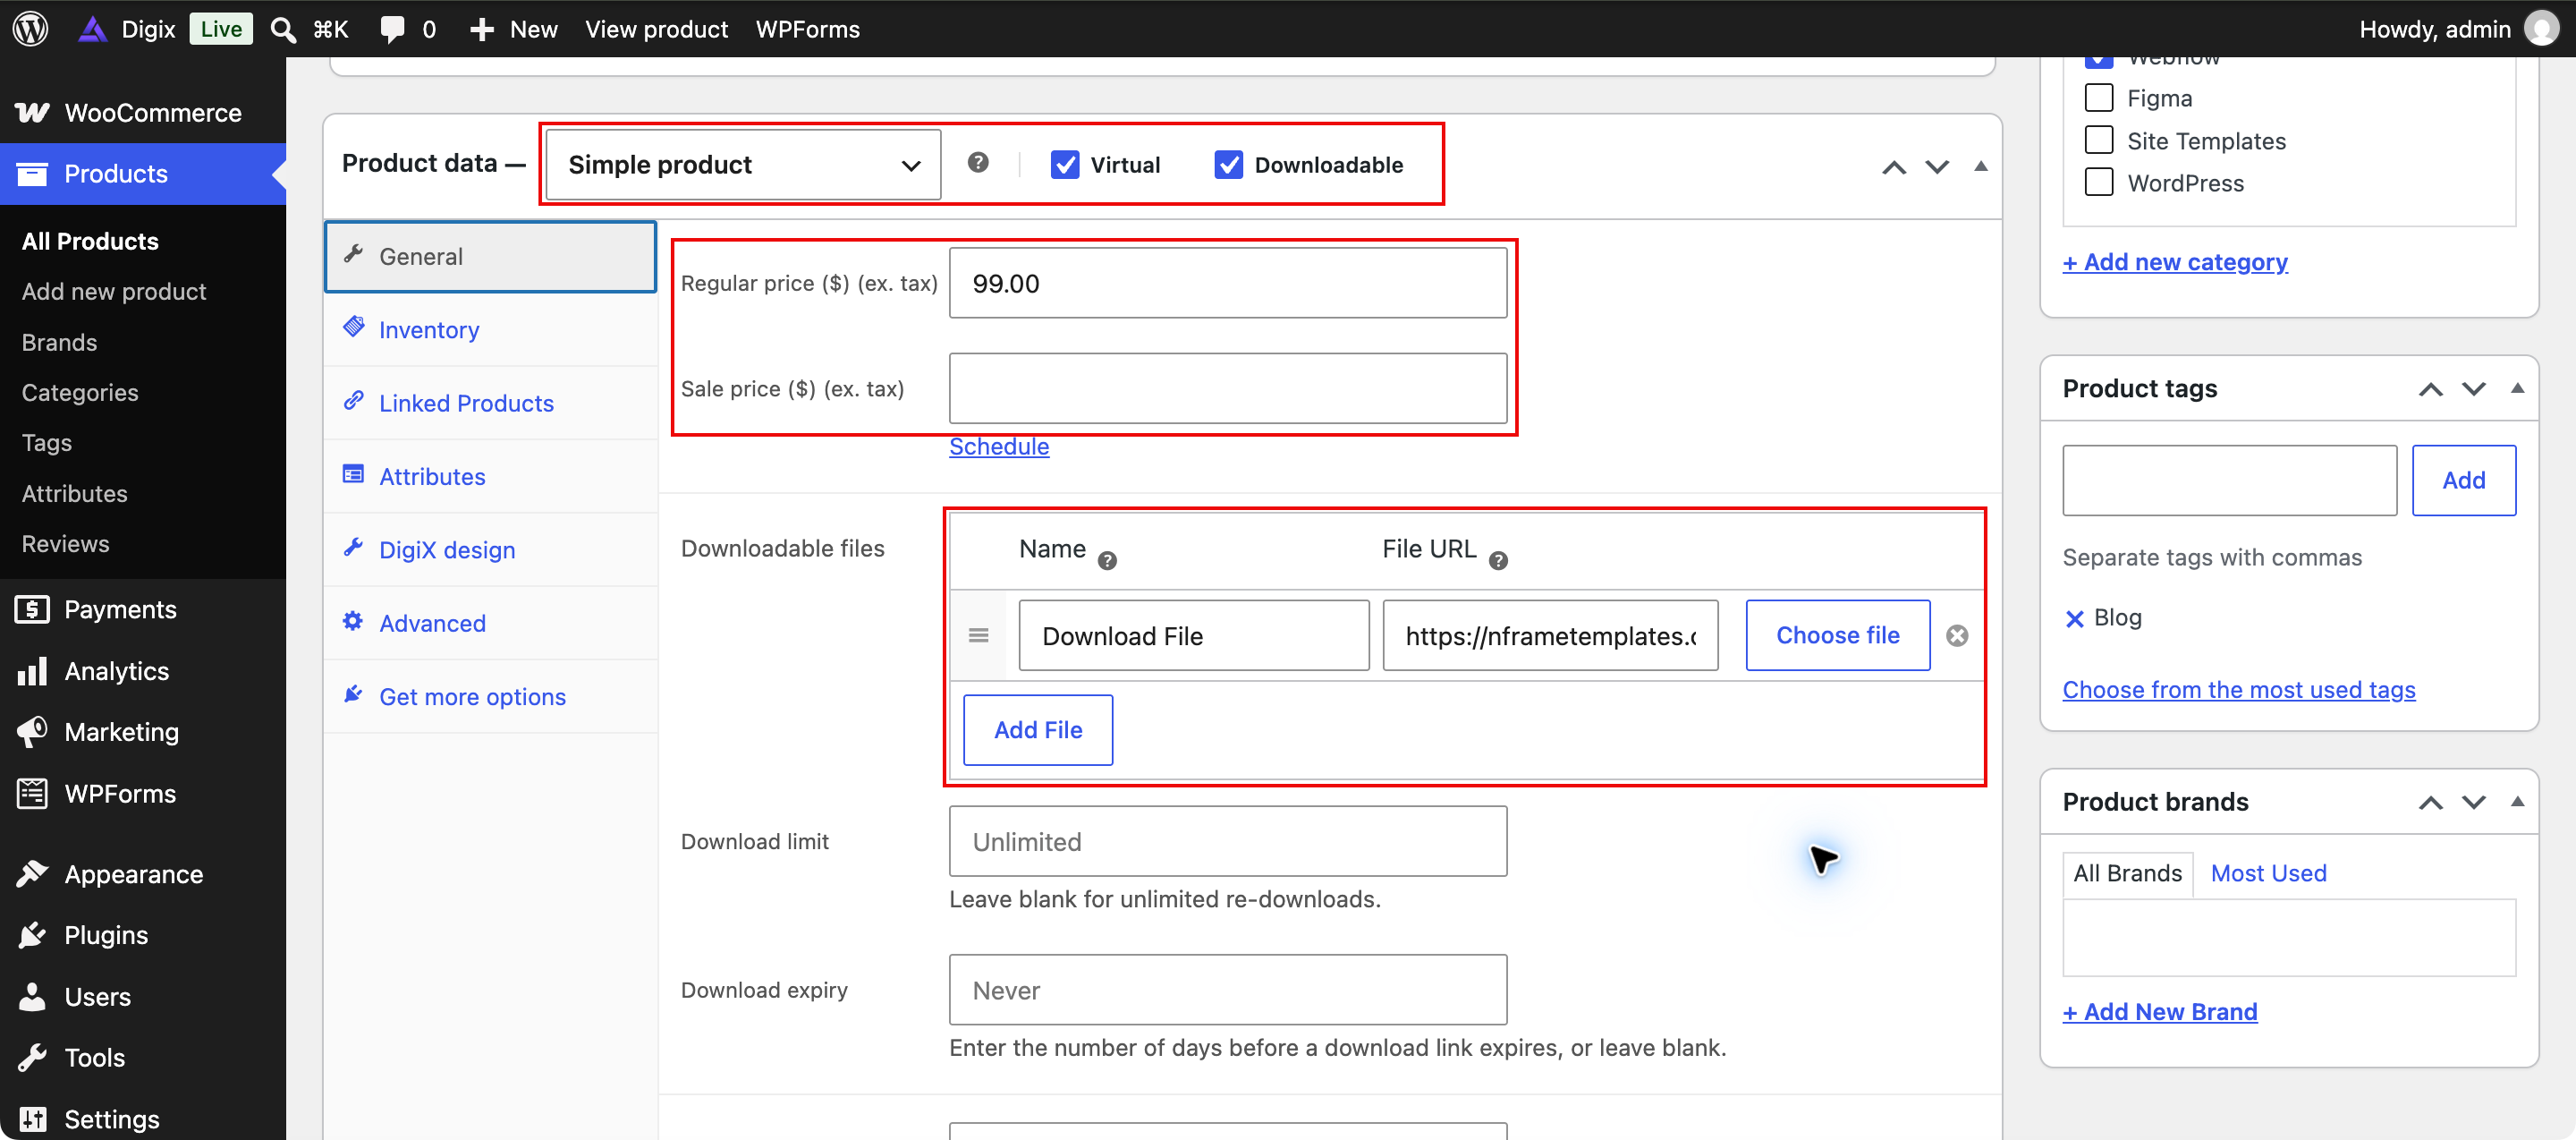
↑ Back to top- Open the product and enable Downloadable.
- Add the file customers should receive and give it a clear name.
- Set download limits and expiry if required.
- Enable Virtual when the item does not require shipping.
- Save and complete a test purchase. Check that the download is available to the customer after the appropriate payment/order status.
A preview link is separate from the purchased file. Do not use the public preview URL as the customer’s paid download.
Variable, grouped, and external products
↑ Back to topFor a variable product, create attributes and variations, then set each purchasable variation’s price and availability. For grouped products, link the appropriate products. For external products, configure the external destination and button text. These product types are managed through WooCommerce.
DigiX product details
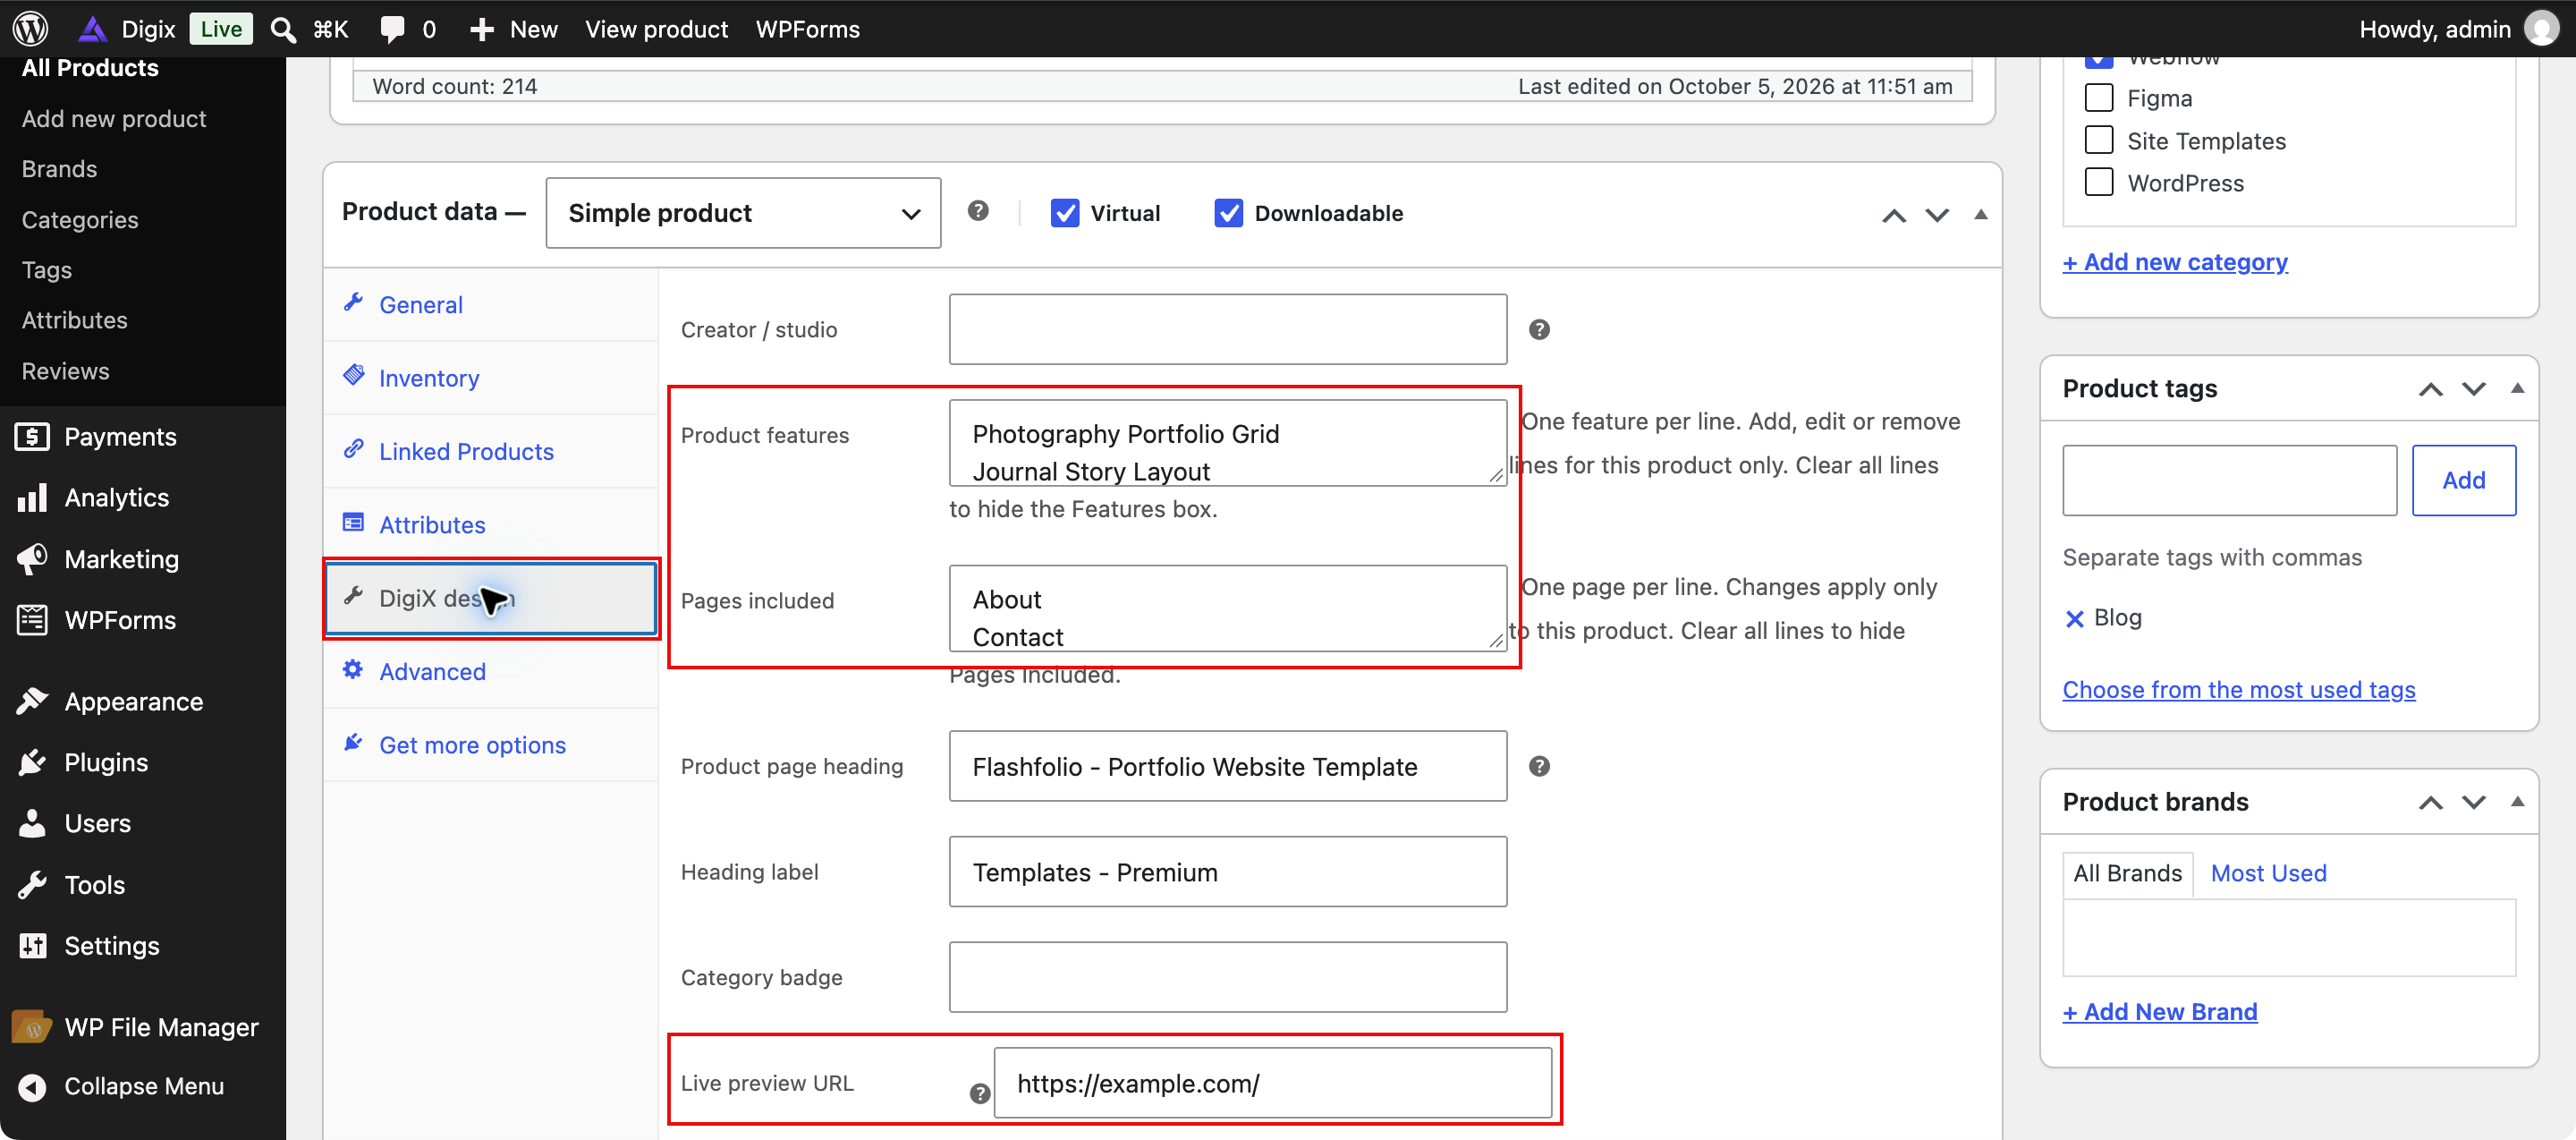
↑ Back to topThe product editor includes optional DigiX presentation fields. Use the field descriptions to decide what applies to your product:
- Product features: enter one feature per line. Clear the list to hide the optional Features box.
- Pages included: enter one page per line when selling a multi-page resource. Clear the list when it does not apply.
- Product page heading: provide an optional heading; leave it blank to use the product name.
- Live preview URL: provide an optional demonstration link.
- Product information: review the optional descriptive fields and dates.
Update the product and inspect the result. Leave irrelevant optional sections empty rather than entering placeholder text. Product category and tag assignments are managed in WooCommerce; descriptive DigiX fields do not replace those assignments.
Forms and newsletter signup
↑ Back to topContact forms
↑ Back to top- Activate WPForms if you use the supplied forms.
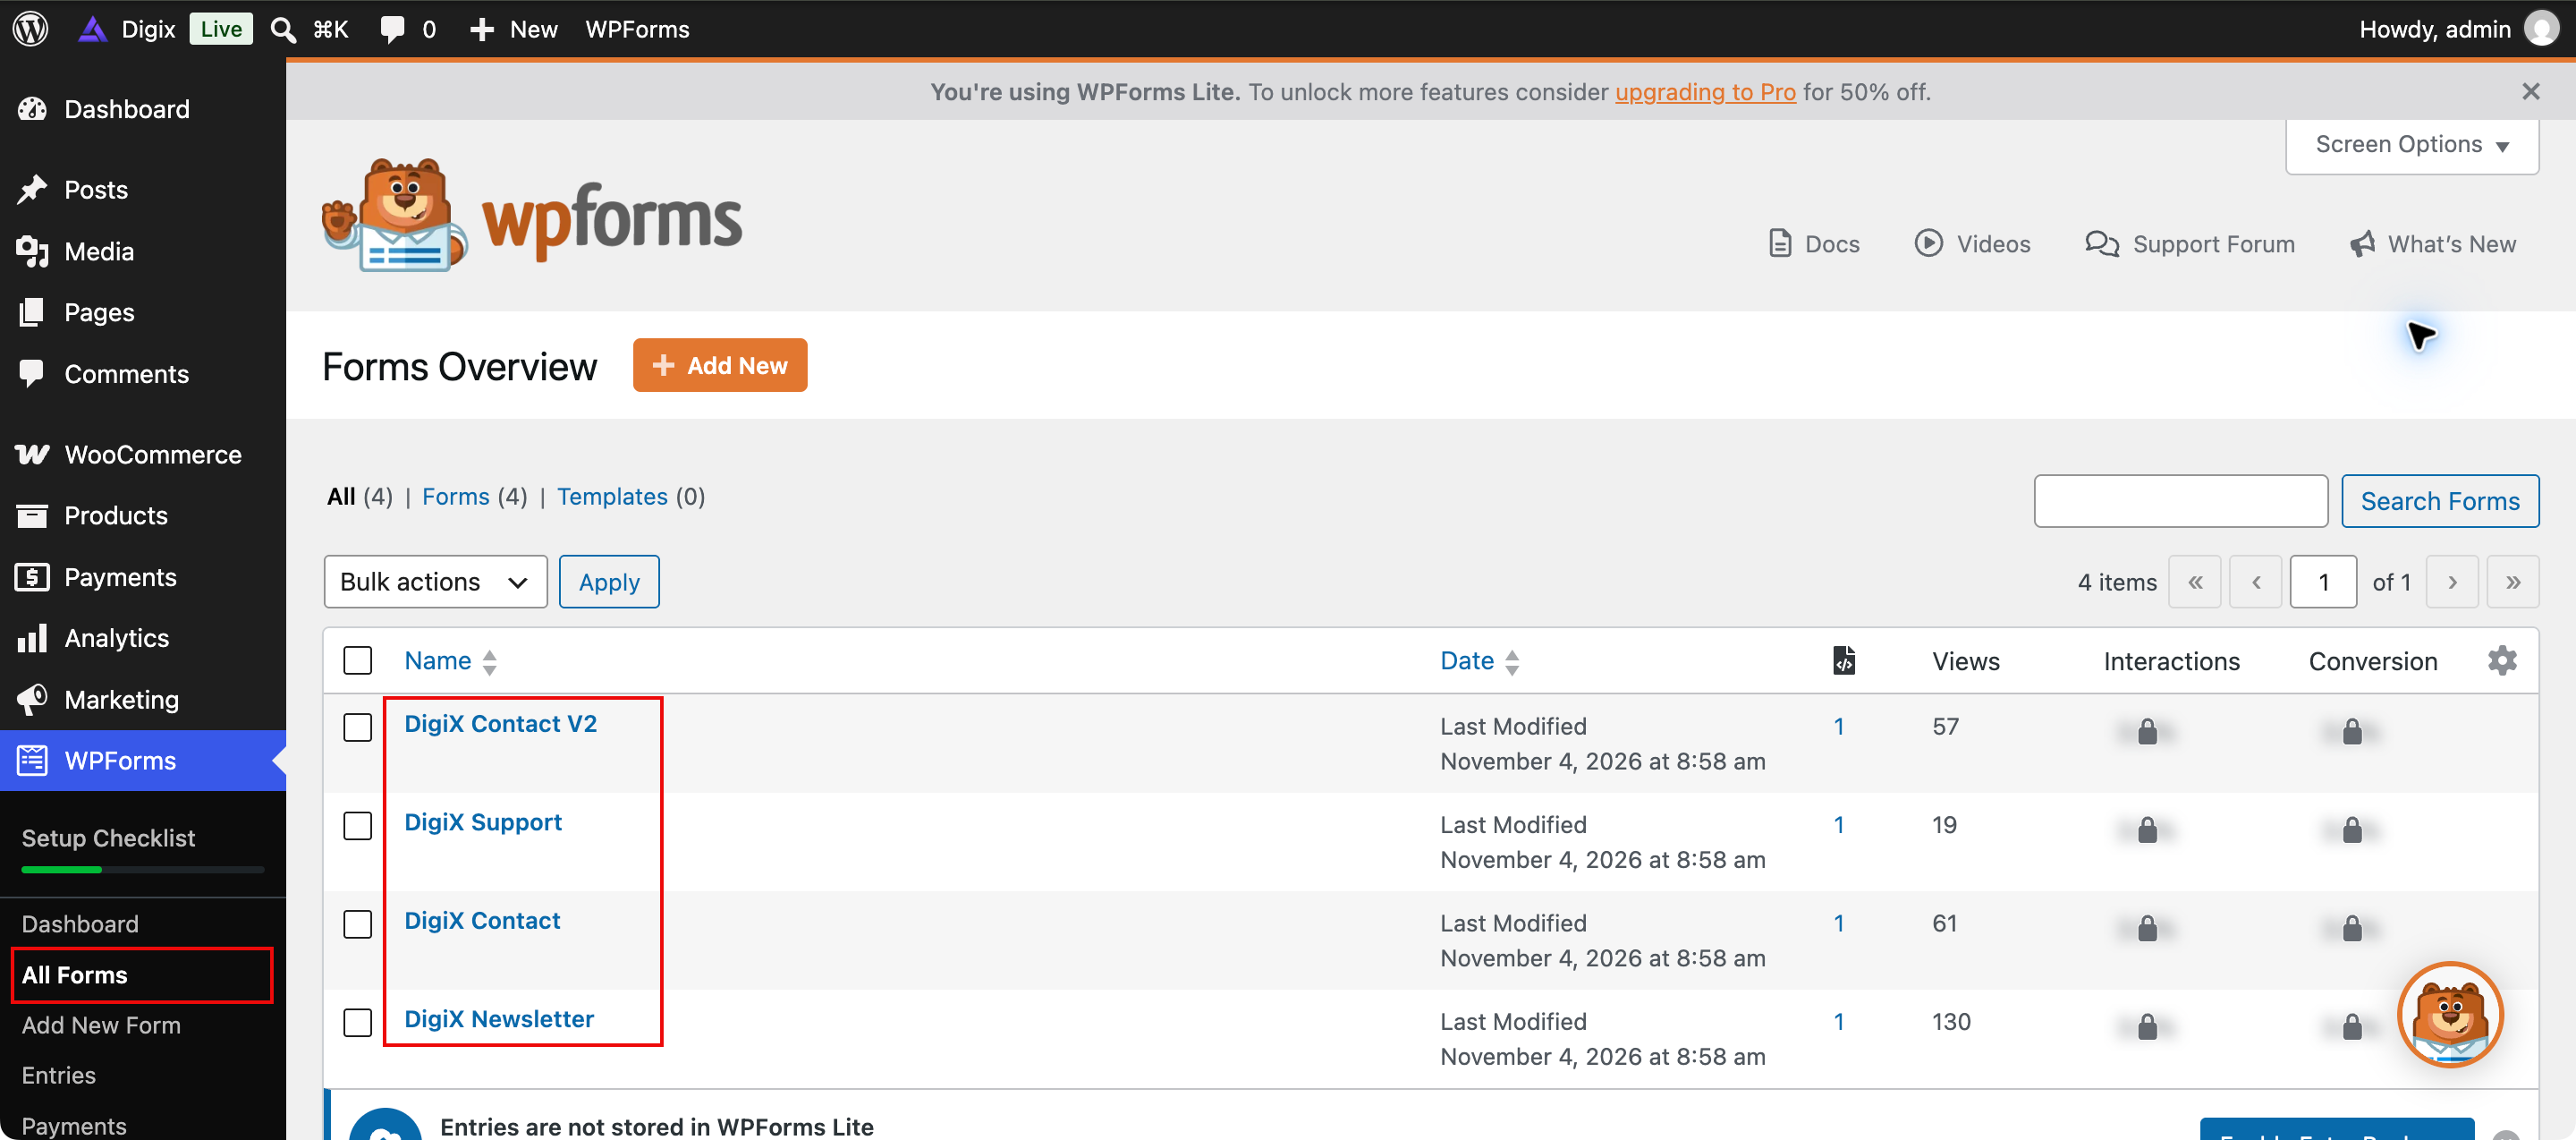
- Go to WPForms → All Forms and open the form you want to use.
- Edit the fields, notification recipient, and confirmation message.
- On the contact page, select the WPForms block and choose the correct form.
- Save and submit a test message from the front end.
Open the form by its name in WPForms → All Forms. The forms shown here are demo examples; your list depends on the forms you have created or imported.
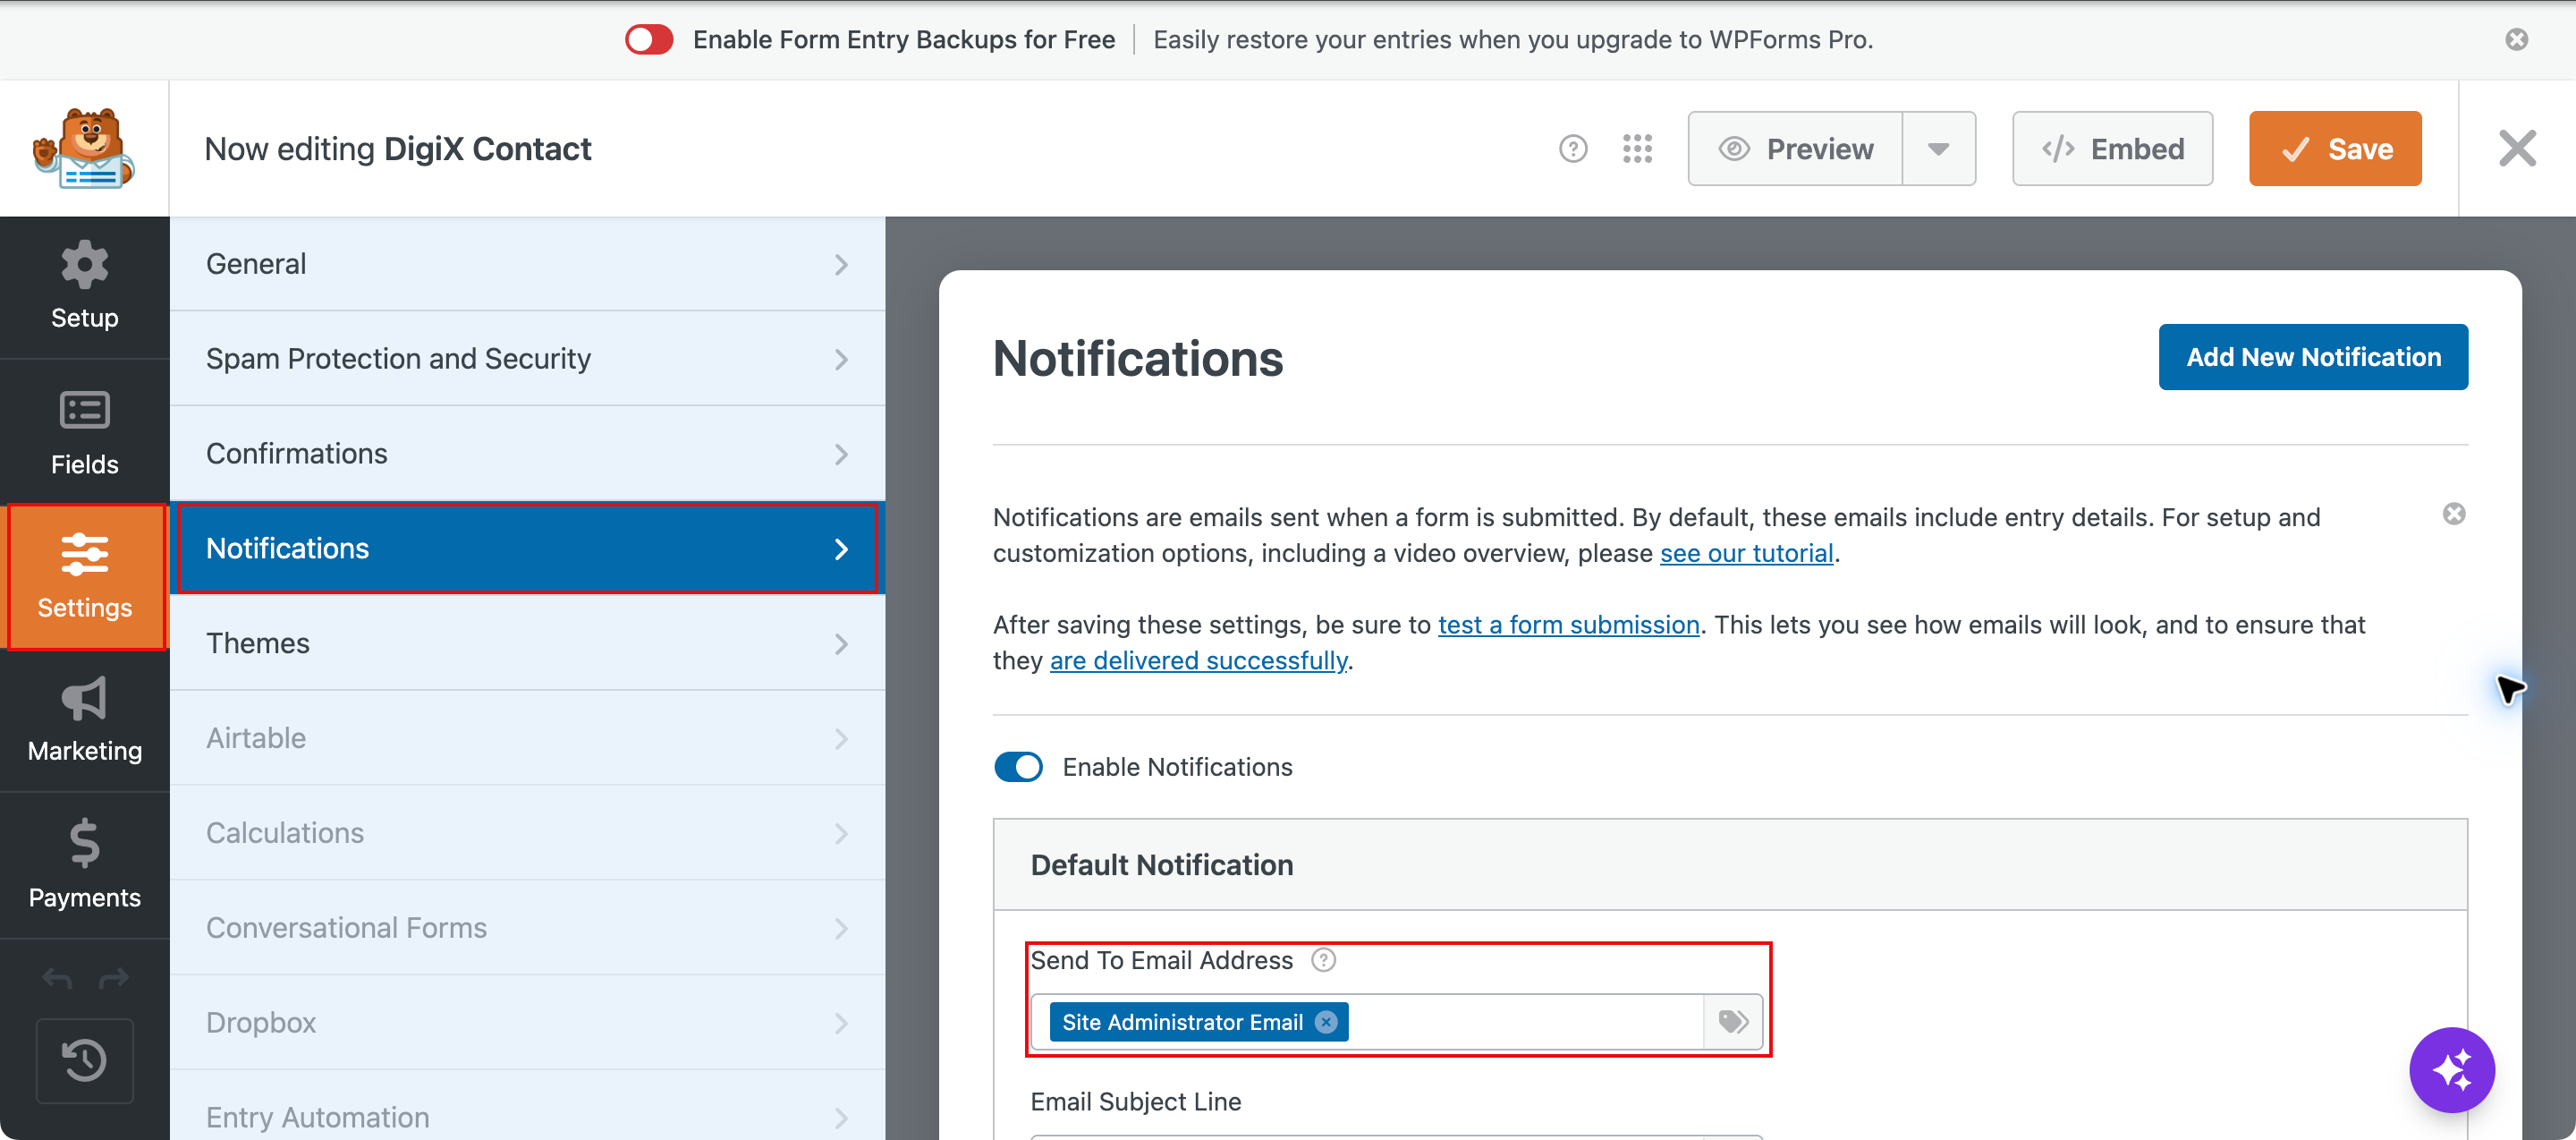
In the form builder, open Settings → Notifications. Set Send To Email Address to the mailbox that should receive submissions. The site-admin email smart tag uses your WordPress administrator email. Review the confirmation message, save the form, and send a test submission.
Newsletter sections
↑ Back to topA newsletter section provides the visual layout. Connect the form to your chosen email marketing service separately, using the appropriate plugin or integration. Check consent wording and confirm that a test signup reaches the intended list.
Updates and safe customization
↑ Back to top- Back up the site’s files and database before updating.
- Test the new theme version on staging where possible.
- Install the update through your available WordPress update flow, or upload the new digix.zip under Appearance → Themes → Add Theme → Upload Theme and review the replacement prompt.
- Clear relevant caches and check your key pages and purchase flow.
Use a child theme for PHP or template-code customizations. Editing the parent theme’s files directly can cause those changes to be overwritten by an update. Site Editor customizations can override updated template files, so review saved customizations if a template does not reflect an update.
Check responsive previews
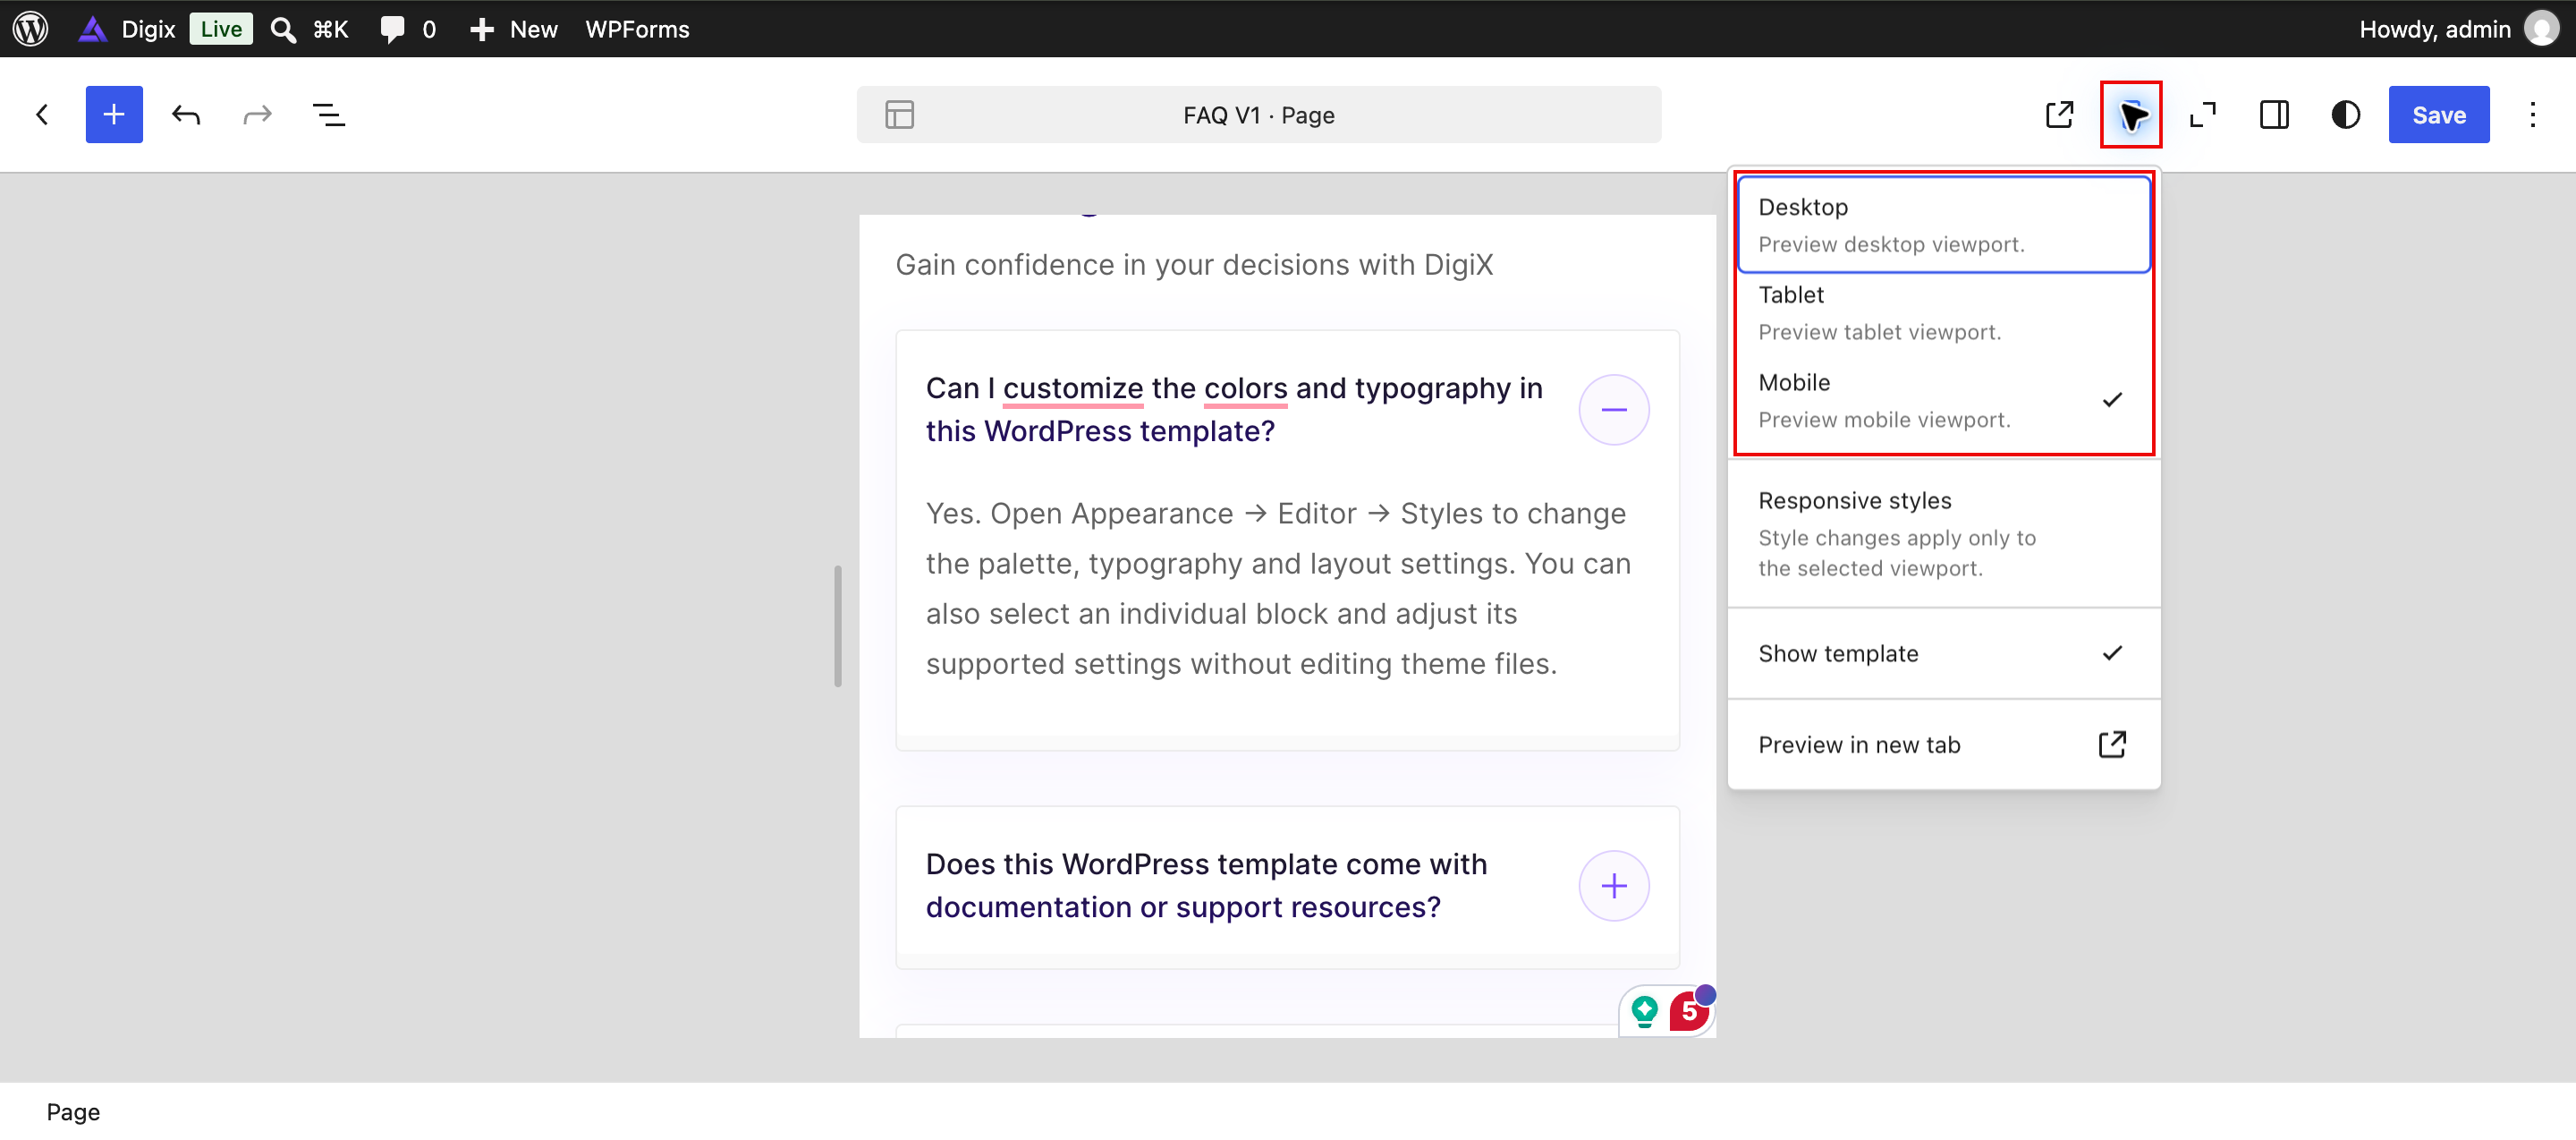
↑ Back to top- In the editor, open the View menu.
- Switch between Desktop, Tablet, and Mobile.
- Check long headings, buttons, images, and navigation.
- Also check the actual front end on a phone. The editor preview helps with layout, but does not replace testing real navigation, forms, and checkout.
Launch checklist
↑ Back to top- Replace all sample content, product files, prices, promotional claims, contact details, and links.
- Check menus, search, images, buttons, and forms on desktop and mobile.
- Review the shop, product, cart, checkout, and account pages.
- Configure payments, taxes, shipping, email delivery, and legal pages.
- Complete a purchase using the payment gateway’s test mode. Verify order emails, account access, and downloadable files.
- Check the site while logged out, then confirm the store’s visibility setting before launch.
Troubleshooting and support
↑ Back to topThe site does not look like the demo
↑ Back to topConfirm that DigiX is active, the correct homepage is assigned, and the expected content exists. If you skipped demo import, add your own pages and patterns. Review saved Site Editor customizations and clear relevant caches.
A store page returns 404
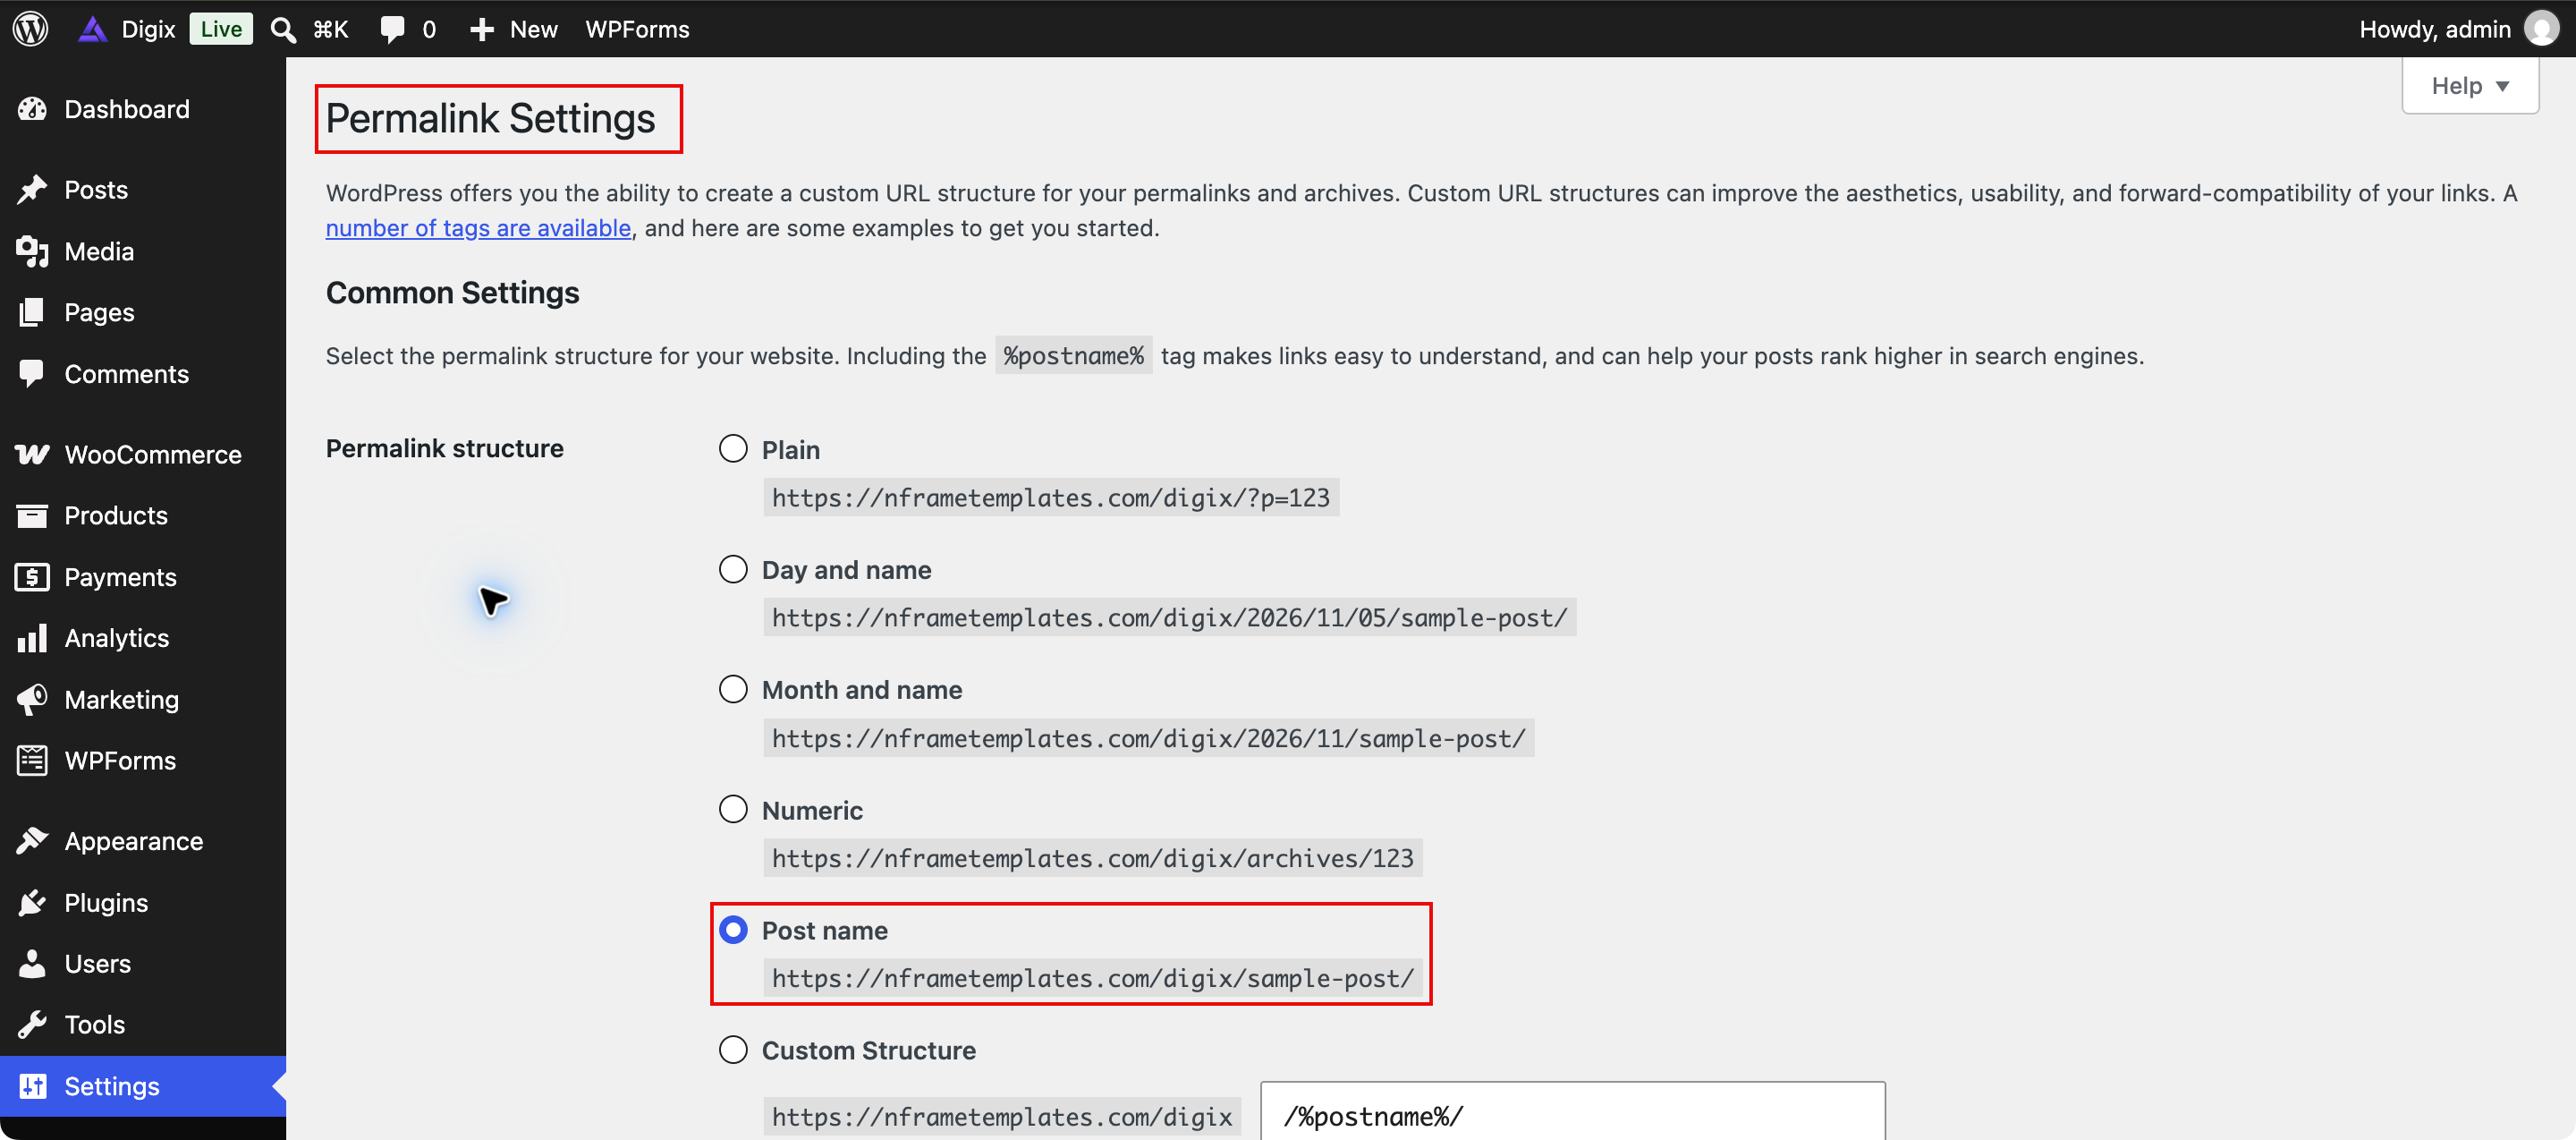
↑ Back to topCheck that the page exists and is assigned in WooCommerce. Then open Settings → Permalinks and save the current settings. Test the affected page again.
Keep the current permalink structure when refreshing these settings. Changing an established URL structure can affect existing links. If saving does not resolve the problem, check the page assignment and ask your host to review rewrite rules.
No payment methods are available
↑ Back to topEnable and configure a payment gateway. Check its supported currency, customer location, and cart conditions. The theme does not activate payment methods.
Demo import stops or takes a long time
↑ Back to topRead the importer’s error and check which content has already imported. Ask your host to check resource limits and blocked media downloads if needed. Avoid repeated imports that create duplicates.
A recommended-plugin notice is missing
↑ Back to topCheck Appearance → Install Plugins. A notice may not be needed when the relevant plugins are already installed and active.
A section or image is missing
↑ Back to topCheck its product fields, featured image, Image block, or query settings. Empty optional fields do not create content automatically. Confirm that the content is published and matches any category or query filters.
Form emails do not arrive
↑ Back to topCheck the notification recipient and spam folder. Review your site’s email delivery configuration and send another test message.
Frequently asked questions
↑ Back to topIs demo import required? No. Build pages with patterns and add your own products.
Do I need a page builder? No. DigiX uses WordPress blocks and the Site Editor.
Can I sell physical products? Yes. Configure the relevant WooCommerce product, shipping, and tax settings.
Are payment or newsletter services included? No. Set up your chosen services separately.
Get help
↑ Back to topOpen your WooCommerce support area and select DigiX. Include the affected page, steps to reproduce the issue, version numbers, and a screenshot. Do not include passwords, payment details, or customer information.

