This guide covers best practices for customizing your WooCommerce theme. You can modify content and appearance to suit your needs, but following the right approach helps you preserve customizations when themes and extensions update. This document walks you through two recommended approaches: using a plugin for minor changes and using a child theme for major alterations.
Why best practices matter
↑ Back to topMany store owners customize their theme from the default look, changing link colors, layout, and overall feel. The most common approach is to modify theme files directly, but this creates a problem: all modifications are lost when theme files are overwritten during an update.
The approaches below help you keep your customizations intact through updates and stay in control of your changes. There are two recommended methods depending on the scope of your changes:
- Plugin or built-in tools — for minor CSS or PHP changes
- Child theme — for major template or structural alterations
Use a plugin or built-in tools for minor changes
↑ Back to topIf you only plan to make minor modifications to your CSS or add small PHP snippets, use built-in WordPress tools or a plugin that keeps your changes separate from theme files. This preserves your customizations during theme updates.
Additional CSS for style changes
↑ Back to topWordPress includes a built-in way to add custom CSS that persists through theme updates. Depending on your theme type, use one of the following approaches:
- Classic themes: Go to Appearance > Customize > Additional CSS in your WordPress dashboard. Add your custom CSS rules in the editor and click Publish.
- Block themes: Go to Appearance > Editor, open the Styles panel, and select Additional CSS to add custom styles.
Both methods store your CSS independently from the theme files, so your changes are preserved when the theme updates.
Example: Change navigation link color
↑ Back to topThis example demonstrates how to find a CSS rule using your browser’s developer tools and apply a custom change using the Additional CSS panel. This section involves inspecting CSS selectors in the browser and writing CSS rules.
To change the navigation link color:
- Right-click the navigation link element in your browser and select Inspect. The browser developer tools open and display the styles applied to the element.
- In the Styles panel, locate the CSS rules for the navigation links. For example, in the Storefront theme the default styles look like this:
.main-navigation ul li a { color: #ffffff; }.main-navigation ul li a:hover { color: #e6e6e6; } - Go to Appearance > Customize > Additional CSS in your WordPress dashboard. Paste the CSS rules and change the color values. For example, to set the link color to red and the hover color to white:
.main-navigation ul li a { color: red; }.main-navigation ul li a:hover { color: white; } - Click Publish and refresh the page. The navigation link color now appears red, and hovering over a link turns it white.
You can also add new styles to supplement those already in the theme. If the theme updates, your custom styles remain intact in the Additional CSS panel. Back up your theme before updating to a newer version and review the site update tutorial for additional guidance.
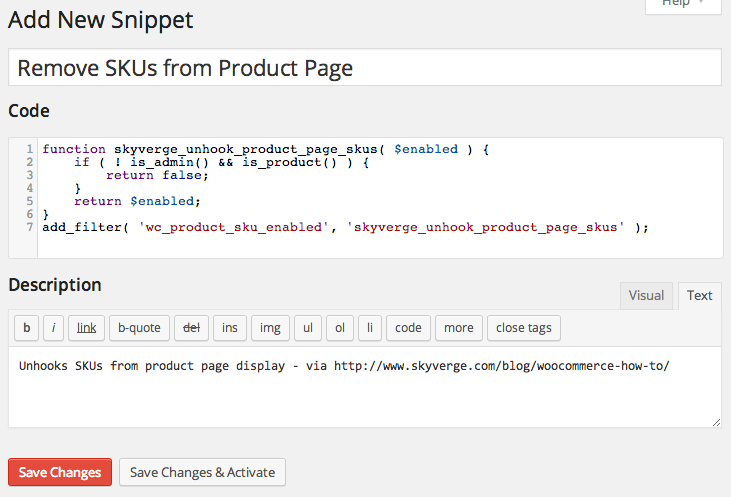
Code Snippets for PHP changes
↑ Back to topThe Code Snippets plugin allows you to add PHP snippets to your site instead of pasting code into the functions.php file. This section involves writing and managing PHP code.
You can write a brief description for each snippet and activate or deactivate them as needed. This approach keeps your PHP customizations safe from theme updates.
Use a child theme for major changes
↑ Back to topIf you need to modify template files, add significant PHP functionality, or make structural changes to your theme, use a child theme. A child theme inherits the parent theme’s styles and functionality but lets you override specific files and add custom code that persists through parent theme updates.
Use a premium child theme
↑ Back to topSome themes offer child themes you can install and activate to change the look of the parent theme without writing code.
A purchased child theme is designed to change the appearance of a theme through another designer’s work. Do not add custom code to a premium child theme. If the child theme updates, your custom code is overridden, the same way direct edits to a parent theme are lost during updates.
Create a custom child theme
↑ Back to topYou can also create your own child theme. A custom child theme acts as a layer on top of the parent theme. Its only purpose is to give priority to your custom code and prevent that code from being discarded when the parent theme updates.
To create a custom child theme, follow the Set up and use a child theme guide. For general information about how child themes work, refer to the WordPress.org documentation on child themes.
Resources
↑ Back to topThe following resources provide additional guidance on safely customizing WordPress and WooCommerce:
- WordPress.org child themes documentation
- WooCommerce developer customization guide
- Set up and use a child theme
Questions and support
↑ Back to topDo you still have questions and need assistance?
This documentation is about the free, core WooCommerce plugin, for which support is provided in our community forums on WordPress.org. By searching this forum, you’ll often find that your question has been asked and answered before.
If you haven’t created a WordPress.org account to use the forums, here’s how.
- If you’re looking to extend the core functionality shown here, we recommend reviewing available extensions in the WooCommerce Marketplace.
- Need ongoing advanced support or a customization built for WooCommerce? Hire a Woo Agency Partner.
- Are you a developer building your own WooCommerce integration or extension? Check our Developer Resources.
If you weren’t able to find the information you need, please use the feedback thumbs below to let us know.