
Hypermarket is a WooCommerce block theme built for the WordPress Site Editor. It includes ready-made store demos, design styles, patterns, custom blocks, WooCommerce layouts, and a guided setup experience.
After activating Hypermarket, you can choose between two ways to start:
- Import a ready-made demo to begin with a complete example store.
- Set up the store manually if you want to build from your existing content or start from scratch.
Both setup methods give you access to the same Hypermarket theme features. Choosing a demo is a faster starting point, while manual setup gives you more control over the initial store configuration.
Requirements
↑ Back to topBefore installing Hypermarket, make sure your site meets the minimum requirements:
- WordPress 7.1 or later.
- PHP 8.0 or later.
- WooCommerce 10.0 or later for store functionality.
Hypermarket 1.1 is tested with WooCommerce up to version 11.1.
WooCommerce provides the product, cart, checkout, customer account, order, and other ecommerce functionality used by Hypermarket.
Installation
↑ Back to topTo start using a product from WooCommerce.com, you can use the “Add to store” functionality on the order confirmation page or the My subscriptions section in your account.
- Navigate to My subscriptions.
- Find the Add to store button next to the product you’re planning to install.
- Follow the instructions on the screen, and the product will be automatically added to your store.
Alternative options and more information at:
Managing WooCommerce.com subscriptions.

After activation, Hypermarket adds a Hypermarket Setup screen under Appearance > Hypermarket Setup.
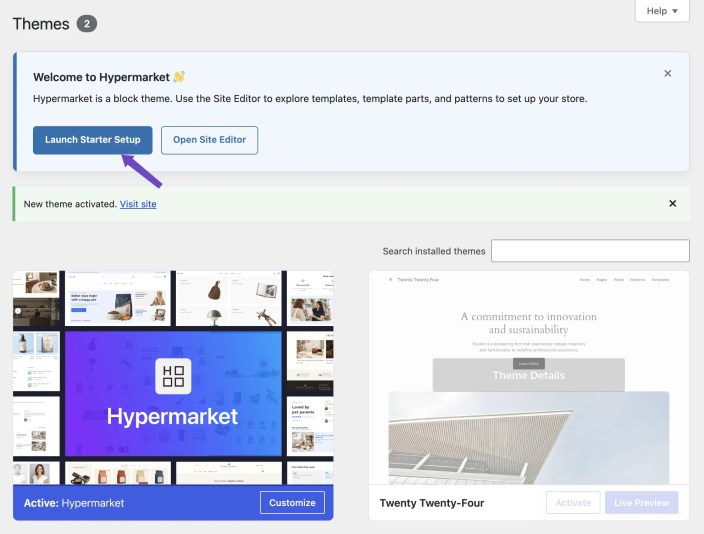
The setup screen helps you choose how you want to begin building the store.
Choose a setup method
↑ Back to topThe first Hypermarket Setup screen lets you start with a ready-made demo or continue without one.
Start with a ready-made demo
Choose this option when you want a complete store design that you can customize afterward.
Hypermarket includes three ready-made demos:
- Minimal Store, the main Hypermarket demo.
- Coffee Shop.
- Pet Shop.
Each demo can include its own pages, products, images, navigation, templates, template parts, store settings, and Hypermarket design style.
You can preview each demo before selecting it.
After choosing a demo, Hypermarket guides you through:
- Installing or activating the plugins required by the demo.
- Importing the demo content and store configuration.
Required plugins must be active before the demo import can begin. Recommended plugins are optional.
See Importing a demo for detailed instructions, including importing into an existing site, import progress, warnings, retry options, and switching demos.
Continue without a demo
Select Continue without a demo if you prefer to set up the store manually.
The manual setup guides you through:
- Setting up WooCommerce.
- Creating a store homepage.
- Creating a blog page.
- Preparing the WooCommerce store pages.
- Choosing a Hypermarket design style.
- Optionally importing sample products.
The manual setup is useful when you already have store content, want to create your own layouts, or do not want to import a complete demo.
See Manual setup for detailed instructions.
Where to customize Hypermarket
↑ Back to topHypermarket is a block theme, so most site-wide design changes are made through the WordPress Site Editor.
Go to Appearance > Editor to work with:
- Styles.
- Templates.
- Template parts.
- Header and footer layouts.
- Navigation.
- Pages.
- Patterns.
- WooCommerce layouts.
Products and other WooCommerce data continue to be managed through the normal WooCommerce screens in the WordPress dashboard.
For example:
- Go to Products to manage products.
- Use WooCommerce settings for store configuration.
- Use Appearance > Editor to change how the store looks and how templates are arranged.
Hypermarket Setup and the Site Editor serve different purposes
↑ Back to topHypermarket Setup helps you prepare the initial store.
Use it to:
- Choose and import a demo.
- Install required demo plugins.
- Set up WooCommerce when using manual setup.
- Create essential pages.
- Select an initial design style.
- Import optional sample products.
Appearance > Editor is where you continue designing and customizing the site after setup.
Use the Site Editor to:
- Change the store’s global styles.
- Edit the header and footer.
- Customize WooCommerce templates.
- Edit page and post templates.
- Insert Hypermarket patterns.
- Adjust navigation.
- Customize individual blocks.
You can return to Hypermarket Setup later if you want to review the setup flow or choose another demo.
Demo content is optional
↑ Back to topYou do not need to import a Hypermarket demo to use the theme.
All core Hypermarket functionality remains available when you choose manual setup, including:
- Hypermarket design styles.
- Hypermarket patterns.
- Hypermarket blocks.
- WooCommerce styling.
- Product layouts.
- Site Editor templates and template parts.
The demos are provided as ready-made starting points rather than a requirement for using the theme.
After setup
↑ Back to topOnce your initial setup is complete, you can begin replacing sample content and adapting the design to your store.
Typical next steps include:
- Add or edit products.
- Replace demo images and text.
- Configure product categories and attributes.
- Set up navigation.
- Add your logo.
- Customize colors and typography.
- Edit the header and footer.
- Adjust shop and product templates.
- Add Hypermarket patterns and blocks.
- Configure WooCommerce payments, shipping, taxes, and other store settings.
The following sections explain each part of Hypermarket in more detail, beginning with Importing a demo and Manual setup.
Importing a demo
↑ Back to topHypermarket includes a built-in demo importer that lets you start with a complete ready-made store instead of building every page and layout manually.
You can preview a demo, install the plugins it needs, import its content, and let Hypermarket configure the main WordPress and WooCommerce settings used by that demo.
Hypermarket currently includes three demos:
- Minimal Store, the main Hypermarket demo.
- Coffee Shop.
- Pet Shop.
Each demo has its own content, layout, and associated Hypermarket design style.
Choose a demo
↑ Back to topGo to Appearance > Hypermarket Setup.
The setup screen displays the available demos with a preview image, description, and preview option.
To choose a demo:
- Review the available demos.
- Select Preview Demo to open the live demo in a new tab.
- Select Choose this demo for the design you want to import.
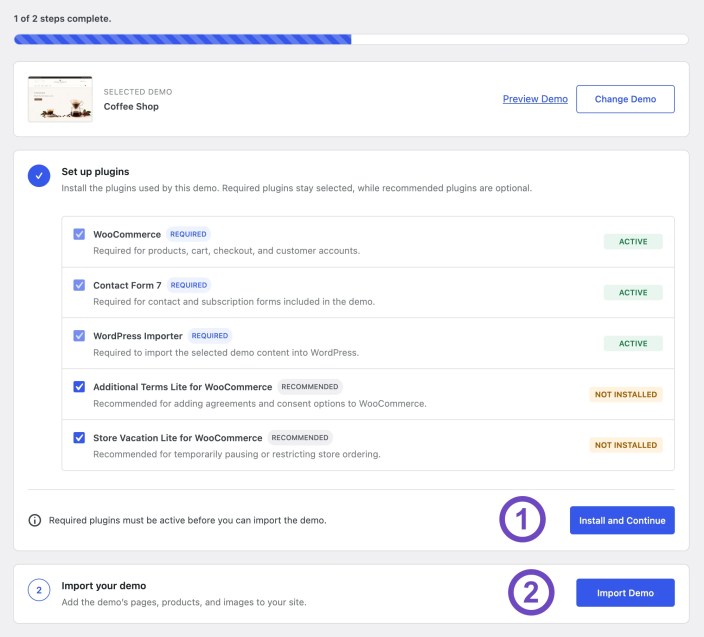
- Review the selected demo on the next setup screen.
- Complete the plugin setup step.
- Select Import Demo when you are ready to begin.
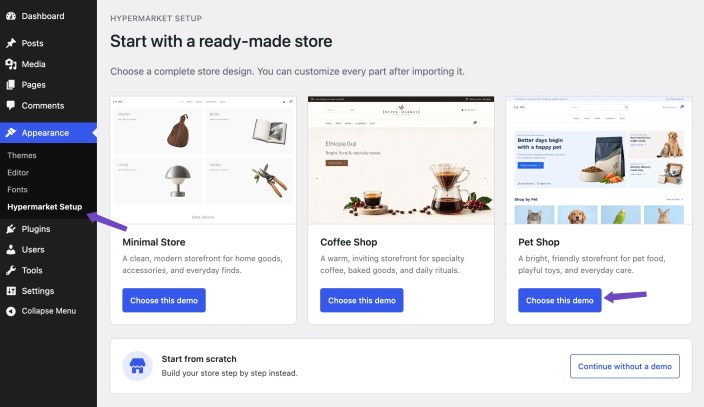
If you change your mind before importing, select Change Demo to return to the demo selection screen.
Available demos
↑ Back to topMinimal Store
Minimal Store is the main Hypermarket demo.
It uses the default Hypermarket design and provides a clean, flexible storefront that can be adapted to a wide range of product types.
Coffee Shop
Coffee Shop is designed for coffee, food, lifestyle, and similar product stores.
It uses the Roast Hypermarket design style.
Pet Shop
Pet Shop is designed for pet food, toys, accessories, and everyday pet care products.
It uses the Daylight Hypermarket design style.
The demos are starting points. After importing one, you can replace its products, images, text, navigation, colors, typography, and layouts with your own content.
Set up required and recommended plugins
↑ Back to topAfter choosing a demo, Hypermarket shows the plugins associated with it.
Plugins are separated into required and recommended plugins.
Required plugins
Required plugins must be installed and active before the demo can be imported.
For example, WooCommerce is required for store functionality such as products, cart, checkout, and customer accounts.
Hypermarket prevents the demo import from starting while a required plugin is missing or inactive.
Use Install and Continue to install or activate the required plugins.
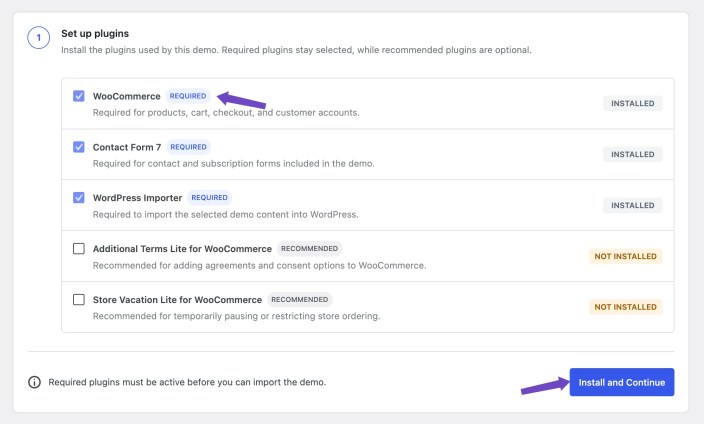
Recommended plugins
Recommended plugins are optional.
They may provide additional functionality used by the demo, but they are not required to complete the demo import.
You can leave recommended plugins unselected and continue with the import.
What Hypermarket imports
↑ Back to topThe exact content can vary between demos, but a Hypermarket demo import can include the following.
Pages
Demo packages can include store and content pages such as:
- Home.
- Shop.
- Cart.
- Checkout.
- My Account.
- Blog.
- Contact.
- FAQ.
- Privacy Policy.
- Terms and Conditions.
Hypermarket also updates the relevant page assignments where required.
Products and product data
Demo packages can include WooCommerce products and their related data.
Depending on the demo, this can include:
- Product titles.
- Descriptions.
- Prices.
- Images and galleries.
- Categories.
- Tags.
- Attributes.
- Variations.
- Other WooCommerce product data included in the demo package.
Imported products are sample content and can be edited or removed after setup.
Posts and media
A demo can also include blog posts, featured images, and other media used throughout the design.
Hypermarket attempts to import the media referenced by the demo so the imported site more closely matches the preview.
Navigation
Hypermarket imports the navigation content used by the selected demo and updates the related navigation references.
This allows imported headers, footers, and other layouts to use the correct navigation on your site.
Templates and template parts
The importer applies the Hypermarket templates and template parts used by the selected demo.
This can include:
- Header.
- Footer.
- Product templates.
- Product archive templates.
- Page templates.
- Post templates.
- Other template parts included with the demo.
These layouts can be edited later through Appearance > Editor.
Site logo and related settings
If the selected demo includes a site logo or other supported site settings, Hypermarket applies them as part of the demo configuration.
You can replace the imported logo and other branding after the import is complete.
WooCommerce and store settings
Hypermarket configures important page assignments used by WordPress and WooCommerce.
Depending on the demo, this can include:
- Homepage.
- Blog page.
- Shop page.
- Cart page.
- Checkout page.
- My Account page.
This avoids having to assign each imported page manually after the demo import.
Hypermarket design style
Each demo has an associated Hypermarket design style.
The current demo and style combinations are:
- Minimal Store uses the default Hypermarket style.
- Coffee Shop uses Roast.
- Pet Shop uses Daylight.
The associated design style is applied automatically during the demo import.
You can switch to another Hypermarket design style later without removing the imported store content.
Warning: Importing a demo can change templates, navigation, design styles, and important page assignments. If the site already contains content or is live, create a backup before starting the import.
Importing into a site that already has content
↑ Back to topHypermarket can import a demo into a site that already contains content.
When Hypermarket detects an existing site, it displays a confirmation before the import begins.
The confirmation explains which parts of the site can be affected.
Existing WordPress content such as your pages, posts, products, and media is not automatically deleted.
However, the selected demo can replace or update Hypermarket-related site configuration, including:
- Hypermarket templates.
- Template parts.
- Header.
- Footer.
- Navigation references.
- Hypermarket design style.
- Homepage assignment.
- Blog page assignment.
- WooCommerce page assignments.
The demo also adds its own pages, products, posts, and media.
This means importing a demo into an established site can result in both your existing content and imported demo content being present.
Review the confirmation carefully before selecting Continue with Import.
For a live or established store, creating a backup before importing a demo is recommended.
Start the demo import
↑ Back to topOnce the required plugins are active, the Import Demo button becomes available.
Select Import Demo to start the process.
Hypermarket then downloads the selected demo package, imports its content, and applies the related store configuration.
Keep the Hypermarket Setup page open while the import is running.
Import progress
↑ Back to topHypermarket displays the current import progress instead of leaving the process on a single loading screen.
The import can move through stages such as:
- Preparing.
- Downloading.
- Importing content.
- Configuring the store.
- Completing the import.
The progress percentage and status message update while Hypermarket works through these stages.
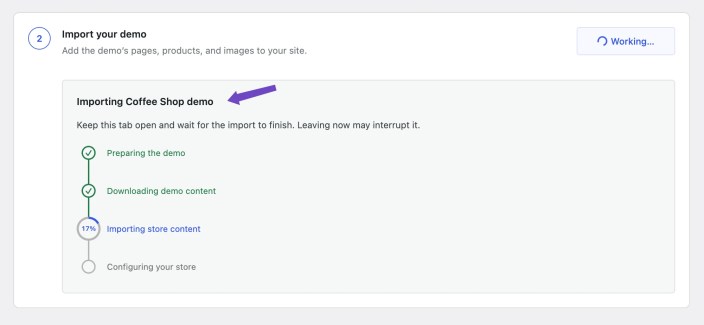
The amount of time required depends on factors such as:
- Server performance.
- Network connection.
- Number of products and images in the demo.
- Remote media download speed.
- WordPress and WooCommerce processing time.
Importing a complete demo can therefore take longer than a normal WordPress page update.
Avoid closing or reloading the page while the importer is actively running unless Hypermarket displays a recovery option.
Connection interruptions
↑ Back to topIf communication between your browser and the server is interrupted, Hypermarket can report the connection state and provide recovery options where appropriate.
An interrupted browser request does not necessarily mean the entire demo import must be started again.
Follow the status shown by Hypermarket before manually refreshing the page or starting another import.
Import warnings
↑ Back to topA warning means that the main import completed but one or more non-critical items could not be imported exactly as expected.
For example, an individual image or media file may fail to download while the rest of the demo imports successfully.
Hypermarket can complete the demo import while reporting these items as warnings.
If the import finishes with warnings:
- Review the warning message.
- Open the imported site.
- Check for missing images or affected content.
- Replace missing media manually if necessary.
A warning does not automatically mean the entire demo import failed.
Import failures
↑ Back to topAn import failure means Hypermarket could not complete a required part of the import.
Possible causes can include:
- The demo package could not be downloaded.
- A required server operation failed.
- A fatal WordPress or PHP error interrupted the import.
- A required plugin is unavailable.
- The importer could not complete the required store configuration.
When an import fails, Hypermarket displays an error and the available recovery action.
Retry a failed or interrupted import
↑ Back to topIf Hypermarket displays a Retry option, use it to retry the failed import.
The importer keeps track of its current state and includes safeguards for interrupted or incomplete imports.
Using Hypermarket’s retry action is preferable to repeatedly refreshing the browser or manually starting multiple imports.
Before retrying:
- Read the error shown in Hypermarket Setup.
- Confirm that the site can connect to the internet.
- Confirm that all required plugins are active.
- Select Retry.
Hypermarket will attempt to recover and continue the demo setup.
Getting support
↑ Back to topIf the import continues to fail after retrying, use the support option provided in the Hypermarket Setup interface.
When contacting support, include useful details such as:
- Which Hypermarket demo you were importing.
- The exact error or warning shown.
- The stage where the problem occurred.
- Whether the site already contained content.
- Whether the issue happened again after using Retry.
This information can help determine whether the problem is related to downloading the demo package, importing WordPress content, media processing, plugin setup, or post-import store configuration.
After the import
↑ Back to topOnce the import completes, review the storefront before replacing the sample content.
Useful areas to check include:
- Homepage.
- Header and navigation.
- Footer.
- Shop page.
- Product category pages.
- Individual product pages.
- Cart.
- Checkout.
- My Account.
- Blog.
- Contact and other content pages.
You can then begin replacing demo content with your own store content.
Use Appearance > Editor to customize the design and templates, and use Products and the normal WooCommerce screens to manage products and store data.
Switching or re-importing demos
↑ Back to topYou can choose another Hypermarket demo after completing an import.
From Appearance > Hypermarket Setup, select Browse other demos and choose a different demo.
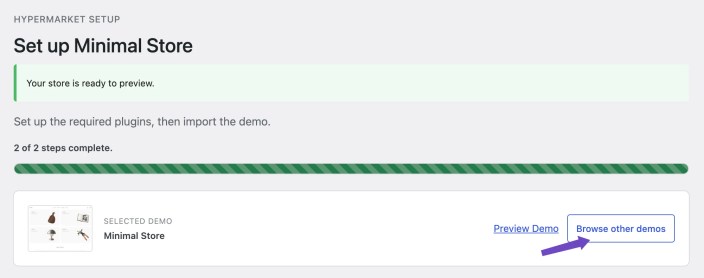
The new demo goes through the same plugin and import process.
When switching demos, Hypermarket can update the site configuration associated with the newly selected demo, including:
- Templates.
- Template parts.
- Header.
- Footer.
- Navigation references.
- Design style.
- Homepage assignment.
- Blog page assignment.
- WooCommerce page assignments.
The new demo also adds its own content.
Existing pages, posts, products, and media are not automatically removed when another demo is imported.
As a result, importing multiple demos into the same site can leave content from earlier demos alongside the newly imported content.
For this reason, using a staging or test site is recommended when you want to compare several demos before choosing the final store design.
Demo imports do not lock the store design
↑ Back to topImporting a demo does not permanently tie the site to that demo.
After the import, you can:
- Replace all sample products.
- Remove imported pages or posts.
- Change the site logo.
- Edit navigation.
- Change the Hypermarket design style.
- Replace the header or footer.
- Edit WooCommerce templates.
- Insert different Hypermarket patterns.
- Customize colors and typography.
- Build new pages from scratch.
The demo provides a complete starting point, while the resulting site remains fully editable through WordPress, WooCommerce, and the Hypermarket design tools.
Manual setup
↑ Back to topHypermarket can be set up without importing a ready-made demo.
Choose manual setup if you want to build the store from scratch, already have existing content, or prefer to add products and layouts yourself.
Go to Appearance > Hypermarket Setup and select Continue without a demo.
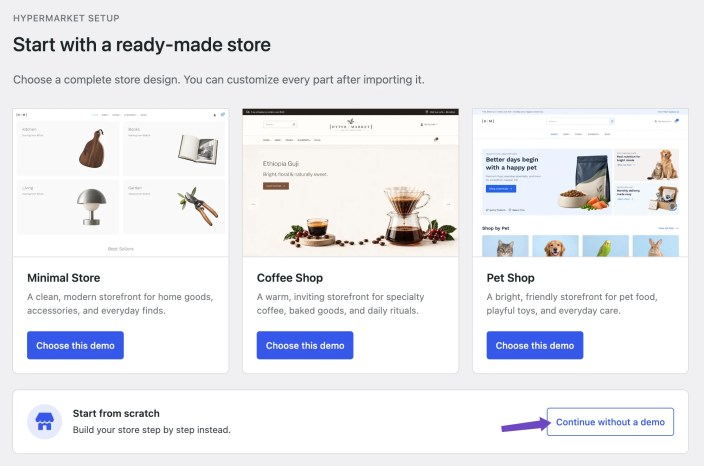
Hypermarket then guides you through the essential store setup steps.
Set up WooCommerce
↑ Back to topWooCommerce provides the ecommerce functionality used by Hypermarket, including products, cart, checkout, customer accounts, orders, shipping, and payments.
The first manual setup step checks whether WooCommerce is installed and active.
Depending on the current state of WooCommerce, Hypermarket displays one of the following actions:
- Install WooCommerce if the plugin is not installed.
- Activate WooCommerce if the plugin is installed but inactive.
- Completed if WooCommerce is already active.
WooCommerce must be active before you can build a functional online store with Hypermarket.
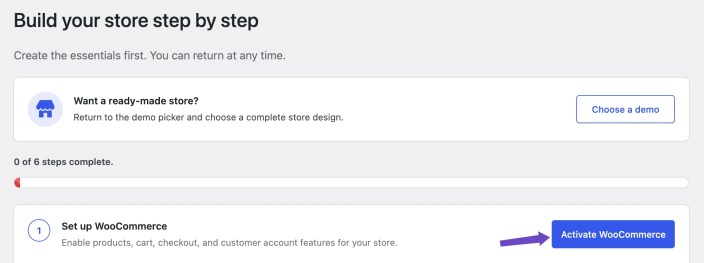
After activation, complete the WooCommerce configuration for your store, including settings such as currency, payments, shipping, taxes, and store location where applicable.
Create your homepage
↑ Back to topThe manual setup can create a ready-made homepage for your store.
Select Create Homepage.
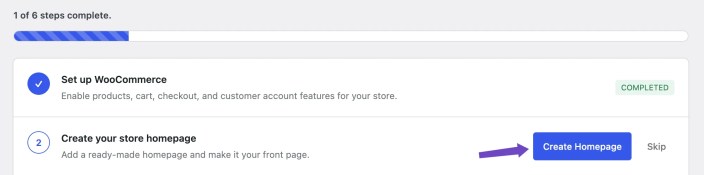
Hypermarket creates the Minimal Store homepage and assigns it as the site’s front page.
This gives you a complete starting layout that you can customize through the WordPress editor and Site Editor.
You can later:
- Replace text and images.
- Add or remove sections.
- Insert Hypermarket patterns.
- Add WooCommerce Product Collections.
- Add Hypermarket blocks.
- Change spacing, colors, and typography.
You are not limited to the Minimal Store layout.
Hypermarket also includes Starter and Landing patterns that can be used as alternative homepage starting points. You can replace the existing homepage content with one of these patterns and then customize it for your store.
Creating a homepage through Hypermarket Setup is optional.
If your site already has a homepage, or you prefer to build one yourself using Hypermarket patterns and blocks, you can skip this step.
Create your blog page
↑ Back to topHypermarket can also create a page for WordPress posts.
Select Create Blog Page from the manual setup screen.
Hypermarket creates the blog page and assigns it as the site’s posts page.
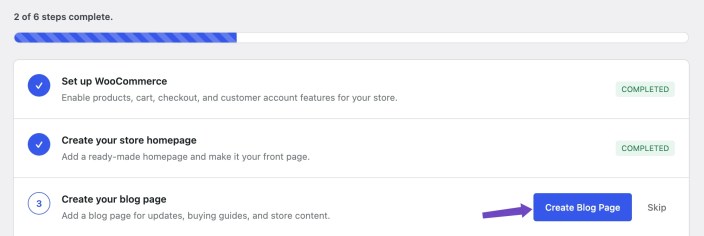
The blog can be used for content such as:
- Store news.
- Buying guides.
- Product stories.
- Tutorials.
- Editorial content.
- Announcements.
This step is optional.
If your site already has a posts page or you do not plan to use a blog, you can skip it.
Prepare WooCommerce pages
↑ Back to topWooCommerce requires several pages for core store functionality.
Select Prepare Pages to create and configure the essential WooCommerce pages using Hypermarket’s layouts.
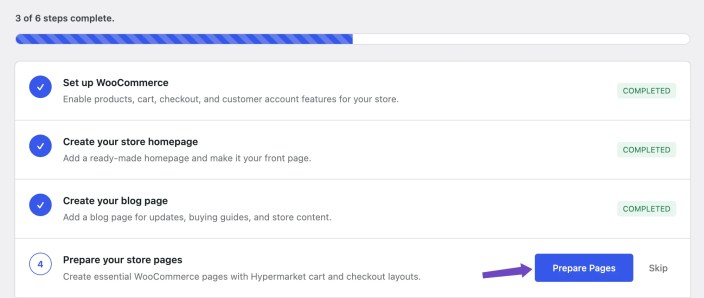
These include the pages used for:
- Shop.
- Cart.
- Checkout.
- My Account.
Hypermarket connects the relevant pages to WooCommerce and applies the appropriate theme layouts where supported.
If WooCommerce has already created these pages, review the existing page assignments before creating additional ones.
You can manage WooCommerce page assignments later through the WooCommerce settings.
Choose a design style
↑ Back to topThe manual setup includes a Choose your store look step.
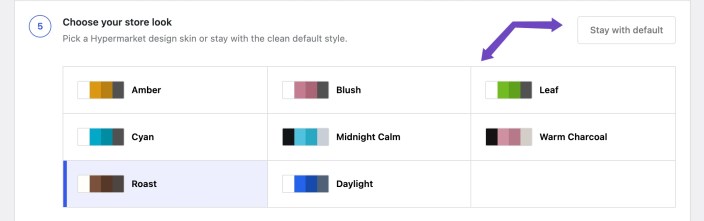
Hypermarket design styles provide coordinated site-wide presentation for areas such as:
- Colors.
- Typography.
- Backgrounds and surfaces.
- Buttons.
- Blocks.
- WooCommerce elements.
- Spacing and other visual details.
Select one of the available Hypermarket styles or keep the default design.
You can change the selected style later through Appearance > Editor > Styles without removing your pages, products, posts, or other store content.
This step is optional.
See Design styles for more information about Hypermarket’s available styles and how they work.
Add sample products
↑ Back to topHypermarket can optionally import sample WooCommerce products during manual setup.
Select Import Products if you want example products available while designing and testing the store.
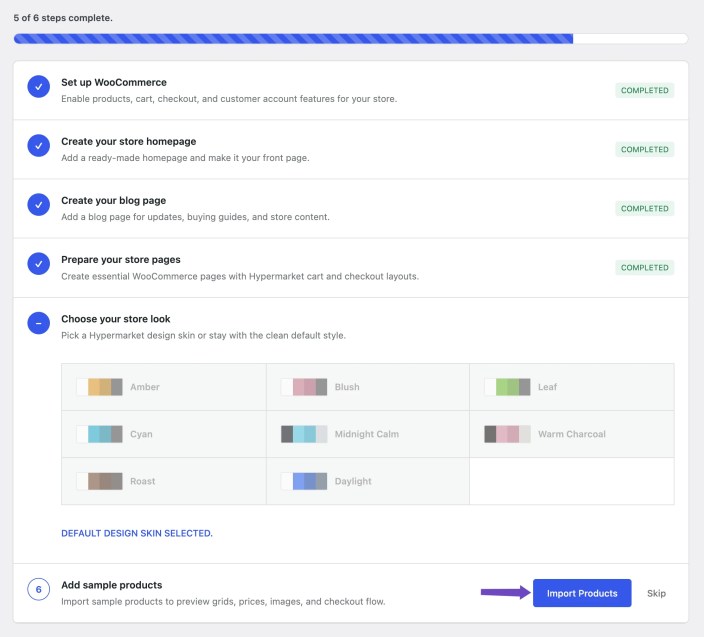
Sample products are useful for previewing areas such as:
- Product grids.
- Product collections.
- Shop archives.
- Product pages.
- Prices.
Add and manage your products
↑ Back to topManage product names, descriptions, images, prices, categories, tags, and variations through WooCommerce’s product editor. Follow the Adding and Managing Products guide for instructions.
Use Hypermarket’s templates and product collection blocks to control how those products appear in your storefront.
Design styles
↑ Back to topHypermarket uses the WordPress Styles system to control the overall visual direction of the store.
A design style can affect much more than colors. Depending on the selected style, it can change typography, surfaces, buttons, spacing, block presentation, WooCommerce styling, image treatment, and other site-wide design settings.
Hypermarket also uses styles to coordinate some product-page layouts with the rest of the store design.
You can switch between Hypermarket design styles without changing your products, pages, posts, or other store content.
How WordPress Styles work
↑ Back to topWordPress block themes use the Site Editor’s Styles system to manage global design settings.
Go to Appearance > Editor > Styles to view the active design and available style variations.
From the Styles interface, you can work with settings such as:
- Colors.
- Typography.
- Layout.
- Backgrounds and surfaces.
- Buttons.
- Links.
- Individual blocks.
- WooCommerce blocks and elements.
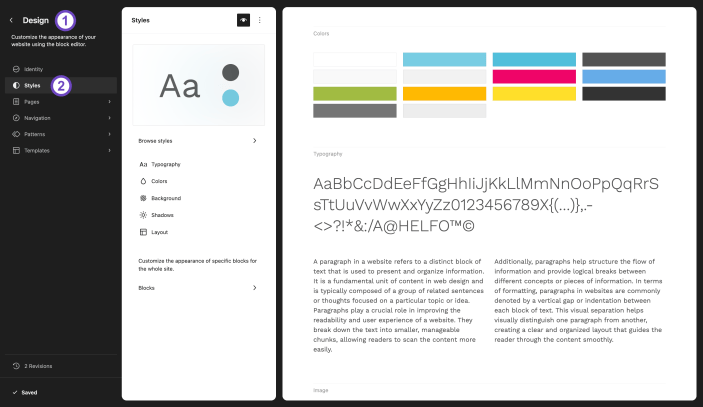
Hypermarket builds on this system with its own predefined design styles, color variations, typography choices, and block styling.
A style provides a coordinated starting point, but you can customize it afterward.
Hypermarket design styles
↑ Back to topHypermarket includes several predefined design styles:
- Default.
- Amber.
- Blush.
- Leaf.
- Cyan.
- Roast.
- Daylight.
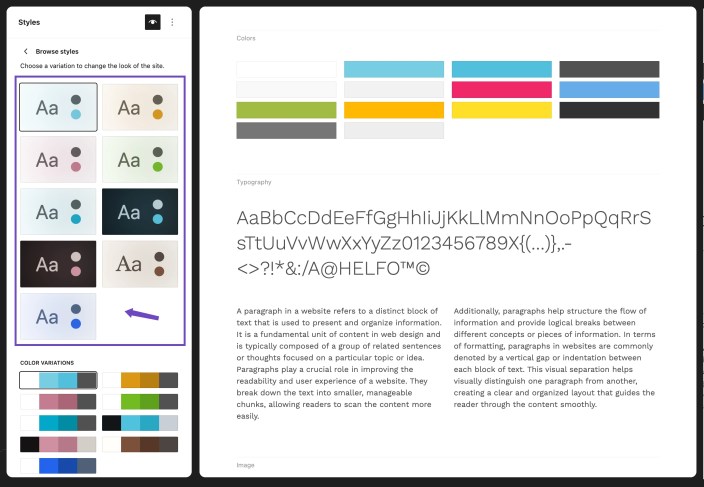
The Default style provides Hypermarket’s base design.
Amber, Blush, Leaf, and Cyan provide alternative visual directions built on the same Hypermarket design system.
Roast and Daylight are used by the Coffee Shop and Pet Shop demos.
Each style can define its own combination of:
- Color palette.
- Background colors.
- Text colors.
- Typography.
- Button presentation.
- Block styles.
- WooCommerce presentation.
- Spacing.
- Image and duotone settings.
- Other global theme settings.
Because these styles affect multiple parts of the store, they are more than simple color schemes.
Default
↑ Back to topThe Default style is the base Hypermarket design.
It provides a clean, flexible starting point for stores that do not need a more specific visual direction.
The Minimal Store demo uses the Default Hypermarket style.
You can keep the Default style and still customize its colors, typography, blocks, and layouts through the Site Editor.
Amber
↑ Back to topAmber provides an alternative Hypermarket visual style with its own coordinated color settings and design treatment.
It can be selected independently of any demo and applied to an existing store without changing store content.
Blush
↑ Back to topBlush provides another Hypermarket visual variation with its own palette and supporting style settings.
Like the other styles, it can be selected at any time through the Site Editor.
Leaf
↑ Back to topLeaf provides a different coordinated Hypermarket design direction, including its own color treatment and related style settings.
Selecting Leaf changes presentation, not content.
Cyan
↑ Back to topCyan provides another predefined Hypermarket design style.
It can be used as-is or further customized through the WordPress Styles interface.
Roast
↑ Back to topRoast is a Hypermarket design style introduced in version 1.1.
It is used by the Coffee Shop demo and provides a warmer visual direction suitable for editorial, food, coffee, and lifestyle stores.
Roast defines more than a color palette. It also includes broader design settings for the store.
Roast is configured to use Hypermarket’s Modern single-product template so the product page presentation matches the rest of the style.
Selecting Roast manually does not import the Coffee Shop demo or its content.
Daylight
↑ Back to topDaylight is a Hypermarket design style introduced in version 1.1.
It is used by the Pet Shop demo and provides a brighter, lighter visual direction.
Daylight changes the site’s global design settings while leaving your content in place.
Selecting Daylight manually does not import Pet Shop products, pages, images, or demo content.
Color variations
↑ Back to topHypermarket includes color variations that can be used to change the site’s palette while keeping the broader design structure.
Color variations can affect settings such as:
- Background colors.
- Text colors.
- Accent colors.
- Button colors.
- Surface colors.
- Duotone presets.
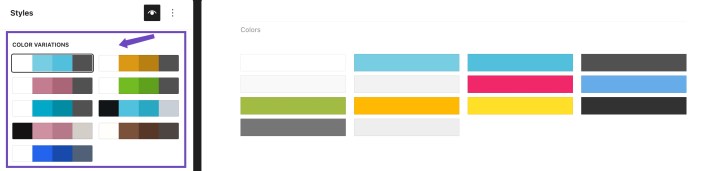
This allows you to change the visual palette without rebuilding the store.
Depending on the active style, you can also customize individual colors manually through Appearance > Editor > Styles > Colors.
Typography variations
↑ Back to topHypermarket also includes predefined typography combinations.
These can change the font families and related typography used across the store.
Available typography combinations include options such as:
- Rubik and Playfair Display.
- Space Grotesk.
- Nunito and Playfair Display.
- Libre Franklin and Libre Baskerville.
Typography changes can affect:
- Body text.
- Headings.
- Buttons.
- Navigation.
- Product titles.
- Other blocks that inherit global typography.
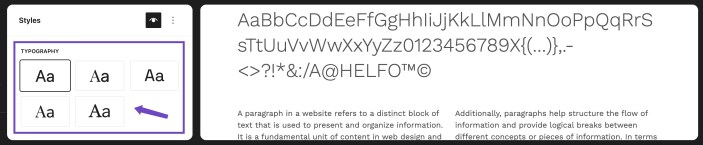
You can use a predefined typography variation or customize font settings manually through Appearance > Editor > Styles > Typography.
Design styles, color variations, and typography are separate
↑ Back to topHypermarket’s design system allows you to work at different levels.
A design style provides a broader coordinated visual direction.
A color variation focuses on the site’s palette.
A typography variation focuses on font families and related type settings.
You can start with a complete Hypermarket design style and then adjust its colors or typography without changing the store content.
For example, you can select Roast as the main design style and then customize its typography or brand colors afterward.
Product-page template behavior
↑ Back to topSome Hypermarket design styles can select a corresponding single-product template.
This lets the product page presentation match the broader design of the active style.
For example, the Roast style is configured to use Hypermarket’s Modern single-product template.
Hypermarket also includes other single-product layouts, including the default and Editorial templates.
When a style changes the product template, only the product presentation changes.
WooCommerce product data remains unchanged, including:
- Product title.
- Description.
- Price.
- Images.
- Gallery.
- Attributes.
- Variations.
- Inventory.
- Shipping data.
The template controls how that data is displayed.
Switch design styles
↑ Back to topYou can switch the active Hypermarket style at any time.
To change styles:
- Go to Appearance > Editor.
- Open Styles.
- Select Browse styles.
- Preview the available Hypermarket styles.
- Select the style you want to use.
- Review the preview.
- Select Save.
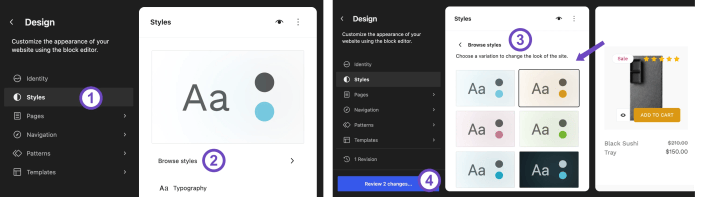
The selected style is then applied to the site’s global design.
Changing styles does not delete or replace:
- Pages.
- Posts.
- Products.
- Product categories.
- Product attributes.
- Variations.
- Images.
- Navigation content.
Only the relevant design configuration changes.
If the selected style defines a different single-product template, the appearance of product pages can also change.
Preview before saving
↑ Back to topThe Site Editor allows you to preview a style before applying it.
When testing a new style, review important areas such as:
- Homepage.
- Header.
- Footer.
- Shop page.
- Product category pages.
- Single product pages.
- Cart.
- Checkout.
- Blog.
- Content pages.
Select Save only when you are satisfied with the result.
Customize a selected style
↑ Back to topA Hypermarket design style is not locked.
After selecting a style, you can continue customizing it through Appearance > Editor > Styles.
You can adjust settings such as:
- Colors.
- Typography.
- Layout.
- Buttons.
- Links.
- Individual blocks.
- WooCommerce blocks.
- Backgrounds.
- Spacing.
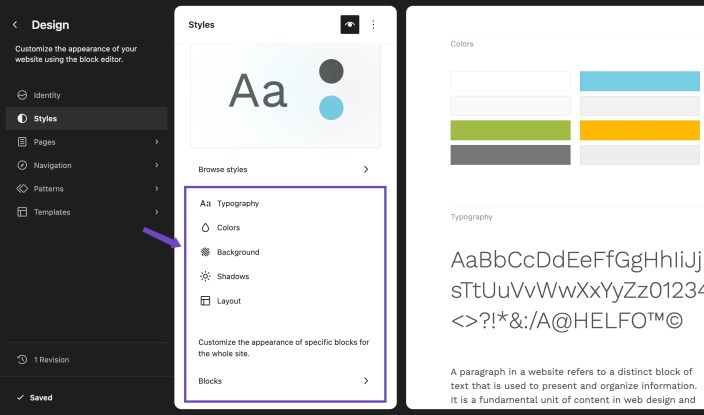
These changes are applied on top of the selected style.
You can therefore use a predefined Hypermarket style as the foundation and still adapt it to your own brand.
Design styles and demo imports
↑ Back to topEach Hypermarket demo has an associated design style.
The current relationships are:
- Minimal Store uses the Default Hypermarket style.
- Coffee Shop uses Roast.
- Pet Shop uses Daylight.
When you import a demo, Hypermarket automatically applies the associated style.
You can change the style afterward without removing the imported demo content.
Likewise, selecting Roast or Daylight manually does not import the Coffee Shop or Pet Shop demo.
The demo import and the design style are separate features.
The demo provides content, layouts, templates, navigation, and store configuration.
The design style controls the visual presentation of the site.
Site Editor and templates
↑ Back to topHypermarket is a WordPress block theme, so most site-wide layouts are managed through the WordPress Site Editor.
Go to Appearance > Editor to work with templates, template parts, global styles, navigation, and other design settings.
You do not need to edit theme files to change the main storefront layouts.
Templates and template parts
↑ Back to topWordPress separates site-wide layouts into templates and template parts.
A template controls the layout used for a specific type of content or page.
Examples include:
- Single product.
- Product archive.
- Search results.
- Blog archive.
- Single post.
- Cart.
- Checkout.
A template part is a reusable section that can appear inside multiple templates.
Common template parts include:
- Header.
- Footer.
Changing a template part can affect every template that uses it.
Header
↑ Back to topThe header is usually managed as a reusable template part.
Go to Appearance > Editor and open the Header template part.
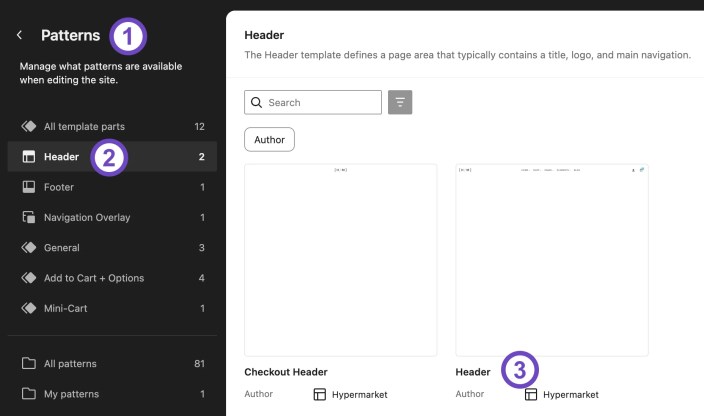
Hypermarket includes three ready-made header patterns that can be used to replace the current header layout.
To replace the header with another Hypermarket header pattern:
- Open the Header template part in the Site Editor.
- Select the existing header content.
- Remove the current blocks.
- Open the block inserter.
- Select Patterns.
- Find the Hypermarket header patterns.
- Insert the header pattern you want to use.
- Update the logo, navigation, links, and other content as needed.
- Select Save.
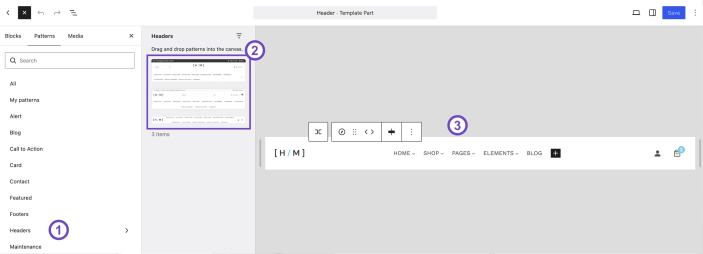
After insertion, the header pattern becomes normal editable block content.
You can customize elements such as:
- Site logo.
- Navigation.
- Search.
- Buttons.
- Account links.
- Cart or store links.
- Layout.
- Spacing.
- Colors.
- Typography.
Because the Header template part is reusable, the selected header layout can appear across every template that uses it.
Footer
↑ Back to topThe footer is managed as a reusable template part.
Go to Appearance > Editor and open the Footer template part.
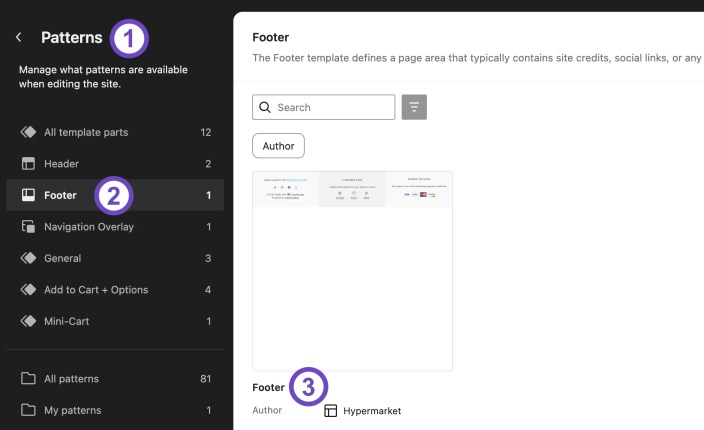
Hypermarket includes three ready-made footer patterns that can be used to replace the current footer layout.
To replace the footer with another Hypermarket footer pattern:
- Open the Footer template part in the Site Editor.
- Select the existing footer content.
- Remove the current blocks.
- Open the block inserter.
- Select Patterns.
- Find the Hypermarket footer patterns.
- Insert the footer pattern you want to use.
- Replace the example content with your own store information.
- Select Save.
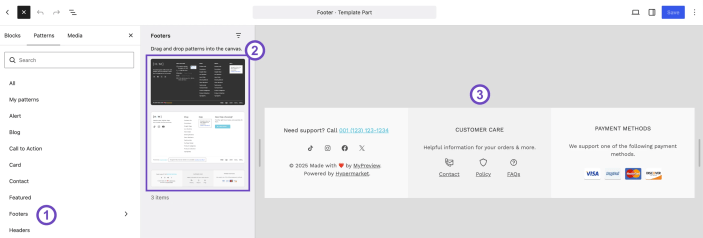
After insertion, the footer pattern can be edited like any other group of WordPress blocks.
You can customize areas such as:
- Navigation.
- Contact information.
- Social links.
- Store details.
- Copyright text.
- Columns.
- Colors.
- Typography.
- Spacing.
Because the Footer template part is reusable, changes normally apply everywhere that footer is used.
Product Quick View template part
↑ Back to topHypermarket includes a dedicated Product Quick View template part that controls the product content shown when a shopper opens Quick View from a product listing.
To edit it:
- Go to Appearance > Editor.
- Open Design > Patterns.
- Open Manage all my patterns or the template parts area, depending on your WordPress editor view.
- Find the Product Quick View template part.
- Open it in the editor.
- Edit the product blocks you want to change.
- Select Save.
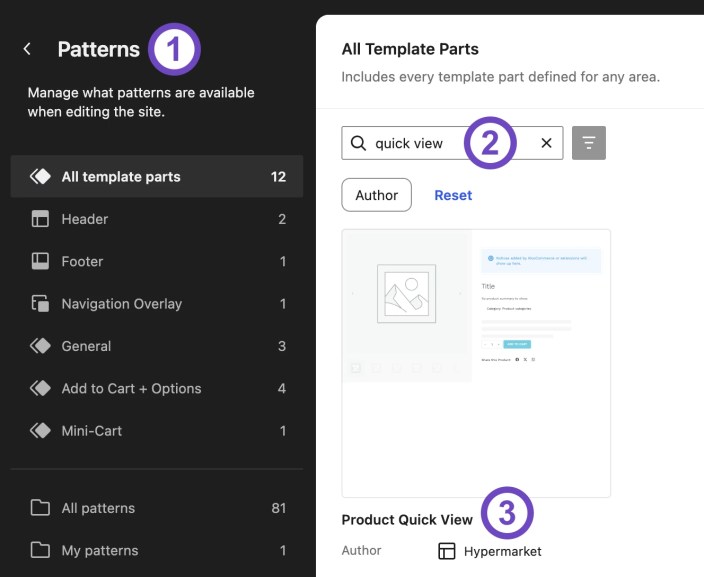
The Product Quick View template part controls the layout displayed inside the Quick View modal. It is separate from the Product Quick View button that appears inside product collections.
The default layout includes product information such as:
- Product gallery.
- Product title.
- Price.
- Product details.
- Add to Cart controls.
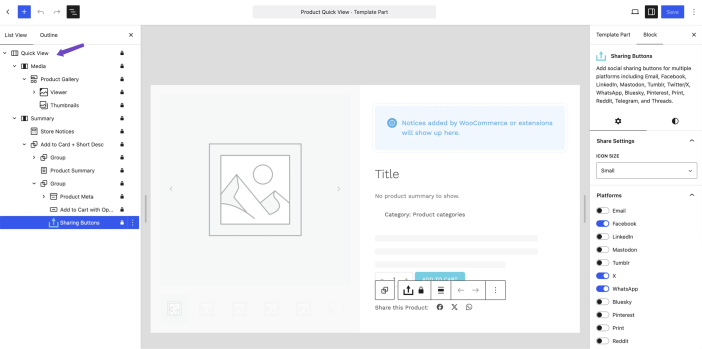
You can customize the blocks inside the template part to change what shoppers see when Quick View opens.
For example, you can:
- Rearrange product information.
- Remove blocks you do not need.
- Adjust spacing.
- Change the gallery layout.
- Change typography and colors.
- Add supported WooCommerce product blocks.
Changes to the Product Quick View template part apply wherever Hypermarket Quick View uses that template.
Note
The Product Quick View button and the Product Quick View template part serve different purposes. The button opens Quick View from a product listing, while the template part controls the content and layout displayed inside the modal.
Product catalog and archive templates
↑ Back to topWooCommerce product archive templates control pages that display groups of products.
These can include:
- Shop page.
- Product category archives.
- Product tag archives.
- Other product archive views.
Go to Appearance > Editor > Templates and open the relevant WooCommerce product archive template.
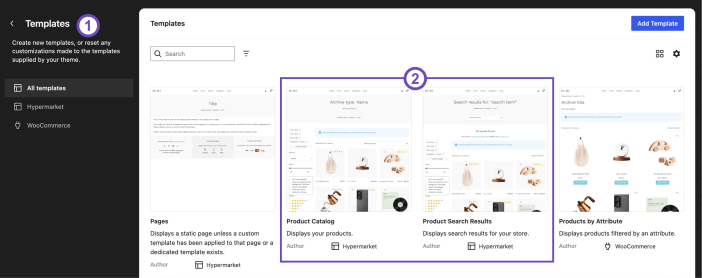
Depending on the template, you can customize areas such as:
- Archive title.
- Product collections.
- Product grid.
- Filtering.
- Sorting.
- Pagination.
- Spacing.
- Supporting content.
The template controls how products are displayed.
The actual product data remains managed through Products in the WordPress dashboard.
Editing a product archive template does not remove or change your products.
Single product template
↑ Back to topThe single product template controls the layout of individual WooCommerce product pages.
Go to Appearance > Editor > Templates and open the relevant single product template.
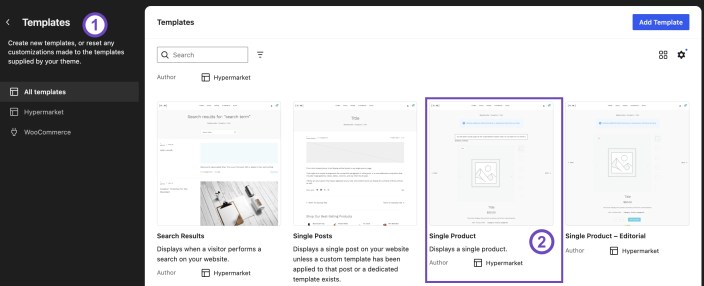
A product template can include areas such as:
- Product images or gallery.
- Product title.
- Price.
- Rating.
- Short description.
- Add to Cart.
- Product variations.
- Product meta.
- Product description.
- Additional information.
- Related products.
Hypermarket includes multiple single-product layouts.
Some Hypermarket design styles can select a corresponding product template automatically. For example, the Roast style uses the Modern single-product template.
Changing the single product template changes the presentation of product data.
It does not change WooCommerce product information such as:
- Title.
- Description.
- Price.
- Images.
- Attributes.
- Variations.
- Inventory.
- Shipping details.
Cart template
↑ Back to topThe Cart template controls the page where customers review the products currently in their cart.
Go to Appearance > Editor > Templates and open the Cart template.
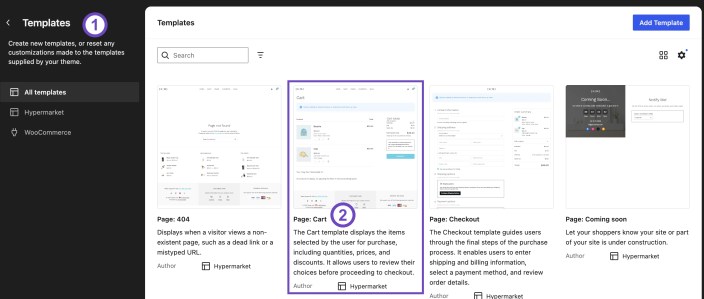
WooCommerce handles the cart functionality, while Hypermarket controls its visual presentation.
You can customize supported areas around the cart blocks, including:
- Layout.
- Spacing.
- Headings.
- Supporting content.
- Surrounding blocks.
Avoid removing essential WooCommerce cart blocks unless you intend to replace their functionality.
Checkout template
↑ Back to topThe Checkout template controls the page used to complete an order.
Go to Appearance > Editor > Templates and open the Checkout template.
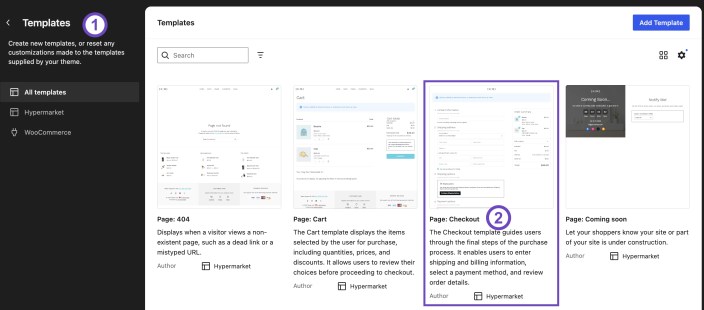
WooCommerce handles functionality such as:
- Customer information.
- Billing details.
- Shipping details.
- Payment.
- Order totals.
- Order submission.
Hypermarket provides the surrounding layout and styling.
You can customize the template while keeping the required WooCommerce checkout blocks in place.
Search template
↑ Back to topThe Search template controls how WordPress search results are displayed.
Go to Appearance > Editor > Templates and open the Search template.
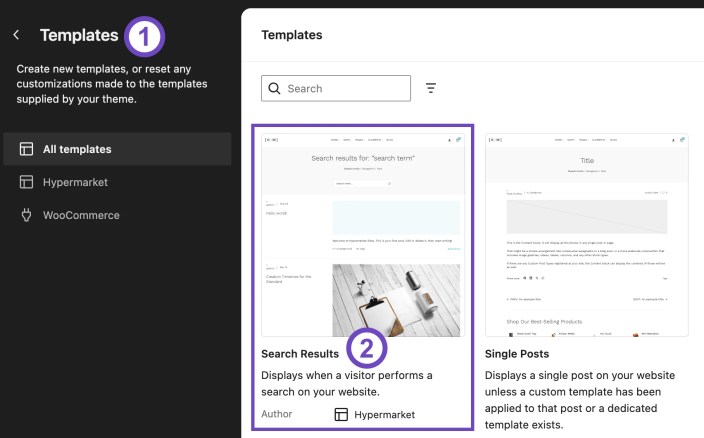
You can customize areas such as:
- Search results layout.
- Headings.
- Result cards.
- Pagination.
- Empty-result messages.
- Spacing.
Search functionality itself continues to be handled by WordPress and any active search-related plugins.
Blog and post templates
↑ Back to topHypermarket uses standard WordPress templates for blog content.
Common templates include:
- Blog or posts page.
- Single post.
- Archive.
- Category archive.
- Tag archive.
- Author archive.
Go to Appearance > Editor > Templates and open the template you want to modify.
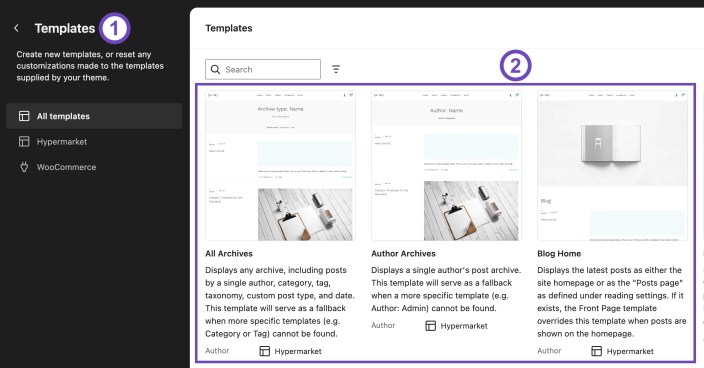
You can customize areas such as:
- Featured image.
- Post title.
- Author.
- Publication date.
- Post content.
- Categories.
- Tags.
- Navigation between posts.
- Archive layout.
- Pagination.
Editing a blog or post template changes presentation only.
The content of the posts remains managed through Posts in the WordPress dashboard.
Templates can contain patterns and normal blocks
↑ Back to topTemplates and template parts are built from WordPress blocks.
You can insert:
- Core WordPress blocks.
- WooCommerce blocks.
- Hypermarket blocks.
- Hypermarket patterns.
For example, you can insert a Hypermarket header pattern into a Header template part or add a promotional pattern to a product archive template.
After insertion, the individual blocks can be edited normally.
Reset a customized template
↑ Back to topWordPress stores template customizations separately from the original files provided by Hypermarket.
If you customize a template and later want to return to the version supplied by the theme, use the Site Editor’s available reset or clear-customization option.
The exact wording can vary between WordPress versions.
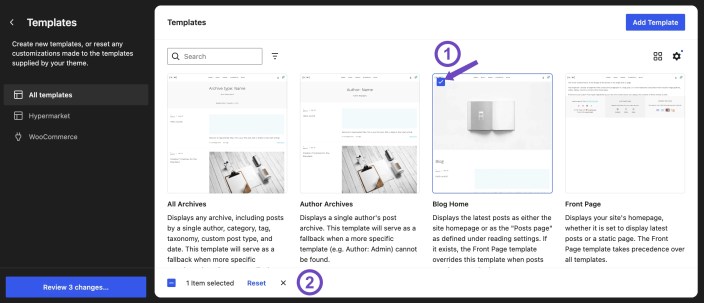
Resetting a template removes your saved customization for that template and restores the current Hypermarket version.
This can be useful if:
- A template has been heavily modified.
- A layout no longer looks correct.
- You want to use an updated template provided by a newer Hypermarket version.
Warning
Resetting a template removes the custom changes you made to that template. Review the changes before resetting.
Template customizations and theme updates
↑ Back to topBecause WordPress stores customized templates separately, a customized template can continue using your saved version even after Hypermarket provides an updated version of that template.
If you expect a theme update to change a template but do not see the new layout, check whether the template has been customized in the Site Editor.
Resetting the customized template allows WordPress to use the version currently provided by Hypermarket.
Content and templates are different
↑ Back to topTemplates control how content is displayed.
They do not normally contain the underlying store data itself.
For example:
- The single product template displays WooCommerce product data.
- The product archive template displays groups of products.
- The single post template displays WordPress post content.
- The header template part displays navigation and other reusable blocks.
Your actual content remains stored separately in WordPress and WooCommerce.
This means:
- Editing the single product template does not edit the product itself.
- Editing the Shop template does not delete products.
- Editing a blog template does not change post content.
- Editing the header does not delete the pages linked in navigation.
- Resetting a template does not delete the underlying products, posts, or pages.
To change content, use the relevant WordPress or WooCommerce screen.
To change how that content is presented, use the Site Editor.
Patterns
↑ Back to topHypermarket includes a library of ready-made WordPress block patterns for building store pages, promotional sections, navigation areas, and other layouts more quickly.
A pattern is a pre-designed arrangement of blocks. You can insert a pattern into a page, template, or template part, then replace its content with your own text, images, products, links, and branding.
Patterns are starting layouts. After insertion, the blocks inside a pattern can be edited normally.
Where to find Hypermarket patterns
↑ Back to topHypermarket patterns are available through the WordPress block inserter.
When editing a page, template, or template part:
- Open the block inserter.
- Select Patterns.
- Browse the available categories.
- Select the Hypermarket pattern you want to insert.
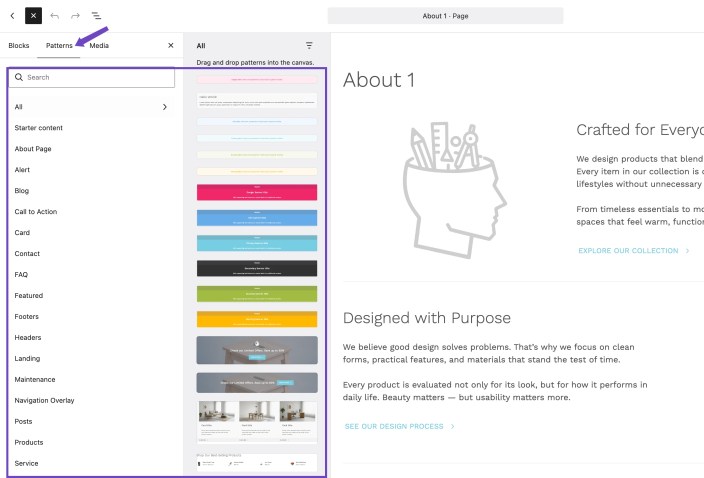
Hypermarket registers its own Hypermarket pattern category and also provides patterns across several purpose-based categories.
Depending on your WordPress version, the exact location or presentation of the Patterns browser can vary slightly.
Pattern categories
↑ Back to topHypermarket organizes patterns into categories so you can find layouts by purpose.
Available categories include:
- Blog.
- Products.
- Call to Action.
- Service.
- Contact.
- Testimonials.
- FAQ.
- Alert.
- Card.
- Featured.
- About Page.
- Section Heading.
- Shop.
- Landing.
- Posts.
- Maintenance.
- Navigation Overlay.
- Footer
- Header
A pattern can appear in more than one category when it is useful in different contexts.
Insert a pattern
↑ Back to topTo insert a Hypermarket pattern:
- Open the page, template, or template part you want to edit.
- Open the block inserter.
- Select Patterns.
- Browse the Hypermarket or relevant pattern category.
- Select a pattern to insert it.
- Edit the inserted content as needed.
- Select Save or Update.
After insertion, you can begin replacing the pattern content. If you also want to change its structure or rearrange the blocks, detach the pattern first so WordPress converts it into regular editable blocks.
Detach a pattern to edit its layout
↑ Back to topAfter inserting a Hypermarket pattern, WordPress may keep the pattern in a restricted editing state.
You can usually edit content such as text and images immediately, but structural changes such as moving blocks, changing columns, or rearranging the layout may not be available until the pattern is detached.
To fully edit the pattern layout:
- Insert the Hypermarket pattern.
- Select the pattern in the editor.
- Open the pattern toolbar or the three-dot options menu.
- Select Detach pattern.
- The pattern is converted into regular editable blocks.
- Make the layout changes you need.
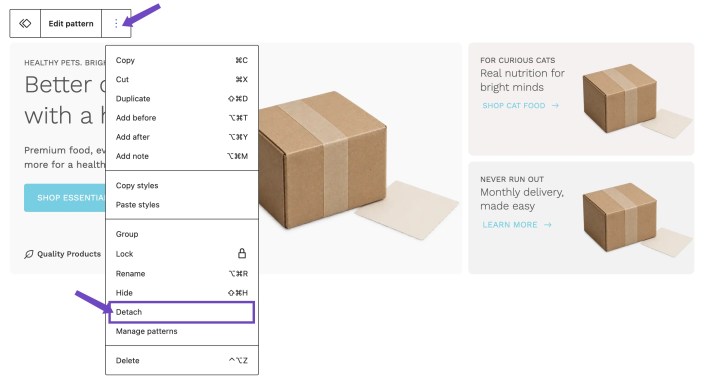
After detaching the pattern, you can:
- Move and reorder blocks.
- Add or remove blocks.
- Change columns.
- Adjust spacing and alignment.
- Replace images.
- Change product collections.
- Modify the overall structure.
Detaching affects only the inserted copy of the pattern. The original Hypermarket pattern remains available in the pattern library and can be inserted again elsewhere.
Note: If you only need to change text, images, links, or other content, you may not need to detach the pattern. Detach it when you want to change the structure or layout.
Edit text and links
↑ Back to topText inside a Hypermarket pattern uses normal WordPress blocks.
To change text:
- Select the heading, paragraph, button, or other text block.
- Replace the example text.
- Update links or button destinations where needed.
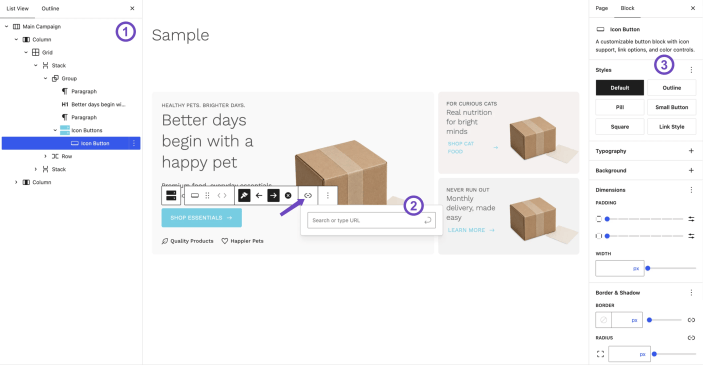
You can also change supported settings such as:
- Typography.
- Alignment.
- Colors.
- Spacing.
- Button style.
- Link settings.
Replace images
↑ Back to topImages in Hypermarket patterns can be replaced with your own media.
Select the Image, Cover, or other media block and use its block controls to replace the existing image.
You can choose an image from the Media Library or upload a new one.
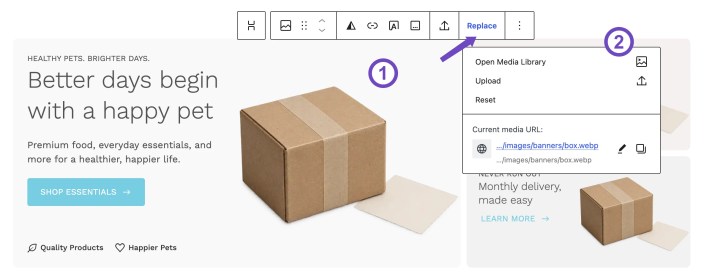
Depending on the block, you can also adjust settings such as:
- Aspect ratio.
- Crop.
- Focal point.
- Size.
- Overlay.
- Duotone.
Replacing the image does not require rebuilding the rest of the pattern.
Change products and product collections
↑ Back to topSome Hypermarket patterns include WooCommerce product blocks or Product Collection blocks.
Select the relevant product block to change what is displayed.
Depending on the block, available controls can include:
- Product category.
- Collection type.
- Product selection.
- Sorting.
- Filters.
- Number of products.
- Columns.
- Layout.
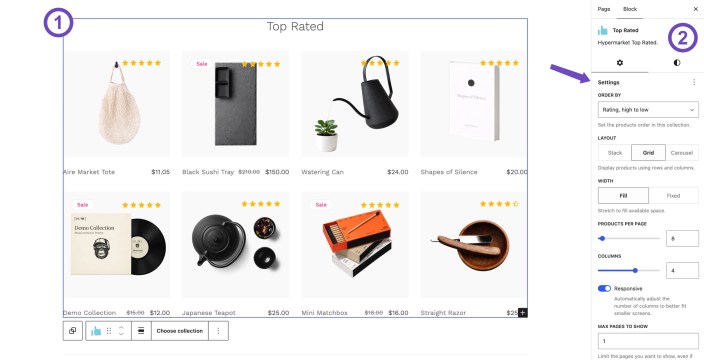
The product data itself remains managed by WooCommerce.
To change a product’s title, price, image, stock, description, attributes, or variations, edit the product under Products in the WordPress dashboard.
Change the layout
↑ Back to topPatterns are fully editable after insertion.
You can:
- Add blocks.
- Remove blocks.
- Move blocks.
- Duplicate blocks or sections.
- Change columns.
- Adjust alignment.
- Change spacing.
- Replace images.
- Change colors.
- Change typography.
- Add or remove WooCommerce blocks.
This lets you use a Hypermarket pattern as a foundation without keeping the original layout exactly as provided.
Use patterns in pages
↑ Back to topHypermarket patterns can be used to build individual sections or complete pages.
For example, you can combine patterns to create:
- Homepage.
- About page.
- Contact page.
- Landing page.
- Promotional campaign page.
- Store information page.
- Editorial page.
Patterns can be combined with:
- Core WordPress blocks.
- WooCommerce blocks.
- Hypermarket blocks.
- Your own existing content.
You do not need to build an entire page from Hypermarket patterns.
A single pattern can also be inserted into an otherwise custom page.
Use patterns in templates and template parts
↑ Back to topPatterns can also be inserted into templates and template parts through Appearance > Editor.
This is useful for reusable or site-wide areas such as:
- Header.
- Footer
Hypermarket blocks
↑ Back to topHypermarket includes custom blocks for building store pages, promotional sections, product navigation, contact areas, and other storefront content.
You can find the main Hypermarket blocks from the WordPress block inserter under the Hypermarket category.
Hero Slider
↑ Back to topUse the Hero Slider to create a large rotating banner for promotions, featured collections, campaigns, or important store messages.
To add one:
- Open the block inserter.
- Search for Hero Slider.
- Insert the block.
- Add your first slide content.
- Use the slider controls to add more slides when needed.
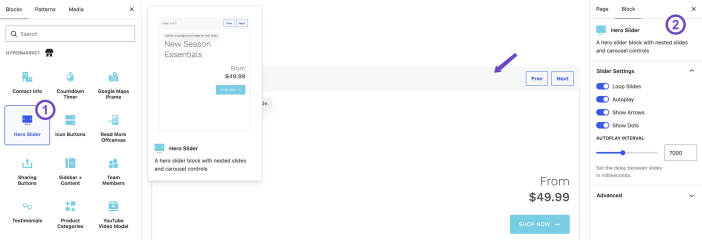
Each slide can have its own background image, text, buttons, and layout.
When a slide is selected, you can choose from the available content layouts:
- Top Left.
- Top Center.
- Split Sides.
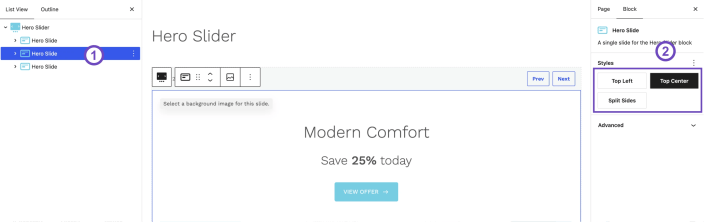
You can also edit each slide directly in the editor, reorder slides, and replace its content without affecting the other slides.
The Hero Slider settings control how the full slider behaves. Available options include:
- Autoplay.
- Autoplay interval.
- Continuous looping.
- Previous and next arrows.
- Navigation dots.
Use the slider settings for the overall behavior, then select an individual slide when you want to change that slide’s image or content.
Icon Buttons
↑ Back to topUse Icon Buttons when you want one or more buttons with icons.
To add them:
- Insert the Icon Buttons block.
- Add an Icon Button inside it.
- Add more buttons from within the same group as needed.
- Select each button individually to edit its text, icon, and link.
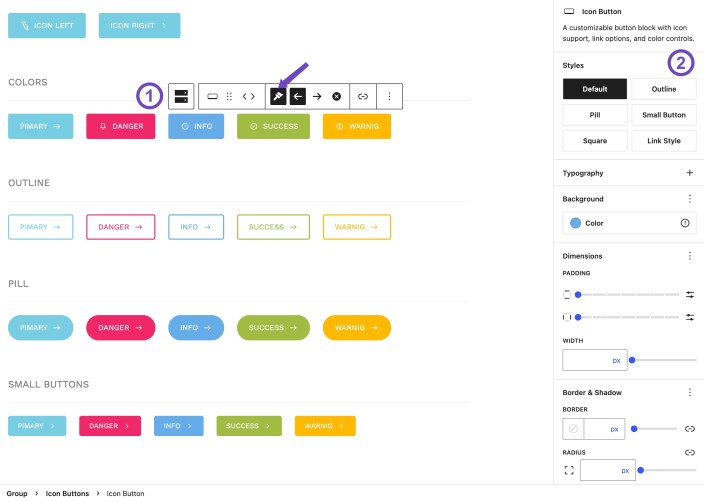
The Icon Buttons block controls the group layout and spacing.
Each individual button can have its own:
- Text.
- Link.
- Icon.
- Icon position.
- Width.
- Padding.
- Colors.
- Typography.
- Border.
- Border radius.
- Shadow.
Use the icon picker to choose from the icons included with Hypermarket.
Product Categories
↑ Back to topUse the Product Categories block to create category-based store navigation, such as Shop by Category, Shop by Pet, or Shop by Collection.
To add it:
- Insert Product Categories.
- Choose how categories should be selected.
- Configure how the categories should be displayed.
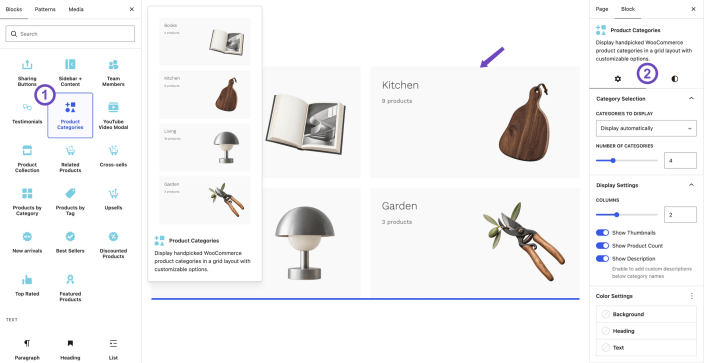
You can use:
- Automatic selection to let Hypermarket display categories using the WooCommerce category order.
- Handpicked selection to choose the exact categories you want to show.
You can also control:
- Number of categories.
- Number of columns.
- Category thumbnails.
- Product counts.
- Descriptions.
- Custom descriptions.
- Colors.
The block includes different layout styles, including Default, Stacked, and Compact.
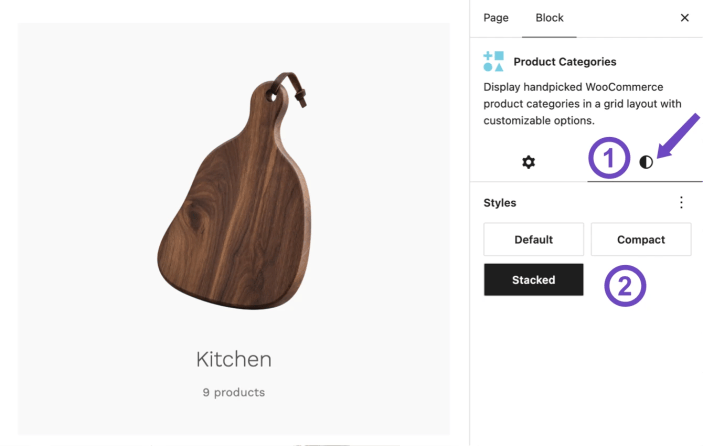
Category images and category data come from WooCommerce. If a category does not have an image, add one from the WooCommerce product category settings.
Testimonials
↑ Back to topUse Testimonials to display customer reviews or quotes in a structured grid.
After inserting the block, add and manage testimonials directly inside its settings.
Each testimonial can include:
- Quote.
- Customer name.
- Role or label.
- Avatar.
- Rating.
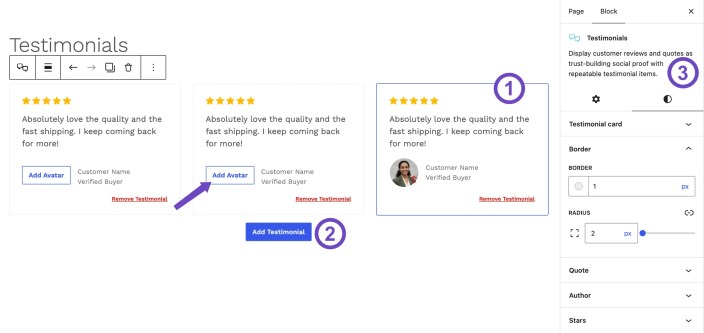
You can also control the number of columns and whether avatars and ratings are shown.
Use the styling controls to adjust the testimonial cards, quote text, author information, ratings, and border radius.
Testimonials entered here are managed by the block itself. They are not automatically pulled from WooCommerce product reviews.
Team Members
↑ Back to topUse Team Members to introduce staff, founders, contributors, or other people connected to the store.
After inserting the block, add team members and configure each person’s:
- Name.
- Position.
- Image.
- Social links.
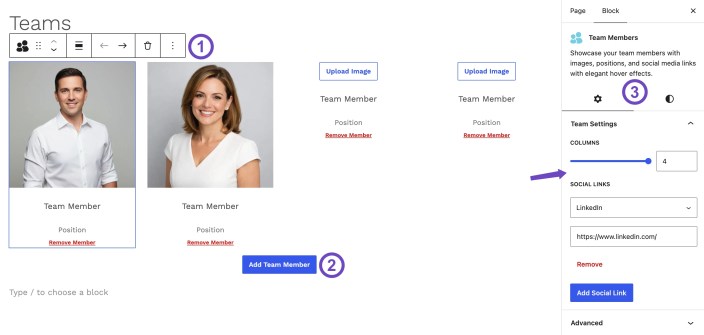
You can control the number of columns and customize the appearance of the member cards, names, positions, and border radius.
For the cleanest layout, use images with similar dimensions and aspect ratios.
Contact Info
↑ Back to topUse Contact Info to display your store’s contact details in one place.
After inserting the block, add or reorder the information you want to show.
Supported contact items include:
- Address.
- Phone.
- WhatsApp.
- Email.
- Working hours.
You can choose whether each item uses an icon.
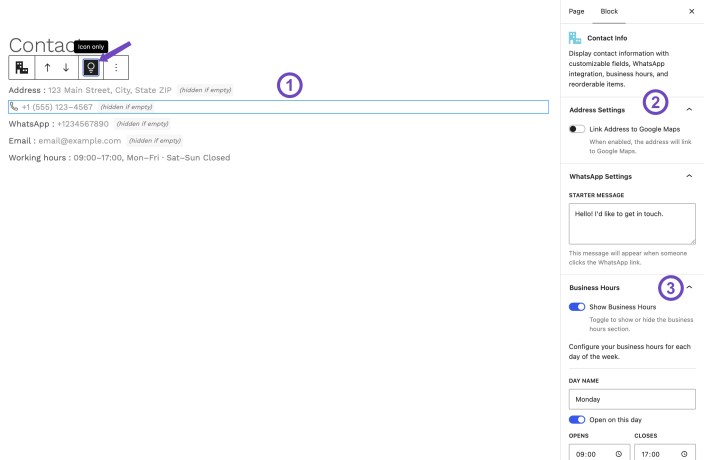
Additional settings include:
- Linking the address to Google Maps.
- Setting a predefined WhatsApp message.
- Showing business hours.
- Configuring opening and closing times for each day.
- Adding lunch break times.
- Marking individual days as closed.
This block works well on Contact pages, footer sections, and store information pages.
Google Maps Iframe
↑ Back to topUse Google Maps Iframe to show a physical store, showroom, office, or pickup location.
After inserting the block:
- Enter the address.
- Adjust the zoom level.
- Choose whether to use satellite view.
- Choose whether Street View controls should be available.
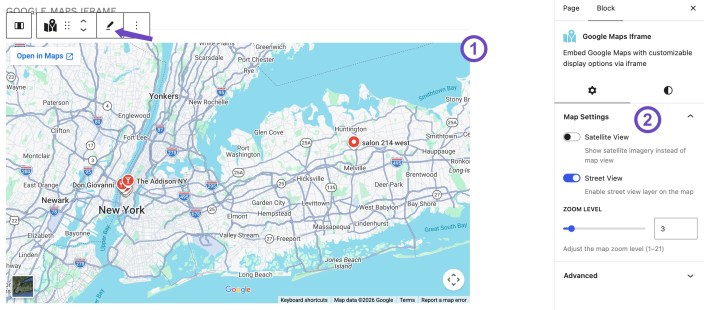
The block includes Default and Wide ratio styles.
Use the Wide ratio style when the map is part of a large Contact page section.
YouTube Video Modal
↑ Back to topUse YouTube Video Modal when you want visitors to open a YouTube video in a modal instead of embedding a large player directly in the page.
After inserting the block:
- Add the YouTube video URL.
- Choose whether to show a caption.
- Edit the caption text if needed.
- Choose whether the video should autoplay after opening.
- Use the YouTube thumbnail or upload a custom cover image.
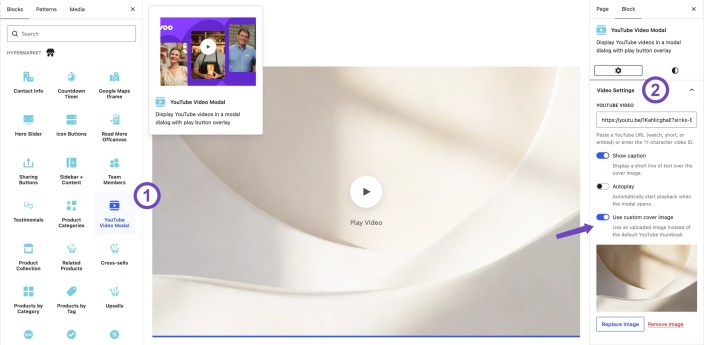
You can also customize the caption typography and colors.
A custom cover image is useful when you want the video section to match the visual style of the rest of the page.
Countdown Timer
↑ Back to topUse Countdown Timer for sales, launches, events, limited offers, or other time-based promotions.
After inserting the block:
- Set the target date.
- Set the target time.
- Customize the labels if needed.
The timer displays:
- Days.
- Hours.
- Minutes.
- Seconds.
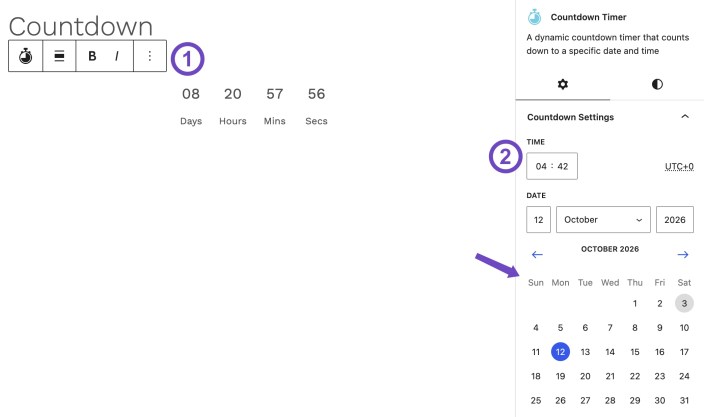
You can customize the appearance of the countdown values and labels, including typography, backgrounds, borders, and border radius.
Use surrounding Heading and Paragraph blocks for the promotional message itself.
Sharing Buttons
↑ Back to topUse Sharing Buttons to let visitors share the current page or post.
After inserting the block, choose which sharing options should be available.
Supported options include:
- Email.
- Facebook.
- LinkedIn.
- Mastodon.
- Tumblr.
- X/Twitter.
- WhatsApp.
- Bluesky.
- Pinterest.
- Print.
- Reddit.
- Telegram.
- Threads.
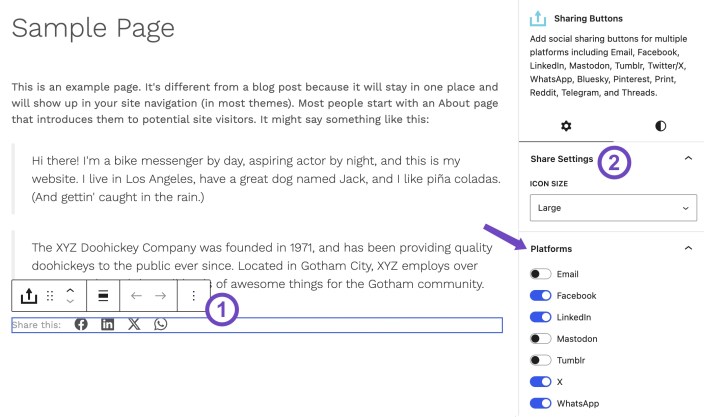
You can reorder the platforms, change the icon size, and add optional text such as “Share this post”.
This block shares the current content. It is different from the WordPress Social Icons block, which links to your own social profiles.
Read More Offcanvas
↑ Back to topUse Read More Offcanvas when you want visitors to open a post in an offcanvas panel without leaving the current page.
It is designed for layouts such as post lists and Query Loops.
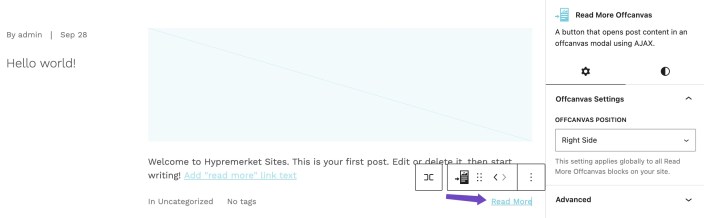
After inserting it inside a post-based layout, you can customize:
- Button text.
- Colors.
- Typography.
- Padding.
- Margin.
The block automatically uses the current post from the surrounding Query Loop or Post Template.
Sidebar + Content
↑ Back to topUse Sidebar + Content to create a layout with a narrow sidebar and a larger main content area.
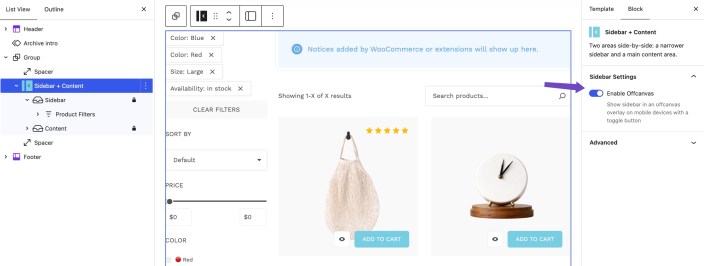
This is useful for:
- Shop filters.
- Product category navigation.
- Blog sidebars.
- Supporting navigation beside main content.
After inserting the block, add content to the sidebar and main content areas.
You can also:
- Move the sidebar to the opposite side.
- Enable offcanvas behavior for the sidebar.
Offcanvas mode is especially useful when the sidebar contains filters that need a more compact presentation on smaller screens.
Product Quick View
↑ Back to topProduct Quick View is a supporting Hypermarket block used inside WooCommerce product collection layouts.
It adds the Quick View action to a product card so shoppers can preview product information without leaving the current product listing.
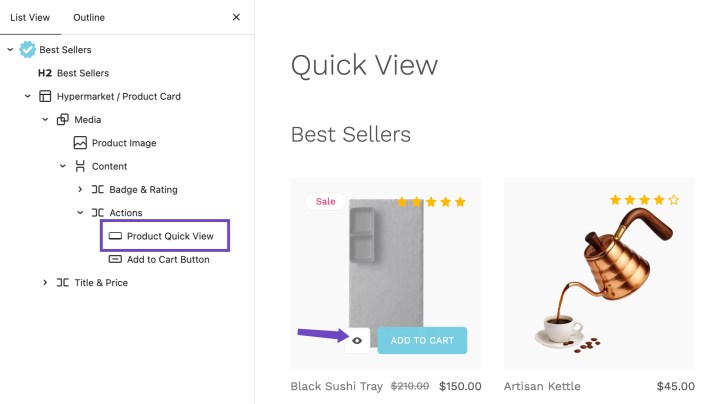
You normally do not insert Product Quick View on its own. Hypermarket includes it as part of its product collection and product card layouts.
If you are building or replacing a product collection layout, use the Hypermarket product template patterns available from the Patterns library. These patterns include the expected product-card structure and supporting blocks such as Product Quick View.
See Product collections for more information about product card layouts and Patterns for information about inserting Hypermarket template-part patterns.
Hypermarket Icon Library
↑ Back to topHypermarket includes an icon library you can use with both the core WordPress Icon block and Hypermarket’s Icon Buttons. Add standalone icons to pages, headers, and footers, or pair them with buttons to highlight an action.
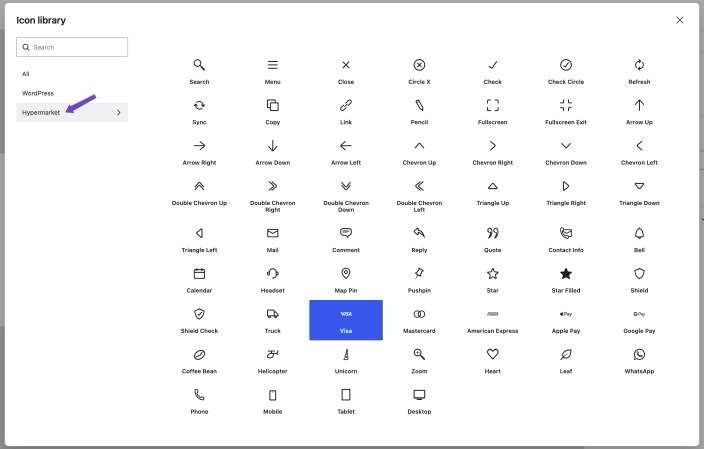
Choose from arrows, contact symbols, delivery icons, payment logos, and more. Browse or search the Hypermarket collection directly in the editor to find an icon that fits your content.
Product collections
↑ Back to topHypermarket extends the WooCommerce Product Collection block with store-ready layouts and collection types that match the theme’s product card design.
Product Collections are useful whenever you want to show products in a grid, such as featured products, new arrivals, best sellers, related products, or products from a specific category.
Add a product collection
↑ Back to topTo add a Hypermarket product collection:
- Open the page, template, or template part you want to edit.
- Open the block inserter.
- Browse the Hypermarket category or search for the collection you want.
- Insert the collection.
- Use the block settings to adjust the products and layout.
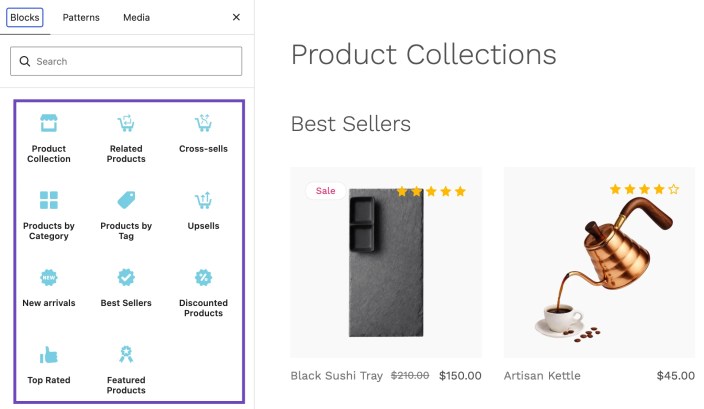
Hypermarket product collections use WooCommerce’s Product Collection block underneath, so product data still comes directly from WooCommerce.
Available product collections
↑ Back to topHypermarket provides several ready-made Product Collection variations.
Product Collection
Use Product Collection when you want a general product grid with full WooCommerce query controls.
By default, Hypermarket displays products using its standard product card layout and four columns.
This collection is useful when you want to build a more customized product query yourself.
Related Products
Use Related Products on product pages to show products related to the current product.
The collection automatically uses the current product as its reference.
Hypermarket includes a heading and its standard product card layout by default.
Cross-sells
Use Cross-sells where you want to display products WooCommerce has configured as cross-sells for the current product.
The collection automatically uses the current product as its reference.
This layout is commonly useful around cart and product-related experiences.
Upsells
Use Upsells to display products assigned as upsells to the current WooCommerce product.
Like Related Products and Cross-sells, the collection uses the current product automatically.
New arrivals
Use New arrivals to highlight recently added products.
Hypermarket’s default collection is configured to show products added within the previous seven days.
You can adjust the collection settings if you need a different product range.
Best Sellers
Use Best Sellers to display products ordered by WooCommerce popularity.
This is useful for homepage sections and merchandising areas where you want to surface products that sell frequently.
Discounted Products
Use Discounted Products to display products that are currently on sale.
The collection automatically filters the product query to sale products.
Top Rated
Use Top Rated to display products ordered by their WooCommerce rating.
This collection works best when the store actively collects customer product reviews.
Featured Products
Use Featured Products to display products marked as featured in WooCommerce.
This is useful when you want direct control over which products appear in a promotional section.
Products by Category
Use Products by Category when you want to show products from one or more WooCommerce product categories.
After inserting the collection, choose the categories you want to display.
This works well for sections such as:
- Coffee.
- Accessories.
- Dog products.
- New-season clothing.
- Homeware.
The collection uses Hypermarket’s product card layout while WooCommerce handles the category filtering.
Products by Tag
Use Products by Tag when you want to build a collection around WooCommerce product tags rather than categories.
For example, tags can be useful for product groupings such as:
- New.
- Organic.
- Gift ideas.
- Limited edition.
- Summer.
The Hypermarket product card
↑ Back to topHypermarket Product Collections use a shared product card layout so products remain visually consistent across the store.
The default card includes:
- Product image.
- Sale badge.
- Product rating.
- Quick View.
- Add to Cart.
- Product title.
- Product price.
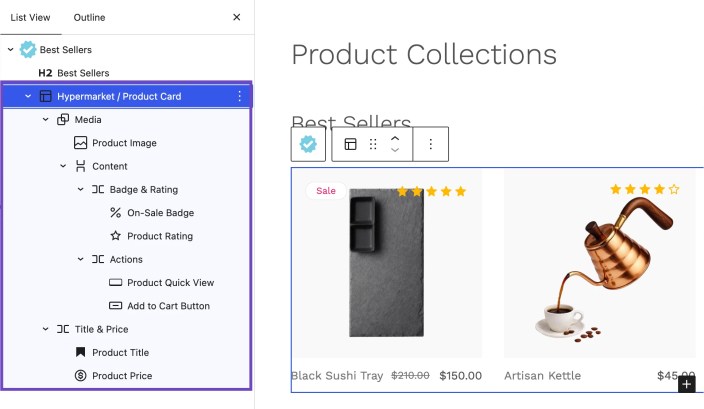
The product card is built from WooCommerce blocks, with Hypermarket adding its own layout and Quick View integration.
This means you can still edit the blocks inside the Product Template when you need a custom product card.
Edit the product card
↑ Back to topSelect the Product Collection, then select the nested Product Template inside it.
The Product Template controls the layout that is repeated for every product in that collection.
Inside the template, you can edit elements such as:
- Product image.
- Sale badge.
- Rating.
- Product title.
- Price.
- Add to Cart.
- Quick View.
- Supporting Groups and layout blocks.
Changes to the Product Template apply to every product card in that particular collection.
For example, if you remove the rating block, ratings are removed from every product shown by that Product Collection.
Quick View in product collections
↑ Back to topHypermarket includes Quick View as part of its default product card.
When shoppers select Quick View, the product opens in a modal without requiring them to leave the product listing.
The Quick View button inside the Product Collection only opens the modal.
The content shown inside the modal is controlled separately by Hypermarket’s Product Quick View template part.
To change that layout:
- Go to Appearance > Editor.
- Open Design > Patterns.
- Open the template parts area.
- Find Product Quick View.
- Edit the template part.
- Select Save.
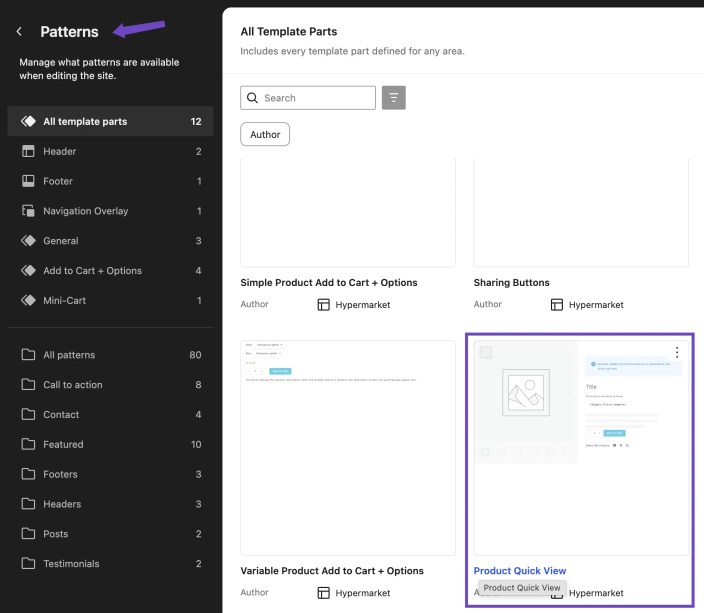
Changes to the Product Quick View template part apply wherever Hypermarket Quick View is used.
See Site Editor and templates for more information about editing template parts.
Change the number of products and columns
↑ Back to topSelect the Product Collection and use its block settings to change the number of products and the grid layout.
Depending on the collection type, you can adjust settings such as:
- Products per page.
- Number of columns.
- Product ordering.
- Pagination.
- Filters.
- Product categories.
- Product tags.
- On-sale products.
- Featured products.
Some ready-made Hypermarket collections intentionally hide controls that are not relevant to that collection.
For example, a Featured Products collection already knows that it should display featured products.
Change which products are displayed
↑ Back to topThe available product controls depend on the collection type.
For a general Product Collection, WooCommerce gives you broader query controls.
For purpose-specific collections, Hypermarket provides sensible defaults.
Examples include:
- Best Sellers orders products by popularity.
- Top Rated orders products by rating.
- Discounted Products shows sale products.
- Featured Products shows featured products.
- Products by Category filters by category.
- Products by Tag filters by product tag.
You can use the collection that most closely matches what you want to show instead of configuring the complete query manually.
Use Product Collections inside patterns
↑ Back to topHypermarket includes product patterns that already contain configured Product Collections.
These can be useful when you want a complete section rather than starting with an empty collection.
Examples include layouts for:
- Featured products.
- Best sellers.
- Top-rated products.
- Product carousels.
- Related products.
- Cross-sells.
- Featured offers.
Insert the pattern, then customize the collection and surrounding content.
If WordPress restricts structural editing after inserting the pattern, detach the pattern first and then edit its blocks.
See Patterns for more information.
Product Collections and the Product Categories block
↑ Back to topThe Product Categories Hypermarket block and Products by Category Product Collection serve different purposes.
Use Product Categories when you want visitors to browse category links.
Use Products by Category when you want to display the actual products that belong to selected categories.
For example:
- Use Product Categories for a “Shop by category” section.
- Use Products by Category for a “Shop Coffee” section containing coffee products.
Product data comes from WooCommerce
↑ Back to topProduct Collections do not create separate copies of your products.
Information such as the following comes directly from WooCommerce:
- Product title.
- Price.
- Sale price.
- Image.
- Rating.
- Stock status.
- Featured status.
- Categories.
- Tags.
- Add to Cart behavior.
To change that information, edit the product under Products in the WordPress dashboard.
Product Collections and design styles
↑ Back to topHypermarket Product Collections are designed to inherit the active Hypermarket design style.
Changing the design style can update the appearance of elements such as:
- Typography.
- Colors.
- Product surfaces.
- Buttons.
- Spacing.
The products and collection query remain unchanged.
You can also customize individual blocks within a Product Template when a specific collection needs a different presentation.
Product page layouts
↑ Back to topHypermarket includes multiple single-product layouts for WooCommerce.
These layouts control how an individual product page is structured, including the product gallery, title, price, summary, Add to Cart area, product details, sharing controls, and related products.
Default product layout
↑ Back to topThe default Hypermarket product layout uses a centered presentation.
It includes:
- Breadcrumbs.
- Product gallery.
- Previous and next product navigation.
- Product title.
- Price.
- Short description.
- SKU.
- Product category.
- Product rating.
- Add to Cart controls.
- Sharing buttons.
- Product details.
- Related products.
The product gallery appears above the main product information, with the product summary centered below it.
This layout is suitable when you want a clean, spacious product page with the product imagery as the main focus.
Modern product layout
↑ Back to topHypermarket also includes a Modern product layout.
The Modern layout places the product gallery and product information side by side on larger screens.
The product information is presented in a dedicated panel and includes:
- Product title.
- Price.
- Short description.
- Add to Cart controls.
- SKU.
- Product category.
- Sharing buttons.
Below the main product area, the layout includes product description, additional information, reviews, and related products.
The Modern layout works well for stores where product information and purchase controls should remain visually prominent beside the product gallery.
Editorial product layout
↑ Back to topHypermarket also includes an Editorial single-product template.
The Editorial template gives you another starting point for product-page design and can be customized through the Site Editor like the other product templates.
You can use it when you want a product page that is more content-focused or when you want to build a more editorial product presentation.
Product layouts and design styles
↑ Back to topHypermarket can associate a product-page layout with a design style.
For example, the Roast design style uses the Modern single-product layout.
When you activate a design style that defines a product template, Hypermarket uses that layout for the Single Product template.
If the selected design style does not define a different product template, Hypermarket uses the standard Single Product layout.
Edit the product page layout
↑ Back to topTo customize the product page layout:
- Go to Appearance > Editor.
- Open Design > Templates.
- Open the Single Product template.
- Select the blocks you want to edit.
- Add, remove, move, or configure blocks as needed.
- Select Save.
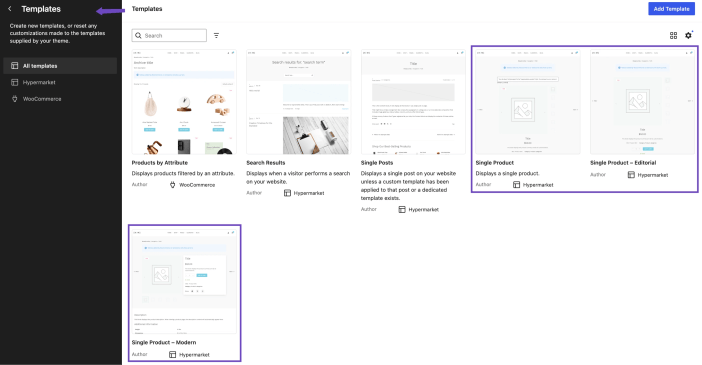
The Single Product template applies to product pages across the store unless a more specific template or customization is being used.
You can customize areas such as:
- Product gallery.
- Product title.
- Price.
- Short description.
- Product meta.
- Add to Cart.
- Sharing buttons.
- Product details.
- Reviews.
- Related products.
- Spacing.
- Colors.
- Typography.
Product data and product layout are separate
↑ Back to topThe Single Product template controls the layout of the page.
The individual product controls the content displayed inside that layout.
For example:
- The Product Title block displays the title entered on the product.
- The Product Price block displays the WooCommerce price.
- The Product Gallery displays that product’s images.
- The Product Summary displays the short description.
- Add to Cart uses the product’s type, variations, stock, and purchasing settings.
To change the product itself, edit it under Products in the WordPress dashboard.
To change how all product pages are arranged, edit the Single Product template in the Site Editor.
Customizing the Single Product template overrides style-driven layouts
↑ Back to topIf you save your own customized Single Product template in WordPress, that custom template takes priority over the product layout selected by a Hypermarket design style.
For example, if Roast normally uses the Modern layout but you customize and save the Single Product template yourself, WordPress will use your customized template instead.
This allows you to start with a Hypermarket layout and then make it your own without the design style replacing your changes.
Reset the product template
↑ Back to topIf you have customized the Single Product template and want to return to the original Hypermarket version, use the Site Editor’s template reset option.
Resetting removes your saved template customization and restores the version supplied by the theme.
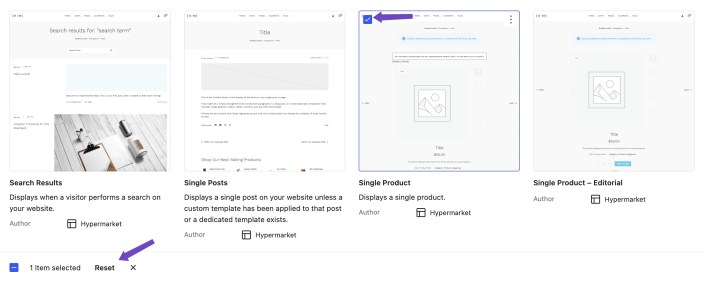
After resetting, Hypermarket can once again use the product layout associated with the active design style.
Warning
Resetting a template removes the custom layout changes you made to that template. If you may need those changes later, make a backup before resetting.
Related products
↑ Back to topHypermarket includes a Related Products section in its product layouts.
Related Products uses the Hypermarket product-card structure described in Product collections.
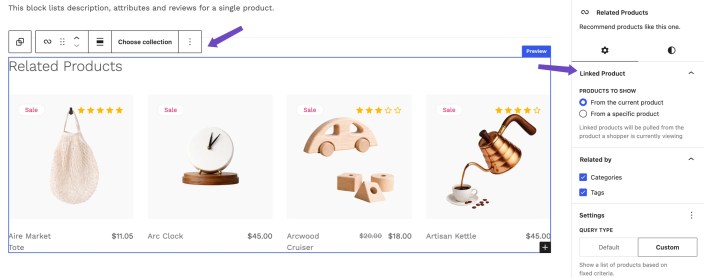
You can edit or remove the Related Products section from the Single Product template if you do not want it to appear on product pages.
Sharing buttons
↑ Back to topHypermarket product layouts can include the Sharing Buttons block.
Select the Sharing Buttons block inside the Single Product template to choose which sharing services should be available or to remove sharing entirely.
See Hypermarket blocks for more information about Sharing Buttons.
Product page changes affect multiple products
↑ Back to topBe careful when editing the Single Product template.
A change made to the template can affect every product that uses that template.
For example, removing the Product Rating block from the template removes it from all affected product pages. It does not delete the ratings stored in WooCommerce.
If you only need to change one product’s title, images, description, price, or other product data, edit that product instead of the template.
Header, footer, and navigation
↑ Back to topHypermarket uses WordPress template parts for the site header, footer, and navigation overlay.
You can edit these areas from the Site Editor without editing theme files.
Go to Appearance > Editor, then open the relevant template part.
Header
↑ Back to topThe Header template part controls the main header shown across the site.
Depending on the layout you choose, the header can include:
- Site logo.
- Main navigation.
- Product search.
- Customer account.
- Mini cart.
- Announcement or utility bar.
- Supporting text or links.
Hypermarket includes three ready-made header patterns.
Default Header
The default Header is the simplest layout.
It includes:
- Site logo.
- Main navigation.
- Customer account.
- Mini cart.

This layout works well when you want a compact, minimal header.
Classic Header
The Classic Header uses a more traditional multi-row store layout.
It can include:
- Top announcement area.
- Product search.
- Centered site logo.
- Customer account.
- Main navigation.
- Mini cart.
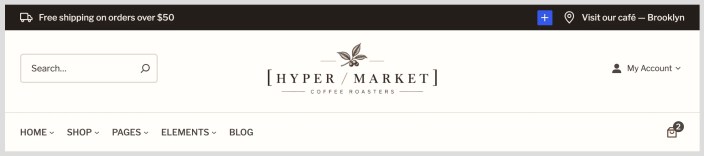
This layout is useful when search and navigation need more prominence.
Minimal Utility Header
The Minimal Utility Header includes:
- Utility or announcement bar.
- Site logo.
- Product search.
- Customer account.
- Mini cart.
- Centered navigation.

It provides more store tools than the default Header while keeping the overall layout compact.
Change the header layout
↑ Back to topTo replace the current header with another Hypermarket header pattern:
- Go to Appearance > Editor.
- Open the Header template part.
- Select the existing header content.
- Remove the current blocks.
- Open the block inserter.
- Select Patterns.
- Browse the Header category.
- Insert the Hypermarket header pattern you want to use.
- Update the logo, navigation, search, links, and other content.
- Select Save.
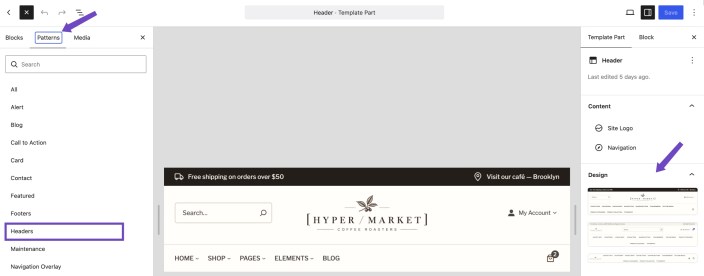
Hypermarket provides three header patterns, so you can replace the entire header without rebuilding it block by block.
If WordPress restricts structural editing after inserting the pattern, detach the pattern first and then customize its blocks.
Customize the header
↑ Back to topAfter inserting a header pattern, select the individual blocks inside it to make changes.
For example, you can:
- Replace the site logo.
- Edit navigation links.
- Add or remove menu items.
- Change the product search.
- Remove the customer account block.
- Remove the mini cart.
- Change announcement text.
- Adjust spacing.
- Change colors.
- Change typography.
- Add or remove other supported blocks.
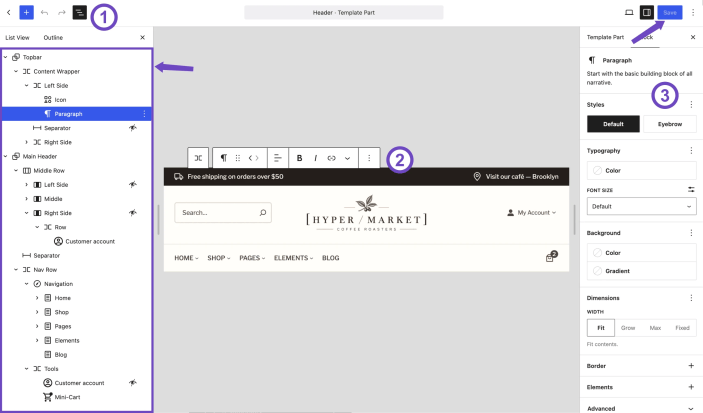
Because Header is a template part, changes can affect every template that uses it.
Footer
↑ Back to topThe Footer template part controls the footer shown across the site.
Hypermarket includes three ready-made footer patterns with different levels of content and navigation.
Depending on the selected pattern, a footer can include:
- Site information.
- Navigation menus.
- Contact details.
- Social links.
- Support information.
- Calls to action.
- Payment icons.
- Copyright text.
Change the footer layout
↑ Back to topTo replace the current footer:
- Go to Appearance > Editor.
- Open the Footer template part.
- Remove the existing footer content.
- Open the block inserter.
- Select Patterns.
- Browse the Footer category.
- Insert the Hypermarket footer pattern you want to use.
- Replace the example content with your own store information.
- Select Save.
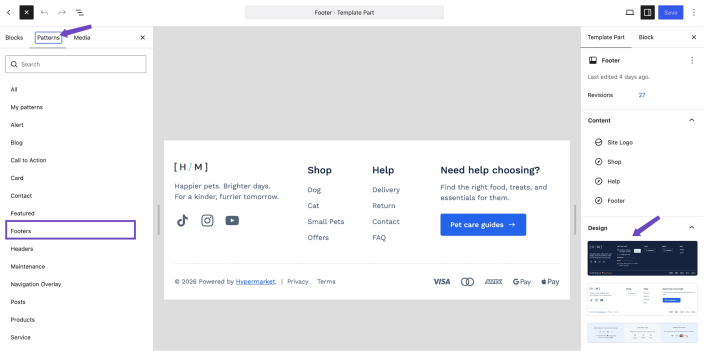
If WordPress restricts structural editing after inserting the pattern, detach the pattern before rearranging its blocks.
Customize the footer
↑ Back to topAfter inserting a footer pattern, update the parts that are relevant to your store.
This can include:
- Store description.
- Navigation links.
- Contact details.
- Phone number.
- Social links.
- Copyright text.
- Payment icons.
- Calls to action.
- Colors.
- Typography.
- Spacing.
Some Hypermarket footer patterns include the Contact Info or Icon Buttons blocks. Select those blocks directly to edit their settings.
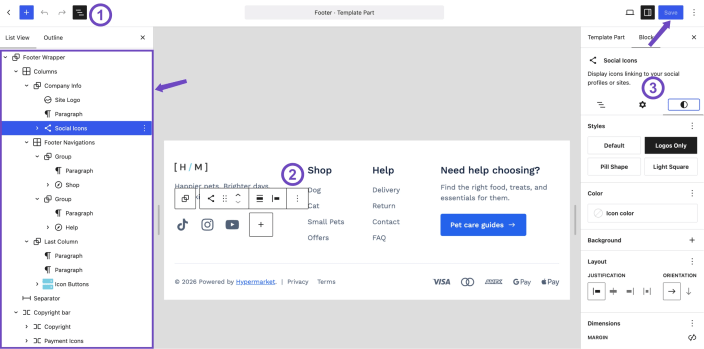
If you do not need a particular footer section, you can remove it after detaching the pattern.
Navigation
↑ Back to topHypermarket uses the WordPress Navigation block for menus.
You can edit navigation from the Header, Footer, Navigation Overlay, or any other template part that contains a Navigation block.
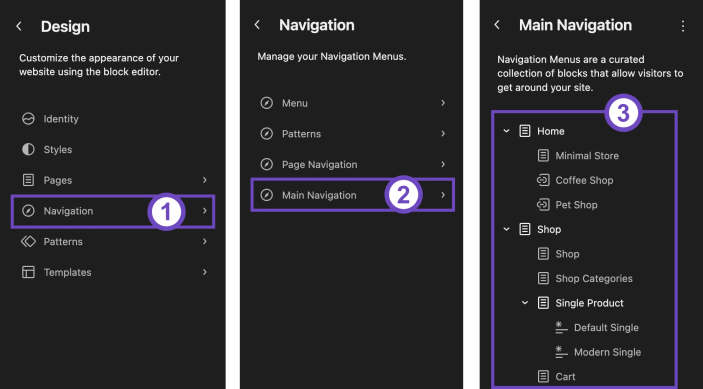
Select the Navigation block to:
- Add links.
- Remove links.
- Reorder menu items.
- Create submenus.
- Link to pages.
- Link to product categories.
- Add custom links.
- Change alignment.
- Change spacing.
- Adjust typography and colors.
A single site can contain multiple Navigation blocks for different purposes.
For example, the header can use one navigation menu while the footer uses separate Shop, Help, or About menus.
Add a page to navigation
↑ Back to topTo add a page:
- Select the Navigation block.
- Add a new navigation item.
- Search for the page you want.
- Select the page.
- Reorder the item if needed.
- Save the template part.
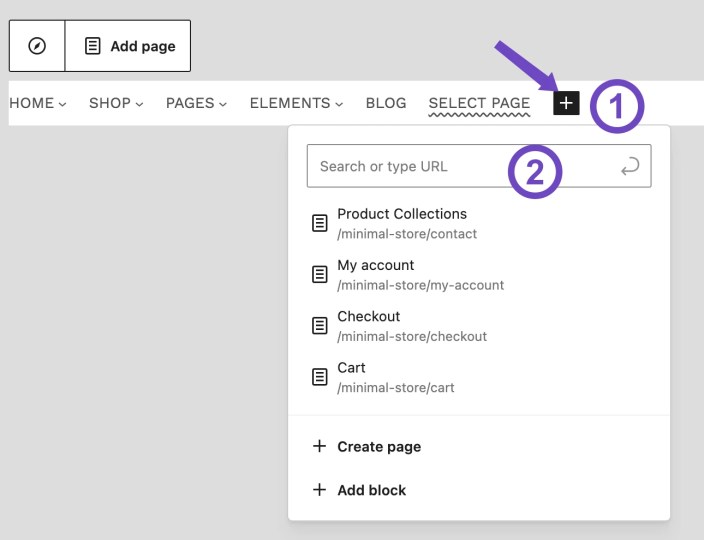
You can use the same process for product categories and other supported content types.
Create a submenu
↑ Back to topTo create a submenu:
- Select the Navigation block.
- Select the navigation item that should become the parent.
- Add or move other links underneath it.
- Arrange the submenu items in the order you want.
- Save your changes.
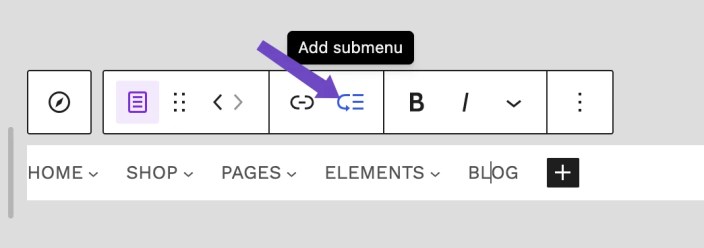
Submenu behavior is handled by the WordPress Navigation block.
Navigation overlay
↑ Back to topHypermarket includes a dedicated Navigation Overlay template part.
The navigation overlay is used when WordPress opens the navigation in an overlay experience, commonly on smaller screens or when an overlay menu is enabled.
Hypermarket’s default navigation overlay includes:
- Close control.
- Product search.
- Vertical navigation.
Edit the navigation overlay
↑ Back to topTo customize it:
- Go to Appearance > Editor.
- Open Design > Patterns.
- Open the template parts area.
- Find Navigation Overlay.
- Open it in the editor.
- Edit the search, navigation, spacing, or other blocks.
- Select Save.
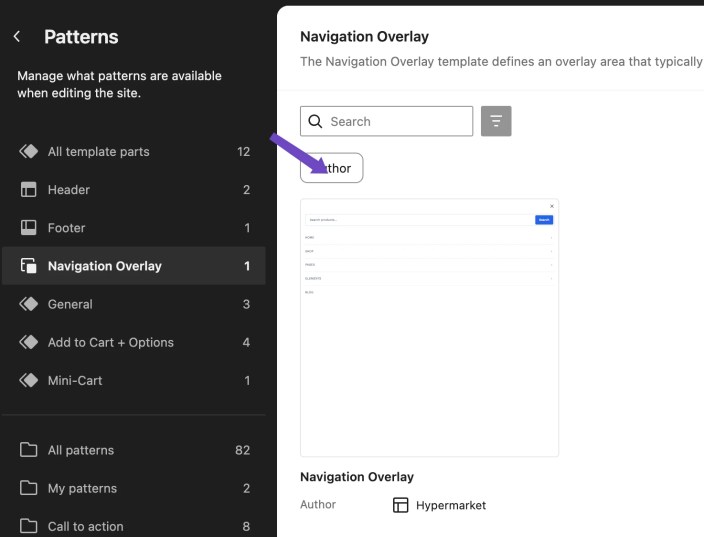
You can customize the Navigation Overlay separately from the main Header.
For example, the desktop header can remain compact while the overlay contains a larger vertical menu and product search.
Navigation overlay pattern
↑ Back to topHypermarket also includes a ready-made Navigation Overlay pattern.
If you replace the content of the Navigation Overlay template part, you can insert this pattern again from the Navigation Overlay pattern category.
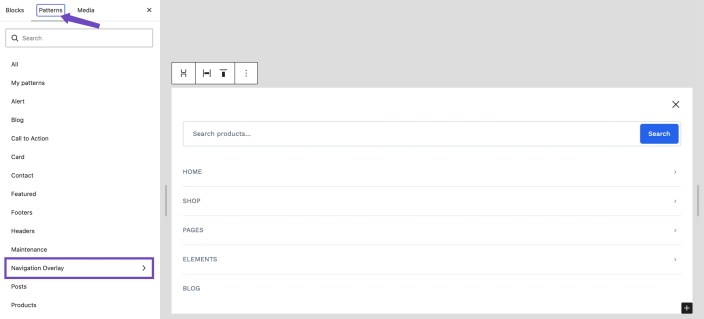
The pattern includes the basic structure Hypermarket expects for the overlay.
Product search in the header
↑ Back to topSome Hypermarket header patterns include a Search block configured for WooCommerce products.
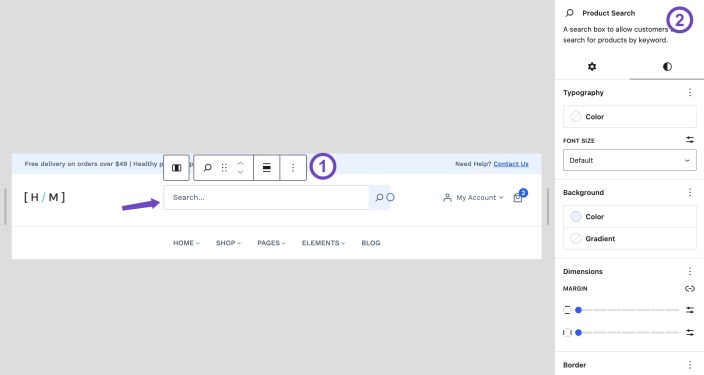
This lets visitors search the product catalog directly from the header.
You can remove the search if your store does not need it or adjust its position and appearance through the block settings.
Customer account
↑ Back to topHeader patterns can include the WooCommerce Customer Account block.
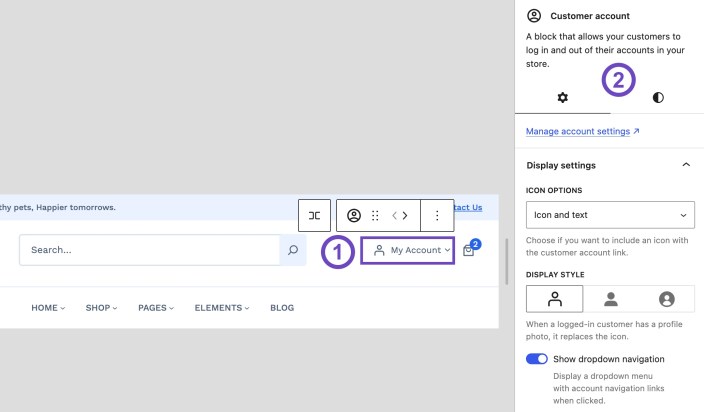
This gives customers access to their account area from the header.
You can remove it if account access is not needed in the header.
Mini cart
↑ Back to topHypermarket header patterns can include the WooCommerce Mini-Cart block.
The Mini-Cart gives shoppers quick access to products currently in their cart.
Select the block to configure the options WooCommerce makes available for the Mini-Cart.
Different navigation areas can use different menus
↑ Back to topHeader and footer Navigation blocks do not have to contain the same links.
For example, you might use:
- Header navigation for Shop, Collections, About, and Contact.
- Footer Shop navigation for product categories.
- Footer Help navigation for Shipping, Returns, FAQ, and Contact.
- Footer legal navigation for Privacy Policy and Terms.
This makes it easier to keep the main header concise while still providing access to secondary pages elsewhere.
Header and footer changes are site-wide
↑ Back to topHeader and Footer are reusable template parts.
When you edit them, the changes apply to templates that use those template parts.
If you only want to add content to one page, edit that page or template instead of changing the Header or Footer.
Restore a Hypermarket header or footer
↑ Back to topIf you have heavily customized a header or footer and want to start again, you can remove its current content and insert one of the Hypermarket header or footer patterns.
This gives you a clean starting layout without requiring you to rebuild all of the blocks manually.
See Patterns for more information about inserting and detaching Hypermarket patterns.
WooCommerce pages and integrations
↑ Back to topHypermarket is designed around WooCommerce and includes layouts and styling for the main store pages and shopping flows.
WooCommerce manages the store functionality and data. Hypermarket controls how those areas are presented within the theme.
Essential WooCommerce pages
↑ Back to topA typical WooCommerce store uses several important pages, including:
- Shop.
- Cart.
- Checkout.
- My Account.
WooCommerce assigns these pages from its settings.
If you used Hypermarket demo import or the manual setup flow, Hypermarket can create and prepare the required store pages for you.
You can review WooCommerce page assignments from the WooCommerce settings in the WordPress dashboard.
Shop and product archives
↑ Back to topThe Shop page and product taxonomy archives use Hypermarket’s WooCommerce product archive layout.
This includes product listings for areas such as:
- Main Shop page.
- Product categories.
- Product tags.
- Product attributes.
Hypermarket uses WooCommerce Product Collection blocks for its block-based product archive presentation.
The default product card can include:
- Product image.
- Sale badge.
- Rating.
- Quick View.
- Add to Cart.
- Product title.
- Price.
See Product collections for information about editing product cards and collection layouts.
Product category and tag archives
↑ Back to topWooCommerce automatically creates archive views for product categories and product tags.
For example, visiting a specific product category displays the products assigned to that category.
You manage the category or tag itself under Products in the WordPress dashboard.
The archive layout is controlled separately through the Site Editor.
Product search
↑ Back to topHypermarket includes a dedicated product search results layout.
Product searches from supported Hypermarket header patterns and WooCommerce product search blocks use the product catalog rather than a general site-content search.
Search results use Hypermarket’s product presentation, including the Product Collection structure and product card.
This keeps product search visually consistent with other store listings.
Cart
↑ Back to topThe Cart page displays the products a customer intends to purchase.
Hypermarket includes a dedicated Cart page template that works with WooCommerce’s Cart content.
The Cart experience can include WooCommerce functionality such as:
- Cart items.
- Product quantities.
- Product removal.
- Coupons.
- Shipping calculations.
- Cart totals.
- Checkout action.
The exact functionality available depends on WooCommerce and any installed WooCommerce extensions.
Edit the Cart page
↑ Back to topThe Cart page content itself is managed through the WordPress page assigned as the WooCommerce Cart page.
Hypermarket also supplies the surrounding Cart page template.
If you want to change the main WooCommerce Cart block, edit the Cart page.
If you want to change the surrounding page structure, use the Site Editor.
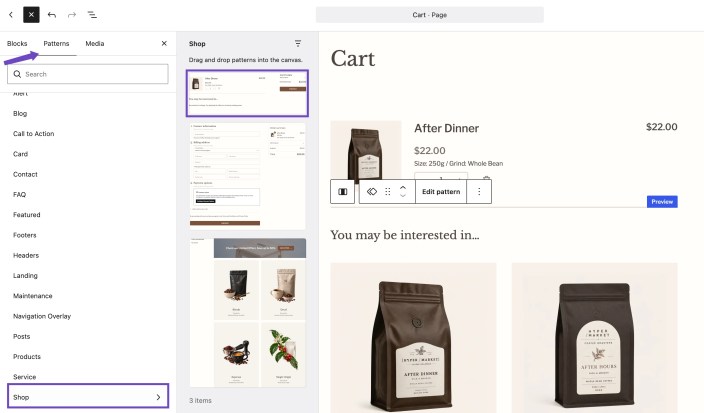
Be careful when removing required WooCommerce blocks from transactional pages because doing so can prevent customers from completing the expected store flow.
Checkout
↑ Back to topThe Checkout page is where customers enter their order details and complete payment.
Hypermarket includes a dedicated Checkout page template designed around WooCommerce’s Checkout experience.
The Checkout can include:
- Contact information.
- Billing address.
- Shipping address.
- Shipping methods.
- Order summary.
- Coupons.
- Payment methods.
- Additional checkout fields.
- Place Order action.
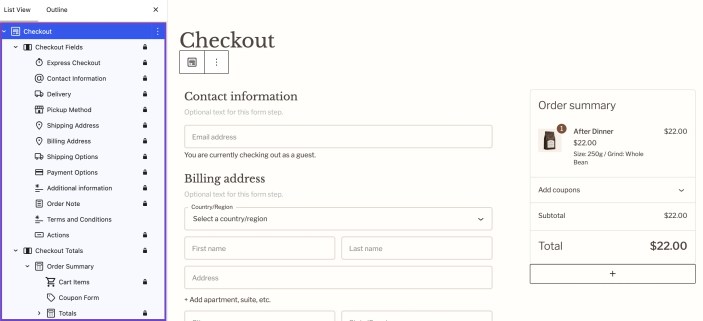
The available fields and payment options are controlled by WooCommerce and installed extensions.
Checkout header
↑ Back to topHypermarket uses a separate Checkout Header template part for the Checkout page.
This keeps the checkout experience more focused than the main storefront header.
To customize it:
- Go to Appearance > Editor.
- Open Design > Patterns.
- Open the template parts area.
- Find Checkout Header.
- Edit the blocks you want to change.
- Select Save.
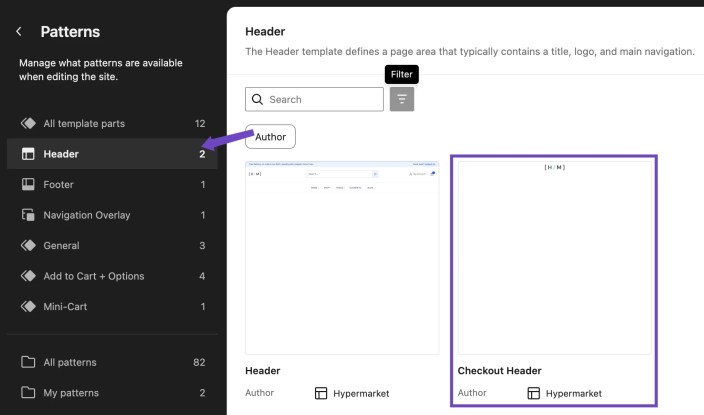
Because this template part is used specifically for checkout, changing it does not require changing the main site Header.
Order confirmation
↑ Back to topAfter a successful checkout, WooCommerce displays the order confirmation experience.
Hypermarket includes a dedicated Order Confirmation template.
Depending on the order, it can display:
- Order status.
- Order summary.
- Order totals.
- Downloads.
- Shipping address.
- Billing address.
- Additional checkout fields.
- Additional order information.
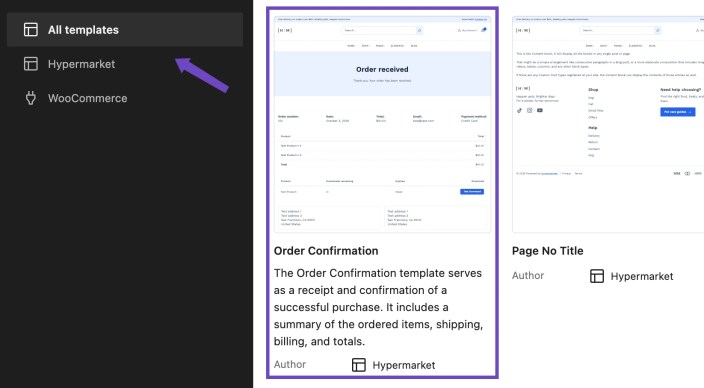
The data shown here comes from the WooCommerce order.
My Account
↑ Back to topThe My Account page is managed by WooCommerce and provides customers with access to their account information.
Depending on the store and installed extensions, customers may be able to view:
- Orders.
- Downloads.
- Addresses.
- Payment methods.
- Account details.
- Other extension-specific account sections.
Hypermarket provides styling for WooCommerce account views so they remain visually consistent with the rest of the theme.
The available account sections are controlled by WooCommerce and installed extensions.
Mini cart
↑ Back to topHypermarket header patterns can include the WooCommerce Mini-Cart block.
The Mini-Cart gives shoppers access to their current cart without requiring them to visit the Cart page first.
Its contents and cart state are managed by WooCommerce.
You can edit or remove the Mini-Cart block from the Header template part.
See Header, footer, and navigation for more information.
Quick View
↑ Back to topHypermarket includes Quick View functionality in its product collection layouts.
Quick View lets shoppers view important product information without leaving the current product listing.
The button is included in Hypermarket’s product card structure.
The content displayed inside the Quick View modal is controlled by the Product Quick View template part.
To customize it, go to Appearance > Editor, open the template parts area, and edit Product Quick View.
See Site Editor and templates and Product collections for more information.
Add to Cart
↑ Back to topHypermarket uses WooCommerce Add to Cart blocks and functionality throughout the store.
Add to Cart behavior depends on the product type.
For example:
- Simple products can be added directly.
- Variable products require customers to select variations.
- Grouped products can contain multiple related products.
- Other product types can introduce their own purchasing controls.
Hypermarket provides presentation around these WooCommerce controls without replacing their underlying functionality.
Product galleries
↑ Back to topSingle-product layouts use WooCommerce product gallery blocks.
Depending on the selected Hypermarket product layout, the gallery can include:
- Main product image.
- Gallery images.
- Thumbnail navigation.
- Previous and next image controls.
- Zoom or lightbox behavior where supported.
Product images themselves are managed from the WooCommerce product editor.
Store notices
↑ Back to topHypermarket templates include WooCommerce Store Notices where appropriate.
WooCommerce can use these notices for messages such as:
- Cart updates.
- Coupon results.
- Checkout errors.
- Successful actions.
- Other store feedback.
Do not remove Store Notices from important transactional templates unless you have another way to present WooCommerce messages to customers.
WooCommerce breadcrumbs
↑ Back to topHypermarket includes WooCommerce breadcrumbs in store templates where appropriate.
Breadcrumbs help visitors understand where they are within the product catalog.
Their appearance follows the active Hypermarket design style and theme styling.
Pagination
↑ Back to topProduct archives and larger Product Collections can use WooCommerce and WordPress pagination controls.
Hypermarket styles pagination to match the rest of the storefront.
Pagination behavior itself is controlled by the relevant WooCommerce Product Collection or query.
Wishlist and Saved for Later
↑ Back to topHypermarket includes presentation support for WooCommerce wishlist and Saved for Later interfaces where those features are available.
These features are not created by the Hypermarket theme itself.
If the required WooCommerce feature or extension is active, Hypermarket helps its frontend elements fit with the rest of the store design.
Configuration and data for those features remain controlled by WooCommerce or the extension providing them.
WooCommerce Subscriptions
↑ Back to topHypermarket also includes presentation styling for subscription-related WooCommerce interfaces.
Subscription products, billing schedules, renewals, customer subscription management, and payment behavior are controlled by the subscription extension.
Hypermarket does not add subscription functionality by itself.
Its role is to keep supported subscription interfaces visually consistent with the theme.
Third-party WooCommerce extensions
↑ Back to topMany WooCommerce extensions add their own blocks, account sections, checkout fields, or frontend components.
Hypermarket inherits and styles standard WordPress and WooCommerce elements where possible, but an extension can introduce its own markup and styling.
For that reason, installing an extension does not necessarily mean every extension screen will use a Hypermarket-specific layout.
When using a WooCommerce extension:
- Configure the extension according to its own documentation.
- Test its frontend output with Hypermarket.
- Review mobile and desktop layouts.
- Check Cart, Checkout, My Account, and product pages if the extension changes those areas.
WooCommerce functionality versus Hypermarket presentation
↑ Back to topIt is useful to keep this distinction in mind.
WooCommerce controls:
- Products.
- Orders.
- Customers.
- Cart data.
- Checkout.
- Payments.
- Shipping.
- Taxes.
- Inventory.
- Account data.
Hypermarket controls or enhances:
- Store templates.
- Product layouts.
- Product card presentation.
- Quick View presentation.
- Header and mini cart placement.
- Store styling.
- Design styles.
- Patterns.
- WooCommerce block presentation.
Changing a Hypermarket layout does not change the underlying WooCommerce order or product data.
Customize WooCommerce templates carefully
↑ Back to topWooCommerce pages such as Cart, Checkout, and Order Confirmation contain blocks required for important store actions.
You can customize their surrounding design from the Site Editor, but avoid removing functional WooCommerce blocks unless you understand their purpose.
After making significant changes, test the complete customer journey:
- Browse the Shop.
- Open a product.
- Select variations if applicable.
- Add the product to the cart.
- Review the Mini-Cart and Cart page.
- Continue to Checkout.
- Confirm shipping and payment sections appear correctly.
- Complete a test order when possible.
- Review the Order Confirmation and My Account experiences.
This helps ensure visual changes have not interrupted the purchasing flow.
Customization
↑ Back to topHypermarket is built as a block theme, so most visual changes are made from the WordPress Site Editor rather than through a traditional theme Customizer.
Go to Appearance > Editor to customize the overall design, templates, template parts, and global styles.
Global styles
↑ Back to topUse Styles in the Site Editor when you want to change the overall appearance of the store.
Global styles can control areas such as:
- Colors.
- Typography.
- Layout widths.
- Spacing.
- Buttons.
- Links.
- Headings.
- Individual block styles.
Changes made here can affect the entire site.
Use global styles for design decisions that should remain consistent across multiple pages and templates.
Design styles
↑ Back to topHypermarket includes ready-made design styles that can change the overall visual direction of the theme.
A design style can adjust settings such as:
- Color palette.
- Typography.
- Background and surface colors.
- Button appearance.
- Block defaults.
- Layout settings.
Some Hypermarket design styles can also use a different product-page layout.
See Design styles for the available styles and how product layouts are selected.
Colors
↑ Back to topYou can change site colors from the Site Editor under Styles > Colors.
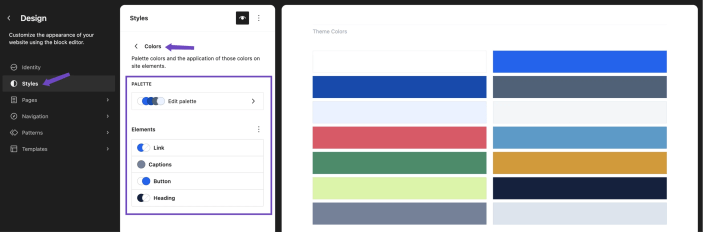
Depending on the active design style, Hypermarket provides colors for common roles such as:
- Primary.
- Background.
- Surface.
- Body text.
- Muted text.
- Borders.
- Success.
- Warning.
- Danger.
Using the theme palette helps keep the design consistent across blocks and WooCommerce elements.
You can still override colors on individual blocks when needed.
Typography
↑ Back to topUse Styles > Typography to customize typography across the store.
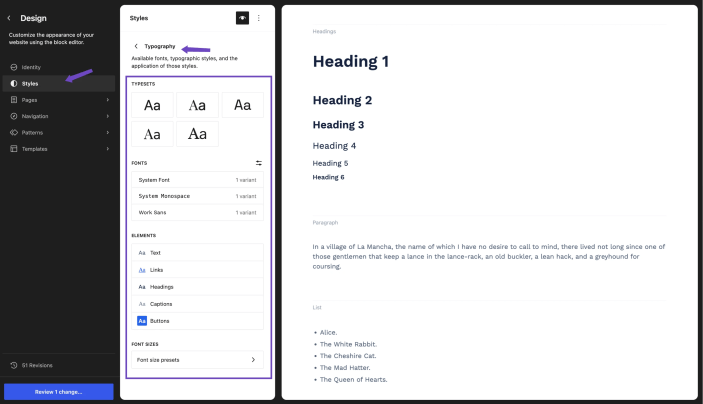
You can adjust settings such as:
- Font family.
- Font size.
- Font weight.
- Line height.
- Letter spacing.
You can also select individual elements such as headings or buttons and customize them separately.
Some Hypermarket design styles include their own font combinations.
Layout widths
↑ Back to topHypermarket uses WordPress content and wide layout widths.
Blocks can use alignment options such as:
- Default content width.
- Wide width.
- Full width.
The available alignment depends on the selected block.
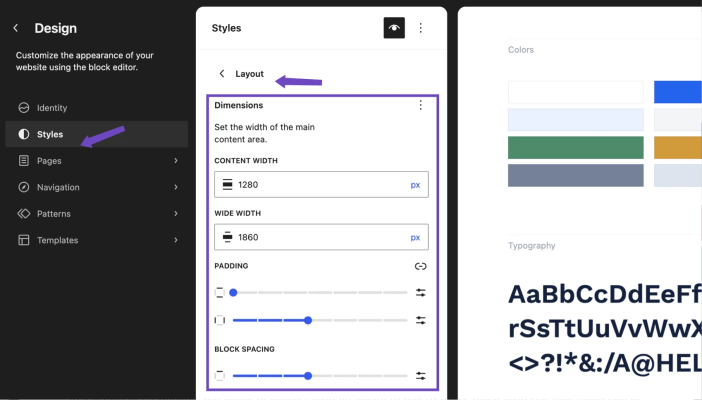
Use wide or full-width layouts for sections such as:
- Hero banners.
- Product collections.
- Maps.
- Promotional sections.
Use the normal content width for text-heavy content where readability is more important.
Block-level customization
↑ Back to topMost blocks include their own settings in the editor sidebar.
Depending on the block, these can include:
- Colors.
- Typography.
- Spacing.
- Alignment.
- Borders.
- Border radius.
- Shadows.
- Dimensions.
- Layout.
- Block styles.
Block-level settings override the global appearance for that specific block.
Use them when one section needs to differ from the rest of the site.
Block styles
↑ Back to topHypermarket provides additional styles for selected WordPress, WooCommerce, and Hypermarket blocks.
When a block has alternate styles:
- Select the block.
- Open the Styles panel in the block settings.
- Choose the style you want.
Block styles change the presentation without requiring you to rebuild the block.
Examples include different Product Categories layouts and other Hypermarket-specific presentation options.
Customize patterns
↑ Back to topHypermarket patterns are starting layouts that can be customized after insertion.
After inserting a pattern, replace its example content with your own:
- Text.
- Images.
- Links.
- Products.
- Contact details.
- Navigation.
- Calls to action.
If WordPress allows content editing but prevents you from changing the structure, select the pattern and choose Detach pattern.
After detaching it, you can freely:
- Move blocks.
- Remove blocks.
- Add blocks.
- Change columns.
- Adjust spacing.
- Rebuild the layout.
Detaching only affects the inserted copy. The original Hypermarket pattern remains available from the inserter.
See Patterns for more information.
Customize templates
↑ Back to topTemplates control the overall structure of specific types of pages.
To edit a template:
- Go to Appearance > Editor.
- Open Design > Templates.
- Select the template you want to change.
- Edit its blocks.
- Select Save.
Examples include:
- Single Product.
- Product Archive.
- Product Search Results.
- Cart.
- Checkout.
- Order Confirmation.
- Blog and archive templates.
Changes to a template can affect every page that uses it.
Use templates for structural changes that should apply across multiple pages.
Customize template parts
↑ Back to topTemplate parts are reusable site areas used by templates.
Hypermarket includes template parts such as:
- Header.
- Footer.
- Navigation Overlay.
- Checkout Header.
- Product Quick View.
To edit one:
- Go to Appearance > Editor.
- Open Design > Patterns.
- Open the template parts area.
- Select the template part.
- Edit its blocks.
- Select Save.
Because template parts are reusable, changes can appear anywhere that template part is used.
Customize the header and footer
↑ Back to topHypermarket includes three ready-made header patterns and three ready-made footer patterns.
If you want a different layout:
- Open the Header or Footer template part.
- Remove the existing content.
- Open the pattern inserter.
- Choose one of the Hypermarket header or footer patterns.
- Insert it.
- Detach the pattern if structural editing is restricted.
- Replace the example content.
- Save the template part.
See Header, footer, and navigation for more information.
Customize product cards
↑ Back to topHypermarket Product Collections use a shared product card structure when inserted.
To change a product card inside a specific collection:
- Select the Product Collection.
- Select the nested Product Template.
- Edit the blocks inside the product card.
- Save your changes.
You can change elements such as:
- Product image.
- Sale badge.
- Rating.
- Quick View.
- Add to Cart.
- Product title.
- Price.
Changes apply to all products displayed by that Product Template.
See Product collections for more information.
Customize product pages
↑ Back to topProduct-page structure is controlled by the Single Product template.
Go to:
Appearance > Editor > Design > Templates > Single Product
From there you can change the product gallery, summary, Add to Cart area, product details, reviews, related products, and other sections.
If you save your own customized Single Product template, that custom version takes priority over a product layout selected automatically by a Hypermarket design style.
See Product page layouts for more information.
Customize Quick View
↑ Back to topThe button shown on product cards and the content displayed inside Quick View are separate.
The Quick View button is part of Hypermarket’s product card structure.
The modal content is controlled by the Product Quick View template part.
To change it:
- Go to Appearance > Editor.
- Open Design > Patterns.
- Open the template parts area.
- Select Product Quick View.
- Edit the product blocks inside it.
- Select Save.
Changes apply wherever Hypermarket Quick View is used.
Customize navigation
↑ Back to topHypermarket uses the WordPress Navigation block.
Select a Navigation block to change:
- Menu links.
- Link order.
- Submenus.
- Typography.
- Spacing.
- Alignment.
- Colors.
Different Navigation blocks can use different menus, so the header, footer, and navigation overlay do not need to contain the same links.
Customize individual pages
↑ Back to topPages such as Home, About, Contact, FAQ, and landing pages are edited from Pages in the WordPress dashboard.
Use the page editor when the change should affect only that page.
Use the Site Editor when the change should affect a shared template or template part.
Add custom CSS
↑ Back to topIf a design adjustment is not available through block settings or global styles, you can add custom CSS through the Site Editor’s additional CSS tools where available in your WordPress version.
Use custom CSS for small presentation adjustments rather than rebuilding functionality.
Before adding CSS, check whether the block already provides a native setting for the change you need.
Native block controls are usually easier to maintain and more likely to adapt correctly across different screen sizes.
Custom CSS classes
↑ Back to topMany WordPress blocks allow you to add an additional CSS class from the block settings.
Use this when you want to target one specific block or group of blocks with custom CSS.
Choose descriptive class names that are unlikely to conflict with WordPress, WooCommerce, or plugin classes.
Responsive customization
↑ Back to topHypermarket layouts are designed to adapt across desktop, tablet, and mobile devices.
After making layout changes, preview the page at different screen sizes from the editor.
Pay particular attention to:
- Header navigation.
- Product grids.
- Multi-column sections.
- Product pages.
- Cart.
- Checkout.
- Footer columns.
- Large images.
- Long button labels.
A layout that works well on desktop may need simpler spacing or fewer columns on smaller screens.
Keep global and local changes separate
↑ Back to topA useful rule is:
Use Styles when the change should apply broadly.
Use Templates when the structure should change for a type of page.
Use Template Parts when a reusable site area should change.
Use Patterns when you need a ready-made starting layout.
Use block settings when only one block should change.
Use the page or product editor when only that individual piece of content should change.
Keeping these levels separate makes future changes easier to manage.
Reset a customization
↑ Back to topWordPress lets you reset customized templates or styles back to the version supplied by the theme.
Use this when you want to discard your saved customization and return to the Hypermarket default.
Be careful when resetting a template because your custom layout changes will be removed.
If you may want to reuse the current design later, make a backup before resetting it.
Changes after a theme update
↑ Back to topYour content, Site Editor customizations, and saved WordPress templates are stored separately from the theme files.
Do not edit Hypermarket theme files directly for normal design changes.
Use the Site Editor, block settings, or a child theme for code-level customization.
This helps prevent theme updates from overwriting your changes.
Troubleshooting
↑ Back to topThis section covers common issues you may encounter while setting up or customizing Hypermarket.
A pattern will not let me move or rearrange blocks
↑ Back to topAfter inserting a Hypermarket pattern, WordPress may allow you to edit content such as text and images while restricting structural changes.
If you cannot move blocks, change columns, or rearrange the layout:
- Select the pattern.
- Open the block toolbar or options menu.
- Choose Detach pattern.
- Edit the blocks normally.
Detaching only affects that inserted copy. The original Hypermarket pattern remains available from the pattern inserter.
My header or footer does not look like the demo
↑ Back to topHypermarket includes several header and footer patterns.
If the current Header or Footer template part uses a different pattern from the demo, the layout will also be different.
To replace it:
- Go to Appearance > Editor.
- Open the Header or Footer template part.
- Remove the existing content.
- Open the pattern inserter.
- Browse the Header or Footer category.
- Insert the Hypermarket pattern you want.
- Detach it if you need to change the structure.
- Replace the example content.
- Save the template part.
Also check that your logo, navigation menus, contact details, and other store content have been configured.
Navigation links are missing or incorrect
↑ Back to topHypermarket uses the WordPress Navigation block.
If the header or footer shows the wrong links:
- Open the relevant template part in the Site Editor.
- Select the Navigation block.
- Review the current menu items.
- Add, remove, or reorder links.
- Save your changes.
Different Navigation blocks can use different menus, so changing one footer menu does not necessarily change the header navigation.
The mobile menu does not contain the content I expected
↑ Back to topHypermarket includes a separate Navigation Overlay template part.
If the overlay menu needs different links, search, or layout:
- Go to Appearance > Editor.
- Open Design > Patterns.
- Open the template parts area.
- Select Navigation Overlay.
- Edit the content.
- Save your changes.
The Navigation Overlay can be customized separately from the main Header.
Product search is showing the wrong type of results
↑ Back to topSome Hypermarket header patterns include a Search block configured specifically for WooCommerce products.
If you replace that block with a normal WordPress Search block, search behavior may change.
Select the Search block in the header and confirm that it is configured for product search if you want visitors to search the WooCommerce catalog.
A product is missing from a Product Collection
↑ Back to topCheck the settings of the Product Collection first.
The product may be excluded because of the selected collection type or query.
For example:
- Featured Products requires the product to be marked as featured.
- Discounted Products requires an active sale price.
- Products by Category requires the product to belong to the selected category.
- Products by Tag requires the selected tag.
- New arrivals depends on the product publication date.
- Related Products depends on WooCommerce product relationships.
Also confirm that the product is published and visible in the catalog.
A product category does not appear
↑ Back to topIf a category is missing from the Product Categories block:
- Confirm that the category exists under Products > Categories.
- Confirm that products are assigned to it.
- Check whether the block is using Automatic or Handpicked selection.
- In Handpicked mode, make sure the category is selected.
- Check the number of categories configured to display.
Hypermarket does not display empty categories in this block.
Category images are missing
↑ Back to topCategory images are managed by WooCommerce.
Go to Products > Categories, edit the category, and add an image.
If the category already has an image, confirm that Show thumbnails is enabled in the Hypermarket Product Categories block.
Quick View button appears but the modal content needs changing
↑ Back to topThe Quick View button and the Quick View modal layout are separate.
To change what shoppers see after opening Quick View:
- Go to Appearance > Editor.
- Open Design > Patterns.
- Open the template parts area.
- Select Product Quick View.
- Edit the product blocks.
- Save your changes.
Changes to this template part apply wherever Hypermarket Quick View is used.
Quick View does not appear in a custom product layout
↑ Back to topHypermarket includes Quick View in its own product card layouts and product patterns.
If you build a WooCommerce Product Collection from scratch and replace the default Product Template, Quick View may not be included automatically.
Use a Hypermarket Product Collection or product pattern as a starting point if you want the standard Hypermarket product card structure.
Product cards look different in one collection
↑ Back to topEach Product Collection contains its own Product Template.
If you edit the Product Template inside one collection, those changes apply to that collection and may make it look different from other collections.
Compare the nested Product Template with a standard Hypermarket Product Collection if you want to restore the normal product card structure.
The product page layout changed after selecting a design style
↑ Back to topSome Hypermarket design styles can select a different Single Product layout.
For example, the Roast design style uses the Modern product layout.
If you switch design styles, the product page can change accordingly.
See Design styles and Product page layouts for more information.
The product page does not change when I switch design styles
↑ Back to topIf you previously customized and saved the Single Product template, your custom template takes priority over the layout selected by the active Hypermarket design style.
To return to the theme-controlled product layout, reset the customized Single Product template from the Site Editor.
Warning: Resetting the template removes the custom layout changes saved in that template.
Product information is incorrect on the product page
↑ Back to topThe Single Product template controls layout, but the product editor controls product data.
If the title, image, price, description, SKU, stock, category, attributes, or variations are wrong, edit the product under Products.
Do not edit the template when the issue affects only one product.
Product variation options are missing
↑ Back to topEdit the variable product and confirm:
- The product type is set to Variable product.
- The required attributes have been added.
- The attributes are enabled for variations.
- Variations have been created.
- Each variation has the required price and stock settings.
Hypermarket displays the WooCommerce variation controls, so variation availability depends on the product configuration.
A sale product does not show as discounted
↑ Back to topConfirm that the product has an active sale price in WooCommerce.
If the sale was scheduled, check that the current date falls within the sale period.
For variable products, confirm the relevant variations have valid sale prices.
Ratings are not showing
↑ Back to topRatings require WooCommerce product reviews and ratings to be enabled and the product to have rating data.
Also check that the Product Rating block has not been removed from the Product Template or Single Product template.
Related products are not what I expected
↑ Back to topWooCommerce determines related products using product relationships such as categories and tags.
Review the categories and tags assigned to the product if the Related Products section is not showing the products you expect.
You can also edit or remove the Related Products collection from the Single Product template.
Cart or Checkout layout looks broken
↑ Back to topCart and Checkout contain functional WooCommerce blocks that should not be removed casually.
If you recently customized one of these pages or templates:
- Review the blocks you removed or moved.
- Confirm that the main WooCommerce Cart or Checkout content is still present.
- Check that WooCommerce is active and up to date.
- Test the page while logged out as well as logged in.
- Test with a simple product before troubleshooting more complex product types.
If necessary, restore the WooCommerce page content or reset the surrounding Hypermarket template.
Checkout fields or payment methods are missing
↑ Back to topHypermarket does not create checkout fields or payment methods.
These are controlled by WooCommerce and installed extensions.
Check:
- WooCommerce payment settings.
- Shipping zones and methods.
- Checkout extensions.
- Whether the payment gateway is enabled.
- Whether gateway requirements are met.
- Whether the customer location affects available methods.
My Account looks incomplete
↑ Back to topThe available sections in My Account depend on WooCommerce and installed extensions.
For example, downloads only appear when relevant downloadable purchases exist, and subscription sections require a subscription extension.
Hypermarket styles these views but does not create the underlying account features.
Demo import failed or stopped
↑ Back to topIf a demo import stops before completion, return to Appearance > Hypermarket Setup.
The importer can show the current stage, warnings, and available recovery actions.
Depending on the error, you may be able to retry the failed step.
Before retrying:
- Confirm the internet connection is working.
- Confirm required plugins can be installed or activated.
- Confirm WordPress can write to the required directories.
- Review any error shown by the importer.
Avoid repeatedly starting new imports if a recovery or retry option is available.
Demo import asks for filesystem credentials
↑ Back to topSome WordPress installations require FTP or filesystem credentials before WordPress can install plugins or write files.
Enter the credentials requested by WordPress and continue the import.
This prompt comes from WordPress and depends on the server’s filesystem configuration.
Demo import added content to an existing site
↑ Back to topDemo import can create pages, products, posts, media, menus, templates, and store settings.
For this reason, a backup is recommended before importing a demo into a site that already contains content.
If you imported a demo accidentally, review the imported content carefully before deleting anything, especially on an existing store.
A re-import did not completely replace the old design
↑ Back to topDemo import should not be treated as a full site reset.
Existing Site Editor customizations, templates, content, or settings can take priority over newly imported data.
If the site has already been customized, review:
- Styles.
- Templates.
- Template parts.
- Navigation.
- Pages.
- WooCommerce page assignments.
Reset or replace only the areas you intentionally want to restore.
A template does not match the theme default
↑ Back to topWordPress stores template customizations separately from the theme.
If you edited and saved a template previously, WordPress can continue using that customized version even after Hypermarket changes the original template.
Open the template in the Site Editor and use the reset option if you want to return to the version supplied by Hypermarket.
Warning: Resetting removes your saved changes to that template.
Theme updates did not change a customized template
↑ Back to topThis is expected when WordPress has a saved customized version of the template.
Your customized version takes priority over the template included with the theme.
Reset the template if you want to use the updated Hypermarket version.
Global style changes are not affecting one block
↑ Back to topThe block may have its own local style settings.
Select the block and check whether it has custom:
- Colors.
- Typography.
- Spacing.
- Borders.
- Dimensions.
Block-level settings can override global styles.
Remove or reset those local settings if you want the block to inherit the global design again.
The site looks different after changing design styles
↑ Back to topA design style can change more than colors.
Depending on the style, it can affect typography, surfaces, block defaults, layout settings, and product-page presentation.
Review the site after changing styles, especially:
- Header.
- Product pages.
- Product collections.
- Cart.
- Checkout.
- Footer.
You can continue customizing the selected style through the Site Editor.
A block is missing from the inserter
↑ Back to topSome Hypermarket blocks are supporting blocks and are intentionally not available as standalone inserter items.
For example:
- Hero Slide is added inside Hero Slider.
- Icon Button is added inside Icon Buttons.
- Product Quick View is used inside product templates.
- Container is used internally in Hypermarket layouts.
Insert the parent block or appropriate Hypermarket pattern instead.
A Hypermarket block is completely missing
↑ Back to topConfirm that:
- Hypermarket is the active theme.
- WooCommerce is active if the block depends on WooCommerce.
- WordPress and WooCommerce meet Hypermarket’s minimum requirements.
- The editor has been refreshed after activating or updating the theme.
If the issue started after installing another plugin, temporarily test for a plugin conflict on a staging site.
Changes appear in the editor but not on the storefront
↑ Back to topFirst save the page, template, template part, or styles you edited.
Then check:
- Browser cache.
- WordPress caching plugins.
- Hosting or server cache.
- CDN cache.
Clear relevant caches and reload the storefront.
Also confirm that you edited the template or page that the frontend is actually using.
Changes appear on one page but not another
↑ Back to topCheck whether you changed:
- An individual page.
- A reusable template part.
- A template.
- A Product Template inside one Product Collection.
These operate at different levels.
For example, changing one Product Collection does not automatically change every other Product Collection on the site.
The Site Editor shows unexpected content after a demo import
↑ Back to topDemo import can update pages, navigation, styles, templates, and template parts.
Open the affected area in the Site Editor and confirm which template or template part is being used.
If necessary, replace the content with a Hypermarket pattern and customize it for your store.
Custom CSS stopped working
↑ Back to topCheck whether the selector still matches the current block markup.
WordPress, WooCommerce, and plugins can update generated markup over time.
Where possible, use:
- Native block controls.
- Global styles.
- Block styles.
- A custom CSS class you control.
These are generally more reliable than targeting deeply nested generated selectors.
A third-party WooCommerce extension looks different
↑ Back to topWooCommerce extensions can add their own markup, blocks, and styles.
Hypermarket provides broad WooCommerce styling, but it cannot guarantee that every third-party interface will exactly match Hypermarket’s built-in layouts.
Check the extension’s own settings first.
If the functionality works but the presentation needs adjustment, use the Site Editor, available block settings, or targeted custom CSS.
Check for plugin conflicts
↑ Back to topIf an issue appears after installing or updating a plugin, test for a conflict on a staging or backup copy of the site.
A basic conflict test is:
- Update WordPress, WooCommerce, Hypermarket, and the affected plugin.
- Temporarily deactivate non-essential plugins.
- Test the issue again.
- Reactivate plugins one at a time until the issue returns.
Do not perform a plugin conflict test on a live store during active sales unless you have a safe staging environment.
Before requesting support
↑ Back to topIf the problem remains, collect the following information before contacting support:
- Hypermarket version.
- WordPress version.
- WooCommerce version.
- PHP version.
- A description of the issue.
- Steps to reproduce it.
- The page or template affected.
- Screenshots or a screen recording when useful.
- Any error message shown.
- Whether the issue still occurs with non-essential plugins disabled.
- Whether the site uses custom CSS or customized templates.
Clear reproduction steps make it much easier to identify whether the issue comes from Hypermarket, WooCommerce, WordPress, or another plugin.
Frequently asked questions
↑ Back to topHelp customers by answering commonly asked questions.
What makes Hypermarket different from other WooCommerce themes?
Hypermarket is a block-first WooCommerce theme built around the WordPress Site Editor.
It includes WooCommerce-focused templates, product collections, custom blocks, patterns, design styles, Quick View, multiple product-page layouts, and ready-made header and footer designs.
The goal is to give you a consistent storefront system without requiring a page builder.
Do I need a page builder to use Hypermarket?
No.
Hypermarket is designed to work with the native WordPress block editor and Site Editor.
You can build and customize pages, templates, headers, footers, product layouts, and store sections using WordPress blocks and Hypermarket patterns.
Do I have to import a demo?
No.
Demo import is optional.
You can either start with one of the ready-made demos or choose Continue without a demo from Appearance > Hypermarket Setup and build the store manually.
Both approaches use the same Hypermarket features.
Can I switch design styles later?
Yes.
Go to Appearance > Editor > Styles to preview and select another Hypermarket design style.
Changing the design style can update colors, typography, surfaces, block defaults, and other design settings.
Some styles can also use a different product-page layout.
Can I customize the Single Product page?
Yes.
Go to Appearance > Editor > Design > Templates > Single Product.
You can edit the gallery, product title, price, summary, Add to Cart area, product details, reviews, related products, and other blocks.
Changes to this template can affect all products that use it.
Can I change the product card layout?
Yes.
Hypermarket Product Collections use a nested Product Template that controls the repeated product card.
Select the Product Collection, then select the Product Template inside it to edit elements such as:
– Product image.
– Sale badge.
– Rating.
– Quick View.
– Add to Cart.
– Product title.
– Price.
Does Hypermarket include Quick View?
Yes.
Hypermarket includes Quick View in its standard product collection and product card layouts.
Shoppers can open product information without leaving the current product listing.
Can I change the header and footer?
Yes.
Hypermarket includes three ready-made header and footer patterns.
Open the Header or Footer template part in the Site Editor, remove the current content, and insert another Hypermarket pattern.
Then replace the example navigation, contact information, social links, and other content with your own.
Can I use my existing WooCommerce products?
Yes.
Hypermarket uses normal WooCommerce product data.
Existing product titles, prices, images, categories, tags, attributes, variations, inventory, and other WooCommerce information remain available.
Does Hypermarket support variable products?
Yes.
Variable products are managed through WooCommerce.
Hypermarket supports WooCommerce variation and Add to Cart interfaces in its product layouts.
Can I use Hypermarket with WooCommerce extensions?
Yes, but the exact presentation depends on the extension.
Hypermarket includes broader styling for WooCommerce areas such as account views, wishlist interfaces, Saved for Later, subscriptions, cart, checkout, and other store components where those features are available.
The extension itself still controls its functionality and data.
Can I use Hypermarket with WooCommerce extensions?
Yes, but the exact presentation depends on the extension.
Hypermarket includes broader styling for WooCommerce areas such as account views, wishlist interfaces, Saved for Later, subscriptions, cart, checkout, and other store components where those features are available.
The extension itself still controls its functionality and data.
Does Hypermarket support WooCommerce Subscriptions?
Yes.
Hypermarket fully supports WooCommerce Subscriptions and includes styling for subscription products, customer subscription management, renewal information, account views, and related subscription interfaces.
Subscription functionality such as billing schedules, renewals, and payment handling is provided by WooCommerce Subscriptions, while Hypermarket ensures those interfaces are styled consistently with the rest of your store.
Is Hypermarket responsive?
Yes.
Hypermarket is designed for desktop, tablet, and mobile layouts.
You should still preview your own customizations at different screen sizes, especially after changing columns, spacing, navigation, product grids, or large images.

