The WooCommerce Customizer has a few settings to change the appearance of the default WooCommerce checkout. If you are using the checkout shortcode you can set whether certain fields on the checkout form are required or optional. If you are using the Checkout Block (default for all new WooCommerce installs), you’ll see a link directing you to the site editor to make changes. The following information is only relevant to stores using the (legacy) WooCommerce checkout shortcode.
On this page you’ll learn:
- How to set different checkout fields as optional, required, or hidden.
- How to set the privacy policy and terms of services pages.
- The difference between editing the checkout when using the checkout shortcode vs. the checkout block.
Checkout
↑ Back to topConfigure the appearance of the checkout page by navigating to Appearance > Customize > WooCommerce > Checkout.
Options when using the Checkout Shortcode
↑ Back to topWhen using the checkout shortcode, you can set whether the following fields are optional, required, or hidden from the checkout page:
- Company name field
- Address line 2 field
- Phone field
This is what displays if you are using the WooCommerce checkout shortcode.
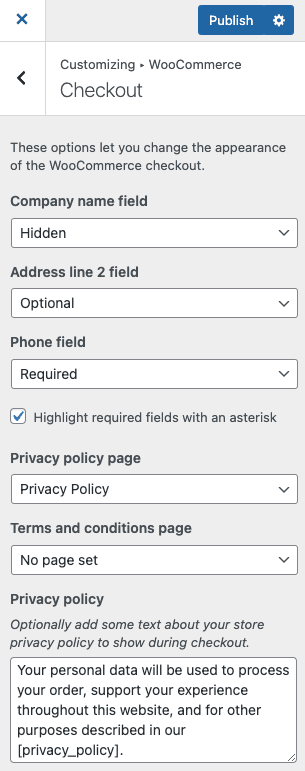
Additionally, you can set the pages for the store’s terms and conditions and privacy policy with the the two designated dropdown menus.
Finally, you have the option to add text about your store’s privacy policy (which appears at the end of your checkout page).
It is recommended to create Privacy Policy and Terms and Conditions pages. The pages set are linked along with the text you enter and appear on the Checkout page like this:
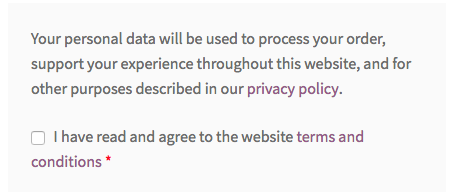
The “privacy policy” link opens the page in a new window, while the “terms and conditions” link opens a box on the page showing the contents of the terms and conditions page. An order cannot be placed without checking the required terms and conditions box.
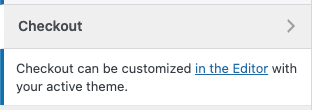
Options when using the Checkout Block
↑ Back to topIf you are using the Checkout Block, you’ll need to click the link to be taken to the editor for the checkout.
A link to the Editor displays if you are using the Checkout Block. Click the link to edit the checkout.
Once on the editor page, you can click on the different blocks to remove them, edit text, or move them around on the page. Using the checkout block provides a little more flexibility as to how information appears to your customers on the checkout page.
Questions and support
↑ Back to topDo you still have questions and need assistance?
This documentation is about the free, core WooCommerce plugin, for which support is provided in our community forums on WordPress.org. By searching this forum, you’ll often find that your question has been asked and answered before.
If you haven’t created a WordPress.org account to use the forums, here’s how.
- If you’re looking to extend the core functionality shown here, we recommend reviewing available extensions in the WooCommerce Marketplace.
- Need ongoing advanced support or a customization built for WooCommerce? Hire a Woo Agency Partner.
- Are you a developer building your own WooCommerce integration or extension? Check our Developer Resources.
If you weren’t able to find the information you need, please use the feedback thumbs below to let us know.