
Before Getting Started
↑ Back to top(Optional) We recommend you to complete WooCommerce subscription setup after completing the order/purchase. It will help you to install your theme/extensions & keep them up to date.
Installation
↑ Back to topPrerequisite: Make sure that you’ve downloaded the theme package from the Downloads section under your WooCommerce account.
Method 1 (via WordPress dashboard)
↑ Back to topThis is simple & straight forward way to install theme for your site. Here you can find the instructions to install theme step by step,
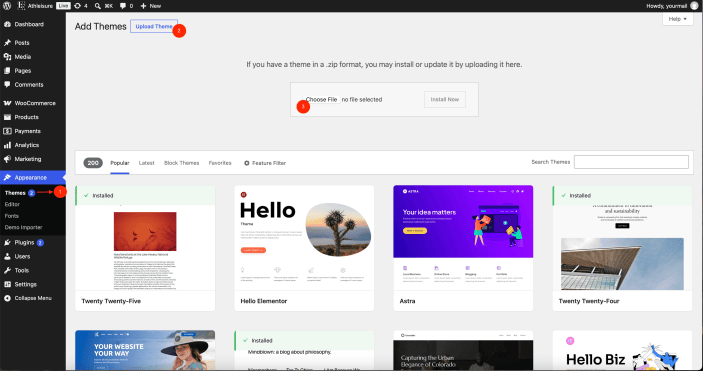
- Login to your WordPress Dashboard and go to Appearance > Themes.
- Click Add New and then Upload theme.
- Click Choose file and locate athleisure.zip from the your computer.
- Click Install Now. Once theme installed successfully, you can activate the theme.
Method 2 (via FTP)
↑ Back to top- Extract the actual theme package athleisure.zip to the folder “athleisure”
- Login/Connect to your server via FTP Client
- Go to wp-content/themes/ at your installed WordPress directory.
- Upload the athleisure folder (Now you have successfully installed the theme).
- Login to WordPress Dashboard and go to Appearance -> Themes and activate the athleisure theme.
Demo Importer
↑ Back to topPrerequisite: You must have installed & activated Athleisure theme before proceeding to import.
To make your site-building process quick and simple, you can start with pre-built demos or pages. Here you can find the step-by-step instructions to import demo contents.
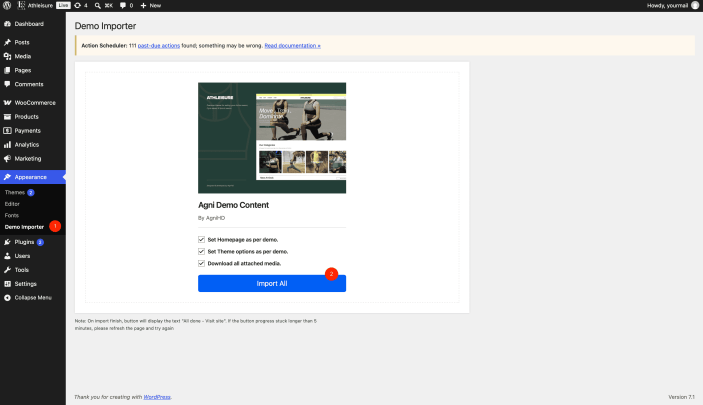
- Go to your WordPress Dashboard and click Appearance > Demo Import menu from the left side menu.
- Check/uncheck the options based on your needs and click Import All.
- Now, it will take a few minutes (5 – 30mins) based on your server & network capabilities to complete the whole import process.
Block Patterns
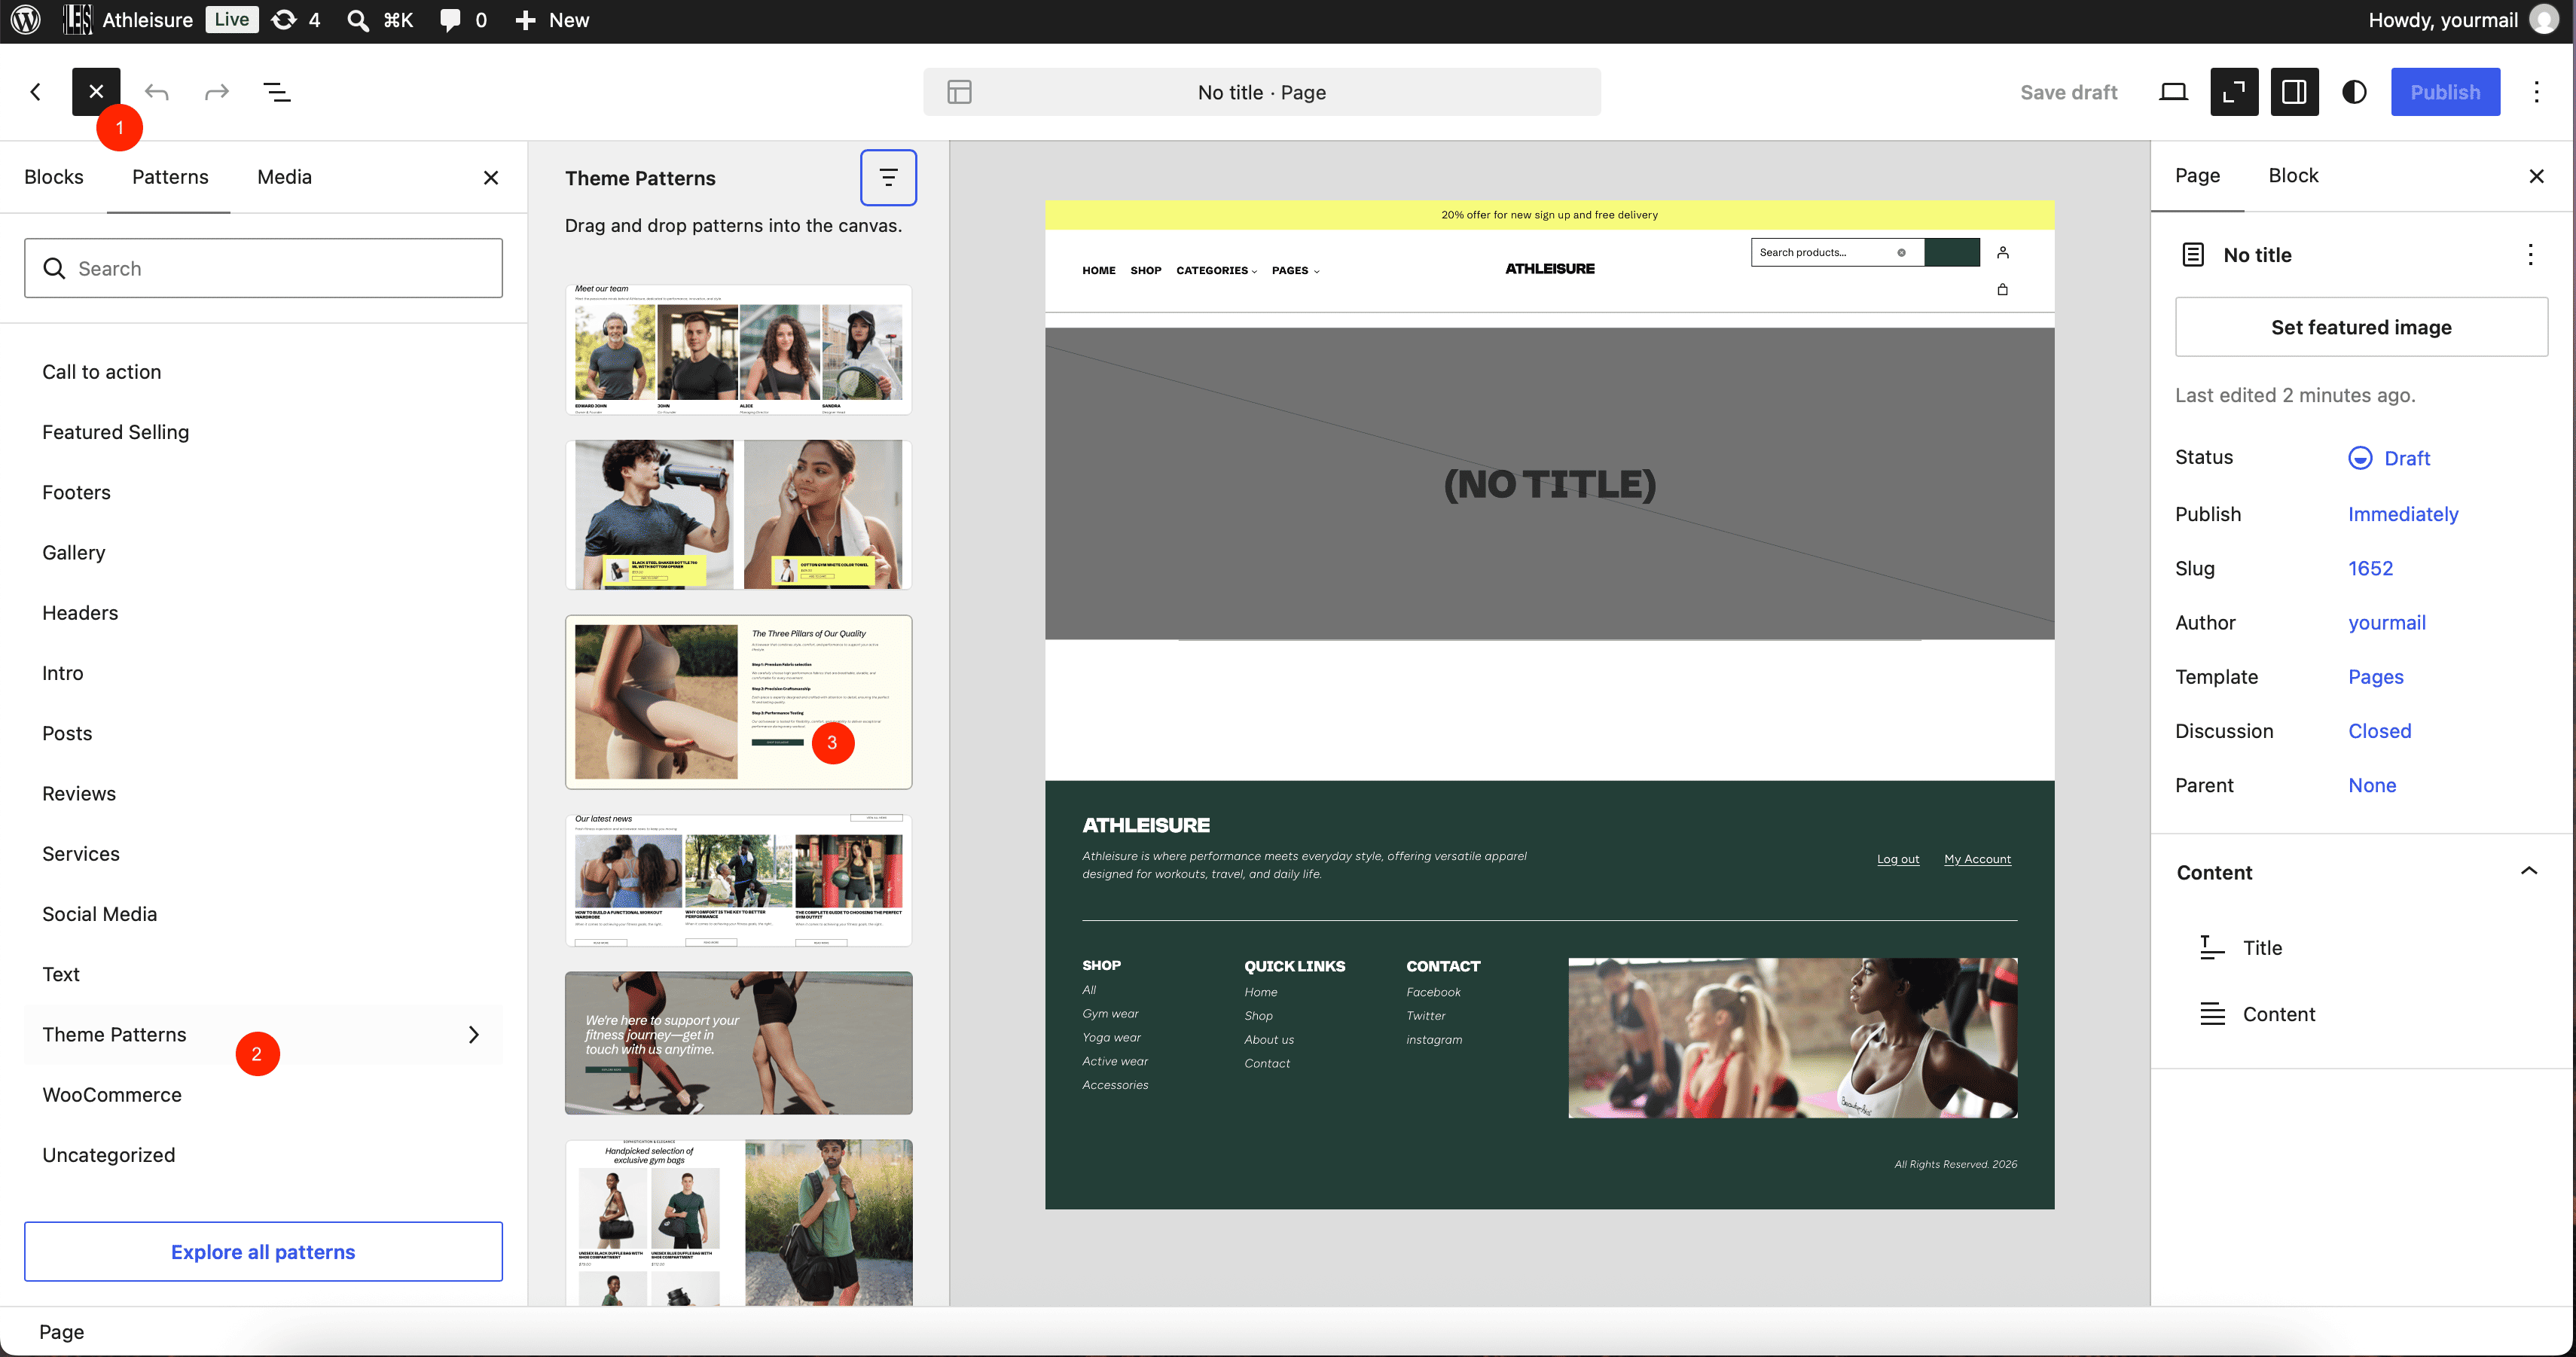
↑ Back to topBlock Patterns are predefined block layouts available from the patterns tab of the block inserter. Once inserted into content, the blocks are ready for additional or modified content and configuration. Here you can find the step-by-step instructions to insert patterns.
- Go to Pages and choose your desired page.
- Now, you can click + icon and choose Patterns tab to see all available patterns.
- Choose your desired one and start editing.
Note: You can use patterns inside posts & products as well in the same way you’re using it for pages.
Blocks
↑ Back to topThe block editor introduces a modular approach to pages, posts & products. Each piece of content in the editor, from a paragraph to an image gallery to a headline, has its own block. And just like physical blocks, WordPress blocks can be added, arranged, and rearranged, allowing WordPress users to create media-rich pages in a visually intuitive way – and without workarounds like shortcodes or custom HTML.
Here you can find the instructions to insert blocks,
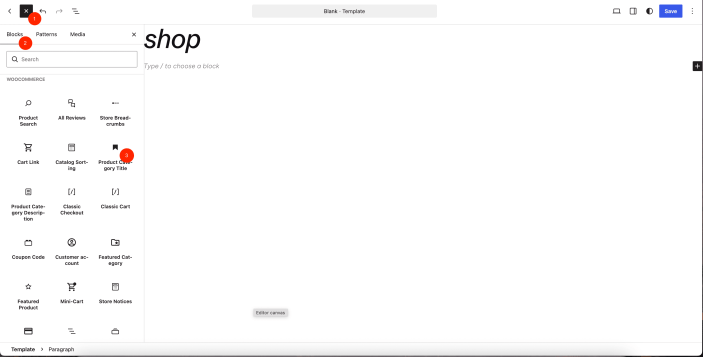
- Go to Pages and choose your desired page.
- Now, you can click + icon at the top left inside the toolbar to insert blocks
Optionally you can simply start typing the block name with “/” prefix. It will list all available blocks. For example “/woo” will display WooCommerce-related blocks.
Note: You can use blocks inside posts & products as well in the same way you’re using it for pages.
Useful Links:
Site Editor (FSE)
↑ Back to topSite Editor allows you to control the whole site, such as Header, Content & Footer. Site Editor can be accessed by clicking the WordPress icon (WordPress logo) at the top left corner. It consists of three areas.
- Templates
- Patterns
- Site
Templates
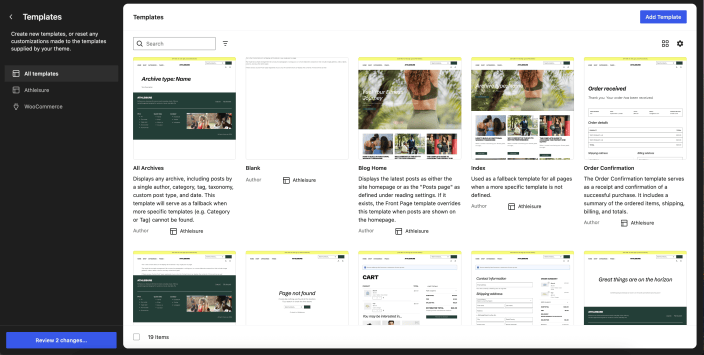
↑ Back to topThe templates area will allow you to define the structure of the content area of your site, such as archives of products & posts, page, 404, search, etc…
- From the Site Editor Appearance > Editor click on the WordPress icon (or Site icon if you have set one) to open the Site Editor left navigation.
- Click on Templates to view the list of templates on your site, including any you have created and any that come with the theme.
- Click on any of the templates in the list to edit the template. From here, you can customize the layout of the selected template using blocks.
Patterns
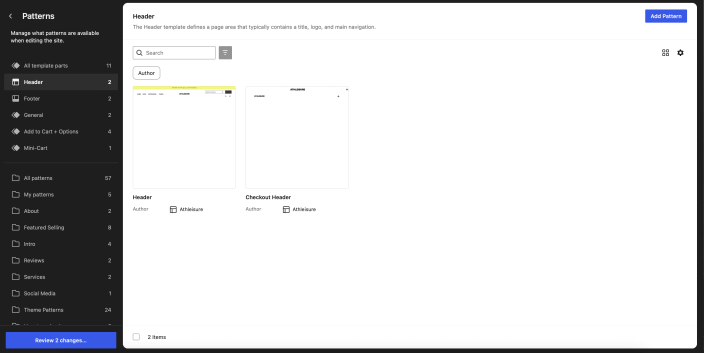
↑ Back to topPatterns & It’s Template Parts will allow you to display the same set of contents (global contents) for all templates to keep it organized and to customize easily. It defines the header, footer, filter & cart sidebar areas. It can be accessed commonly by all templates such as pages, products, etc.
Single Product Template
↑ Back to topTo edit the Single product template, you need to go inside Templates > Single Product.
To add new blocks, just click + icon to insert the block inside the current product template or create a completely new set of blocks by deleting all blocks as per your wish.
Products Catalog Template
↑ Back to topTo edit the Single product template, you need to go inside Templates > Product catalog.
To display all products you have added through dashboard, just click + icon to insert the block All products block to show the grid of all products.
Creating Header
↑ Back to topTo edit the header, you need to go inside Patterns > Templates Parts > Header based on your preference.
To add new blocks, just click + icon to insert the block inside the current header or create a completely new set of blocks by deleting all blocks as per your wish.
Creating Megamenus
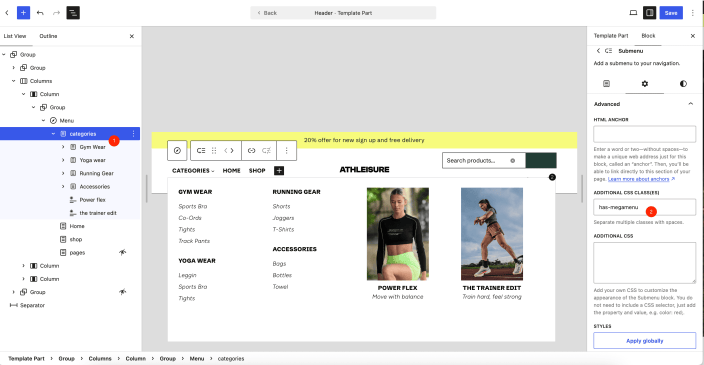
↑ Back to topAt first, you need to create a normal menu for your header inside Templates Parts > Header. And insert a Navigation block to insert menu items.
To convert your usual menu into a megamenu, you need to add the class has-megamenu to the menu of the respective Navigation block.
Setup Carousel for Products Block & Group Block
↑ Back to topProducts carousel
To make any usual product blocks such as Best selling products, Newest products, Handpicked products, On sale products & Top rated products to carousel. Just insert any of those blocks by clicking + icon and add custom css class has-carousel to the block.
Group carousel
To make any Group block to carousel, you need to insert similar set of blocks inside group block. For example, you can insert Cover blocks inside Group block by clicking + icon and add custom css class has-carousel to the block.
You can access “Additional CSS class(es)” from Advanced tab inside the Block Settings sidebar (Settings icon inside the toolbar from the top right).
Set Homepage
↑ Back to topYou can set your static home page inside Settings > Readings tab under Your homepage displays. Choose Static page and select your desired Homepage.
Custom CSS
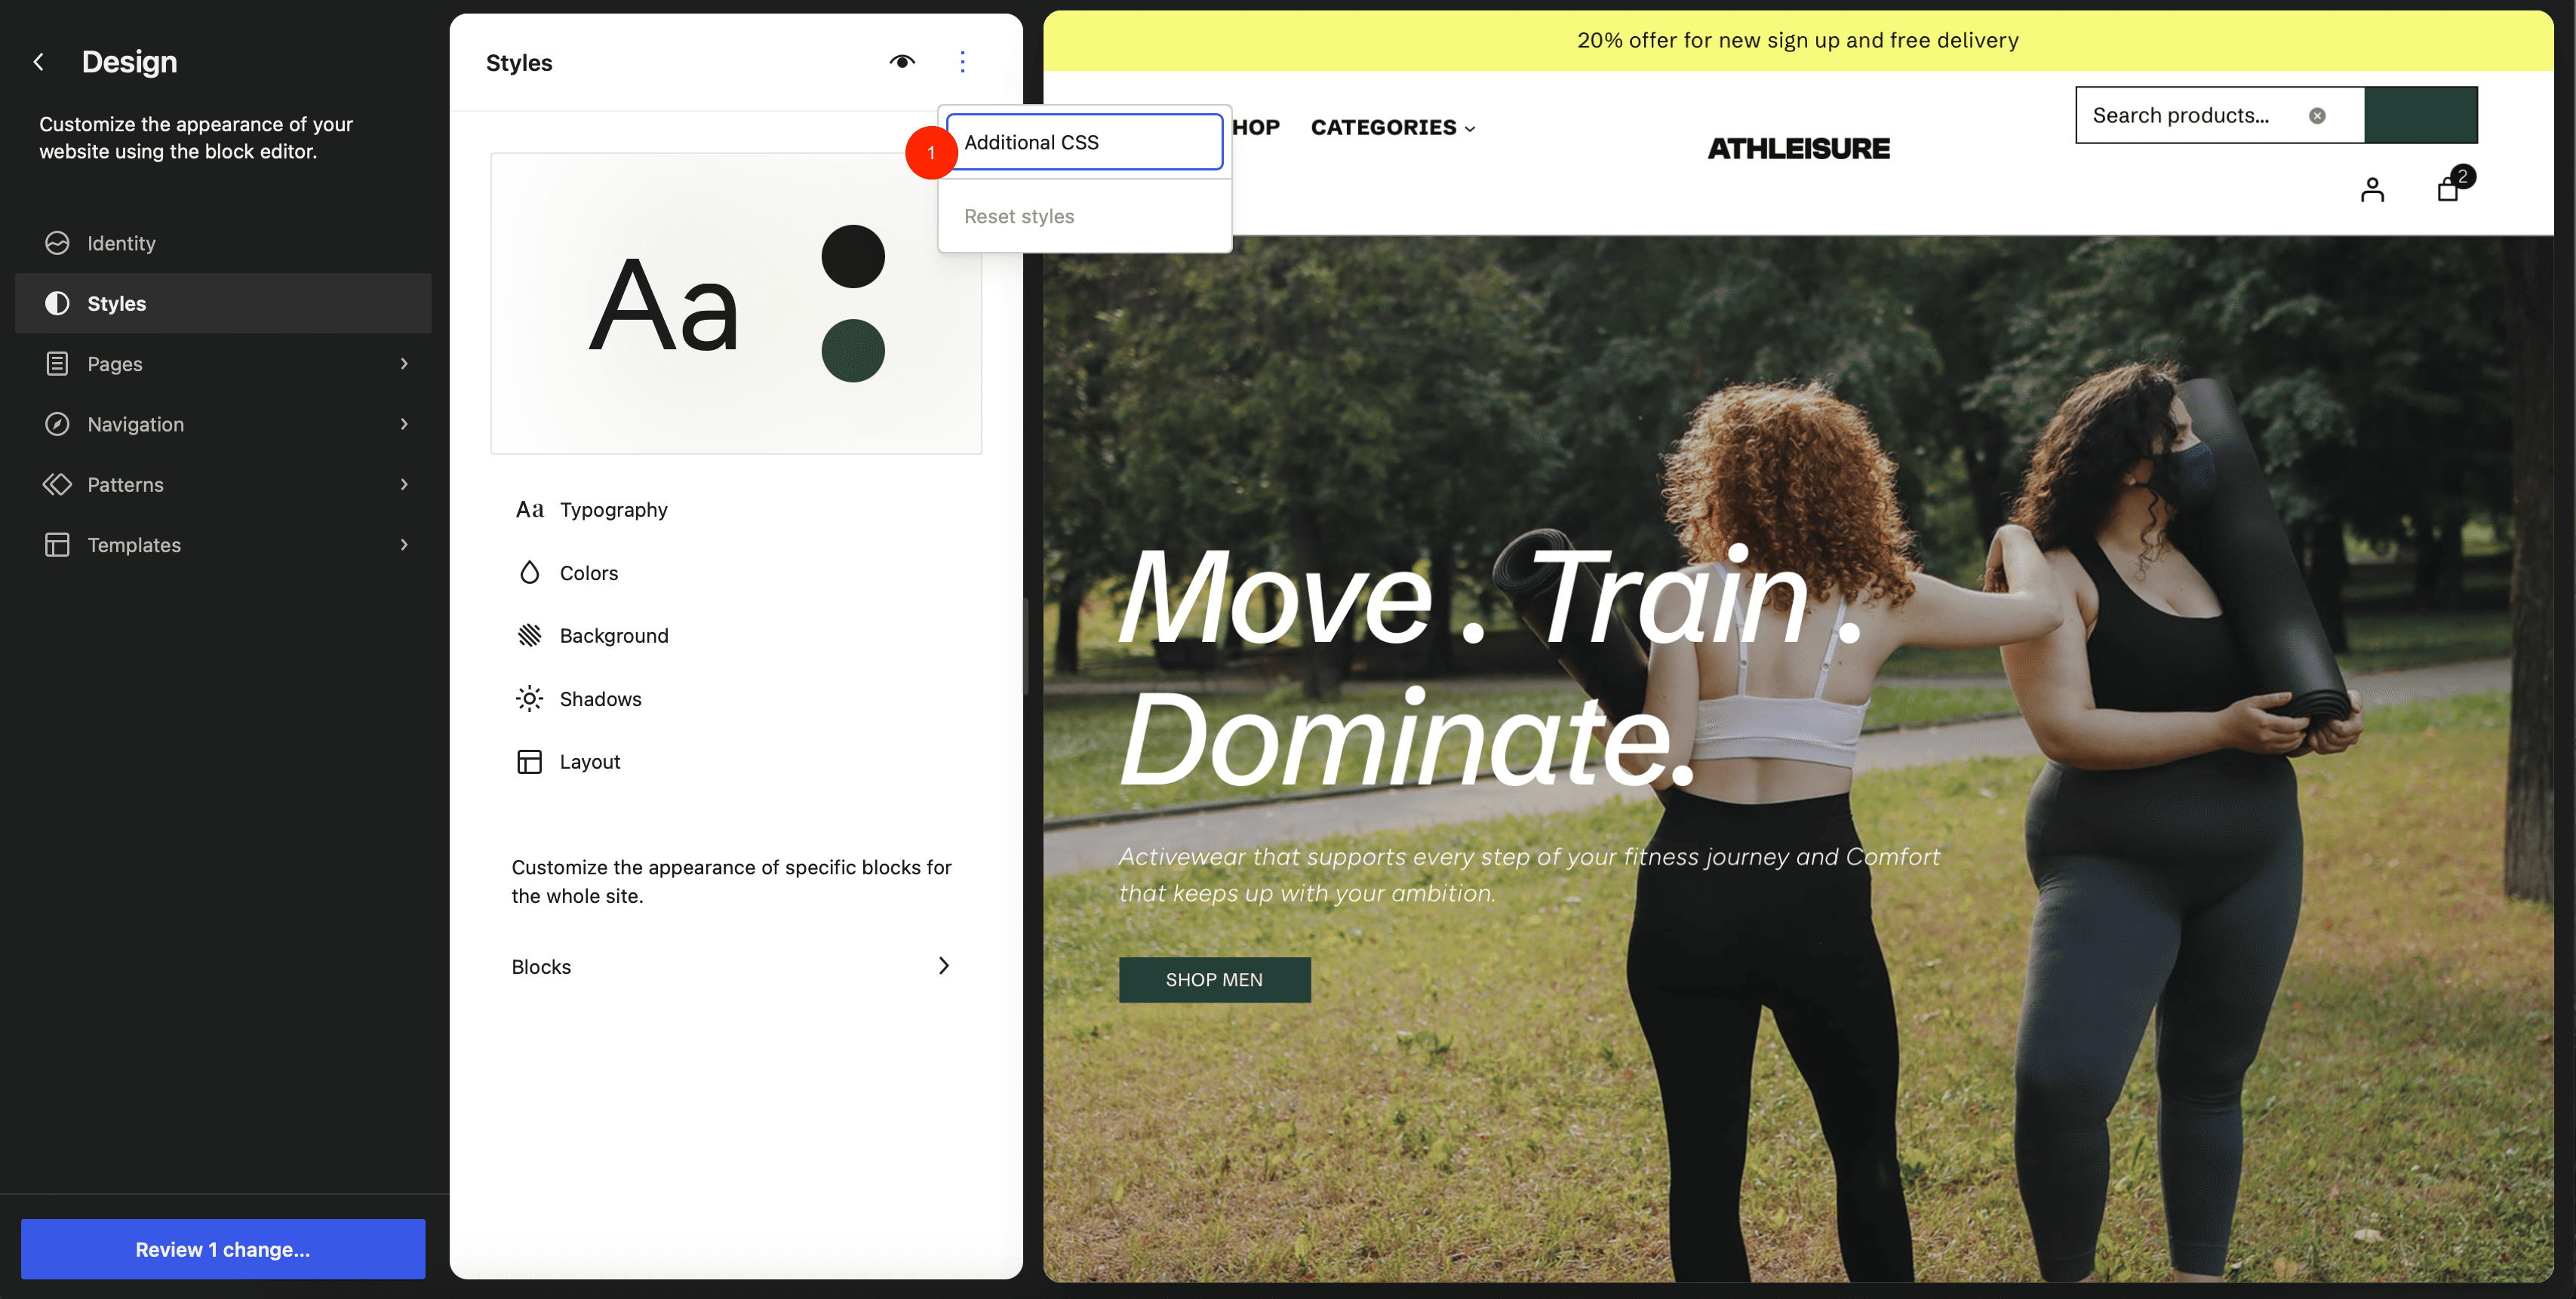
↑ Back to topYou can add your own CSS styles under Additional CSS tab inside Appearance > Editors -> Styles.
Update Theme
↑ Back to topWe recommend you keep the theme up to date always. Theme updates will include major/minor improvements/fixes on codes, options, functionalities, layouts, etc…
Things to consider before updating,
- If you’ve renamed your theme folder, update will considered as fresh copy of theme and you can’t see any of your changes after update.
- We strongly recommend you to take a backup WordPress Installation directory & Database for recovery in case something went wrong.
Here you can find instructions to update,
- Go to your WordPress Dashboard and click Appearance > Themes menu from the left side menu.
- Now you can see the update icon over your theme. Just click to update to the new version of the theme.
Optionally you can download theme’s package from https://woocommerce.com/my-account/downloads/ and install the theme on top of the current version by following the same installation procedure.
Child Theme
↑ Back to topA Child Theme is yet another theme which inherits/uses the properties of the parent theme. In this case, Athleisure is the parent theme. You can create theme with any name with line of declaration to act as a child of athleisure.
An important aspect of the child theme is to allow you to keep your changes & modifications separate from parent theme functions, to preserve it from theme updates.
Useful Links:

