This scenario will walk you through how to use WooCommerce and WooCommerce Bookings to rent out items of varying quantities and variation, such as the color of the equipment. We’ll utilize the Equipment Rental product template, to quickly create the bookable product with the correct configuration.
Scenario
↑ Back to topA party supply store rents out various equipment for parties. One of the items is chairs. They have chairs in varying colors and varying quantities of each color. Customers can select the color and quantity of chairs that they wish to rent for their event. Each chair is $1.50 each.
For this use case, we leverage Persons and Resources in an unconventional way to accomplish the goals of the party supply store.
Setup and Configuration
↑ Back to topFor this use case, we’ll use the Equipment Rental bookable product template as a way to quickly setup and modify a bookable product to meet our needs. Here’s how to start:
First, we’ll need to select the correct bookable product template. . .
- Click on Products > Add New.
- Select the Equipment Rental template that appears in the product data area:
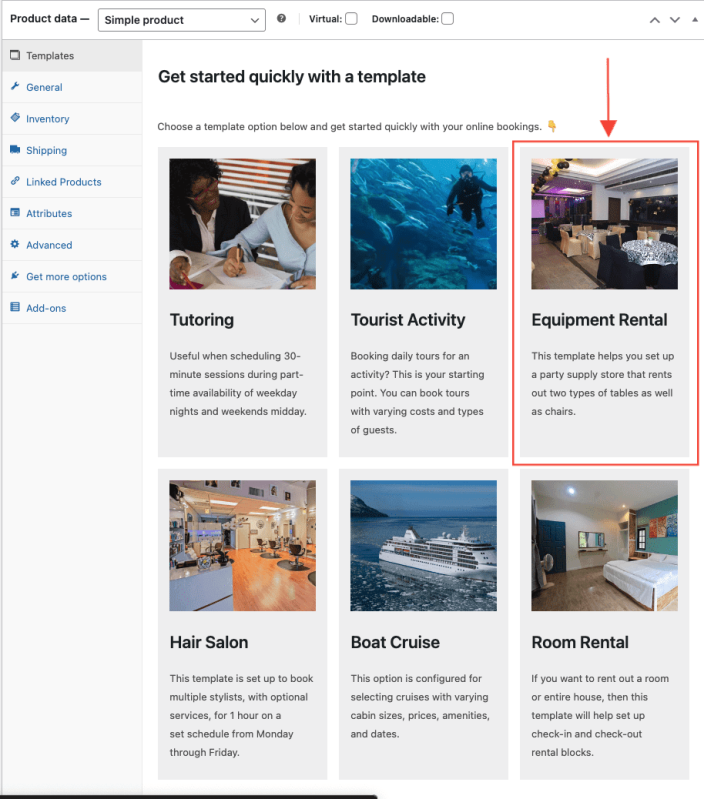
- Click “Use Template” when the template overview screen appears. You’ll then redirect to the bookable product’s edit page.
Now let’s set up our Resources…
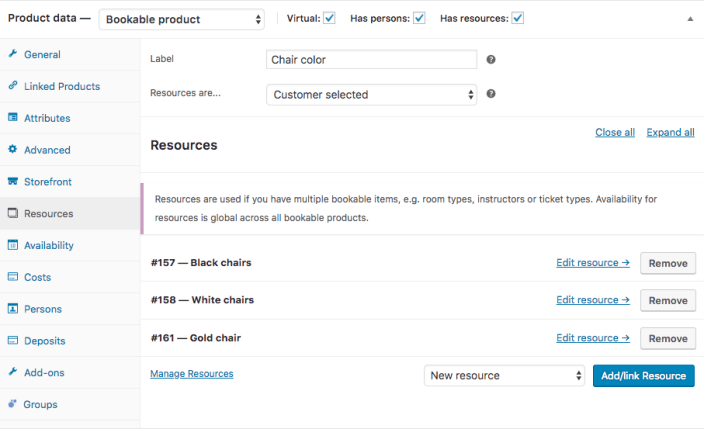
Navigate to the Resources tab on the left side of the product details/edit screen. On the general resources page, you’ll see that the template already creates three pre-set resources and sets the ‘resources are’ field to ‘customer selected.
Before editing the pre-set resources to reflect our chair colors/types, we will want to update the label (name) of the resources. We’re using “Chair color” in our example. Once you’ve entered that, move on to updating the pre-set resources to reflect the black, white, and gold chair colors and quantities.
Follow these steps to update the pre-set resources:
- Click “edit resource” next to one of the pre-set resources (there should be two types of tables and one type of chair).
- Rename the resource “Black chairs” and set the quantity to
200 - Click “Update” in the top right to save the changes.

- Repeat steps 2 and 3 with the other pre-set resources, renaming them “White chairs” and “Gold chairs”, respectively. Their quantities should also be set to
200.
Here’s what our resource settings look like when we’re done:
Next, we’ll set up the person types. . .
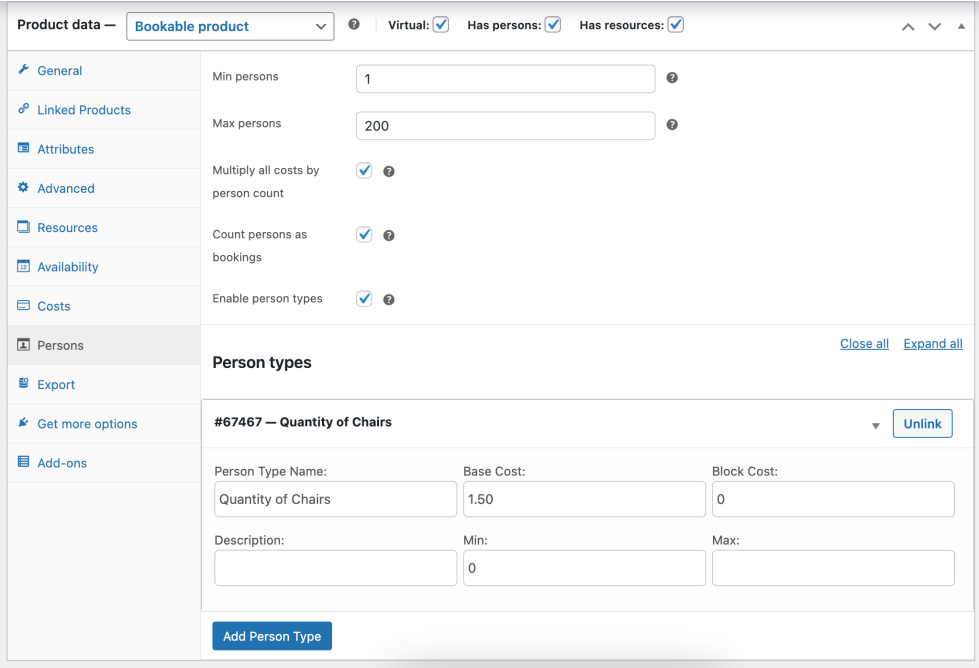
Now, we’ll navigate to the Persons tab on the left side of the product data. The template has already defined the minimum and maximum number of persons, activated all available options (multiply costs by person count, count persons as bookings, and enable person types), and preset one person type. We’ll need to edit the max persons box and the person types.
Follow these steps to update max persons and the person types in the template:
- Set the max persons to
200as we are using “persons” to allow customers to define how many chairs they want to rent as well as calculate the price based on the number of chairs requested. - Expand the settings for the pre-set Person type (down arrow next to the number/name of the person type) and enter the following information:
- Person Type Name –
Quantity of Chairs. This is the label that will show on the quantity selection box. - Base Cost –
1.50. Since we’ve ticked the box to multiply all costs by person count, Bookings will multiply $1.50 by the number of chairs selected.
- Person Type Name –
Here’s how those settings will look:
- Click Update or Publish in the top right of the product edit page to save the settings and publish your product.
Customer View
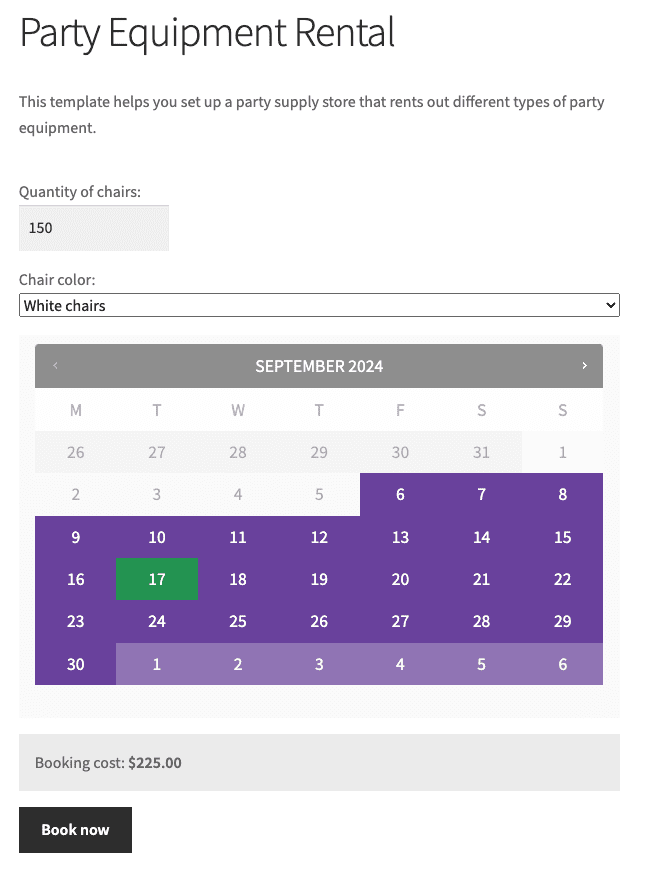
↑ Back to topCustomers who want to rent chairs can navigate to the bookable product and select the color of chair they want to rent and how many. Bookings will automatically multiply the base cost by the number of chairs selected.
Here’s how it will look to a customer who is booking 150 white chairs:
Extending the Use Case – Setting Additional Costs (Optional)
↑ Back to topIf you want to charge an extra price in addition to the price per chair, you can include additional costs under the Costs tab. For example, if you want to add an additional base cost for the whole reservation during your high season months, you can define that by adding a range rule:
- Click on the Costs tab.
- Click the “Add Range” button.
- Select “Range of Months” for the Range type.
- Select the range (for our example, May is the starting month, and August is the ending month)
- Set base cost to
+with a cost of100. - Click Update to save.
Here’s what those settings look like:

You can read more about adding custom costs in Costs for Bookable Products.
Questions and Support
↑ Back to topSomething missing from this documentation? Do you still have questions and need assistance?
- Have a question about a specific extension or theme you’d like to purchase? Use our Contact us page to get answers.
- Have you already purchased this product and need some assistance? Get in touch with a Happiness Engineer via the WooCommerce.com Support page and select this product name in the “Product” dropdown.
