The Orders page found at WooCommerce > Orders displays a list of your store’s orders, which fills up as customers start making purchases in your shop. This page is a central location for finding and managing your shop’s orders.
This document explains:
- How to review orders placed by customers.
- How to change the information shown on the Orders Page with Screen Options.
- How to search, filter, and arrange orders.
- How to preview an order.
- How to use bulk actions to manage order statuses or remove personal data on multiple orders at once.
Orders Overview
↑ Back to topWhen a shop starts taking orders, the Orders admin page fills up. Navigate to WooCommerce > Orders to view your orders.
Each row displays several details. Some information is visible by default, and others can be added. WooCommerce extensions can add additional options as well. These are the default options available in WooCommerce:
- Order – order number and customer name
- Date – the date the order was created
- Status – the current status of the order
- Billing – the customer’s billing address
- Total – the purchase total of the order
- Actions – shortcuts for changing the order status depending on its current state
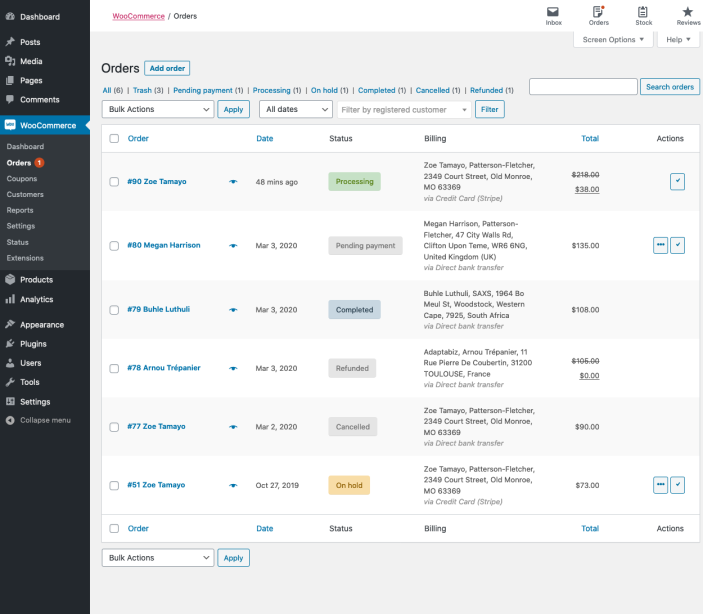
Some other options that can be enabled but are not pictured above are:
- Ship to – where the order will ship to
- Origin – The traffic source of this order (Only available if Order Attribution is enabled)
Note: WooCommerce is highly extensible, open source software. Extensions commonly add additional data to WooCommerce orders. If you see additional information to what’s pictured and mentioned here, it may be added by an extension, your theme, or custom code.
Screen Options
↑ Back to topThe information visible in the Orders table can be altered via the “Screen Options” settings.
To change the columns of data that are visible on the Orders table:
- Go to WooCommerce > Orders.
- Select Screen Options in the top right corner.
- Select which Columns to show.
- Check the boxes of items you want to be displayed.
- Select Apply.
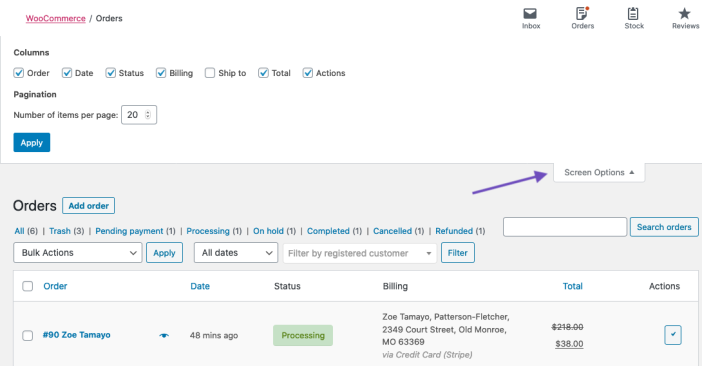
In the Screen Options settings, there’s also a setting to increase the number of Orders visible per page. Increasing this can be an effective way to edit many orders at a time. However, setting the number of orders visible on a single page too high can significantly increase load times for the page.
Order Statuses in the Overview
↑ Back to topOrder Statuses are color-coded and descriptive.
- Canceled: Grey
- Completed: Blue
- Failed: Red
- On Hold: Orange
- Pending payment: Grey
- Processing: Green
- Refunded: Grey
Hovering over an order status displays the most recent Note added to the order.

Order Actions
↑ Back to topIf enabled in the screen options, the orders table will include shortcut buttons to quickly mark orders as Processing or Completed.

Filter and Arrange Orders
↑ Back to topOrders can be filtered by Date (month/year) or by registered customer.
To filter orders:
- Select a month, search for a customer, or both.
- Press the Filter button.

To sort orders, select the heading in ascending or descending order by Order number, Date, or Total.
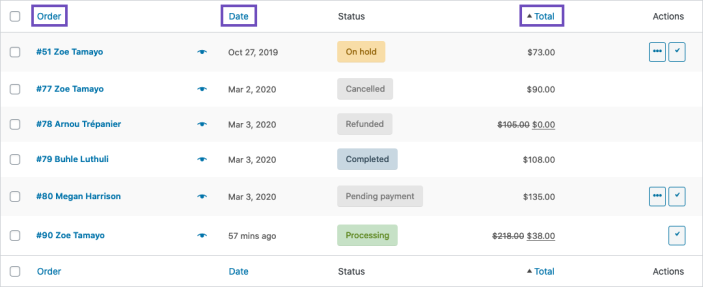
Note: The Total column does not take the refunded amount into consideration when sorting.
Searching and Finding Orders
↑ Back to topOrders can be found using the search box at the top right of the order list. Enter an order number, customer name, or other information shown in the order list such as address. Click the “Search orders” button or press return on your keyboard and search results will show a list of matching orders.
Previewing Orders
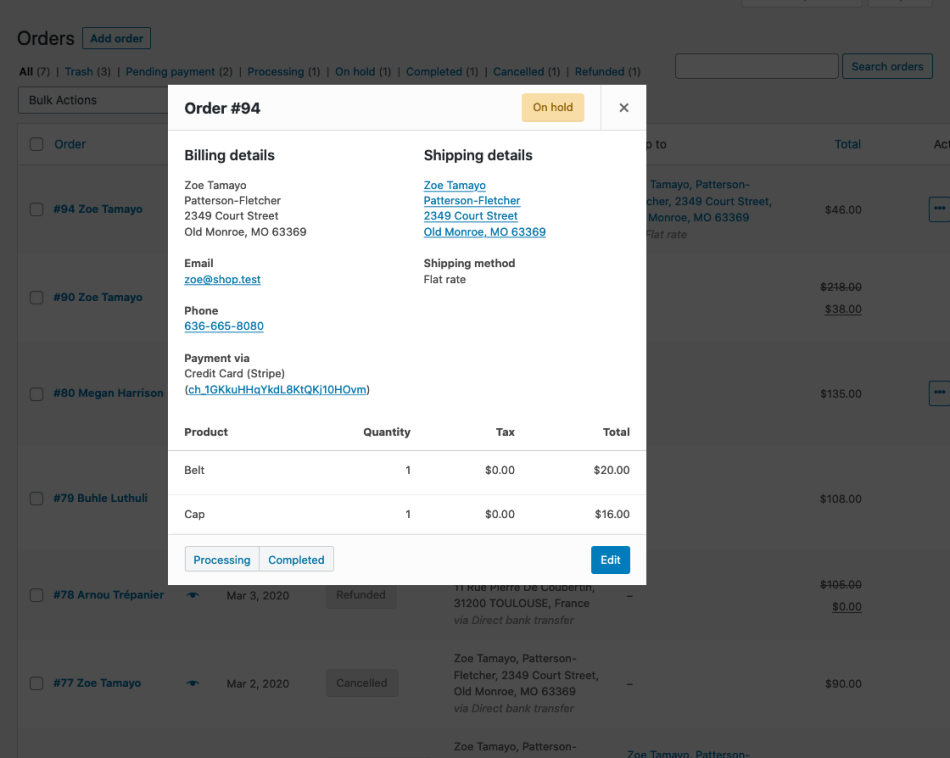
↑ Back to topYou can preview an order by selecting the eye icon next to that order.

Clicking the eye icon opens a preview modal containing that allows you to change the order status. Additionally, the preview modal contains information about the order, such as:
- Order number
- Status
- Billing details
- Payment method
- Shipping details
- Items ordered
Managing Multiple Orders at once with Bulk Actions
↑ Back to topMuch like WordPress’ other post types that let you alter post statuses en masse, WooCommerce Orders also have a bulk editing feature.
Bulk Actions can be used to move orders to the trash, or update their status en masse.
To update multiple orders at once:
- Check the boxes on the left-hand side of the rows you wish to edit.
- Click the Bulk Actions dropdown to display available options.
- Choose the action you’d like to take on the selected orders.
- Select the Apply button.
Your orders will be updated per your selection. Available options include:
- Move to Trash
- Change status to processing
- Change status to on-hold
- Change status completed
- Change status to cancelled
- Remove personal data (if Removing Personal Data settings are enabled)

Multi-Site Orders
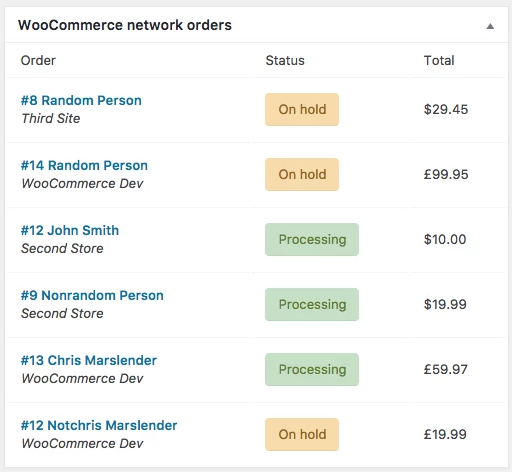
↑ Back to topIf you run a multi-site network there is a widget under Dashboard that shows order information from across all sites. Clicking on an order will take you to the full order details on the store where the order was processed.
Questions and support
↑ Back to topDo you still have questions and need assistance?
This documentation is about the free, core WooCommerce plugin, for which support is provided in our community forums on WordPress.org. By searching this forum, you’ll often find that your question has been asked and answered before.
If you haven’t created a WordPress.org account to use the forums, here’s how.
- If you’re looking to extend the core functionality shown here, we recommend reviewing available extensions in the WooCommerce Marketplace.
- Need ongoing advanced support or a customization built for WooCommerce? Hire a Woo Agency Partner.
- Are you a developer building your own WooCommerce integration or extension? Check our Developer Resources.
If you weren’t able to find the information you need, please use the feedback thumbs below to let us know.
