The single order page in WooCommerce gives you a detailed view of an order placed on your store. You can also create and edit orders from this page. This document covers viewing and editing order details, working with order notes, manually adding orders, and understanding how customer payment links work.
This document explains:
- The information found on the single order page.
- How to edit an order.
- The different kinds of order notes and how to add them.
- How to manually add an order.
- How the customer payment link works for manual orders.
Viewing and editing a single order
↑ Back to topFrom the single order page, you can view, edit, and update order data. The following options are available:
- Change the order status.
- Edit order items, such as products, quantity, prices, and taxes.
- Perform order actions, such as emailing order details to the customer or regenerating download permissions.
- Modify product Meta to edit product variations by removing and adding meta.
- Apply coupons.
- You need to know the coupon code to apply it to the order.
- Coupon usage counts are tracked, and coupons can also be removed from orders.
- The order must be unpaid for coupons to have an effect.
- Add a fee. You can enter an amount or percentage to add a fee to an order.
- Negative fees apportion taxes between all other items and do not reduce the cart total below zero.
Note: Changing order details like product meta, fees, coupons, shipping, etc. can only be done on existing orders that are in the “pending” or “on hold” status. Once orders are in “processing” or further along in the order status flow they are no longer editable.
Order details
↑ Back to topThe Order Details panel contains the following information:
- Order number
- Payment details
- Order date and time
- Order status
- Customer details:
- Username and email, together with a link to view their profile and other purchases the customer may have had in the past
- Billing details
- Shipping details
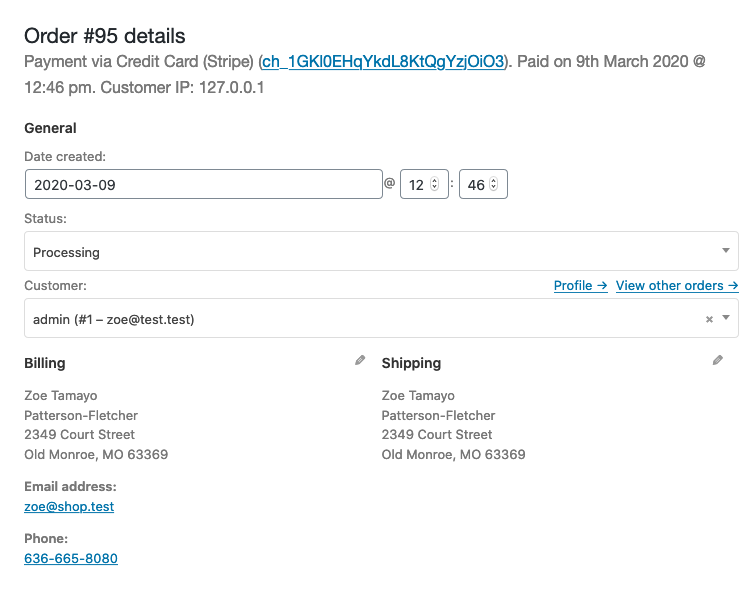
Editing order details
↑ Back to topYou can update most of the details in this section. To edit billing or shipping information, select the pencil icon next to each heading.
- To change the date and time, use the dropdown date selector and the quantity selectors for the time.
- To change the status, choose the appropriate status from the dropdown.
- To change the customer, select the current customer and search for the new customer.
The following fields are editable under Billing:
- Billing address — you can also load this from the customer’s profile by selecting Load billing address
- Phone number
- Payment method and details
The following fields are editable under Shipping:
- Shipping address — you can also load this from the customer’s profile or copy it from the billing address
- Customer provided note

After you make changes, click the Update button in the Order actions metabox to save the order.

Order items and totals
↑ Back to topThe next panel on the order page is the Order Items panel. This contains the product items, the shipping details, and the order summary.
Viewing order items
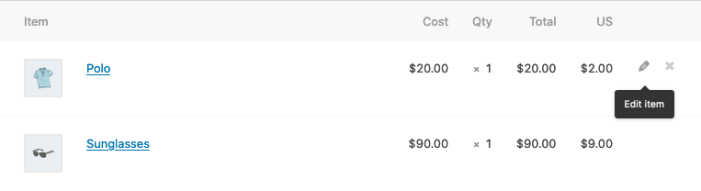
↑ Back to topThe Order Items panel is divided into three sections:
- Each product item row lists:
- Product image
- Product name
- Single product cost
- Quantity
- Total (cost × quantity, with discounts taken into consideration)
- Taxes
- Below that, the shipping details include:
- Shipping method
- Boxed items
- Total cost
- Taxes
- The last section contains an overview of the order costs. This section changes if an order is refunded. By default, it includes:
- Items subtotal: the cost excluding tax
- Coupon(s): the amount deducted based on the use of coupons; the coupons used are displayed to the left in this section
- Shipping: the shipping cost for the order
- Taxes: the amount of taxes for the whole order, which is replaced by the tax code applied to the order
- Order total: the total of the above costs
- An overview of what is paid and the fees taken by the payment gateway

Editing or adding order items
↑ Back to topNote: In WooCommerce each order can only accept one payment. If an order has already been paid and your customer needs additional items, rather than adding new items to their existing order, create a new order. You can then send your customer an invoice with a link to pay.
Apart from refunding, you can edit order items only when the order status is Pending payment or On hold.
To edit a product item, select the pencil icon next to the product line.
The following product item fields can be edited:
- Add Meta: Add and remove meta to change product variable options.
- Quantity: Number of items the customer is purchasing.
- Total: Line price and line tax before pre-tax discounts.
- Tax: Tax cost. For example, if a customer is tax-exempt, you may want to remove the taxes.
Four additional actions appear at the bottom of this panel:

- Add item(s) reveals six options:
- Add product(s): Add additional products to the order.
- Add fee: Add an additional fee, such as gift wrapping.
- Add shipping: Add a shipping cost. After adding it, select the pencil icon to update the name, the method, the cost, and the tax.
- Add tax: Add an additional tax code to every section in the order.
- Cancel: Cancel if you do not want to make any changes.
- Save: Save once the changes are made.
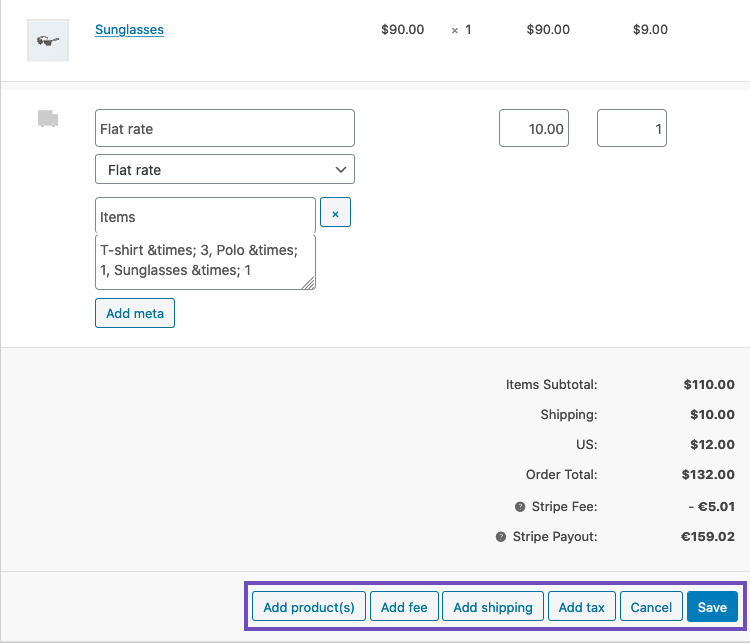
- Apply coupon: If your customer forgot to add a coupon code, or you want to reward the customer before they pay, select this option to open a modal where you can apply a coupon code.
- Refund: Refund the customer. For more information about manual and automatic refunds, see WooCommerce refunds.
- Recalculate: After you make changes to an order’s items, select Recalculate to automatically perform new tax calculations based on your store settings. This is useful when you add or remove products, coupons, or shipping methods. Any manual tax changes you made are removed because the tax settings in your store apply based on the customer address.
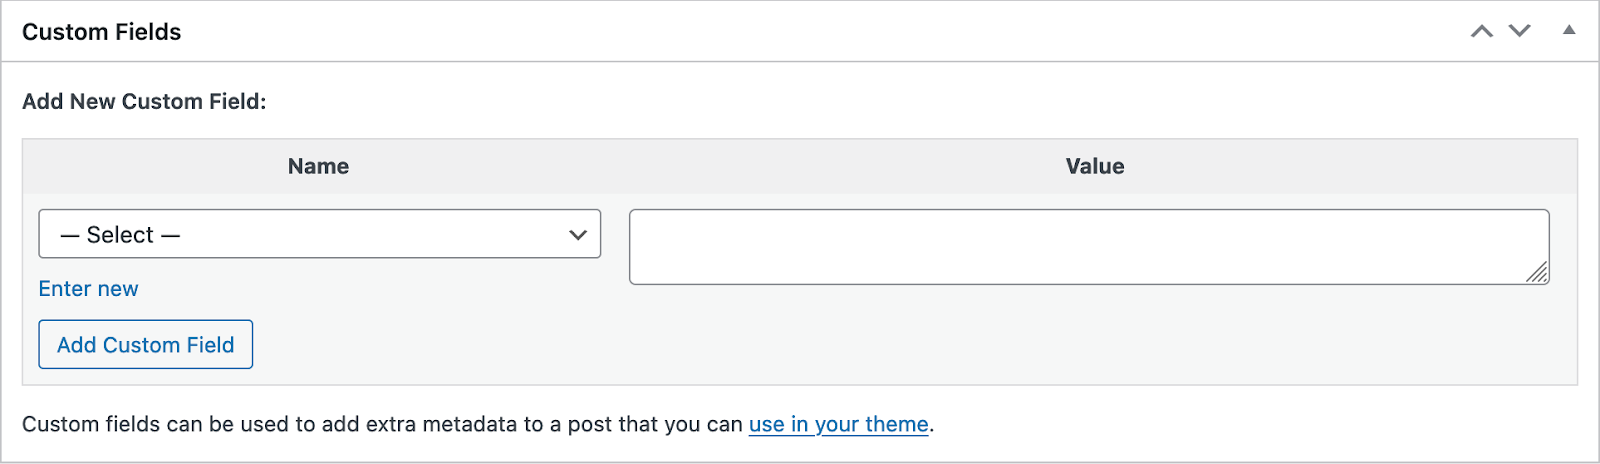
Custom fields
↑ Back to topTo add custom meta fields, use the Custom Fields metabox. This is a core WordPress feature that can be useful if you need to include additional data with your orders.
Order notes
↑ Back to topThe Order Notes panel displays notes attached to the order and can be used for storing event details, such as payment results or stock-level changes. Some payment gateways also add notes for debugging.
WooCommerce uses three types of order notes, each distinguished by color:
- System notes (purple): Automatically added by WooCommerce or extensions, such as details of payment success or failure. If an order status changes as a result of a system process (e.g., checkout), the note appears in purple. System notes are not visible to the customer. However, some order status changes trigger a notification to the store admin or customer.
- General notes (gray): Added by store admins or extensions for internal reference. These include manual order status changes made by admins and private notes. Customers do not see these notes but may receive a notification of the status change (e.g., when a shop manager changes the order status from processing to completed, an email may be sent depending on your email settings).
- Customer notes (blue): Notes added manually to an order and intended for the customer. Customers receive these notes via email, and the notes are visible when viewing order details in the My account area. Email notifications for customer notes can be disabled in the email settings.
Notes can be a powerful tool for communicating with customers or other store managers. For example, you can add a customer note with a shipping tracking number, and the customer is automatically notified by email.
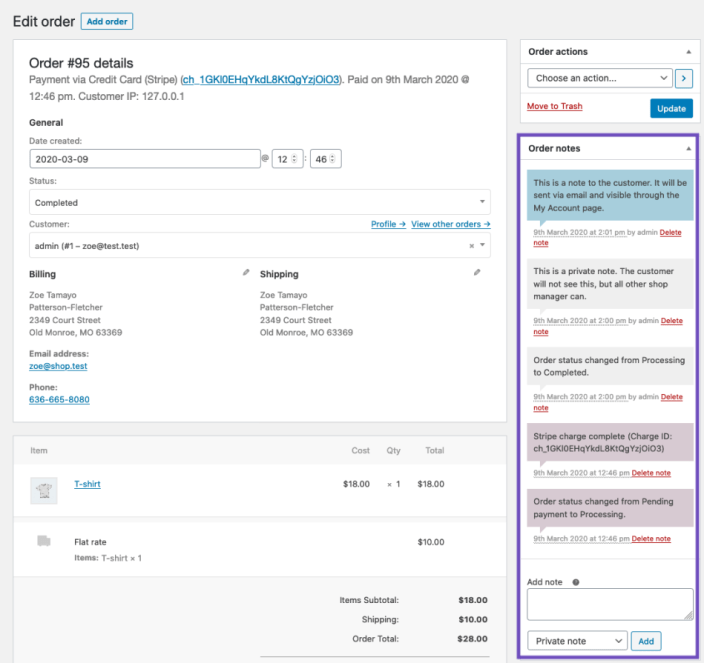
To add a note to an order:
- Type the content of the note in the text area. Some HTML is accepted, including
<a>tags for hyperlinking. - Select Private note or Note to customer from the dropdown.
- Click the Add button.
Notes that are the result of an admin or shop manager action are grey or blue, and have “by {username}” after the timestamp.
Manually adding an order
↑ Back to topYou can create orders directly from the WordPress admin when you need to enter a phone order, create an order on behalf of a customer, or set up an order for testing. To add an order manually:
- Go to WooCommerce > Orders.
- Select Add order at the top of the page. The single order page appears.
- Enter customer details, add line items, apply coupons, apply fees, and calculate totals. These are the same fields described in Editing or adding order items.
- Set a status for the new order. If the customer needs to pay, select Pending payment.
- Click Save.
To send the customer a payment link, open the Order actions dropdown and select Email invoice / order details to the customer. The customer receives an email containing a link to the order pay page.

Customer payment link behavior
↑ Back to topWhen you create a manual order and email the invoice to the customer, the email contains a payment link that takes the customer to the order pay page. Who can access that link depends on whether the order is assigned to a registered customer account or created as a guest order.
Orders assigned to a customer account
↑ Back to topIf you assign the order to a registered customer account (by selecting a customer in the Customer field), WooCommerce ties the order to that account. Only the assigned customer can pay for the order, and they must be logged in to do so.
If someone other than the assigned customer opens the payment link — including a store admin or another user — WooCommerce displays the following message:
This order cannot be paid for. Please contact us if you need assistance.
This is expected behavior. WooCommerce verifies that the logged-in user matches the customer assigned to the order before allowing payment. If you see this message while testing a payment link as an admin, it does not indicate a problem with your payment gateway or a plugin conflict.
Guest orders
↑ Back to topIf you create an order without assigning it to a customer account (leaving the Customer field empty or set to Guest), the payment link does not require a login.
However, guest payment links are not always open to anyone. Depending on the shopper‘s session and how long it has been since the order was created, WooCommerce may ask the person opening the link to verify the order‘s billing email address before showing the payment form. This is expected behavior and prevents unauthorized access to order details.
If the customer is prompted to verify their email, have them enter the same email address used for the order’s billing details. After verification, they can continue to payment.
Choose between guest and customer-linked orders
↑ Back to topUse the following guidelines to decide how to assign a manual order:
- Assign to a customer account when the customer has a registered account and you want the order to appear in their My account > Orders history. The customer must log in to pay.
- Create as a guest order when the customer does not have an account, or when you need anyone with the link to be able to pay without logging in.
Note: If an admin tests a payment link for an order assigned to a customer account, the “This order cannot be paid for” message appears because the merchant is not the assigned customer. To test the payment link, log in as the assigned customer or create a guest order instead.
Questions and support
↑ Back to topDo you still have questions and need assistance?
This documentation is about the free, core WooCommerce plugin, for which support is provided in our community forums on WordPress.org. By searching this forum, you’ll often find that your question has been asked and answered before.
If you haven’t created a WordPress.org account to use the forums, here’s how.
- If you’re looking to extend the core functionality shown here, we recommend reviewing available extensions in the WooCommerce Marketplace.
- Need ongoing advanced support or a customization built for WooCommerce? Hire a Woo Agency Partner.
- Are you a developer building your own WooCommerce integration or extension? Check our Developer Resources.
If you weren’t able to find the information you need, please use the feedback thumbs below to let us know.